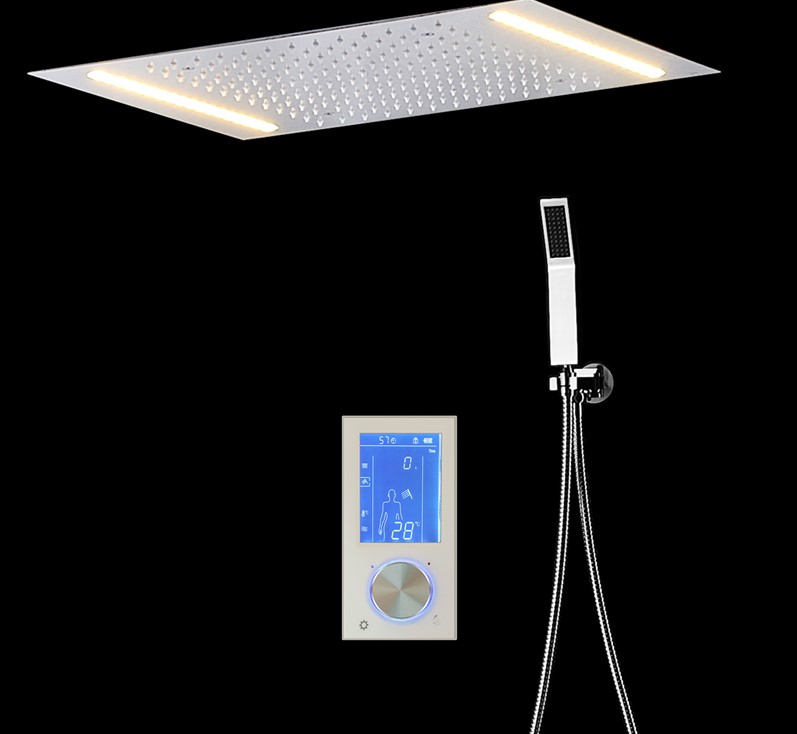
Fontana Emilia Chrome Posh LED Digital Control Thermostatic Rainfall Bathroom Shower Set
Fontana Emilia Bathroom Shower Set is a wall mount, contemporary designed, luxurious set. It comes with a digital controller. The rainfall and thermostatic control features allow for a soothing, enjoyable bathing experience. It is our goal to provide the customer with not only excellent products but also a leading lifestyle. This has an elegant design and elevates the appeal of your decor made from the highest quality and for great tastes. time. Give your bathroom an elegant glance with the Fontana Emilia Posh LED Digital Control Thermostatic Rainfall Bathroom Shower Set. This is one of the trendiest finishes across decor styles in the bathroom. When it comes to new bathroom upgrades, FontanaShowers is offering shape, finishes, and styles that you've looking for.
Fontana Emilia Chrome Posh LED Digital Control Thermostatic Rainfall Bathroom Shower Set Features:
Brand Name: FontanaShowers
Model Number: FS3362
Type: Bath & Shower Set
Valve Core Material: Ceramic
Installation Type: Wall Mount
Type: Fixed Rotatable Type
Style: Contemporary
Bath & Shower Faucet Type: Shower Sets
Number of Handle: Single Handle
Surface Treatment: Polished
Surface Finish: Chrome
Feature: Thermostatic Faucets,LED Light
Size: >15.74" (400mm)
Cold/Hot Water Control Type: Auto-Thermostat Control
Before you begin, please read the installation instructions below. Observe all local building and safety codes.
Unpack and inspect the product for any shipping damages. If you find damages, do not install.
Please note all showers must be installed by a professional and certified plumber otherwise warranty might be voided.
Showerhead
Shower Head Installation Instructions
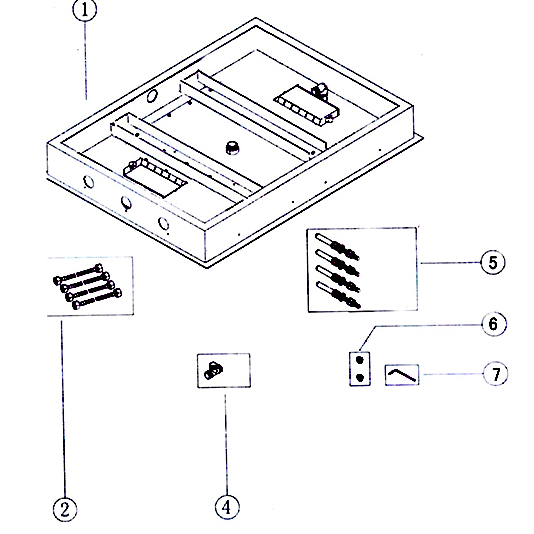
Showerhead lists:
Showerhead
11.8" shower hose Tee joint Expansion bolt G1/2" filter net H4 inner hexagon
Showerhead
Shower Head Installation Instructions
Step 1:
shower
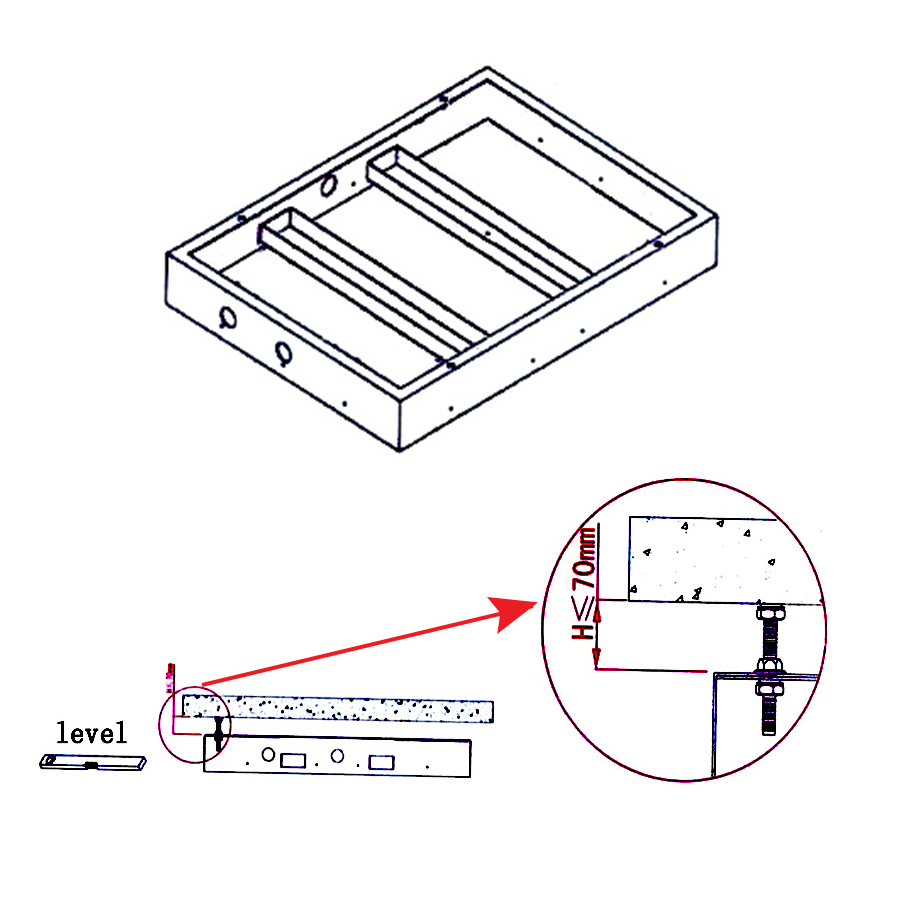
Step 2:
Through the two hexagonal nuts adjust the distance between the mounting bracket and the ceiling, and keep the mounting bracket on the level.
Use explosion screw fixed mounting bracket on the ceiling, pay attention to the explosion screw can adjust the height, and use level adjust the mounting bracket to level.
Shower Head Installation Instructions
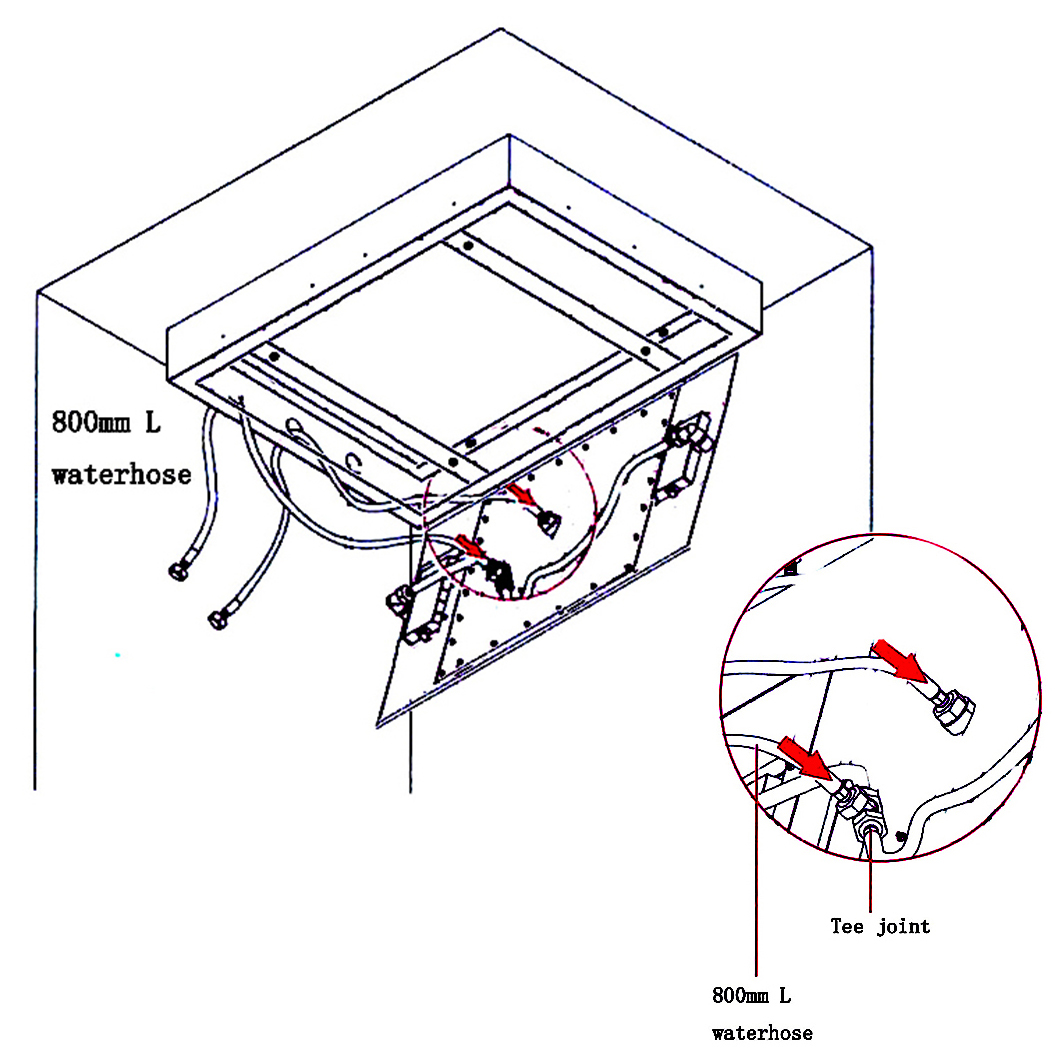
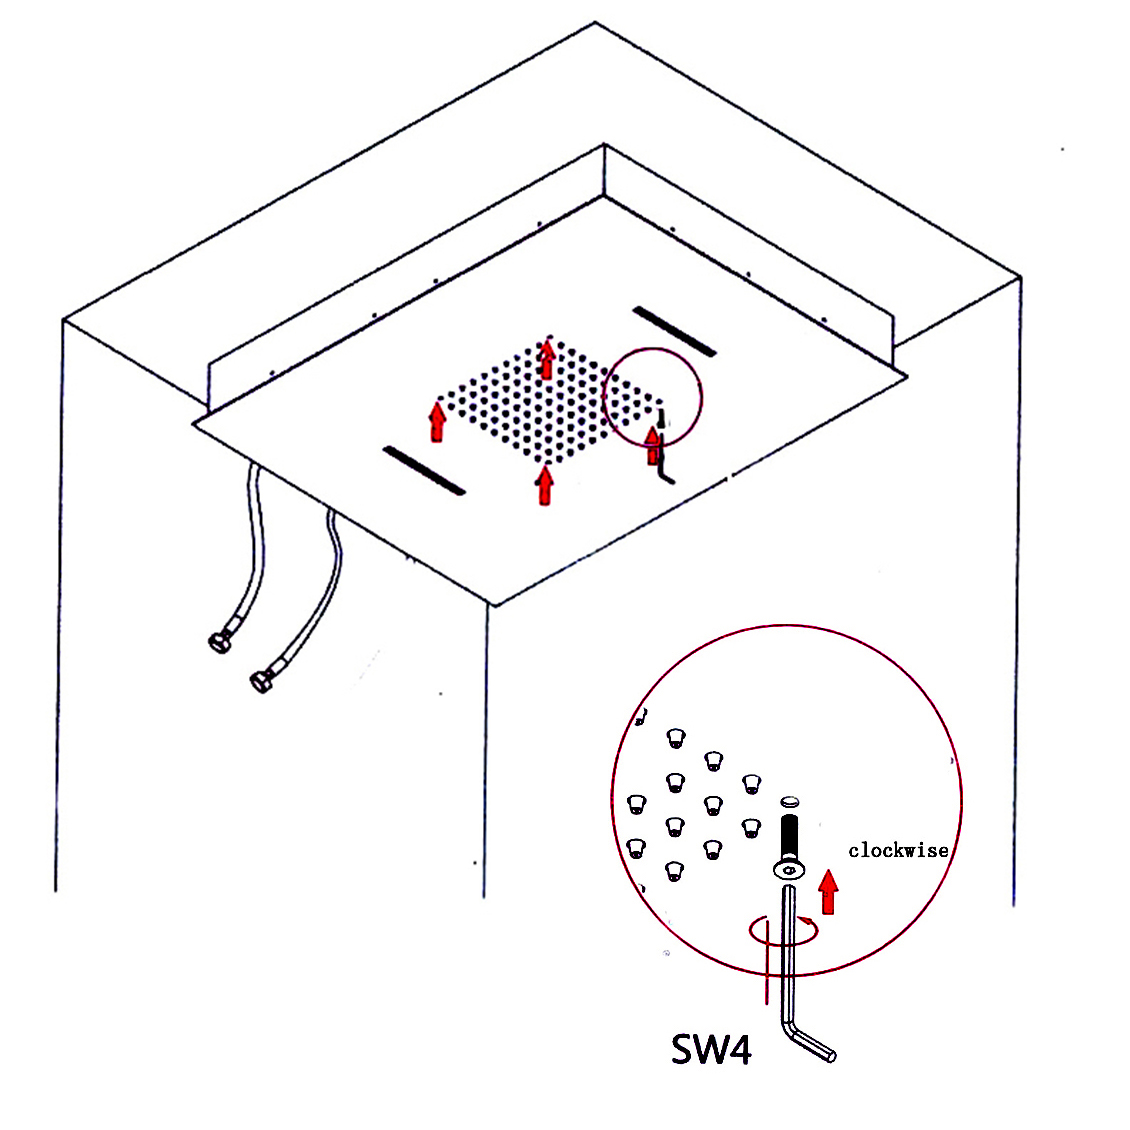
Step 3:
Step 4:
Connect 1 pcs water hose to 1 Tee Joints and G1/2, G1/2 joint in the middle, then put another side of the shower hose through the hole of shower head size.
Install the decorative panel, use SW4 hexagon wrench tighten 4 screws.
Shower Head Installation Instructions
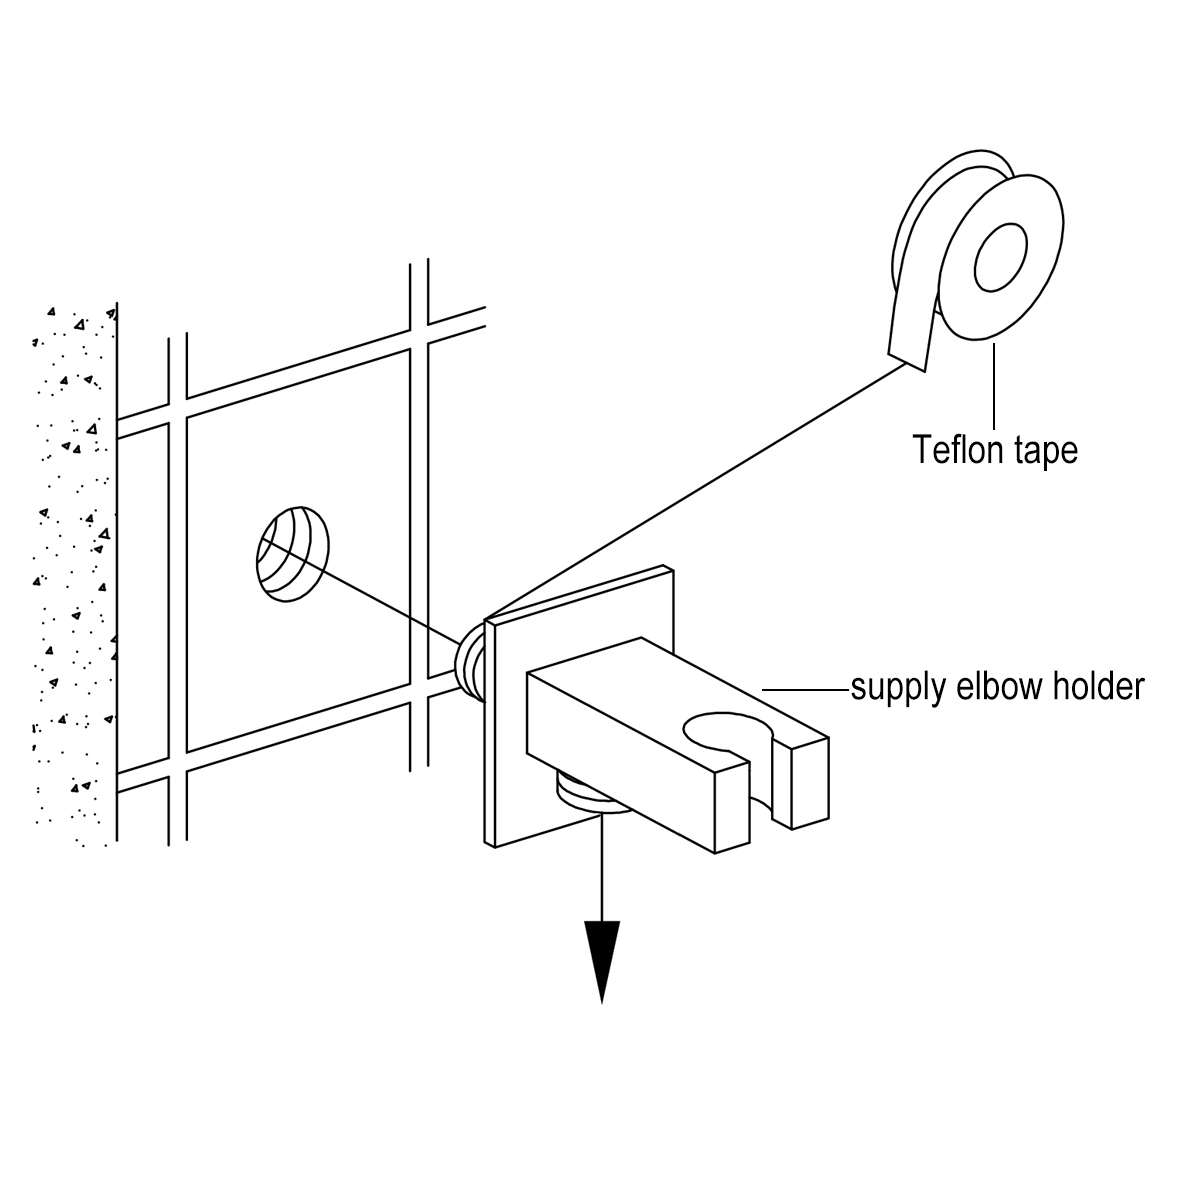
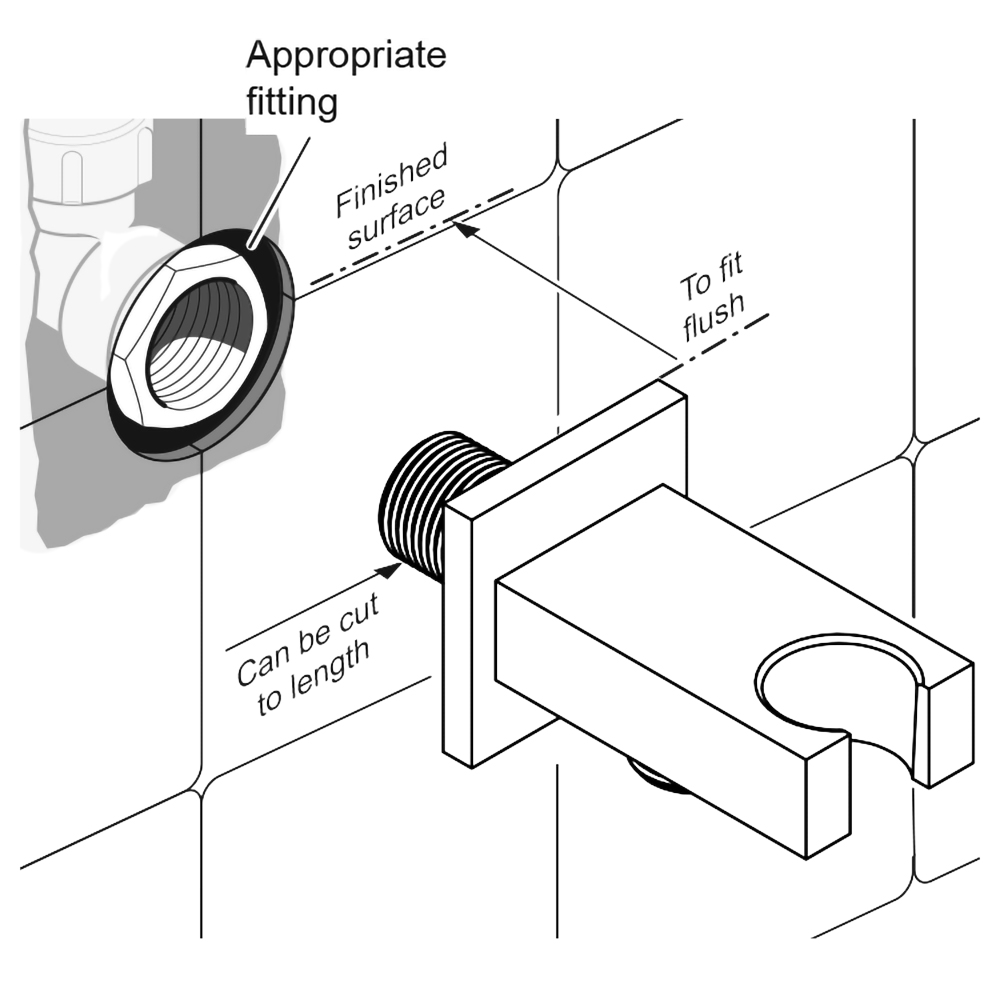
Shower Hand Held Shower Installation Instructions
Step 1:
Step 2:
Hand
Held
Shower
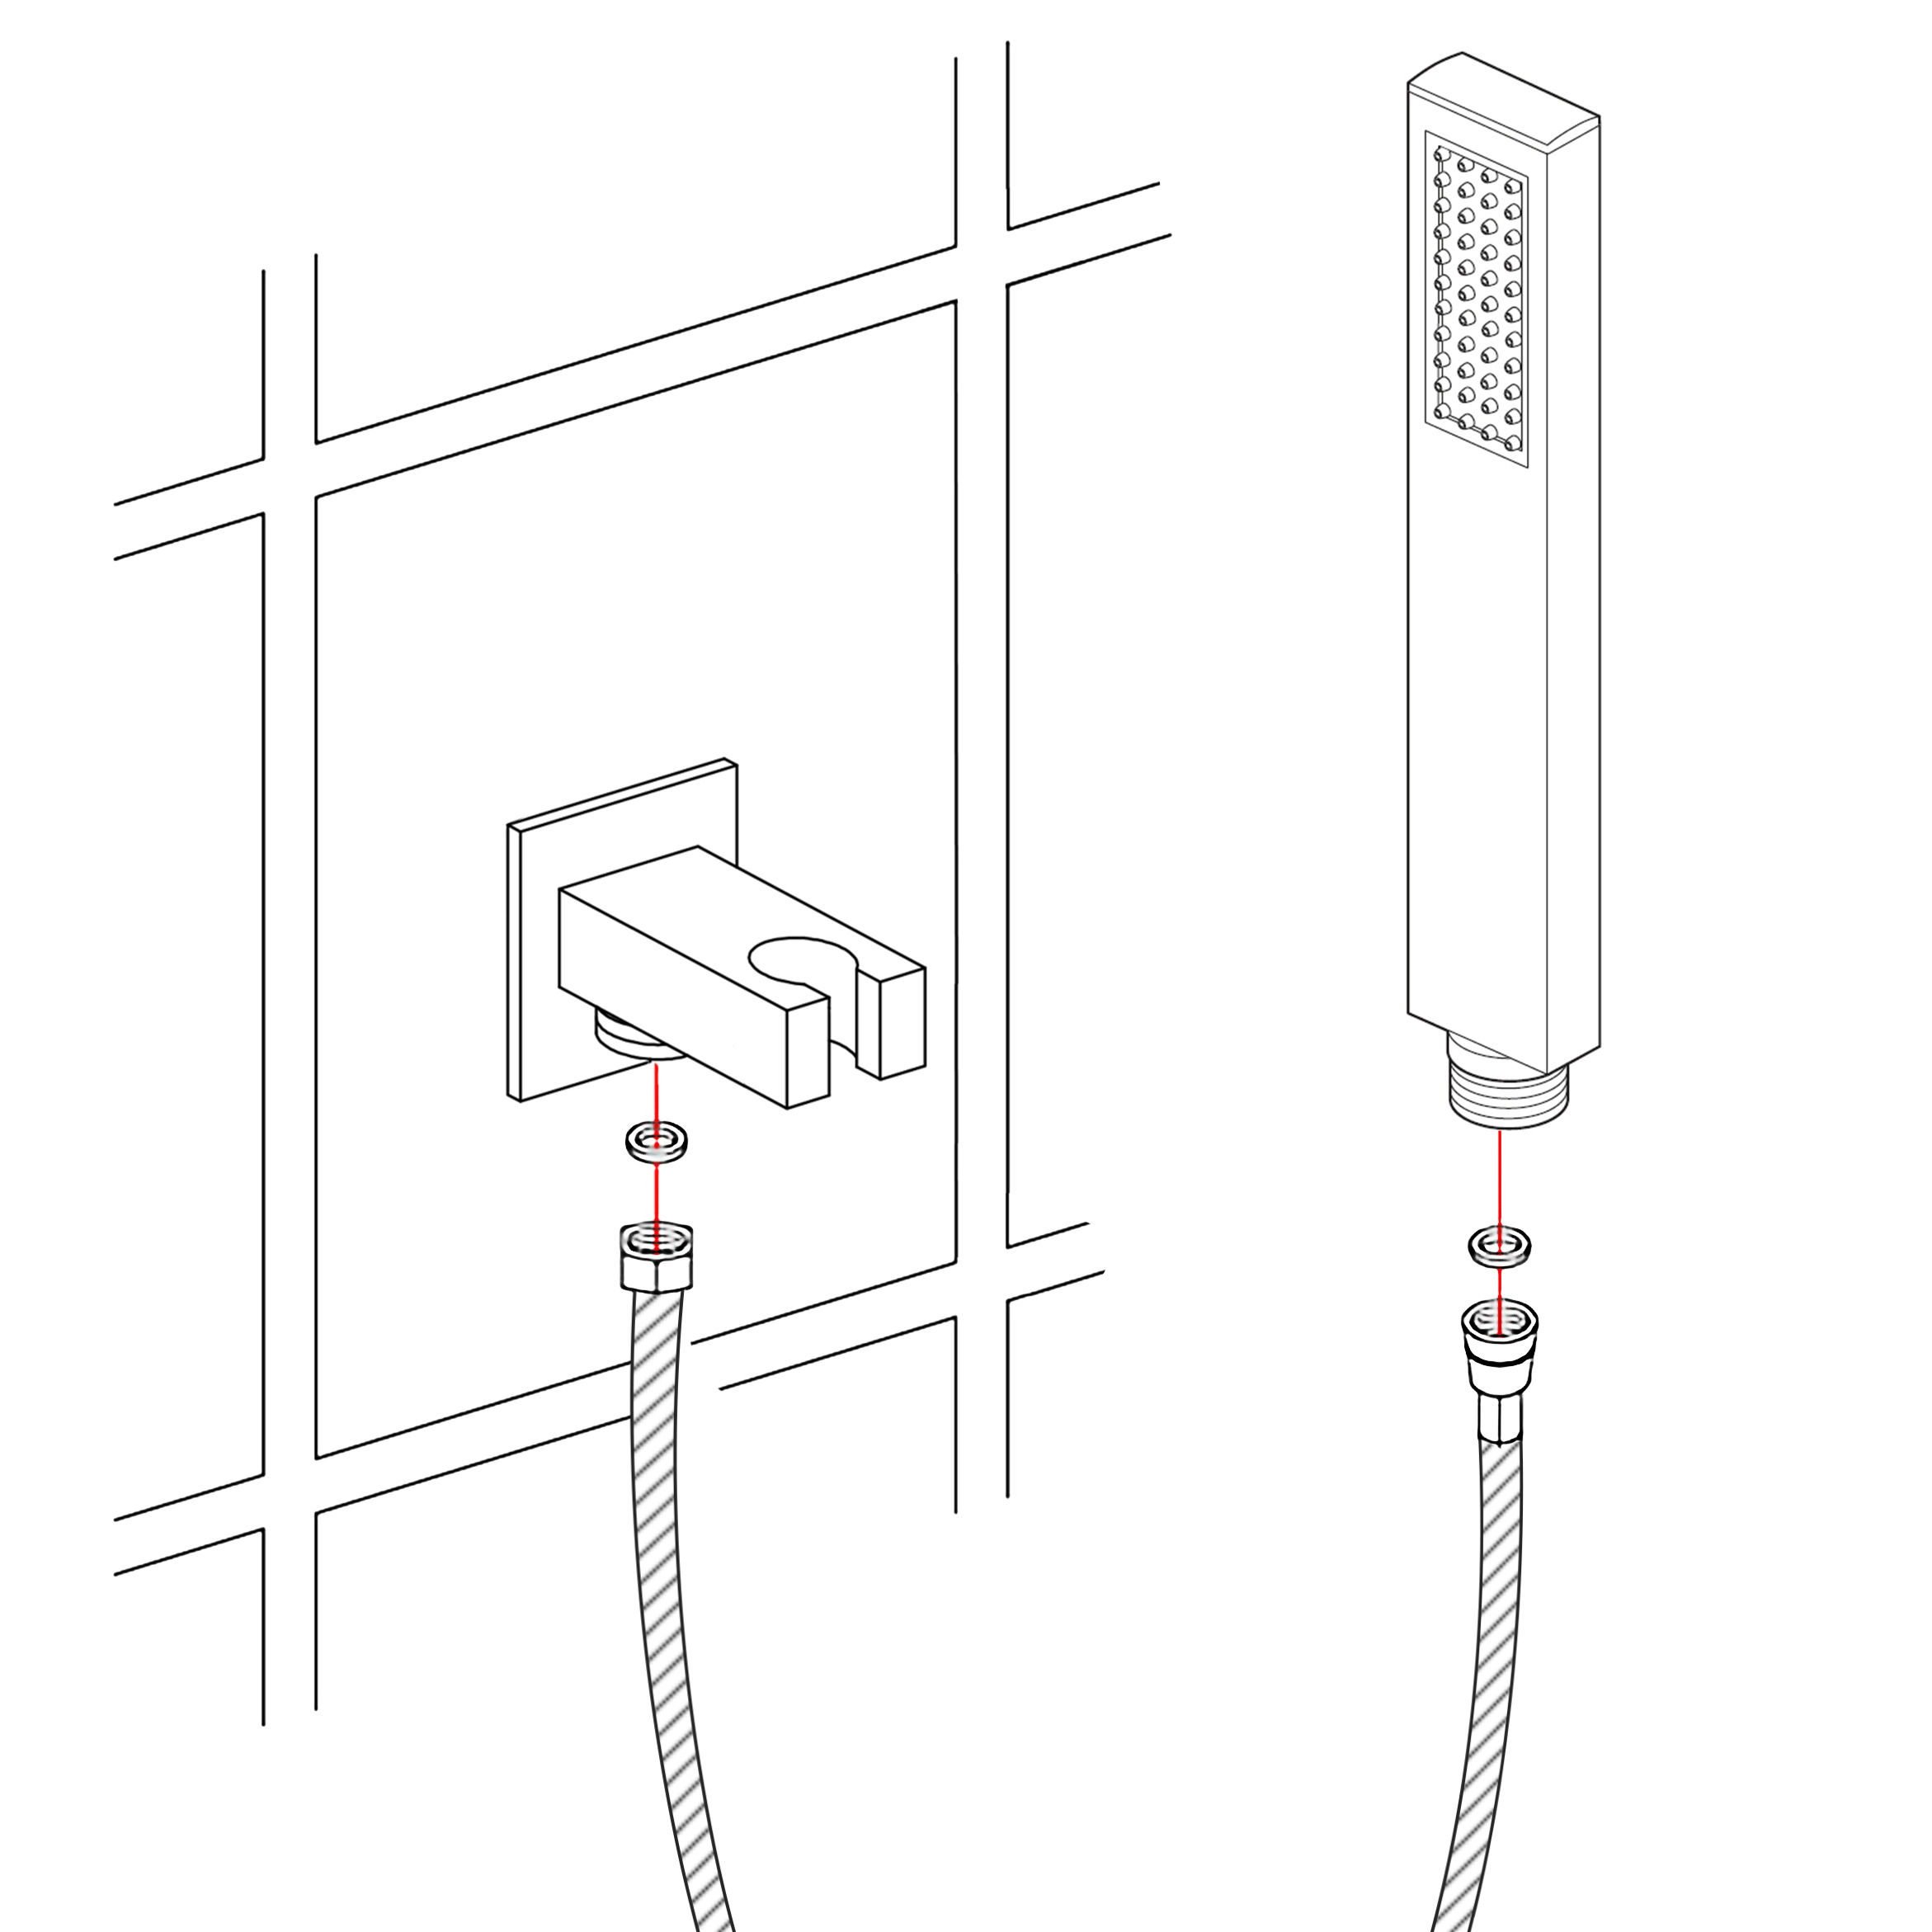
Hand Held Shower
Handheld Shower
Step 3:
Digital Controller Installation Instructions
Operation
· Fly-shuttle switch
· Setting
· Power on/off
· LCD Display
Notice
1. The control panel is sensitive, when you install it, please avoid to let it face directly to the water from hand shower and the head shower because water will get it misoperation or lock the control panel.
2. The touch button is the best sensitive area.
3. The touch panel has water splash protection technology. When the system detects misoperation, no response, and need about 1 second to recover.
Function 1. Water TEMP adjust
2. Hand shower
3. Head Shower
4. Water flow adjust
Operation
Power On
1. Power on/off After electrify, you can touch to make the system ON. When you hear buzzer sound, the fly-shuttle switch and the LCD panel would be lighting. Water TEMP and water flow will be the same as that you set last time. The cursor will be on the icon you using last time. The default working time is 60 minutes.
Power Off
When the system on, touch again to make the system OFF or the default working time is up, when you hear buzzer sound that means have close all the functions.
NOTE:(the background color of the fly-shuttle switch) LED show blue color when TEMP below 33° C
LED show orange color when water TEMP between 34° C- 41° C
LED show red color when water TEMP over 41° C
2. Hand shower and head shower switch When system on, rotating the fly-shuttle button left or right. the cursor would move to icon, pressing the fly-shuttle button to open hand shower or head shower (hand shower and head shower are inter-locked, you can turn on only one time), the corresponding operation icon would brighten up on the LCD panel after turning on. The cursor could move to icon, pressing again the fly-shuttle button to close hand shower or head shower, the corresponding function icon would be dark.
Caution:
• Using rechargeable NI-MH battery [the 5#(AA) and the capacity is more than l000Mah).
• After electrify, forbid using the normal 5#(AA) battery. Otherwise, would cause the battery explosion.
• When the power cut, you can use the high quality normal 5#(AA) dry battery as the emergency measure. But you must unplug the adapter.
• When you install the host box, please put the battery into it. If the product hasn't connected with the power in a long time. Please take out the battery from the host box. This way can avoid affecting the battery working life.
• If you want the battery with a longer working life, you can charge the battery every some months.
Installation of the Control Panel
There are two kinds of installation ways shower controller according to the installation site, one way is to recess mount into the wall. Another way is to build into the shower panel.
1. Build the control panel into the shower panel
Step 1: Open a hole (6.7" X 3.7") on the shower panel, putting some glass cement around the back of the control panel and fit it in the hole of the shower panel as picture shown.
Step 2: Fasten the mounting bracket onto the back of the control panel by screws.
Step 3: Install the host box on the back of the shower panel, connect the cold water and hot water pipe, hand shower, and head shower's pipes.
1. Connect the G1/2" hot and cold water inlet pipes to the host box, tighten it and make sure connection is well sealed (as the picture showed).
2. Connect the G1/2" water inlet pipe of the faucet to the water outlet pipe of the host box, tighten it and make sure connection is well seated (as the picture is shown).
Caution:
• When installation, the hot water pipe, and the cold water pipe cannot mix up. Otherwise, the system cannot work.
• When you tighten the connector nut, torque should not exceed 8NM, GB 2.5NM is OK, otherwise, it will damage the connector of the mixing valve and lead to water leaking.
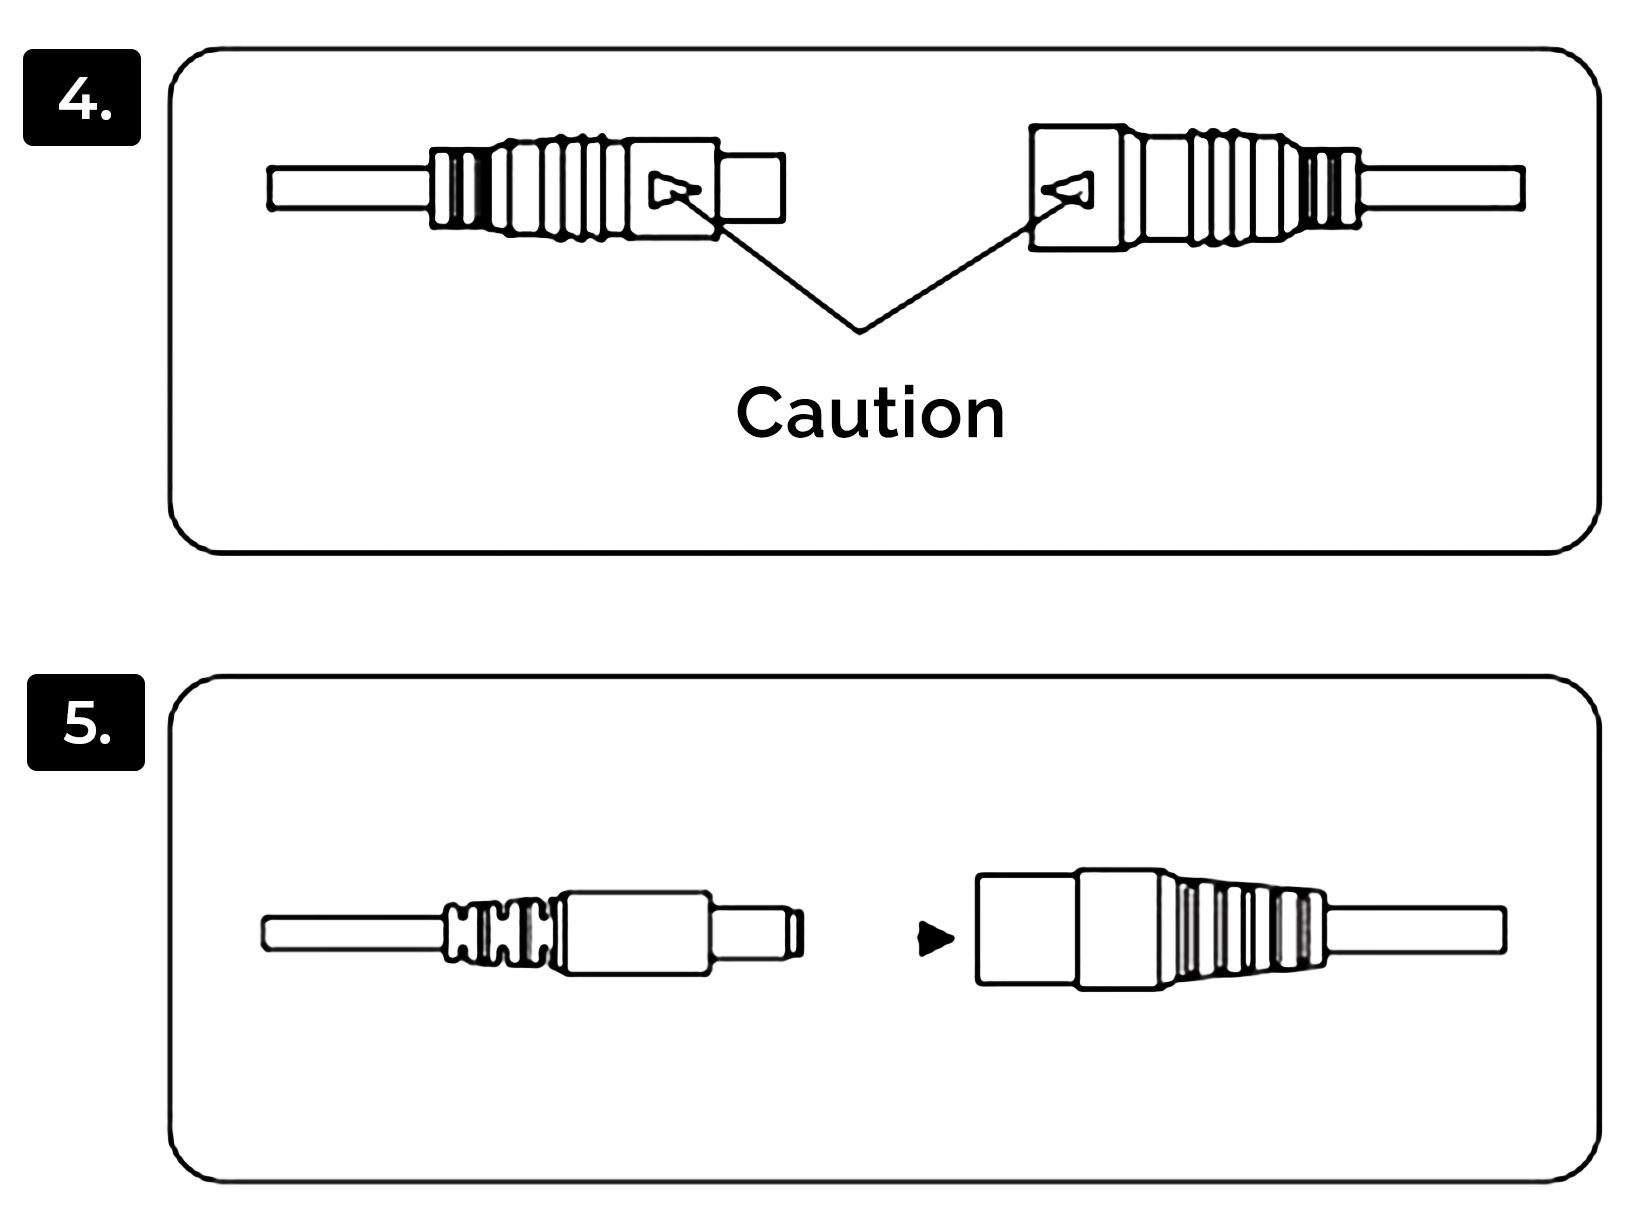
Step 4: Connect the host box control cable with the control cable of shower faucet as an arrow mark on the picture.
Caution: When connecting the two control cables, you must follow the arrow mark which is shown in the cable joint. If not, it will damage the cable joint.
Step 5: Connect the power supply cable of the host box with the adapter.
2. Recess mounted into wall
According to the wall thickness, you can choose installation method A or B.
Method A: If the wall is thin, the host box and the shower control panel can be installed in a different position.
Method B: If the wall is thick, the host box and the shower control panel can be installed in the same position.
Installation step of method A:
Step 1: Open two-hole in the wall, and reserve space for the pipes and adapter.
Step 2:
Dill four holes by 6mm diameter on the upside hole for install the wall bracket (as the picture) and put the plastic screw into the hole.
Step 3: Drill four holes by 8mm diameter on the downside hole for the host box installation and put the expansion screws into the hole.
Step 4:
Install the wall bracket of control panel and the host box in two holes, according to the pipe's position to set the host box position, adjust the screw of wall bracket to make sure it is concave the wall surface with a 0.5-1 mm difference.
Step 5: Connect the water pipe and the power supply cable of the host box, get water supply to make sure the pipe has no leak. Connect the host box control cable to the control panel hole and fasten it, using the cement to seal the wall and cover by the tiles.
Step 6: Connect the control cable between the host box and the control panel put some silicon on the back case of the control panel and put it on the wall bracket.
How to install the Shower Set with Wall Mount Showerhead, Hand Held Shower and Shower Mixer