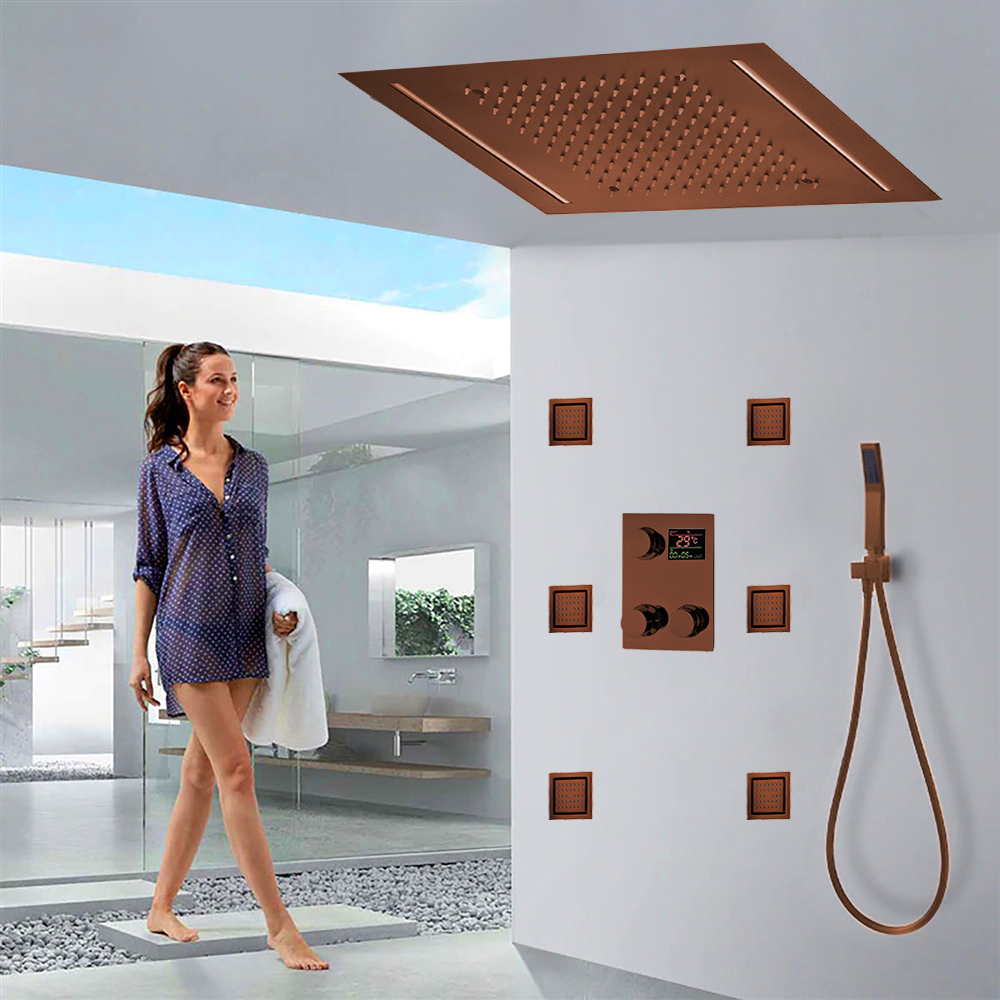
Fontana Light Oil Rubbed Bronze Lima Smart Digital Rainfall Waterfall Shower System
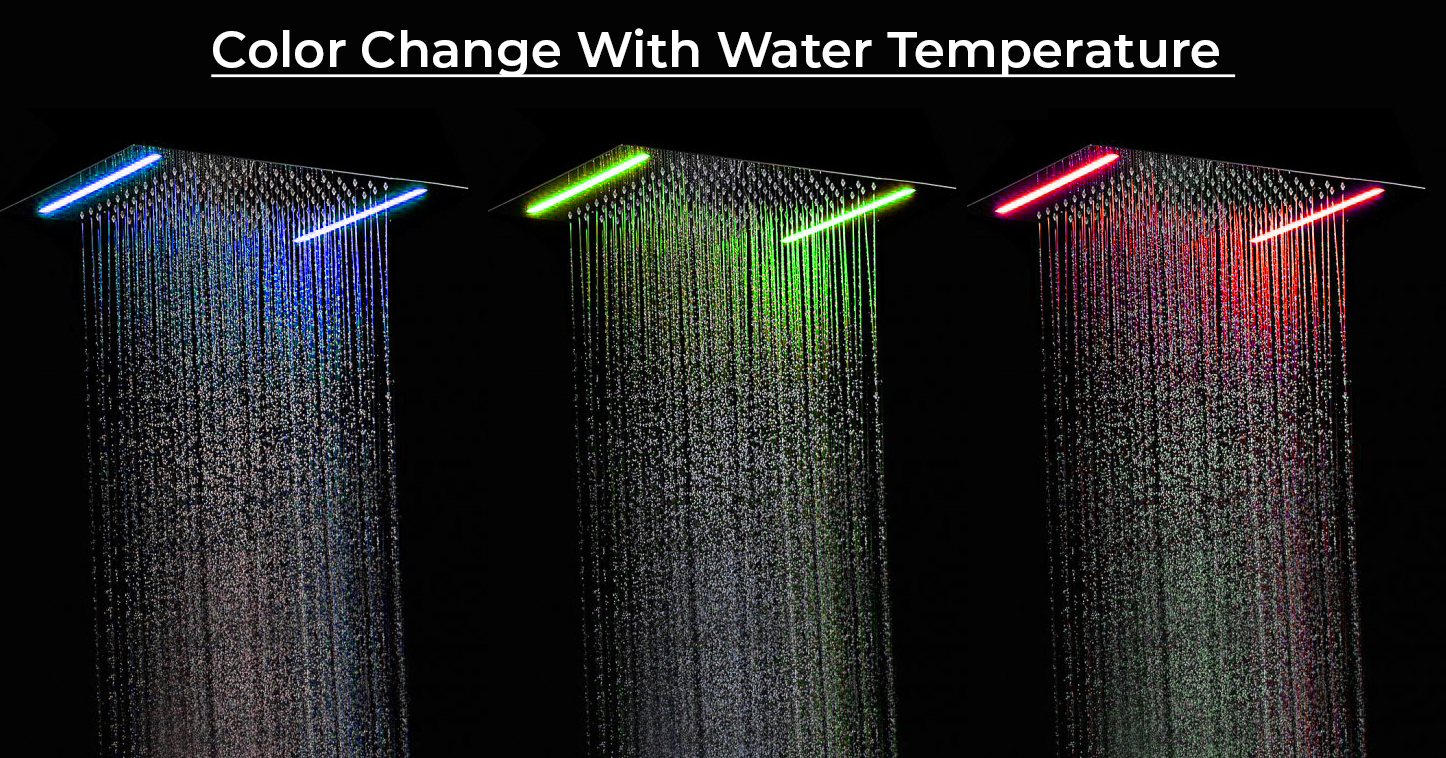
Warm light oil-rubbed bronze tones will compliment your bathroom decor. Gorgeously sized recessed Rainfall Waterfall LED showerhead provides maximum coverage that is enhanced by six body massage jets and handheld shower. A digital thermostatic mixer ensures the water temperature and pressure you desire. LED optional. Turn your shower into a water and light show with this LED Digital Shower System. Adding a touch of elegance to your bathroom, the LED lights will provide a visual water temperature indicator. Built-in hydro-powered device powers the LED lights, which provide visual shower temperature cues to reduce water waste. The lights will dim and brighten when you lower and raise the pressure so you can set the perfect mood, water, and lighting. When the water temperature is ≤89 °F (≤32 °C), the Blue color will show automatically; When the water temperature is between 97 to 107 °F (36-42 °C), the Green color will show automatically; When the water temperature is between 109 to 122 °F (43-50 °C), Red color will show automatically; When the water temperature is above 122 °F (>50 °C), Red color will flash; When water temperature is above 122 °F (>50 °C), Red color will flash immediately.
Fontana Light Oil Rubbed Bronze Lima Smart Digital Rainfall Waterfall Shower System Features:
Brand Name: FontanaShowers
Model Number: FS-892RBD
Material: Solid Brass
Showerhead Finish: Light Oil Rubbed Bronze
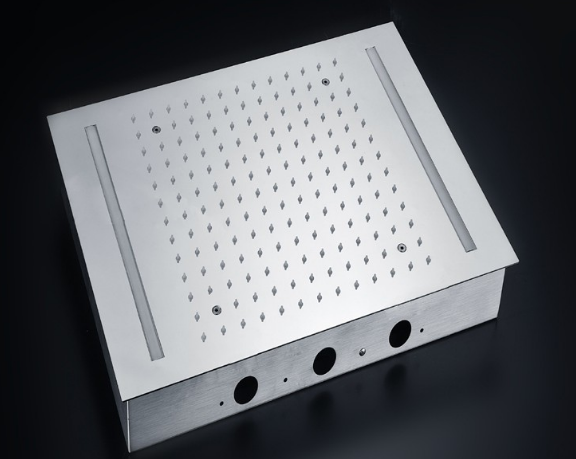
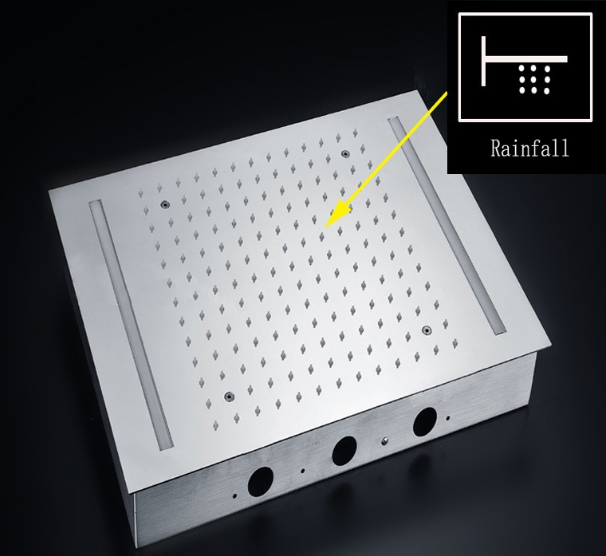
Style: Contemporary Rain Showerhead
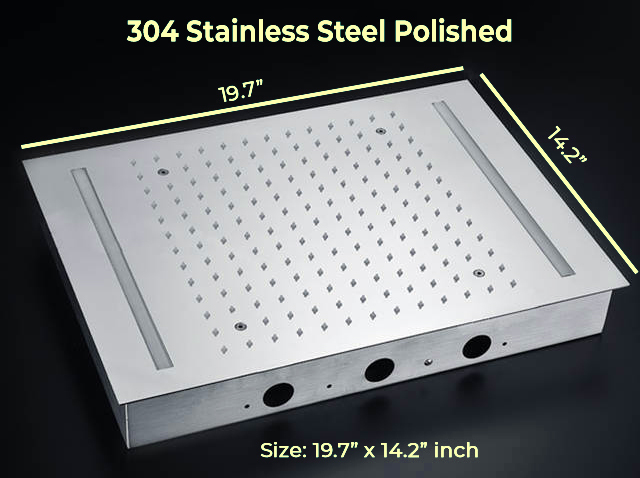
Showerhead Height (thickness): 0.33"
Showerhead Width: 14"
Showerhead Length: 20"
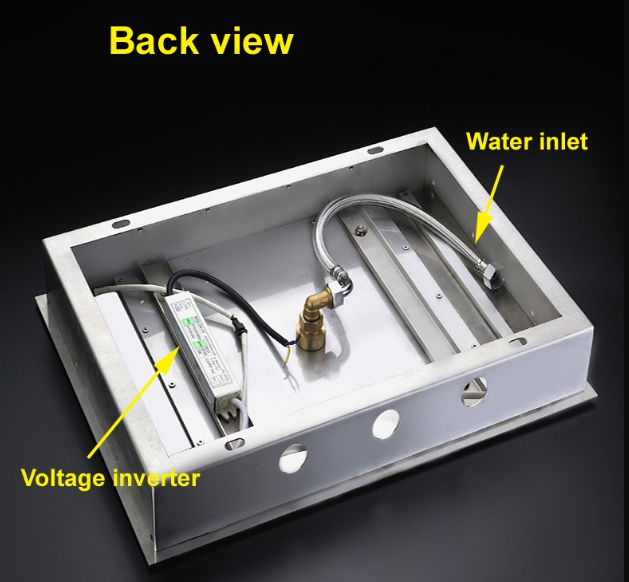
LED Power Source: Water Flow
LED Color: Available without color-changing or with LED colors Blue, Green, Red
1. Attach the upper wall support to the shower wall using a drill and the mounting hardware provided. Use a level to ensure that the shower riser is perfectly straight.
2. Place thread sealant on the ½” pipe threads on the shower wall and thread on the mounting nuts. Allow the sealant to cure for 24 hours before use.
3. Attach the hot and cold valve bodies and decorative escutcheons (if included) directly to the pipe threads. Tighten with an adjustable wrench to secure.
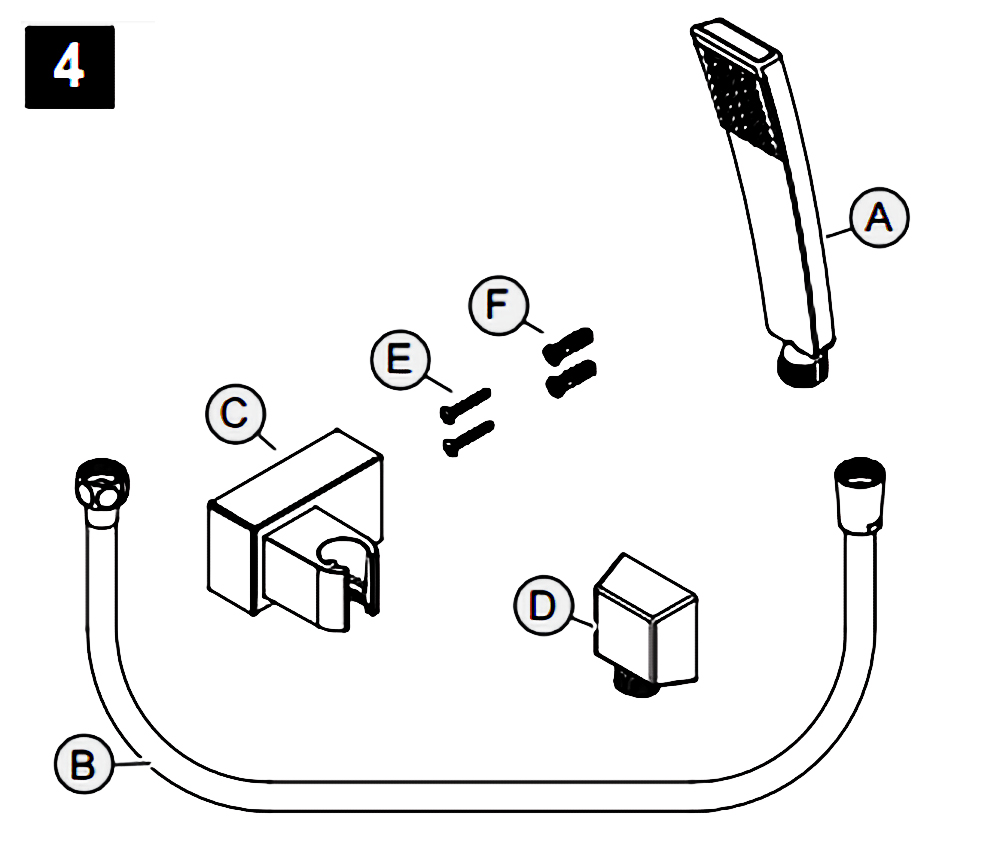
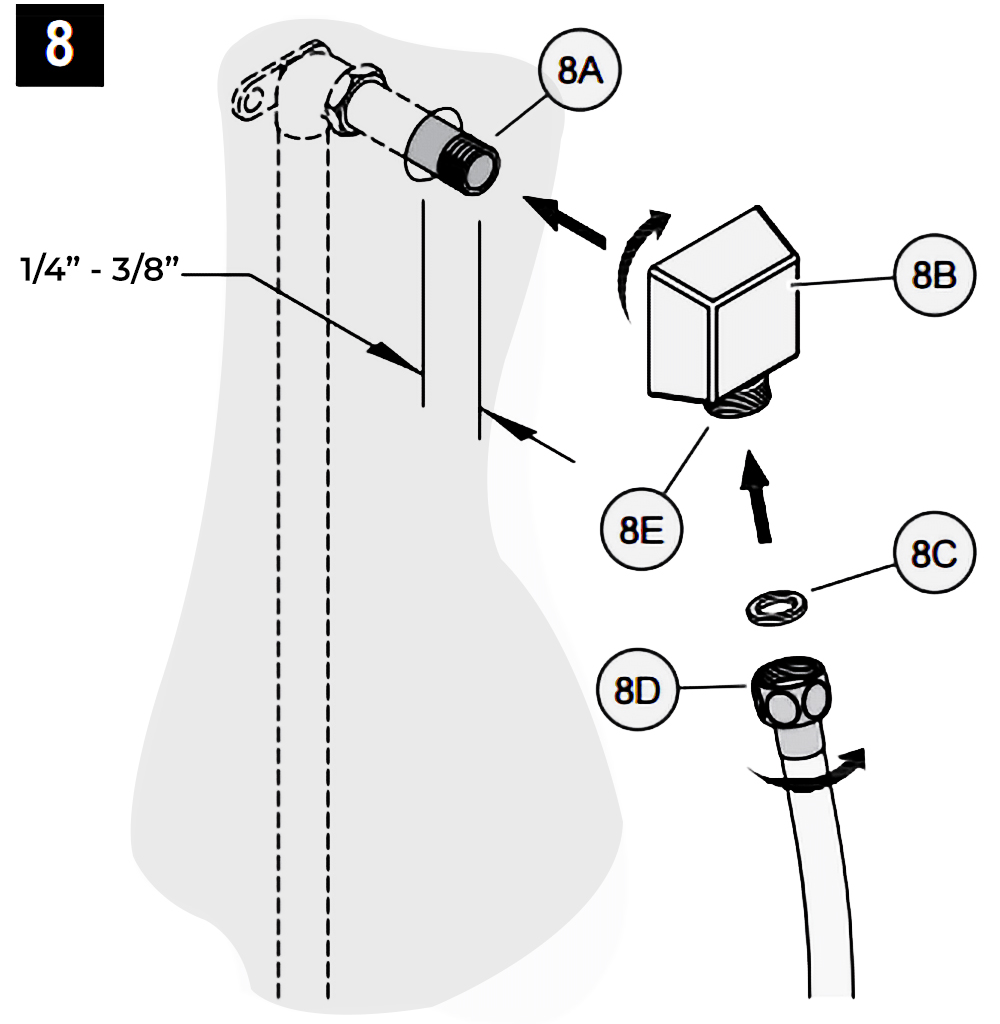
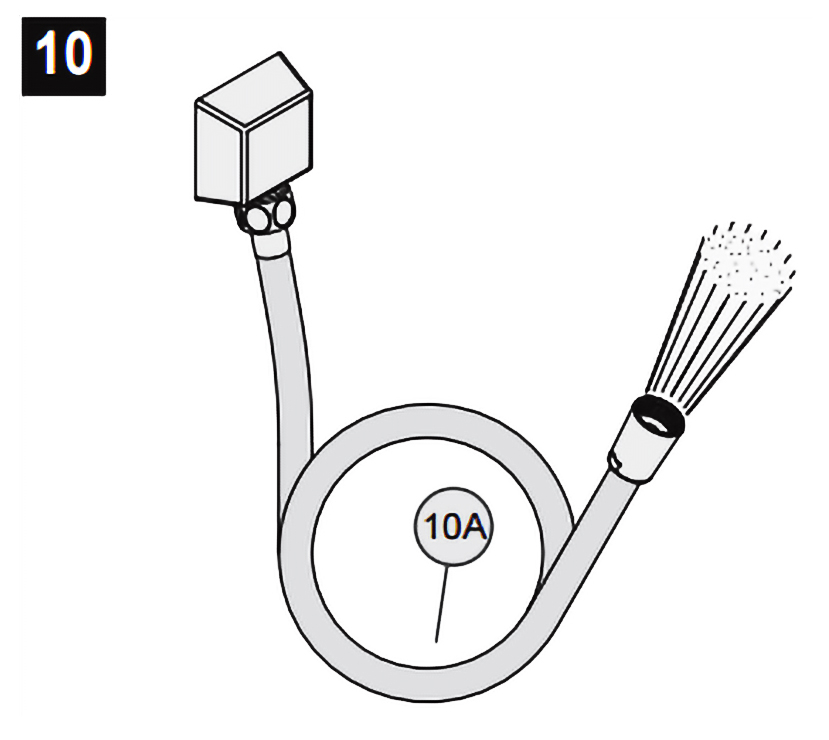
4. To install a hand-held shower, mount the cradle at a suitable height for the user with the hardware provided. Attach the hose to the faucet with any rubber washers or sealing gaskets included. If your system does not feature a hand-held shower move on to the next step.
5. Attach the showerhead to the top of the riser and tighten with a smooth jaw wrench. Do not tighten more than ¼ turn beyond hand tight.
6. Turn on the water supply and open the faucet valves. Check for any leaks and verify that the hot and cold supplies are working correctly. Let the water flow through the riser pipe and shower hose for approximately 30 seconds to clear out debris and dirt.
Note: If leakage occurs, tighten connections with your adjustable wrench as necessary. If problems persist, contact Customer Service.
1. Open packages, check all the goods whether everything is ok.
2. Check the size of the connector and the thread size of the water pipes connector in the wall.
3. Clean the water pipes before installing them.
4. At least 2 water electricians to install the showerhead.
5. Pay attention to the water temperature, not over 70 degrees.
6. Water pressure: 0.05 MPA - 0.5 MPA.
7. Adapter is 100-265 V to 12 V, insurance device rated current less than 30 MA.
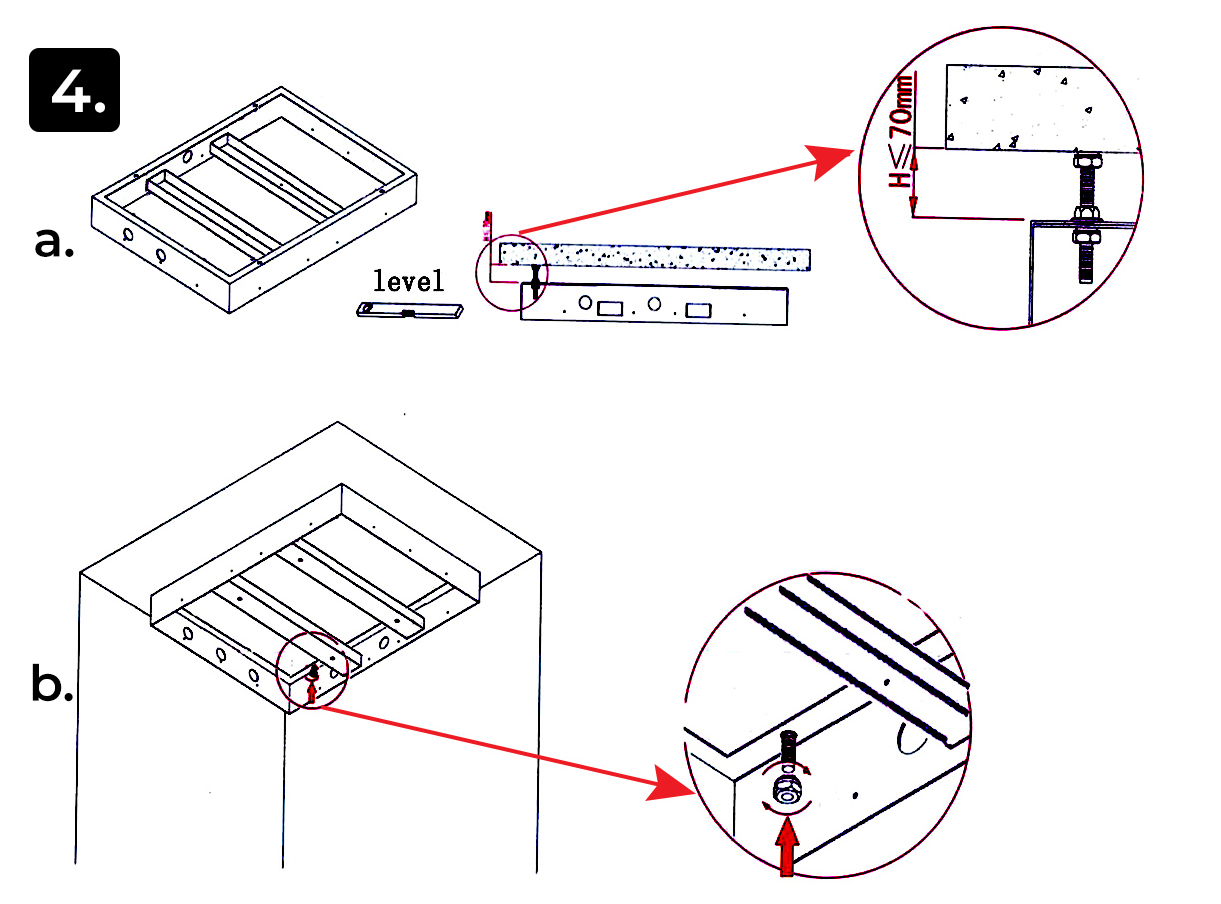
According to the four mounting holes on the mounting bracket, use Electric drill play mounting holes.
a) Through the two hexagonal nuts adjust the distance between the mounting bracket and the ceiling, and keep the mounting bracket on the level.
b) Use explosion screw fixed mounting bracket on the ceiling, pay attention to the explosion screw can adjust the height, and use level adjust the mounting bracket to level.
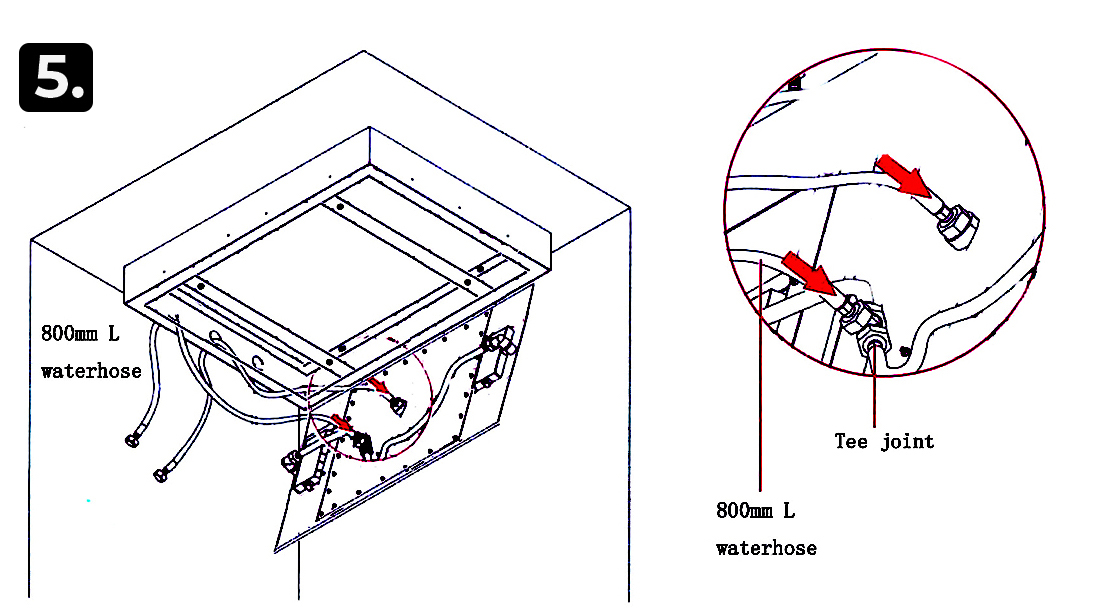
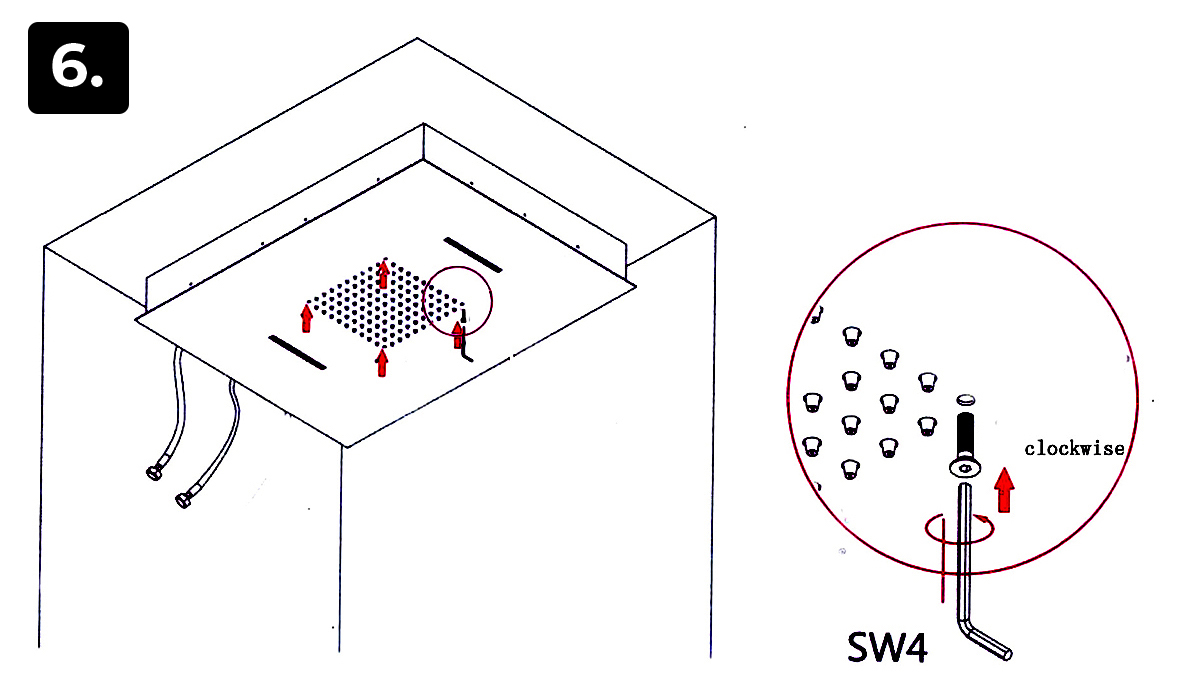
Connect 1 pcs water hose to 1 Tee Joints and G1/2, G1/2 joint in the middle, then put another side of the shower hose through the hole of shower head size.
Install the decorative panel, use SW4 hexagon wrench tighten 4 screws.
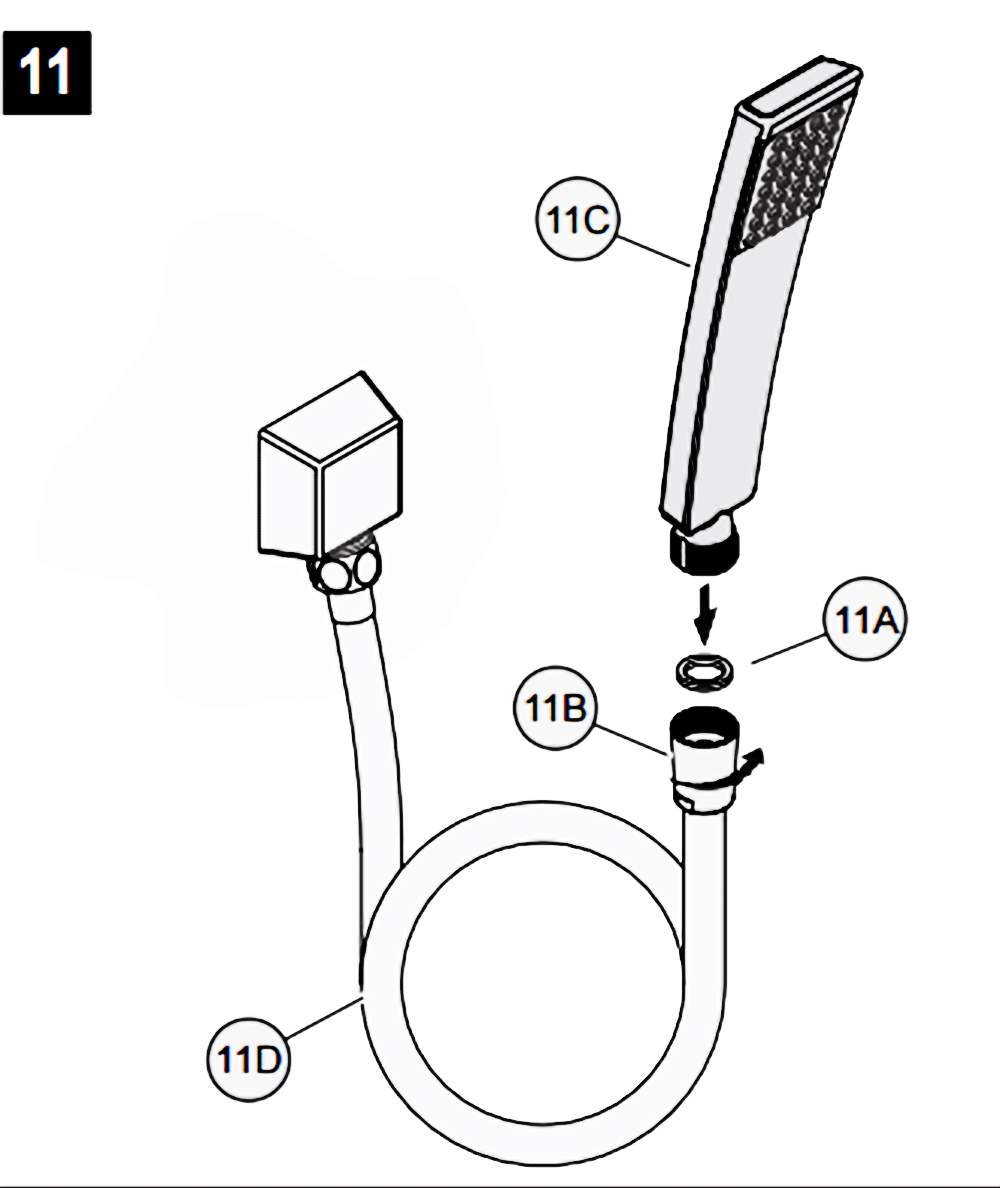
Hand-Held Shower Instructions
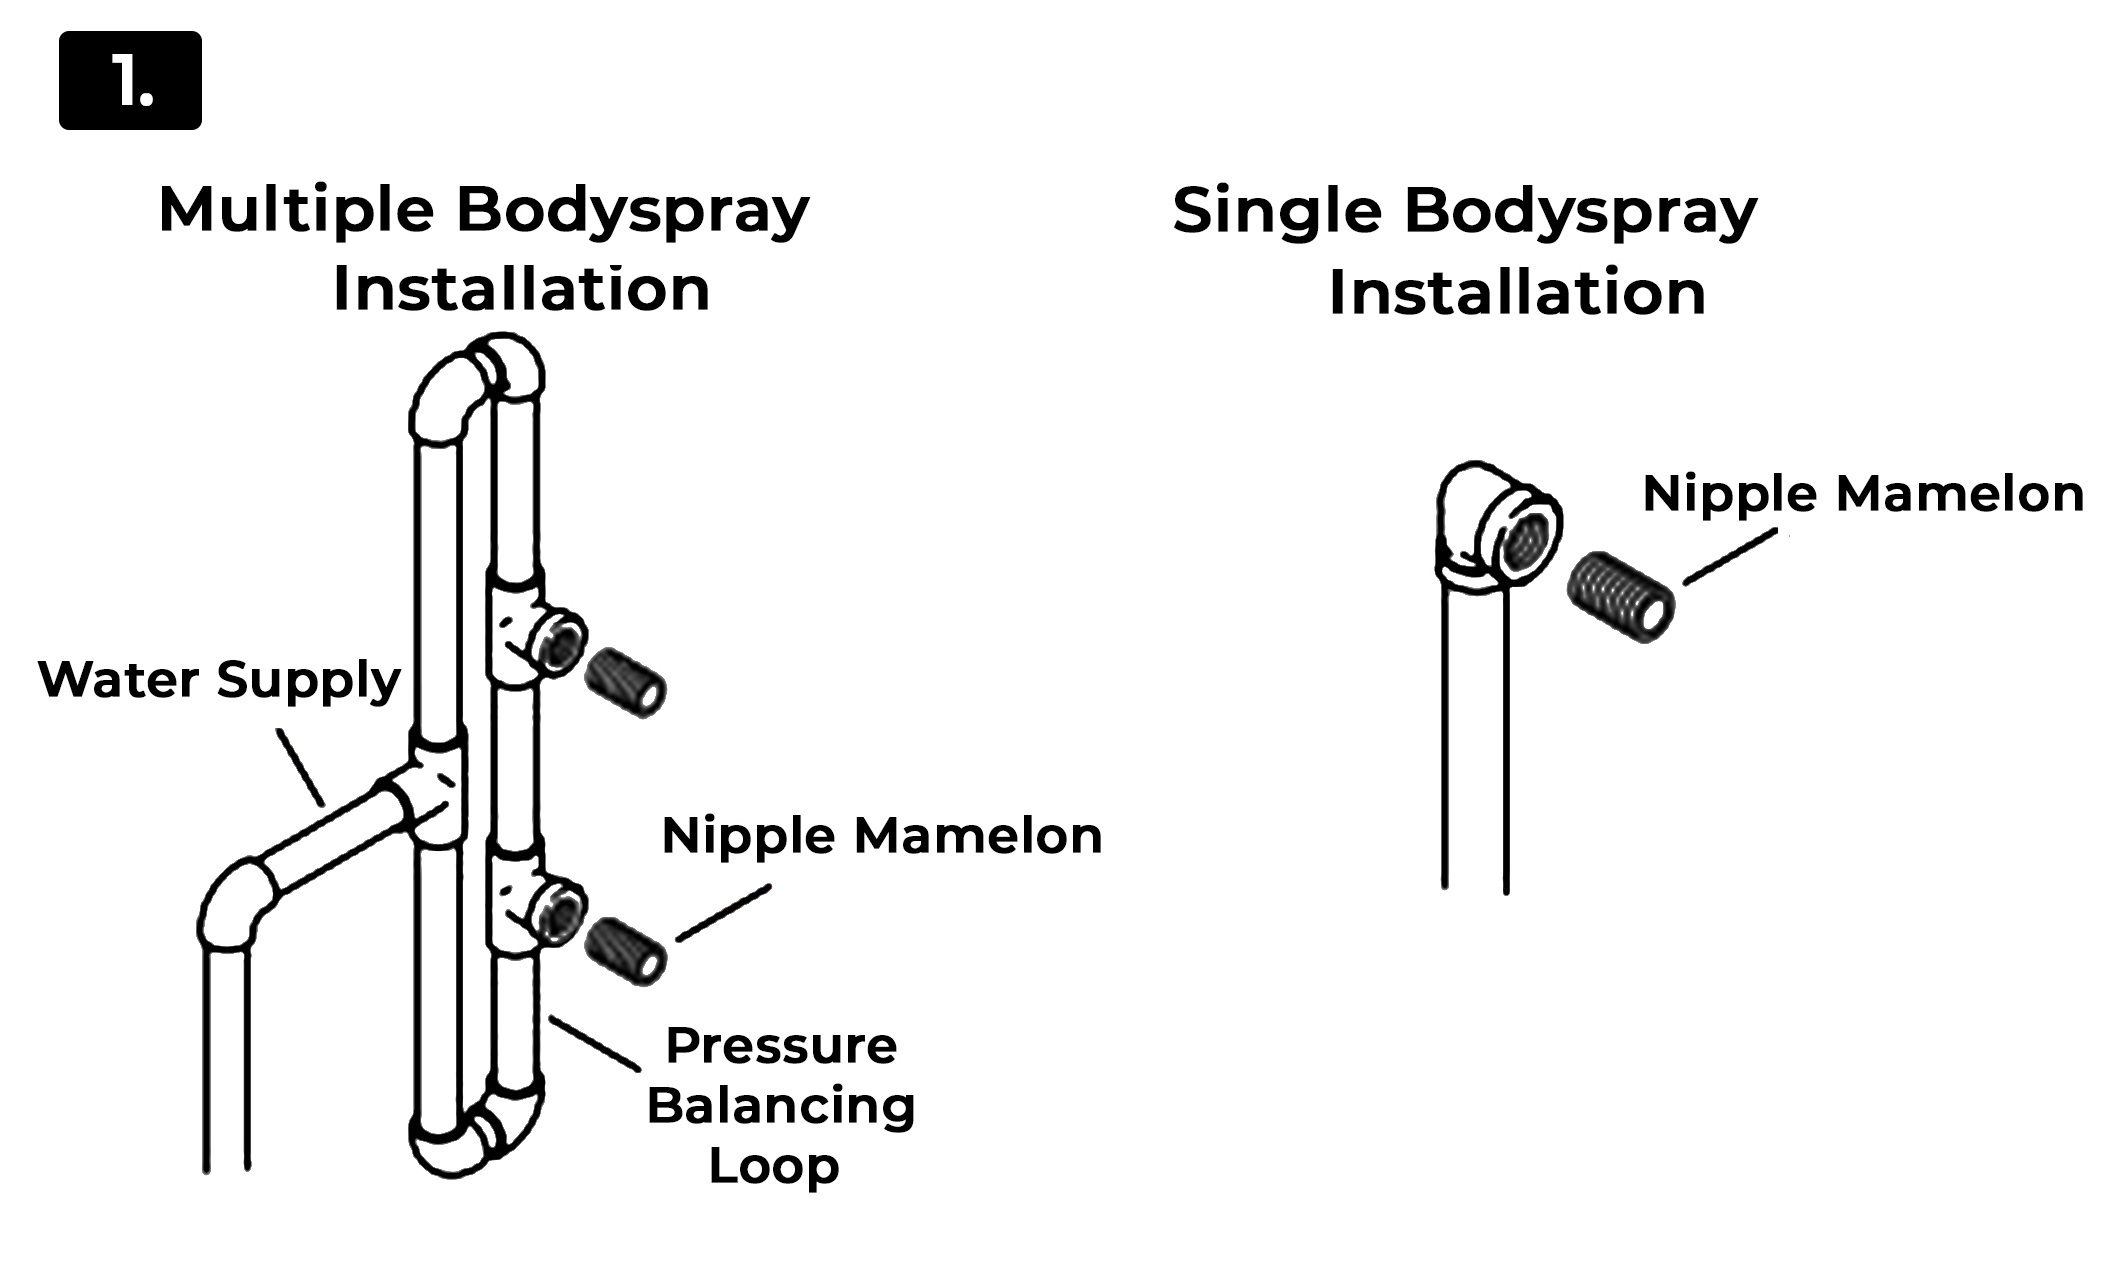
Body-Jet Installation
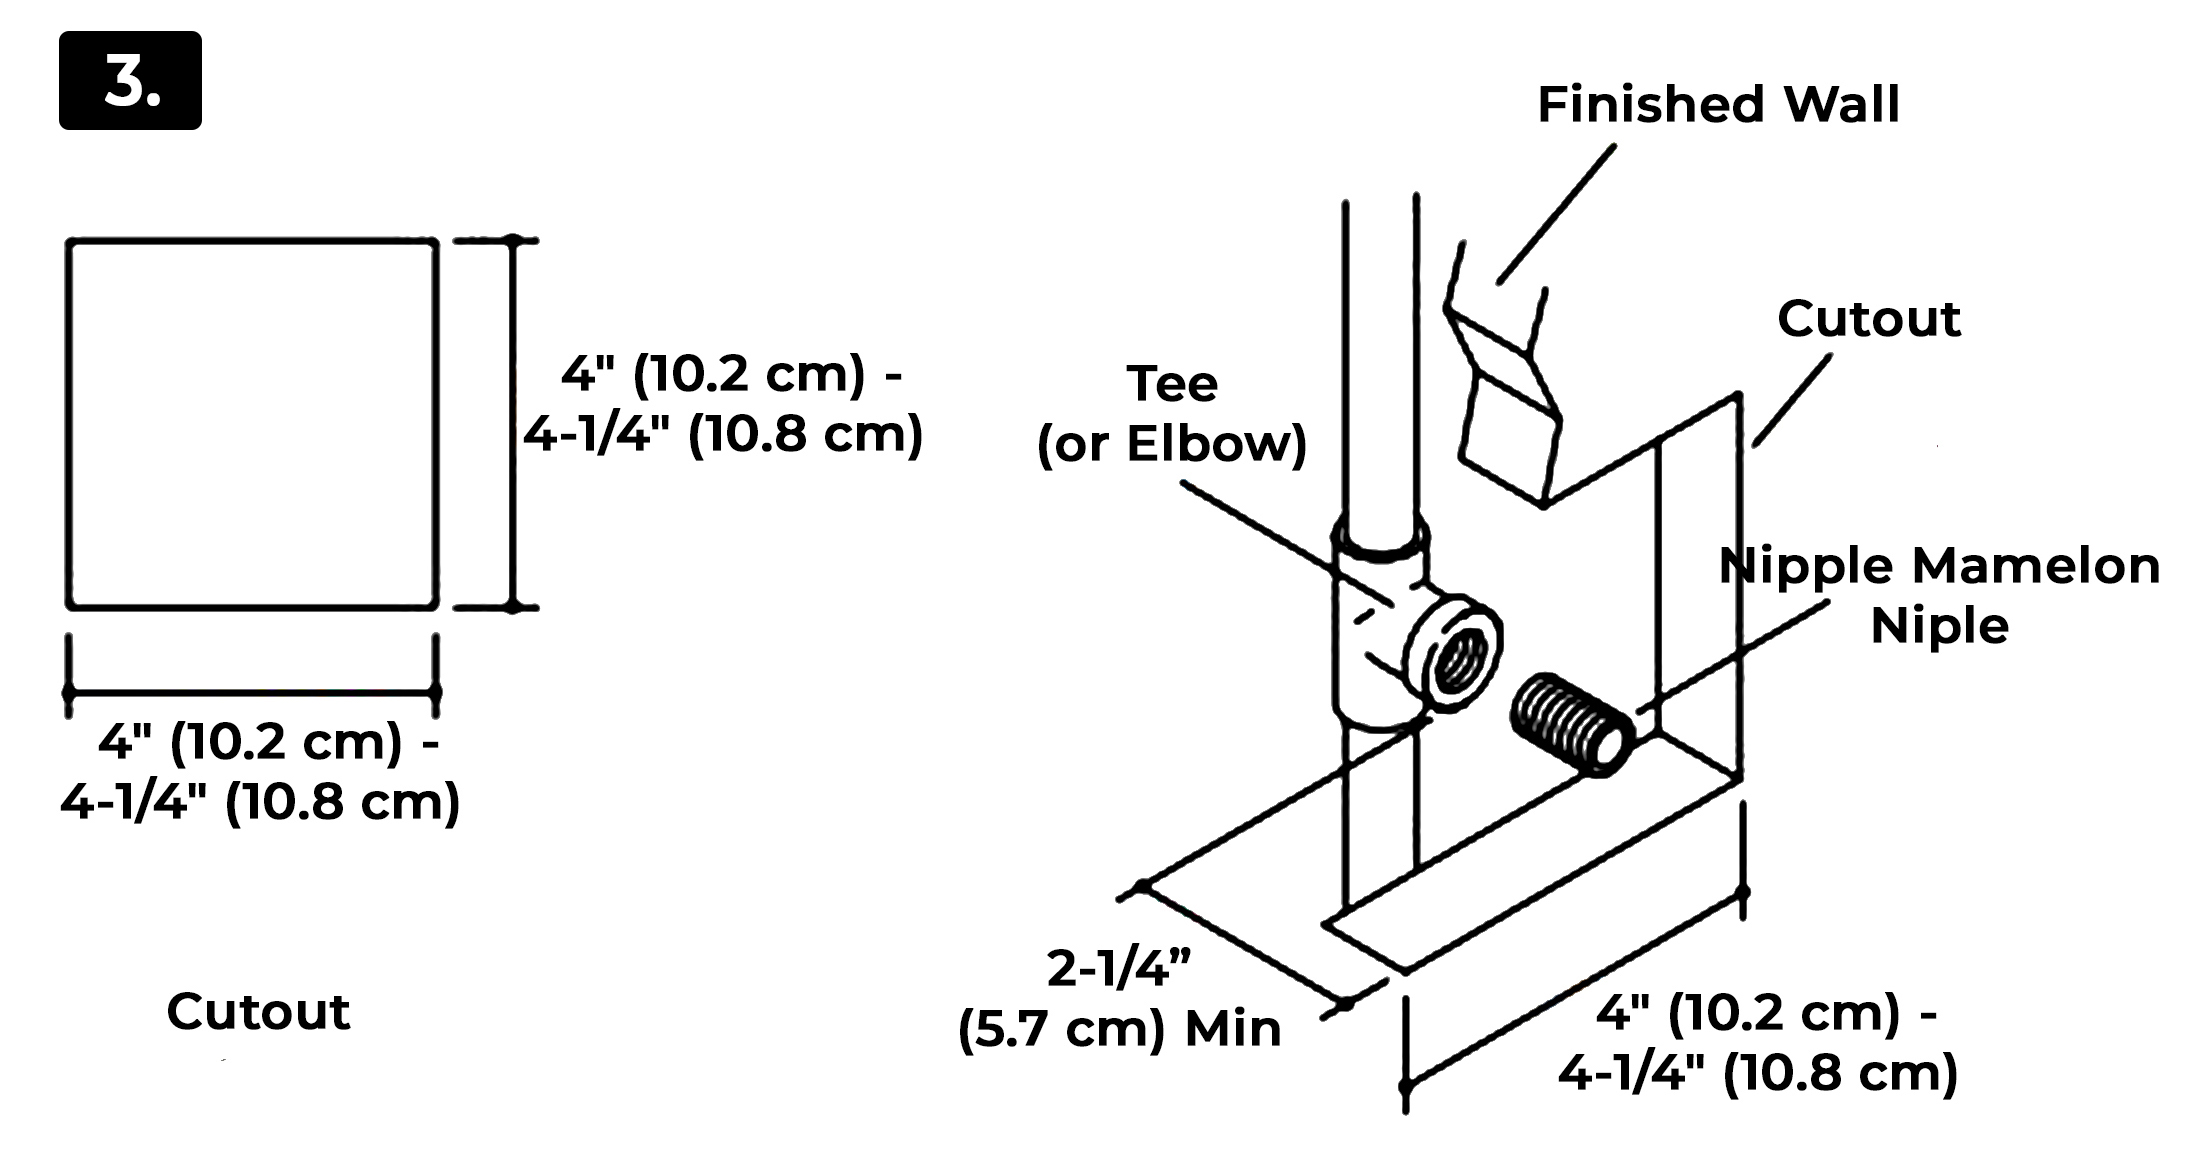
Water Supply Nipple Mamelon Nipple
·Pressure Balancing Loop 1. Route the water supply lines.
2. If installing more than one bodyspray off the same supply line, construct a pressure balancing loop. Locate a tee along the loop at each bodyspray installation location.
3. Do not strap the pipes at this time.
Single Bodyspray Installation
·Nipple Mamelon Nipple
1. Route the water supply line.
2. Install an elbow to the end of the supply pipe at the bodyspray installation location.
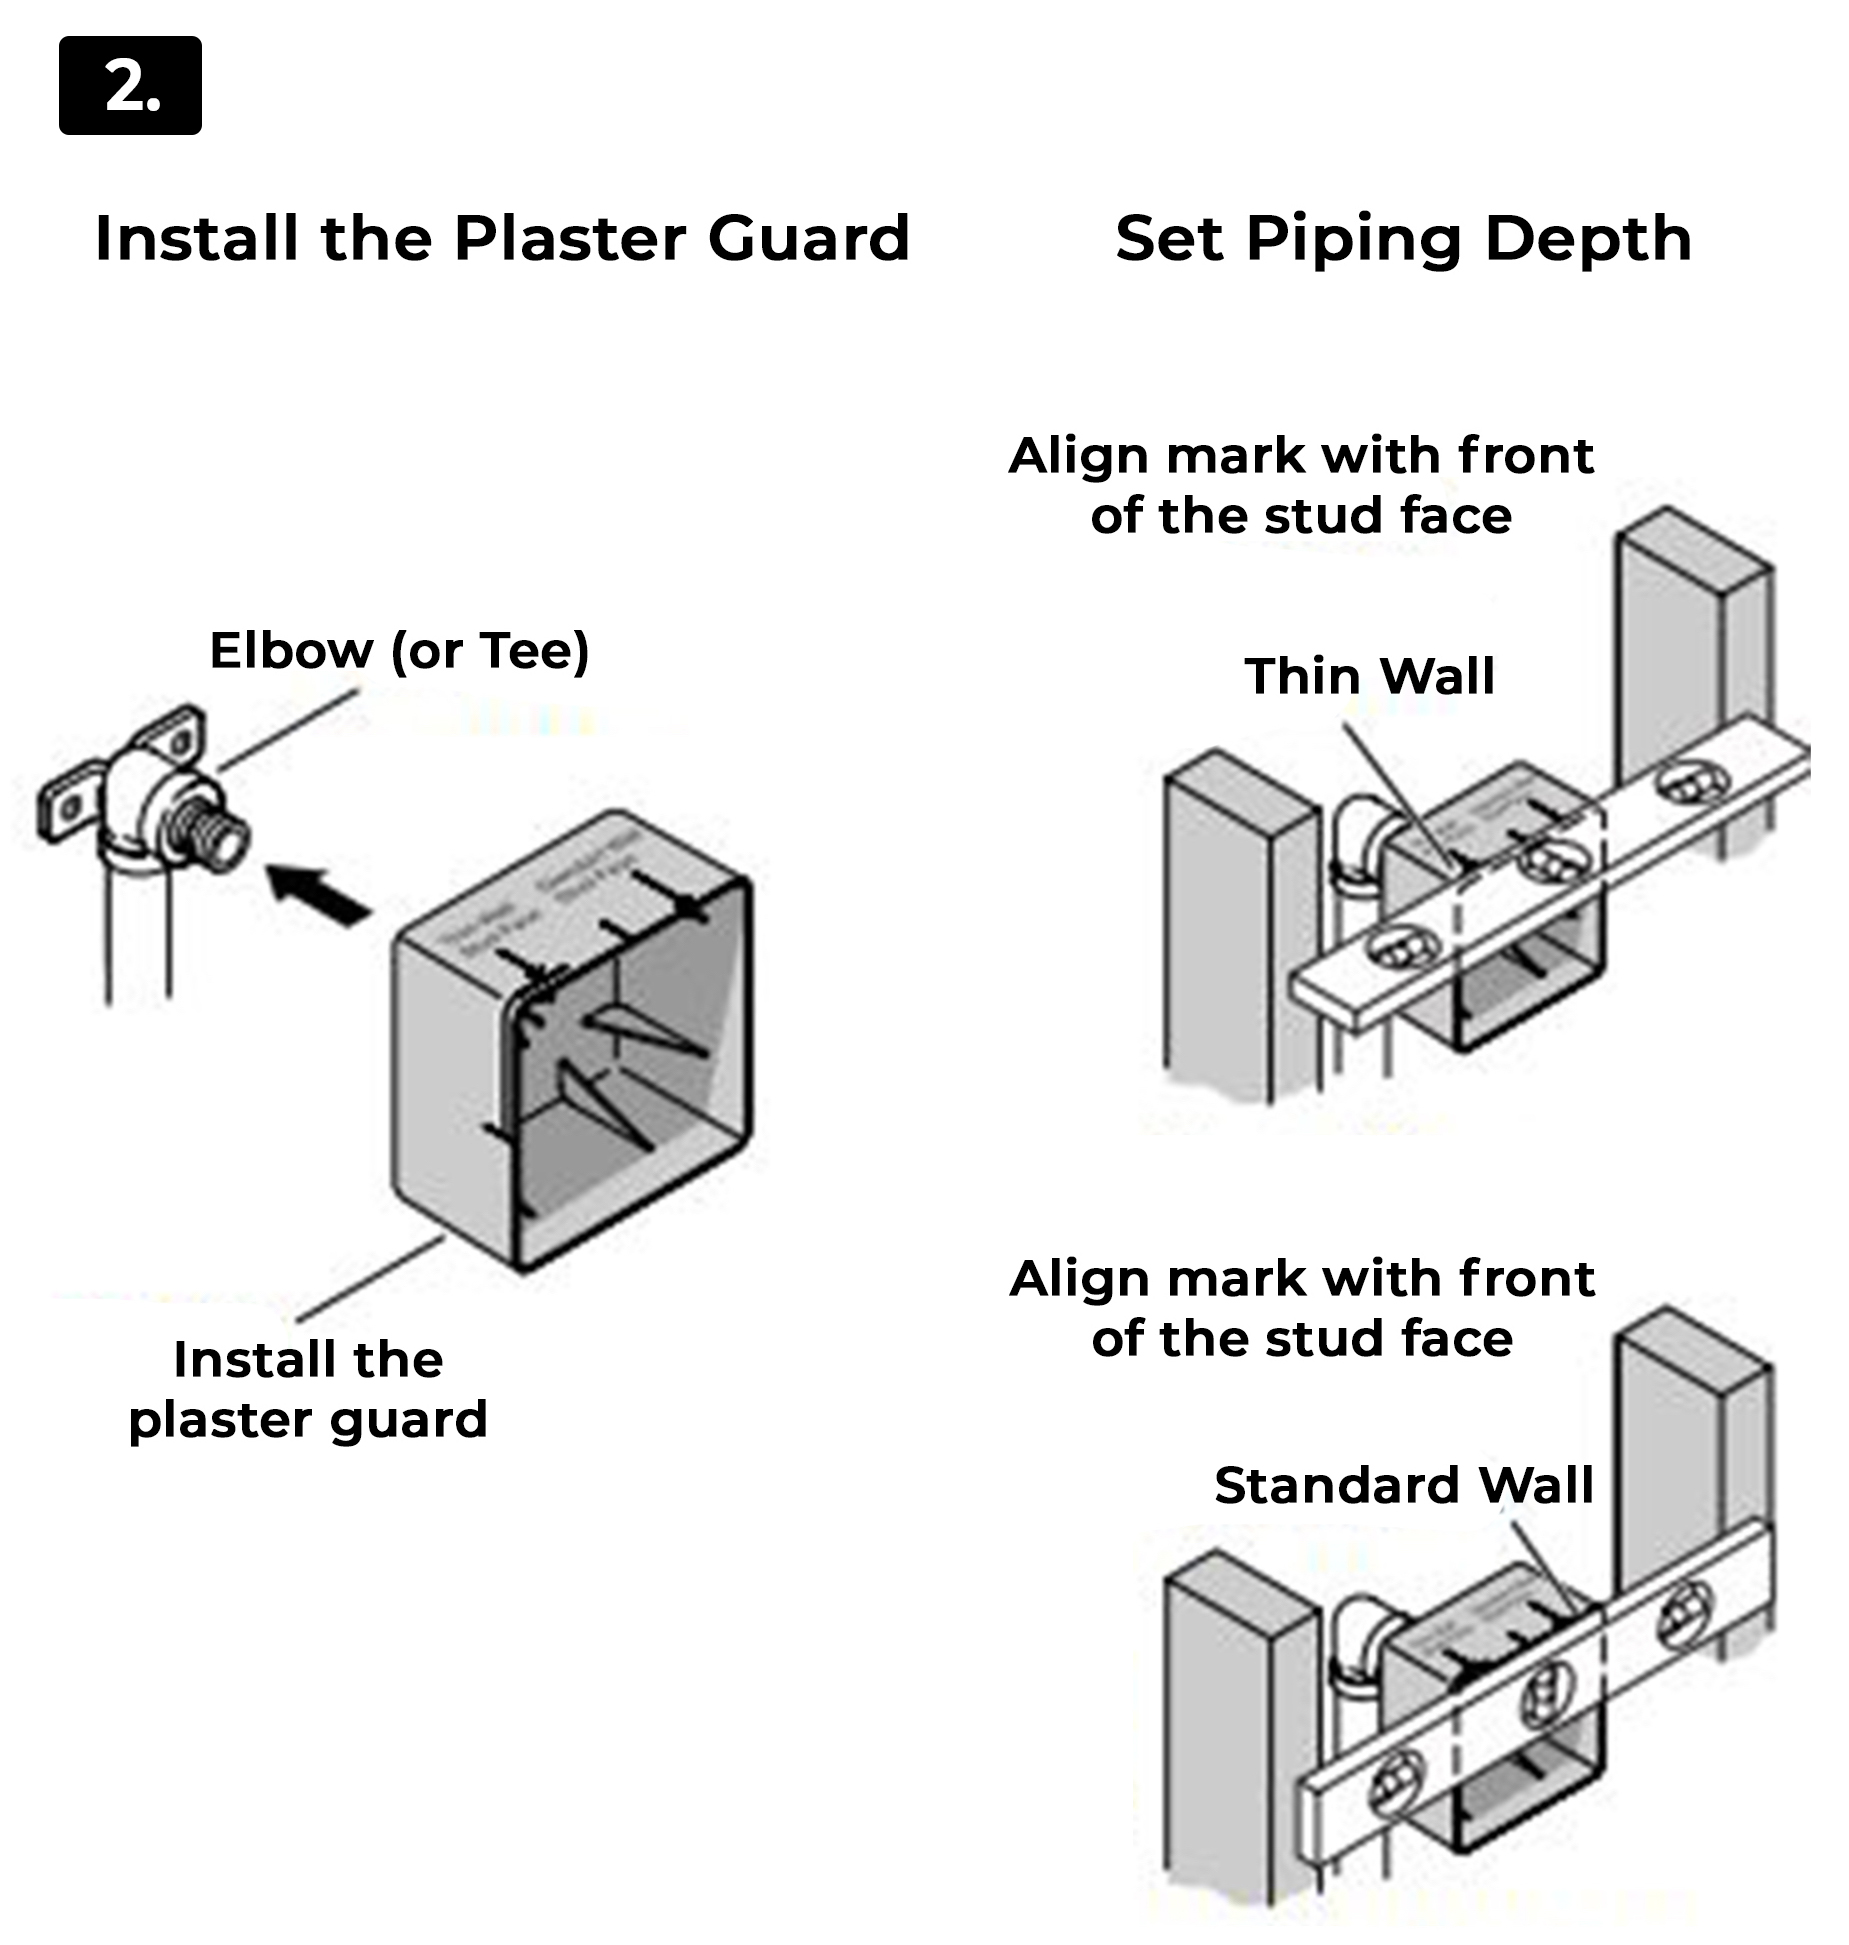
Install the Plaster Guard
·Elbow (or Tee)
·Install the plaster guard
Set Piping Depth
Align mark with the front of the stud face
·Thin Wall
Align mark with the front of the stud face
·Standard Wall
Install the plaster guard. Push until the plaster guard is snug against the face of the elbow (or tee).
1. Install the water-resistant wallboard.
2. Cut out a 4" (10.2 cm) to 4-1/4" (10.8 cm) square at each of the installation location.
3. Install the finished wall material
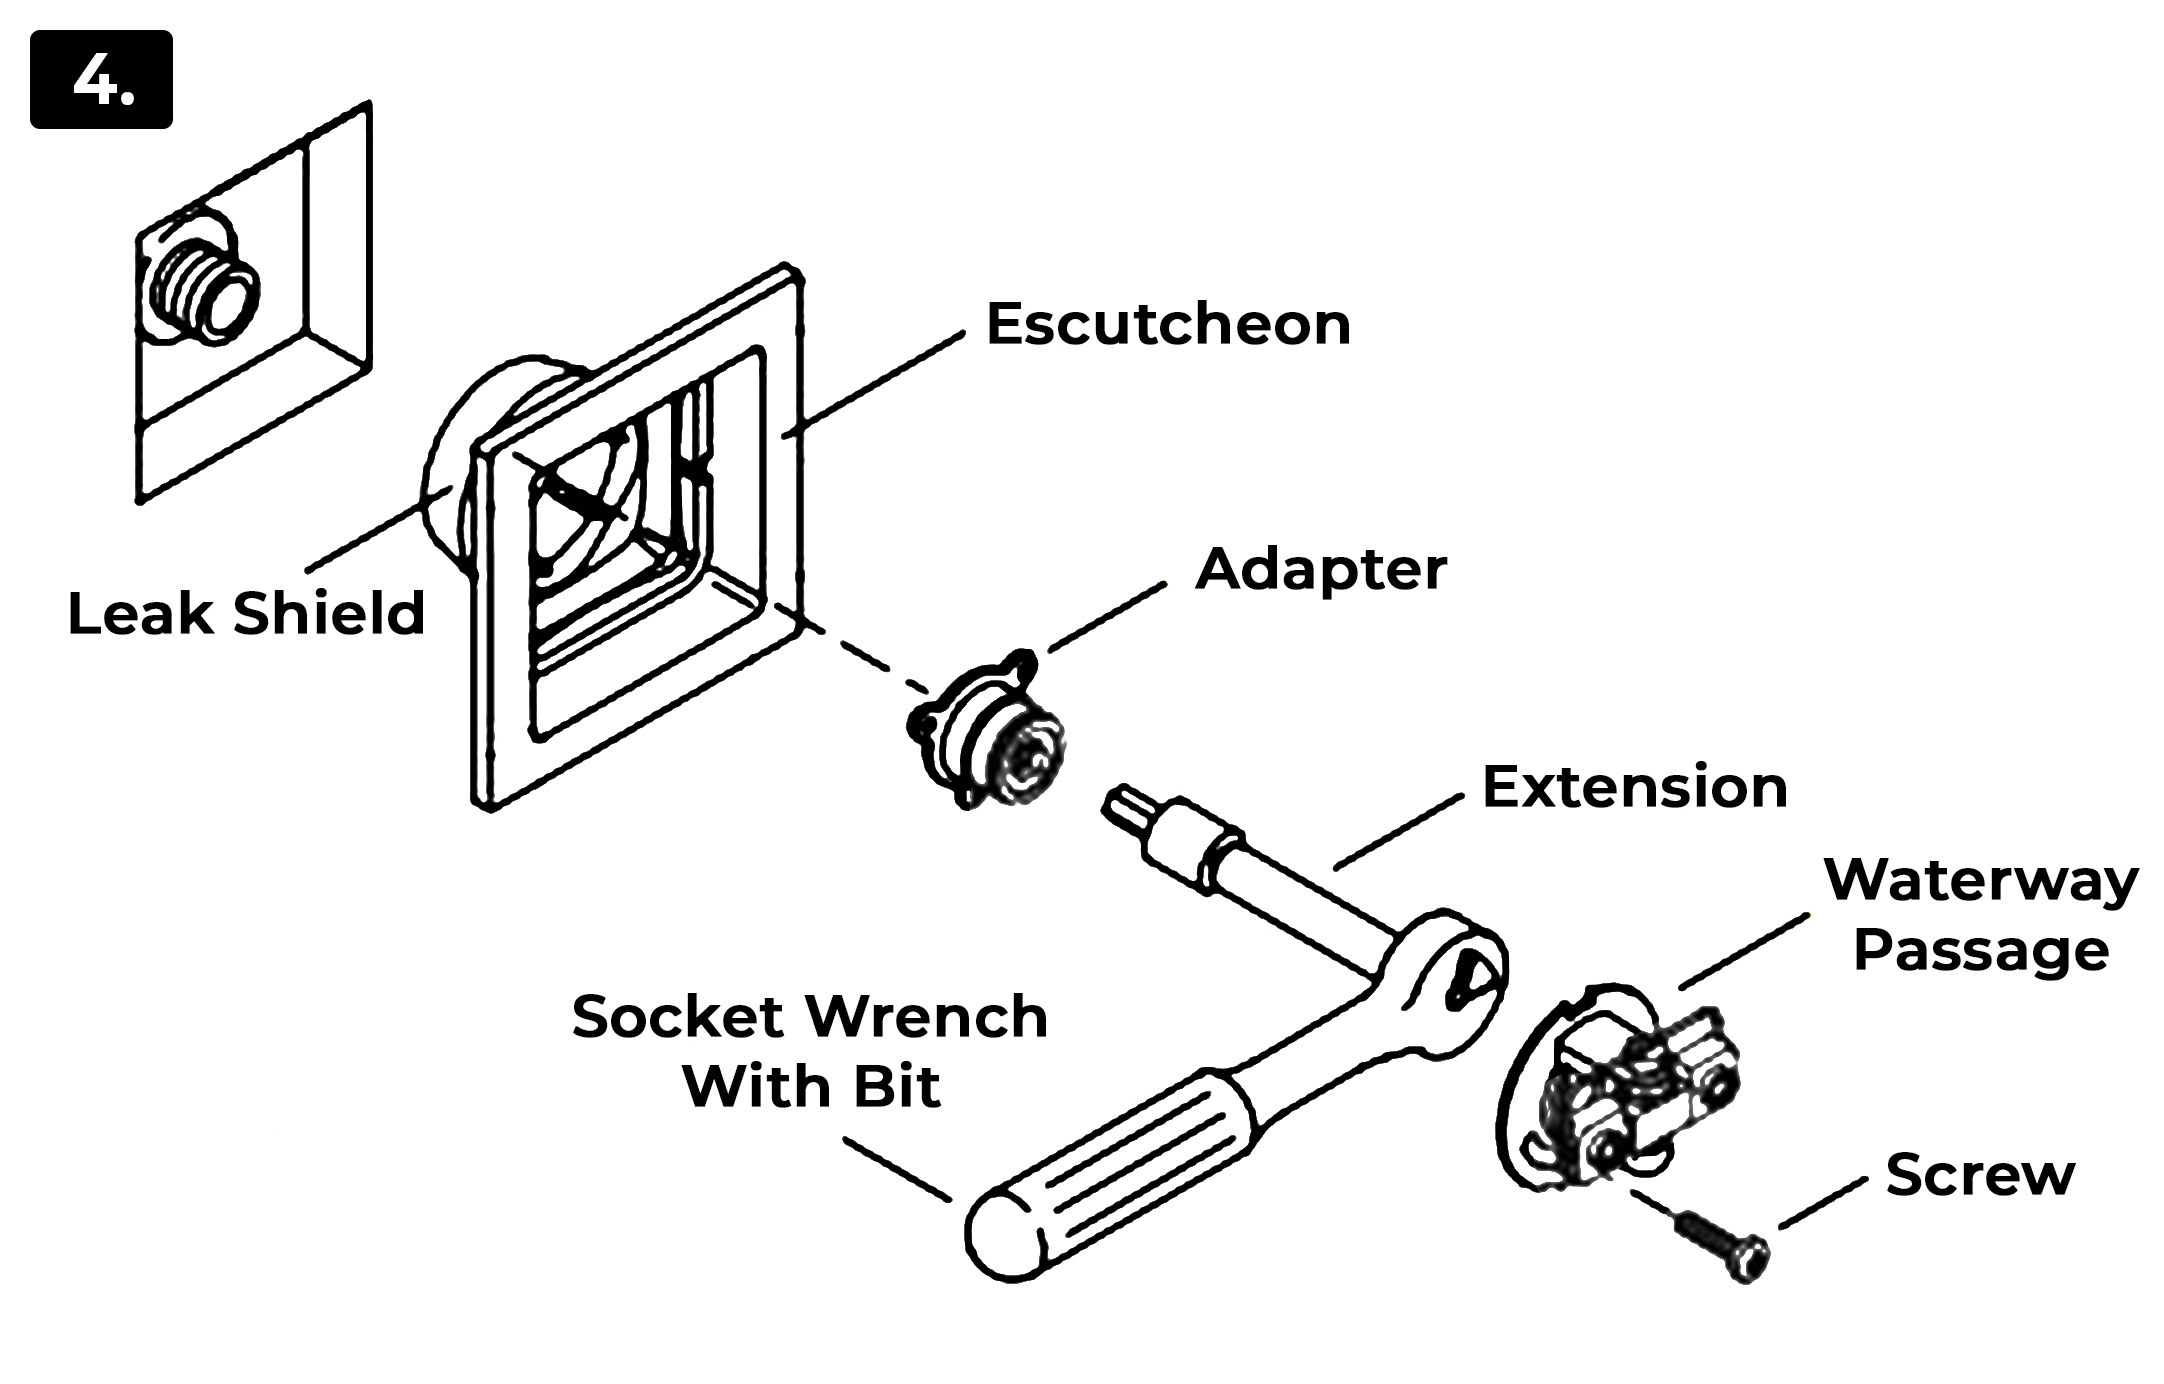
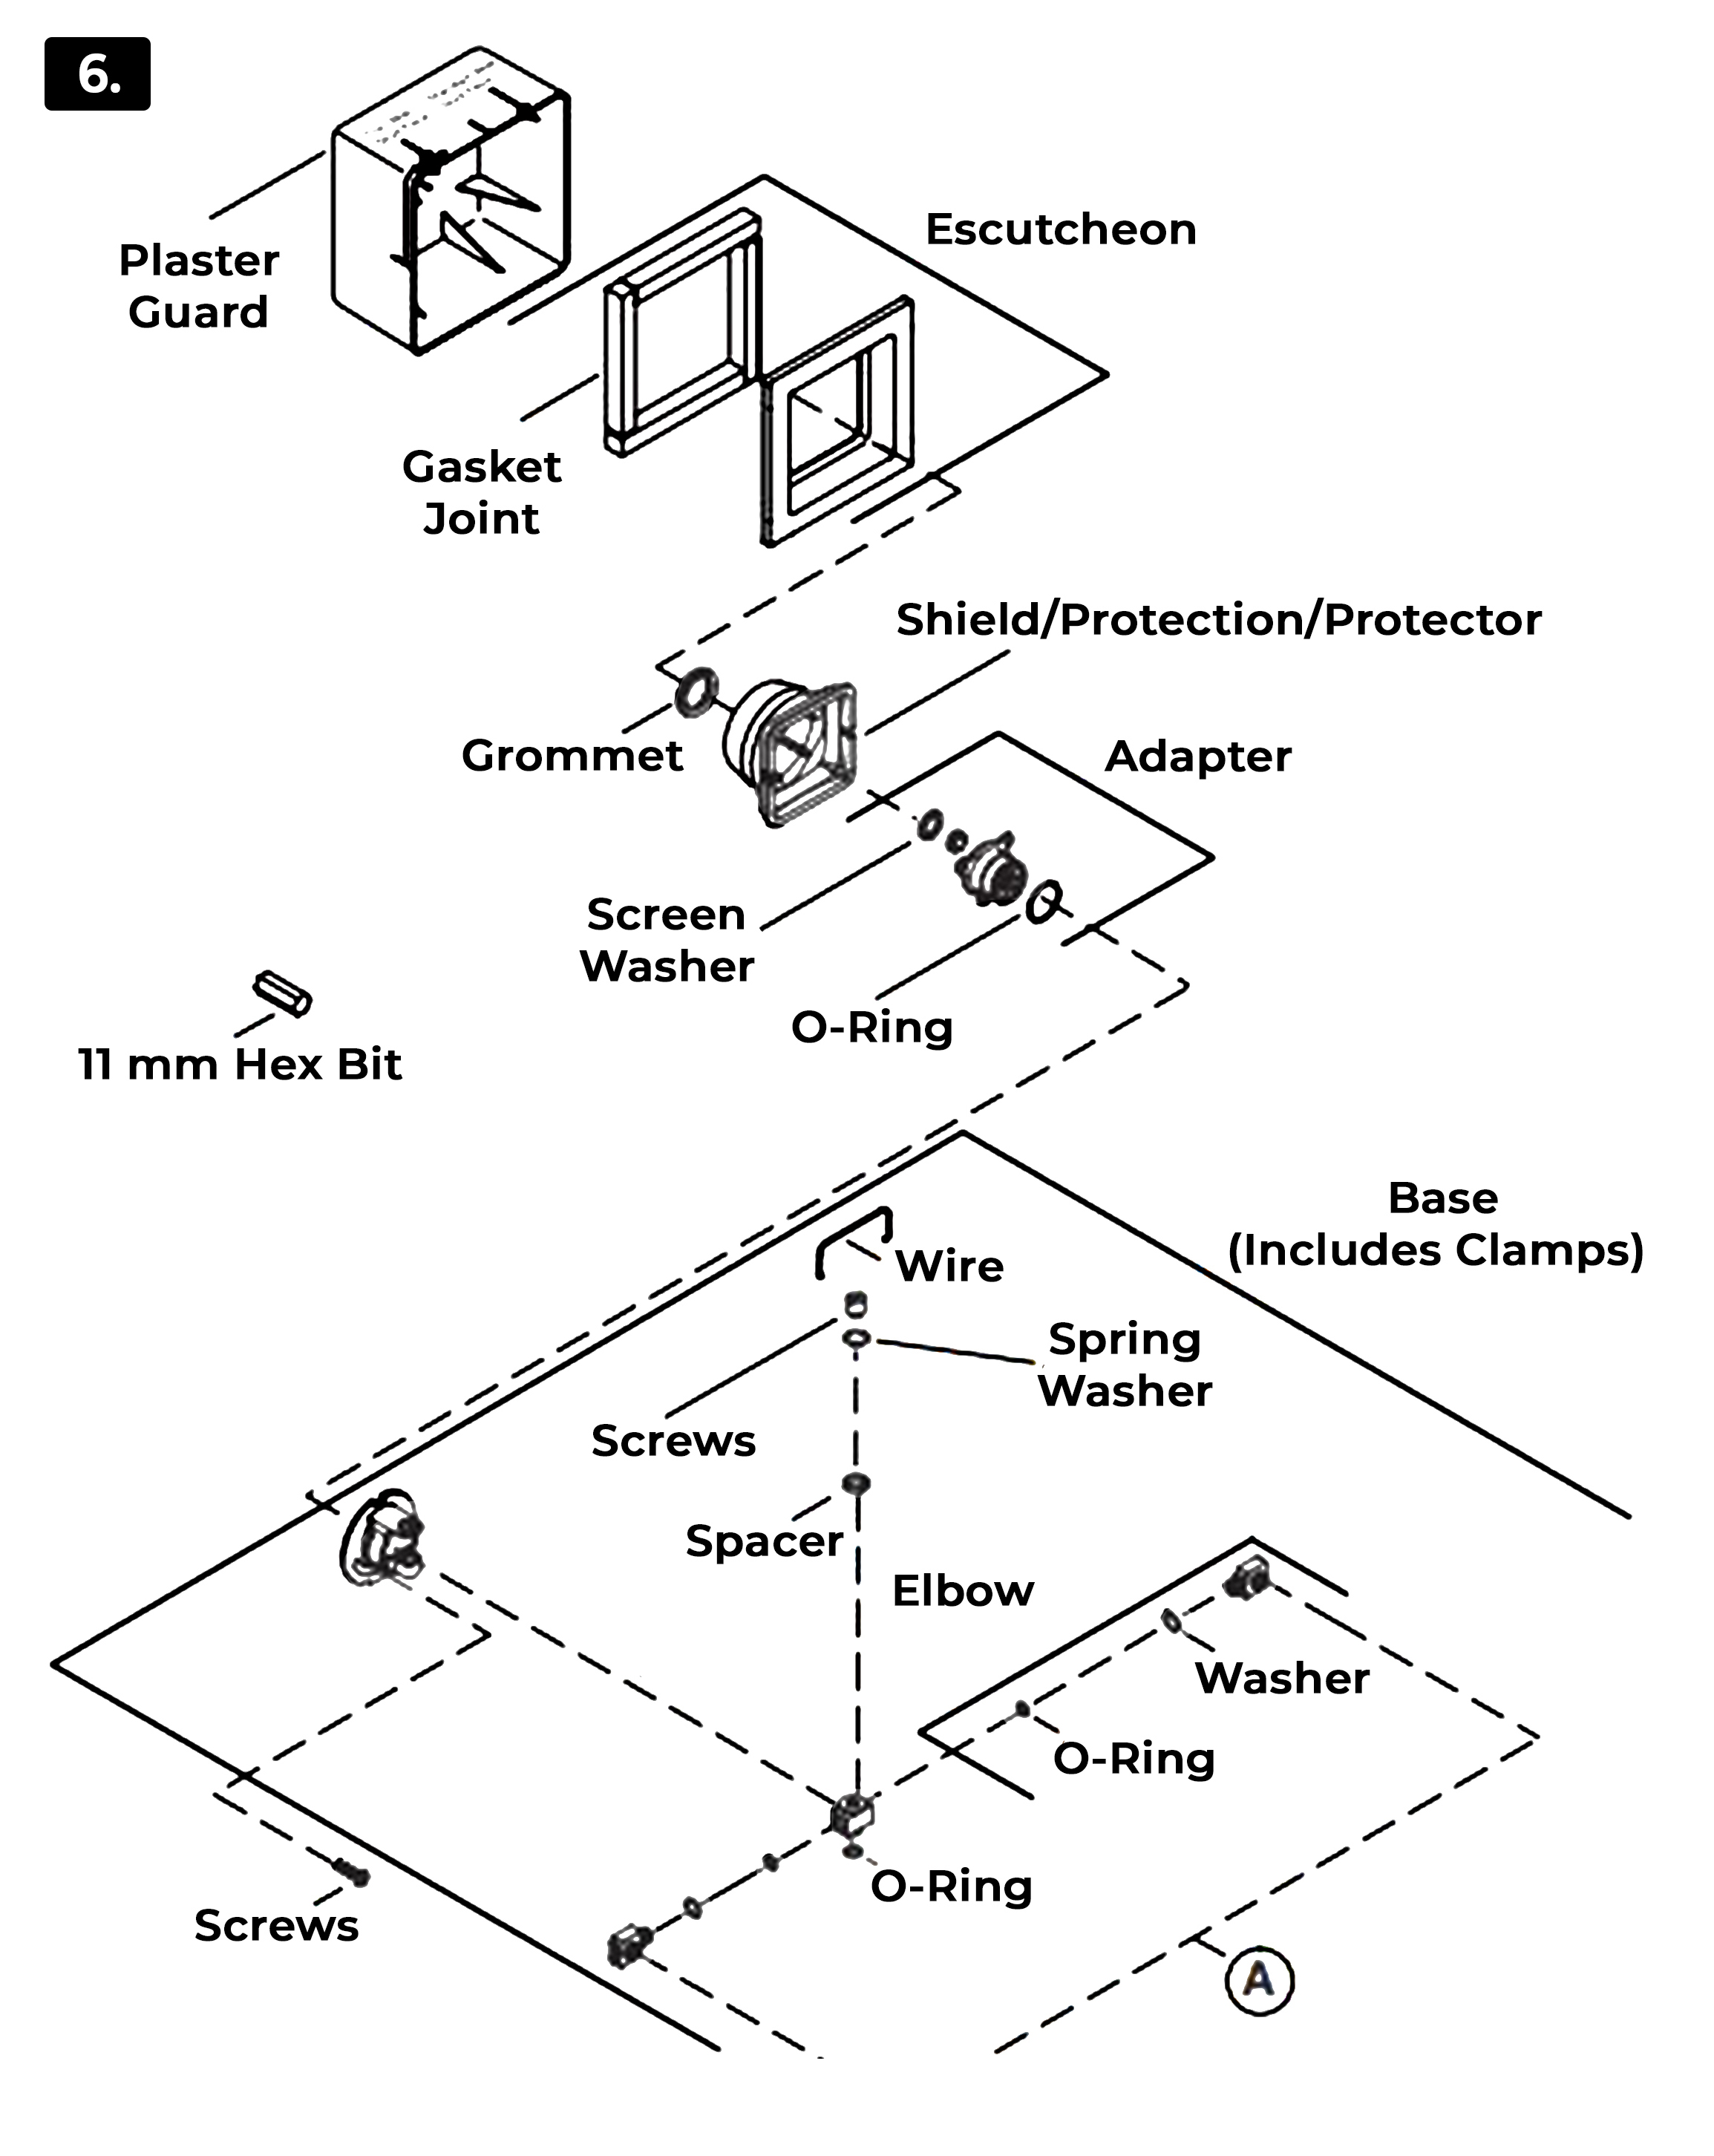
1. Insert the escutcheon into the rough opening. The double ribs of the leak shield should be facing up.
2. If the leak shield makes contact with the elbow: Enlarge the hole in the back of the leak shield to 1-1/4" (3.2 cm).
3. Thread the adapter onto the nipple using the provided 11 mm bit, 11 mm or 7/16" socket, extension and socket wrench. Use masking tape to hold the bit in place, as the bit could fall off and cause damage.
IMPORTANT! The escutcheon should sit loosely at this point. If it is tight against the wall, use a longer pipe nipple.
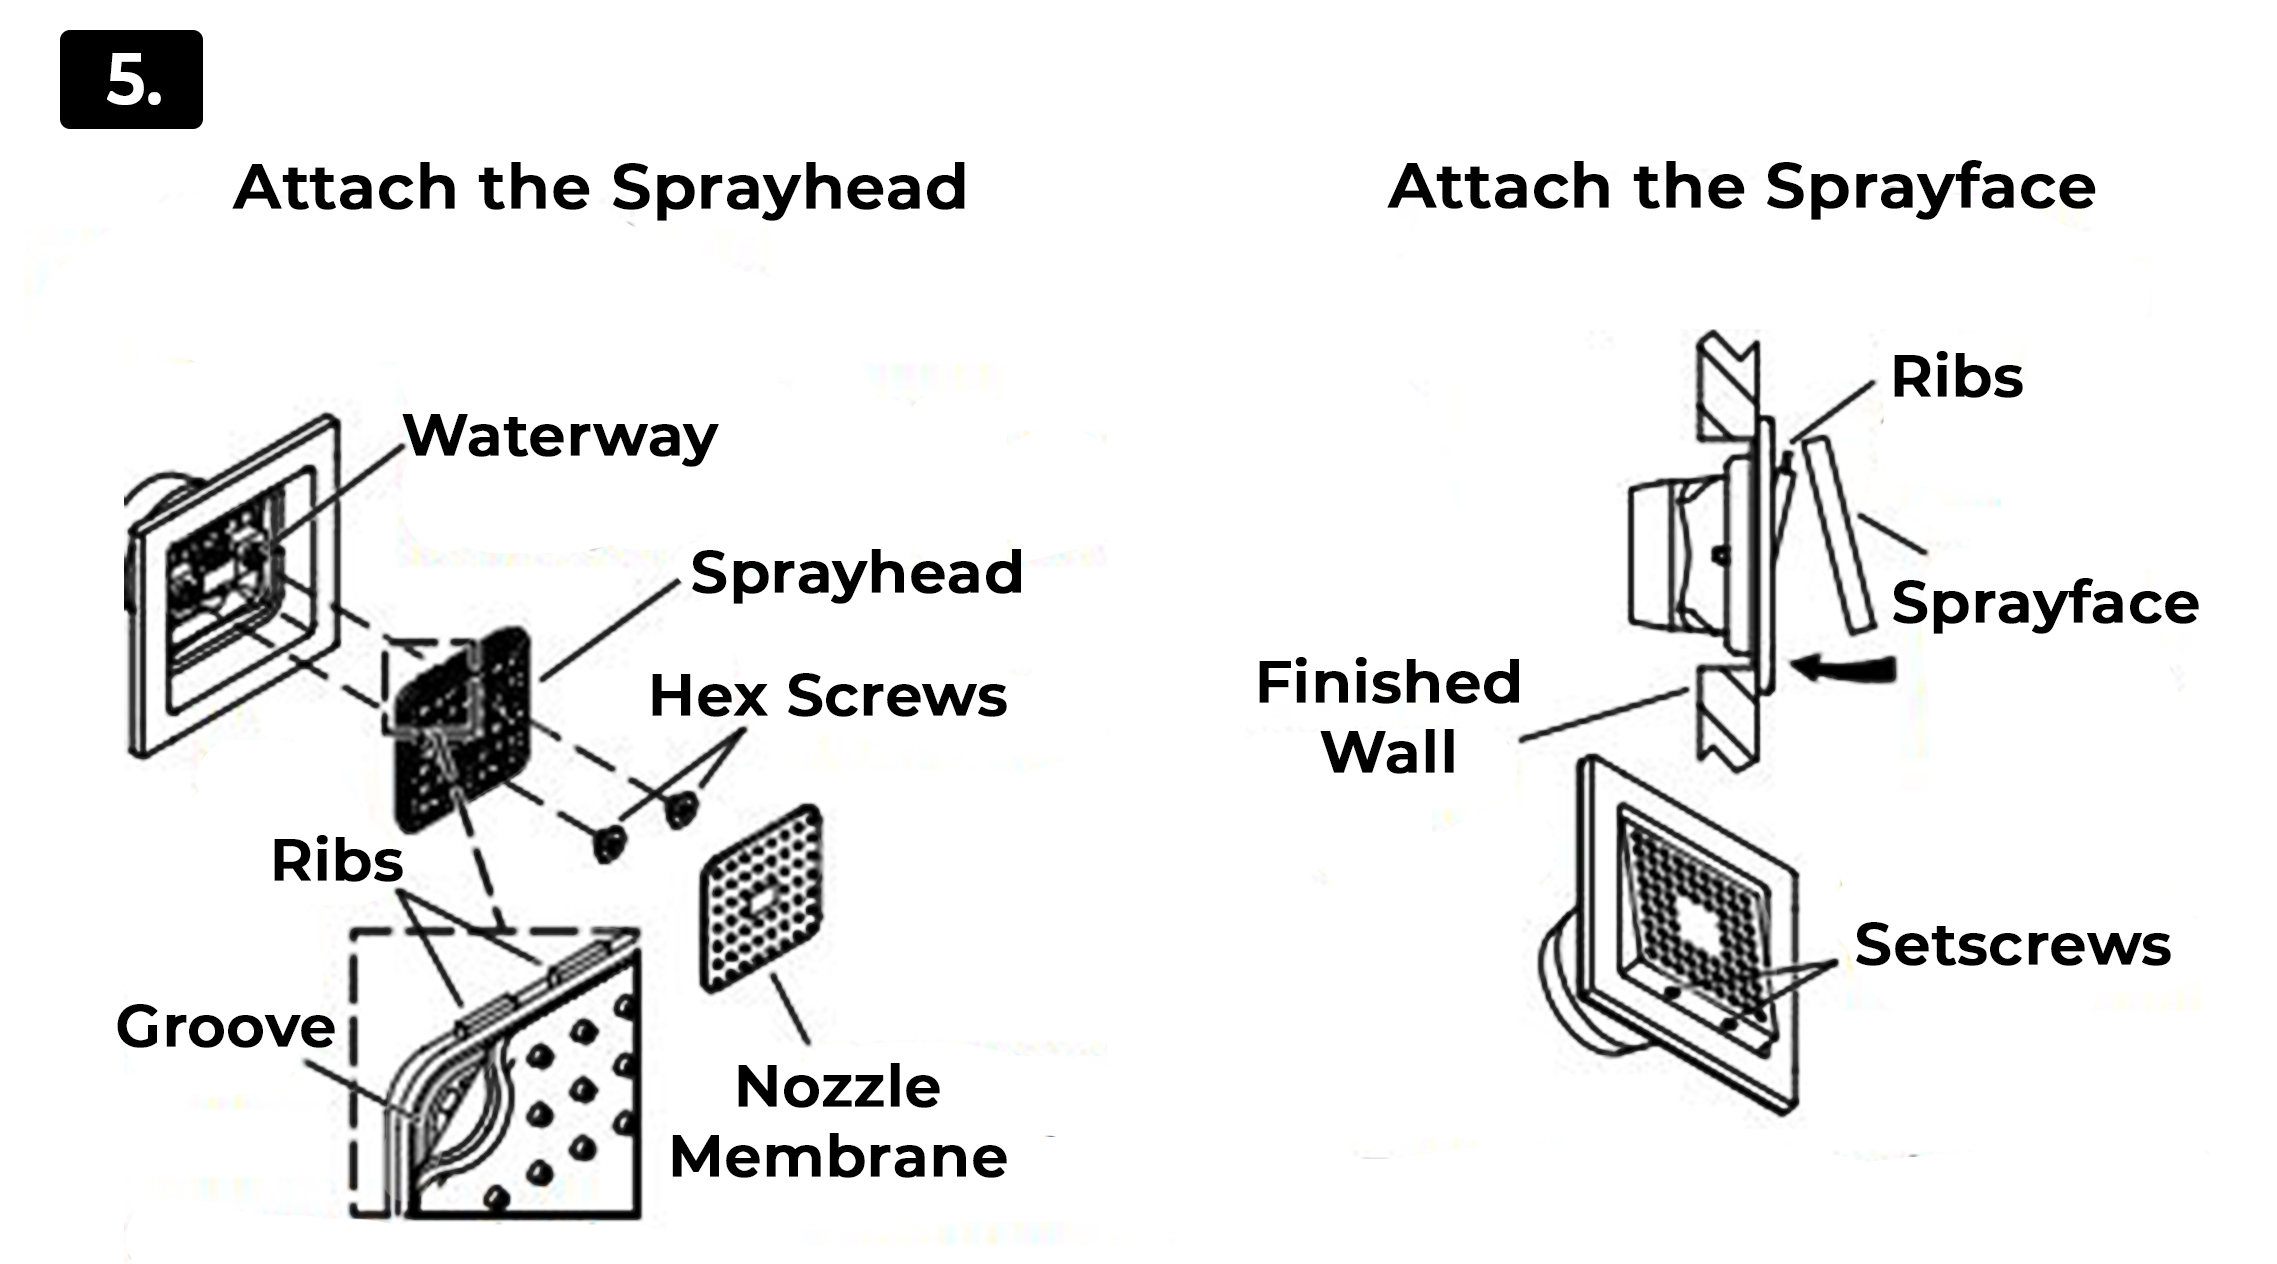
4. Align the groove in the waterway with the double ribs on the leak shield.
5. Press the waterway into place over the adapter. Secure the waterway to the adapter with the screw provided.
6. Verify that the escutcheon does not turn or shift. ·Escutcheon ·Leak Shield ·Adapter ·Extension ·Socket Wrench With Bit ·Screw ·Waterway Passage
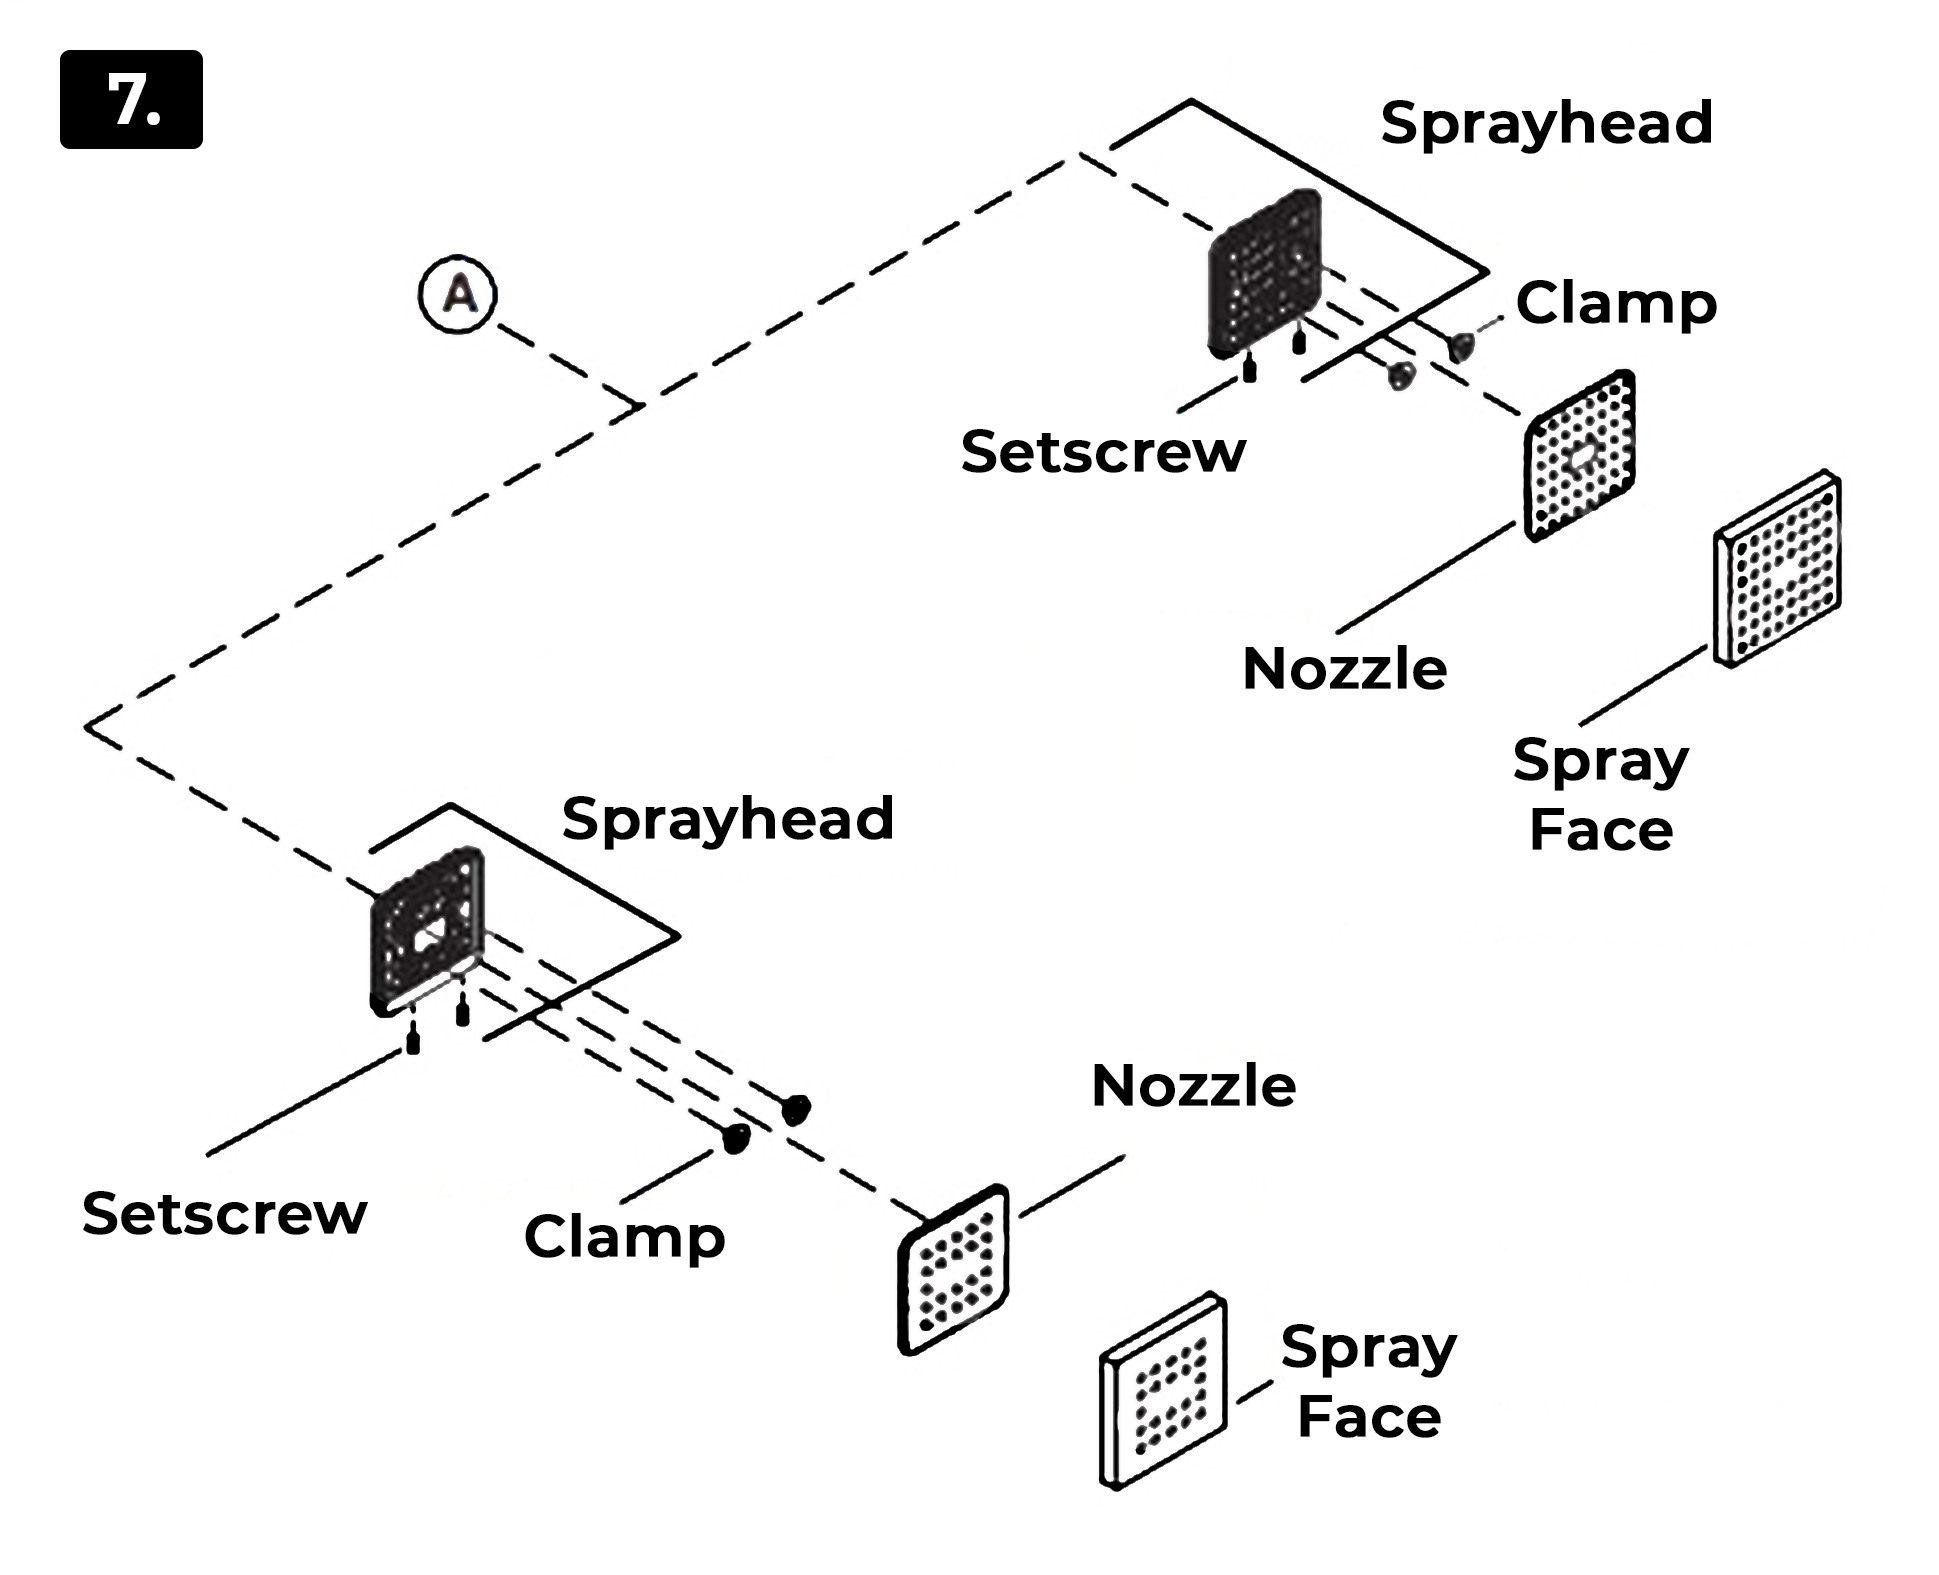
With the ribs of the spray head facing up, install the spray head to the waterway.