


FontanaShowers® | Fabrication and Installation Resource
Fontana DualOrion™ Gold Widespread Basin Faucet: Countertop Hole Layout
This countertop-layout resource helps fabricators and installers transfer the three faucet positions onto a finished vanity deck. It covers basin centerline alignment, equal handle placement, escutcheon coverage, edge clearance, underside conflicts and material-specific preparation before any countertop opening is cut.

Plan the Finished Deck Before Cutting
The three components install independently through the countertop. A successful layout places the high-arc spout on the basin centerline, locates both crystal controls at equal distances from the spout, and preserves enough surrounding material for secure mounting, watertight escutcheon coverage and long-term service access.
- Deck arrangement: Three separate openings
- Left opening: Hot control
- Center opening: Spout
- Right opening: Cold control
- Alignment: One horizontal component axis
- Symmetry: Equal handle spacing around spout
- Reference point: Basin and spout centerline
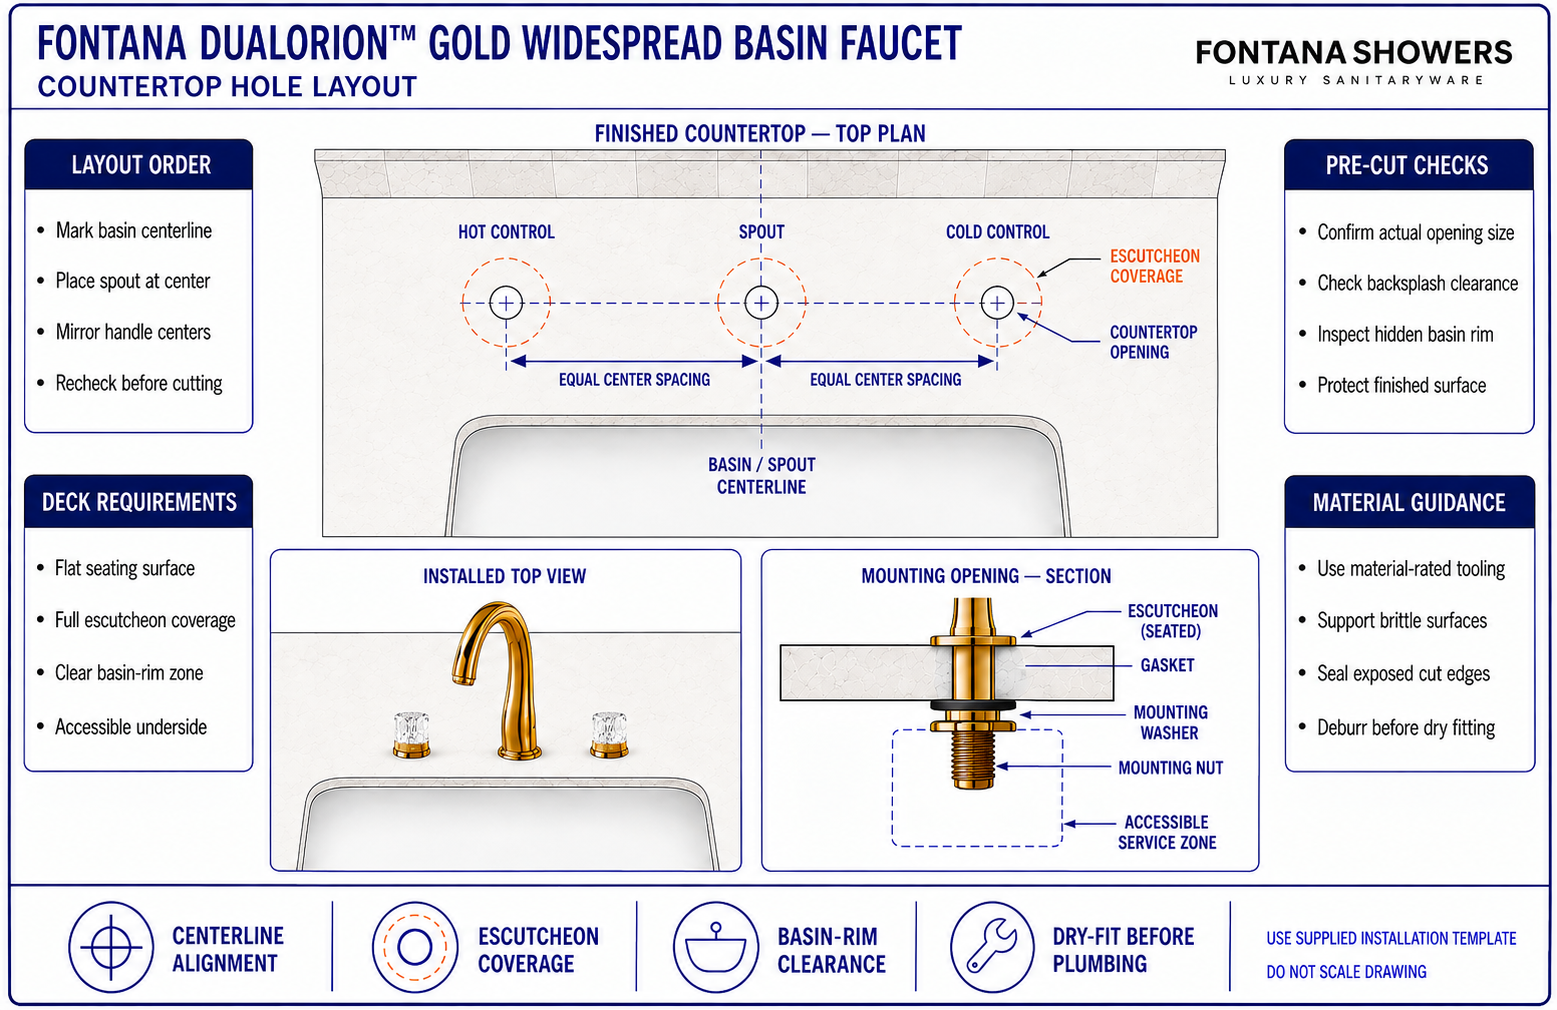
Countertop Opening Plan
The diagram identifies the relationships that must be transferred to the countertop. Confirm each actual opening diameter using the supplied template or physical mounting shank. The escutcheon boundary shown around every opening represents the finished area that conceals and protects the cut edge.
Conceptual layout only. Transfer final opening diameters from the supplied template or actual components before cutting.
| Layout element | Required relationship | Fabrication purpose |
|---|---|---|
| Spout opening | Centered on basin | Directs the outlet toward the basin’s usable washing area. |
| Hot opening | Left of spout | Supports conventional hot-control orientation and balanced presentation. |
| Cold opening | Right of spout | Mirrors the hot-control location across the spout centerline. |
| Handle centers | Equally spaced | Creates consistent visual gaps and predictable below-deck routing. |
| Escutcheon zones | Clear, flat and continuous | Allows full coverage, stable seating and an effective perimeter seal. |
| Underside zones | Free of interference | Preserves room for shanks, valve bodies, fasteners and service tools. |
Countertop Marking and Cutting Sequence
Confirm Fixture Orientation
Identify the user-facing deck edge, backsplash, basin position and intended hot-left/cold-right arrangement.
Mark Basin Centerline
Transfer the basin centerline onto protected countertop tape and extend it across the faucet mounting zone.
Locate Spout Center
Place the spout opening on the centerline where its 5.91-inch reach aligns with the basin interior.
Mirror Handle Centers
Use the supplied template to mark the two controls at equal distances on either side of the spout.
Inspect Underside
Check for basin rims, clips, rails, cabinet walls, drawers and reinforcement beneath every marked location.
Confirm Coverage
Compare each marked opening with its escutcheon and verify sufficient flat sealing surface around the cut.
Cut Appropriate Openings
Use tooling and cooling practices approved for the countertop material; support brittle surfaces during cutting.
Dry-Fit Before Plumbing
Test all three components, inspect alignment and confirm hardware access before permanent sealing and connection.
Countertop Material Considerations
Natural Stone
Use diamond tooling, control heat and vibration, and avoid placing openings near cracks, seams or unsupported edges.
Engineered Quartz
Follow the surface manufacturer’s fabrication guidance and maintain adequate material around every cutout.
Solid Surface
Use clean, supported cuts; finish opening edges smoothly and follow material-specific reinforcement guidance.
Wood or Laminate
Seal exposed core material against moisture and prevent fasteners from crushing or distorting the deck.
Critical Layout Checks
Basin-Rim Clearance
Ensure the hidden basin flange or mounting clips do not overlap any faucet opening or fastening zone.
Backsplash Space
Leave room for the spout base, crystal handles, cleaning access and the faucet’s 9.06-inch overall height.
Flat Seating Surface
Avoid placing escutcheons across bevels, seams, grooves or uneven transitions that could prevent proper sealing.
Handle Symmetry
Compare edge-to-edge gaps on both sides of the spout before drilling to preserve a balanced installed appearance.
Service Tool Access
Allow enough underside clearance to tighten mounting hardware and service valves after the basin is installed.
Surface Protection
Use clean masking, non-staining pads and suitable protective coverings throughout layout and installation.
Pre-Cut Verification Checklist
- The spout mark is centered with the basin and intended water-delivery point.
- Hot and cold marks are on the correct sides and share one horizontal axis.
- Both handle centers are equally spaced from the central spout.
- Each escutcheon has a flat, uninterrupted seating and sealing surface.
- The basin rim, mounting clips and cabinet structure clear all three openings.
- Mounting fasteners and plumbing connections will remain reachable below deck.
- The cutting method is appropriate for the countertop material.
- All marks have been independently rechecked before drilling.
Related Product and Planning Resources
Project verification: This countertop-layout page supports design coordination but does not replace the supplied installation template, current manufacturer instructions or an approved project submittal. The fabricator and licensed installer must verify final opening diameters, center locations, substrate suitability and underside clearances before cutting.









