Fontana Touchless Faucets™ | Architectural and Engineering Resource
Fontana Lymora FS9099BGR Black Granite Automatic Motion Sensor Faucet:
Mounting Hardware Detail
This mounting-hardware resource is intended to support countertop fabricators,
plumbing contractors, installers, architects and facility personnel coordinating
the Fontana Lymora FS9099BGR Black Granite automatic motion-sensor faucet.
The drawing package communicates the faucet base, deck gasket, countertop
penetration, threaded shank, mounting washer, retaining nut, hose / cable
pass-through and typical installation sequence required for a secure,
serviceable deck-mounted installation.
Fontana Lymora FS9099BGR Single-Hole Deck-Mount Assembly
The FS9099BGR uses a single-hole countertop installation with a deck gasket,
threaded mounting shank, mounting washer and retaining nut. The hot and cold
supply hoses together with the sensor / control lead pass below the deck through
the mounting area while the faucet base remains centered over the countertop opening.
- Model: FS9099BGR
- Installation type: Deck mount
- Mounting: Single hole
- Finish: Black Granite
- Body material: Brass
- Connection: 1/2-inch hose connection
- Typical countertop opening: Ø35 mm (1.38 in.)
- Spout reach: 110 mm (4.33 in.)
- Overall faucet height: 175 mm (6.89 in.)
- Primary hardware: Deck gasket, threaded shank, washer and retaining nut
- Pass-through: Hot hose, cold hose and sensor / control lead
Required Mounting Hardware Drawing Package
Each mounting drawing should use a consistent countertop datum, faucet centerline
and component-identification scheme. The package should clearly identify the deck
opening, gasket, faucet base, threaded shank, mounting washer, retaining nut,
hose routing, control-lead routing and installation sequence before drilling or
final tightening.
Mounting Hardware Detail
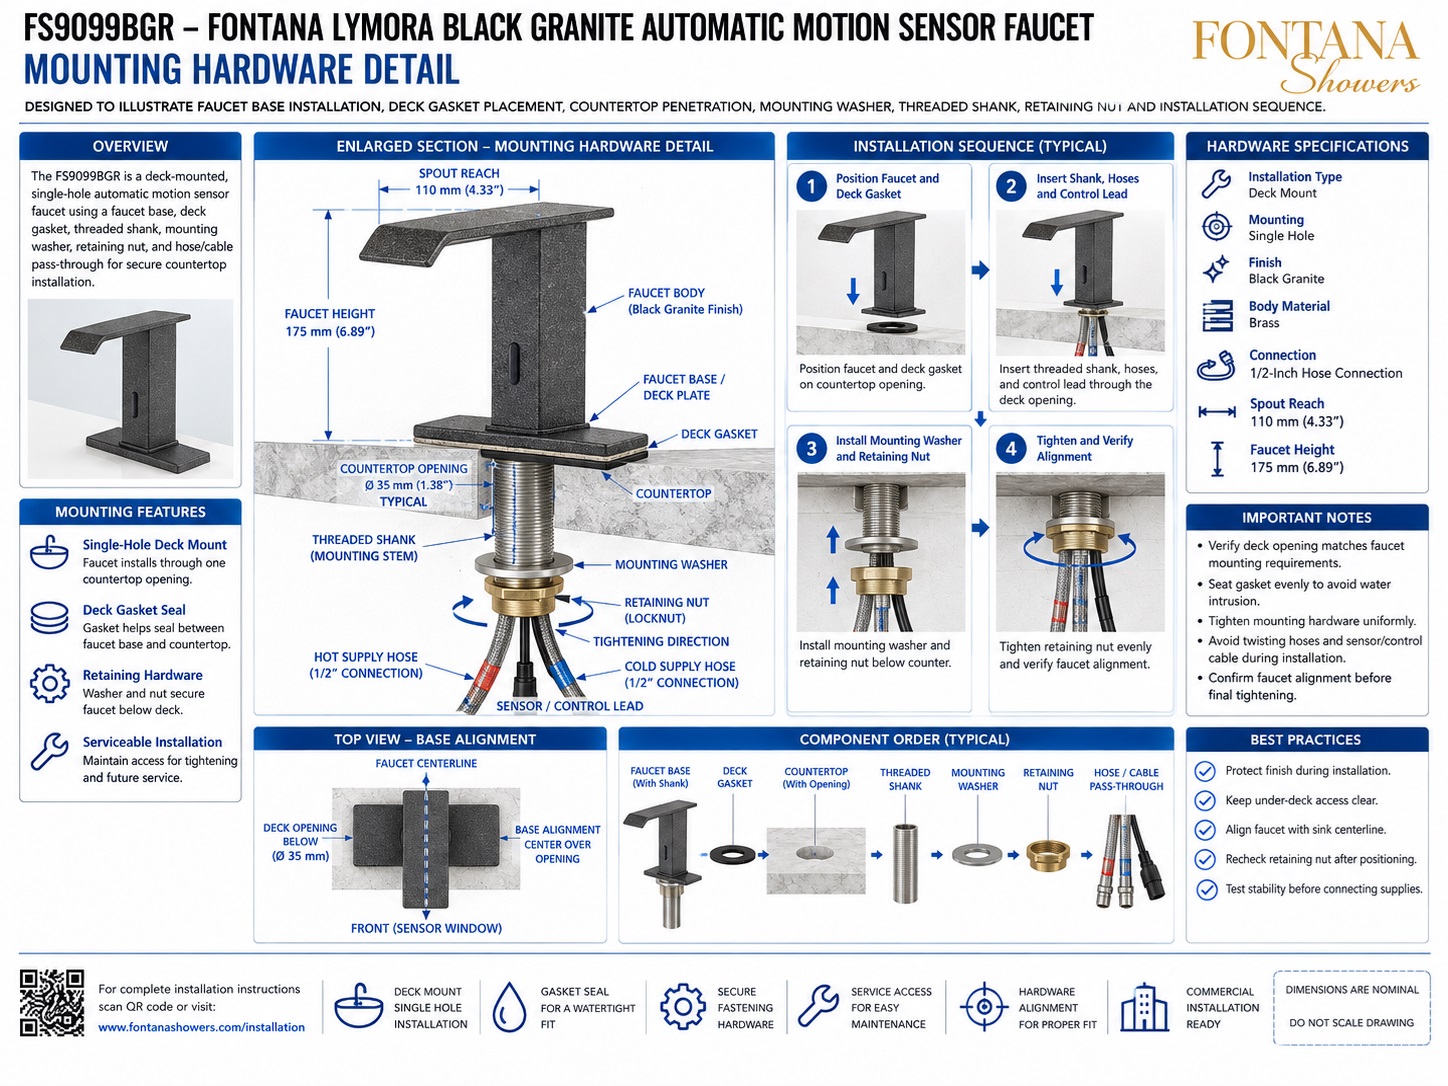
Shows the complete deck-mount assembly including the faucet base, deck gasket, countertop opening, threaded shank, mounting washer, retaining nut and hose / cable pass-through.
Enlarged Section — Mounting Hardware
Illustrates how the faucet base sits above the finished countertop while the threaded shank passes through the deck and is secured from below using the washer and retaining nut.
Single-Hole Countertop Opening
Identifies a typical countertop penetration of approximately Ø35 mm (1.38 in.) centered beneath the faucet body. Final opening size should be verified before drilling.
Deck Gasket
Shows the gasket positioned between the faucet base and finished countertop to help create a sealed interface and support even seating of the faucet.
Threaded Shank
Defines the mounting stem passing through the countertop opening. The shank should remain centered so the faucet does not shift during final tightening.
Mounting Washer
Positions the washer against the underside of the countertop to distribute clamping force and stabilize the faucet body.
Retaining Nut
Shows the locknut threaded onto the shank below the washer. Tighten evenly to secure the faucet without over-compressing the gasket or damaging the countertop.
Installation Sequence
Illustrates the typical four-step process: position faucet and gasket, insert shank / hoses / control lead, install washer and retaining nut, then tighten while verifying alignment.
Top View — Base Alignment
Shows the faucet centered over the deck opening with the front sensor window facing the user side. Align the faucet centerline with the basin centerline before final tightening.
Engineering note:
All mounting dimensions and component relationships shown are nominal coordination
references. Final countertop opening size, deck thickness, gasket configuration,
threaded-shank engagement, mounting-hardware sequence, hose routing and tightening
requirements should be verified against the approved Fontana Lymora FS9099BGR
installation documentation before drilling or final installation.
Installation and Service Coordination Considerations
Countertop Opening
Verify the mounting-hole diameter and centerline before drilling, particularly for stone, quartz, porcelain or other brittle countertop materials.
Gasket Seating
Keep the deck gasket centered and flat beneath the faucet base so it seals evenly and does not bunch during tightening.
Hardware Tightening
Tighten the retaining nut uniformly and avoid over-torquing, which can distort the deck, shift the faucet or damage the mounting assembly.
Faucet Alignment
Align the faucet with the basin centerline and confirm the front sensor window faces the correct direction before final tightening.
Hose & Cable Routing
Route hot and cold hoses and the control lead without twisting, pinching or sharp bends, and maintain enough slack for future service.
Service Access
Keep the under-deck mounting hardware accessible so the faucet can be tightened, removed or serviced without dismantling surrounding cabinetry.
FontanaShowers Installation and Specification Resources
Professional Engineering and Accessibility References
Project verification:
Mounting-hardware drawings are coordination tools and do not replace approved
product documentation. The architect, plumbing engineer, countertop fabricator,
contractor and licensed installer should verify deck opening size, countertop
thickness, gasket placement, threaded-shank engagement, washer and nut sequence,
faucet alignment, hose / cable routing, service access and locally adopted
plumbing requirements before drilling or final installation.
|
|
|