


FontanaShowers® | Architectural and Installation Resource
Fontana DualOrion™ Gold Widespread Basin Faucet: Maximum Deck Thickness Detail
This deck-coordination resource helps designers, fabricators and installers evaluate the complete countertop build-up beneath the spout and crystal handles. It addresses finished surface layers, structural backing, threaded shank engagement, gaskets, washers, retaining nuts and service access so all three components can be mounted securely without inventing an unsupported thickness value.

Deck Thickness Is a Complete Assembly
The relevant thickness is not limited to the visible countertop surface. It includes every layer captured between the exposed fixture bases and the underside mounting hardware. The spout and both valve assemblies must retain sufficient threaded engagement after the gaskets, washers, reinforcement and securing nuts are installed.
- Finished layer: Stone, quartz, solid surface or laminate
- Backing layer: Plywood, cement board or bonded substrate
- Reinforcement: Support plate within the clamping path
- Top seating: Flat surface beneath all three trim bases
- Thread zone: Usable shank remaining below the deck
- Hardware zone: Gasket, washer and retaining-nut depth
- Service zone: Tool, hose and connection access
Deck Build-Up and Mounting Engagement
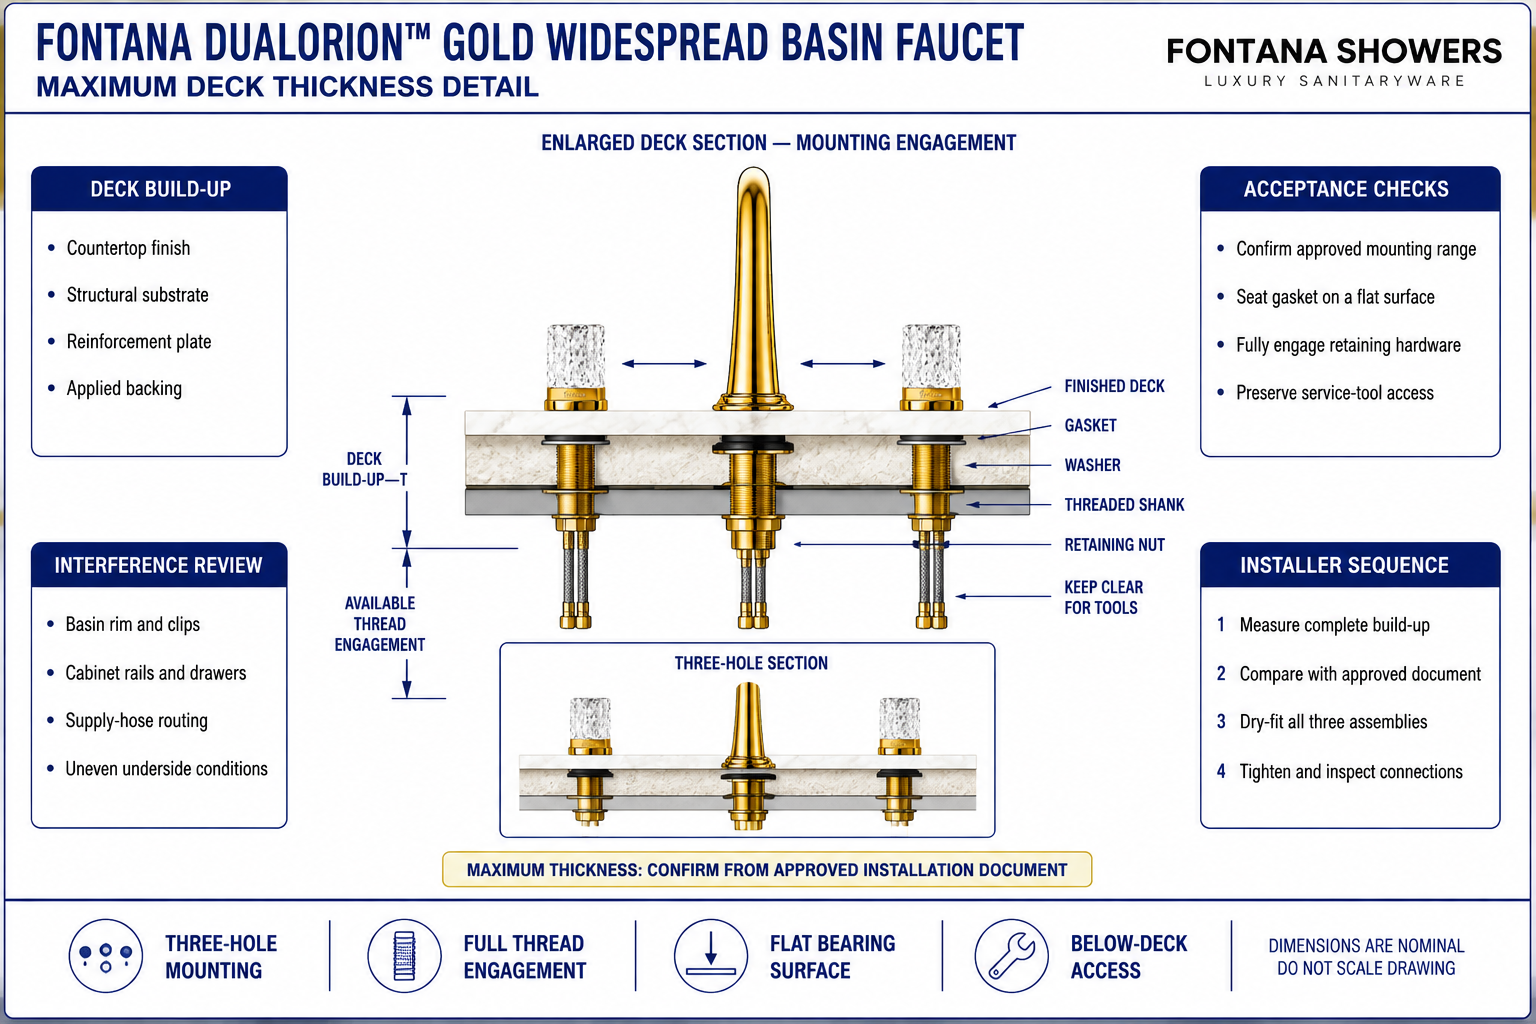
The enlarged section identifies every layer included in the finished deck assembly and shows how countertop depth affects the mounting shanks beneath the three components. Because a manufacturer- approved maximum has not been supplied, the diagram uses the variable T and illustrates engagement relationships rather than publishing an estimated numerical limit.
Conceptual deck section. Confirm the allowable mounting range from approved product documentation and dry-fit all supplied components before drilling.
| Coordination item | Required review | What it controls | Verification |
|---|---|---|---|
| Complete deck build-up | Measure every layer at all three mounting points | Available shank and hardware engagement | Field measurement |
| Top seating surface | Confirm flat support beneath each trim base | Alignment, sealing and finish protection | Straightedge inspection |
| Underside bearing area | Keep washers and retaining nuts unobstructed | Even loading and secure fastening | Below-deck inspection |
| Thread engagement | Dry-fit gaskets, washers and retaining nuts | Mechanical retention of all components | Approved document and dry fit |
| Service zone | Review tool room, hoses and cabinet conflicts | Installation and future maintenance | Installer access check |
Deck-Thickness Verification Process
Measure the Finished Surface
Record the countertop thickness at the spout and both handle centerlines rather than at a remote edge.
Include Every Backing Layer
Add bonded substrates, plywood, cement board and other continuous layers within the mounting path.
Count Local Reinforcement
Include support plates or pads positioned between the underside of the counter and mounting hardware.
Inspect the Underside
Check for basin flanges, clips, rails, seams and ribs that could prevent full washer and nut seating.
Compare Approved Documents
Compare the complete measured build-up with the allowable mounting range in the approved instructions.
Dry-Fit All Components
Install the spout and both valve bodies temporarily with their specified gaskets, washers and nuts.
Confirm Thread Engagement
Verify that each retaining nut engages fully while leaving sufficient room for tightening and inspection.
Approve the Deck Build-Up
Release the countertop for drilling only after the complete three-piece assembly has been accepted.
Deck-Thickness Planning Considerations
Complete Build-Up
Measure the decorative surface, substrate, reinforcement and applied backing as one finished assembly.
Usable Shank Length
Preserve enough exposed threaded shank below the deck for every specified mounting component.
Flat Top Seating
Each exposed base must rest completely on a level surface without crossing seams or bevels.
Flat Underside Bearing
Washers and retaining nuts must bear evenly without bridging ribs, edges or irregular backing.
Basin and Cabinet Conflicts
Keep the hidden basin rim, clips, drawers and rails away from all mounting and service zones.
Connection Access
Provide room to tighten hardware, route hoses and service the faucet without removing the countertop.
Maximum Deck Thickness Checklist
- The complete deck build-up has been measured at all three mounting positions.
- Every visible base rests fully on a flat, uninterrupted countertop surface.
- All specified gaskets, washers and retaining nuts fit in their correct order.
- Each threaded shank retains sufficient engagement after the hardware is installed.
- The hidden basin rim and mounting clips do not obstruct the securing hardware.
- Mounting nuts, valve bodies and supply connections remain accessible below the deck.
- Flexible hoses follow smooth routes without tension, pinching or sharp bends.
- The complete three-piece fixture has been dry-fitted before final countertop drilling.
Related Product and Planning Resources
Project verification: This page identifies deck-thickness relationships but does not establish a manufacturer-approved numerical maximum. The designer, fabricator and licensed installer must verify the supplied fixture, complete countertop build-up, mounting engagement, basin conditions and service access before drilling or final installation.









