Fontana Loiret Faucets™| Architectural and Engineering Resource
Fontana Commercial Brushed Gold Touchless Automatic Sensor Faucet:
Single-Hole Deck Mount
This installation resource supports architects, plumbing engineers,
interior designers, contractors and facility managers coordinating
the FS1099 with a single countertop penetration. The mounting detail
should establish the deck opening, base sealing interface, threaded
mounting tube and under-deck fastening assembly. Coordinate the flexible
water pipe and sensor cable through the same opening while preserving
access to the mounting hardware and control equipment.
Fontana FS1099 Brushed Gold Single-Hole Deck-Mounted Faucet
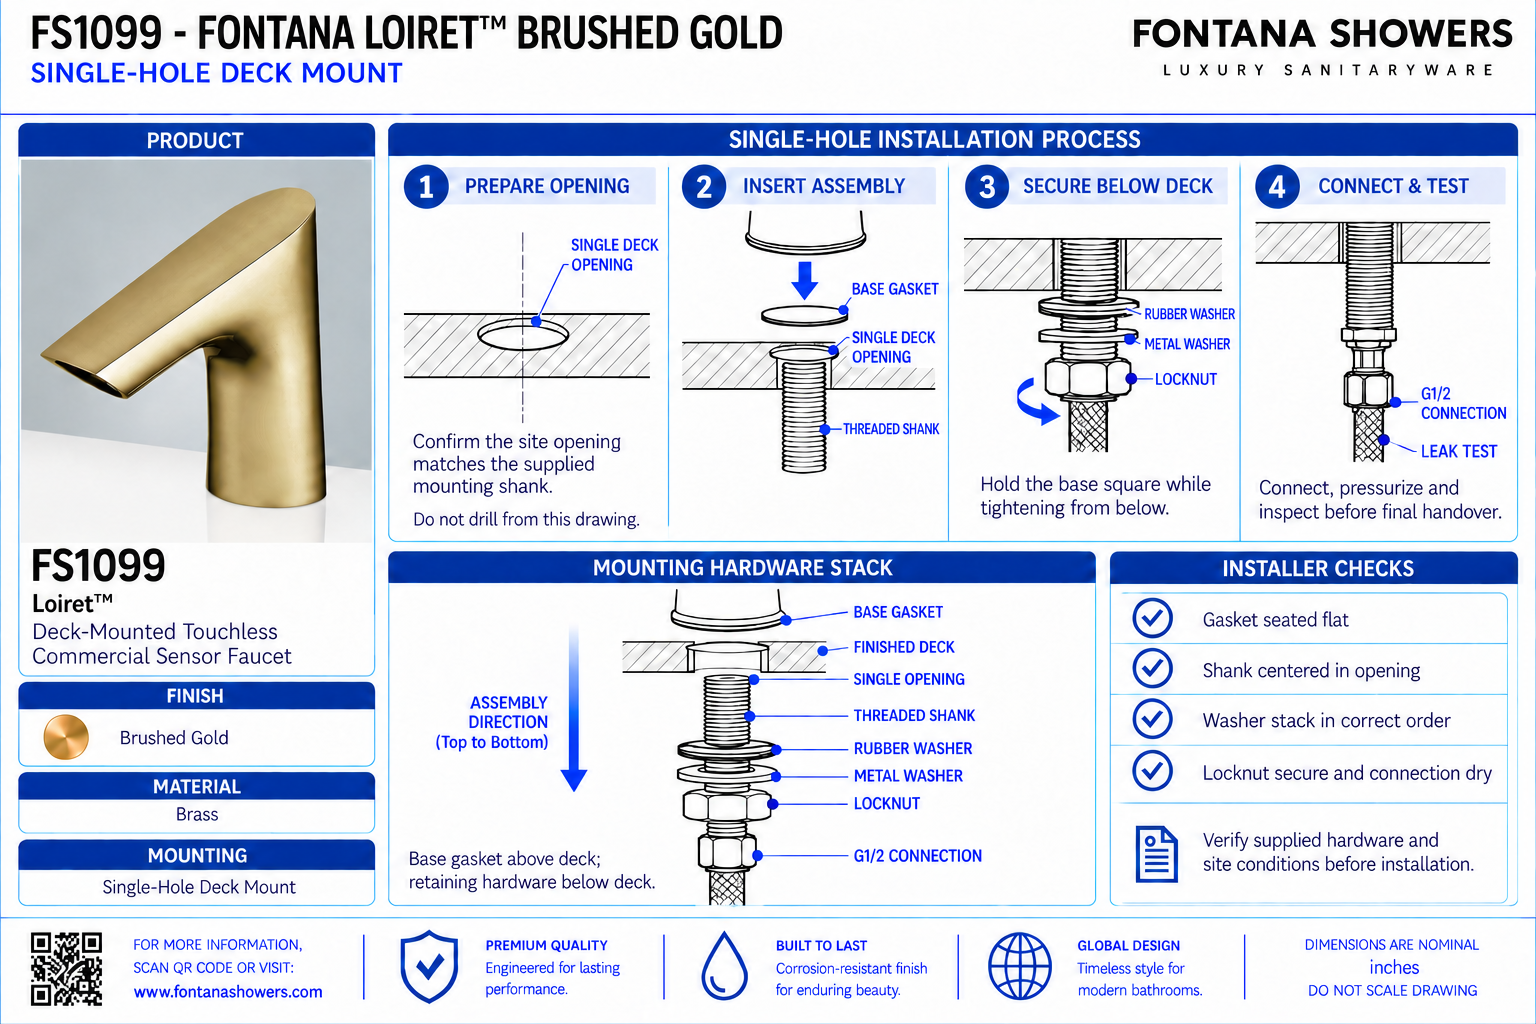
The faucet seats on the finished deck with an O-ring at the base.
Beneath the countertop, the rubber washer, metal washer and mounting
nut secure the threaded tube. Position the body toward the intended
washing area before tightening the fastening assembly.
- Model: FS1099
- Finish: Brushed Gold
- Installation: Single-hole deck mount
- Overall height: 6 inches / 152.4 mm
- Base dimension shown: 1.5 inches / 38.1 mm
- Upper-body dimension shown: 0.5 inch / 12.7 mm
- Mounting-hole diameter: 1.26–1.38 inches / 32–35 mm
- Maximum countertop thickness without deck plate: 1.38 inches / 35 mm
- Base seal: O-ring seated in the faucet’s bottom groove
- Under-deck fastening: Rubber washer, metal washer, mounting nut and locking screws
- Through-deck routing: Flexible water pipe, threaded mounting tube and sensor cable
- Inlet / outlet connection: G1/2 inch
Required Single-Hole Deck Mount Drawing Package
Organize the mounting drawing around one sectional assembly and
a clear installation sequence. Identify the finished deck surface,
penetration centerline, base seal and underside fastening components.
Show the hose and sensor cable passing through the opening without
becoming trapped between the sealing or clamping surfaces.
Mounting Centerline
Locate the single penetration within the basin manufacturer’s
permitted mounting area. Reference the opening to the bowl and
countertop edges, and check the underside for conflicts with
basin returns, supports and cabinetry.
Deck Opening
Dimension the opening using the installation guide’s stated
range. Coordinate drilling with the countertop material,
reinforcement and fabricator’s edge-distance requirements.
Inspect the opening before feeding the mounting assembly through it.
Base Seal Placement
Show the O-ring seated in the bottom groove of the faucet body
above the finished deck. Keep the contact surface clean and
confirm that the seal remains correctly positioned as the body
is lowered into place.
Through-Deck Insertion
Illustrate the flexible water pipe, threaded mounting tube
and sensor cable passing through the single opening.
Guide the components beneath the deck without twisting the hose
or pinching the cable at the penetration.
Under-Deck Washer Assembly
Show the rubber washer against the underside of the deck,
followed by the metal washer and mounting nut on the threaded
tube. Keep the cable and water pipe clear of the clamping
surfaces.
Body Alignment and Fastening
Orient the outlet toward the intended basin washing area before
final tightening. Secure the mounting nut and locking screws
according to the installation instructions, then verify that
the base is seated evenly and the body does not move.
Control Equipment Connections
Locate the control equipment where the faucet hose and sensor
cable can connect without strain. Identify the incoming supply
and faucet outlet connections separately and maintain access
for isolation, inspection and servicing.
Mounting Verification
Inspect the base seal, body orientation, fastening assembly and
routed components before commissioning. Check connections for
leaks and confirm that normal operation does not cause body
movement, cable tension or hose interference.
Engineering note:
Product-body dimensions follow the FS1099 specification drawing;
mounting-hole and countertop-thickness limits follow the separate
FS1099 installation guide. Millimeter equivalents for the body
dimensions are calculated conversions. The illustrated base
dimension is not the drilling diameter. Confirm the supplied
hardware and applicable document revision before countertop
fabrication. No fastening torque is specified in this resource.
Single-Hole Deck Mount Installation Sequence
1. Prepare the Deck
Confirm the penetration location and available mounting thickness.
Inspect the finished surface and underside bearing area for
obstructions or irregularities that could prevent secure seating.
2. Prepare the Faucet
Connect the hose to the faucet as instructed and seat the O-ring
in the bottom groove. Arrange the hose, mounting tube and sensor
cable for insertion through the countertop opening.
3. Insert the Assembly
Feed the components through the single deck penetration and
lower the faucet onto the finished surface. Keep the seal in
position and support the body while assembling the underside
hardware.
4. Align and Secure
Install the rubber washer, metal washer and mounting nut.
Align the body with the basin, then secure the fastening
assembly while keeping the hose and cable outside the clamping
interface.
5. Connect the Equipment
Mount the control equipment in an accessible location and
complete the designated hose, sensor and power connections.
Flush the supply as directed before exposing the faucet’s
internal components to the water line.
6. Inspect and Commission
Verify mounting stability and leak-free connections.
Follow the manufacturer’s startup and calibration procedure,
then test activation, shutoff and discharge placement with
the basin fully installed.
Architectural and MEP Coordination Considerations
Countertop Bearing Surface
Coordinate underside build-ups, reinforcing plates and support
brackets with the washer-bearing area. A locally uneven surface
can prevent the fastening assembly from clamping the deck
consistently.
Fastening Access
Reserve room to reach the mounting nut and locking screws after
the basin is installed. Check the actual tool approach before
closing cabinetry or fitting permanent access restrictions.
Hose and Cable Protection
Keep routed components clear of sharp edges and moving cabinet
hardware. Provide sufficient slack for connection and servicing
while avoiding tight bends or unsupported strain at connectors.
Supply Fittings
Match the G1/2 connection designation to compatible fittings.
Confirm adapter requirements where the project supply uses
another thread system, and keep isolation fittings accessible.
Basin and Accessory Alignment
Check outlet orientation against the selected bowl and preserve
usable handwashing space. Coordinate adjacent accessories so
their locations do not obstruct access or interfere with
sensor operation.
Accessible Service Arrangement
Coordinate control equipment, piping and cable routes with
required knee and toe clearances. Maintain service access
while addressing contact hazards beneath accessible lavatories.
FontanaShowers Installation and Specification Resources
Professional Engineering and Accessibility References
Project verification:
This resource supports installation coordination and does not replace
approved project submittals. Confirm the supplied mounting assembly,
countertop construction, basin compatibility, connection fittings,
electrical configuration and service access before fabrication
and installation.
|
|
|