Fontana Vessel Sink & Touchless Faucet Systems™ |
Architectural and Engineering Resource
Fontana DSFD0024GS Vessel Sink and Chrome Touchless Sensor Faucet:
Vessel Sink Countertop & Drain Installation Detail
This vessel-sink installation resource is intended to support architects,
plumbing engineers, countertop fabricators, contractors and installers
coordinating the Fontana DSFD0024GS vessel sink and chrome touchless
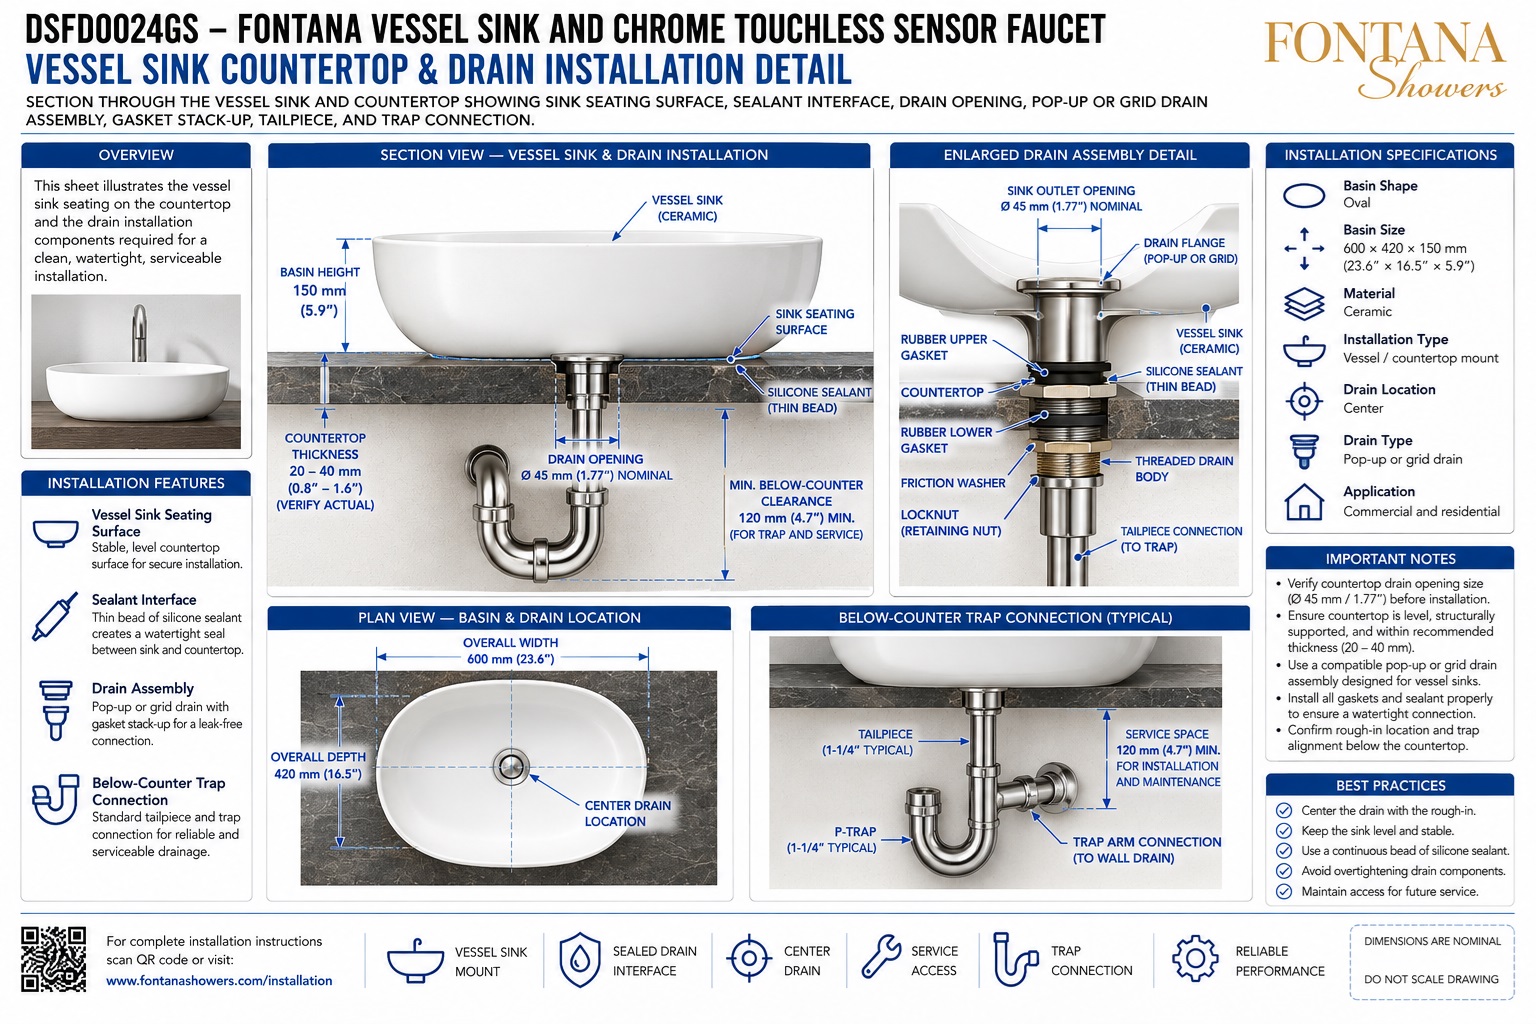
sensor faucet combination. The drawing package communicates the vessel
sink seating surface, countertop interface, center-drain opening,
pop-up or grid drain assembly, gasket stack-up, silicone sealant,
tailpiece, P-trap connection and below-counter service clearance
required for a clean, watertight and serviceable installation.
Fontana DSFD0024GS Vessel Sink Drain Installation Assembly
The DSFD0024GS uses a white oval ceramic vessel basin mounted
directly on the finished countertop. A centered drain assembly
passes through the basin and countertop, while a thin silicone
sealant interface helps protect the seating surface from moisture.
Below the deck, the drain body connects to a serviceable tailpiece
and P-trap arrangement.
-
Model:
DSFD0024GS
-
Basin shape:
Oval
-
Basin size:
600 × 420 × 150 mm
(23.6 × 16.5 × 5.9 in.)
-
Material:
Ceramic
-
Installation type:
Vessel / countertop mount
-
Drain location:
Center
-
Drain type:
Pop-up or grid drain
-
Nominal sink outlet opening:
Ø45 mm (1.77 in.)
-
Countertop thickness:
Approx. 20–40 mm (0.8–1.6 in.)
-
Minimum below-counter clearance:
120 mm (4.7 in.)
-
Typical tailpiece:
1-1/4 in.
-
Typical P-trap:
1-1/4 in.
-
Application:
Commercial and residential
Required Vessel Sink Countertop & Drain Drawing Package
Each installation drawing should use a consistent basin centerline,
drain centerline and finished-countertop datum. The package should
clearly identify the vessel seating surface, countertop thickness,
drain opening, sealing interface, gasket arrangement, retaining
hardware, tailpiece, trap connection and service clearance before
countertop fabrication or final plumbing installation.
Vessel Sink Countertop & Drain Installation Detail
Provides the complete relationship between the ceramic vessel
sink, finished countertop, drain opening, sealant interface,
drain assembly, tailpiece and P-trap connection.
Section View — Vessel Sink & Drain Installation
Shows the vessel basin seated directly on the countertop,
with a centered drain assembly extending through the sink
and deck into the below-counter waste connection.
Vessel Sink Seating Surface
Identifies the required flat, level and structurally supported
countertop area beneath the ceramic vessel sink for stable
installation.
Silicone Sealant Interface
Shows a thin continuous bead of silicone sealant between
the vessel sink and countertop to help prevent water
intrusion beneath the basin.
Center Drain Opening
Identifies a nominal Ø45 mm (1.77 in.) sink outlet opening,
centered with the basin and plumbing rough-in. Verify the
actual drain requirements before drilling.
Enlarged Drain Assembly Detail
Illustrates the drain flange, upper gasket, lower gasket,
friction washer, retaining nut, threaded drain body and
tailpiece connection in their typical installation order.
Plan View — Basin & Drain Location
Shows the 600 × 420 mm oval basin footprint with the drain
located at the intersection of the primary basin centerlines.
Below-Counter Trap Connection
Shows a typical 1-1/4-inch tailpiece and P-trap connection
extending from the centered drain body toward the wall-drain
connection.
Below-Counter Service Clearance
Maintains approximately 120 mm (4.7 in.) minimum service
space beneath the countertop for drain hardware, tailpiece,
trap installation and future maintenance.
Engineering note:
All dimensions and plumbing relationships shown are nominal
coordination references. Final basin dimensions, countertop
thickness, drain-opening diameter, sealant application, gasket
sequence, tailpiece size, trap configuration, wall-drain location
and service clearance should be verified against the actual
Fontana DSFD0024GS vessel sink, selected drain assembly and
approved project documentation before countertop fabrication
or final installation.
Countertop, Drain and Plumbing Coordination Considerations
Basin Seating Surface
Provide a flat, level and structurally supported finished
countertop beneath the vessel basin so the ceramic fixture
remains stable and does not rock after installation.
Drain Centerline
Align the vessel sink drain directly with the plumbing
rough-in before countertop fabrication to avoid unnecessary
offsets in the tailpiece and trap assembly.
Sealant Interface
Apply a continuous thin bead of compatible silicone sealant
at the basin-to-countertop interface and remove excess
material before curing.
Drain Gasket Stack
Keep upper and lower rubber gaskets correctly centered and
seat the friction washer and retaining nut evenly to create
a secure watertight drain connection.
Tailpiece & Trap Alignment
Route the tailpiece vertically and connect the P-trap as
directly as practical to the wall drain while maintaining
serviceability and required plumbing configuration.
Service Access
Keep the drain locknut, tailpiece, P-trap and wall-drain
connection accessible for leak inspection, cleaning,
adjustment and future maintenance.
Vessel Sink Installation Best Practices
Verify Drain Opening
Confirm the actual drain assembly and required countertop
opening before drilling. The illustrated Ø45 mm opening
is a nominal coordination reference.
Keep Basin Level
Confirm the finished countertop and vessel sink are level
before the sealant cures or the drain hardware is fully
tightened.
Avoid Over-Tightening
Tighten drain hardware only enough to compress the gaskets
and secure the assembly. Excessive force may damage ceramic,
countertop materials or sealing components.
Maintain Trap Access
Avoid fixed cabinetry or permanent panels that prevent the
P-trap and tailpiece from being removed for future cleaning
or service.
Leak Testing
After installation, fill and drain the vessel while checking
the flange, gaskets, threaded drain body, tailpiece and trap
for leakage.
Final Fixture Coordination
Confirm basin position, drain centerline, faucet location,
countertop support and below-counter service access before
project handover.
FontanaShowers Installation and Specification Resources
Professional Engineering and Accessibility References
Project verification:
Vessel sink countertop and drain installation drawings are
coordination tools and do not replace approved project submittals.
The architect, plumbing engineer, countertop fabricator, contractor
and licensed installer should verify basin dimensions, drain-opening
diameter, countertop thickness, sealing method, gasket configuration,
tailpiece and trap sizing, wall-drain alignment, service access and
locally adopted plumbing requirements before fabrication and installation.
|
|
|