How to install Fontana Sète
Deck Mount Brushed Nickel Commercial Sensor Soap Dispenser Product Display SD |
FS1223B
|
Easy step by step Installation Instructions for Sensor Soap Dispenser
|
|
Visit Product Page 
|
|
- Before starting, please review the installation instructions provided below.
- Ensure compliance with all local building and safety regulations. Unpack and carefully examine the products for any shipping damage.
- If any damage is found, do not proceed with the installation.
- It is important to note that all products must be installed by a professional, certified plumber to maintain the validity of the warranty.
|
sensor
|
|
|
Automatic Soap Dispenser Installation Instructions
| Hole Size Chart | auto soap
| Soap Bottle Size | 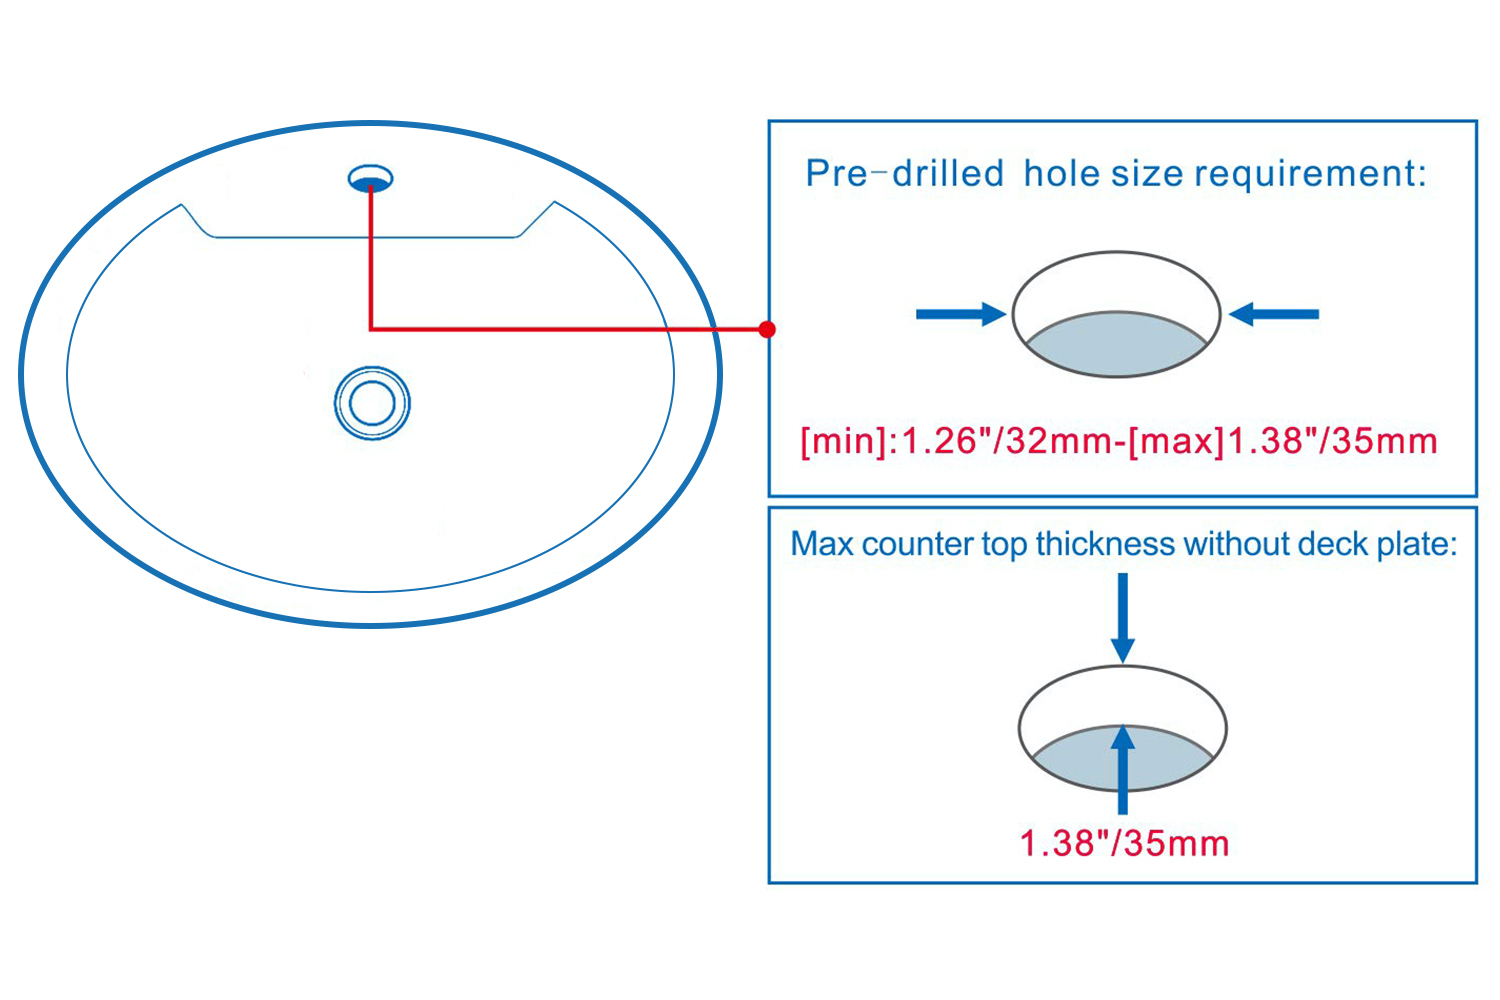
| |  | | | |  | |  |
| | |
| | |
| Size : | sensor | Step 2: | | 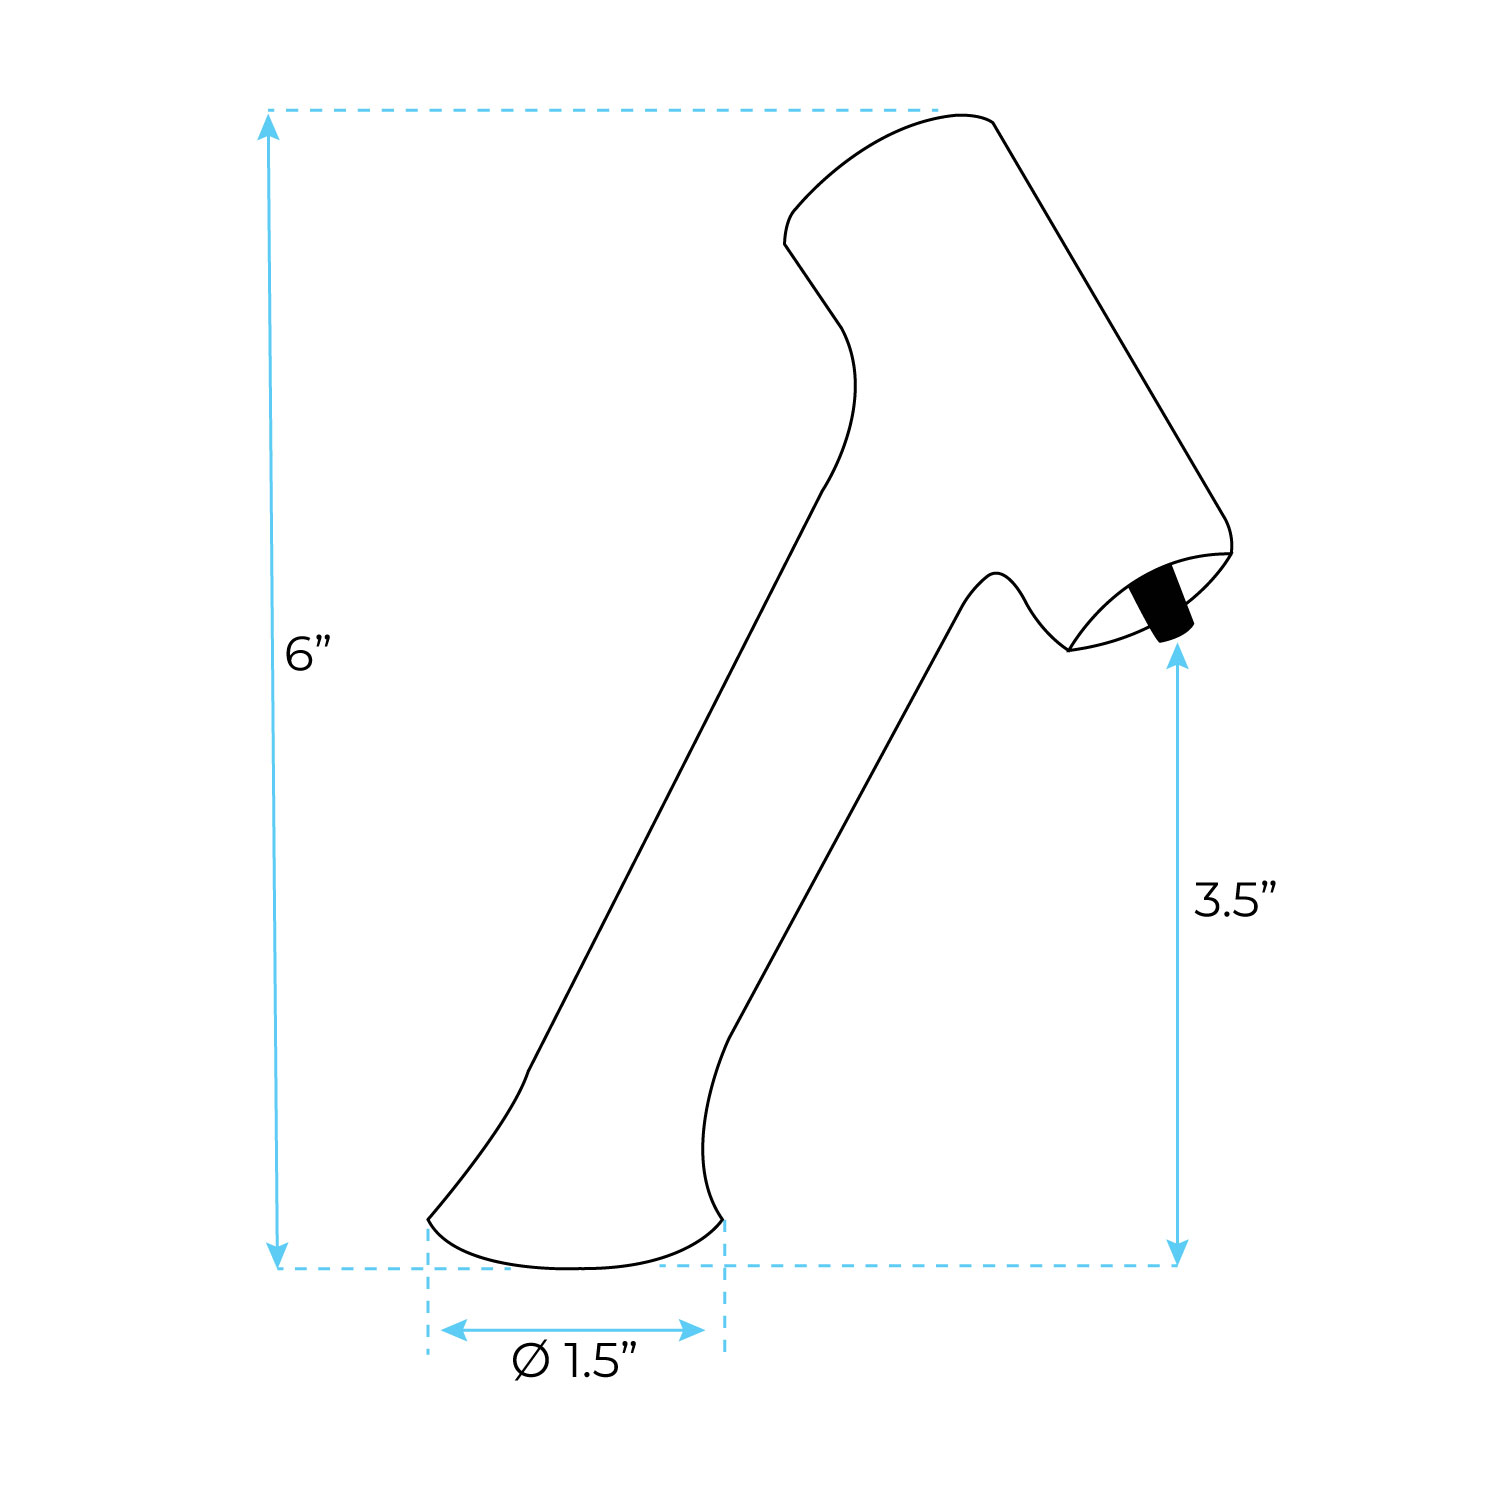
| | .png)
|
|
| |
| | | | | |
Step 3: | |
Step 4: | | 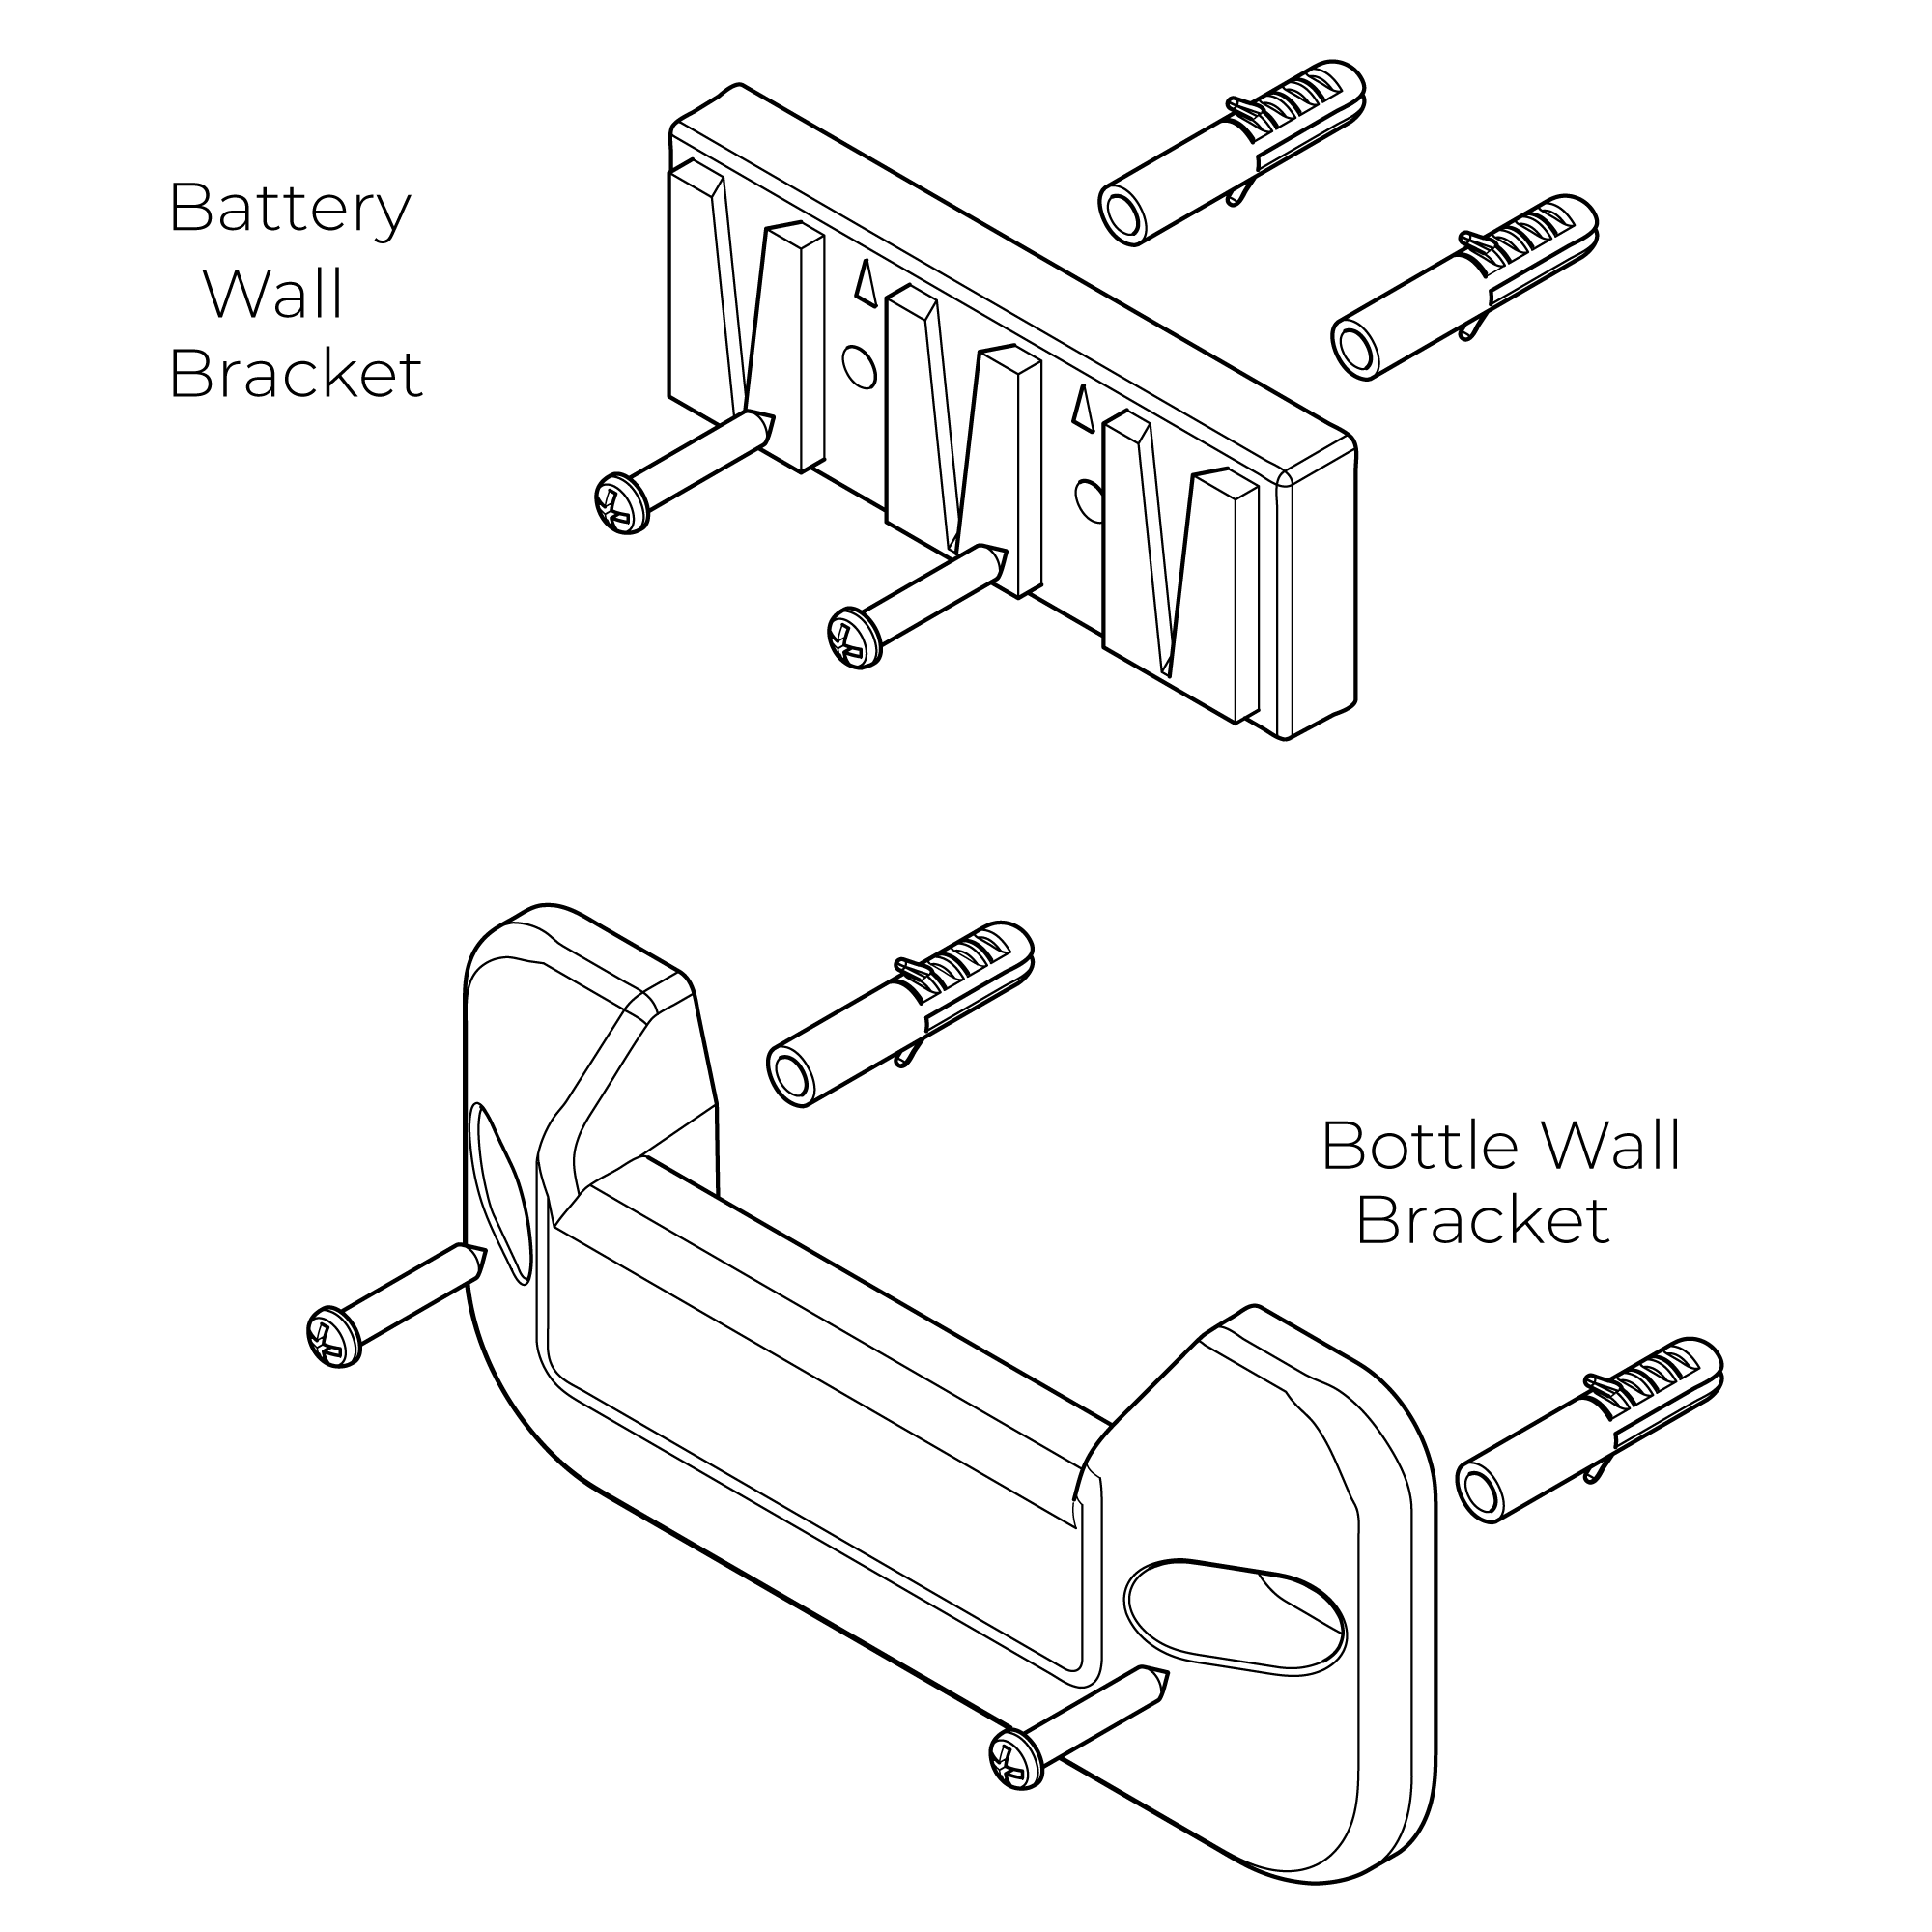 | | 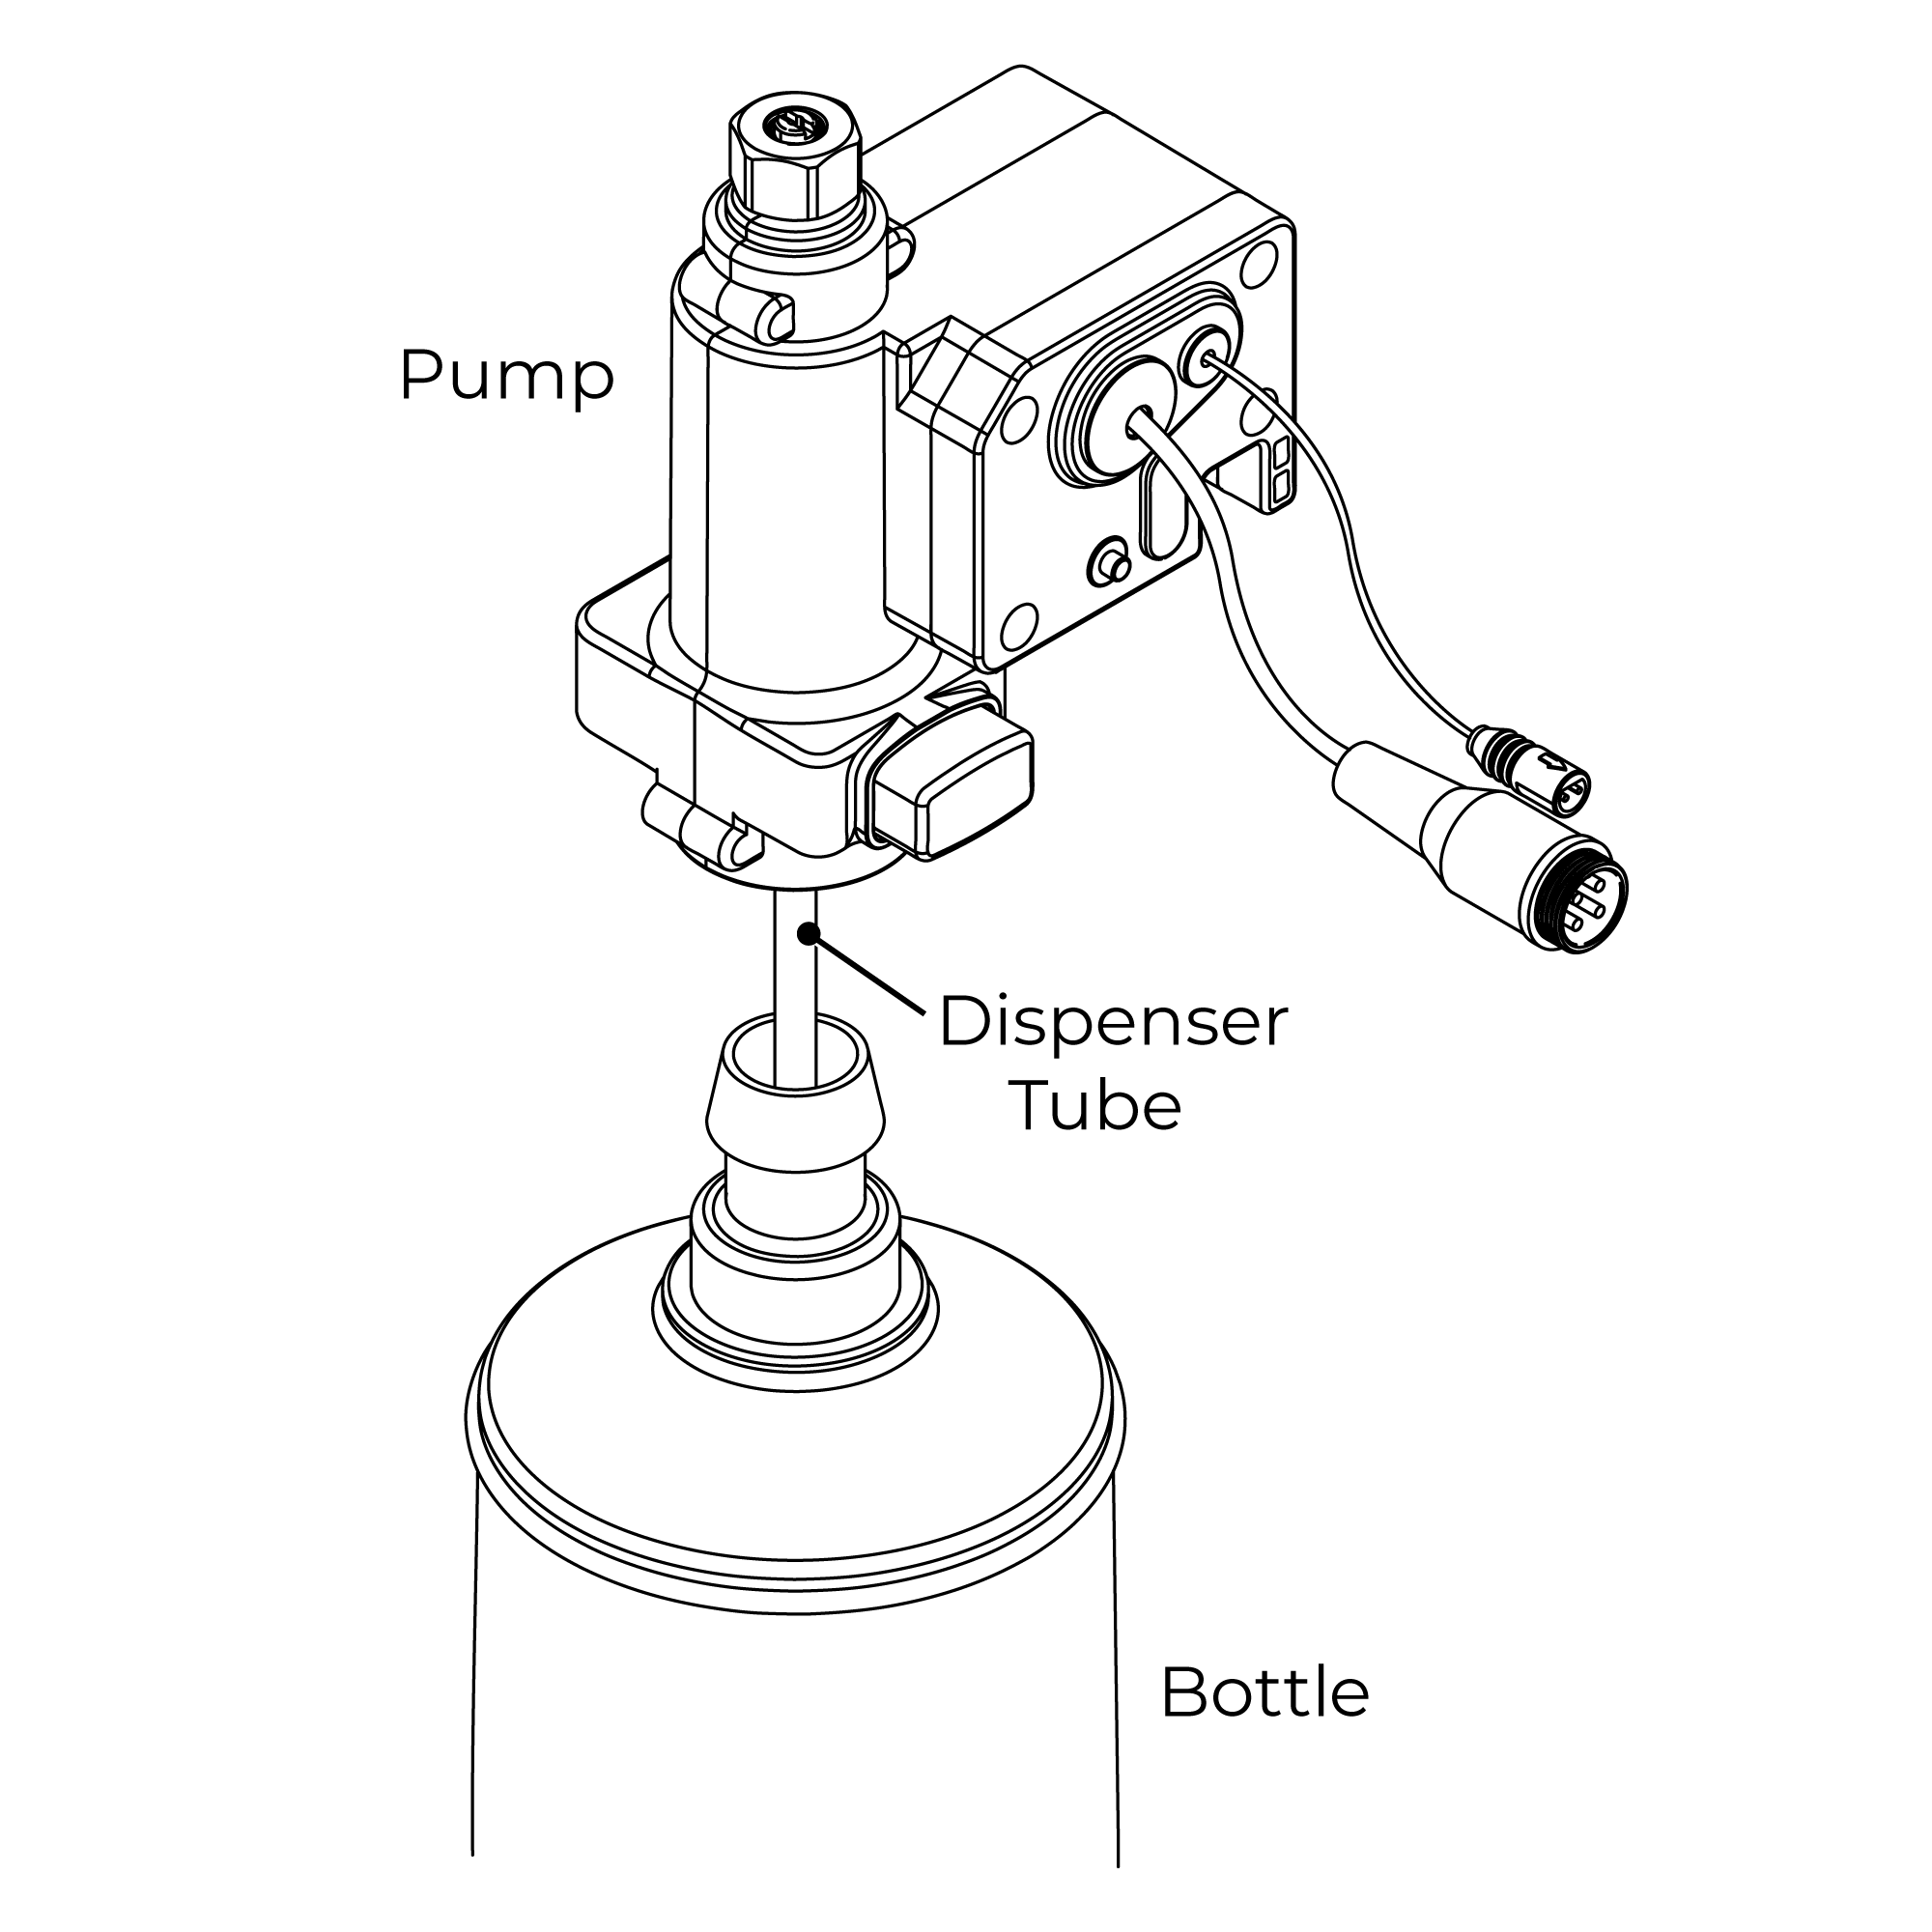 | |
| | | | | Step 5: | | Step 6: | | 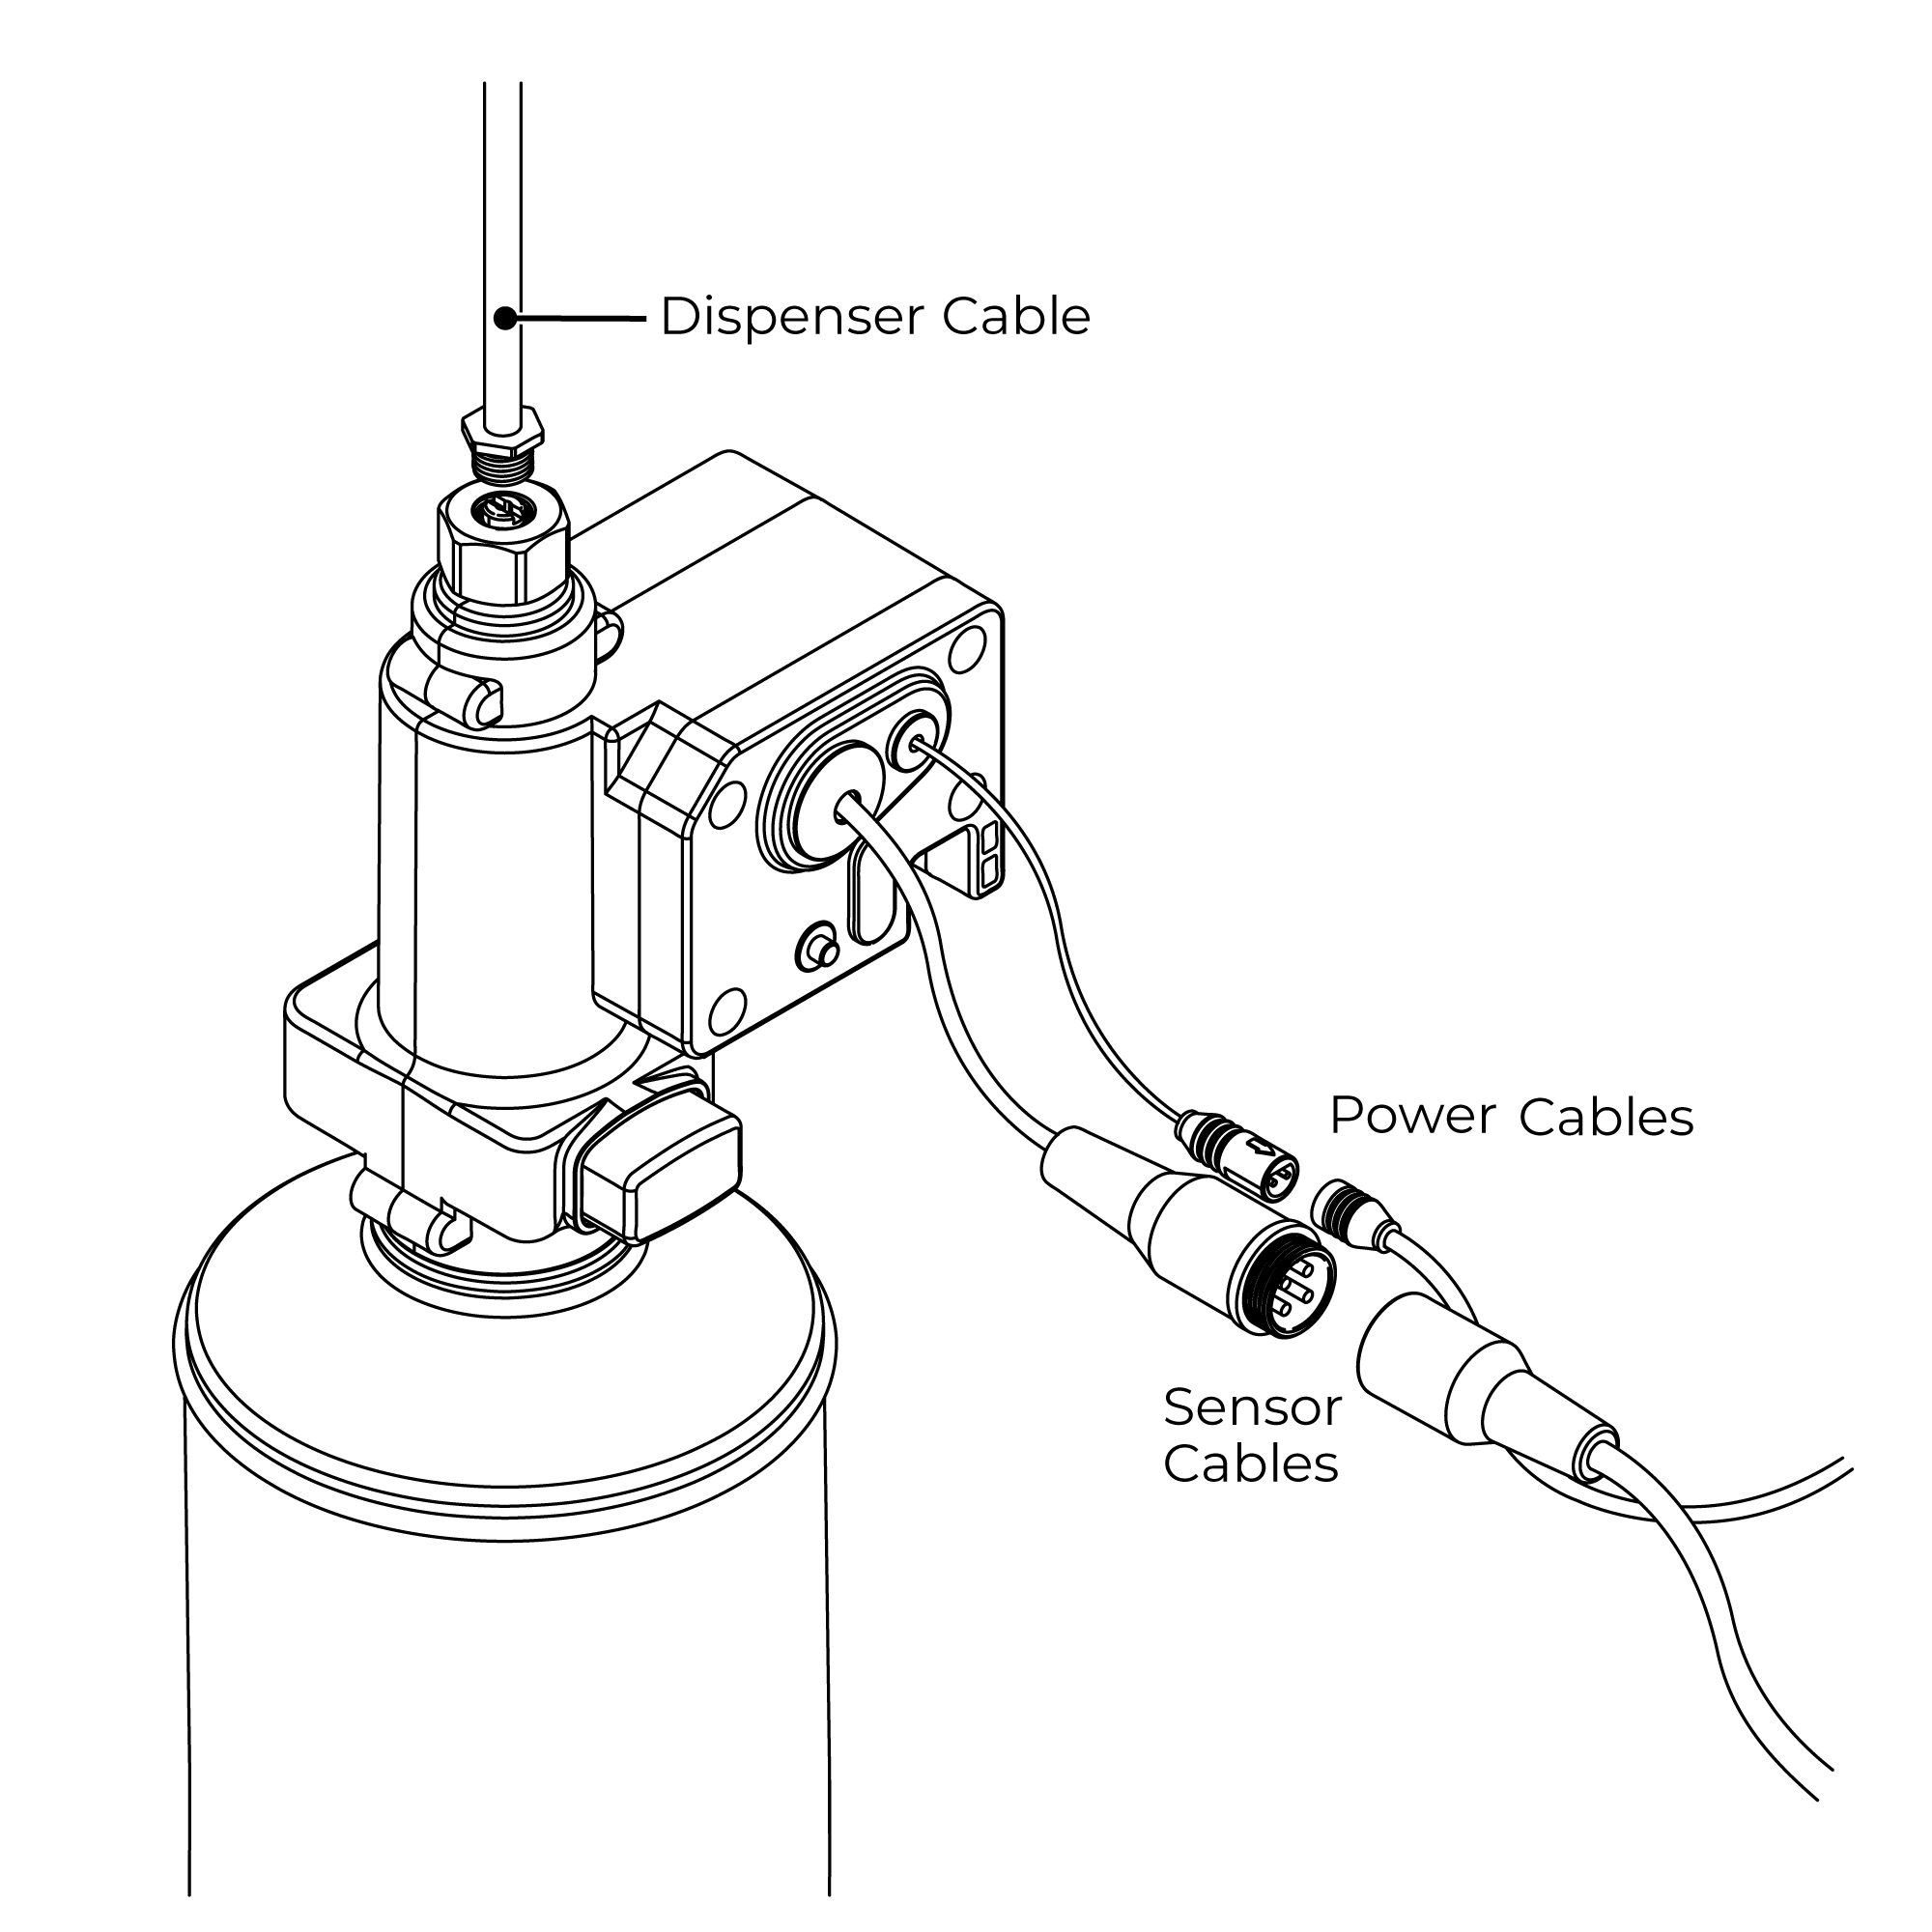 | | 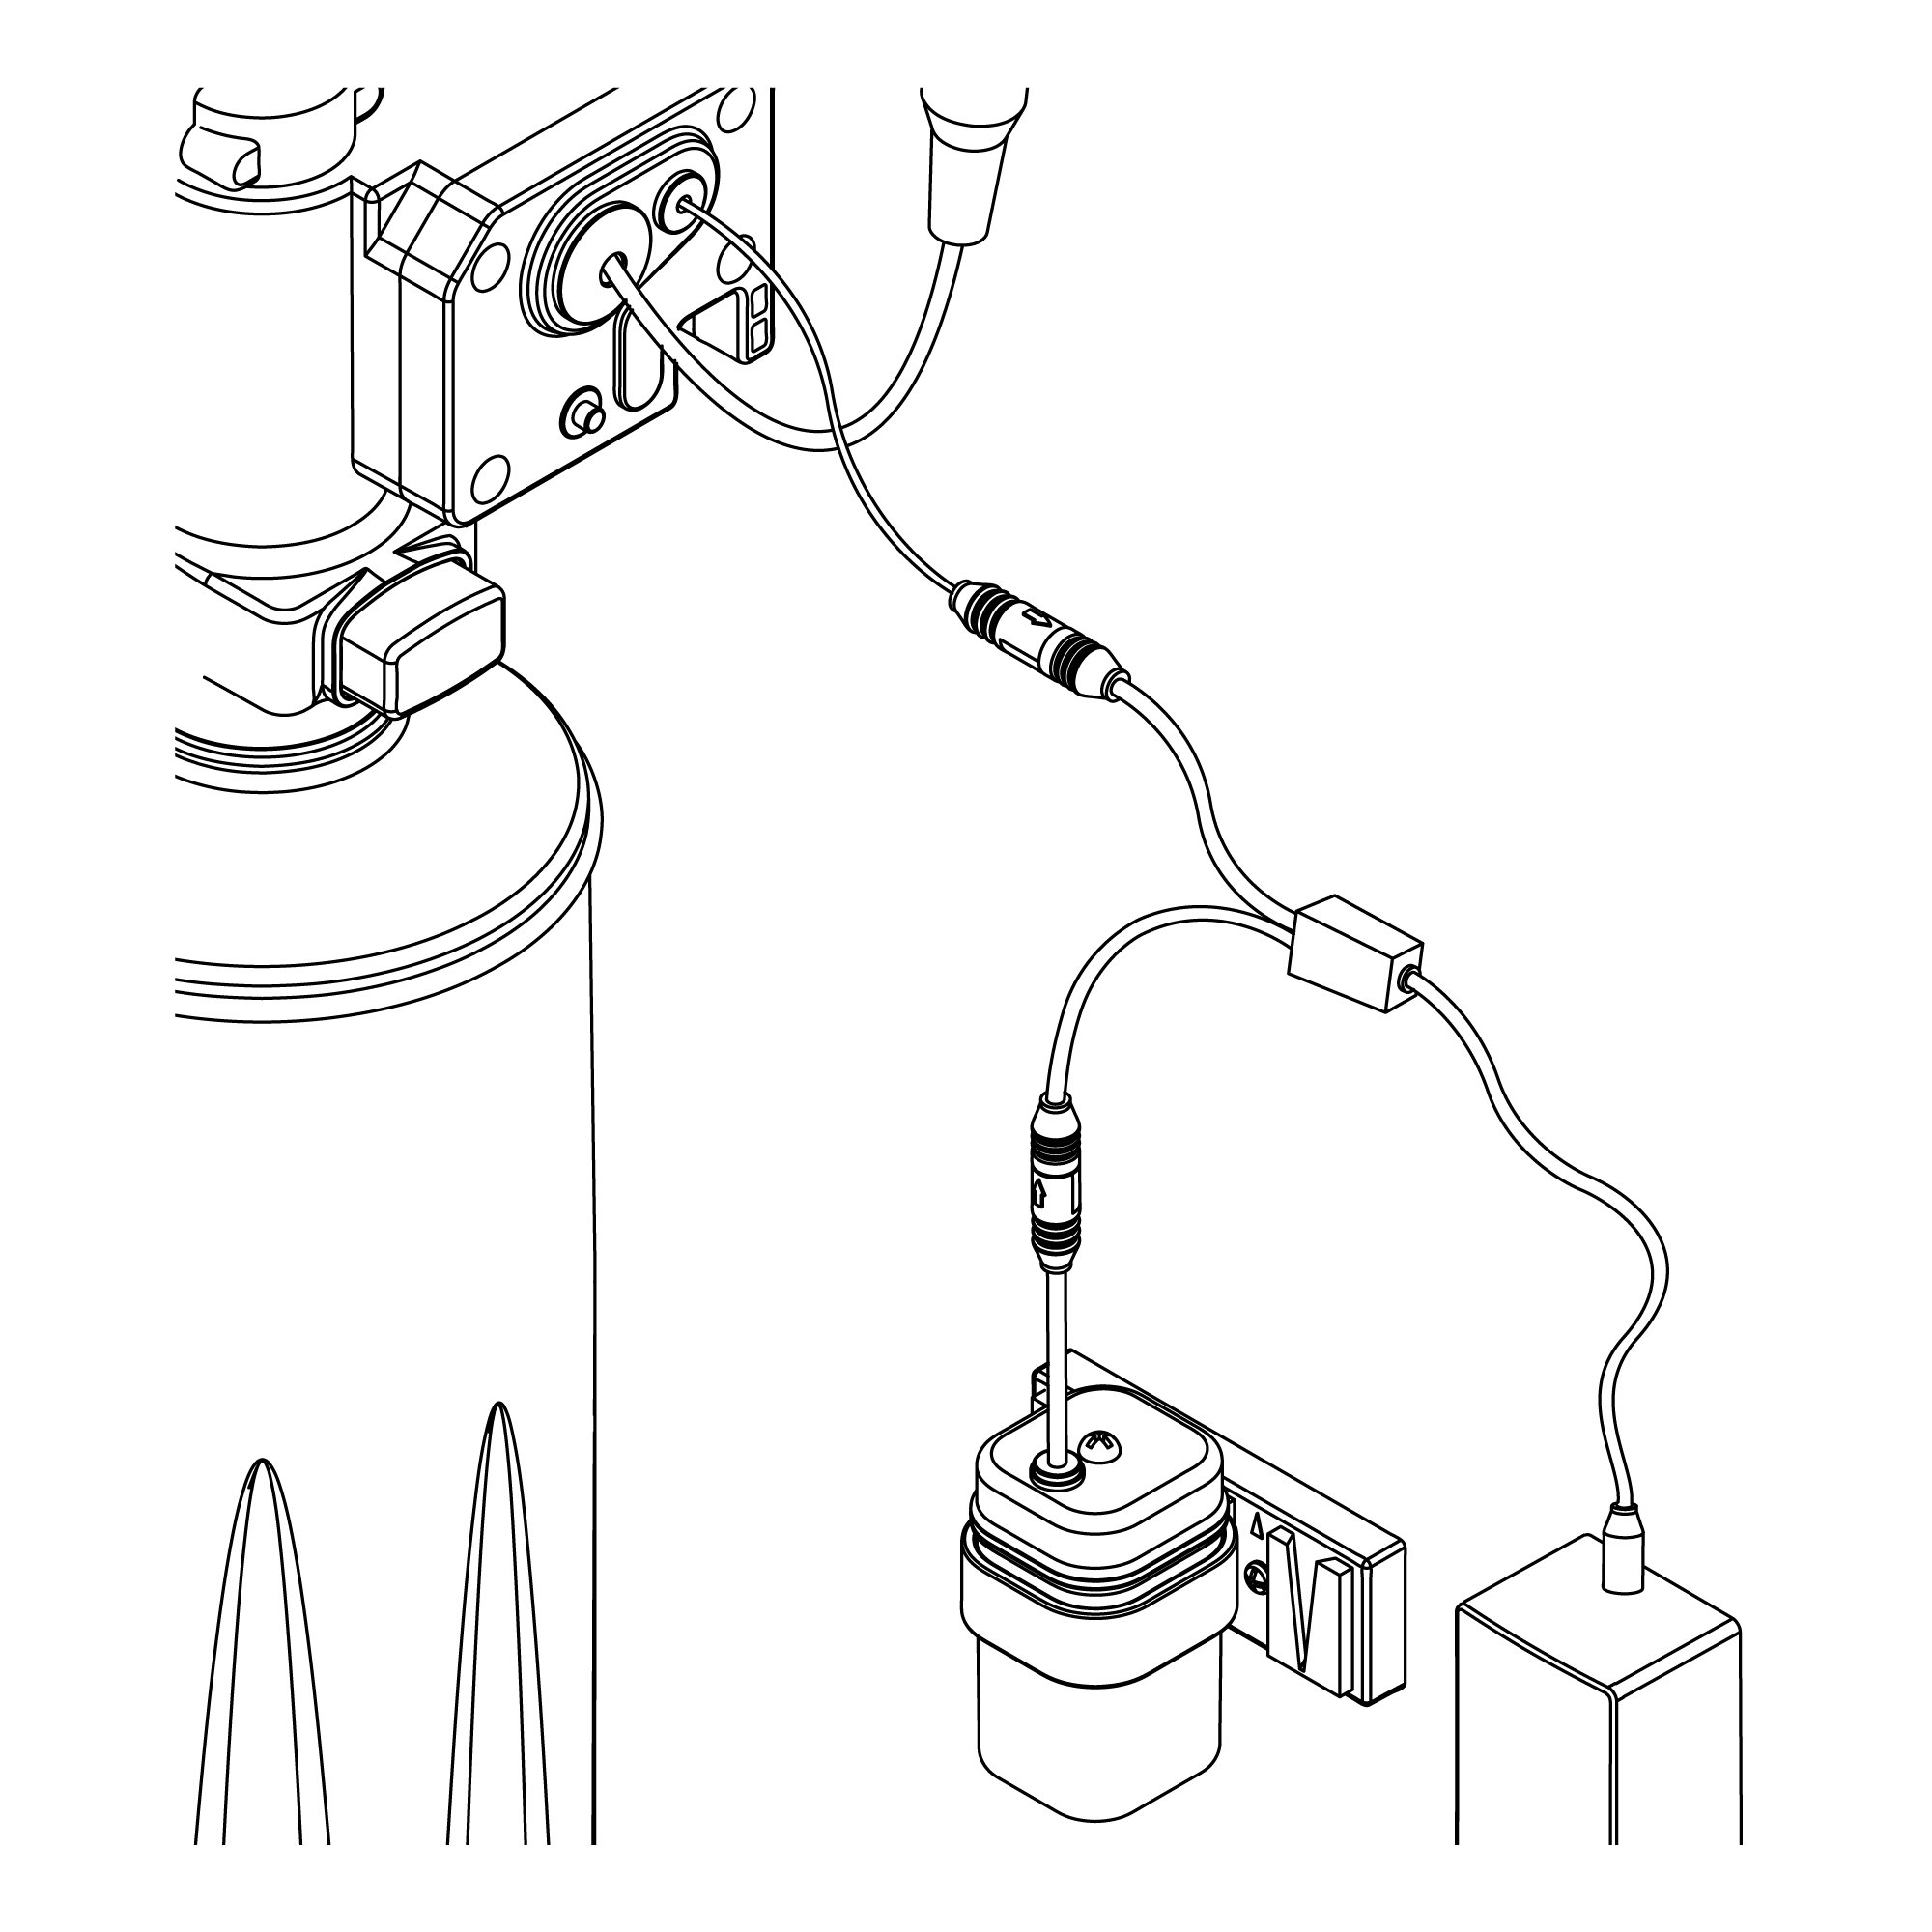 | |
| | | | | Step 7: | | Step 8: | | 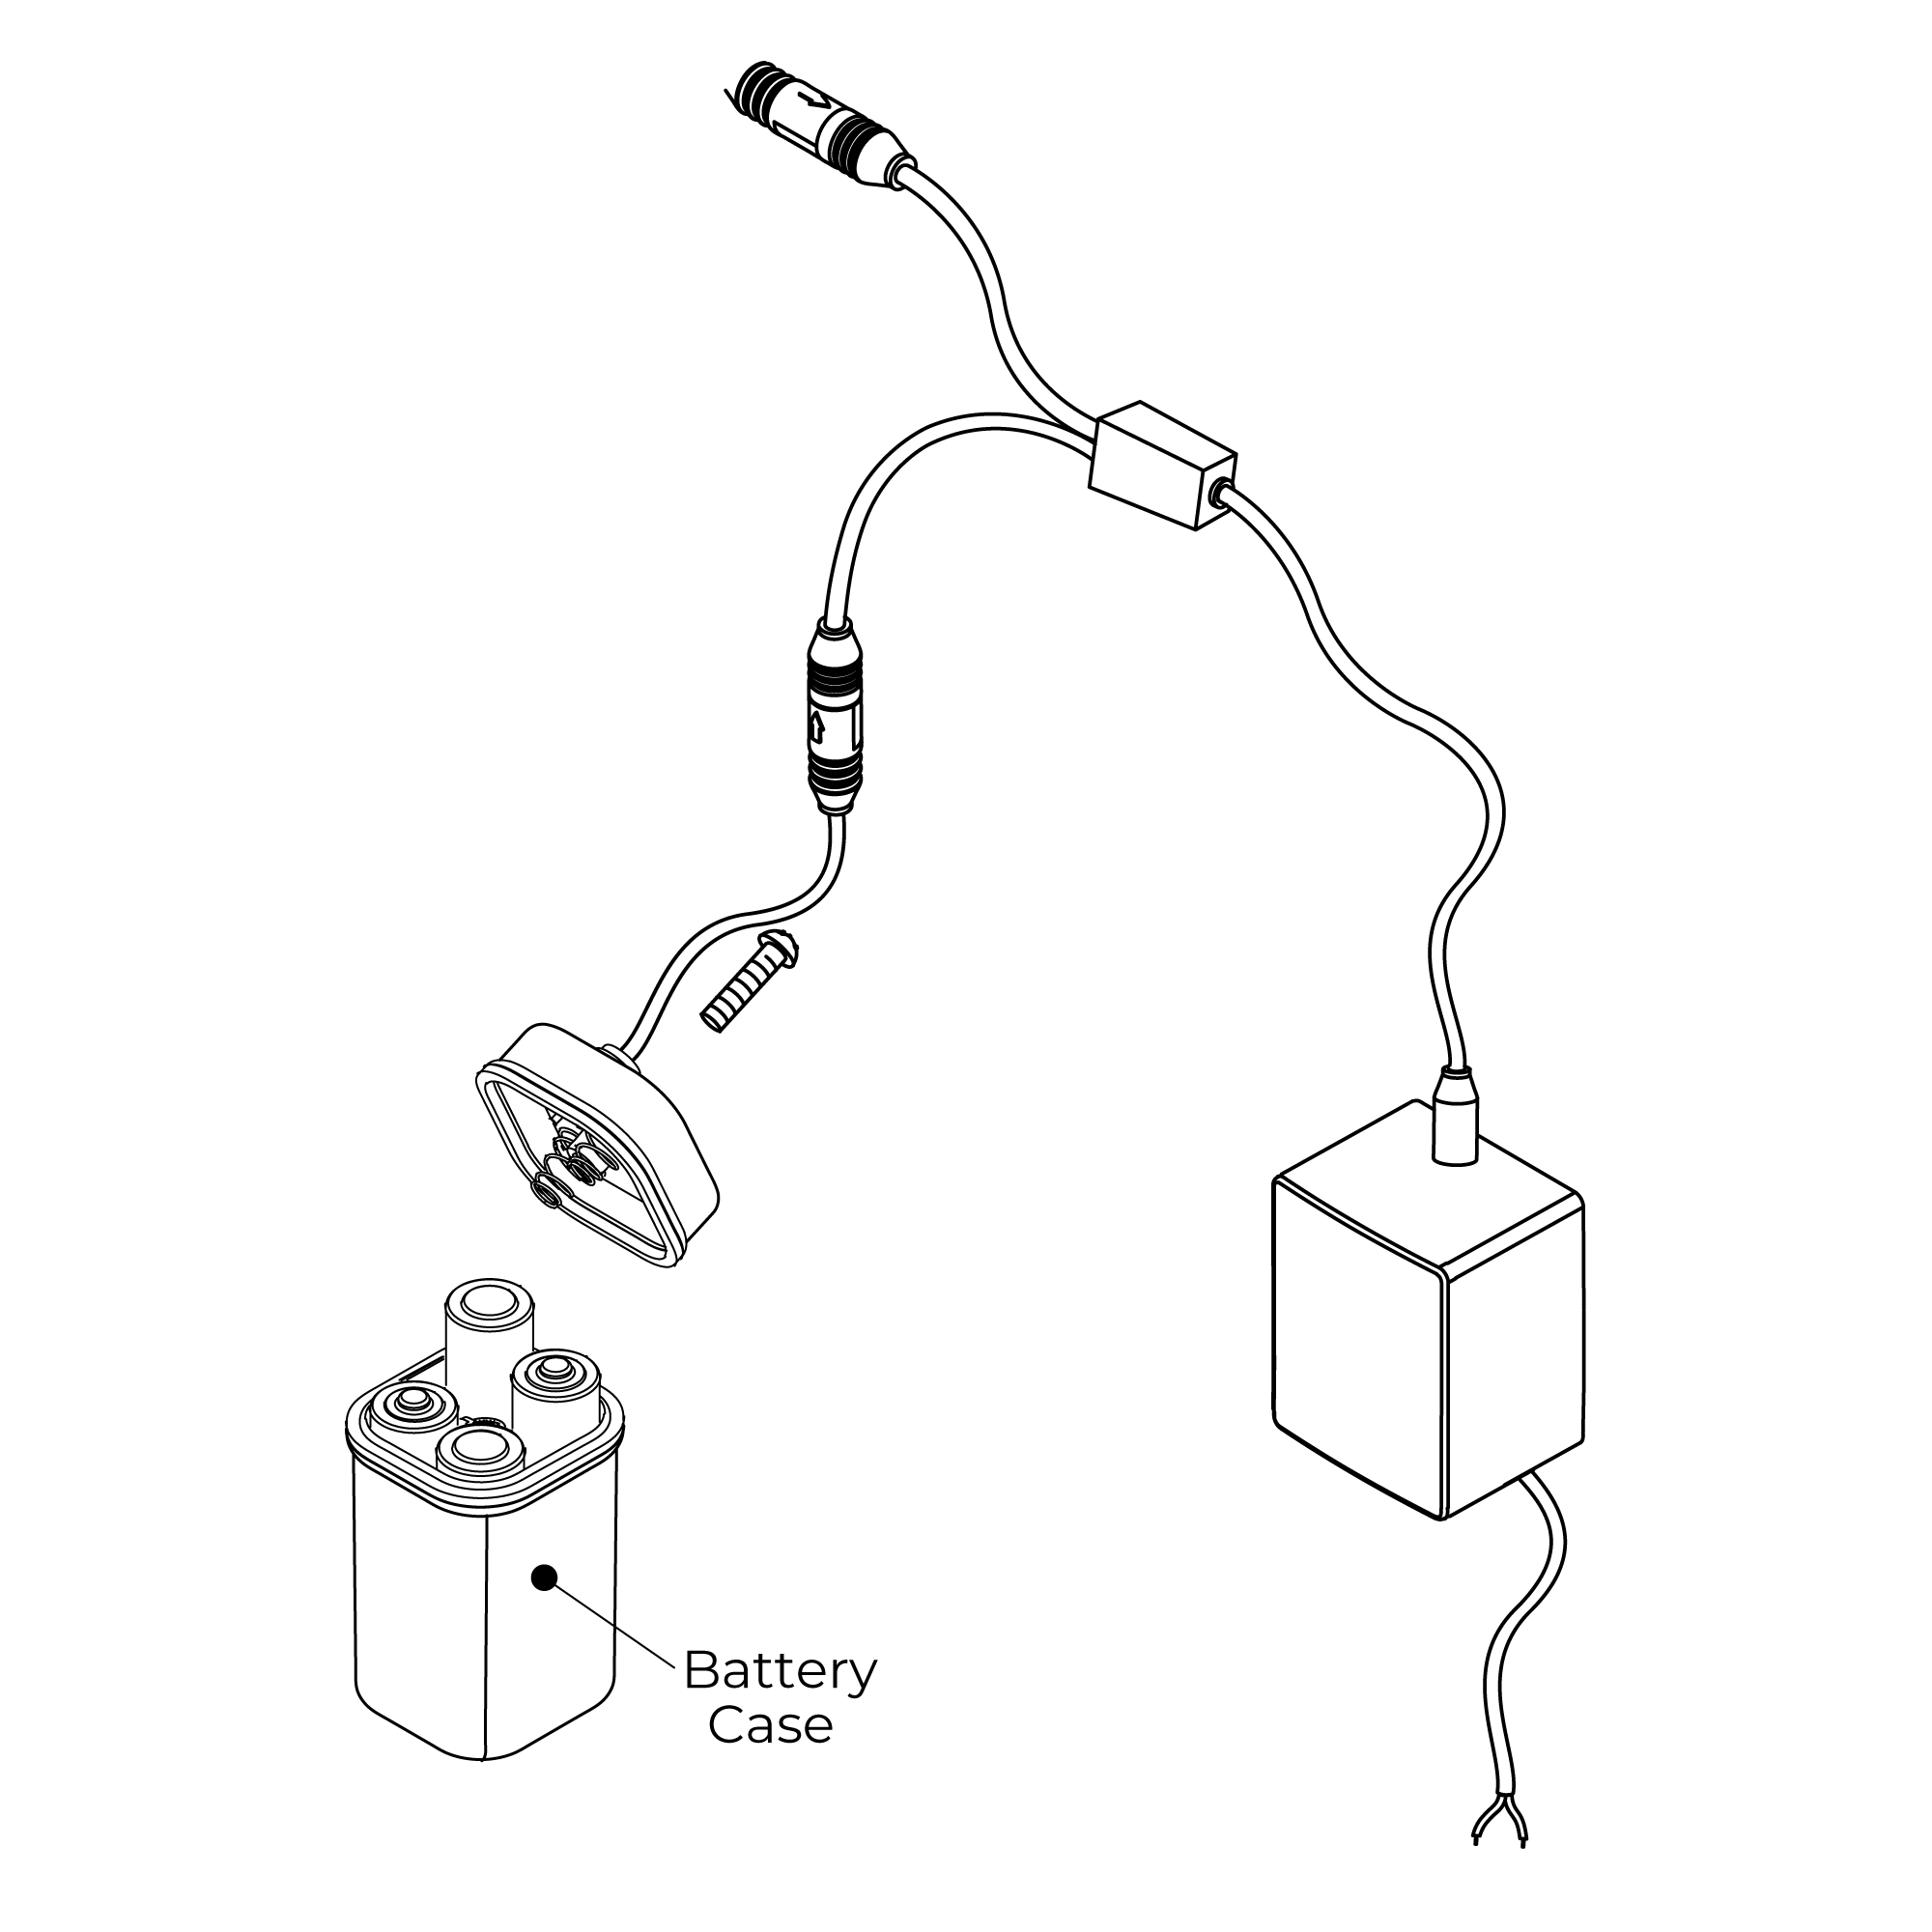 | | 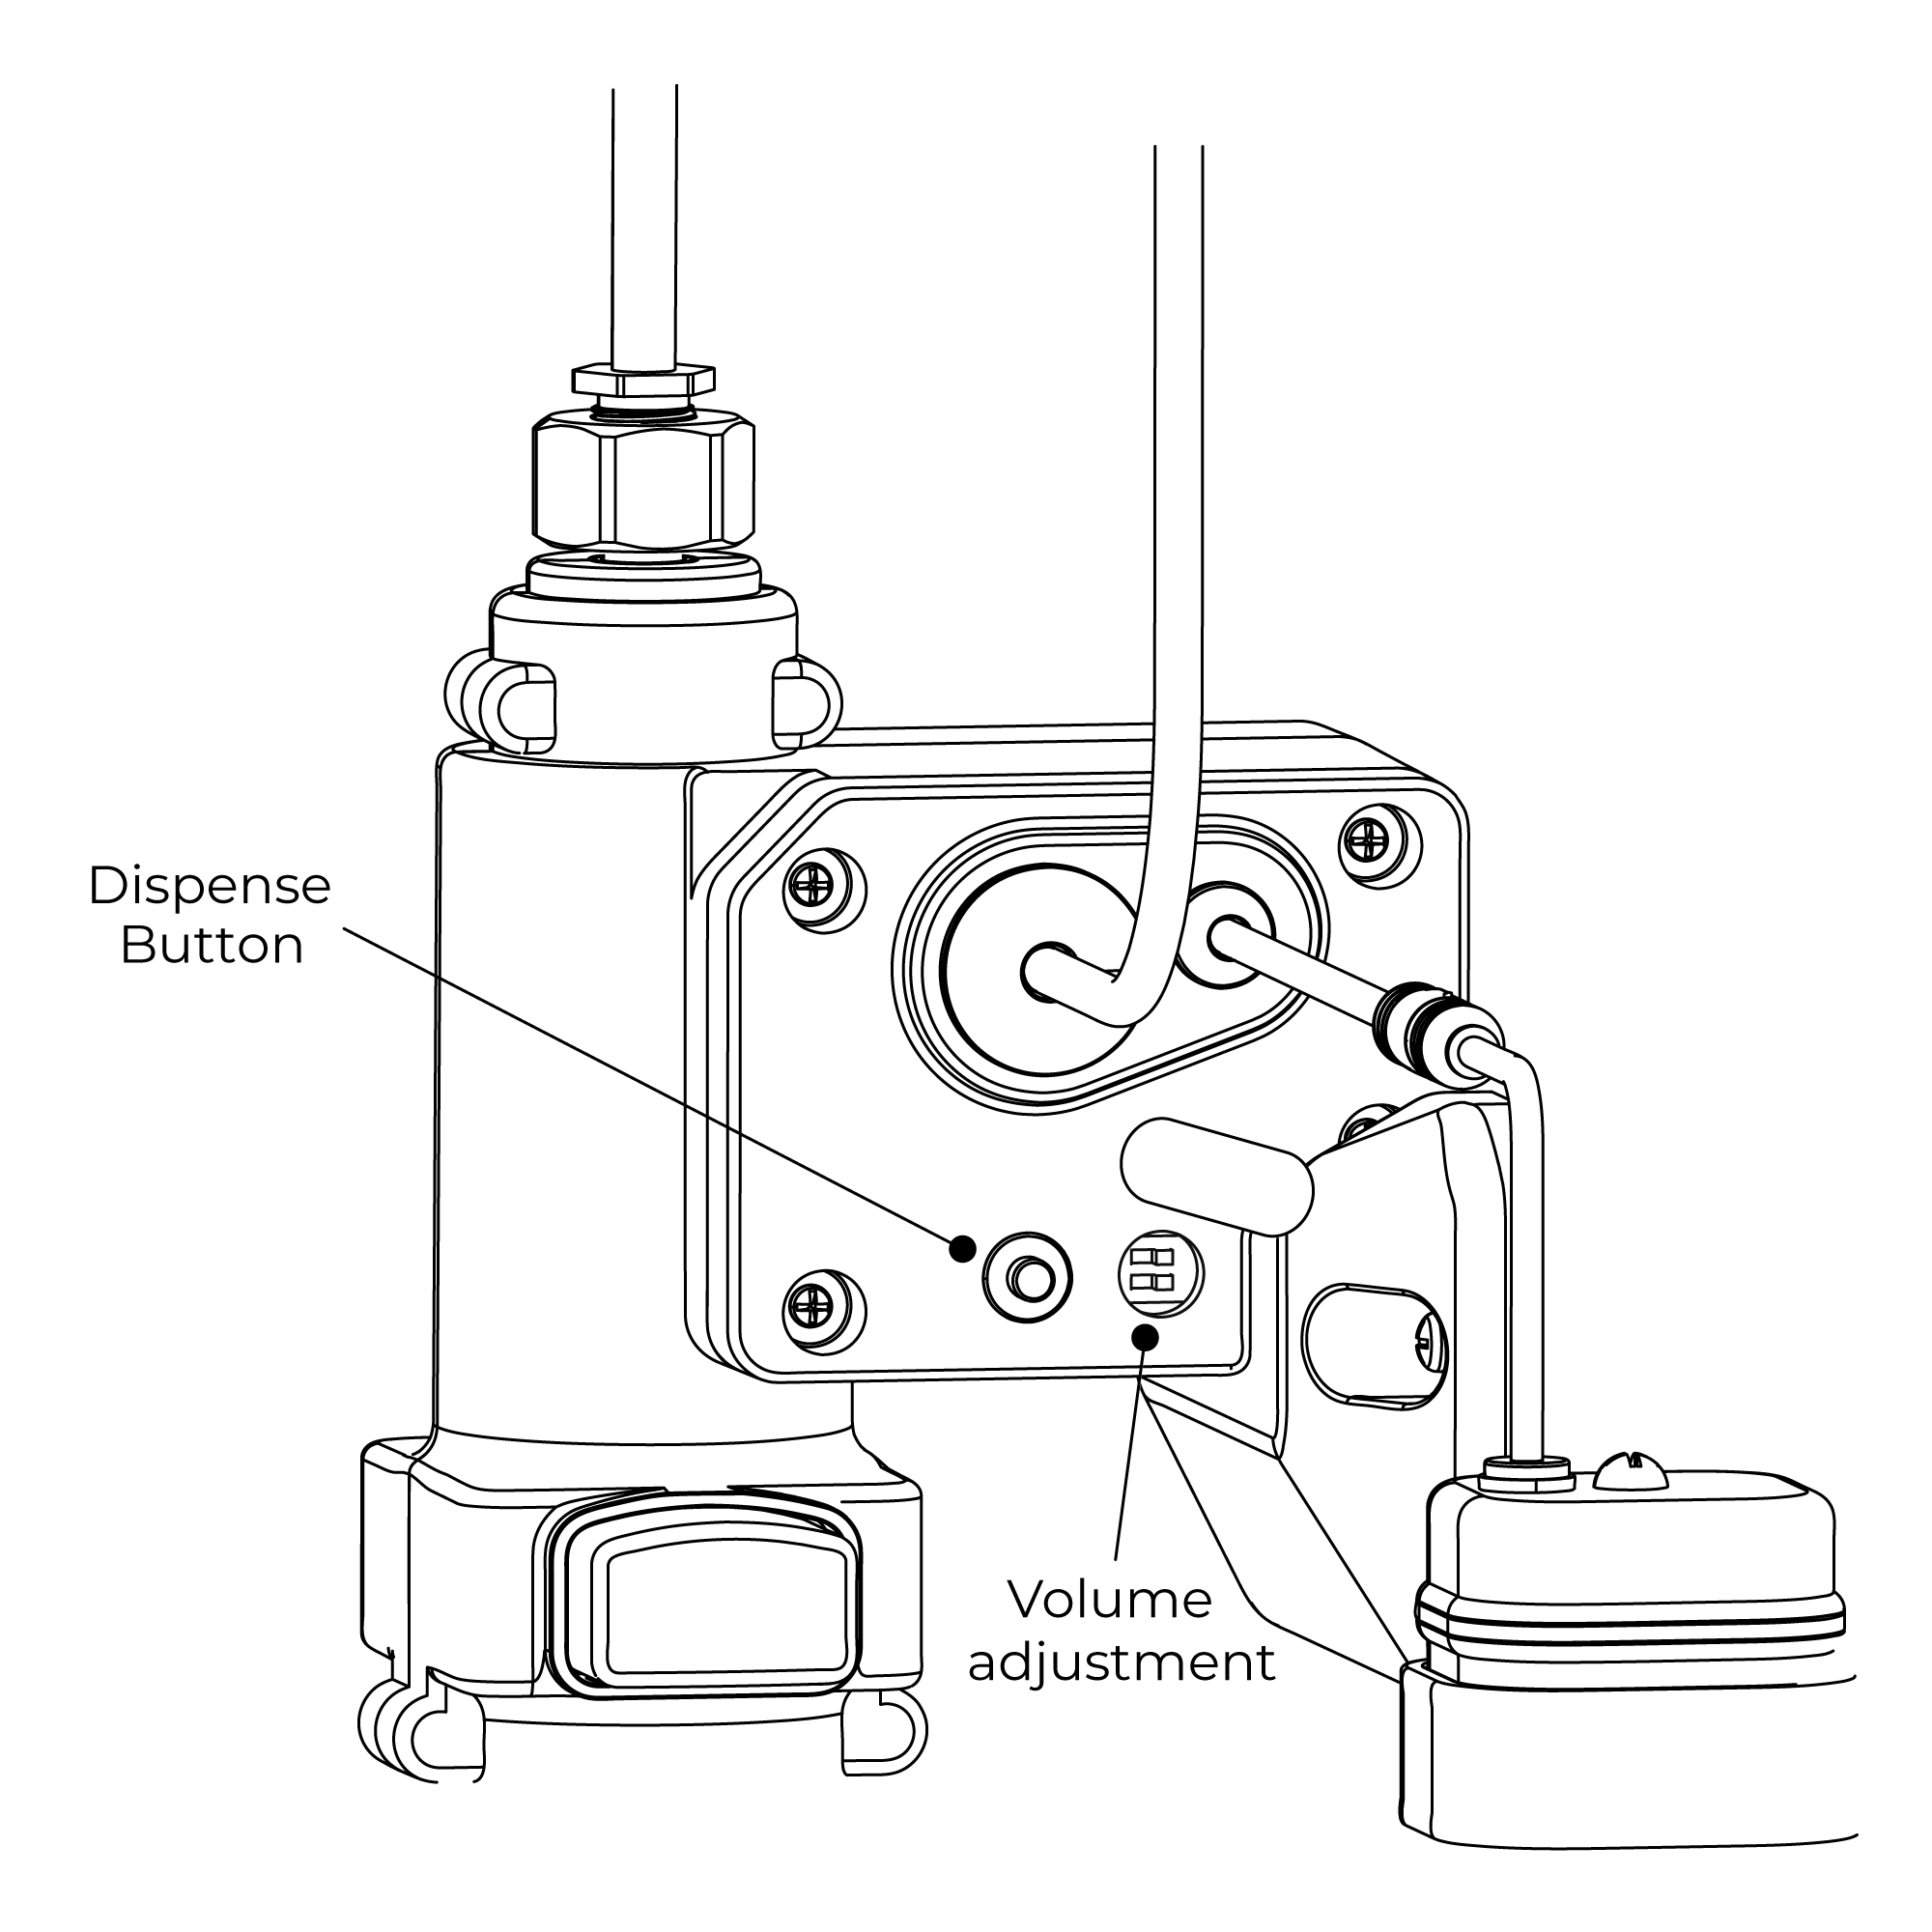 | | | Step 9: | |
| |  | | 
| | | | | | | | |
Features:
- Enhanced Hygiene:
The proximity sensor eliminates the necessity for physical contact with the spout, minimizing the transmission of germs and decreasing the risk of cross-contamination.
- Battery Backup: Your infrared soap dispenser includes a supplementary battery pack. In the event of a power outage, the product will seamlessly transition to battery-operated mode, ensuring continuous functionality of the spout.
- Low Battery Alert: When battery power diminishes and drops below 3.9 volts, the sensor light will flicker, signaling the need for battery replacement. If the batteries are completely depleted, the sensor light will remain inactive.
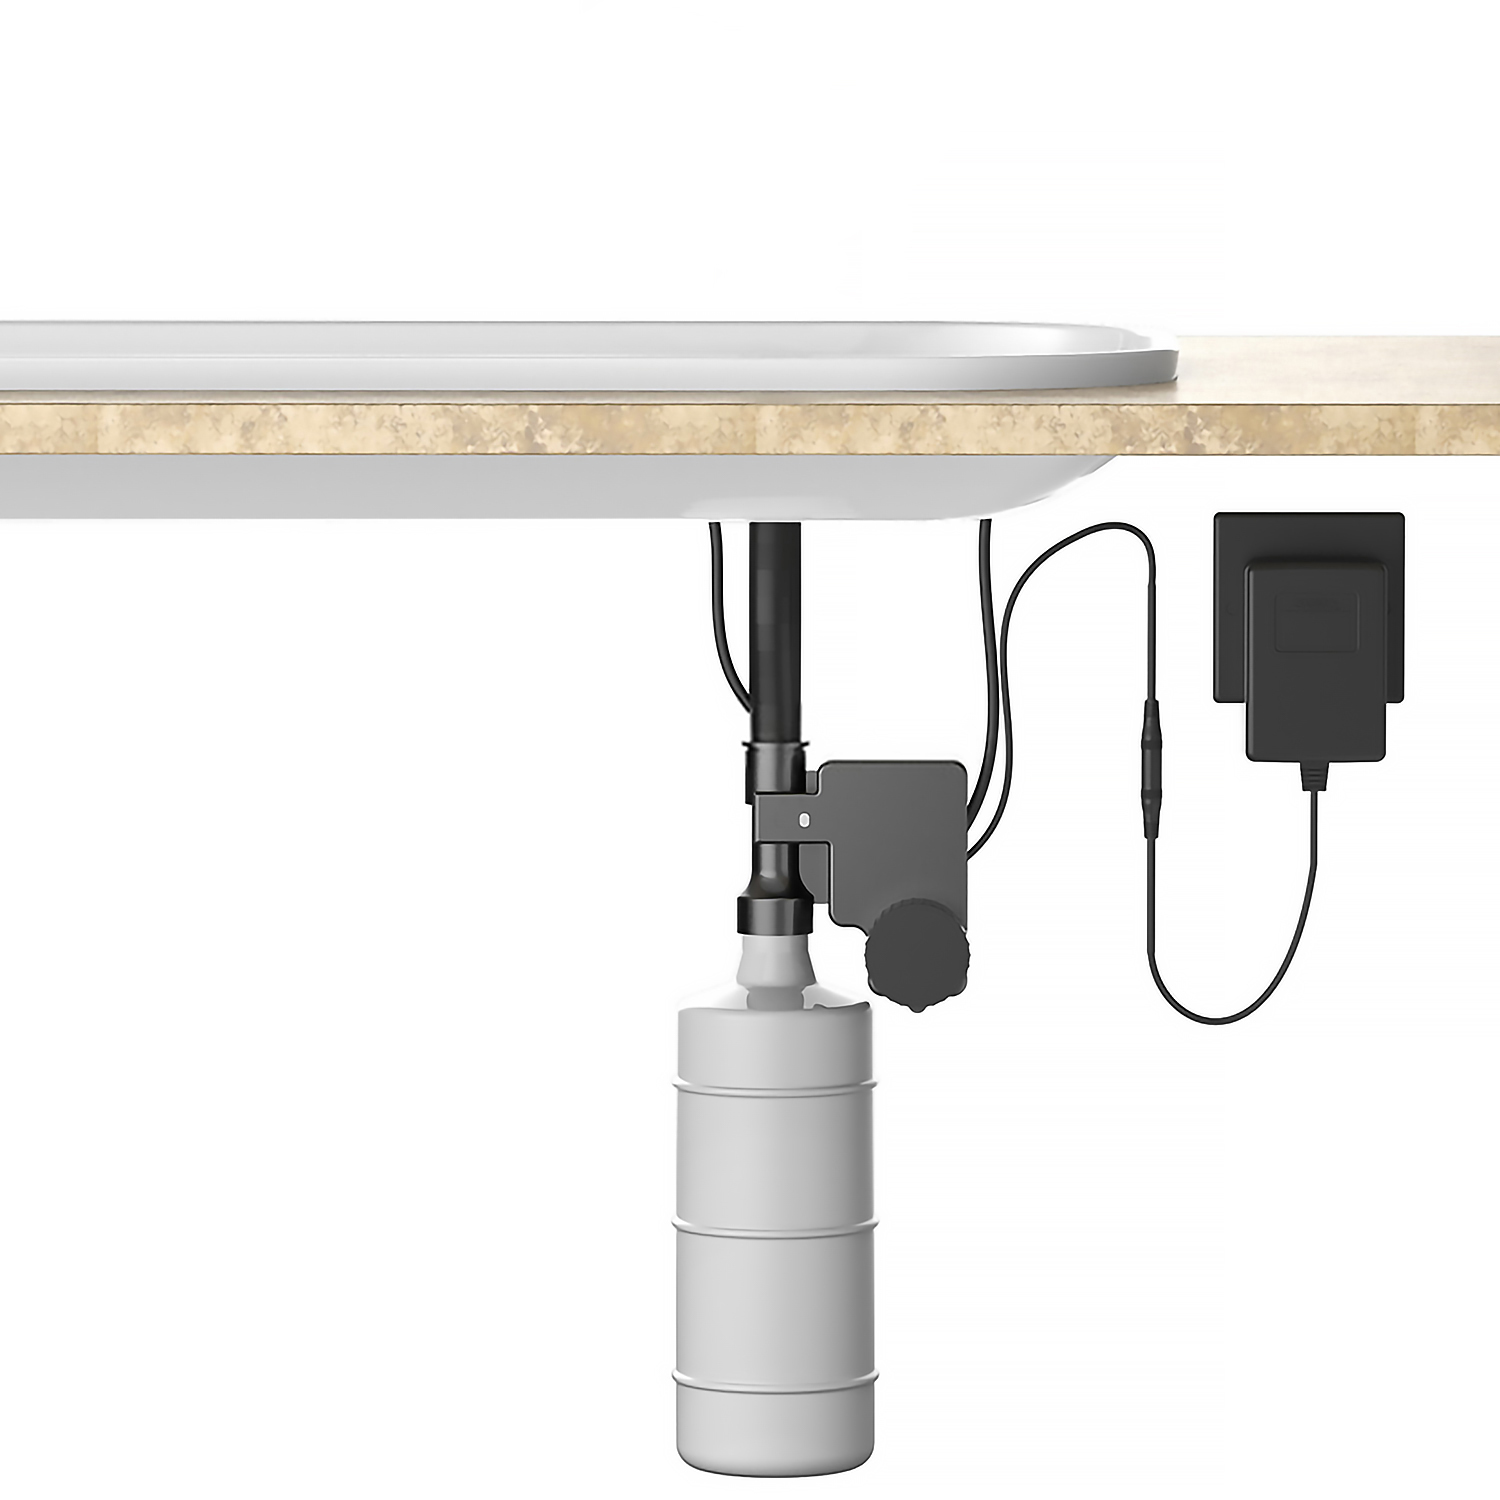
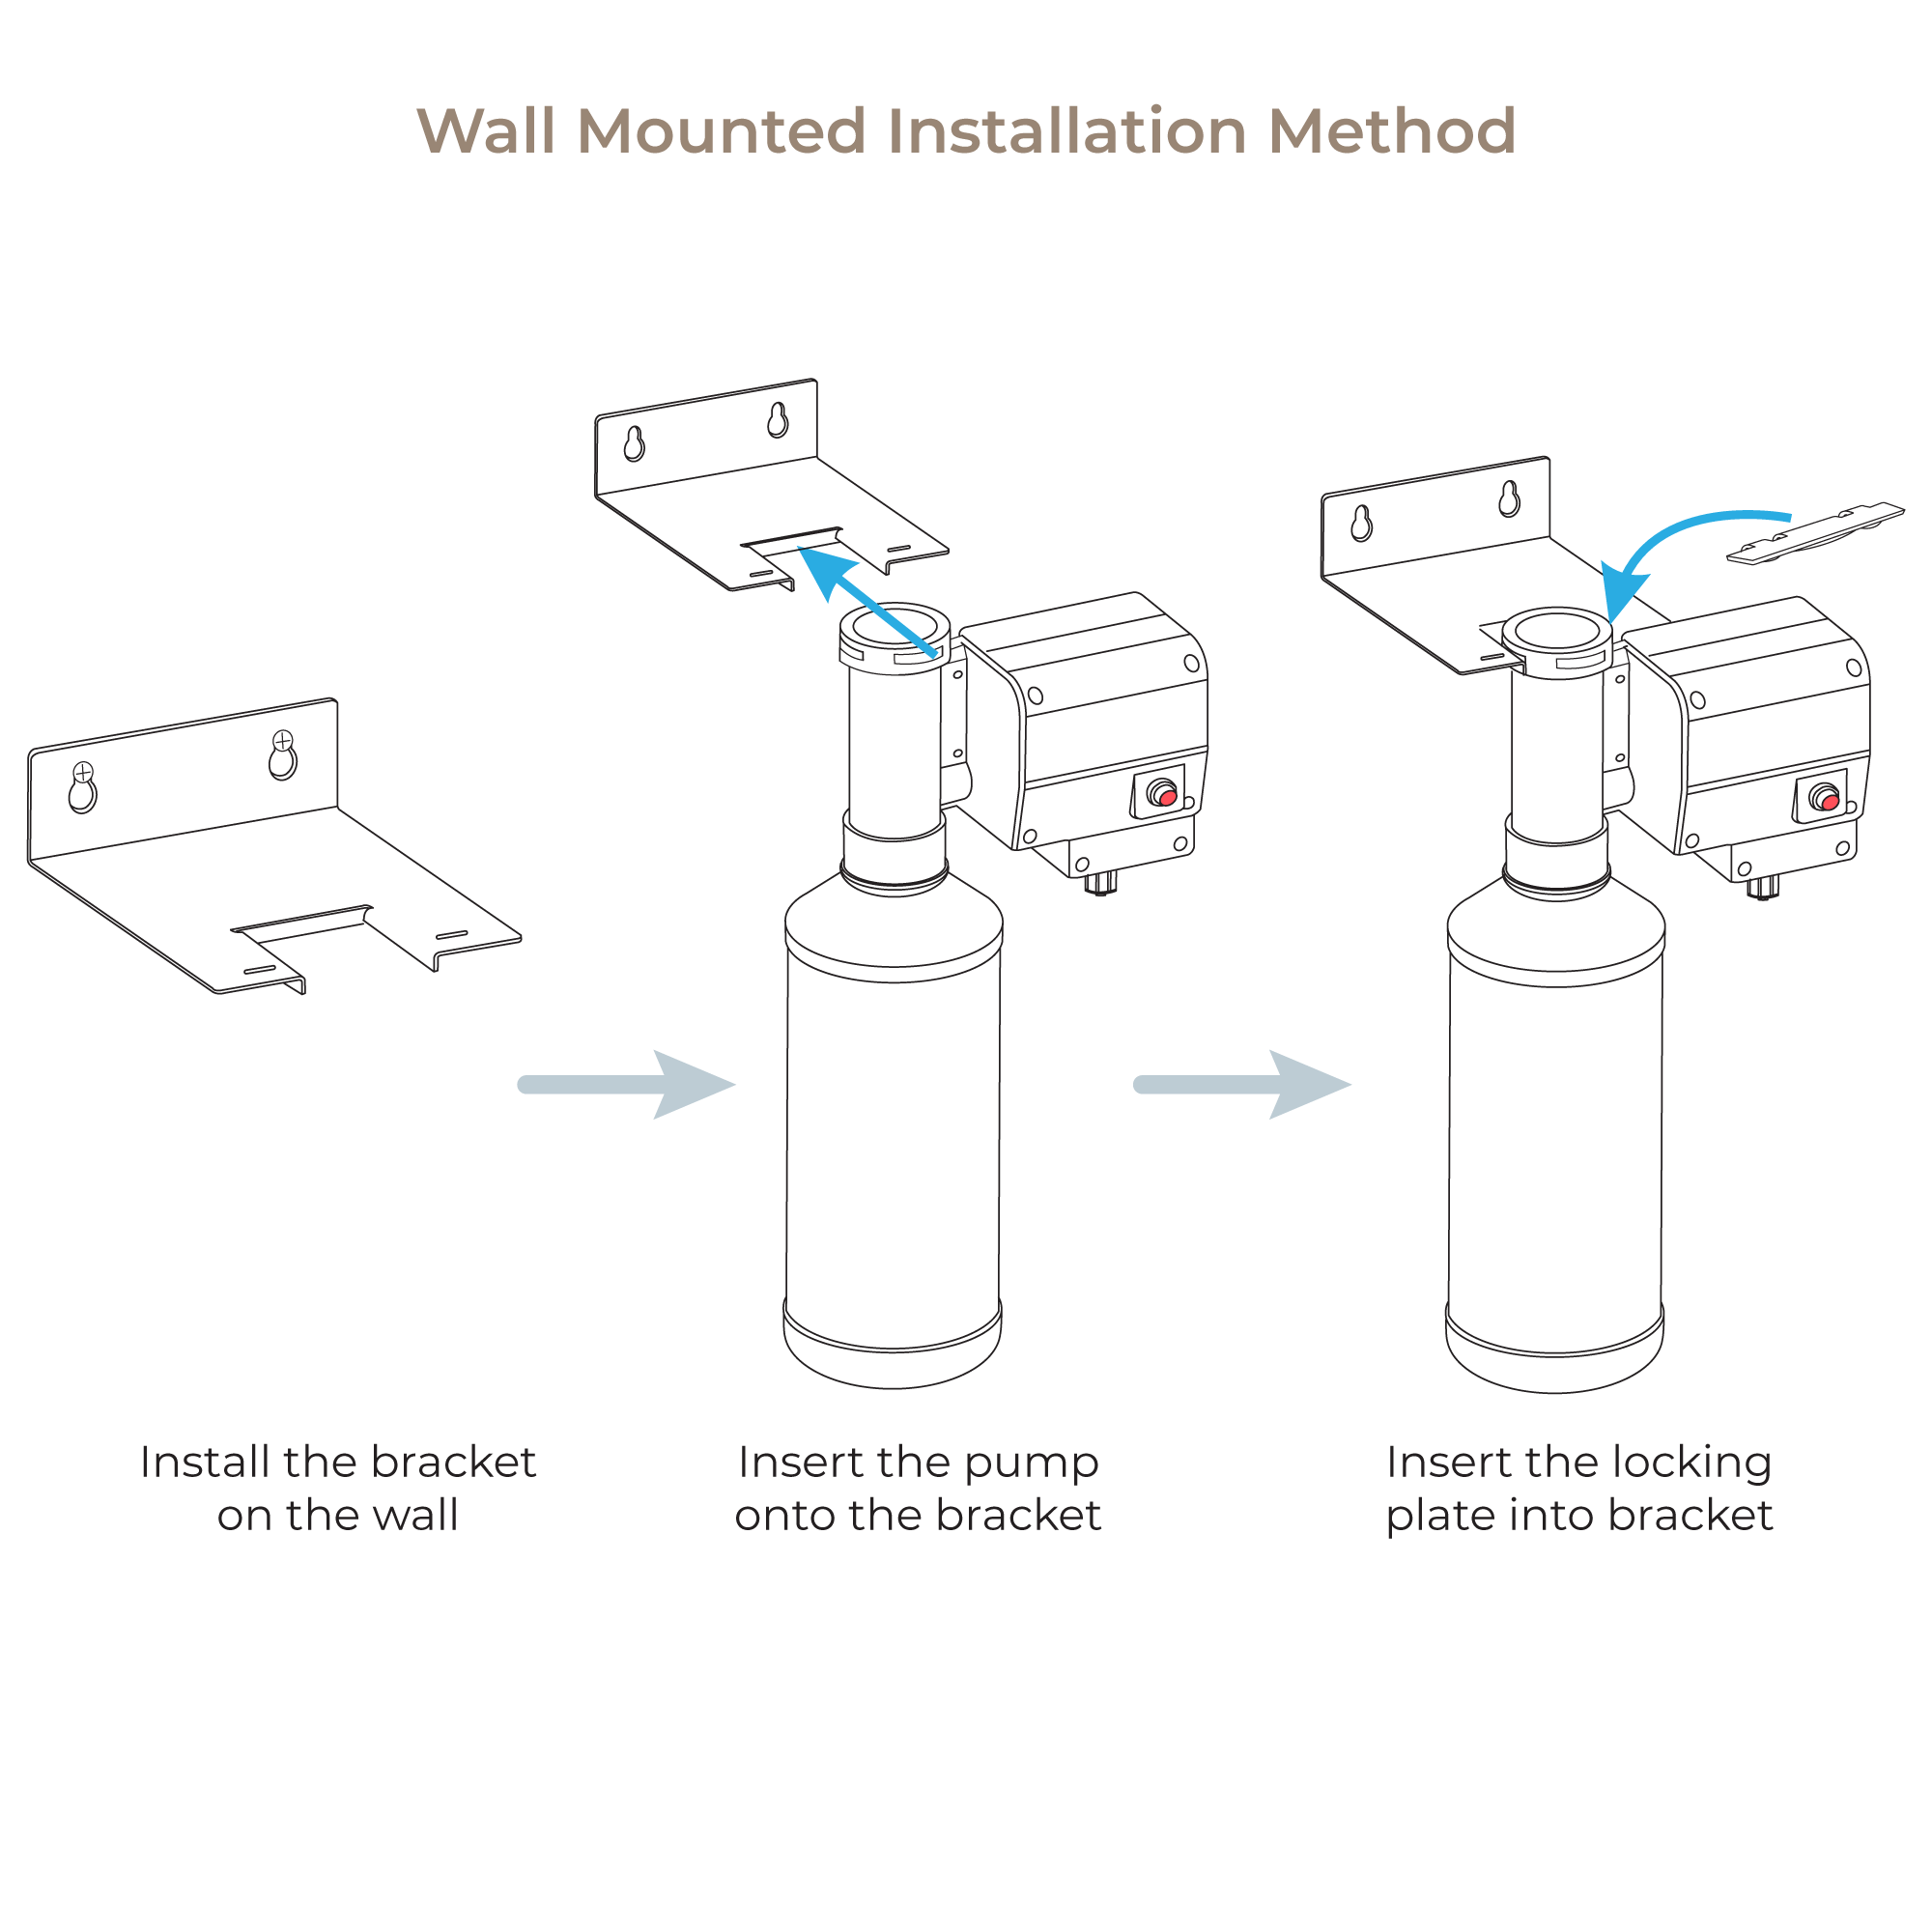
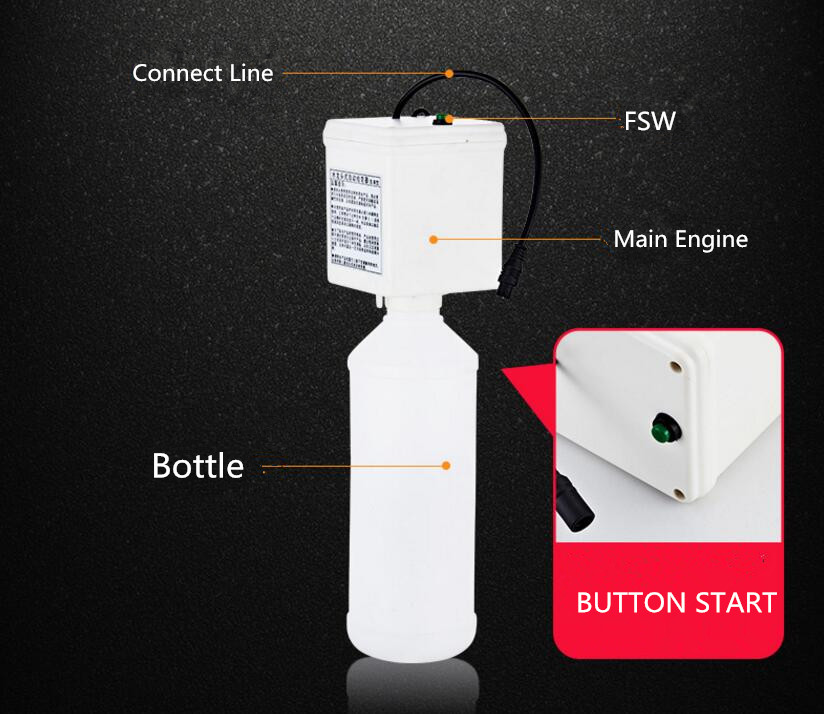
InstallationInstall the Spout: Attach the spout to the sink or basin, making sure to thread the dispensing cable and sensor cable through the corresponding hole in the sink or basin. Secure the Spout to the Sink/Basin: Fasten the metal back nut onto the spout's thread until it reaches the underside of the sink or basin. Use an appropriate spanner to tighten the back nut securely. Mount the Wall Brackets: Position the brackets on the wall surface and mark where the fixing holes will be placed. Once marked, remove the brackets and drill suitable holes for the provided wall plugs. Before drilling, ensure there are no hidden electrical wires, cables, or water supply pipes using an electrical detector. After drilling, fit the wall plugs and reposition the brackets, securing them with the provided screws. Attach the Pump to the Bottle: Ensure the dispenser tube is inside the bottle, then firmly press the pump down onto the bottle until it audibly clicks. To detach the pump, press the release button on the side of the pump and pull it away from the bottle. Connect the Sensor Cable and Dispenser Cable: Join the sensor cable from the spout with the sensor cable on the pump, ensuring a secure connection by tightening the connecting ring. Insert the dispensing cable from the spout into the top connection on the pump and tighten the nut firmly using a suitable spanner. Position the Pump into the Bracket: Slide the pump into the bracket, aligning the cut-out section of the pump with the slot in the wall bracket. Connect the Power Supply Cable: Before any electrical work, ensure the power supply is turned off. Wire the electrical power cable into a switched fused spur off the ring main, connecting the blue wire to the neutral connection and the brown wire to the live connection. The power lead should be permanently connected to the mains supply using the factory-supplied power cable. Plug the power cable into the pump's power socket. Insert Batteries: Remove the battery cover by loosening the screw on top of the cover. Insert four batteries into the battery box, ensuring correct orientation. Replace the battery box cover and tighten the screw, then insert the battery box into the holder and push it into the wall bracket.
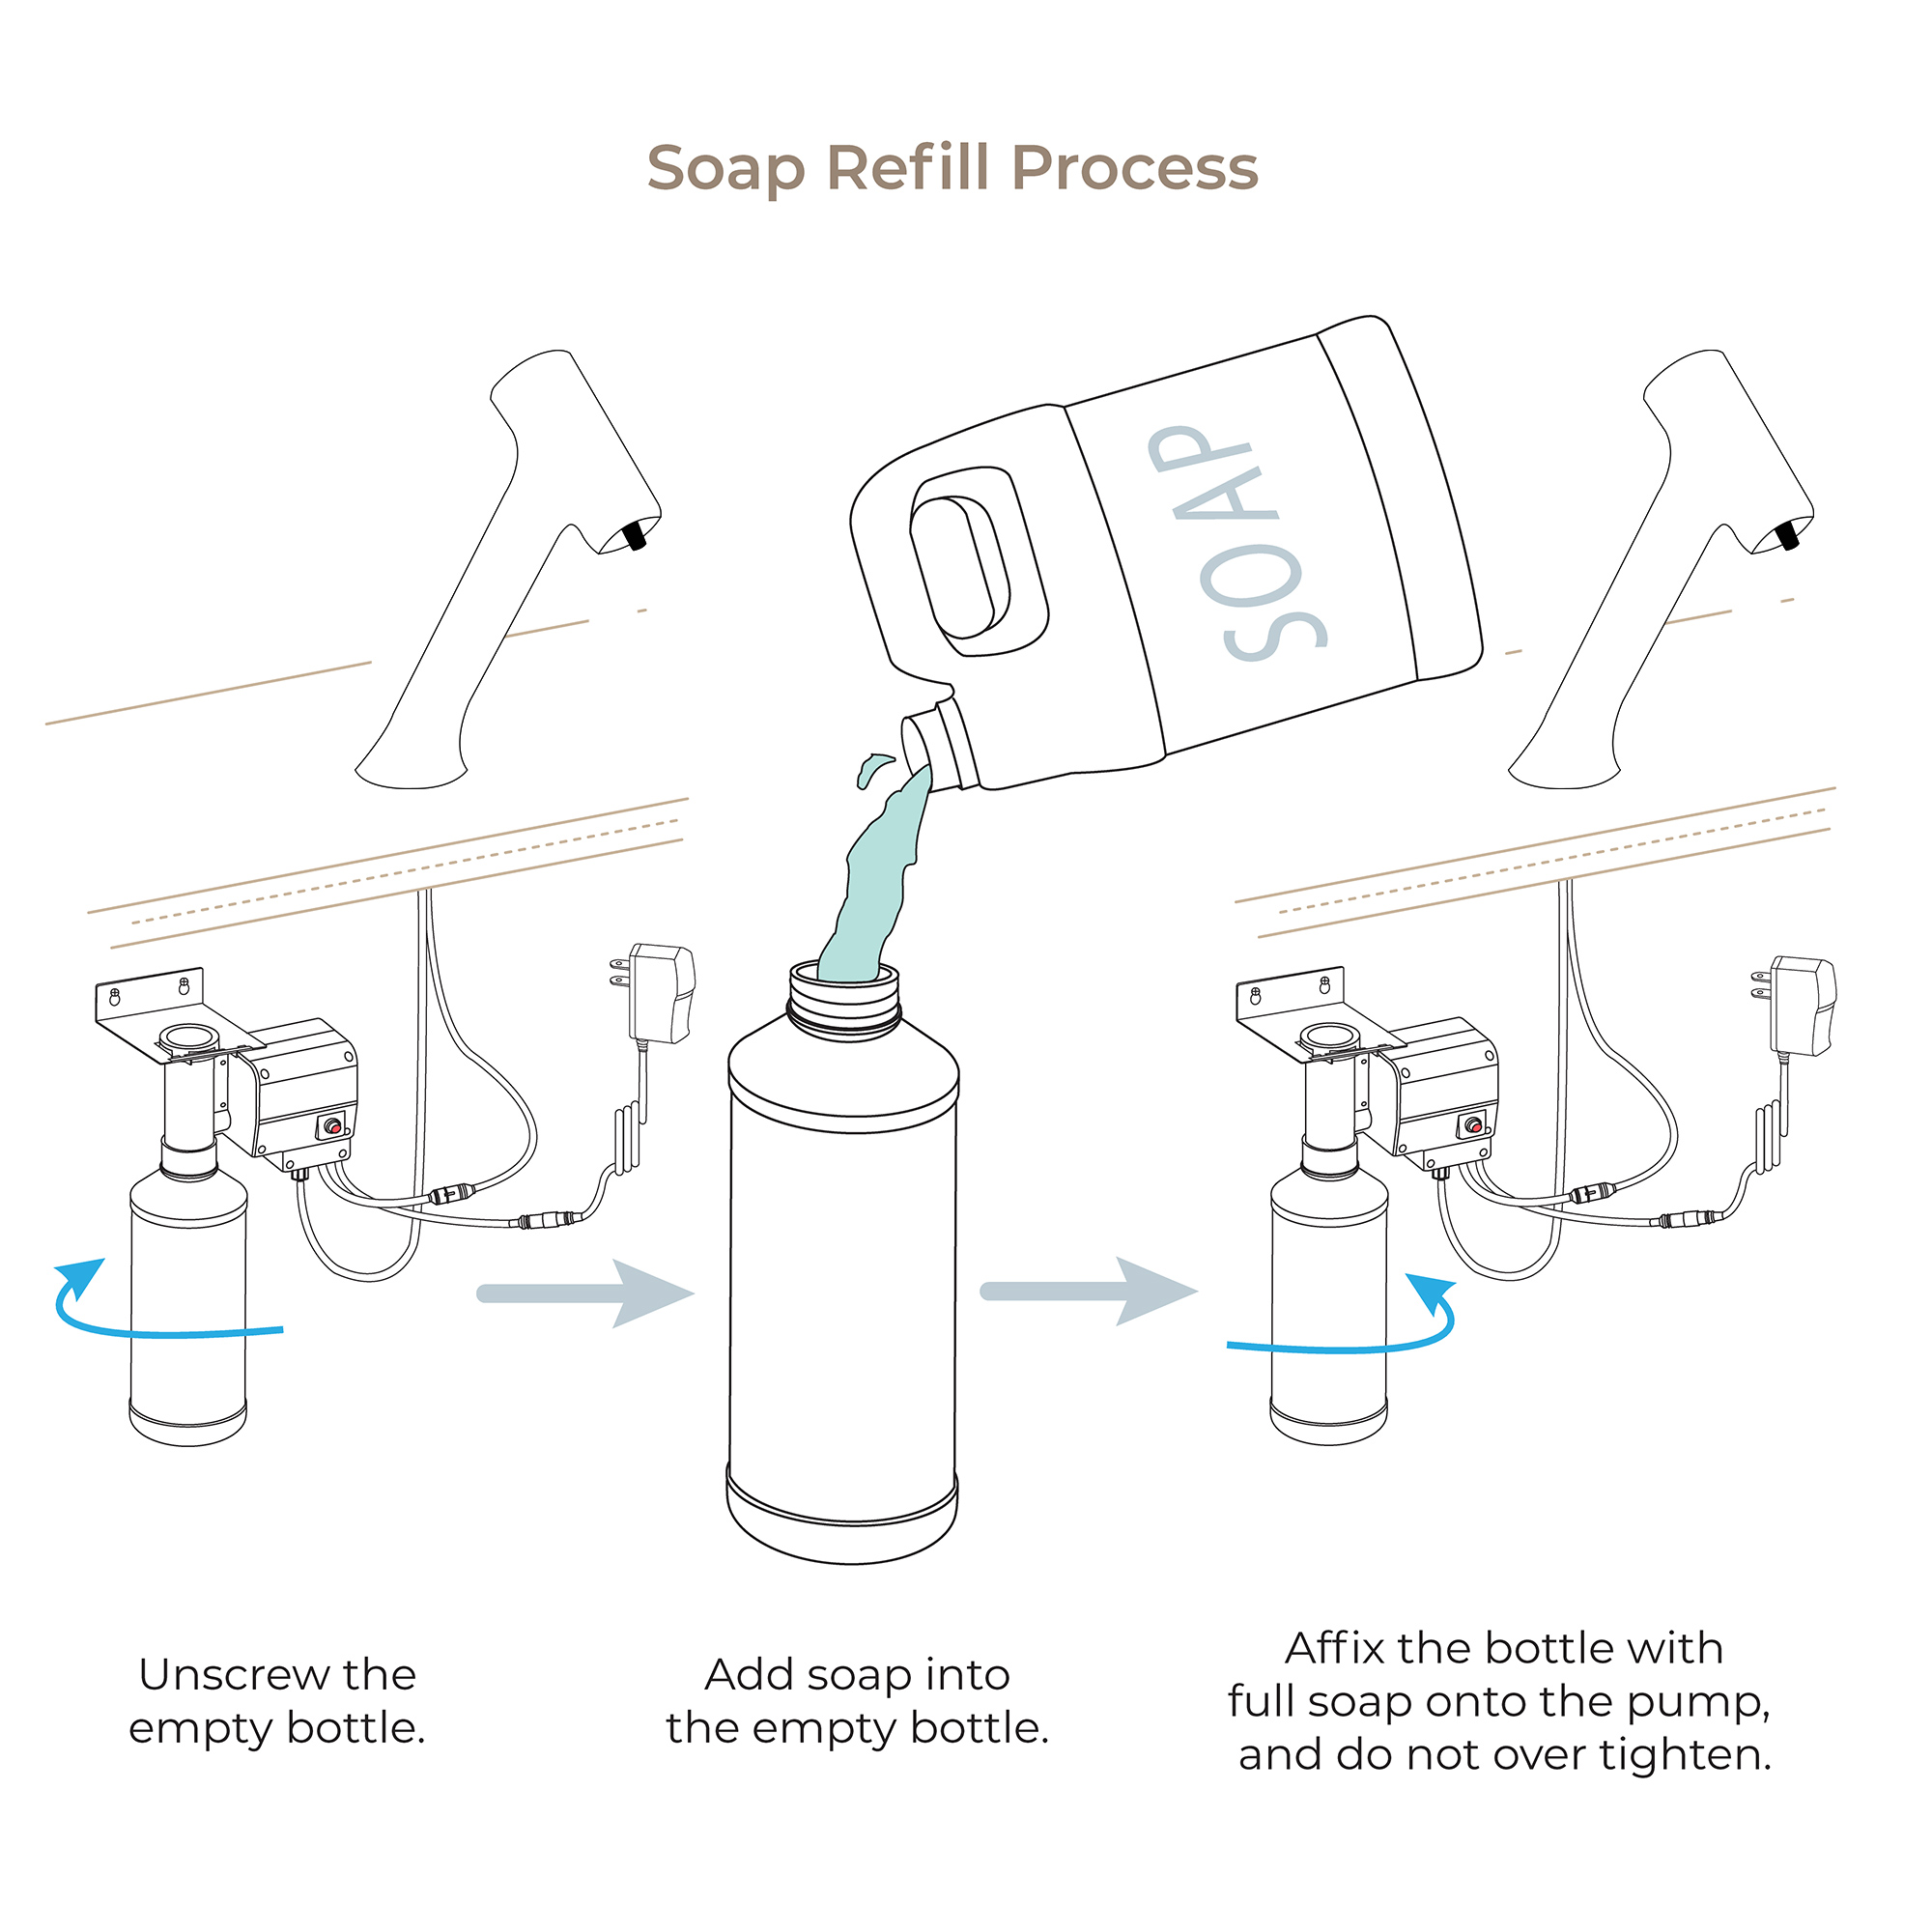
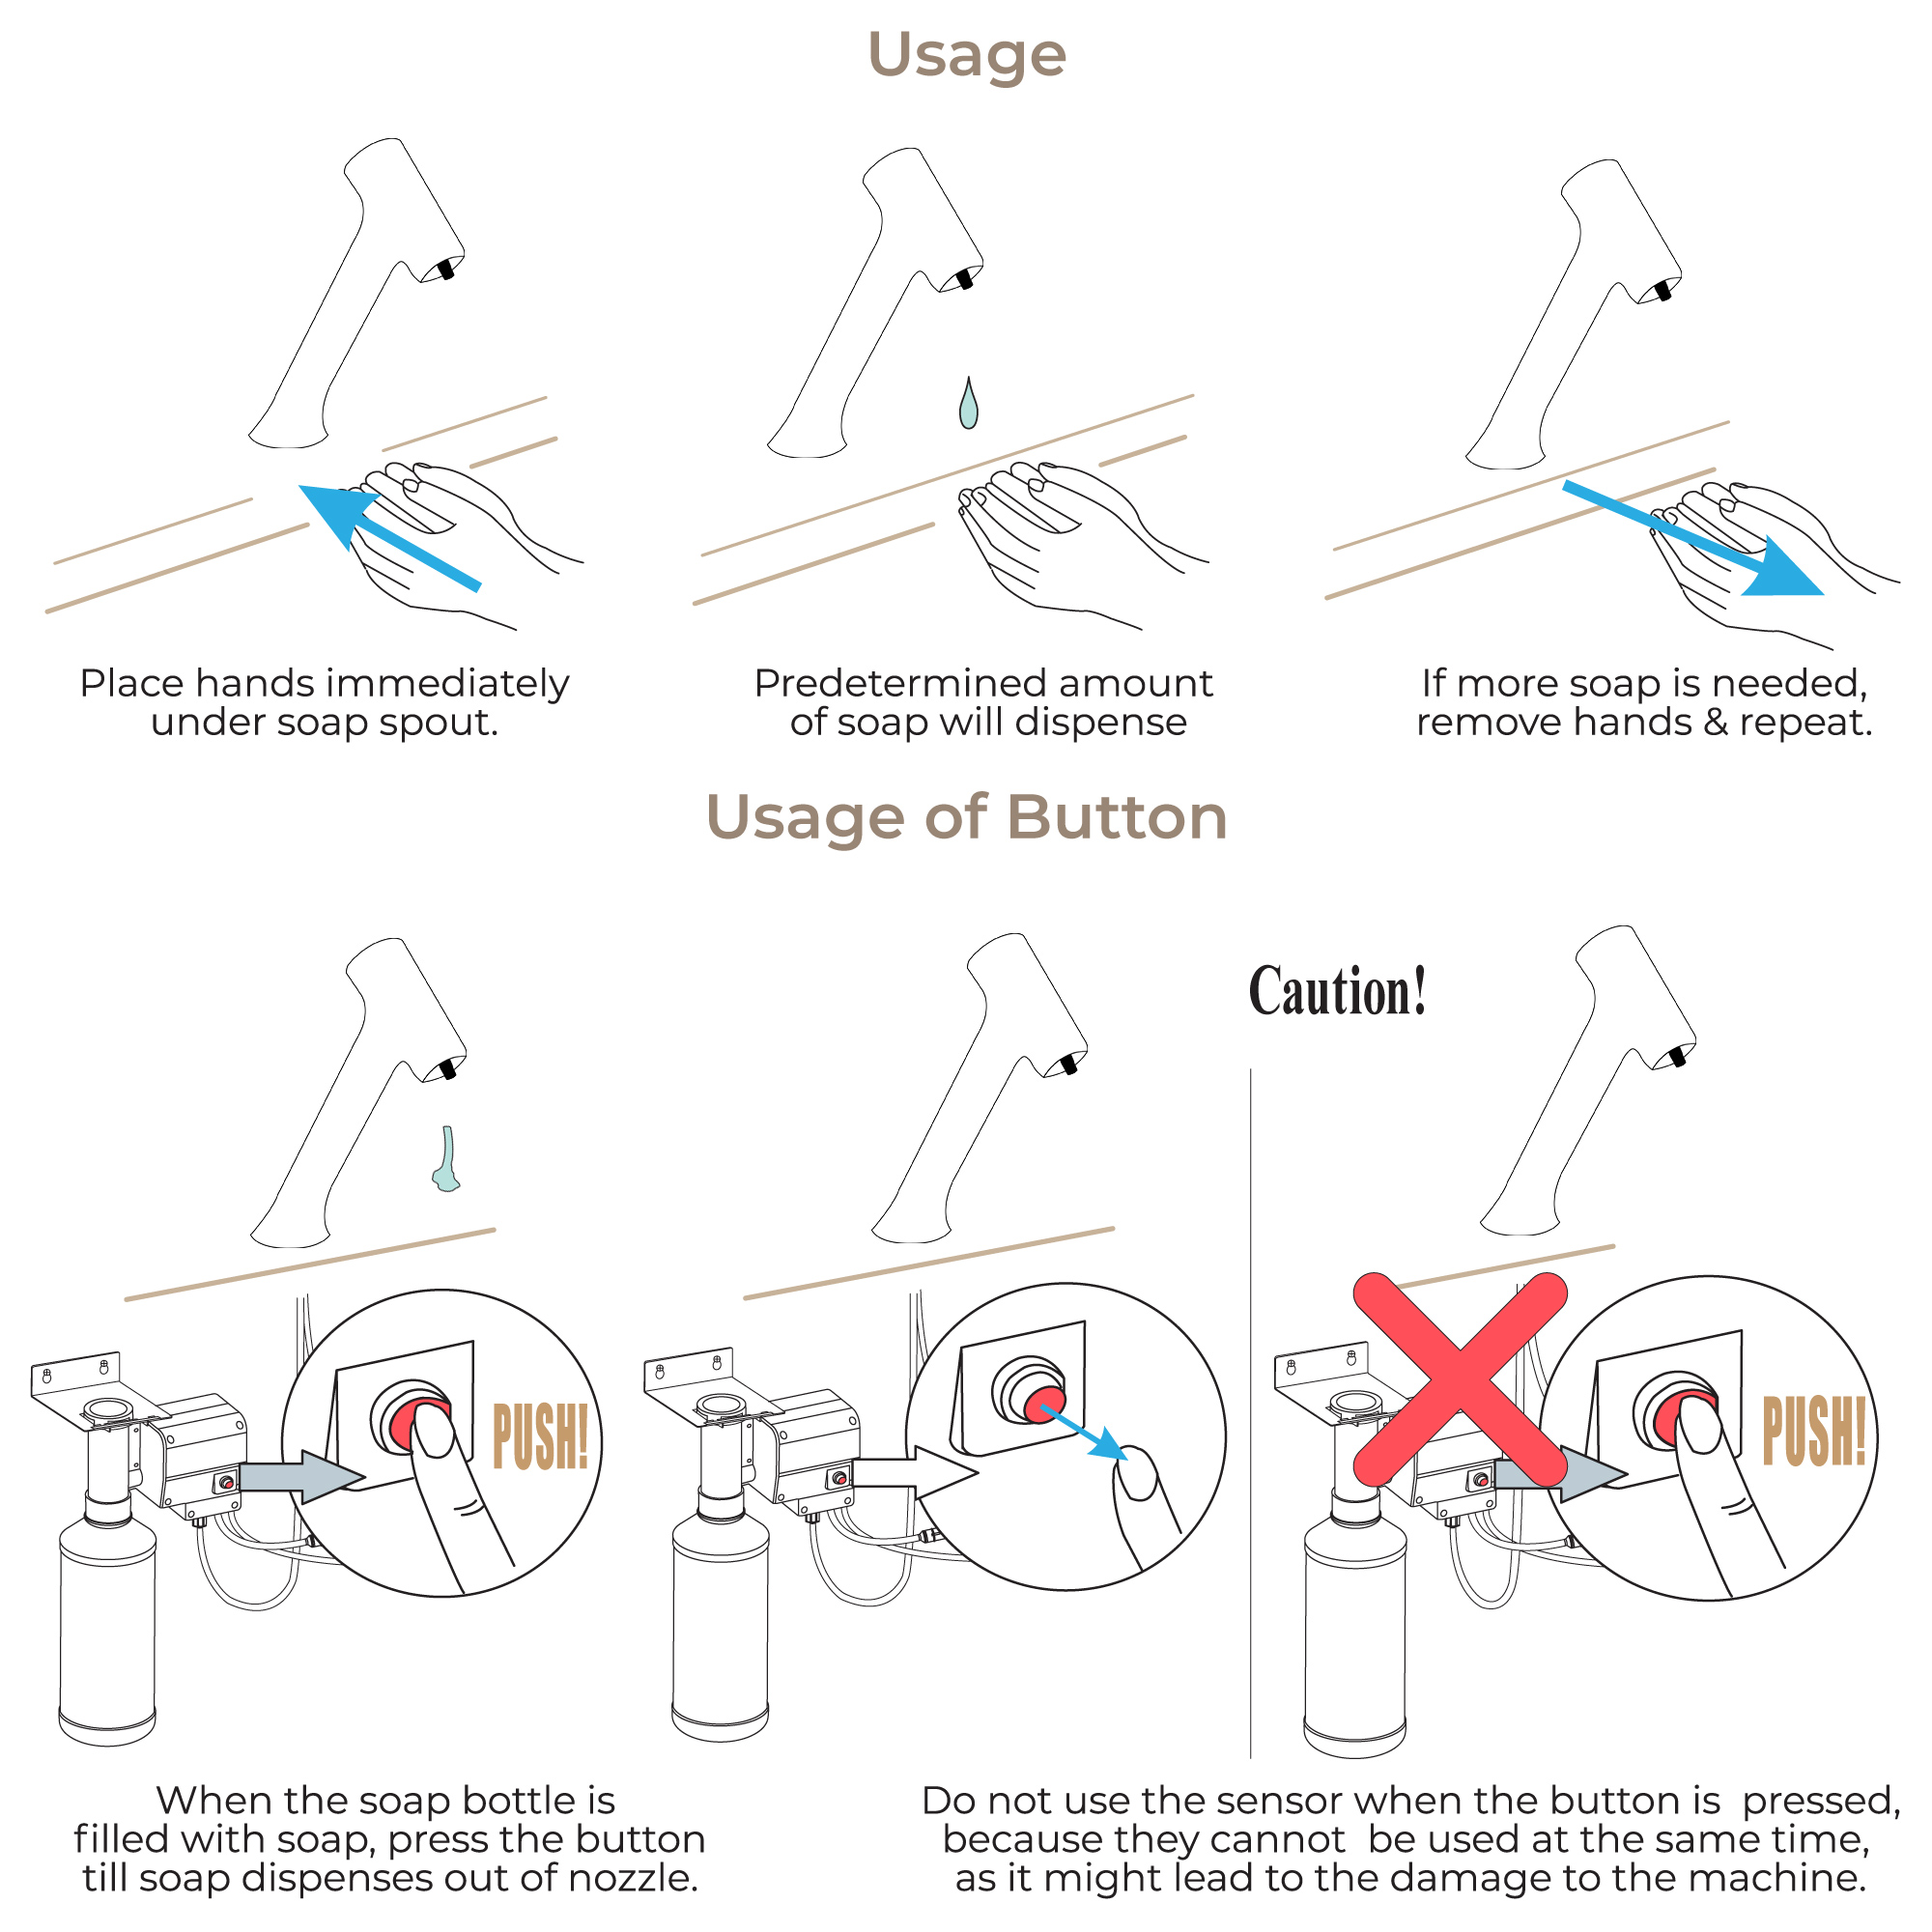
Commissioning SequencePrior to the initial use of the soap dispenser, please follow these steps:
- Fill the soap bottle completely.
- Find the dispense button located on the side of the pump. Press and hold the button until the soap flows out from the spout. This action ensures that both dispenser tube and cable are fully primed with soap.
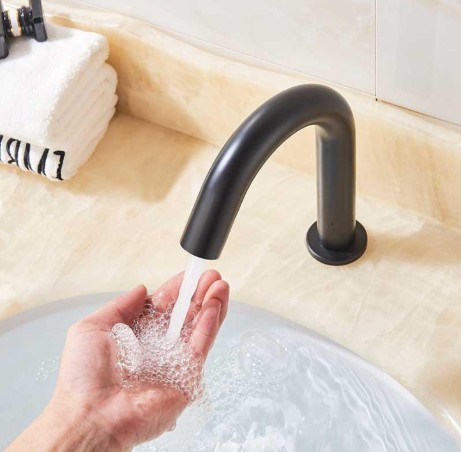
OperationUsing the Automatic Soap Dispenser
- Position your hands under the spout within the sensing range. Once the system detects the user's hands, a small quantity of soap will be dispensed from the spout into the user's hands.
- Once the system detects the user's hands, a small quantity of soap will be dispensed from the spout into the user's hands.
Features
- Material: Crafted from brass, the faucet body exudes elegance and style.
- Anti- Blocking: Our independently developed soap pump incorporates multiple anti-blocking mechanisms into its design.
- Impurity Filtration: Equipped with a built-in filter unit, effectively sieving impurities to safeguard the soap pump and extends its operational lifespan.
- Button function: Easily refill the soap bottle by simply pressing the button.
- Resource conservation: Save up to 30% of soap solution and facilitate effortless cleaning, conserving both time and water.
- Hygienic: Minimize bacterial transmission by eliminating the need to touch the faucet body.
- Moisture-proof seal: Our electronic control unit featured professional moisture-resistant sealant technology for optimal protection against moisture damage.
CARE AND MAINTENANCE - General Instructions
1. Fill the soap bottle with soap for the first use.
2. Press and hold the button until soap is dispensed from the nozzle.
3. Place hand below the nozzle to dispense soap into the palm of hand.
CARE AND MAINTENANCE
- If the soap dispenser does not operate properly, start by ensuring all connections are securely tightened and devoid of any air leaks. If the dispenser continues to malfunction, immerse the manifold in a bottle of warm water. Pump the warm water through the dispenser to clear away any dried soap residue, then reattach the manifold to the soap bottle.
- To clean watermarks and soap residue from polished chrome surfaces, utilize warm water and a gentle detergent. For brushed stainless steel soap dispensers, employ a stainless-steel cleaner. Avoid using abrasive cloths to tackle stubborn stains. Finish by drying the surface with a soft, clean cloth.
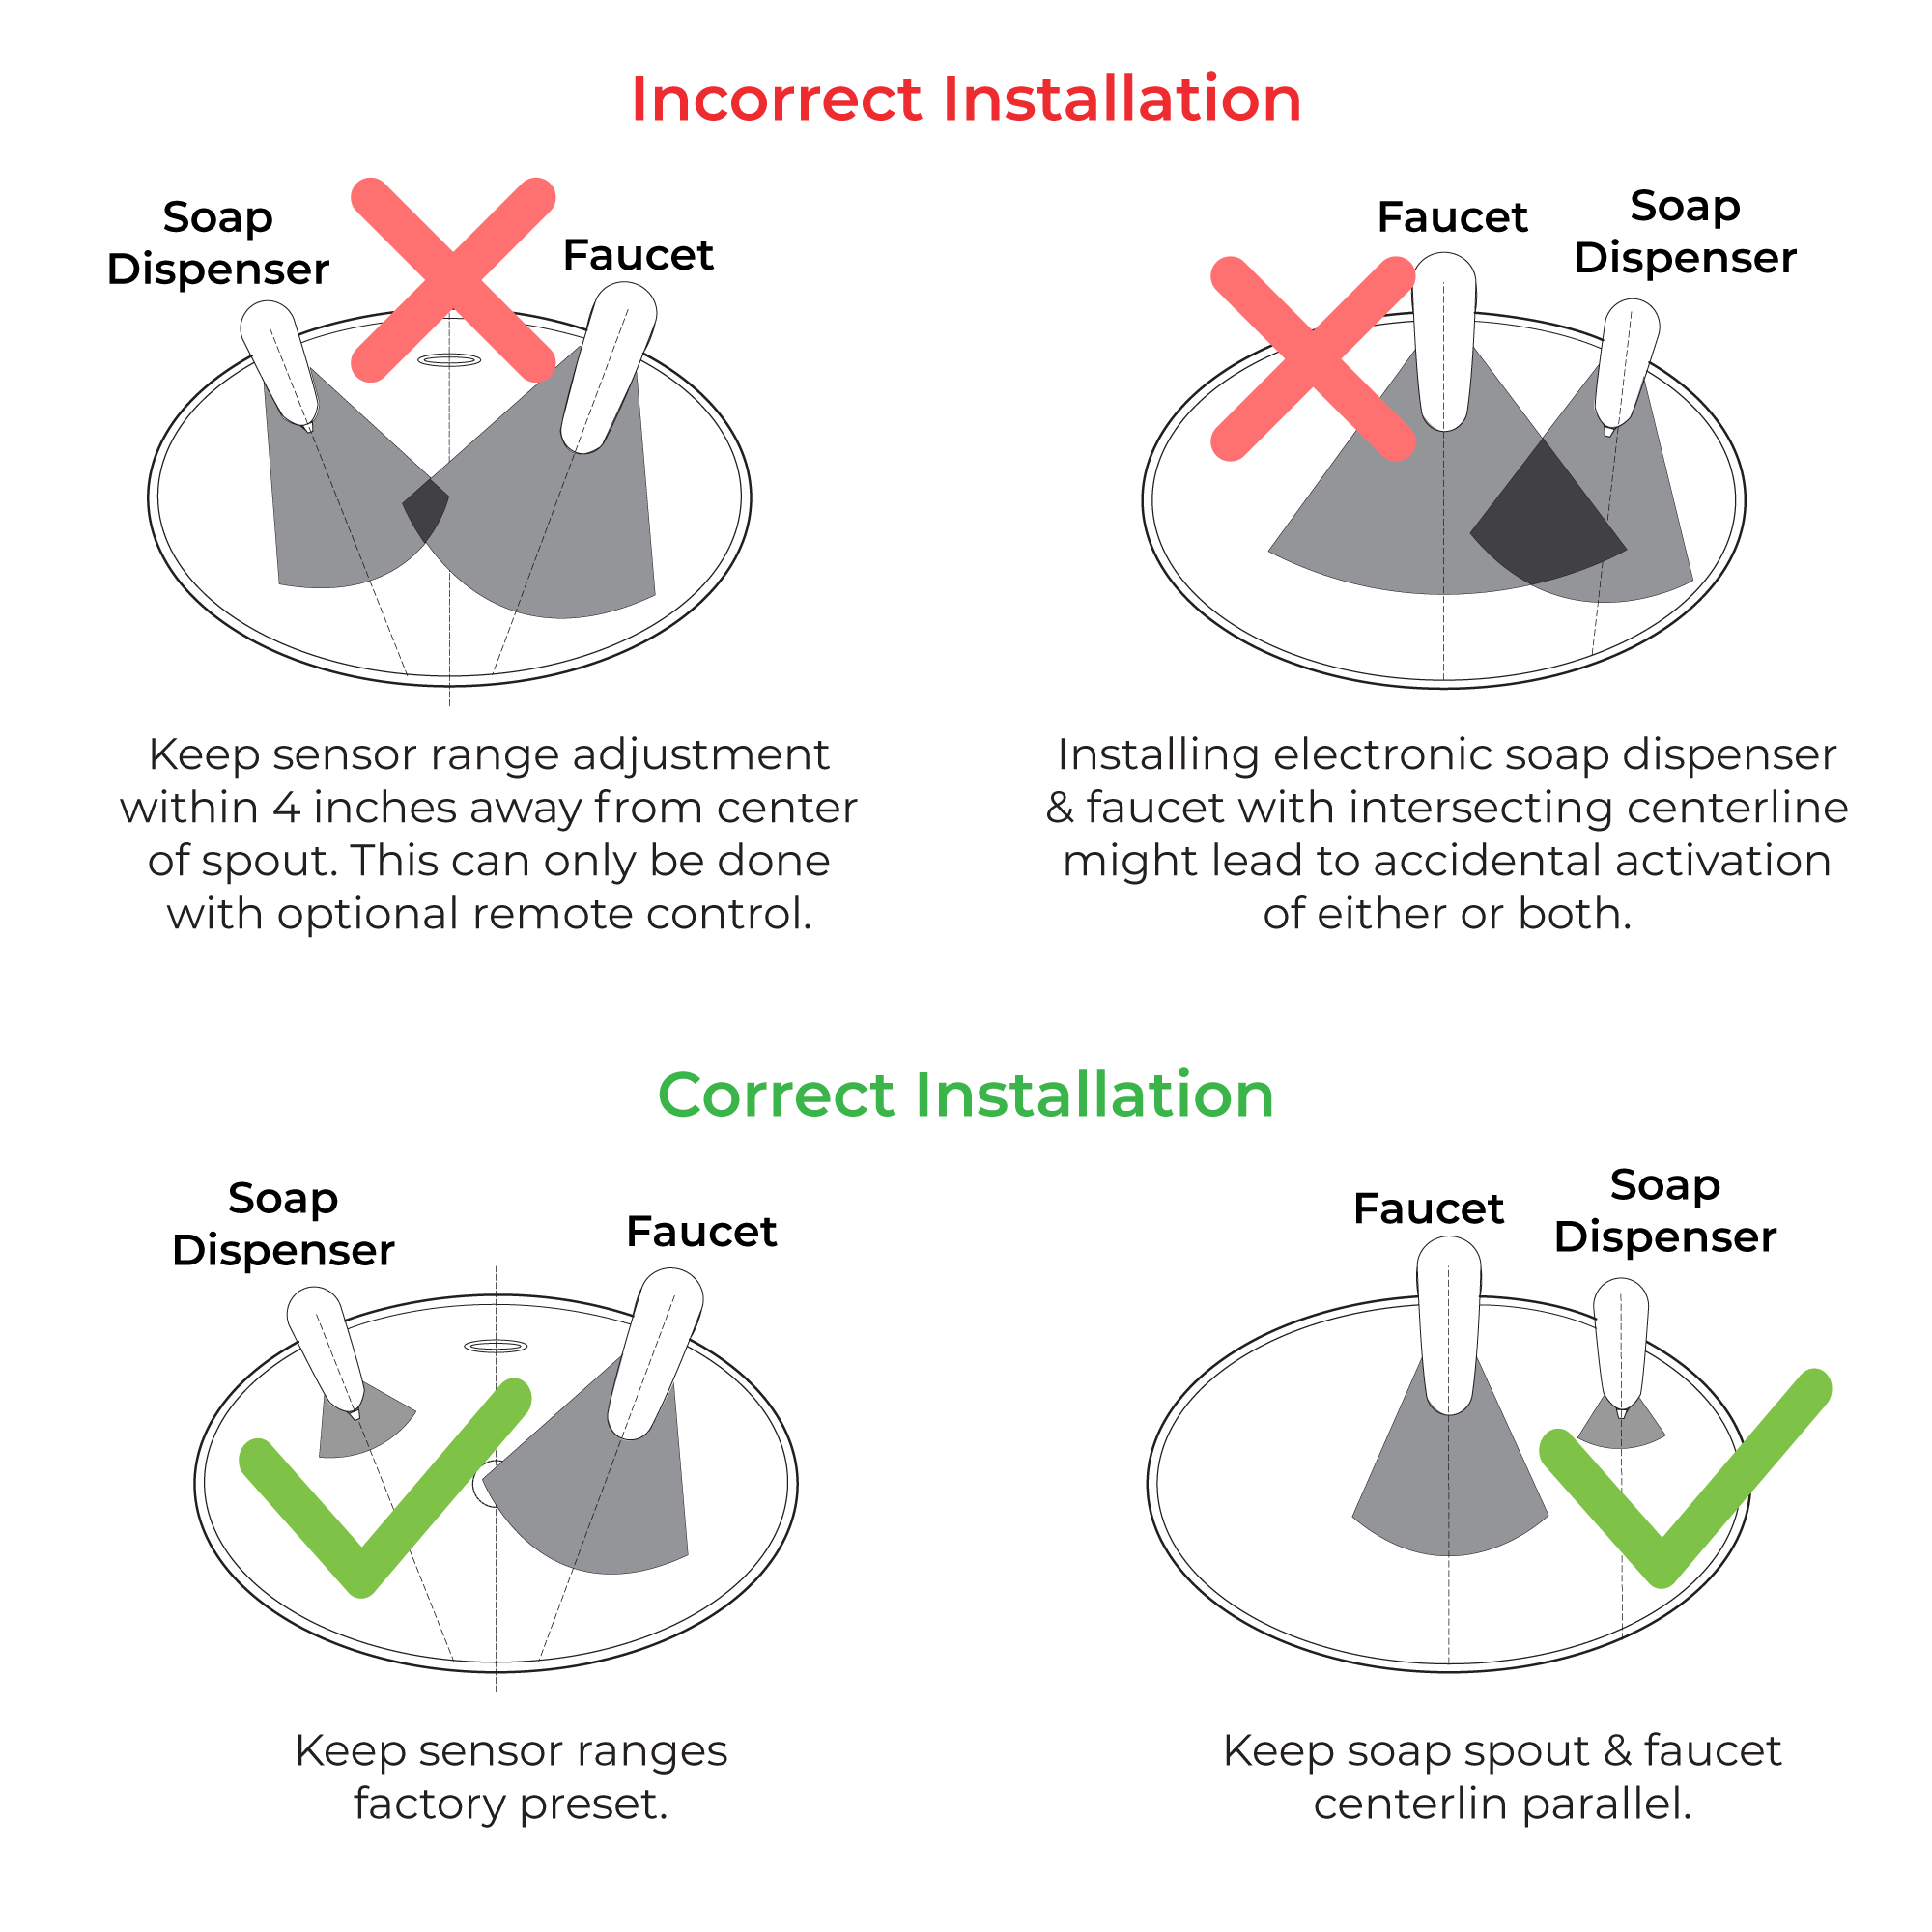
- ALWAYS install the soap tank supplying the dispenser(s) BELOW the level of the dispensers.
- NEVER install the soap tank supplying the dispenser(s) ABOVE the level of the dispensers.
Further Instruction:
- The type and brand of soap used in these dispensers should remain consistent throughout the lifespan of the dispenser. Mixing different soaps can alter their chemical properties and potentially increase their aggressiveness. If there is a need to switch to a different type or brand of soap, thoroughly flush out and clean the soap dispensers and system before introducing the new soap.
|
|

|
|
|
|
|
|
|
|
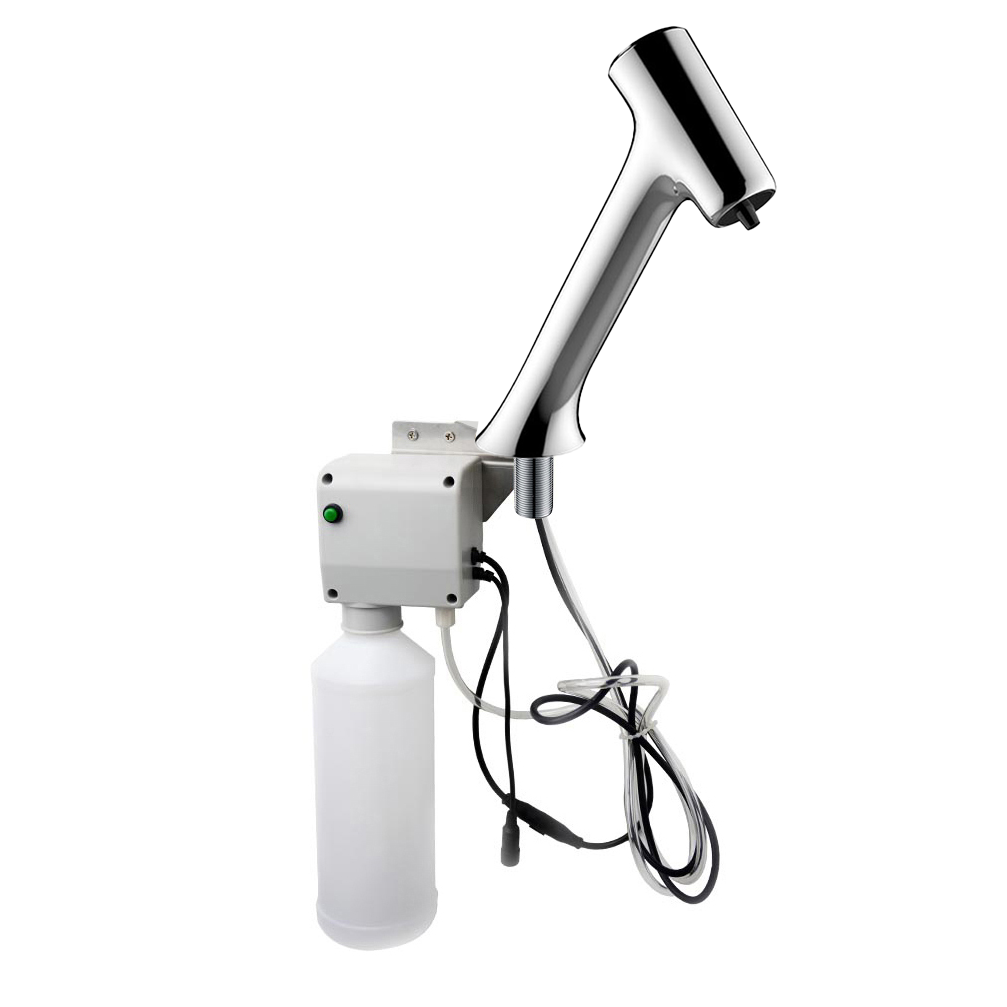
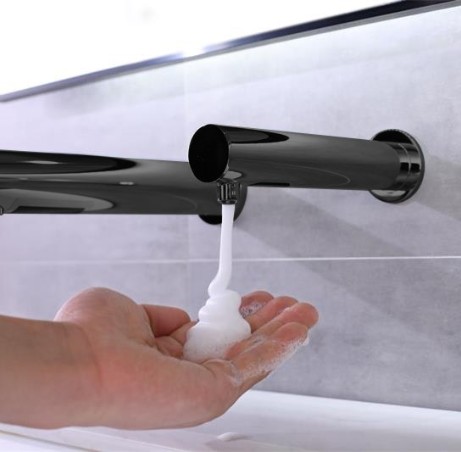
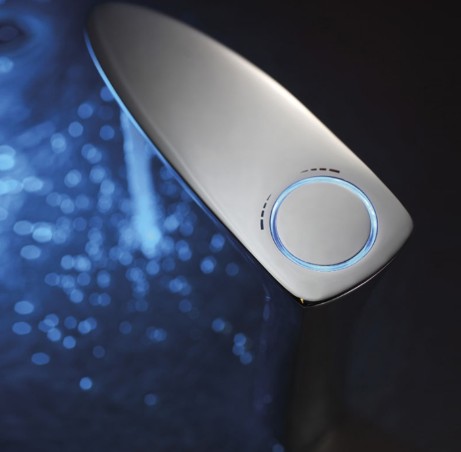
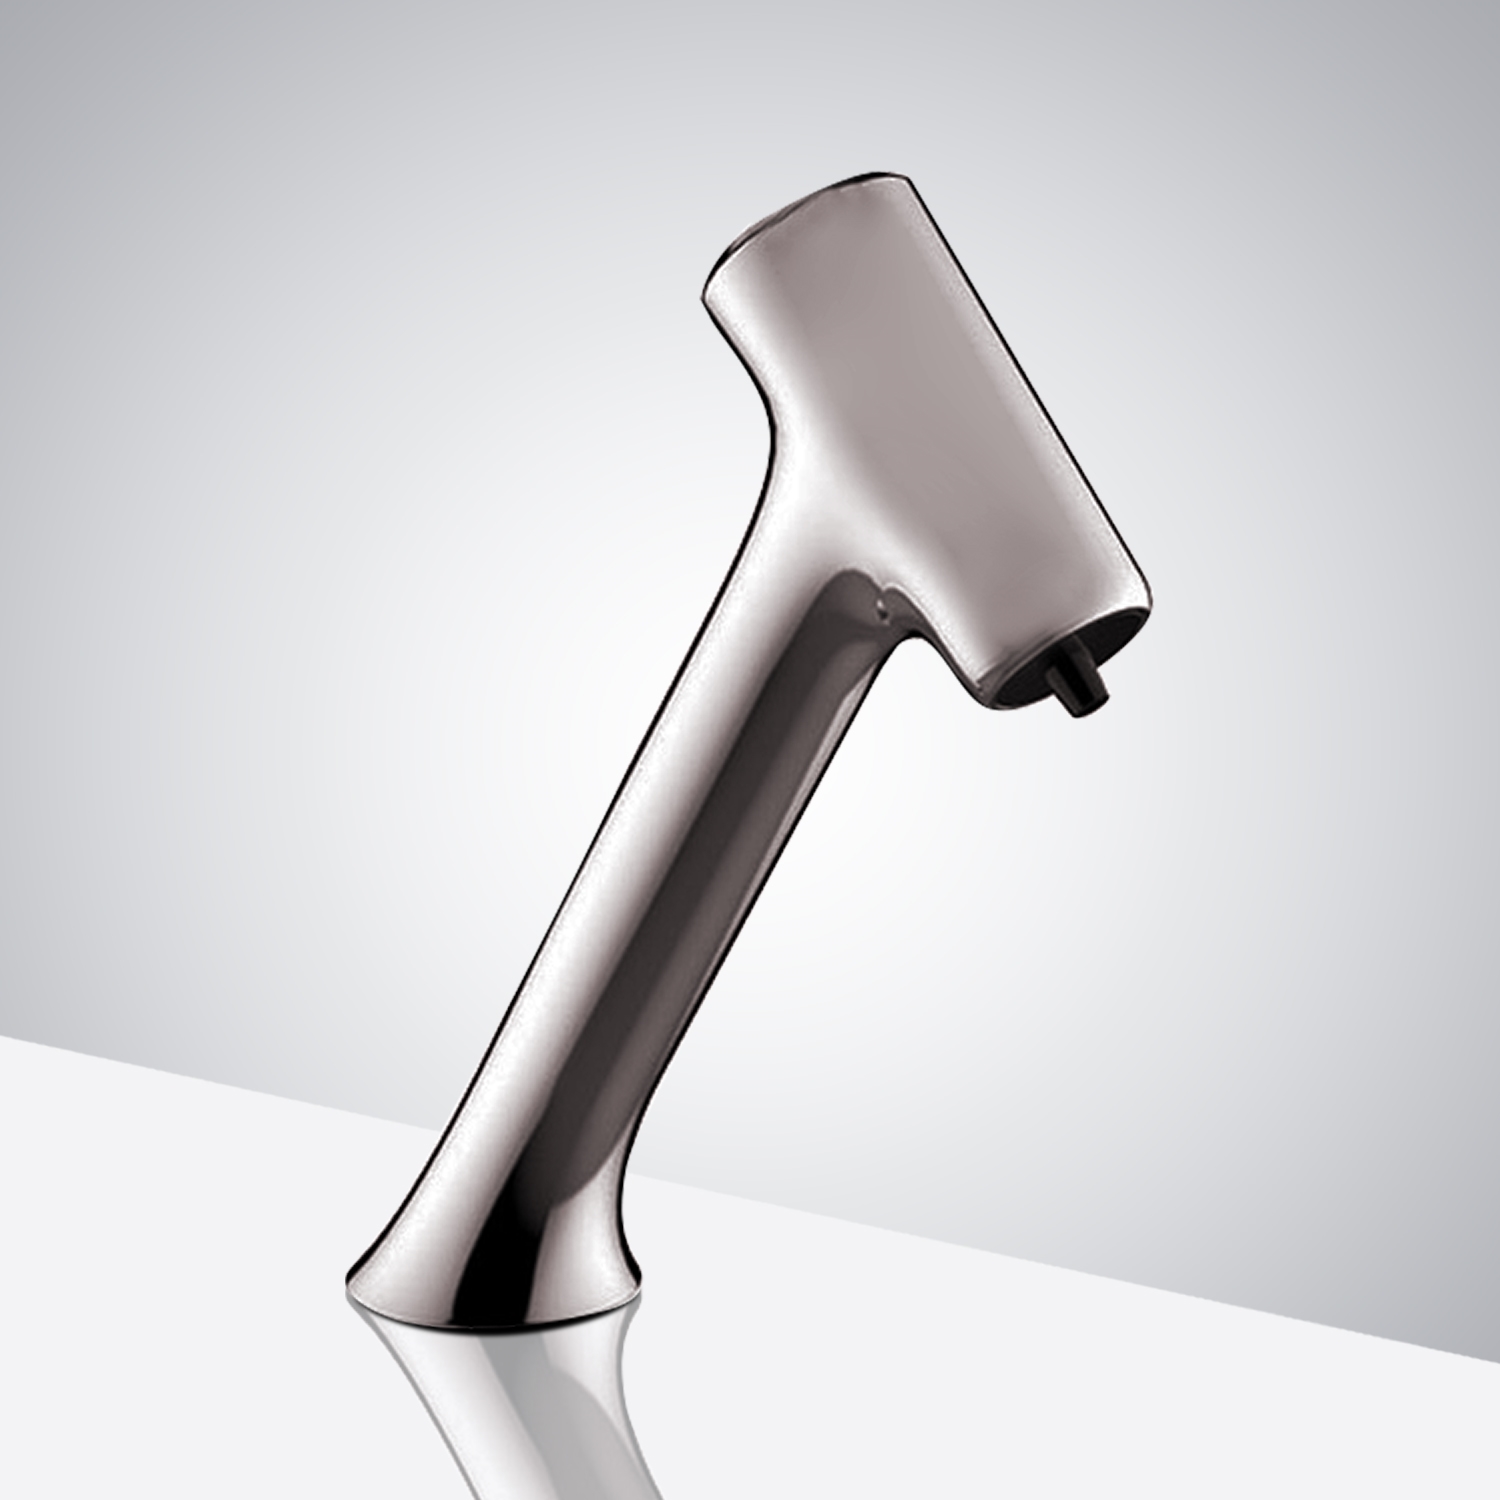
Fontana Sète Deck Mount Commercial Sensor
Soap Dispenser
| The Fontana Sète automatic soap dispenser boasts a sleek Commercial Deck Mount Motion Sensor design, enhancing sanitation with its efficient soap dispensing capabilities and chrome body finish. Featuring an all-in-one sensor design and a generous 0.26-gallon (1500ml) soap container, it promptly dispenses soap upon detection by the sensor eye. With a versatile multi-voltage power supply accommodating input voltages between AC 110-240V, it suits various project requirements. This innovative dispenser not only conserves soap, water, and time but also minimizes germ transmission by eliminating the need for physical contact with faucets or handles. By reducing water wastage during the soap, lathering, and scrubbing process, it contributes to water conservation efforts. Maintenance is hassle-free, thanks to the built-in strainer that prevents debris from entering the solenoid valve and can be easily cleaned. Designed for commercial use in public restrooms, restaurants, offices, hospitals, and other public facilities, this dispenser fits seamlessly into all US standard plumbing configurations. |
|
|
Features:
|
Visit Product Page
|
- Brand Name: FontanaShowers
- Model Number: FS1223B
- Material: Brass
- Finish: Brushed Nickel
- Installation Type: Deck Mounted
- Power supply: AC110-240V; DC 6V
- Type: Automatic Soap Dispenser
- Capacity: 0.26gal (1000ml)
- Usage: Bathroom, Washing, Public Place
- Sensing Distance: 5-150mm
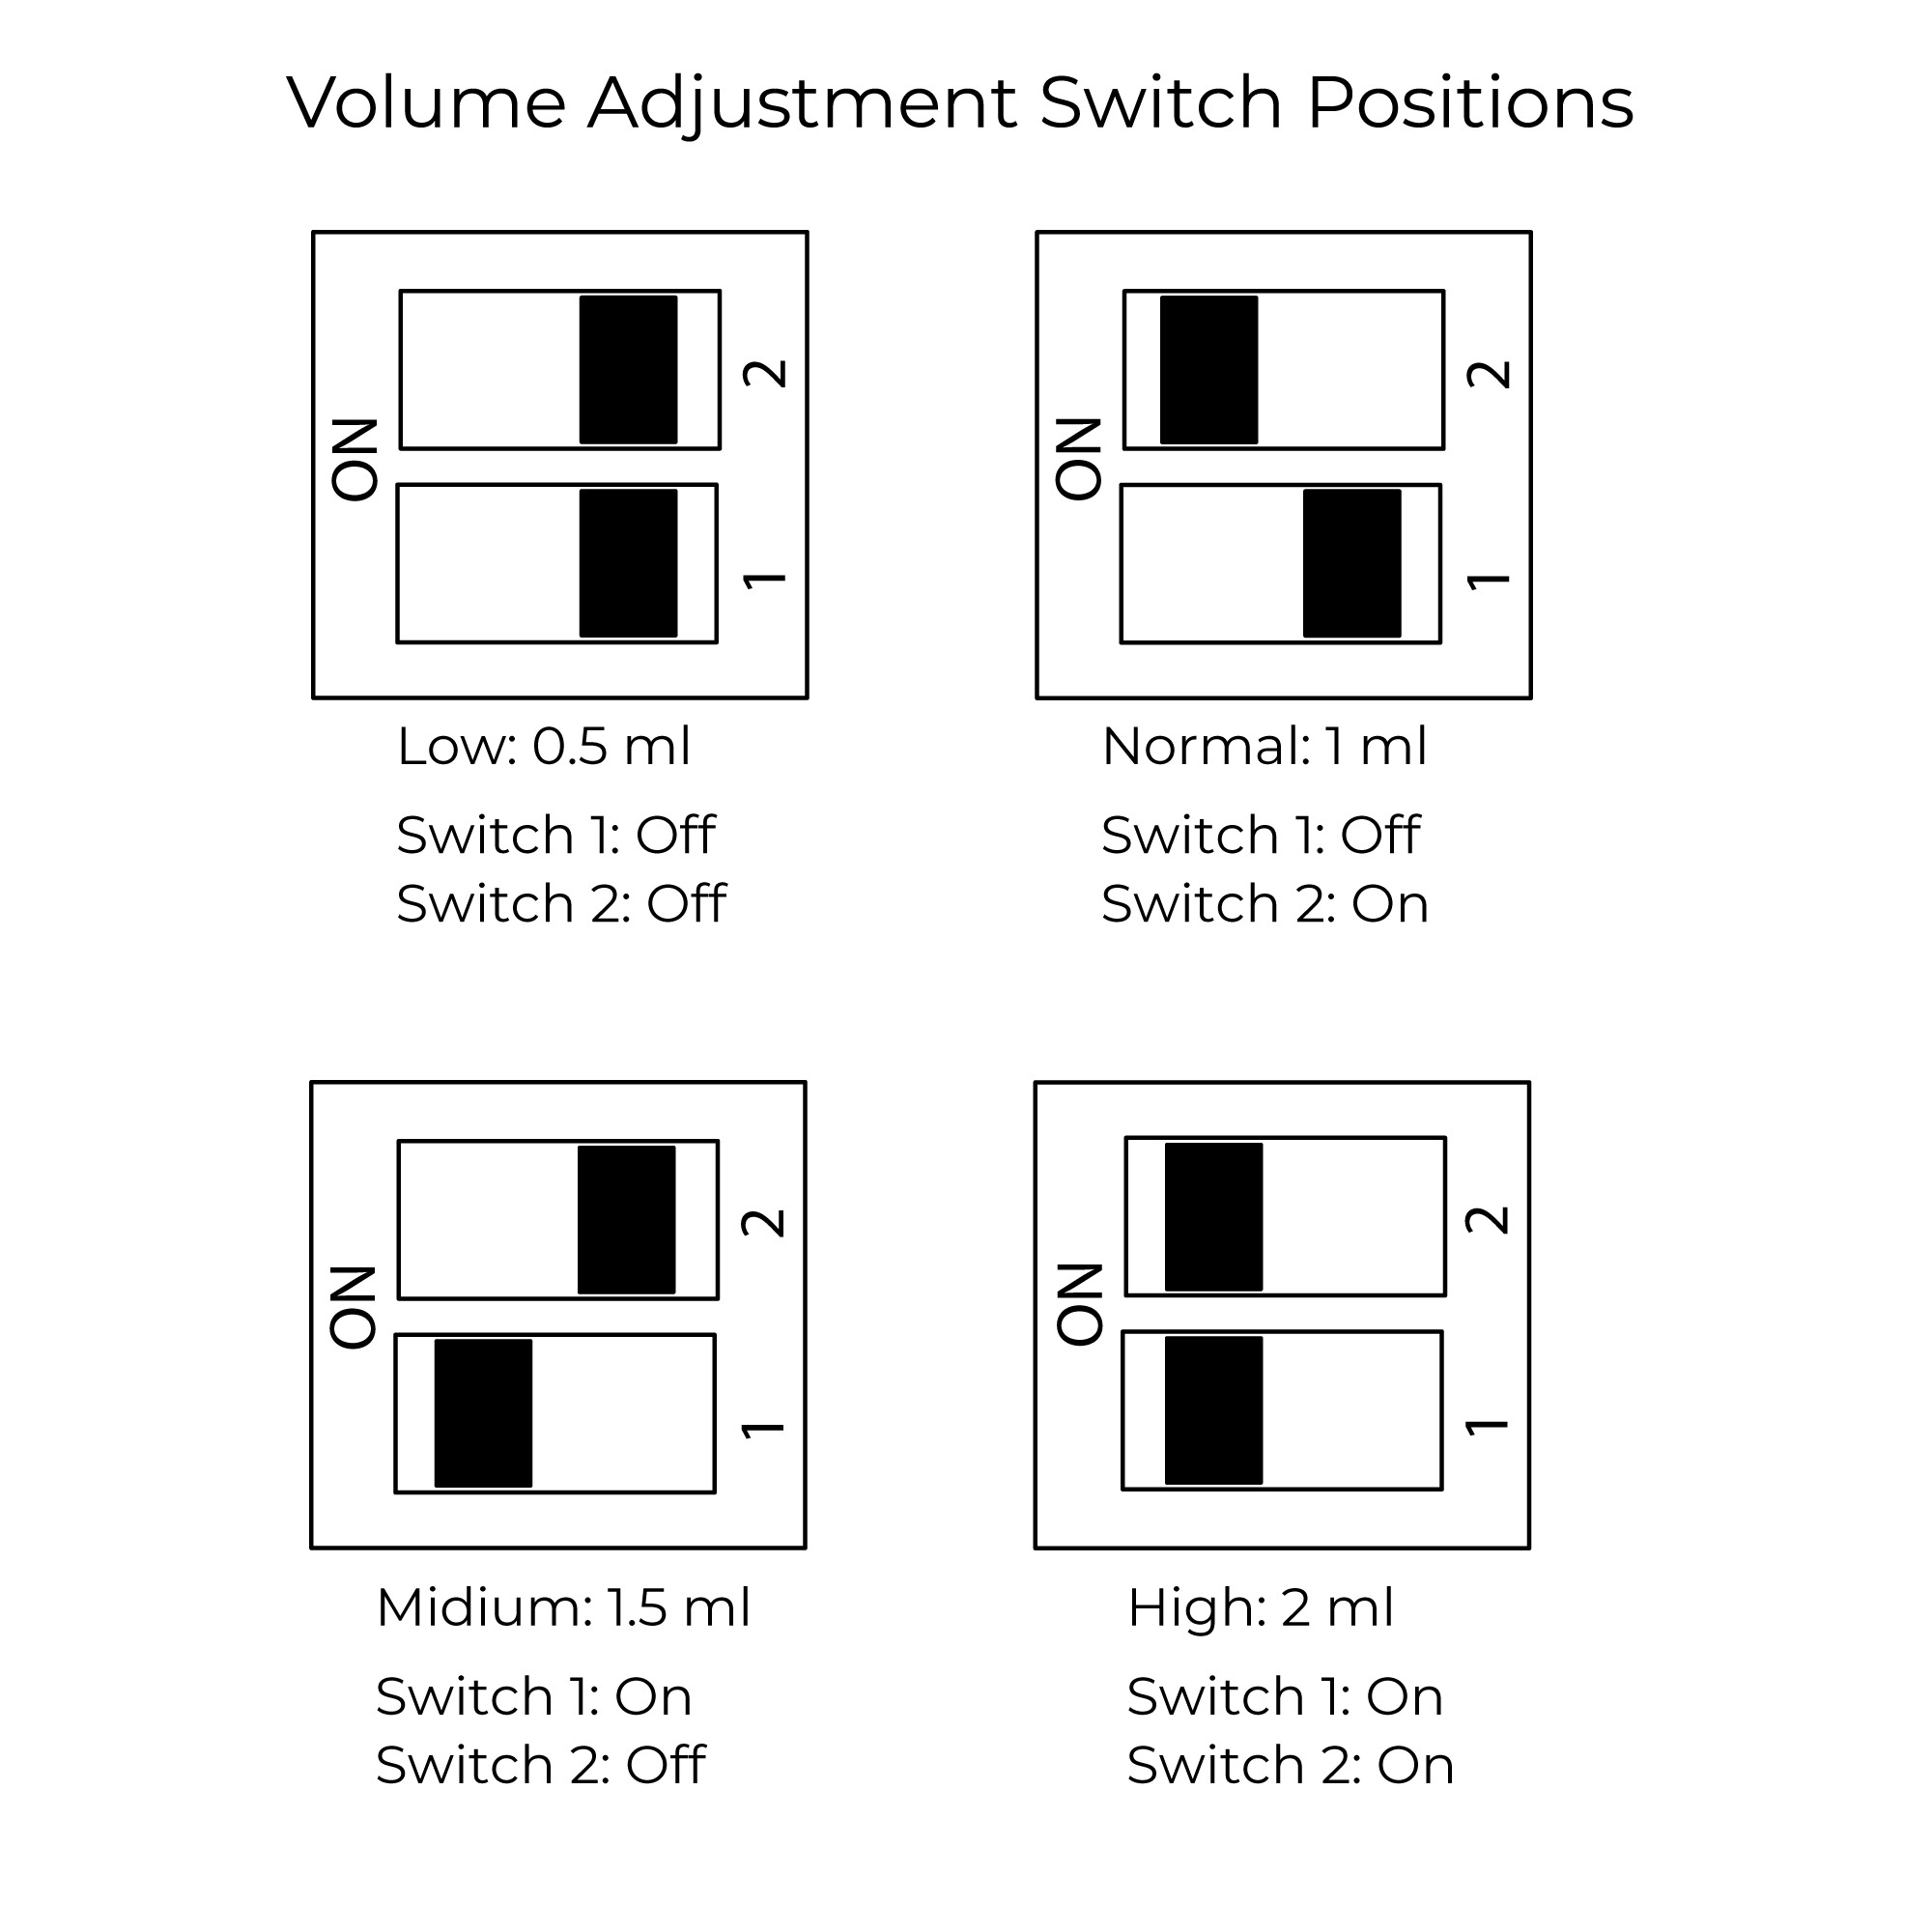
- Soap Volume: 0.5-3ml
- Power Consumption: Standby 0.4W(≤3W);Operation 1.2W(≤5W)
|
|
|
|