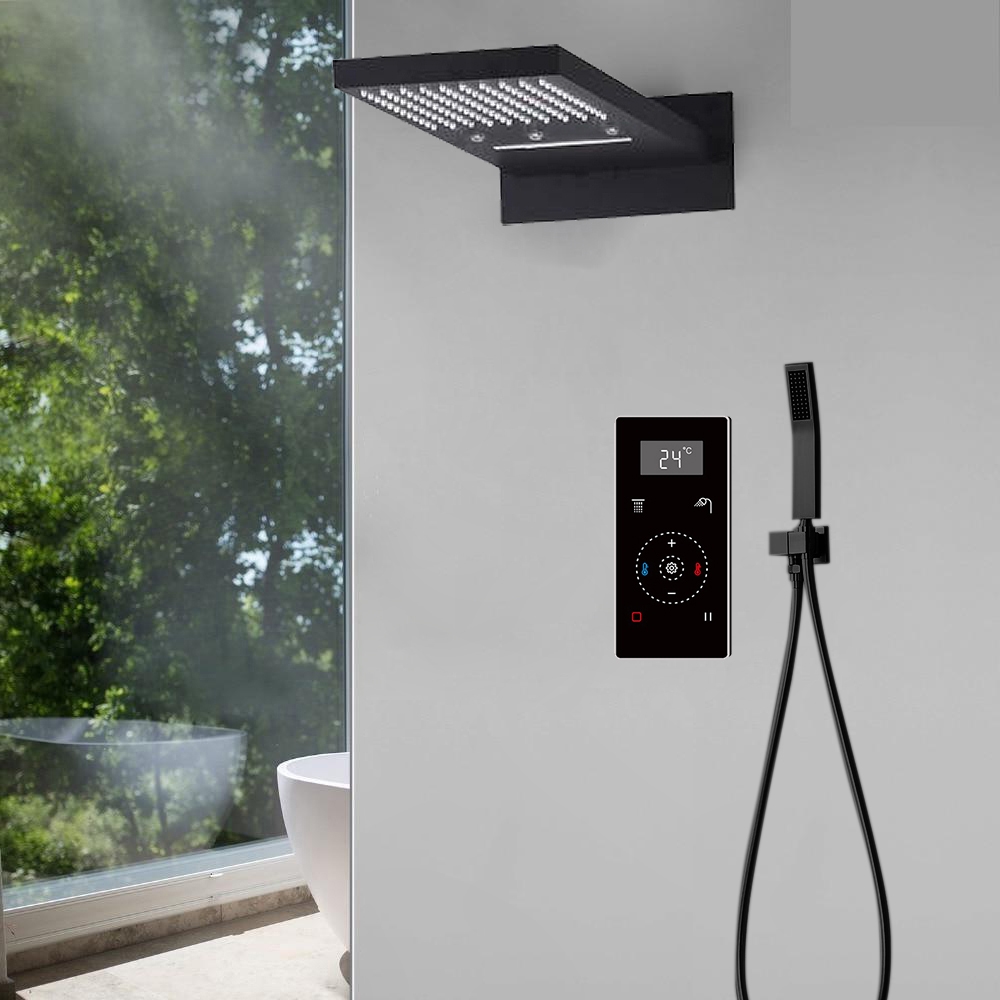
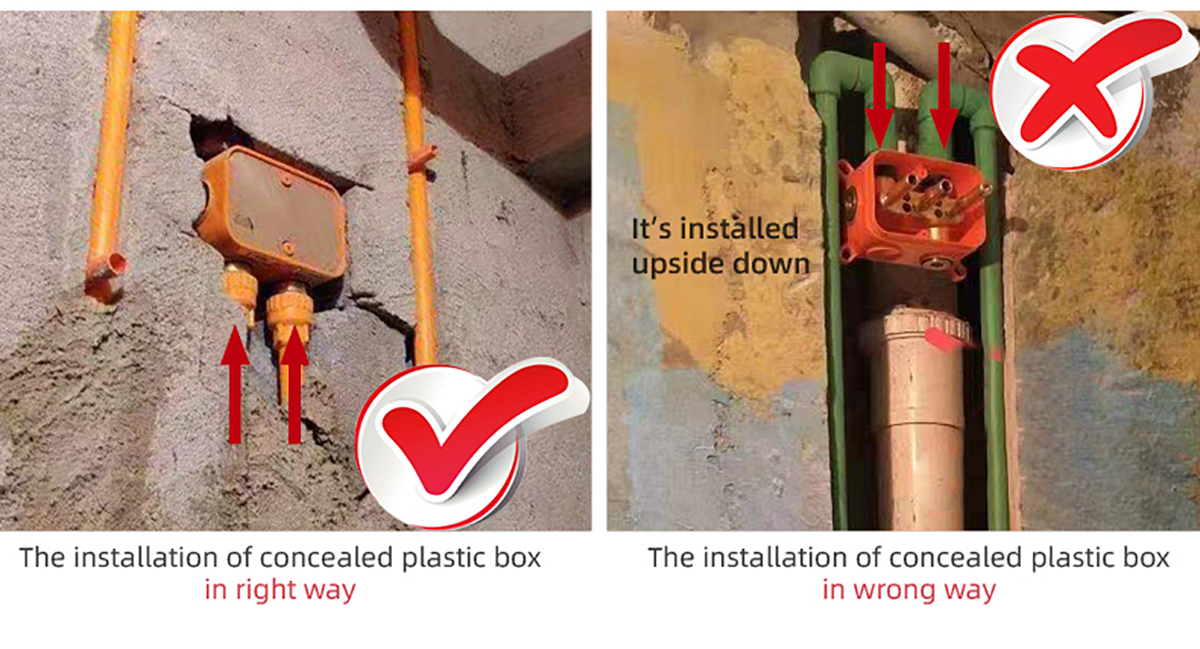
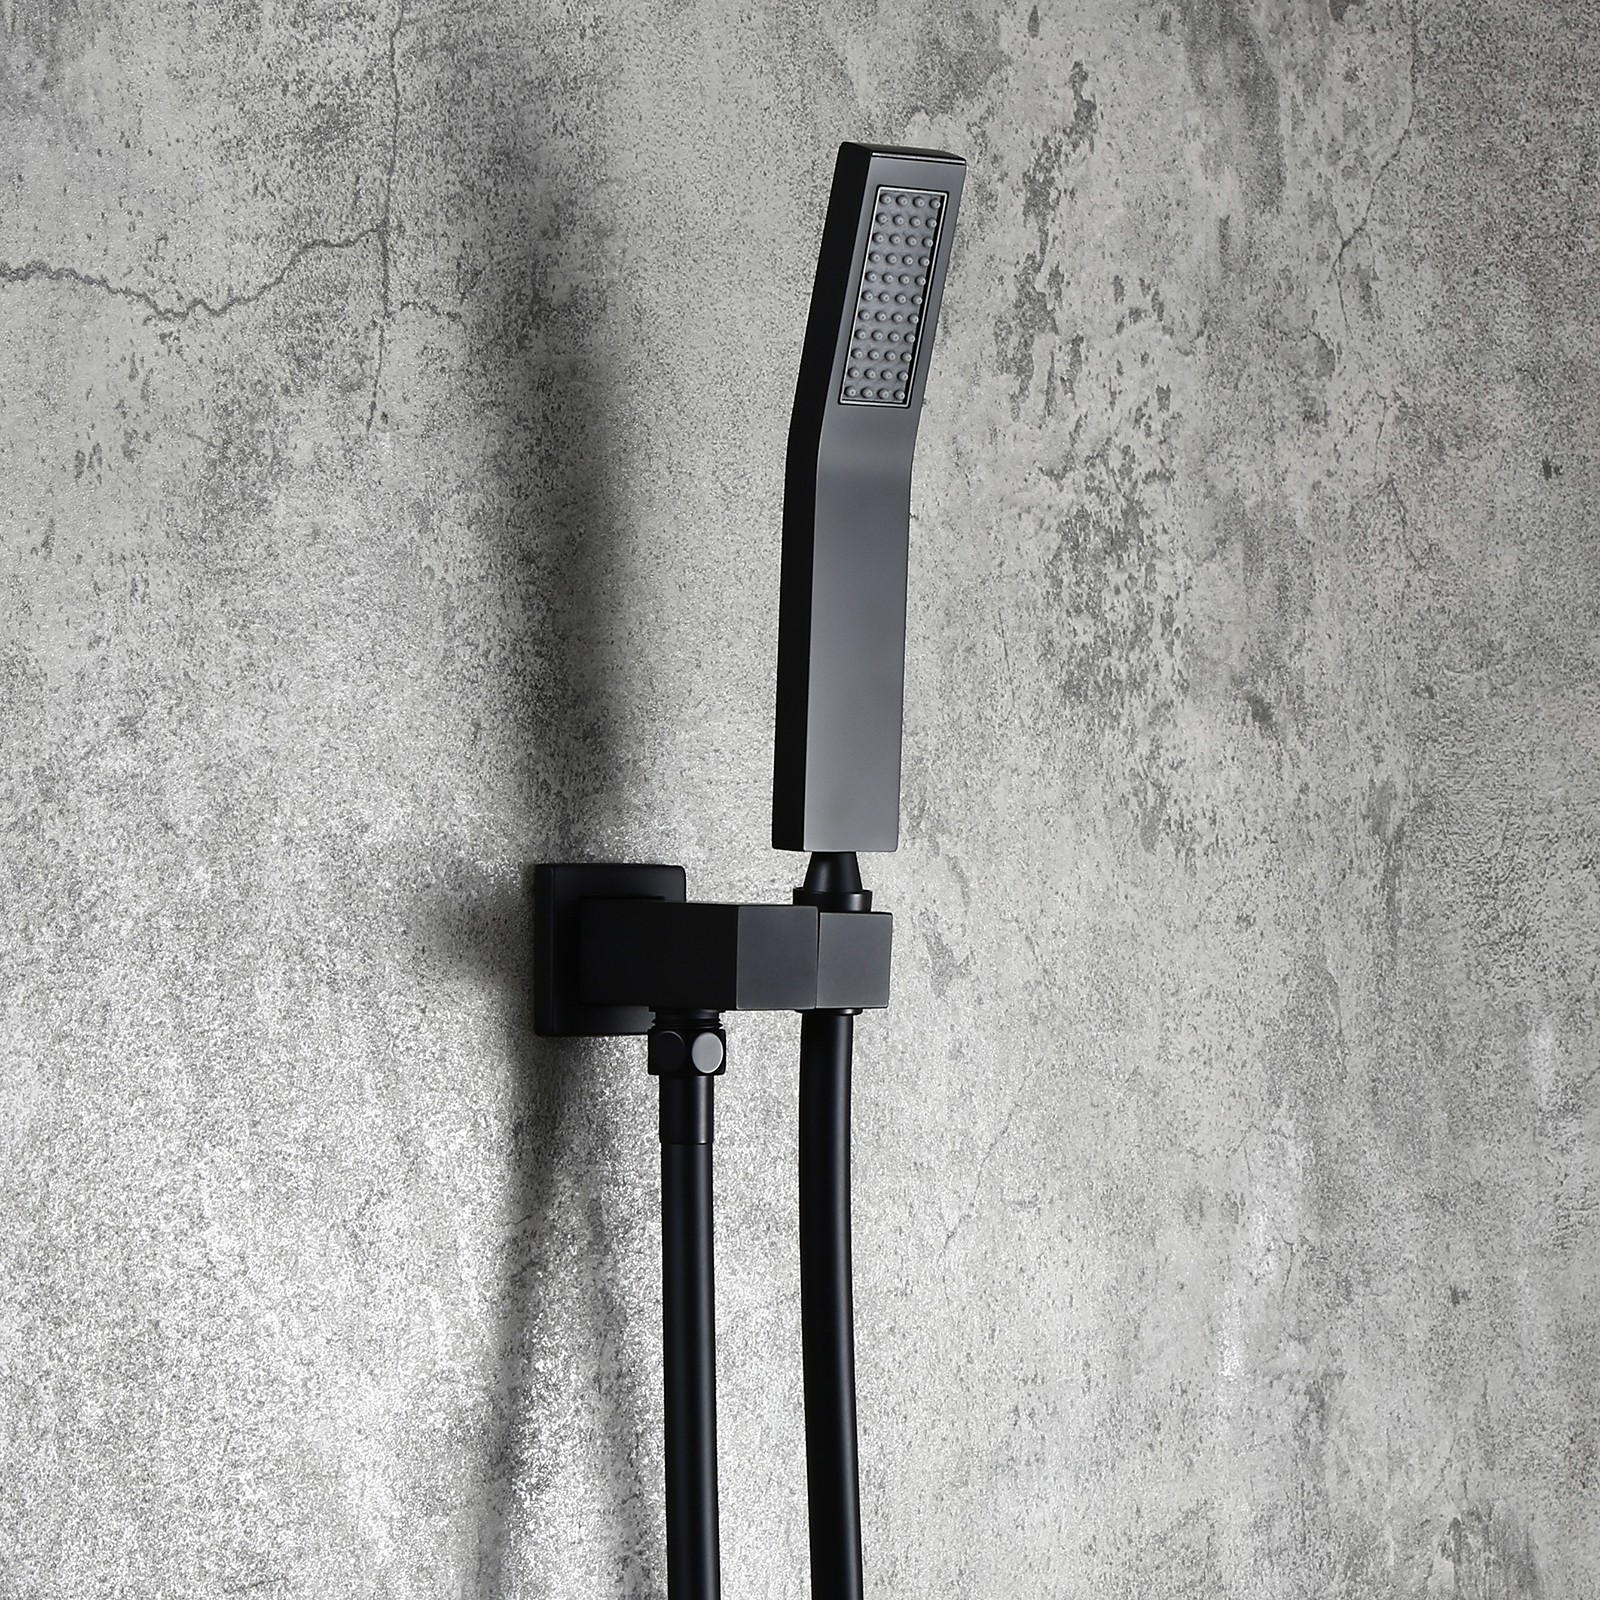
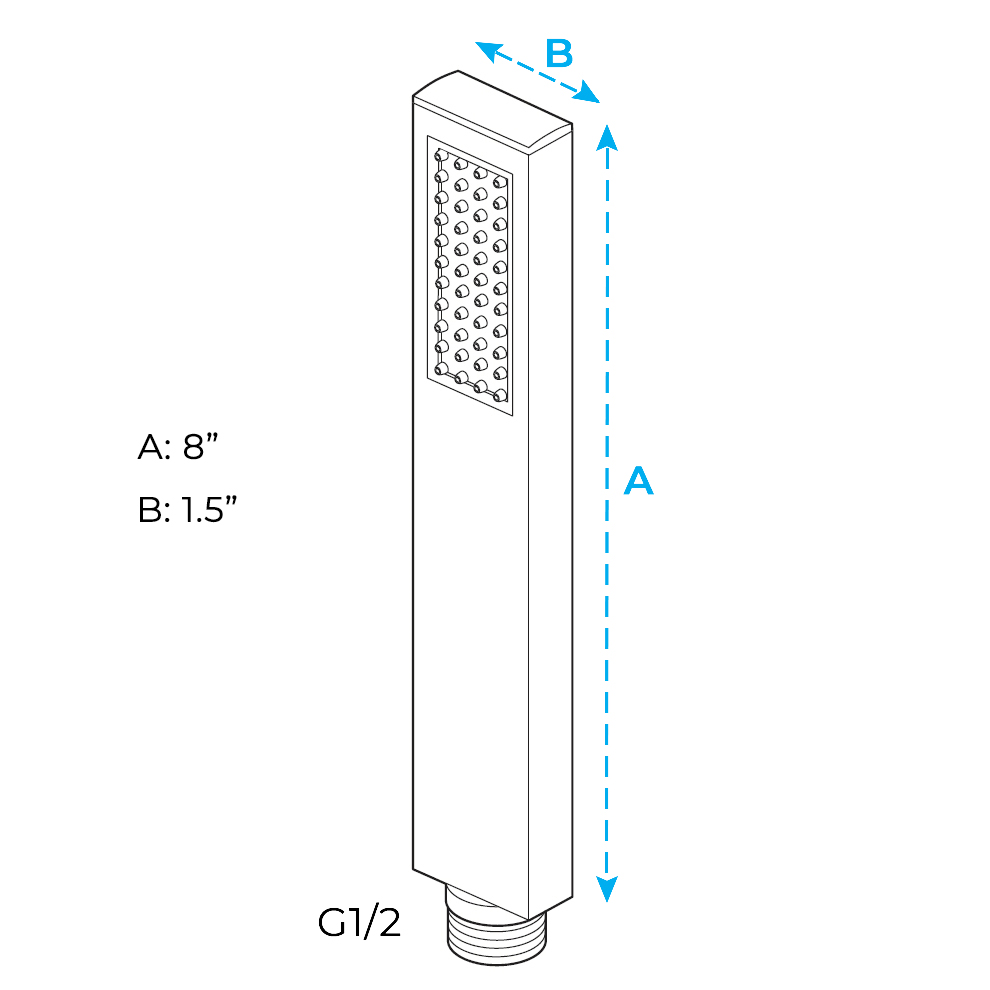
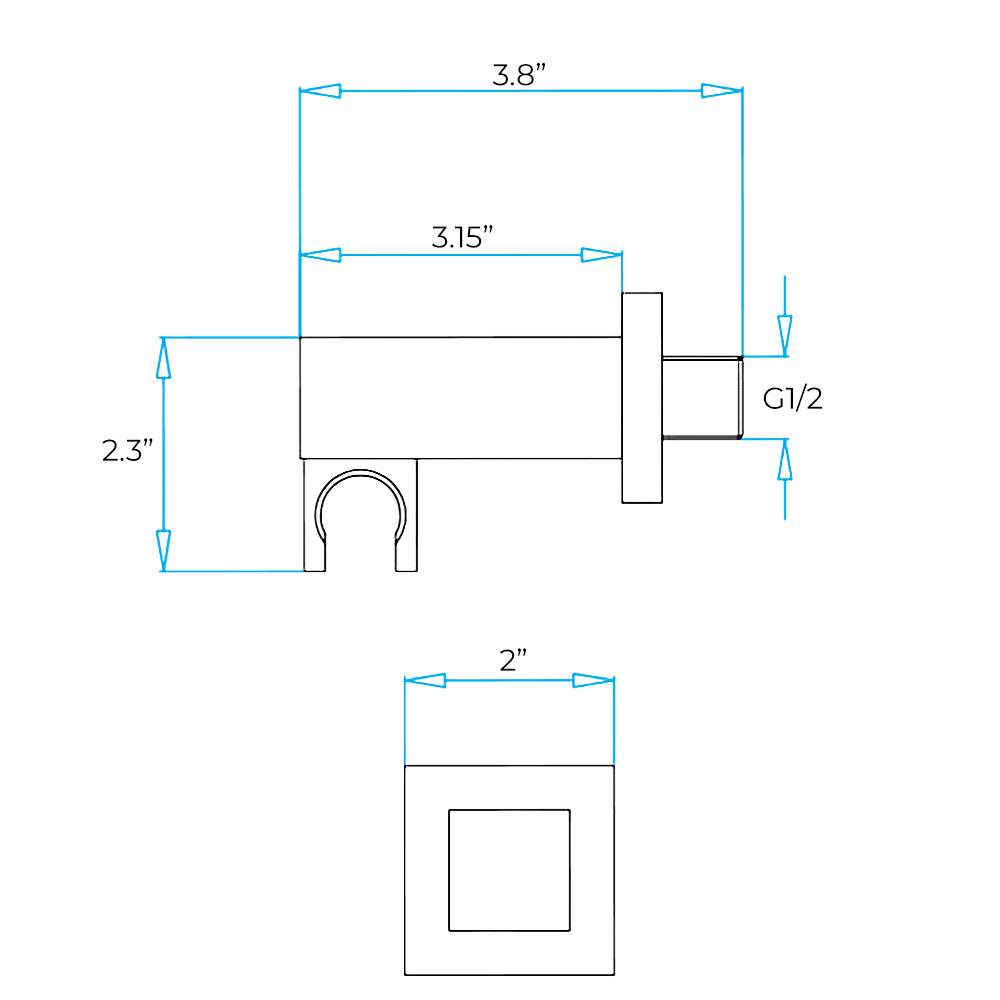
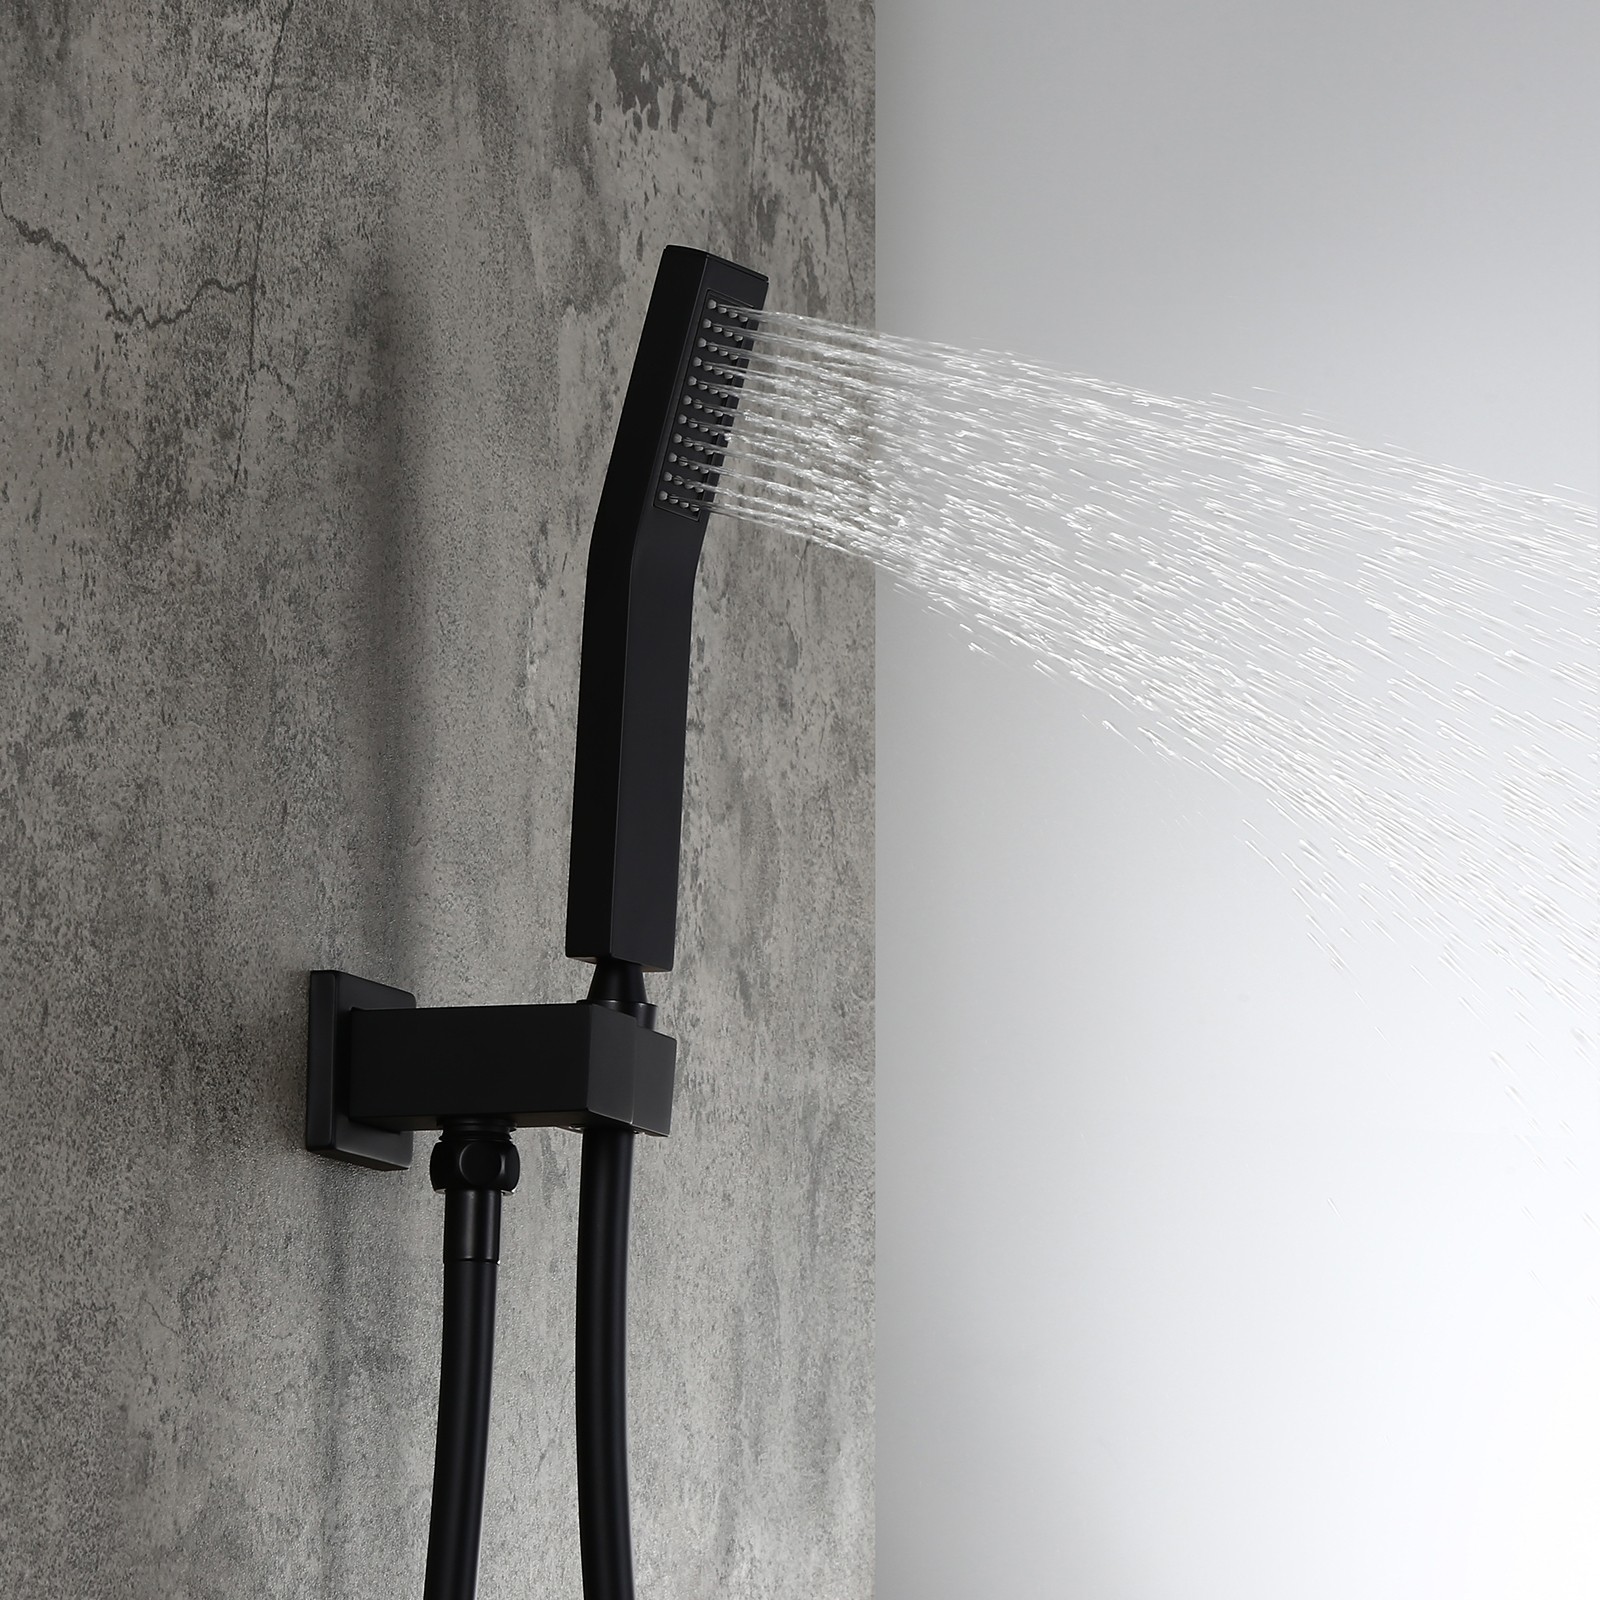
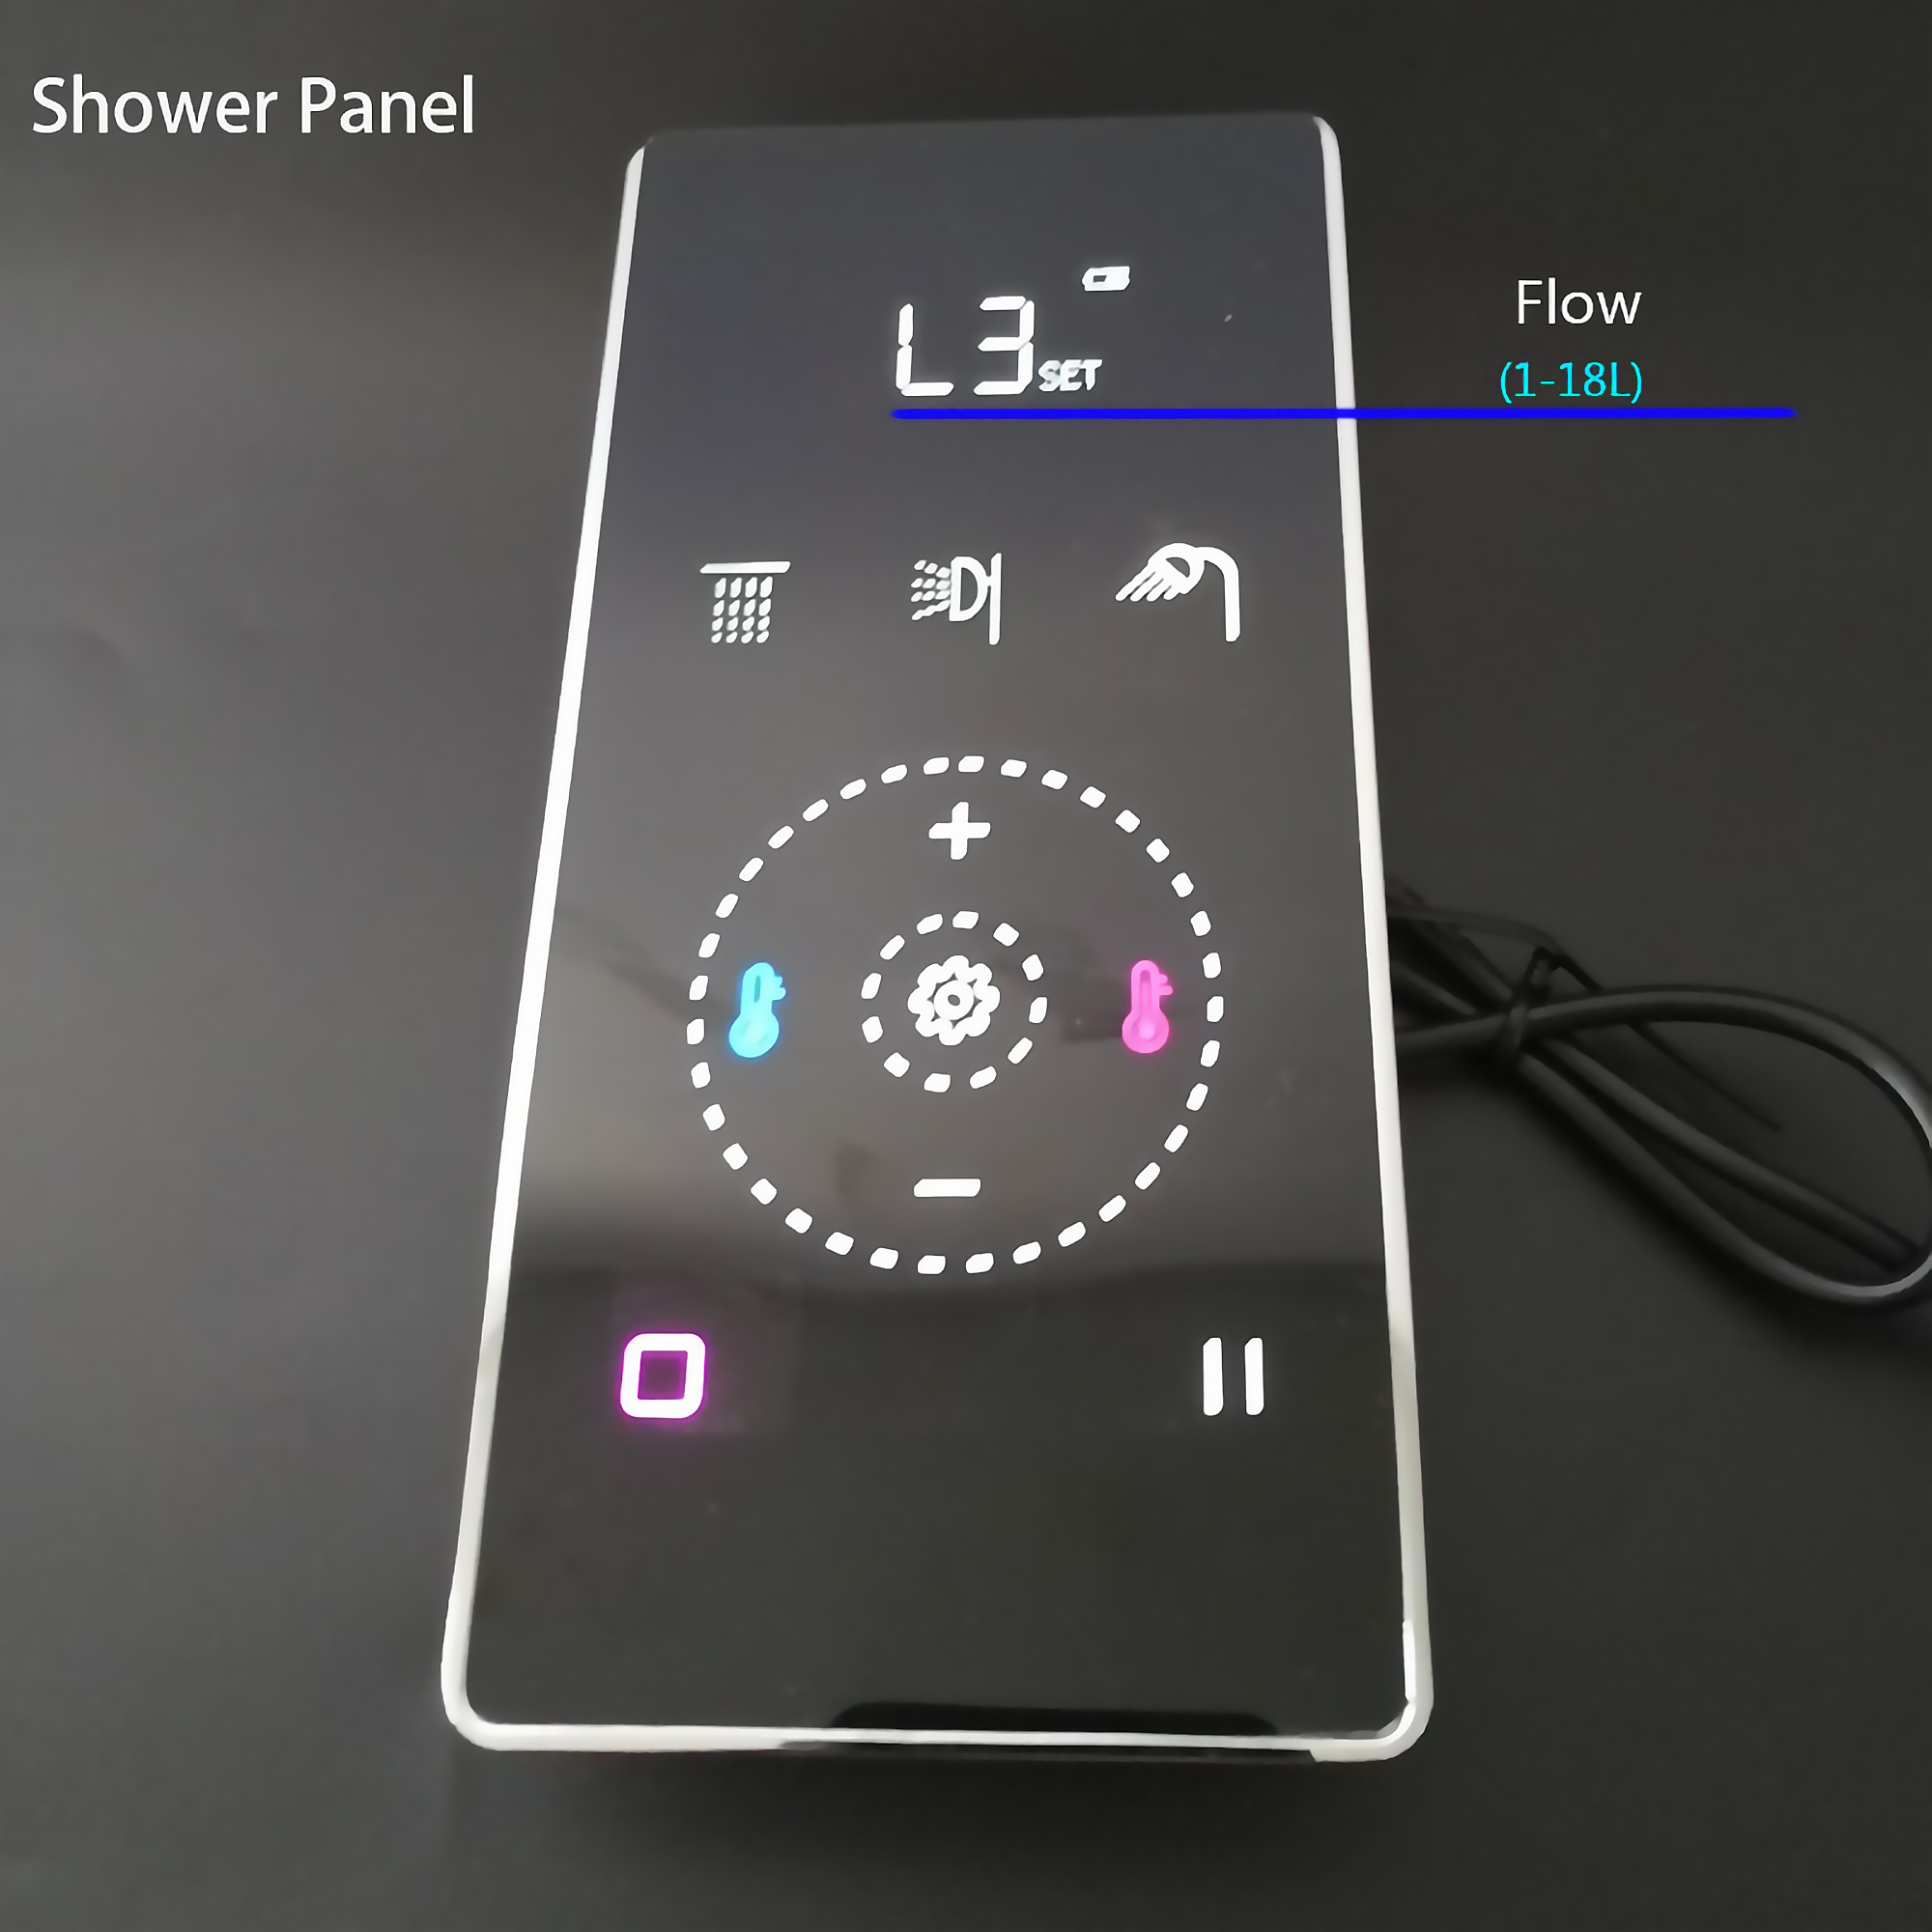
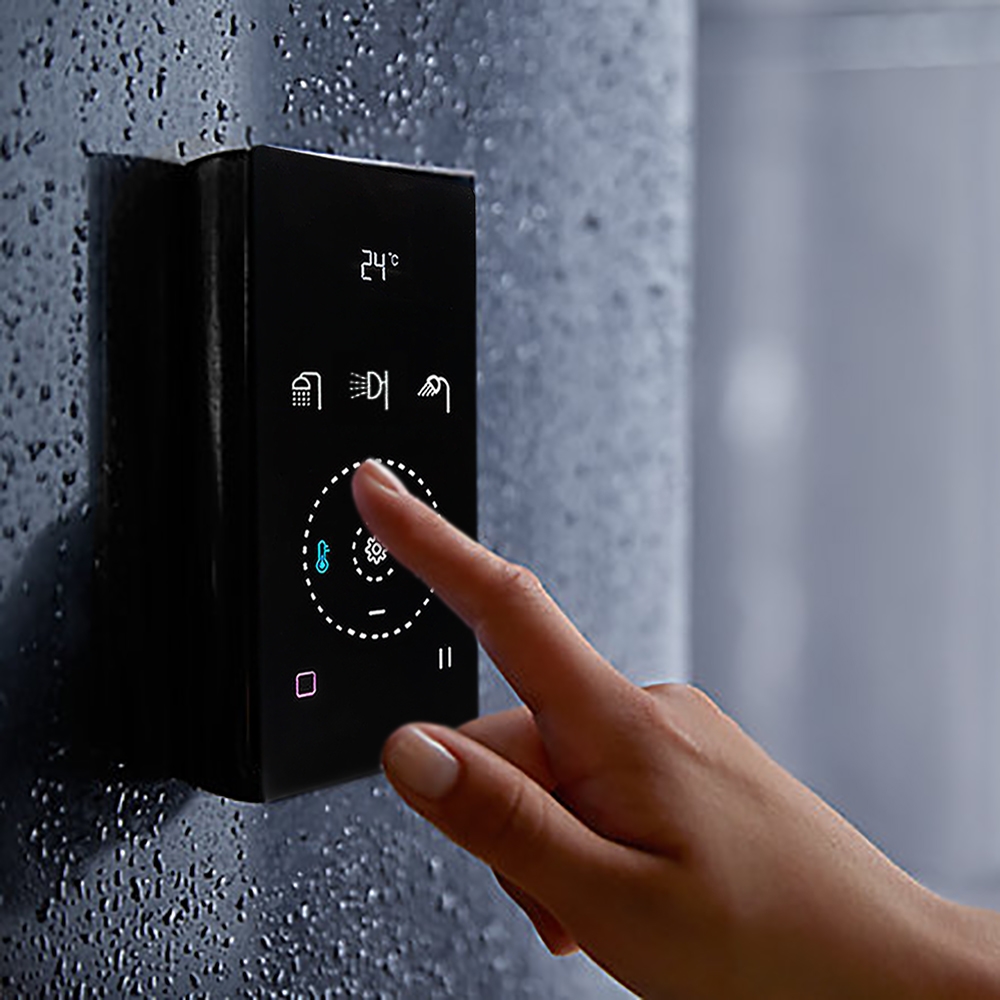
How to install Fontana Lima Solid Brass Dark Oil Rubbed Bronze Thermostatic Mixer | FS10119
Easy step by step Installation Instructions for Thermostatic Rain Waterfall Shower Set
Visit Product Page
Before you begin, please read the installation instructions below. Observe all local building and safety codes.
Unpack and inspect the products for any shipping damages. If you find damages, do not install.
Please note all products must be installed by a professional and certified plumber otherwise warranty might be voided.
shower
Shower Head Installation Instructions
Step 1:
Step 2:
shower
Remove the protective cover (F). Mark the positions and drill holes to suit the anchors (A). Install the anchors (A) and fix the rough-in valve (B) into the wall with screws. Use a level to ensure that the rough-in valve (B) is straight and level. (Important: Flush the water supply to remove any dirt and debris before installing the valve body).
Wrap Teflon tape around the pipe threads and connect water supply lines and in-wall pipes (not included) as desired to the rough-in valve (B). Turn on the water supply and open the cartridge to check for leakage. Then put on the protective cover and finish the wall surrounding the valve. (Note: Test the water pressure after the pipe connections have been made and before the finished wall material is installed).
Shower Head Installation Instructions
Step 3:
Step 4:
Fix the escutcheon (D) to the showerhead (E) with screws (C).
Remove the protective cover when the finished wall is completed. Then, install the showerhead (E) and press it against the finished wall.
Shower Head Installation Instructions
Hand Held Shower Installation Instructions
Step 1:
Step 2:
Hand Held Shower
Hand Held Shower
Handheld Shower
Step 3:
Size:
Handheld Shower
Holder Size
Hand Shower Outlet Installation
• Complete the outlet pipework ensuring it ends in an appropriate 15mm x 1/2" BSP female thread elbow. Note: This fitting is not supplied as variations in installations require the selection of a suitable solder or compression fitting.
• Install the 'Wall Outlet', thread long male 1/2" BSP into the appropriate female fitting using PTFE tape to give a watertight joint. Note: The thread can be cut to size if required. Make sure that all debris is removed from the connector and the section that has been cut is dressed correctly, before installation.
The minimum required water pressure is 0.05 MPa (0.5 bar). Flow rate 2.5 GPM (9.5 L
1. The control panel is sensitive. when installing it. Please avoid letting it face directly to the water from the hand shower and the head shower, because water will get it misoperation or lock the control panel.
2. The touch button is the best sensitive area 3. The touch panel water splash protection technology. When the system detects misoperation no response and needs about 1 second to recover.
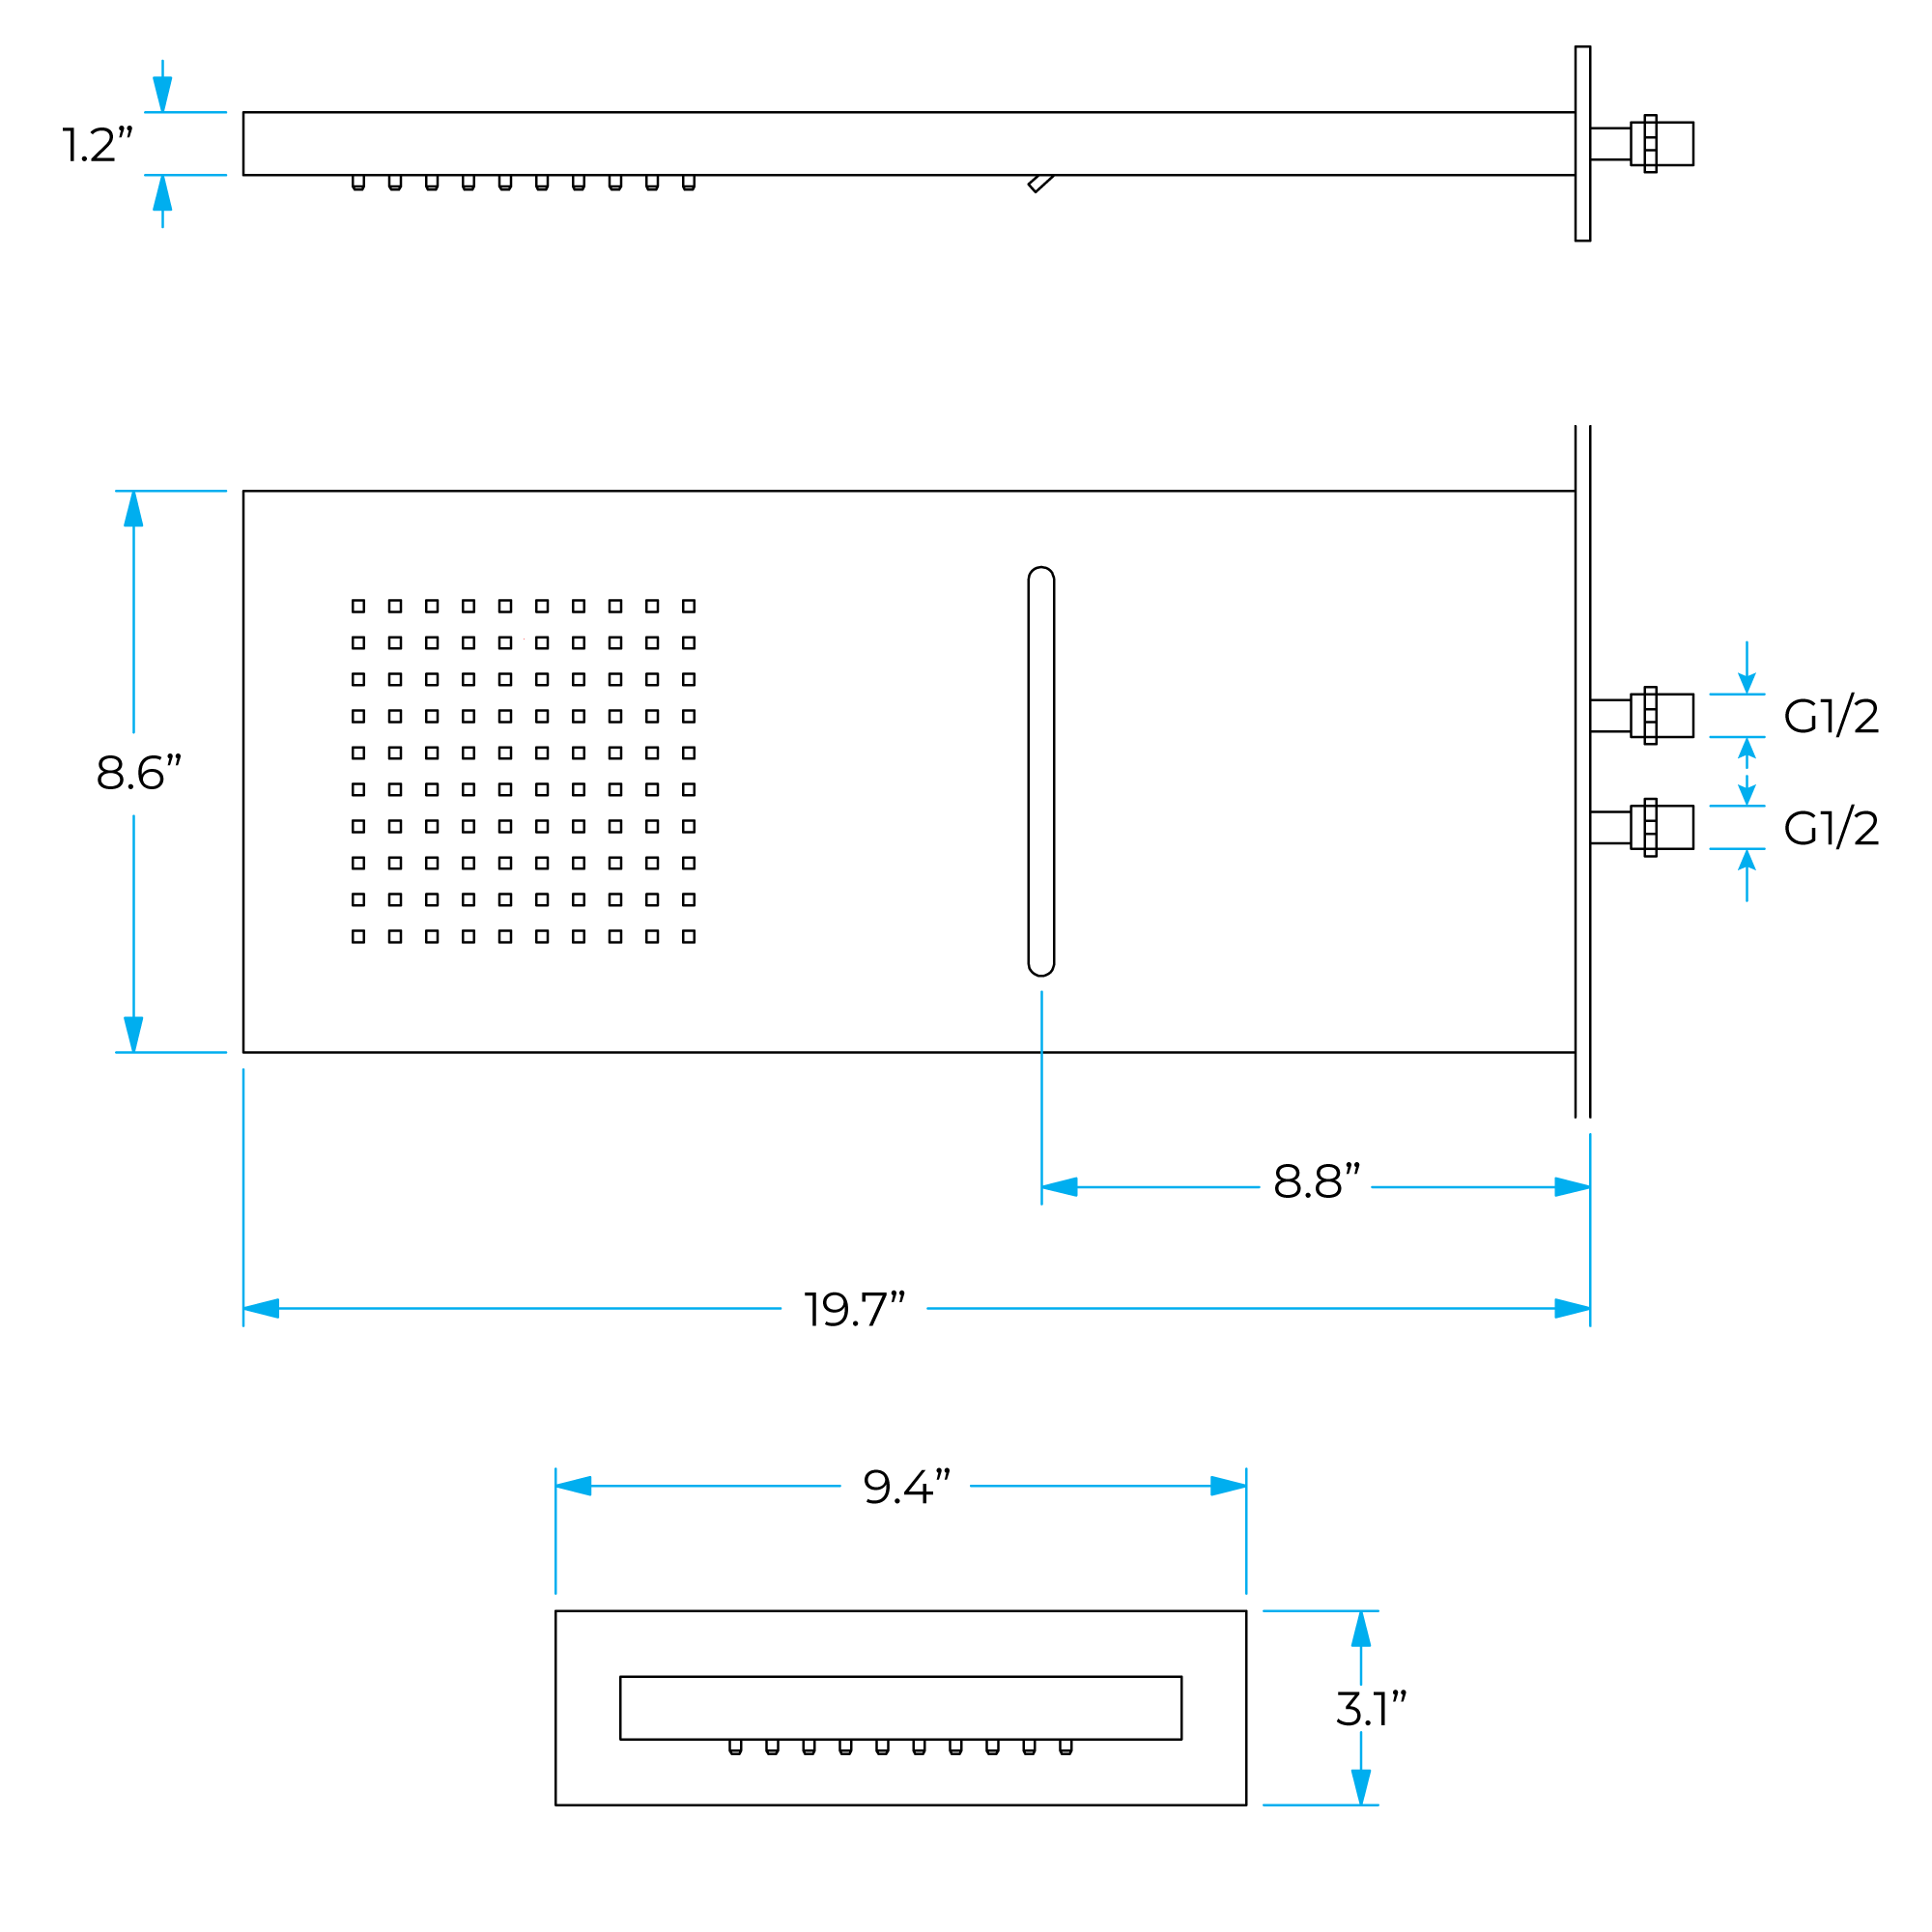
Function
1. Water Temp display and setting
2. Water flow display and setting
3. Timing display and setting
4. Spray mode selection.
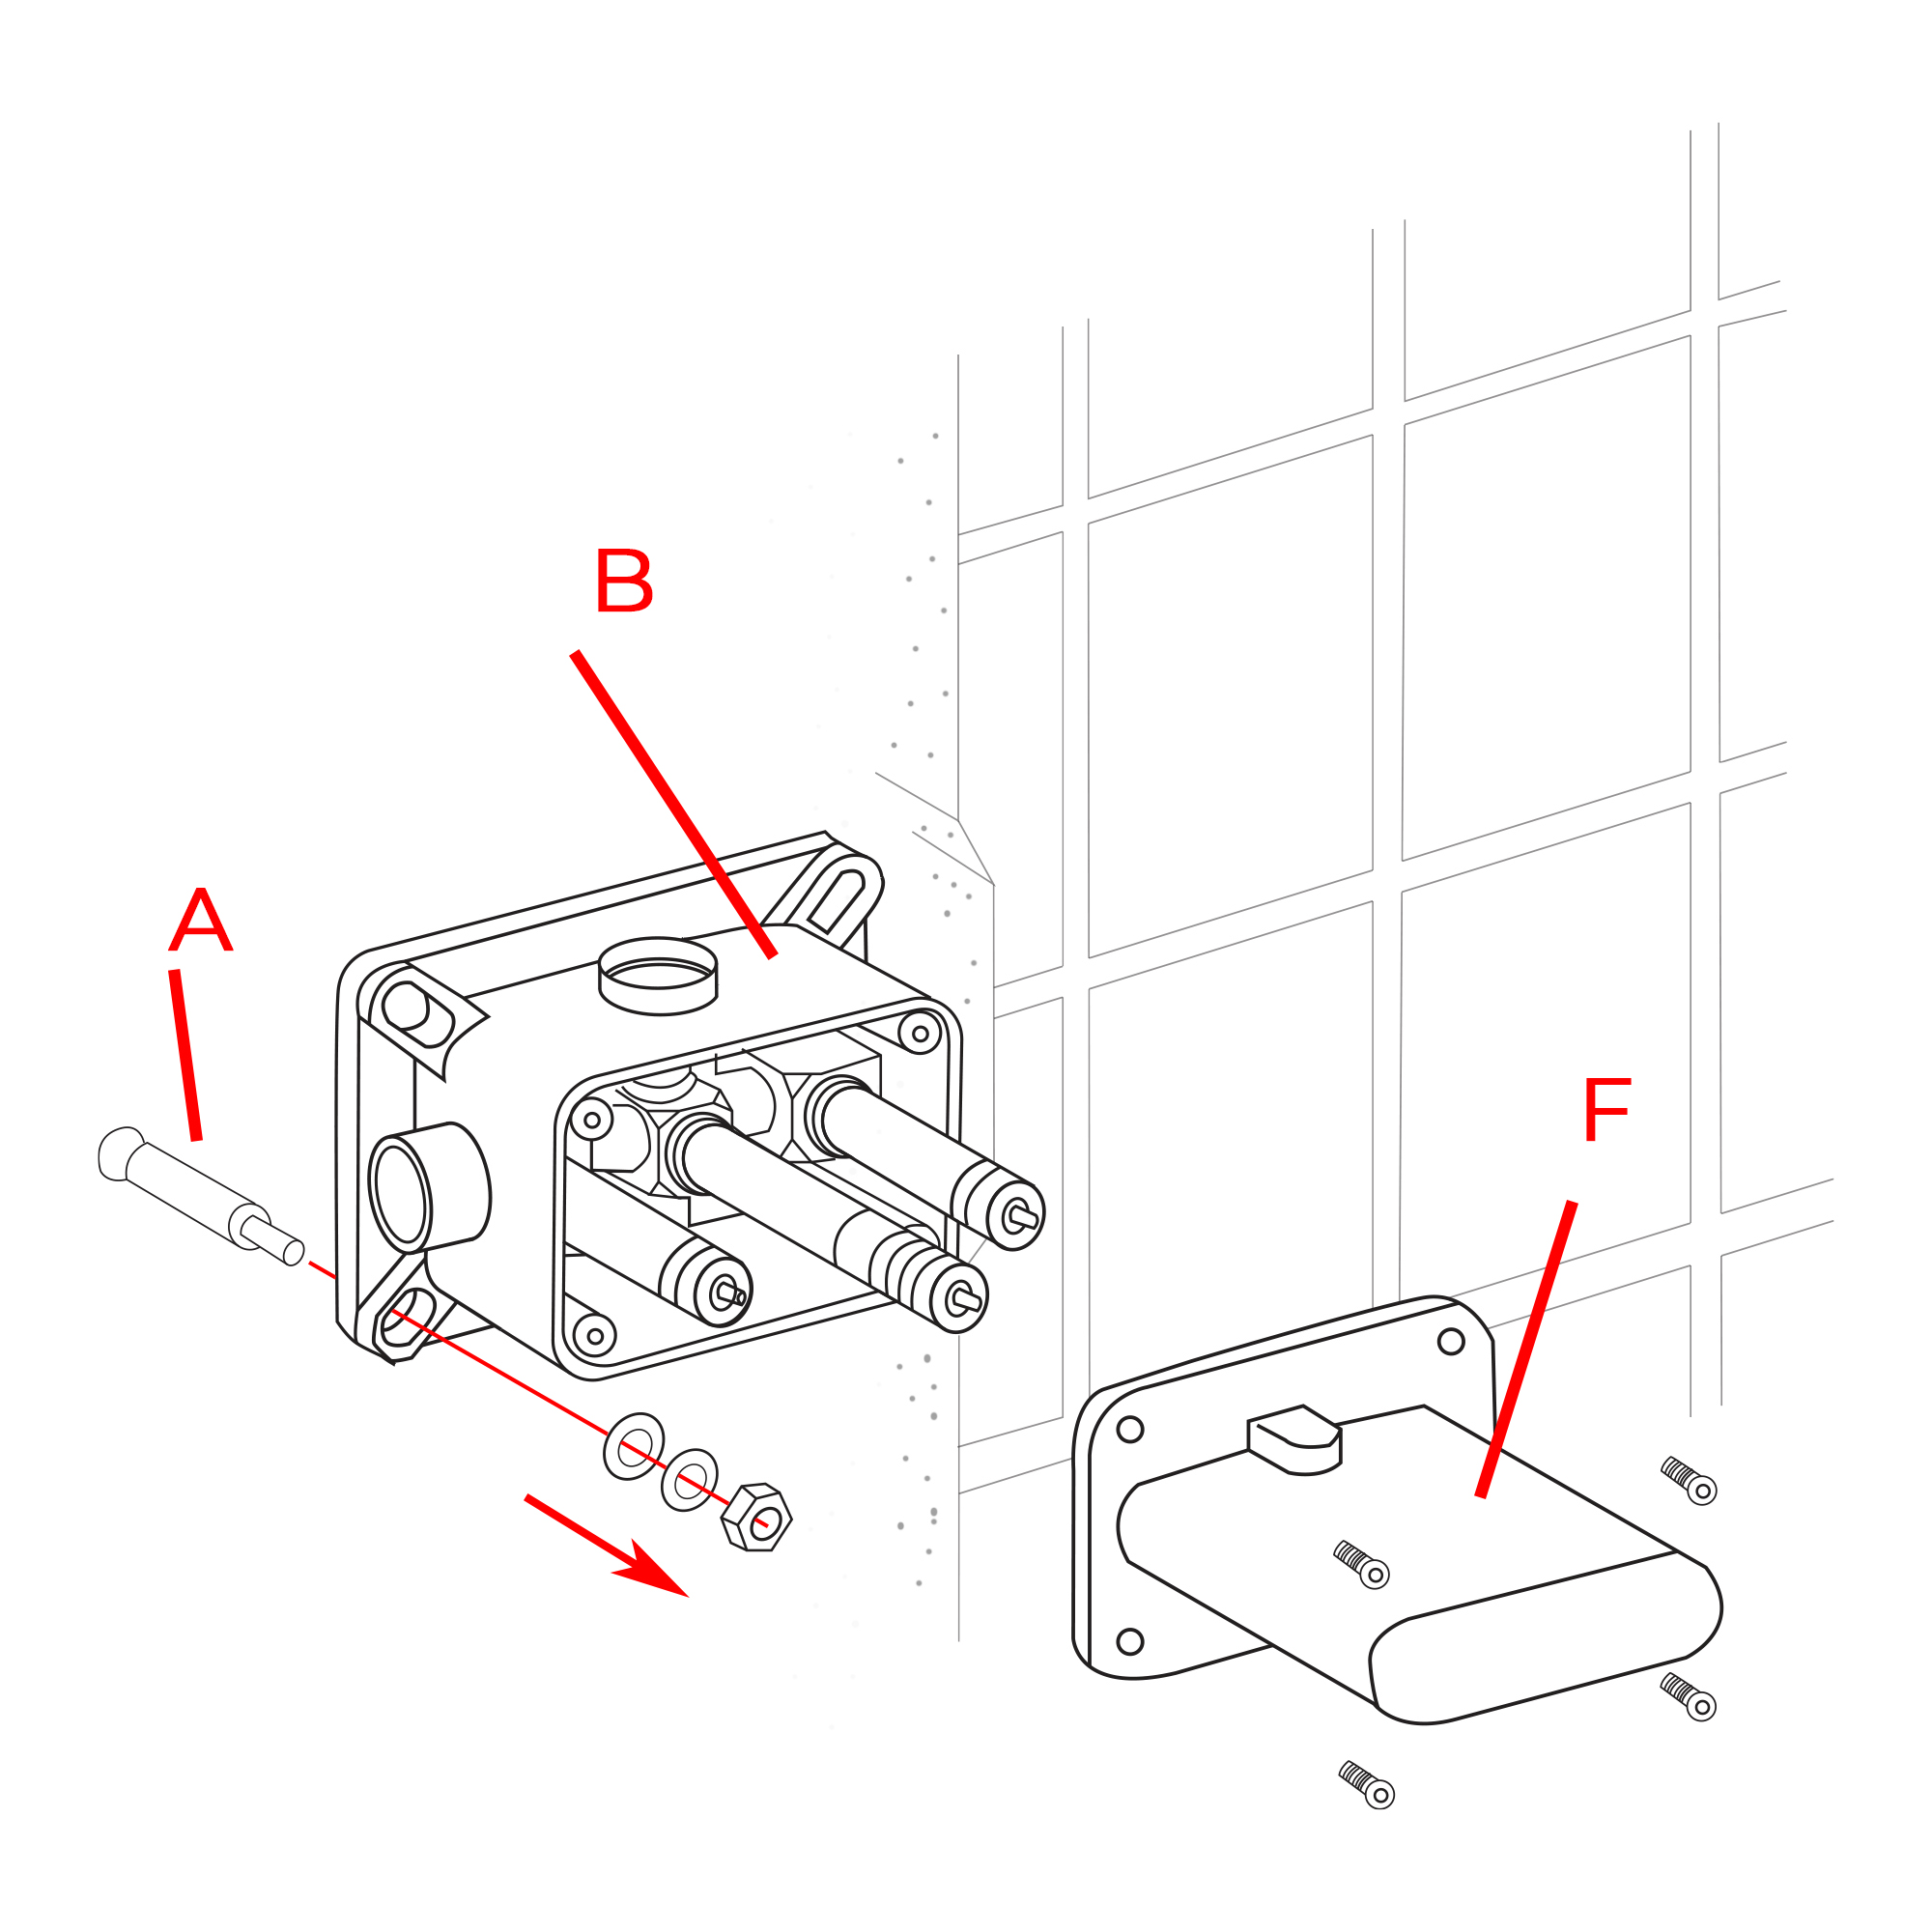
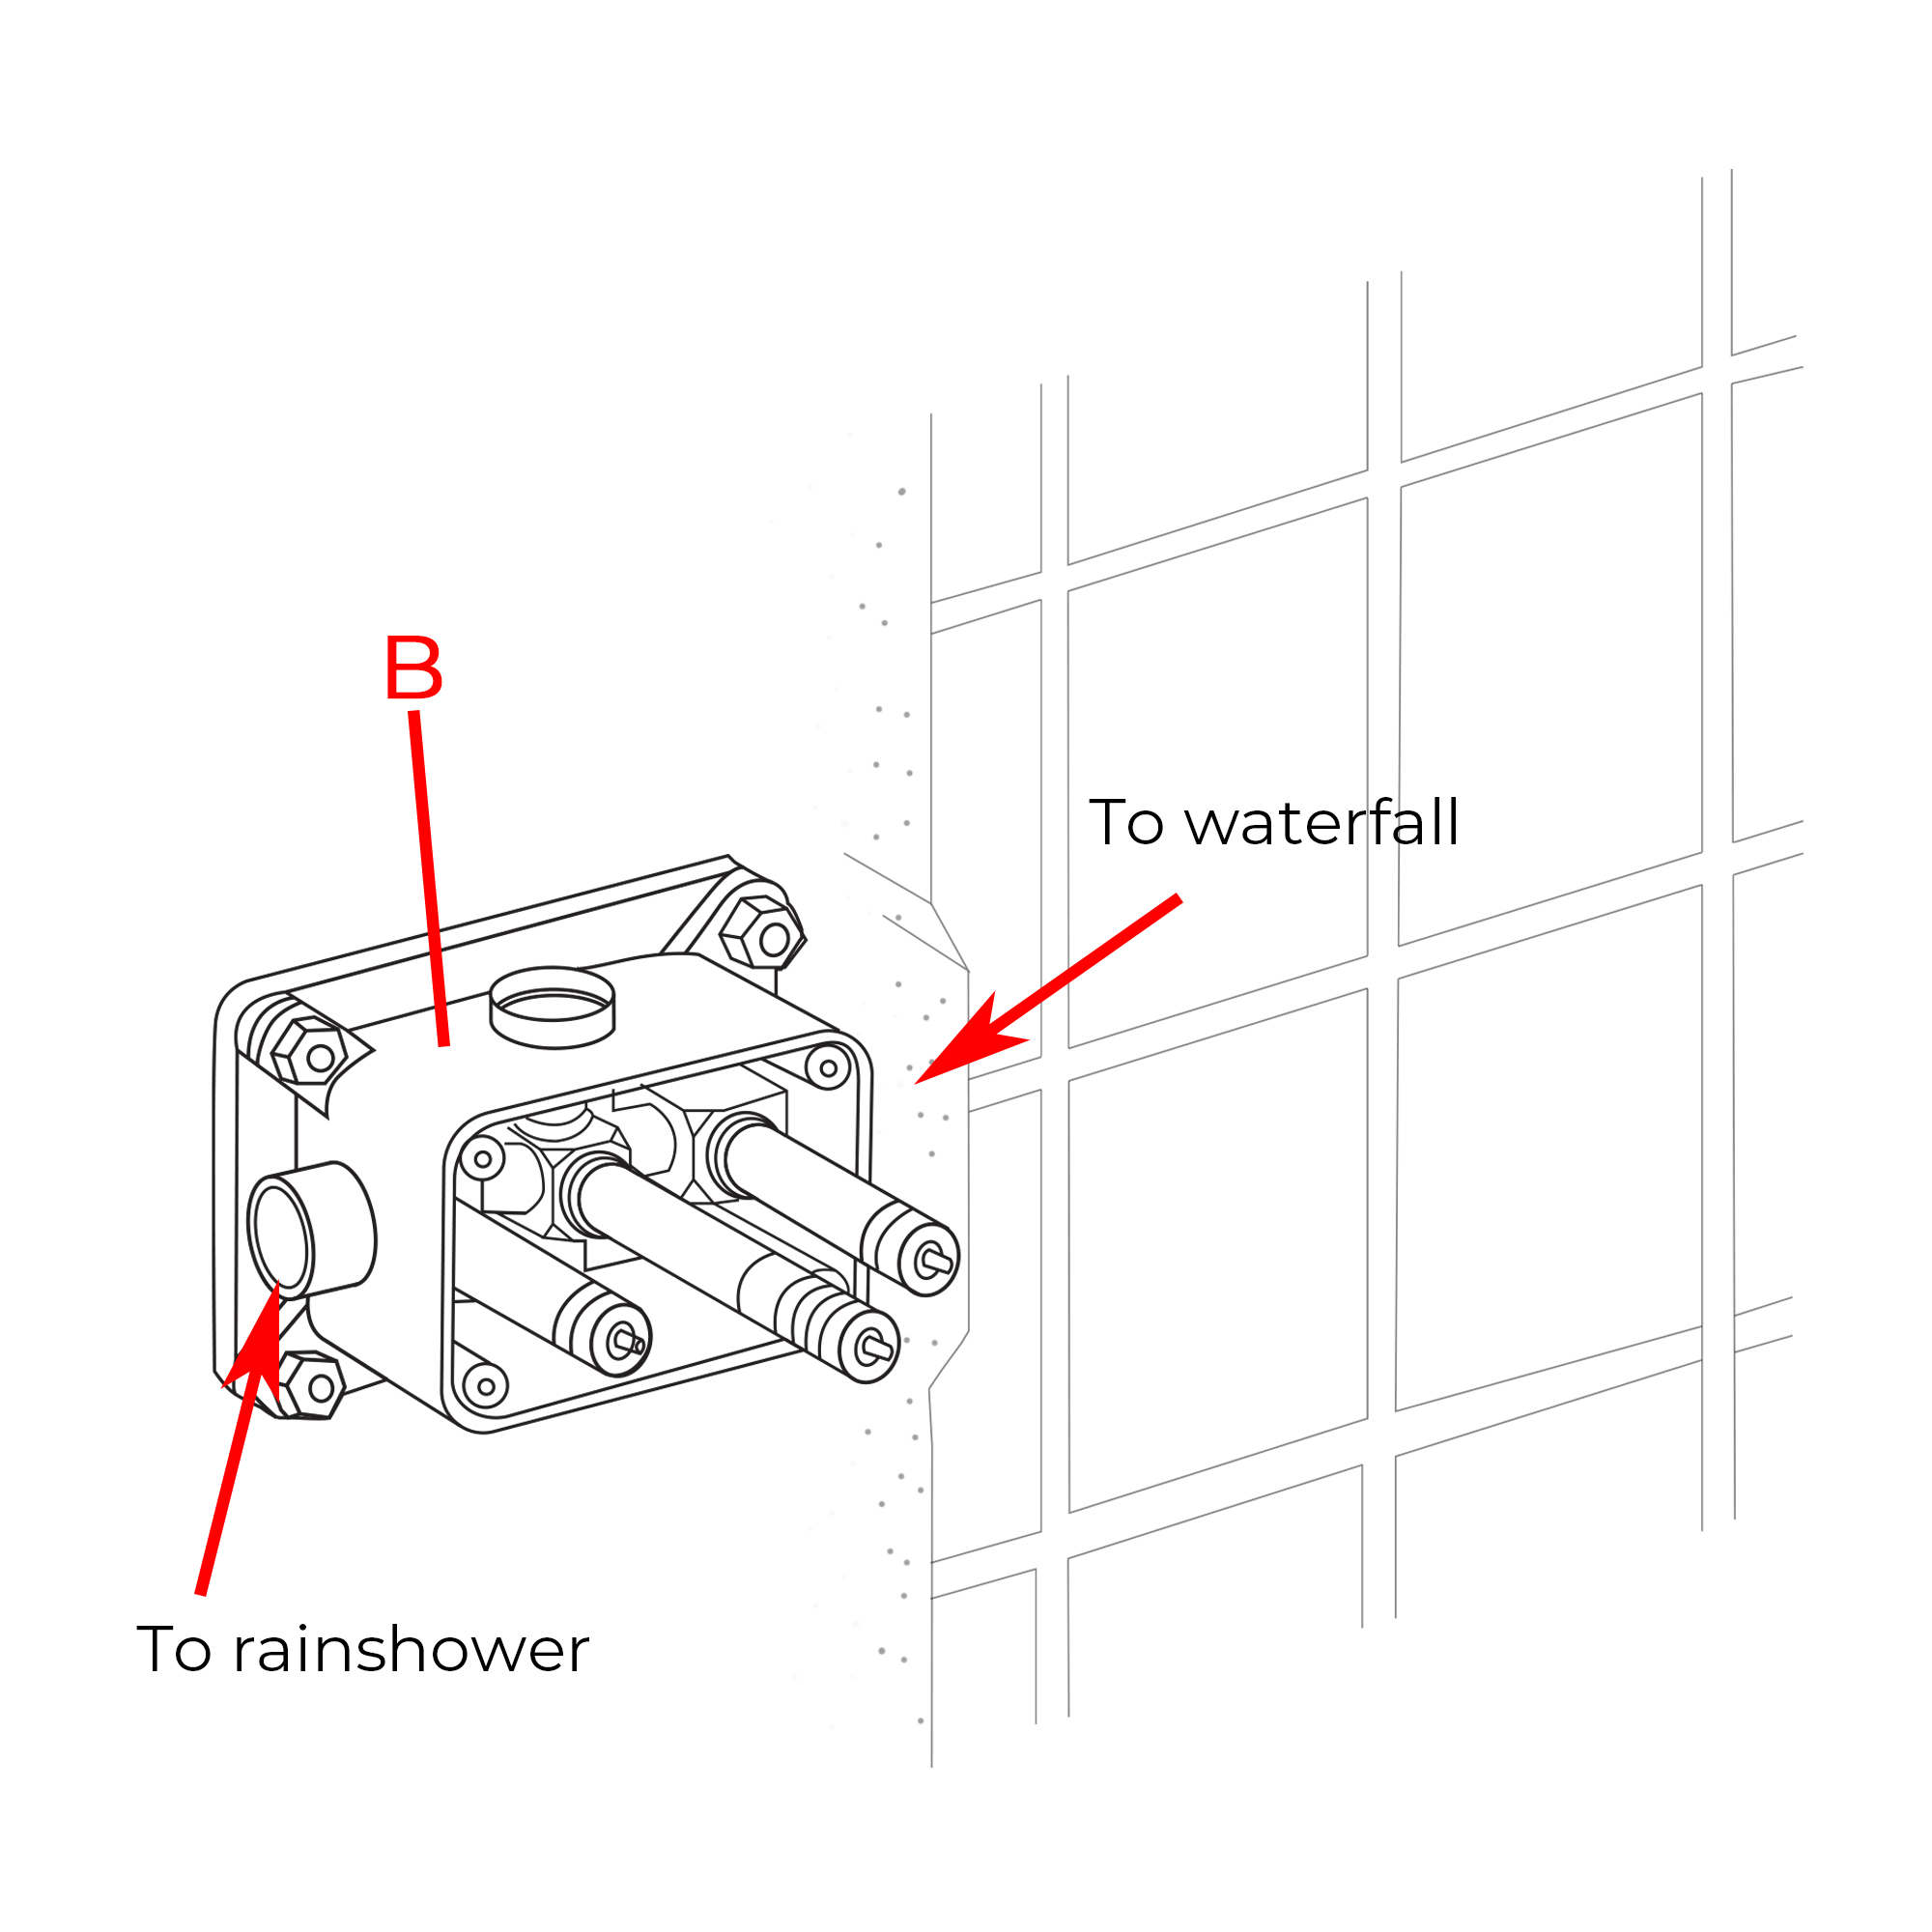
Operation
1. Standby
After electricity, When all the functions are off, System will enter into standby mode automatically, and the display would be off.
2. Power on
When under standby mode, Shortly press6 to enter into the system, the display will show the current water temp, the first boot effluent setting temperature defaults to 38-degree c, While default water flow the maximum flow is L8.
The power-on default mode is hand shower, and the backlit us 2 bright white the backlit is 1 dark. To choose 1 shower mode after power on, in power off 20 minutes to boot. Otherwise, it will still use current after power on, Otherwise, it will still use current shower mode to open the water. when it powers off over 20 minutes or the system is cut off the electricity. the system will recover to hand shower mode.
3. Power off
After booking, the system starts the countdown according to the set boot time: the system will be off automatically when timing countdown to "0" or shortly press 6 key.
4. Lock
After power on, without any operation in 20 seconds. it will enter the lock state. Display show lock symbol. in addition to 6 and 10 number key. other keys without any response press shortly 6 to unlock.
5. Water temp display and setting
When the system is on, the default water temp is 38 degrees C, the display will show the current water temp. If shortly press 4or 8 it will enter into water temp setting mode with 'SET'on, show as picture3. At this moment, if shortly press water temp minus key 4 for one time, water temp will decrease by 1-degree c. If shortly press water temp adds key 8 for one time. water temp will increase by 1-degree c. when no operation on water temp adjustment within 3 seconds, it will exit the water temp setting mode. water temp setting range is 25-degree c- 48-degree c. The set temperature will be saved in the system, the next boot the system automatically calls the save set temperature (Save the setting temperature is not affected by power system).
Fontana Lima Solid Brass Dark Oil Rubbed Bronze Thermostatic Mixer
When it comes to new bathroom upgrades, FontanaShowers is offering shape, finishes and styles that you've looking for. Give your bathroom an elegant glance with our Fontana Lima Solid Brass Dark Oil Rubbed Bronze Thermostatic Mixer. This wonderful mixer is made from high-quality materials. This is one of the most trendiest finishes across decor styles in the bathroom. This has an elegant modern design and elevates the appeal of your decor made from the highest quality and for great tastes.