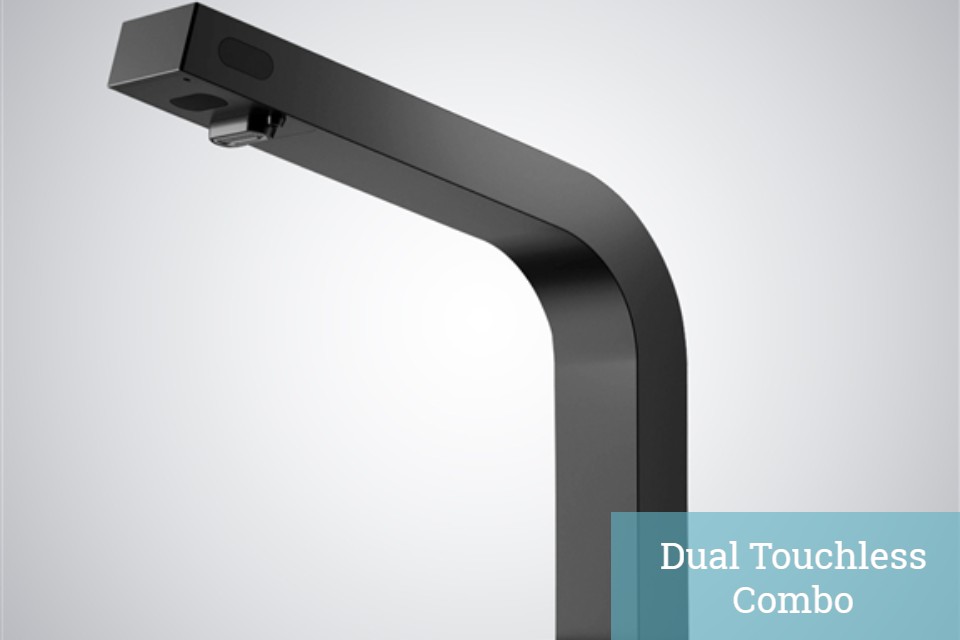
How to install Fontana Rose Gold Commercial Automatic Dual Touchless Sensor Faucet And Soap Dispenser | FS-509GSD
Easy step by step installation instructions for Sensor Faucet & Soap Dispenser Combo
|
|
Visit Product Page 
|
|
- Before you begin, please read the installation instructions below. Observe all local building and safety codes.
- Unpack and inspect the products for any shipping damages. If you find damages, do not install.
- Please note all products must be installed by a professional and certified plumber otherwise warranty might be voided
|
sensor
|
|
|
Sensor Faucet Installations Instructions
|
|
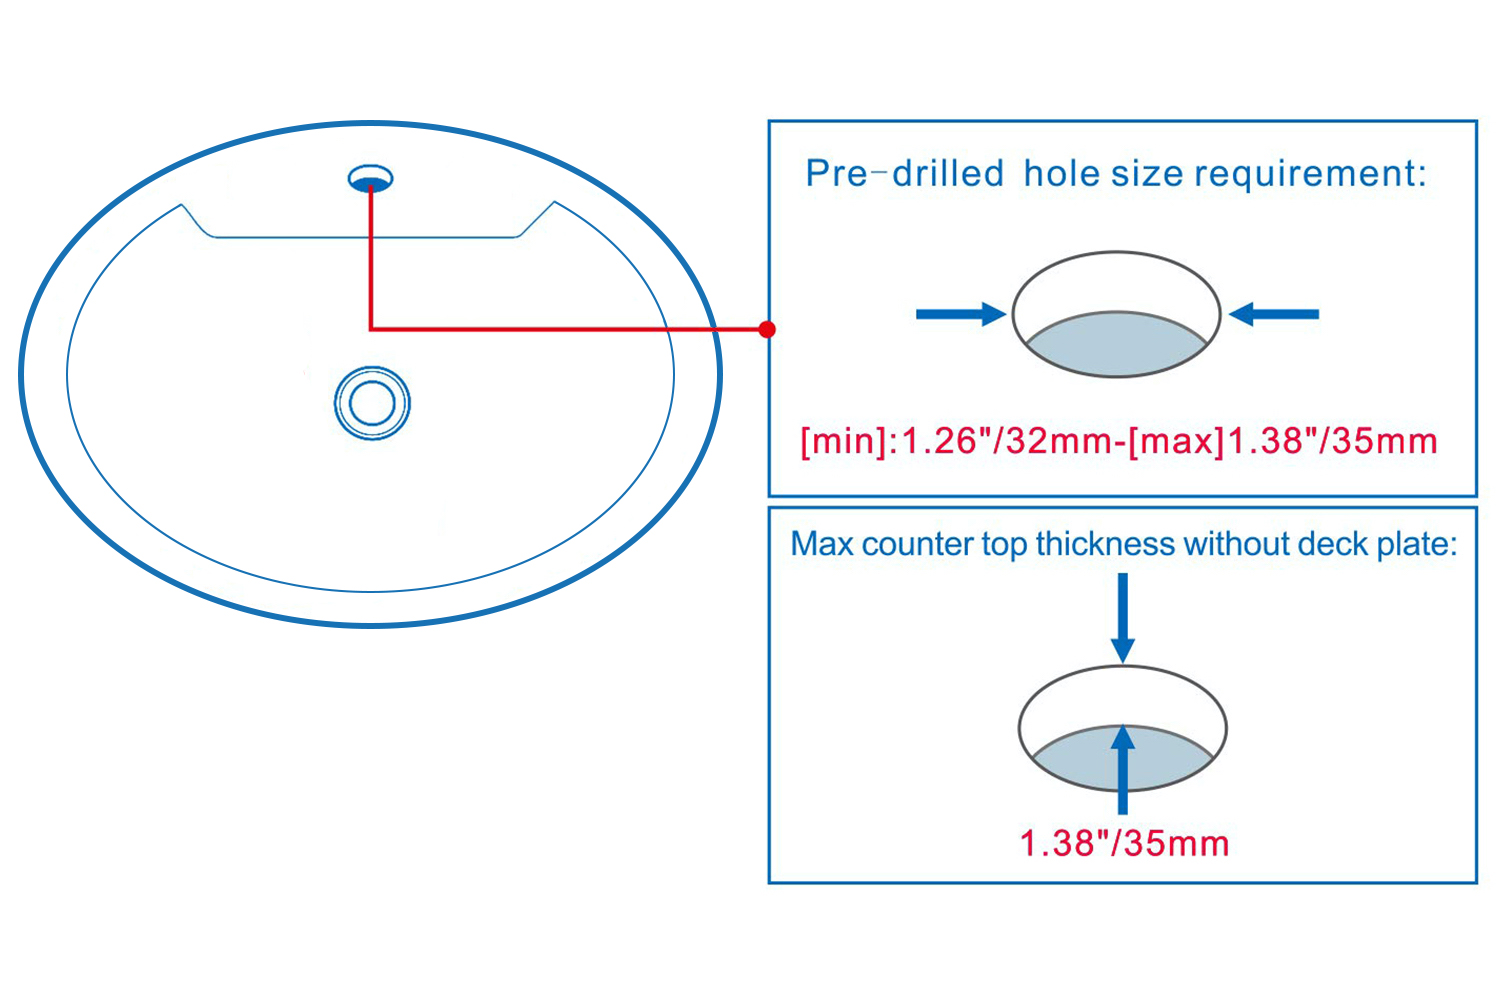
Hole Size:
|
|
|
|
|
|
|
|
|
|
Details:
Flow Pressure: 0.1 - 0.7 Mpa
Material: Durable Solid Brass
Valve Type: Ceramic Valve
Faucet Body Material: Brass
Mounting Type: Single Hole Valve Type: Ceramic Valve Faucet Total height: 175mm (7") Base length: 50mm (2") Spout Length : 70mm (2.8") Spout height: 115mm (4.6") Microcomputer intelligent control, intelligent power-saving. Touch-free use, to prevent cross-infection. Soft water, rich foam, effectively prevents water foam splash, safe and water-saving
Use the AC/DC battery.
Can be cleaned with mild soap to ensure the non-tarnish life shine
|
|
|
|
|
|
|
Deck Mount Installation
|
|
|
|
| |
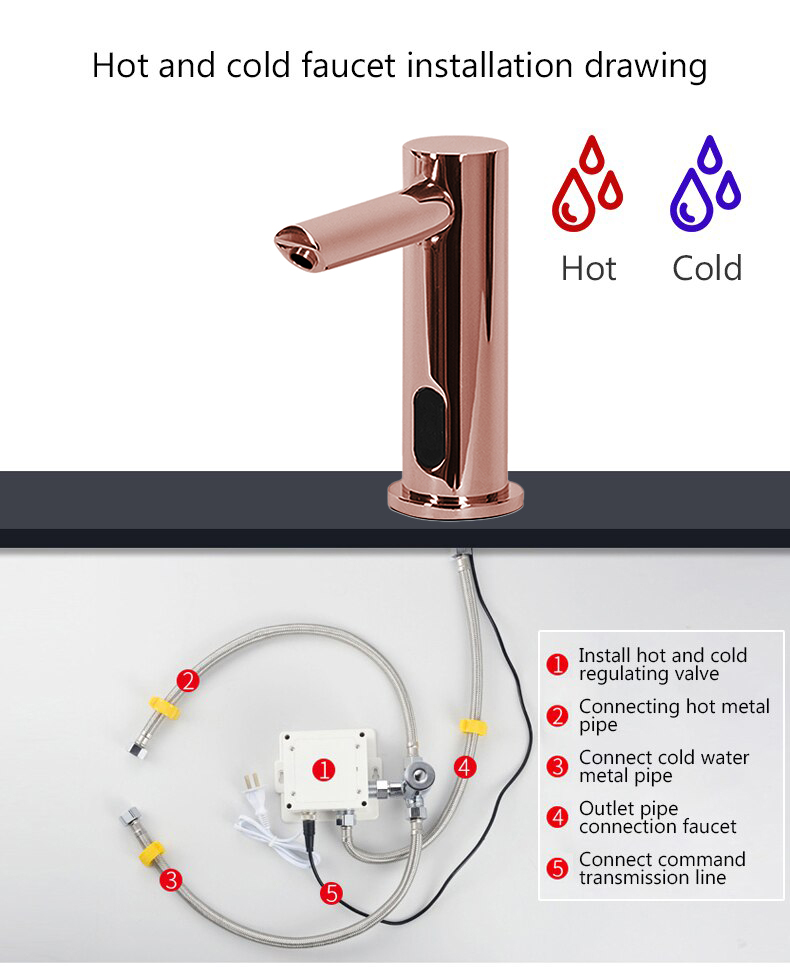
| Battery (DC 6V) Only Control Box | | | | Step 1: | | Step 2: (Hot & Cold Connection) | 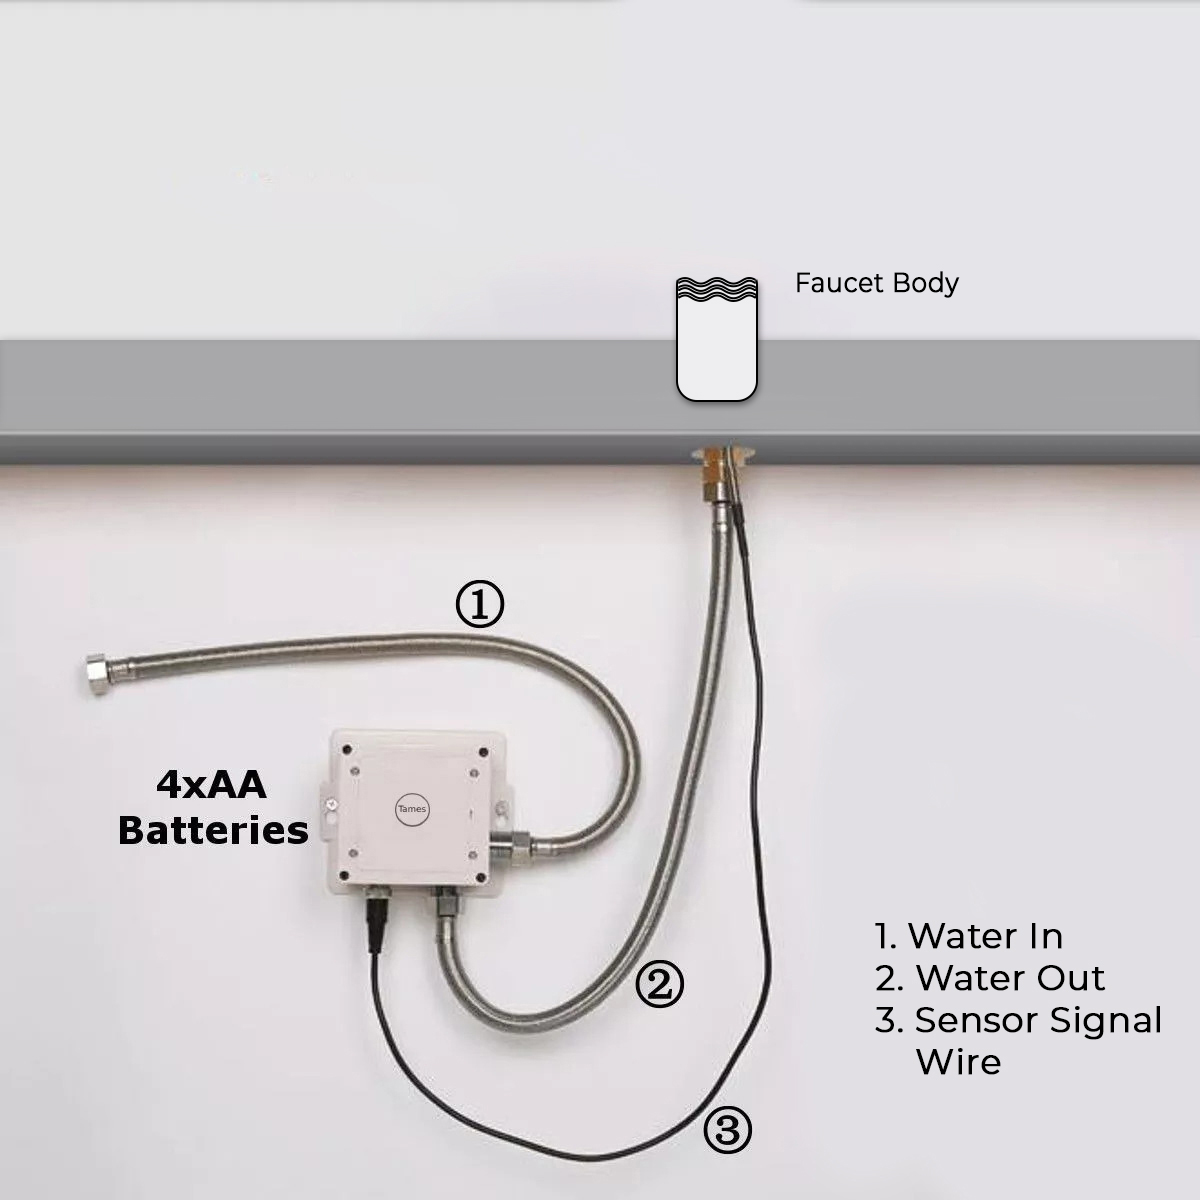
| sensor |  |
| |
| | Battery (DC 6V) & AC 220V Control Box | | | | Step 3: | | Step 4: | 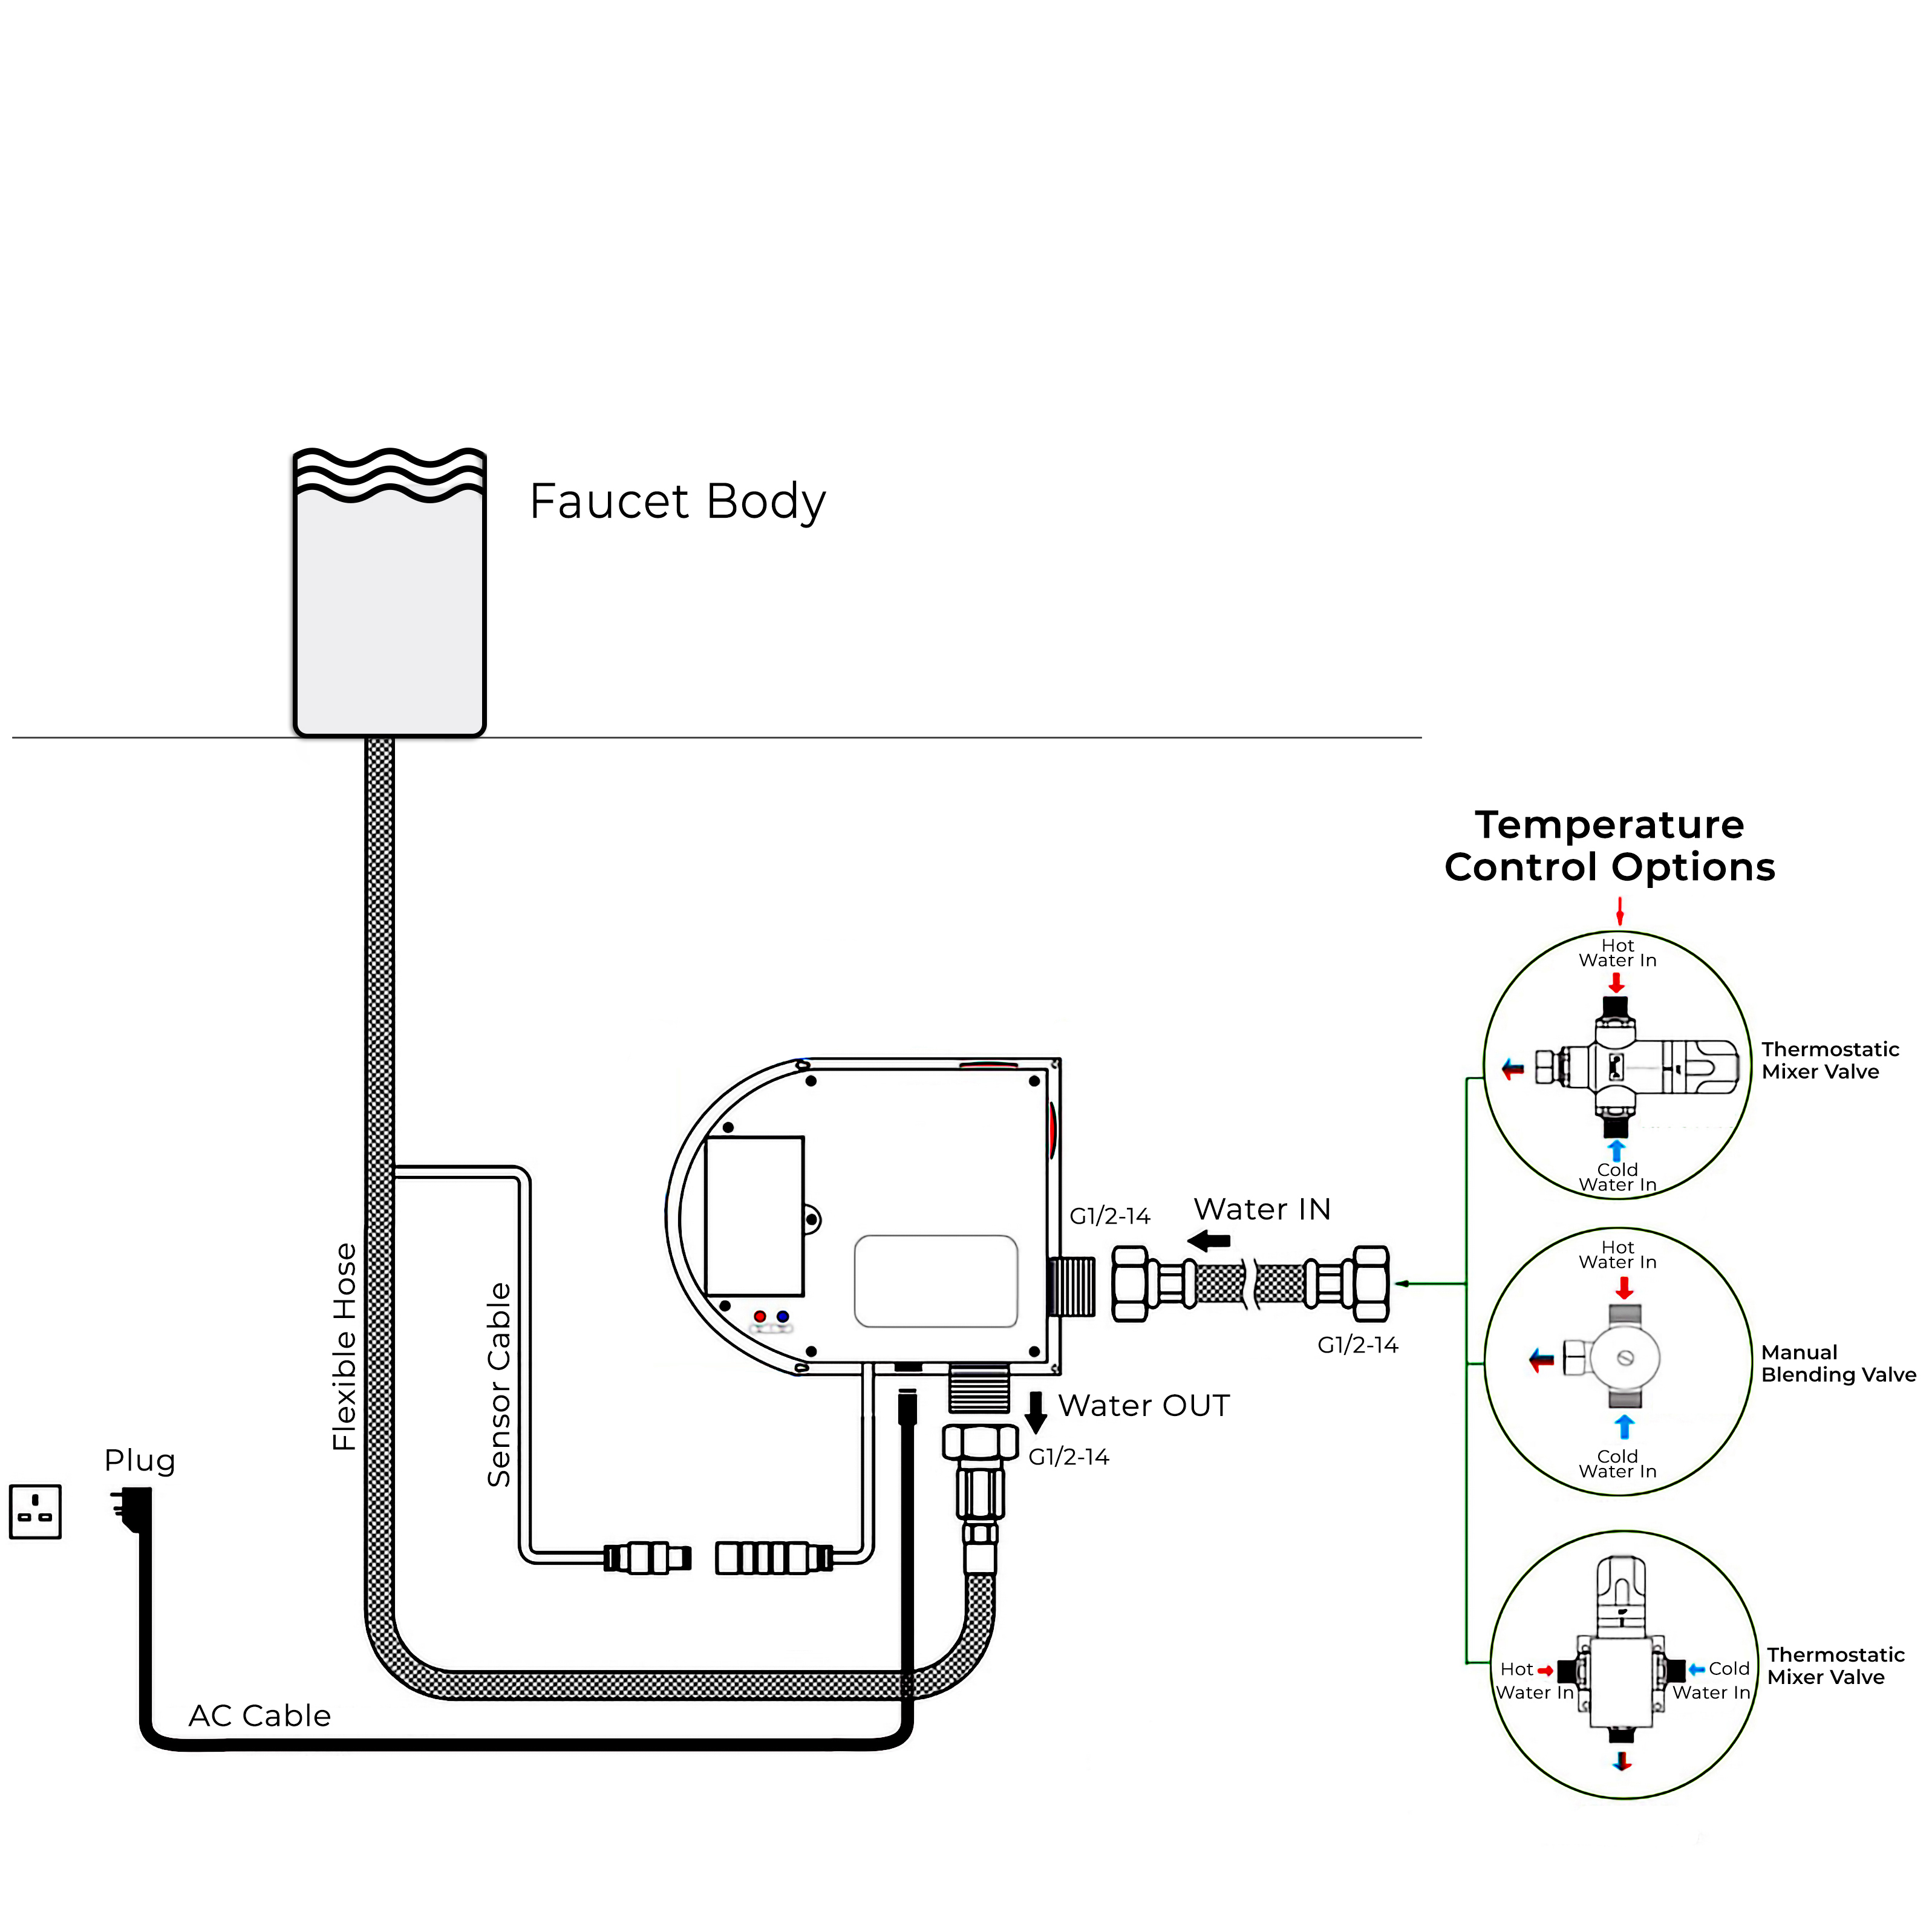 | | 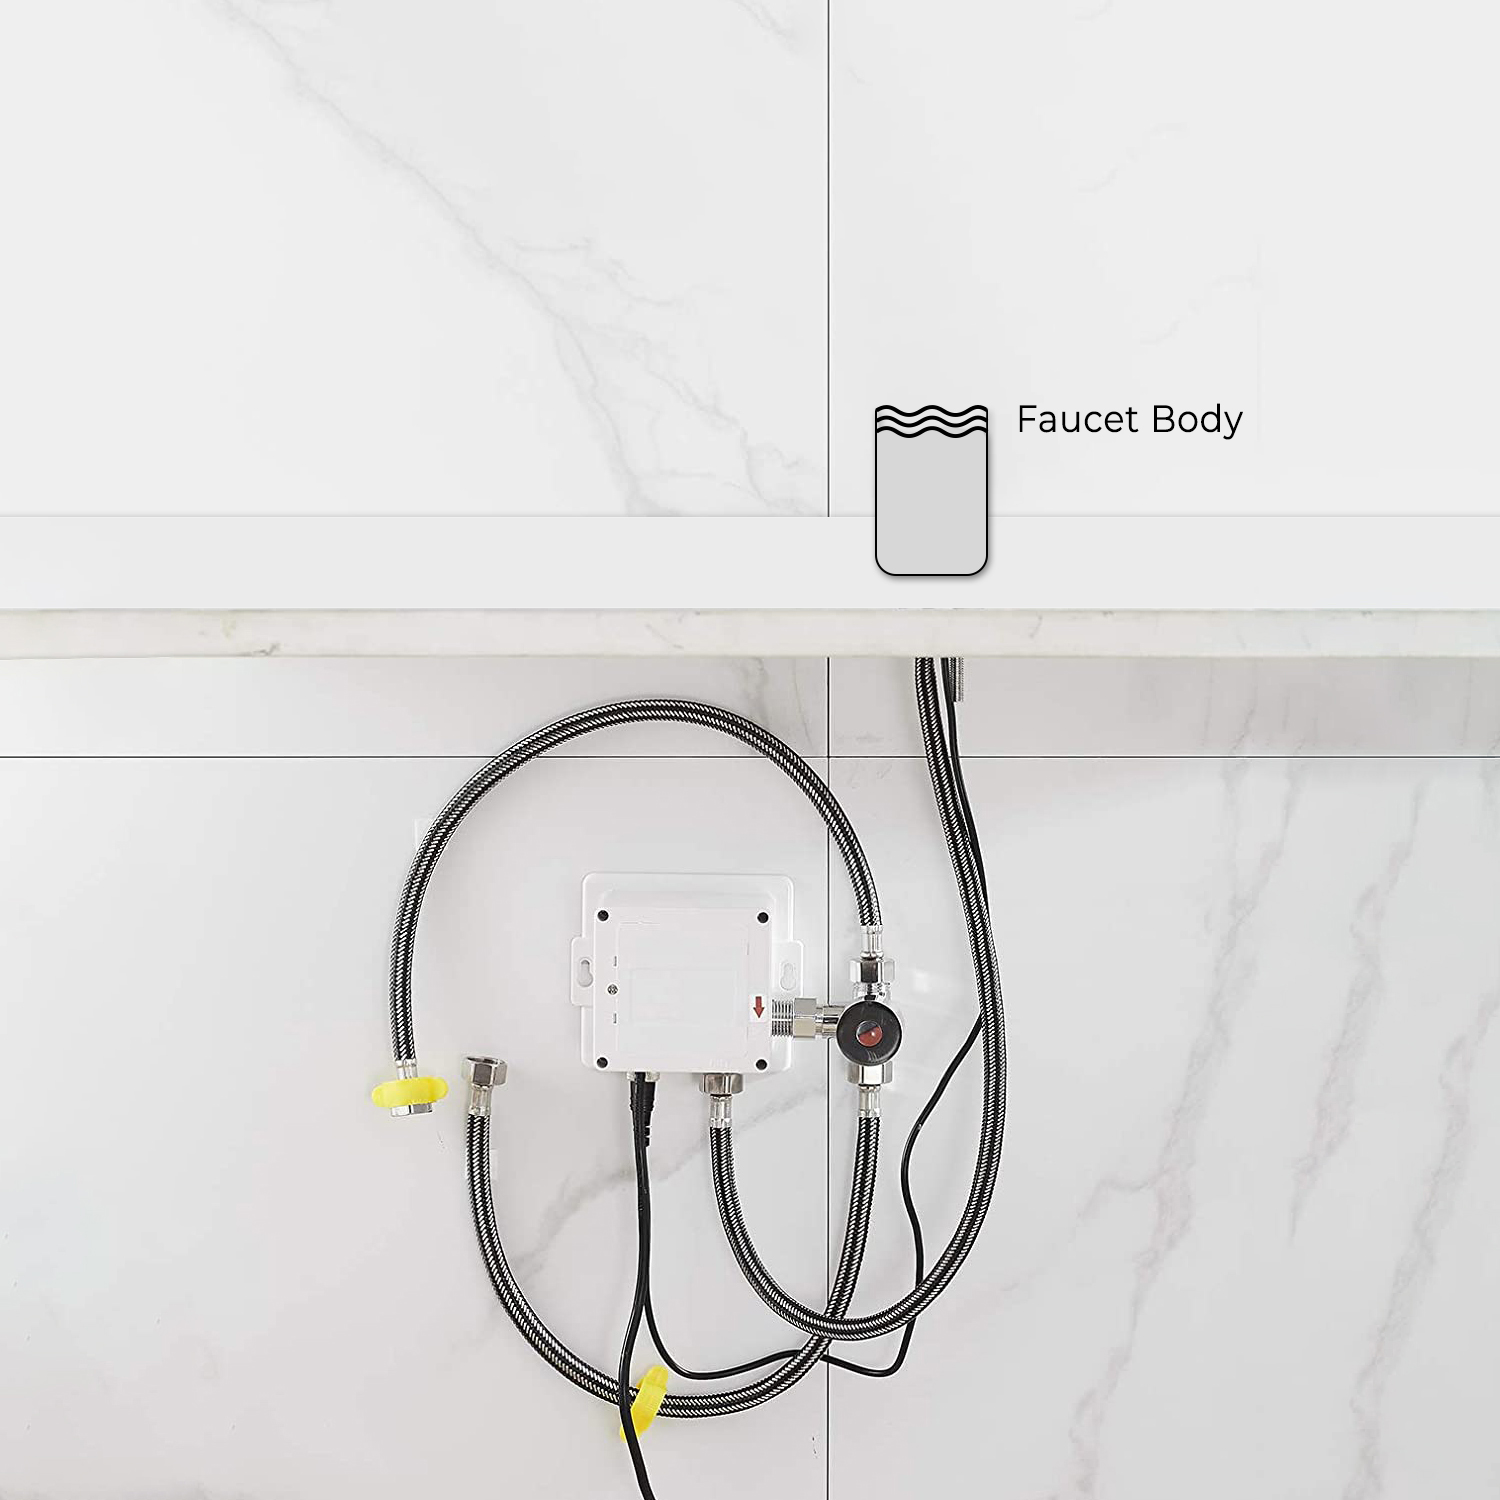 |
| |
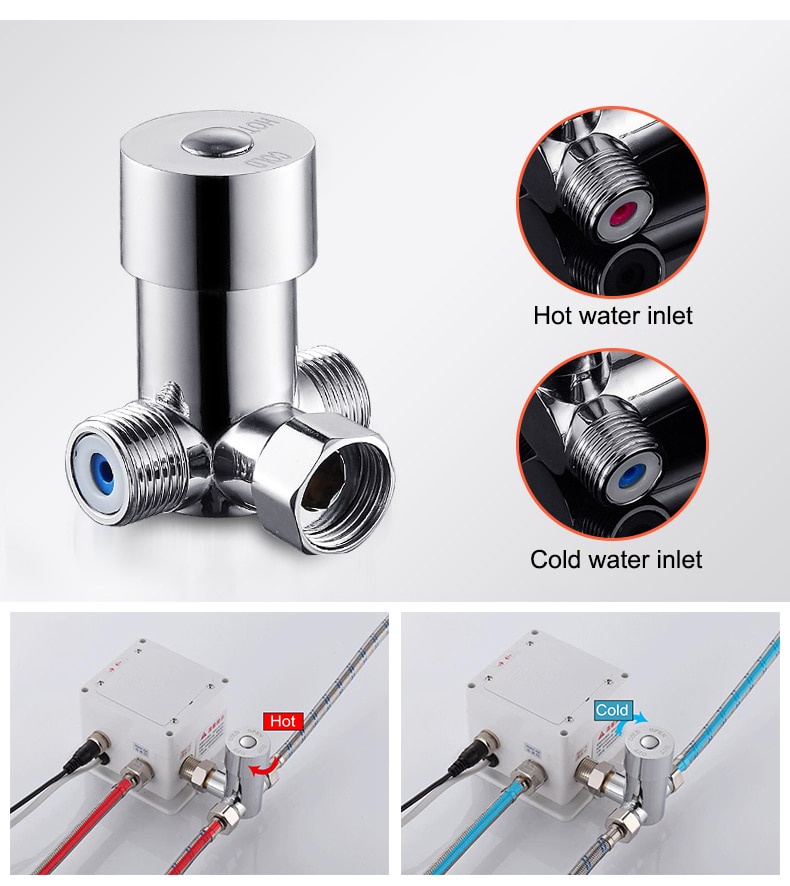
| | Step 5: Flush Debris from waterpipes | | Step 6: Hot & Cold Regulator | 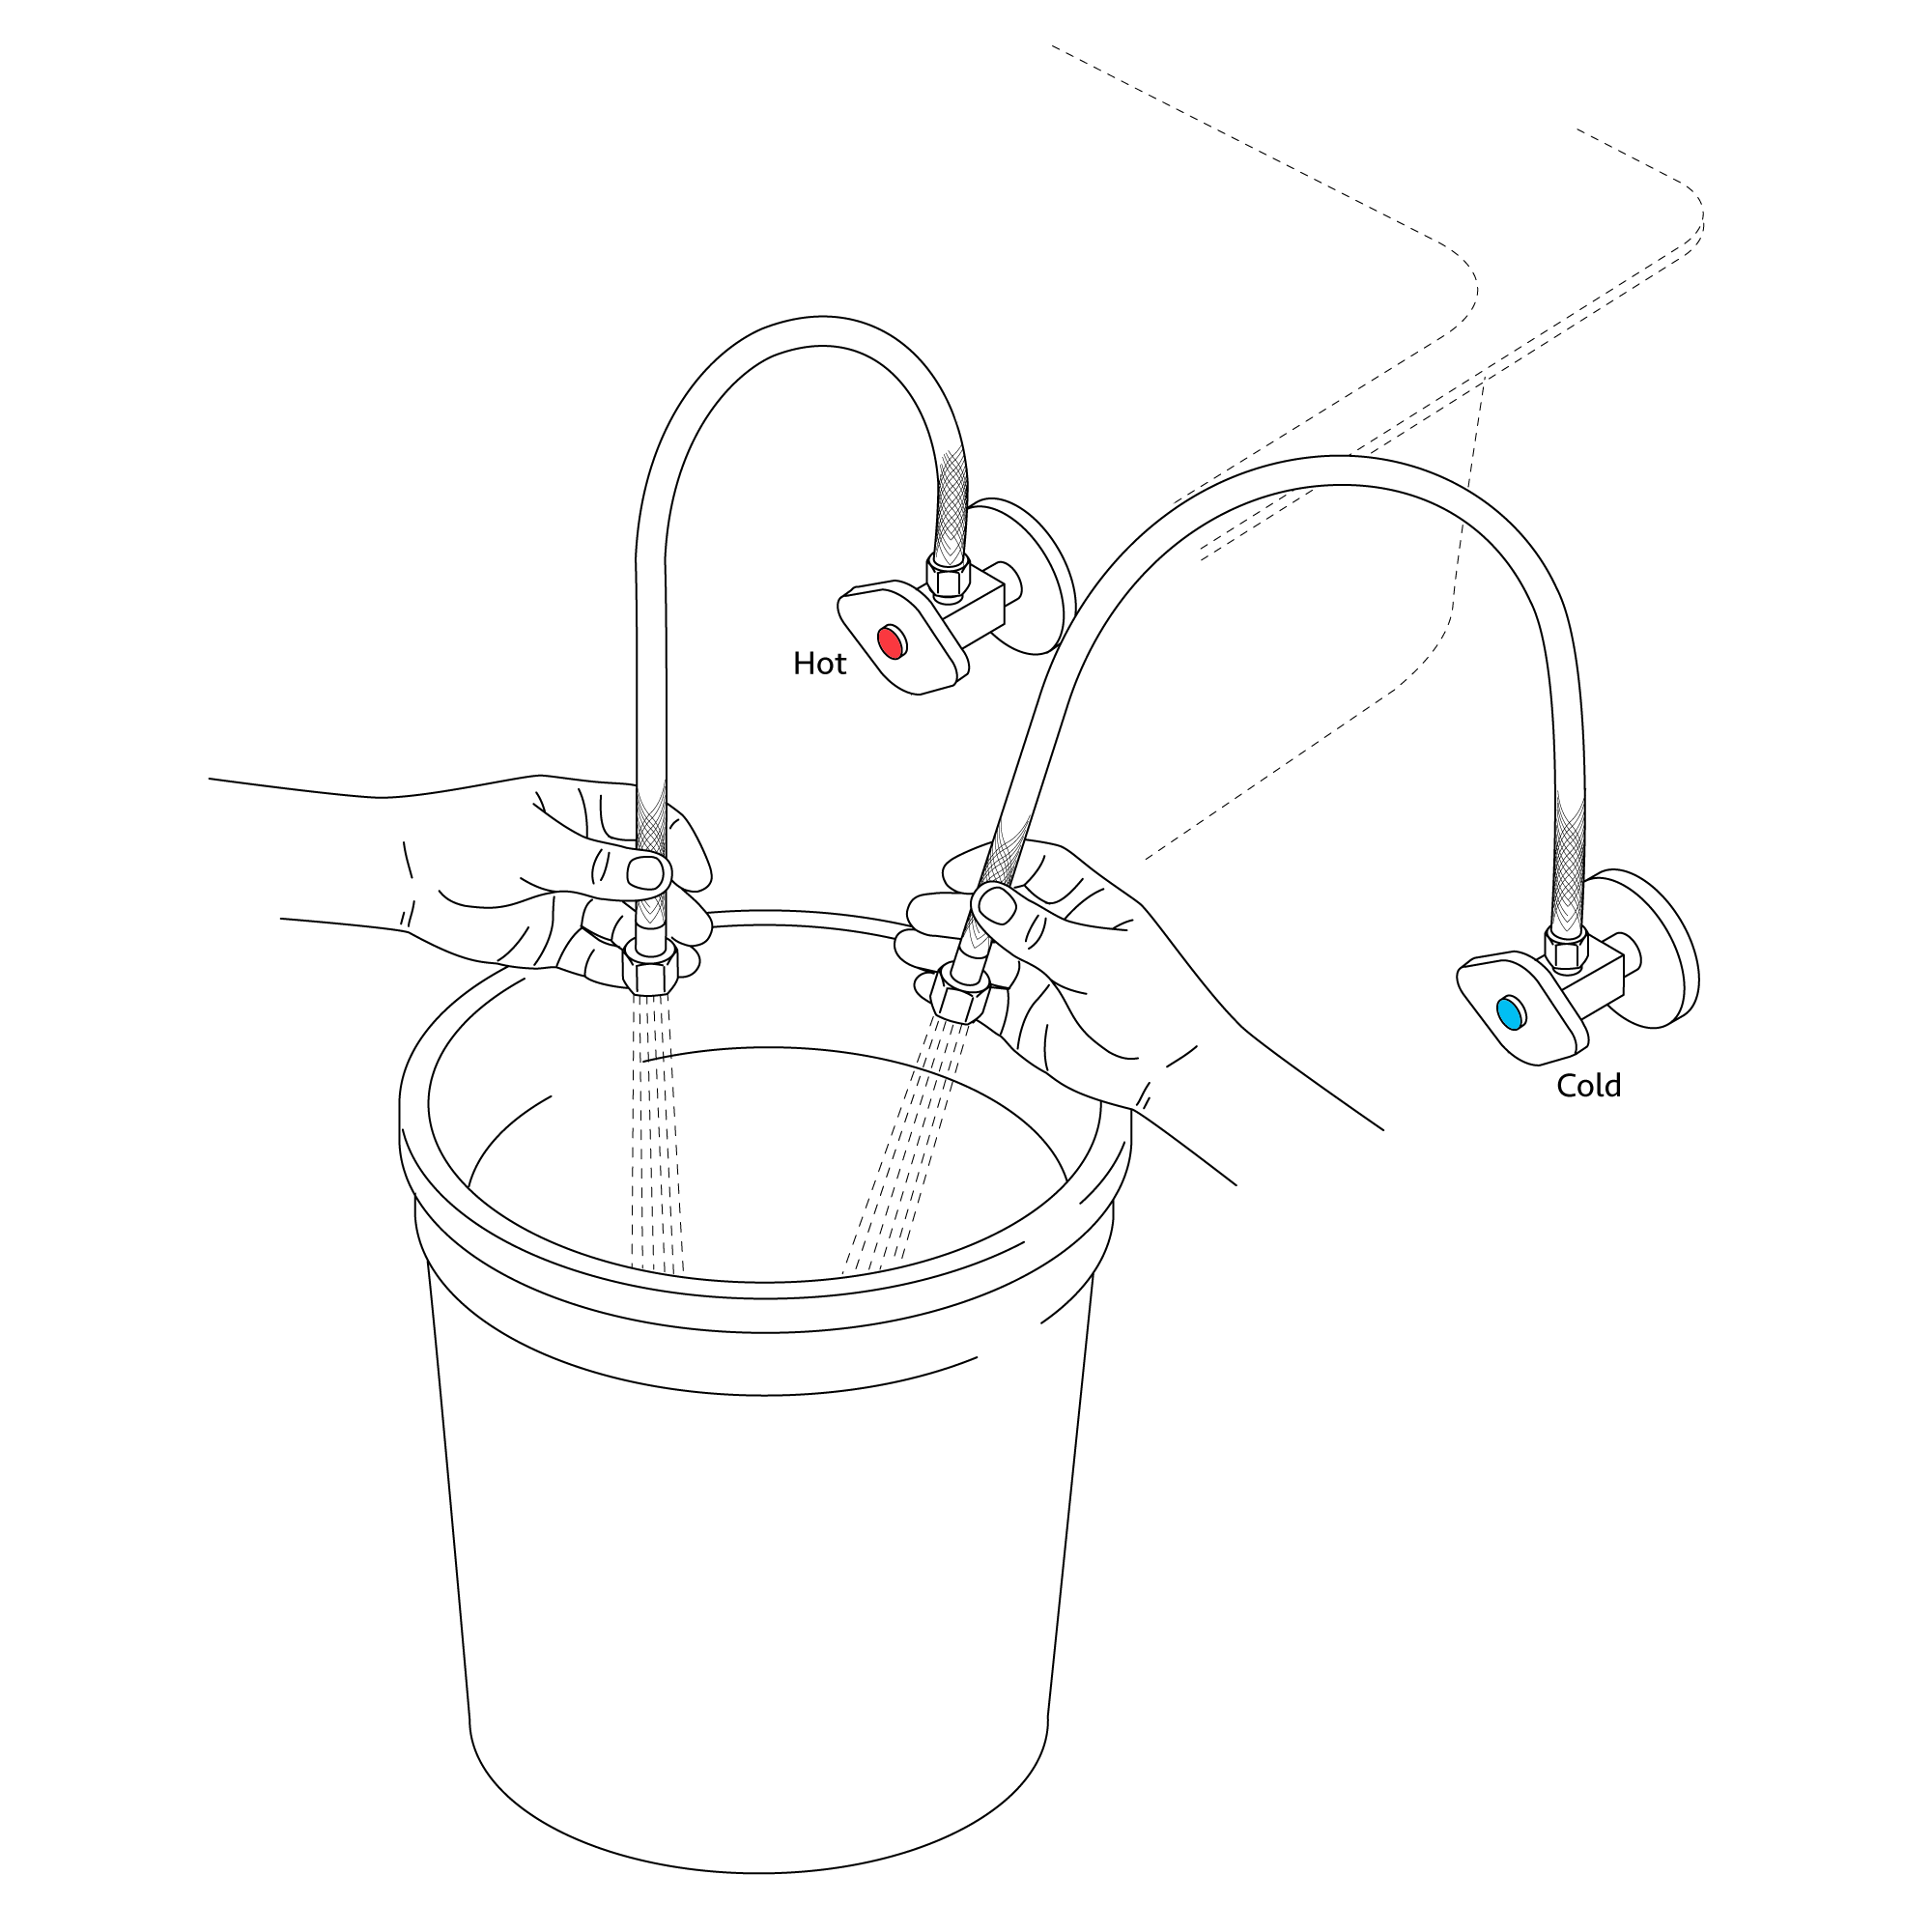 | |  |
| |
| | Step 7: | | Step 8: (Correct way for Hose) | 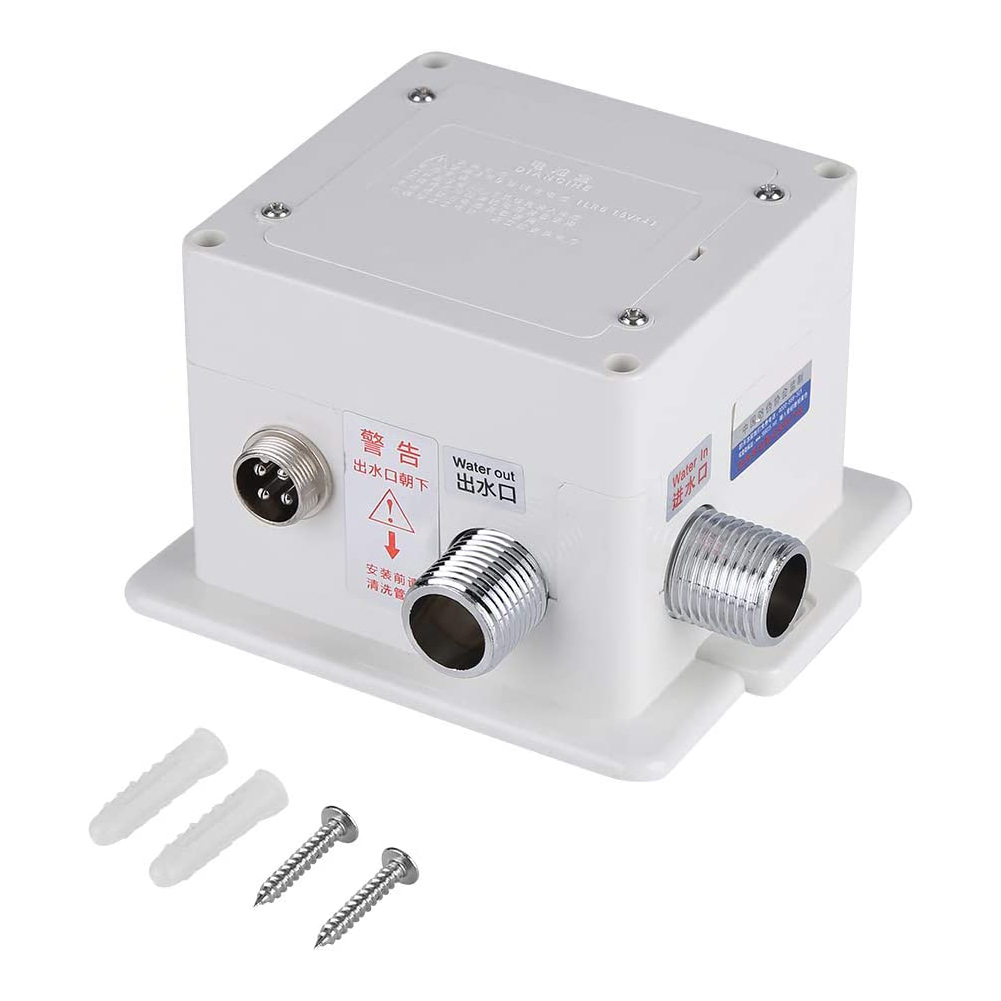 | |  |
| |
|
| | |
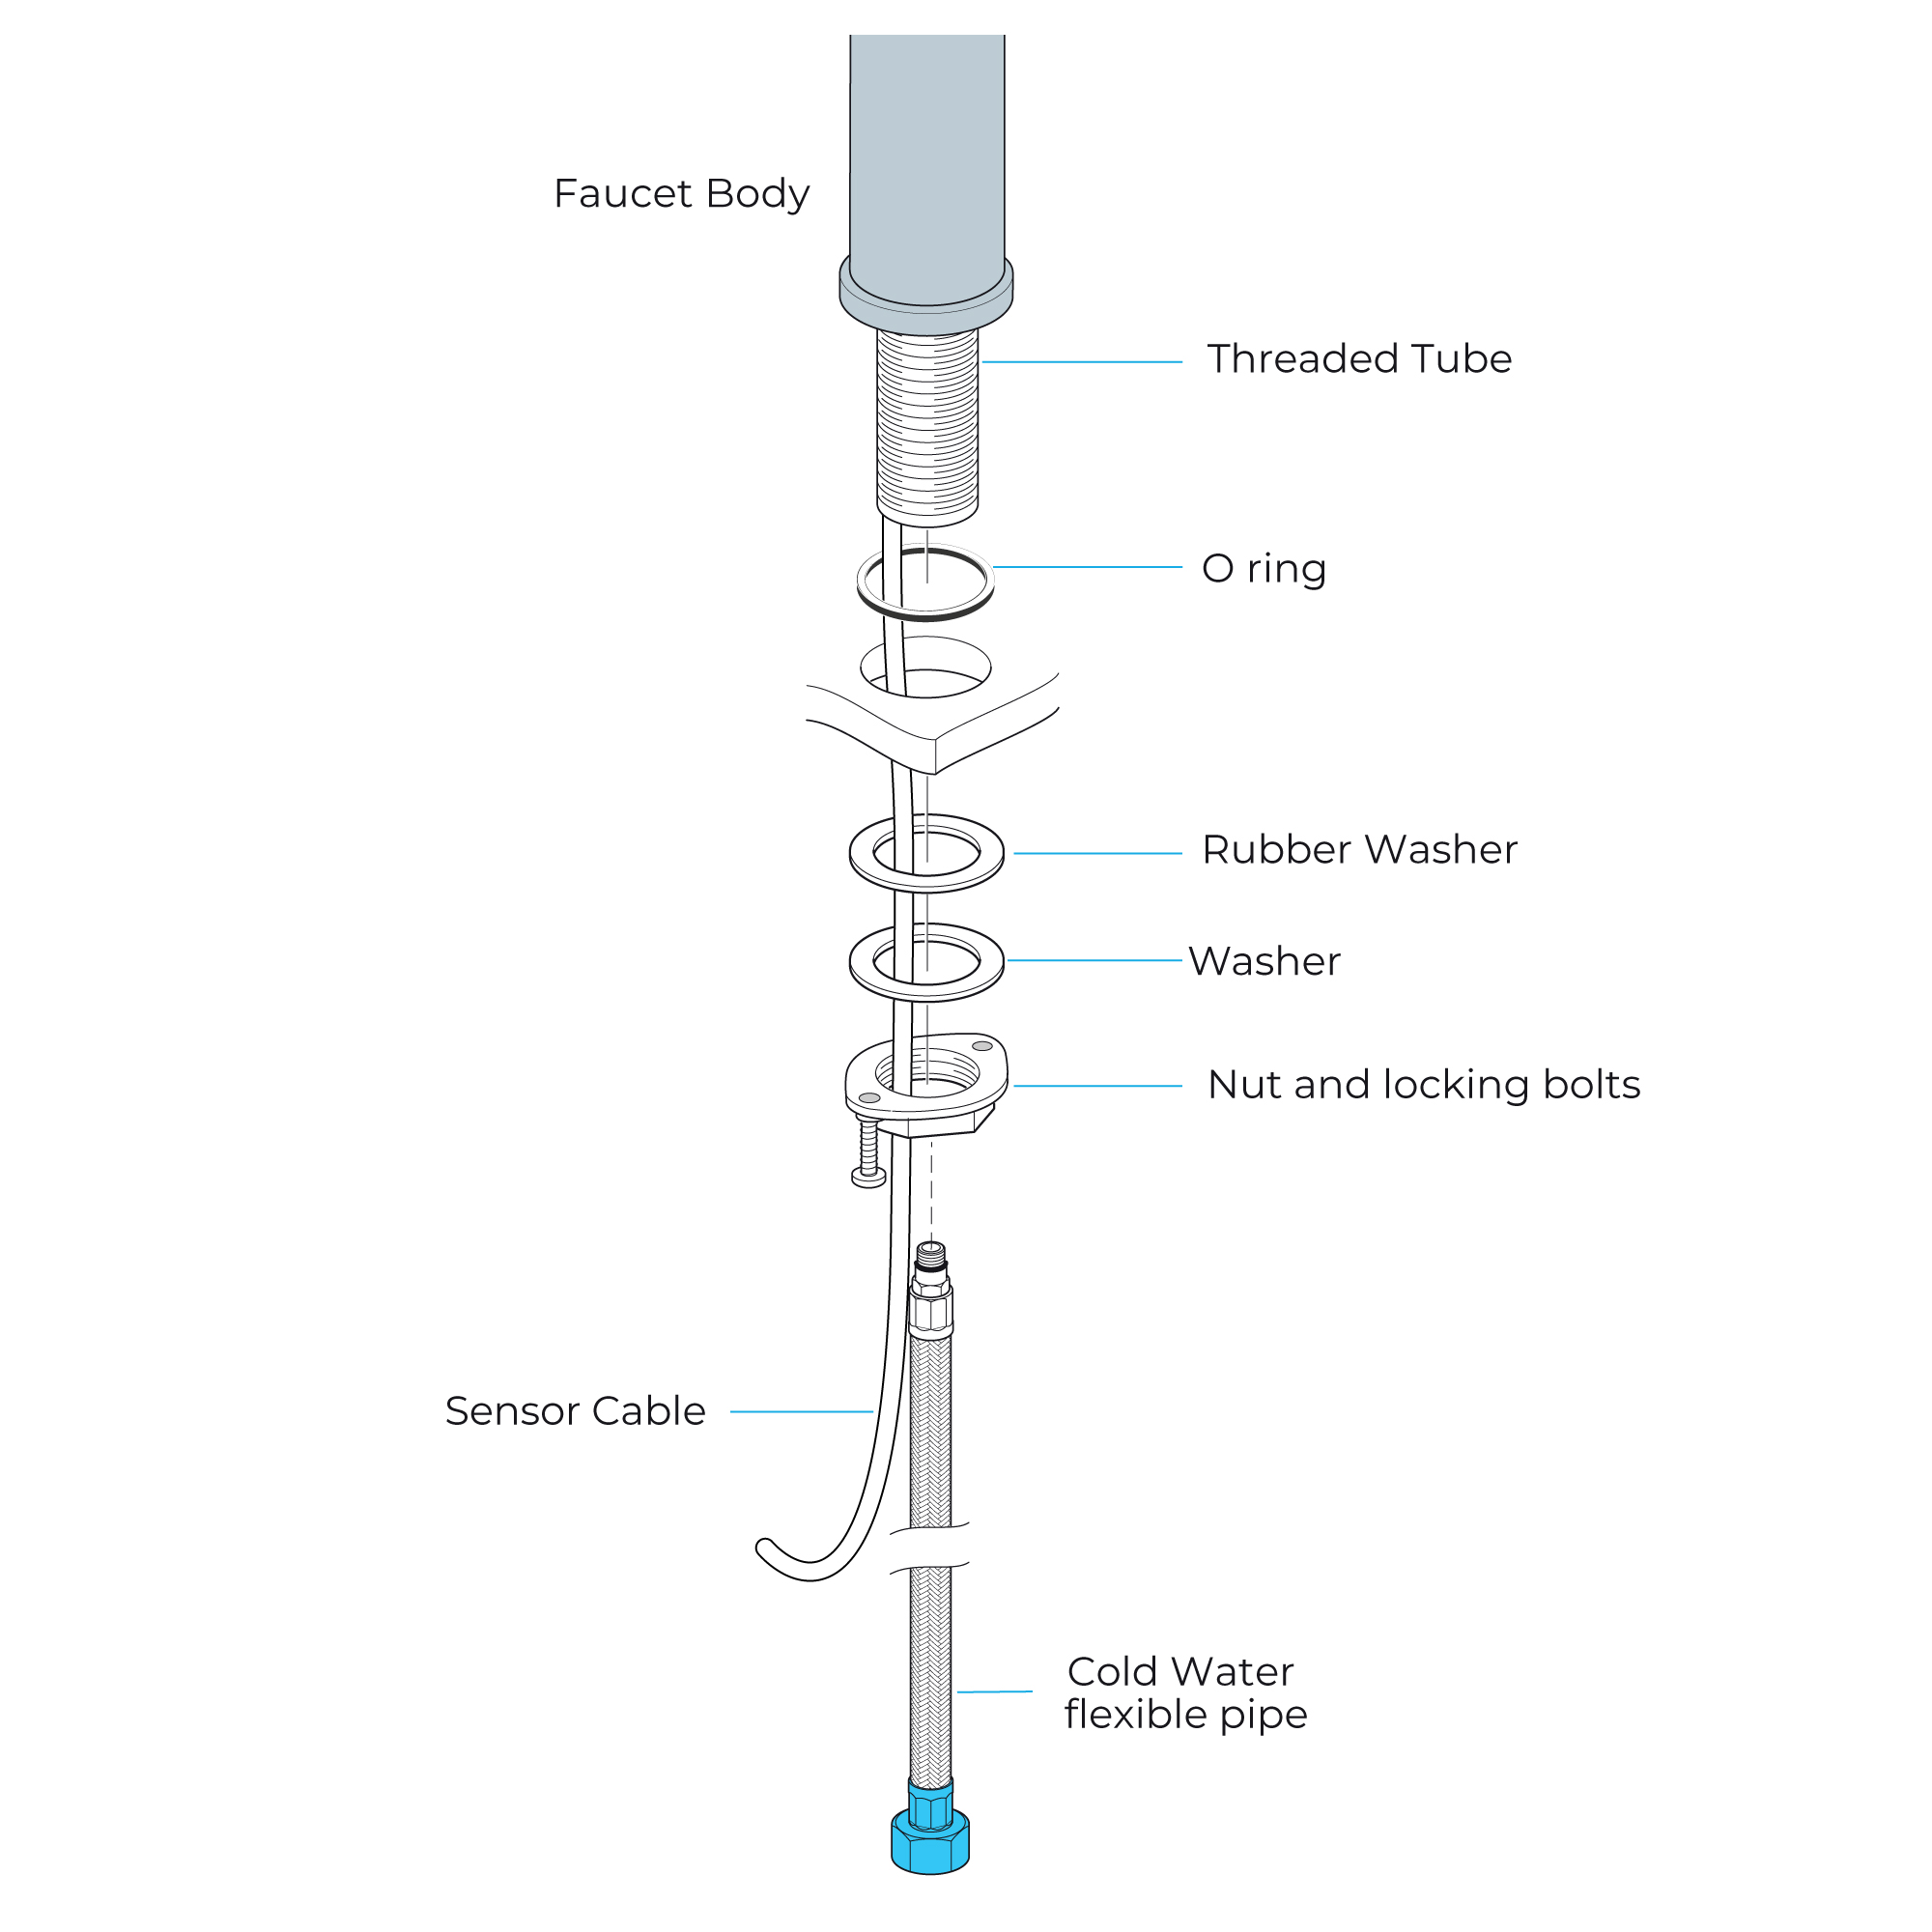
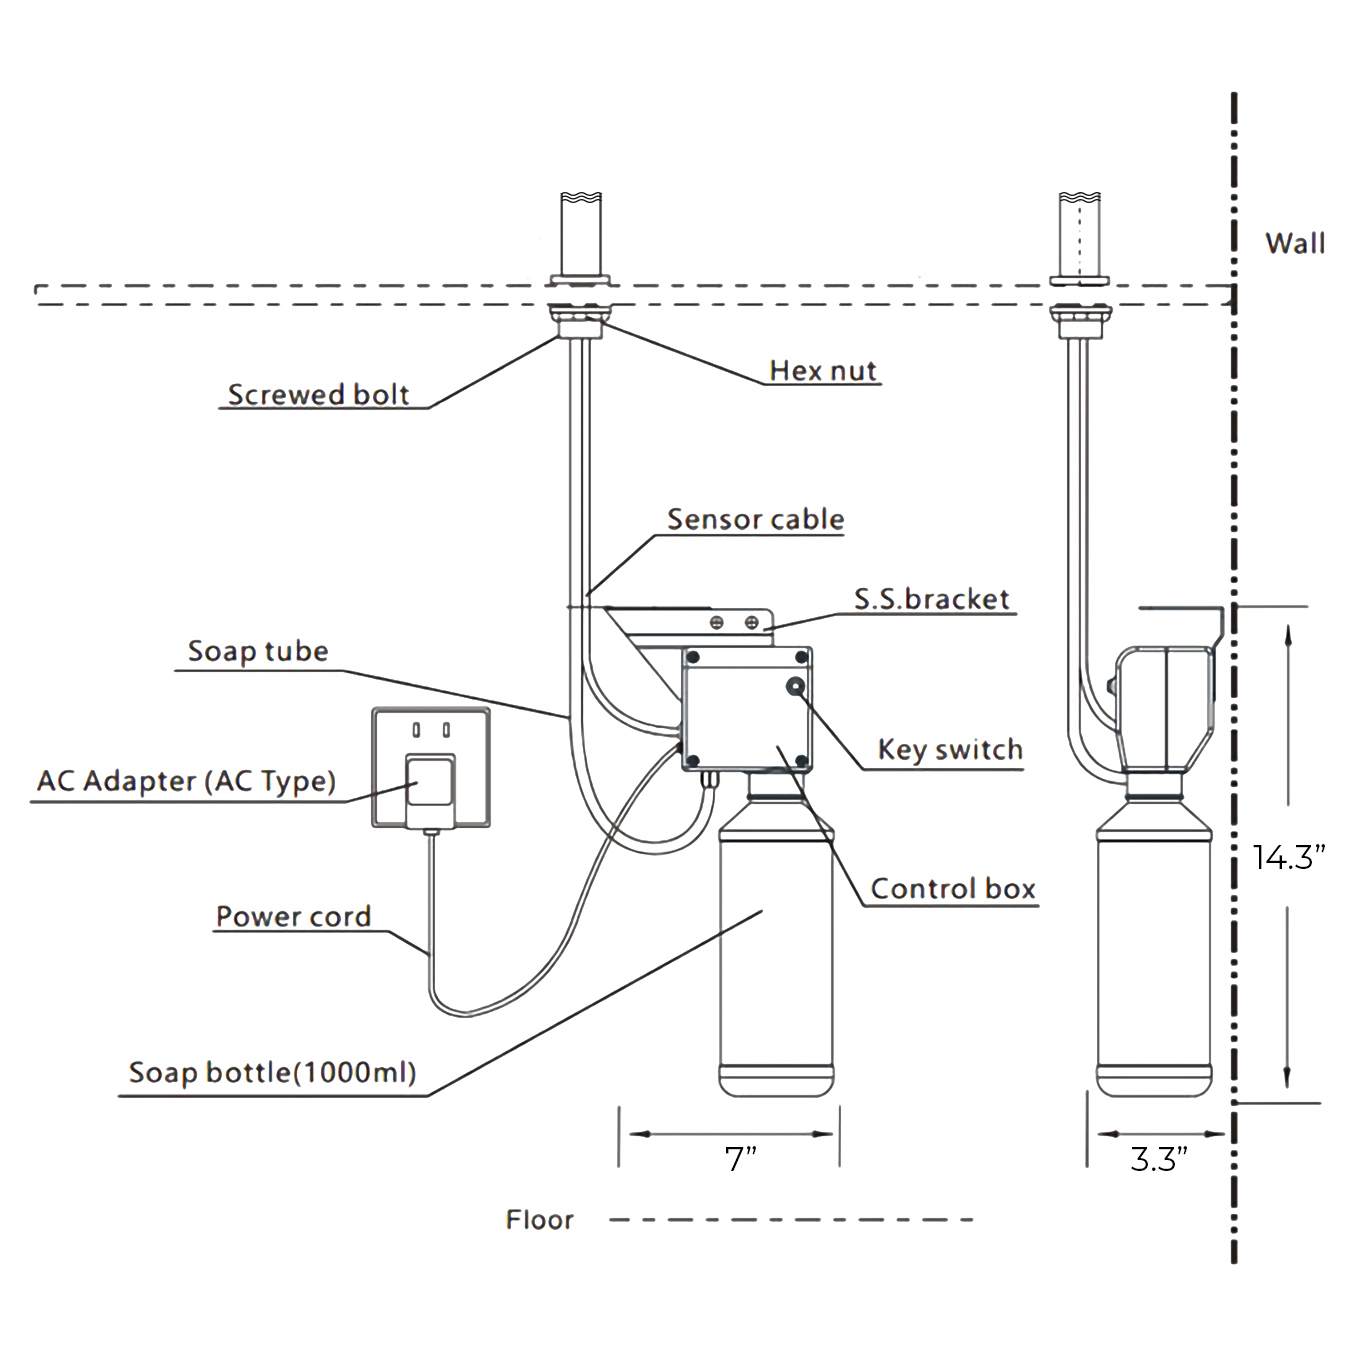
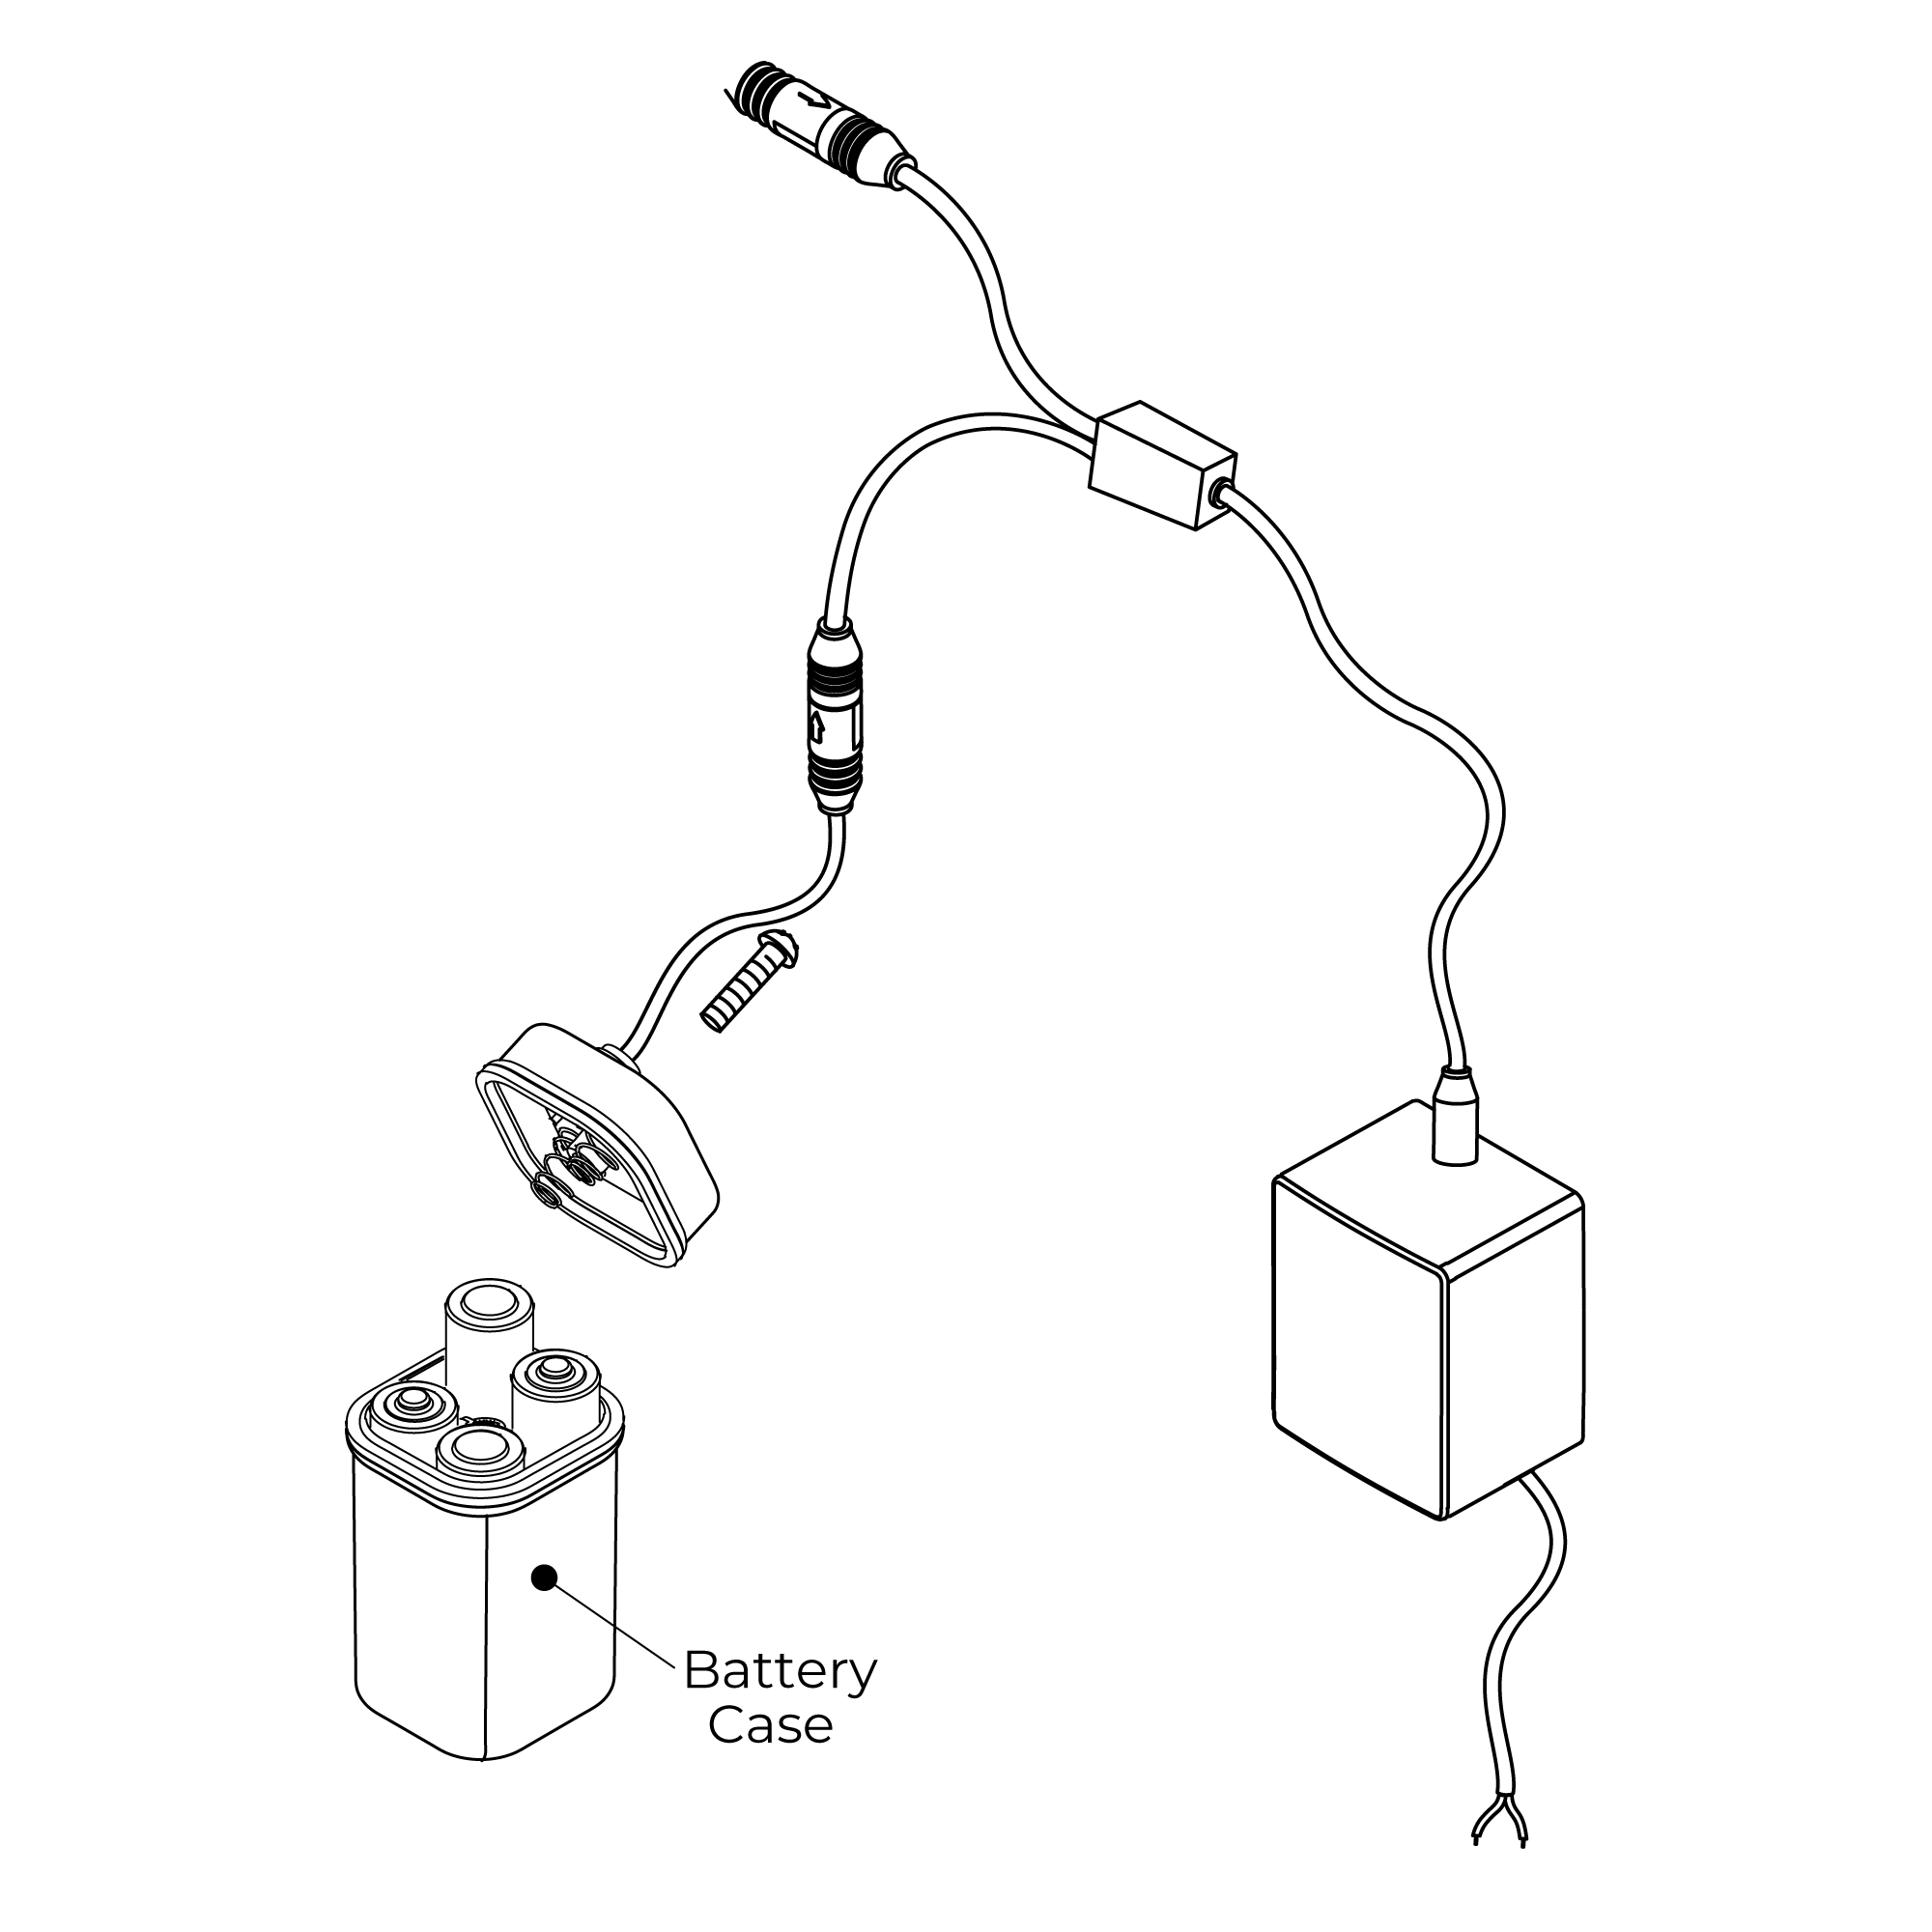
1. Screw the hose into the corresponding screw-hole of the faucet body. Fix the o-ring into the bottom groove of the faucet body.
2. Insert hose, threaded pipe and data cable through the drilled hole of the countertop. Put rubber washer and metal washer onto the threaded pipe, screwing in mounting nut. Adjust the faucet body correctly and tighten the mounting nut with screws.
3. Install the control box to the faucet.
4. Then connect the battery cable to the control box.
5. Make Connections to water supplies. Turn on the water supply and flush water lines into a container for one minute.
Important: This flushes away any debris that could cause damage to internal parts.
6. Connect waterlines to angle stops. Turn on the angle stops and check for leaks (DO NOT TURN FAUCET ON).
7. Turn the faucet on for 1 minute to flush any debris.
| |  |
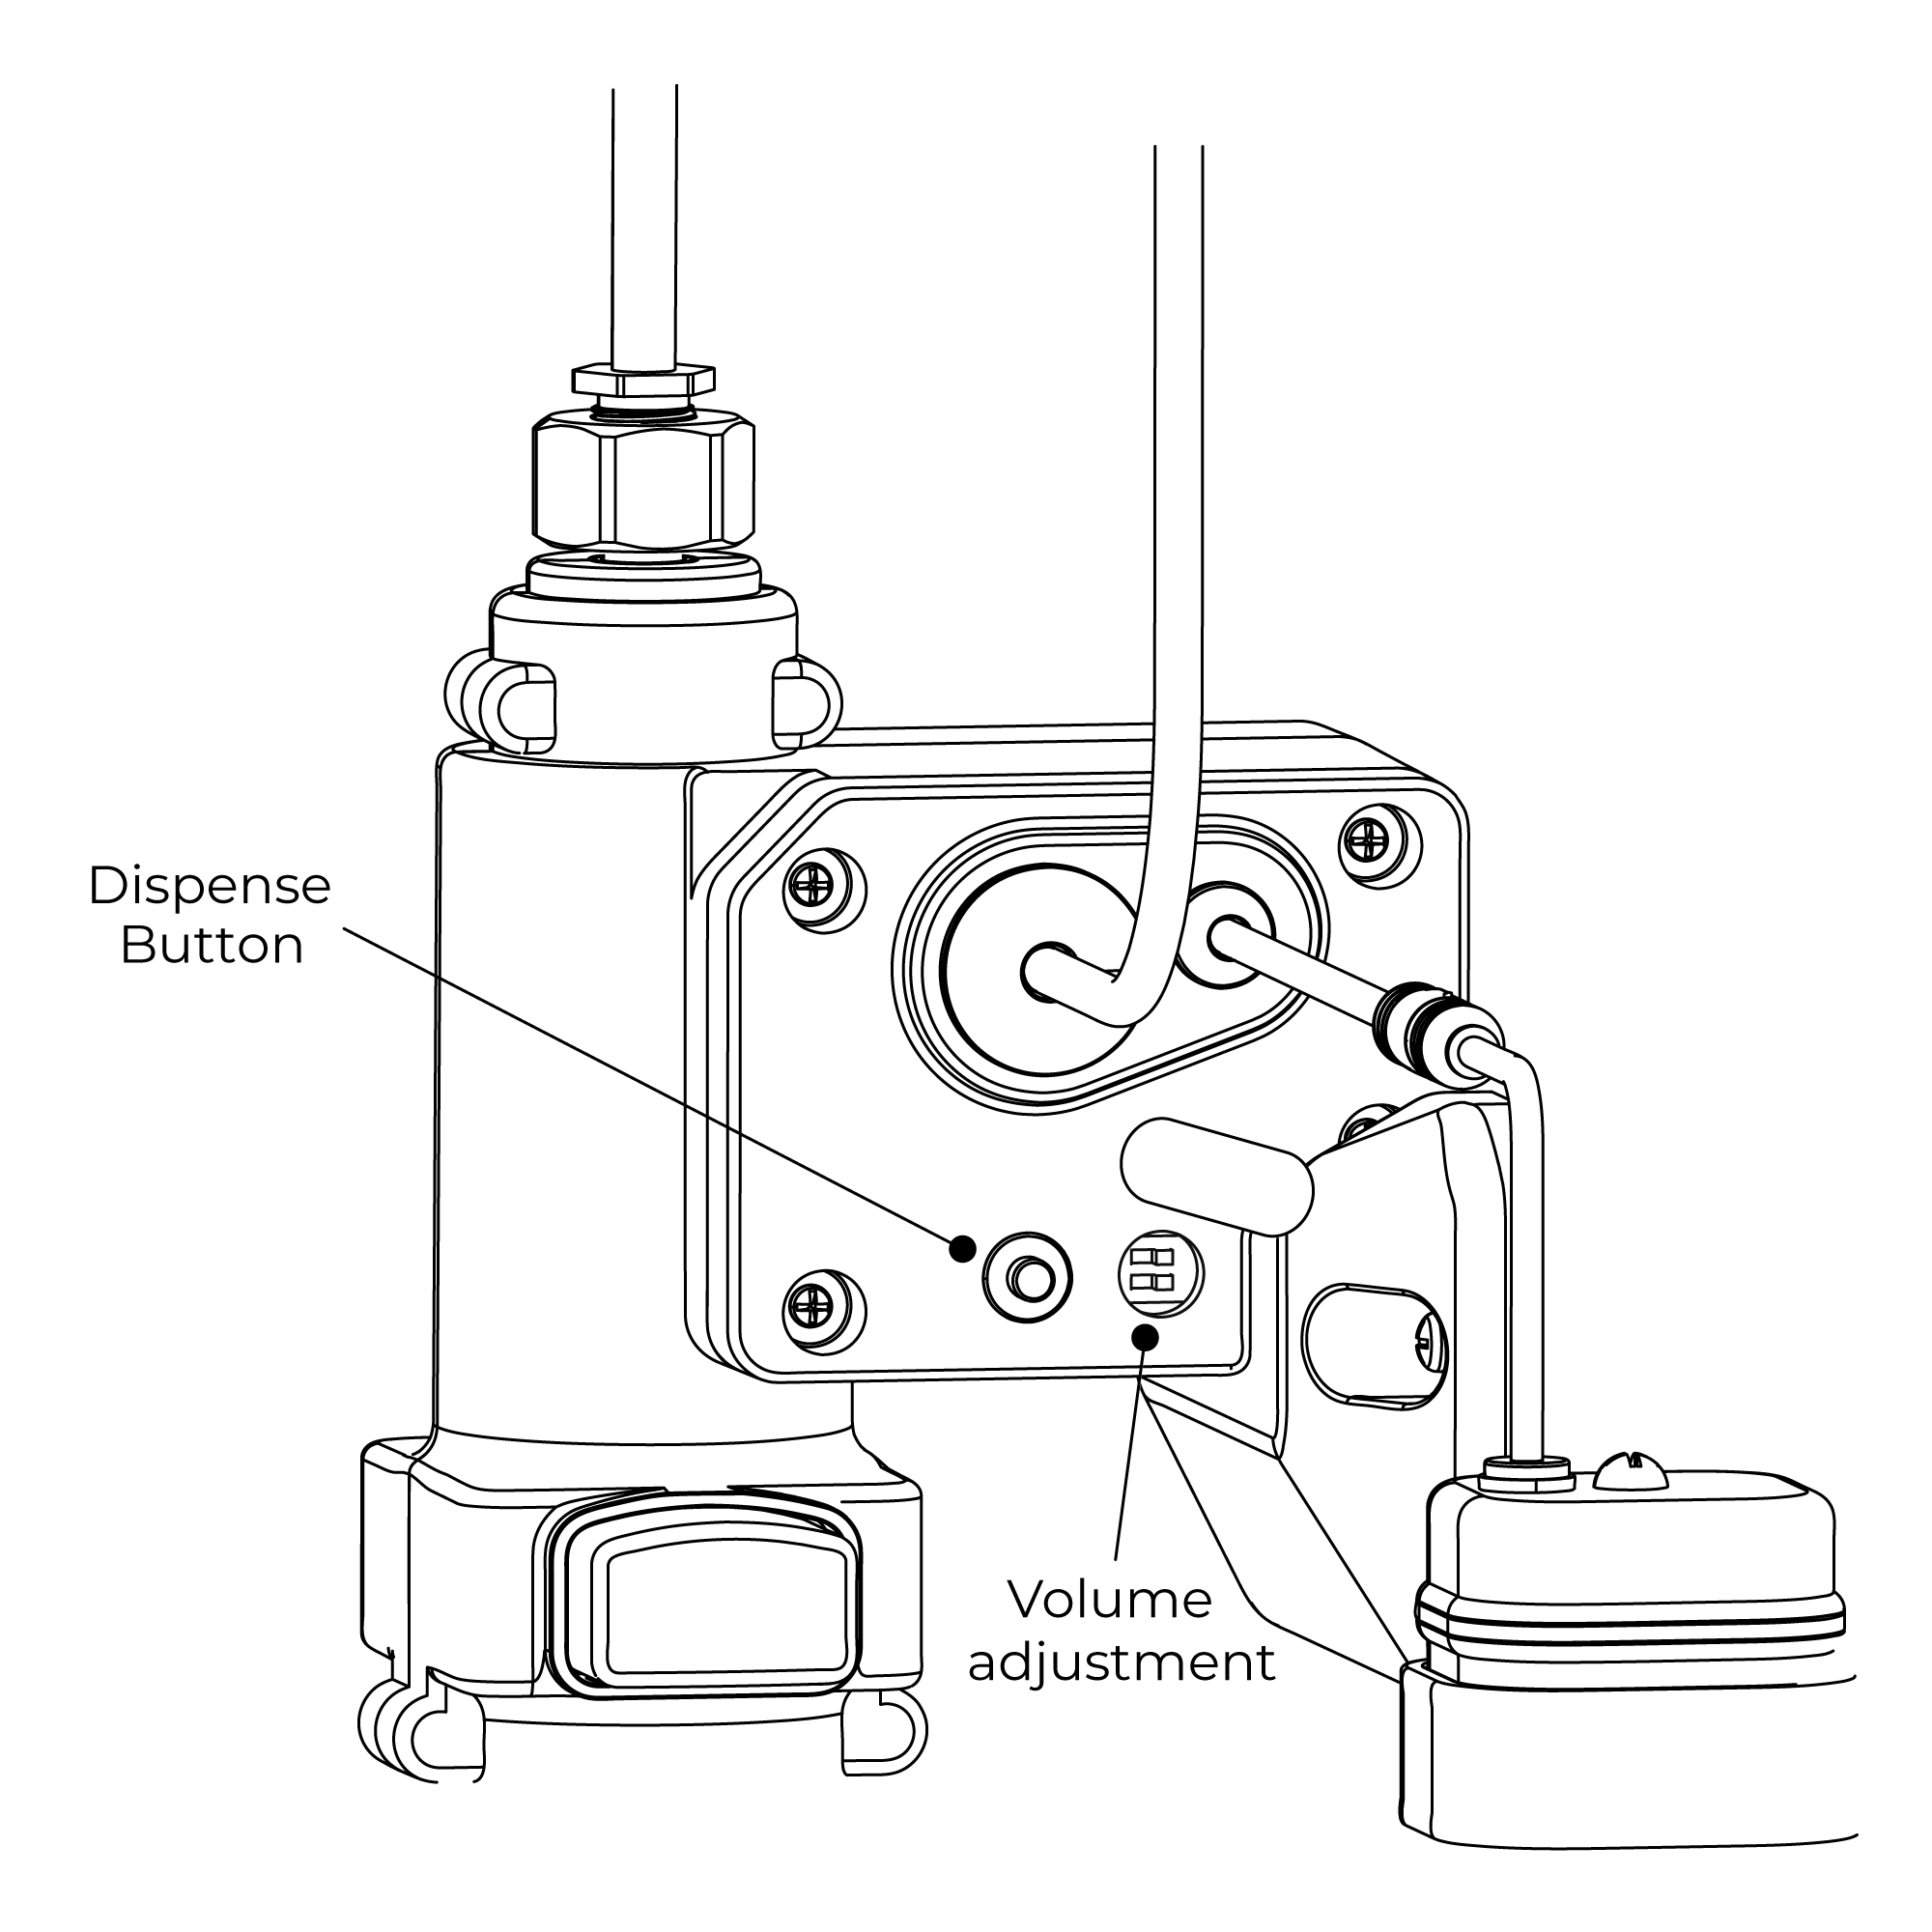
Flexible Connecting Hose
Care must be taken when connecting the flexible connection hose from the power supply box to the spout to ensure it does not bend sharply and kink or twist.
See above for recommended ways to fit the flexible connecting hose.
Important: Failure to follow these guidelines may result in poor performance and damage to the flexible connection hose. | |
 Control Box Installation Instructions Control Box Installation Instructions| Step 1: | | Step 2: | 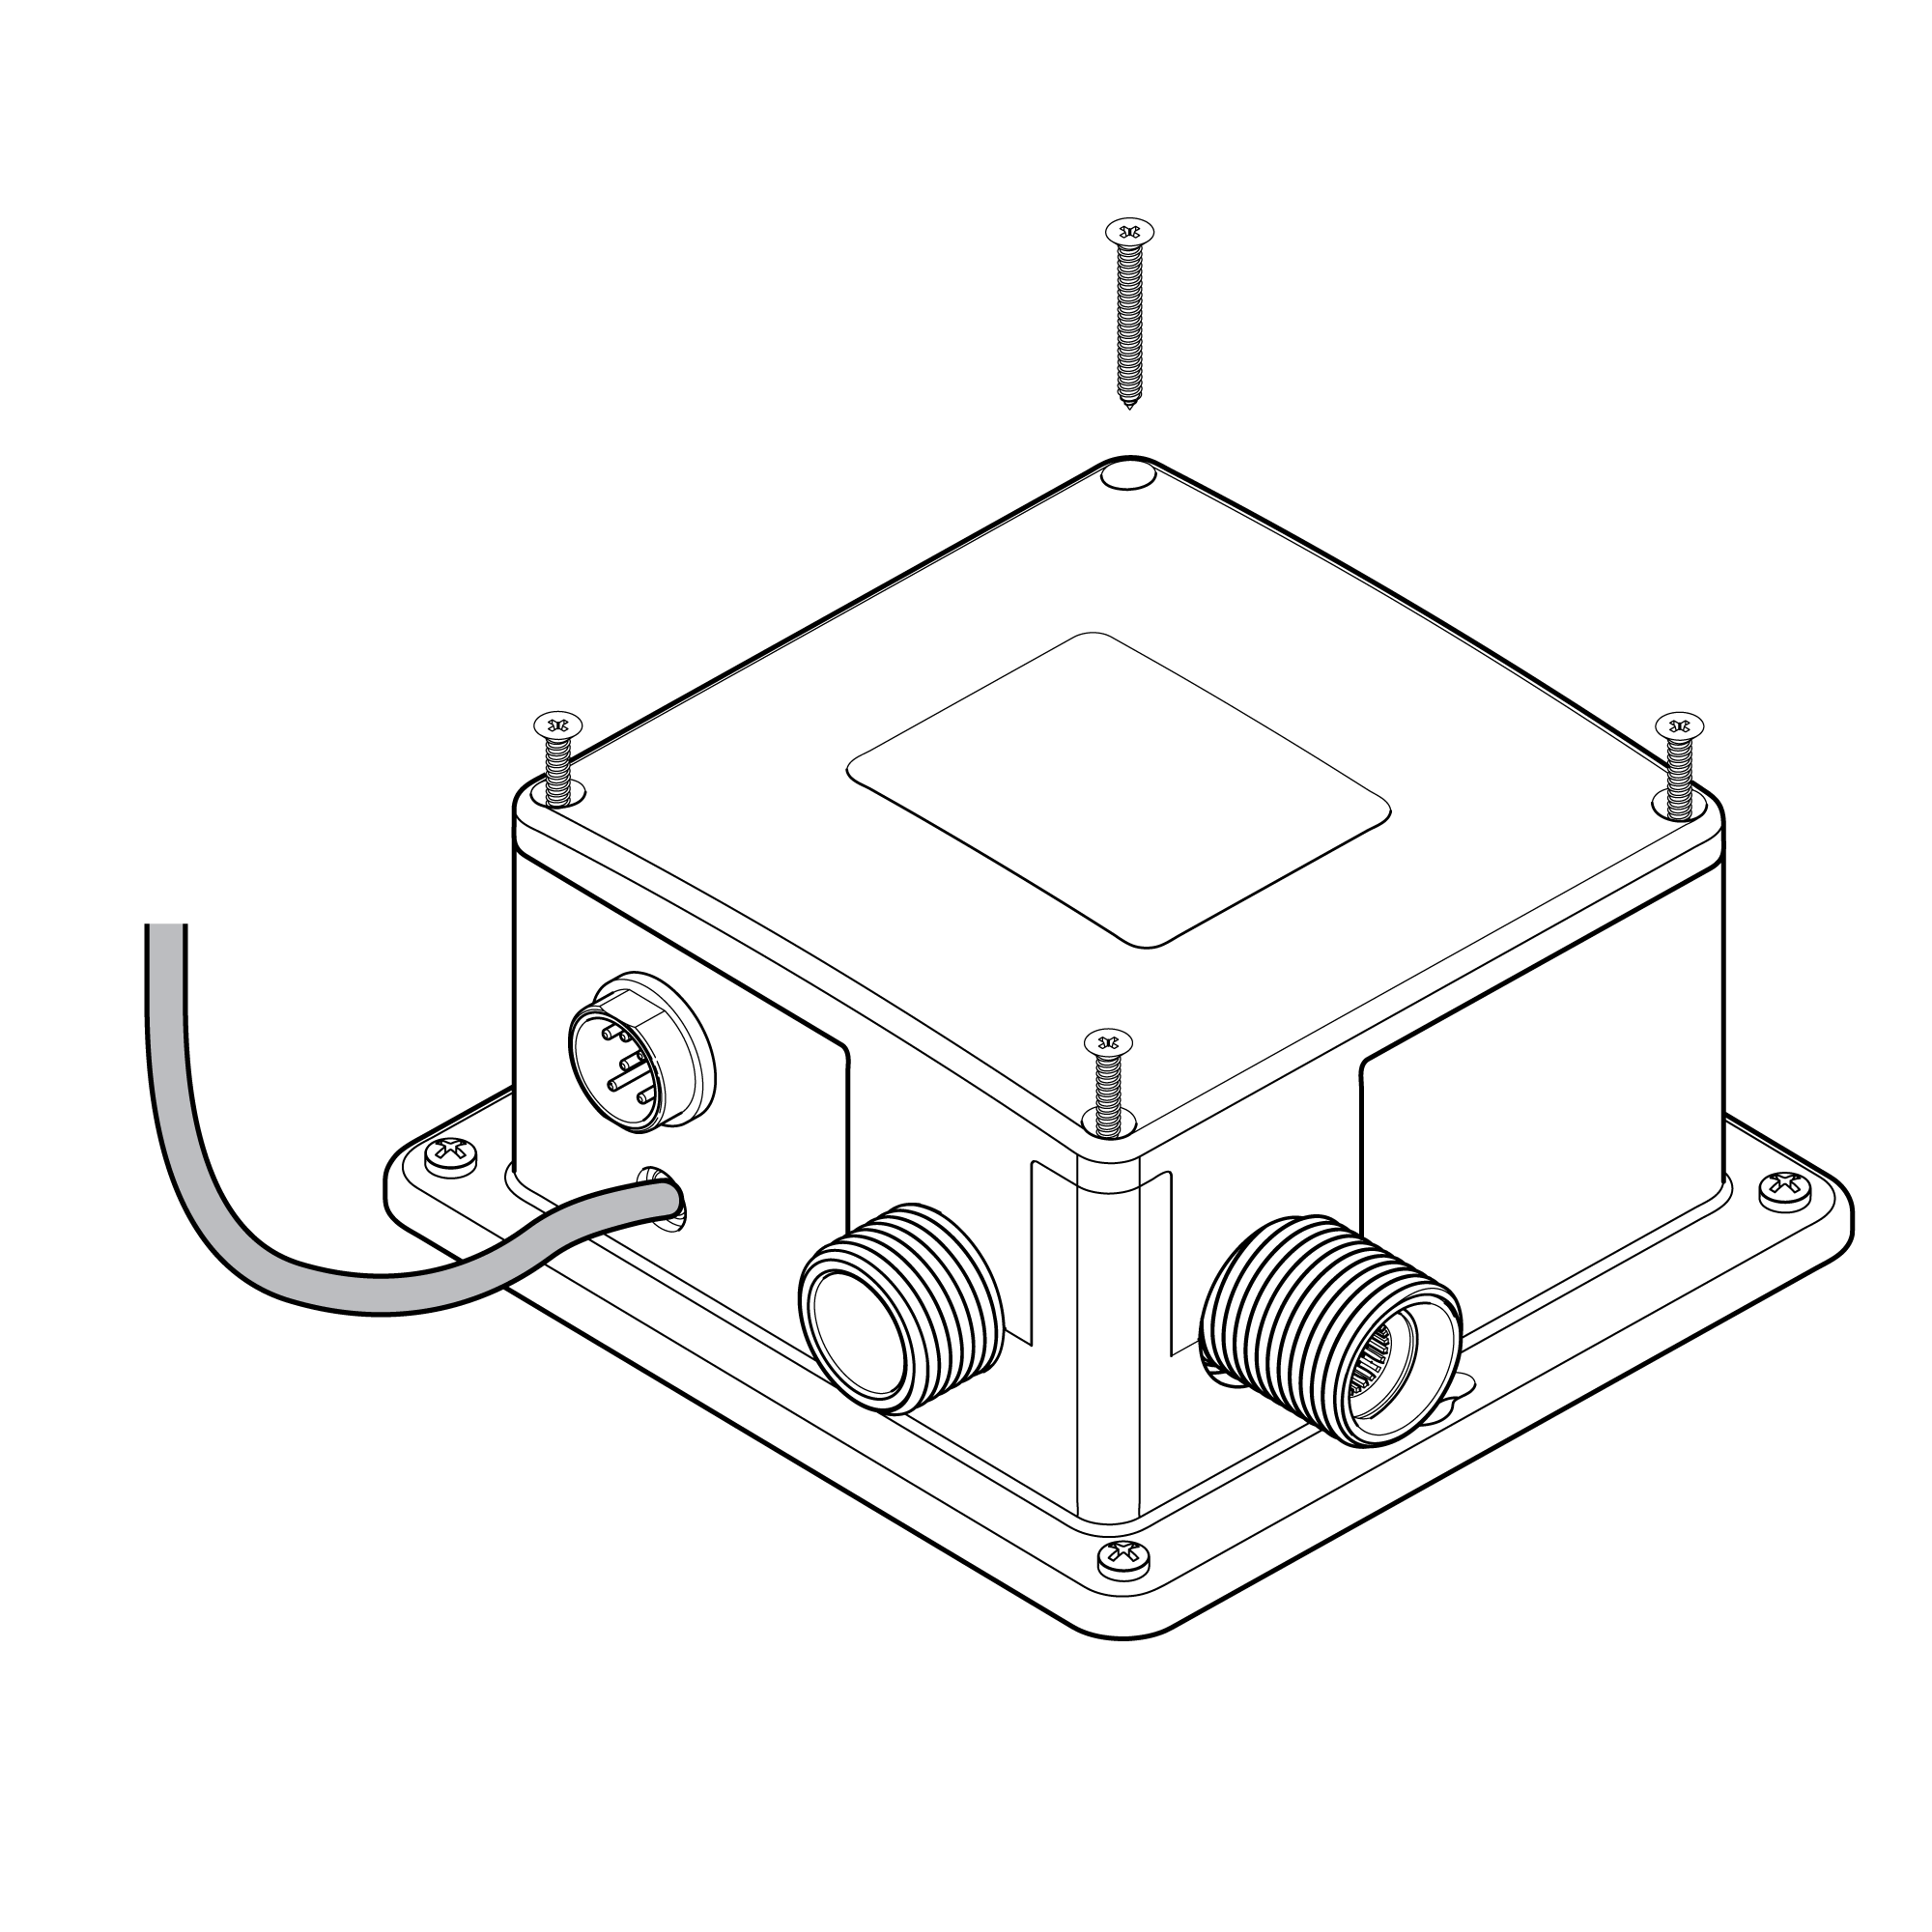 | control box | 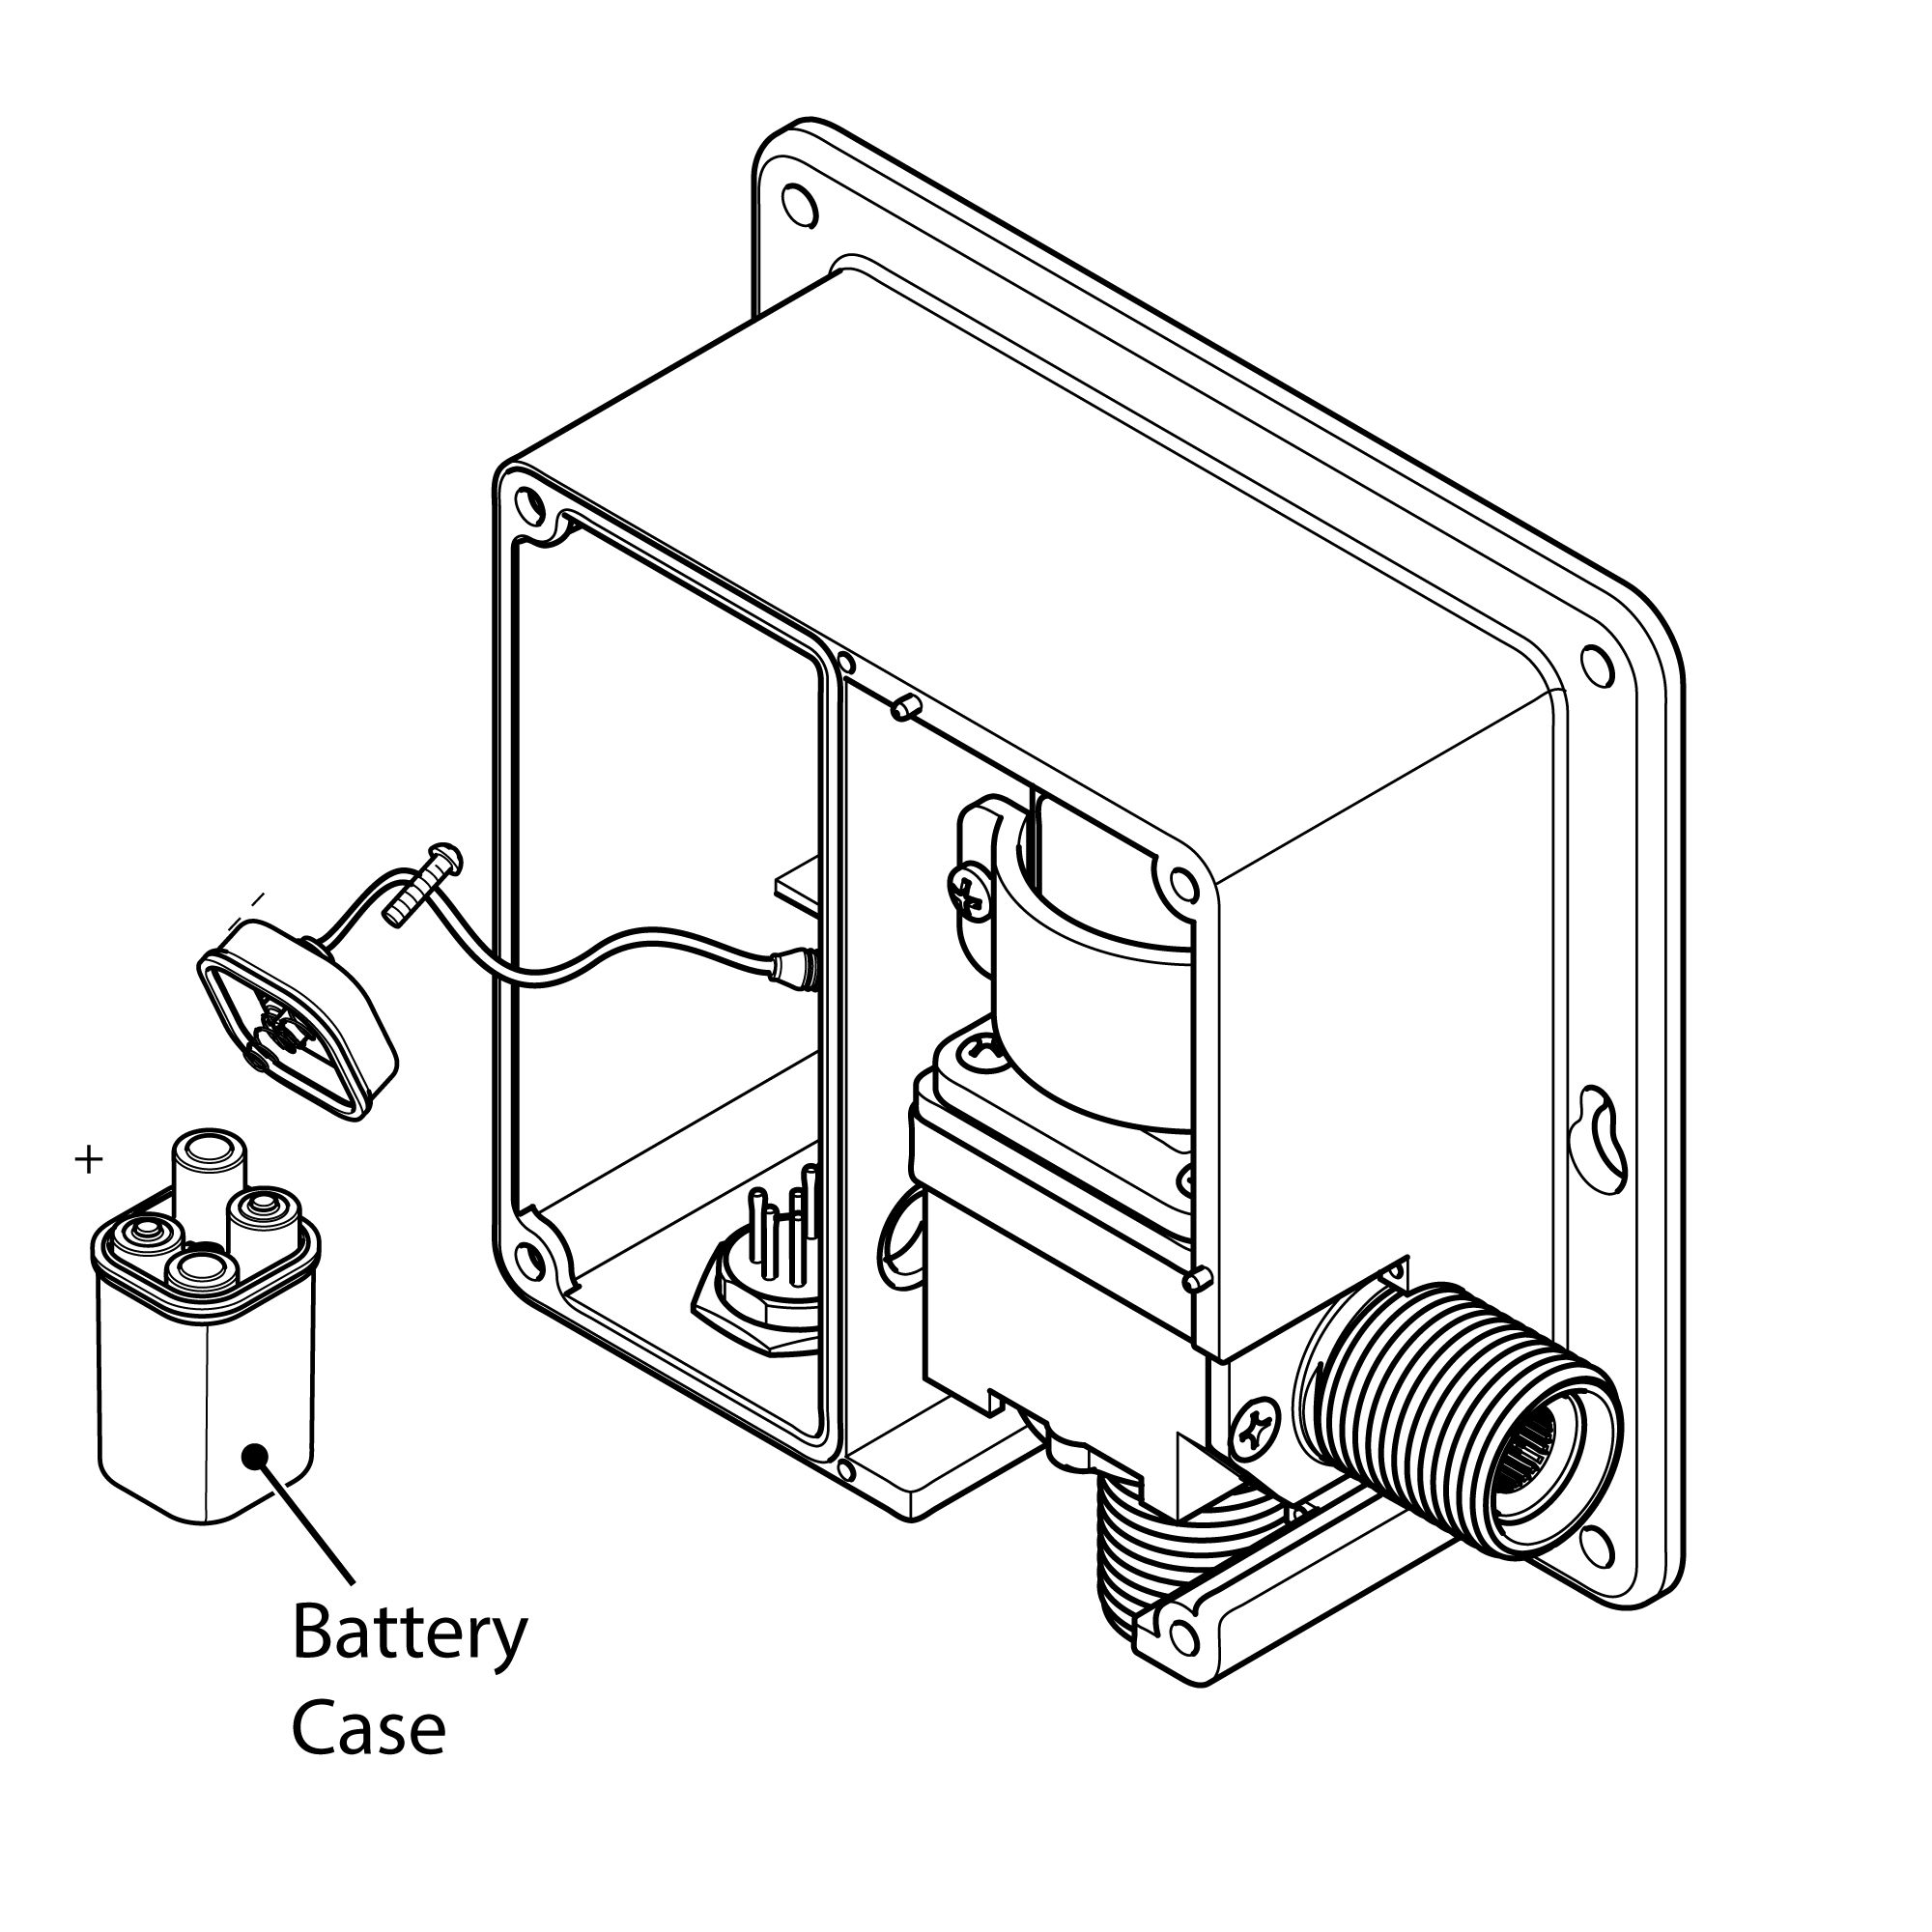 | | | | | Step 3: | | Step 4: | 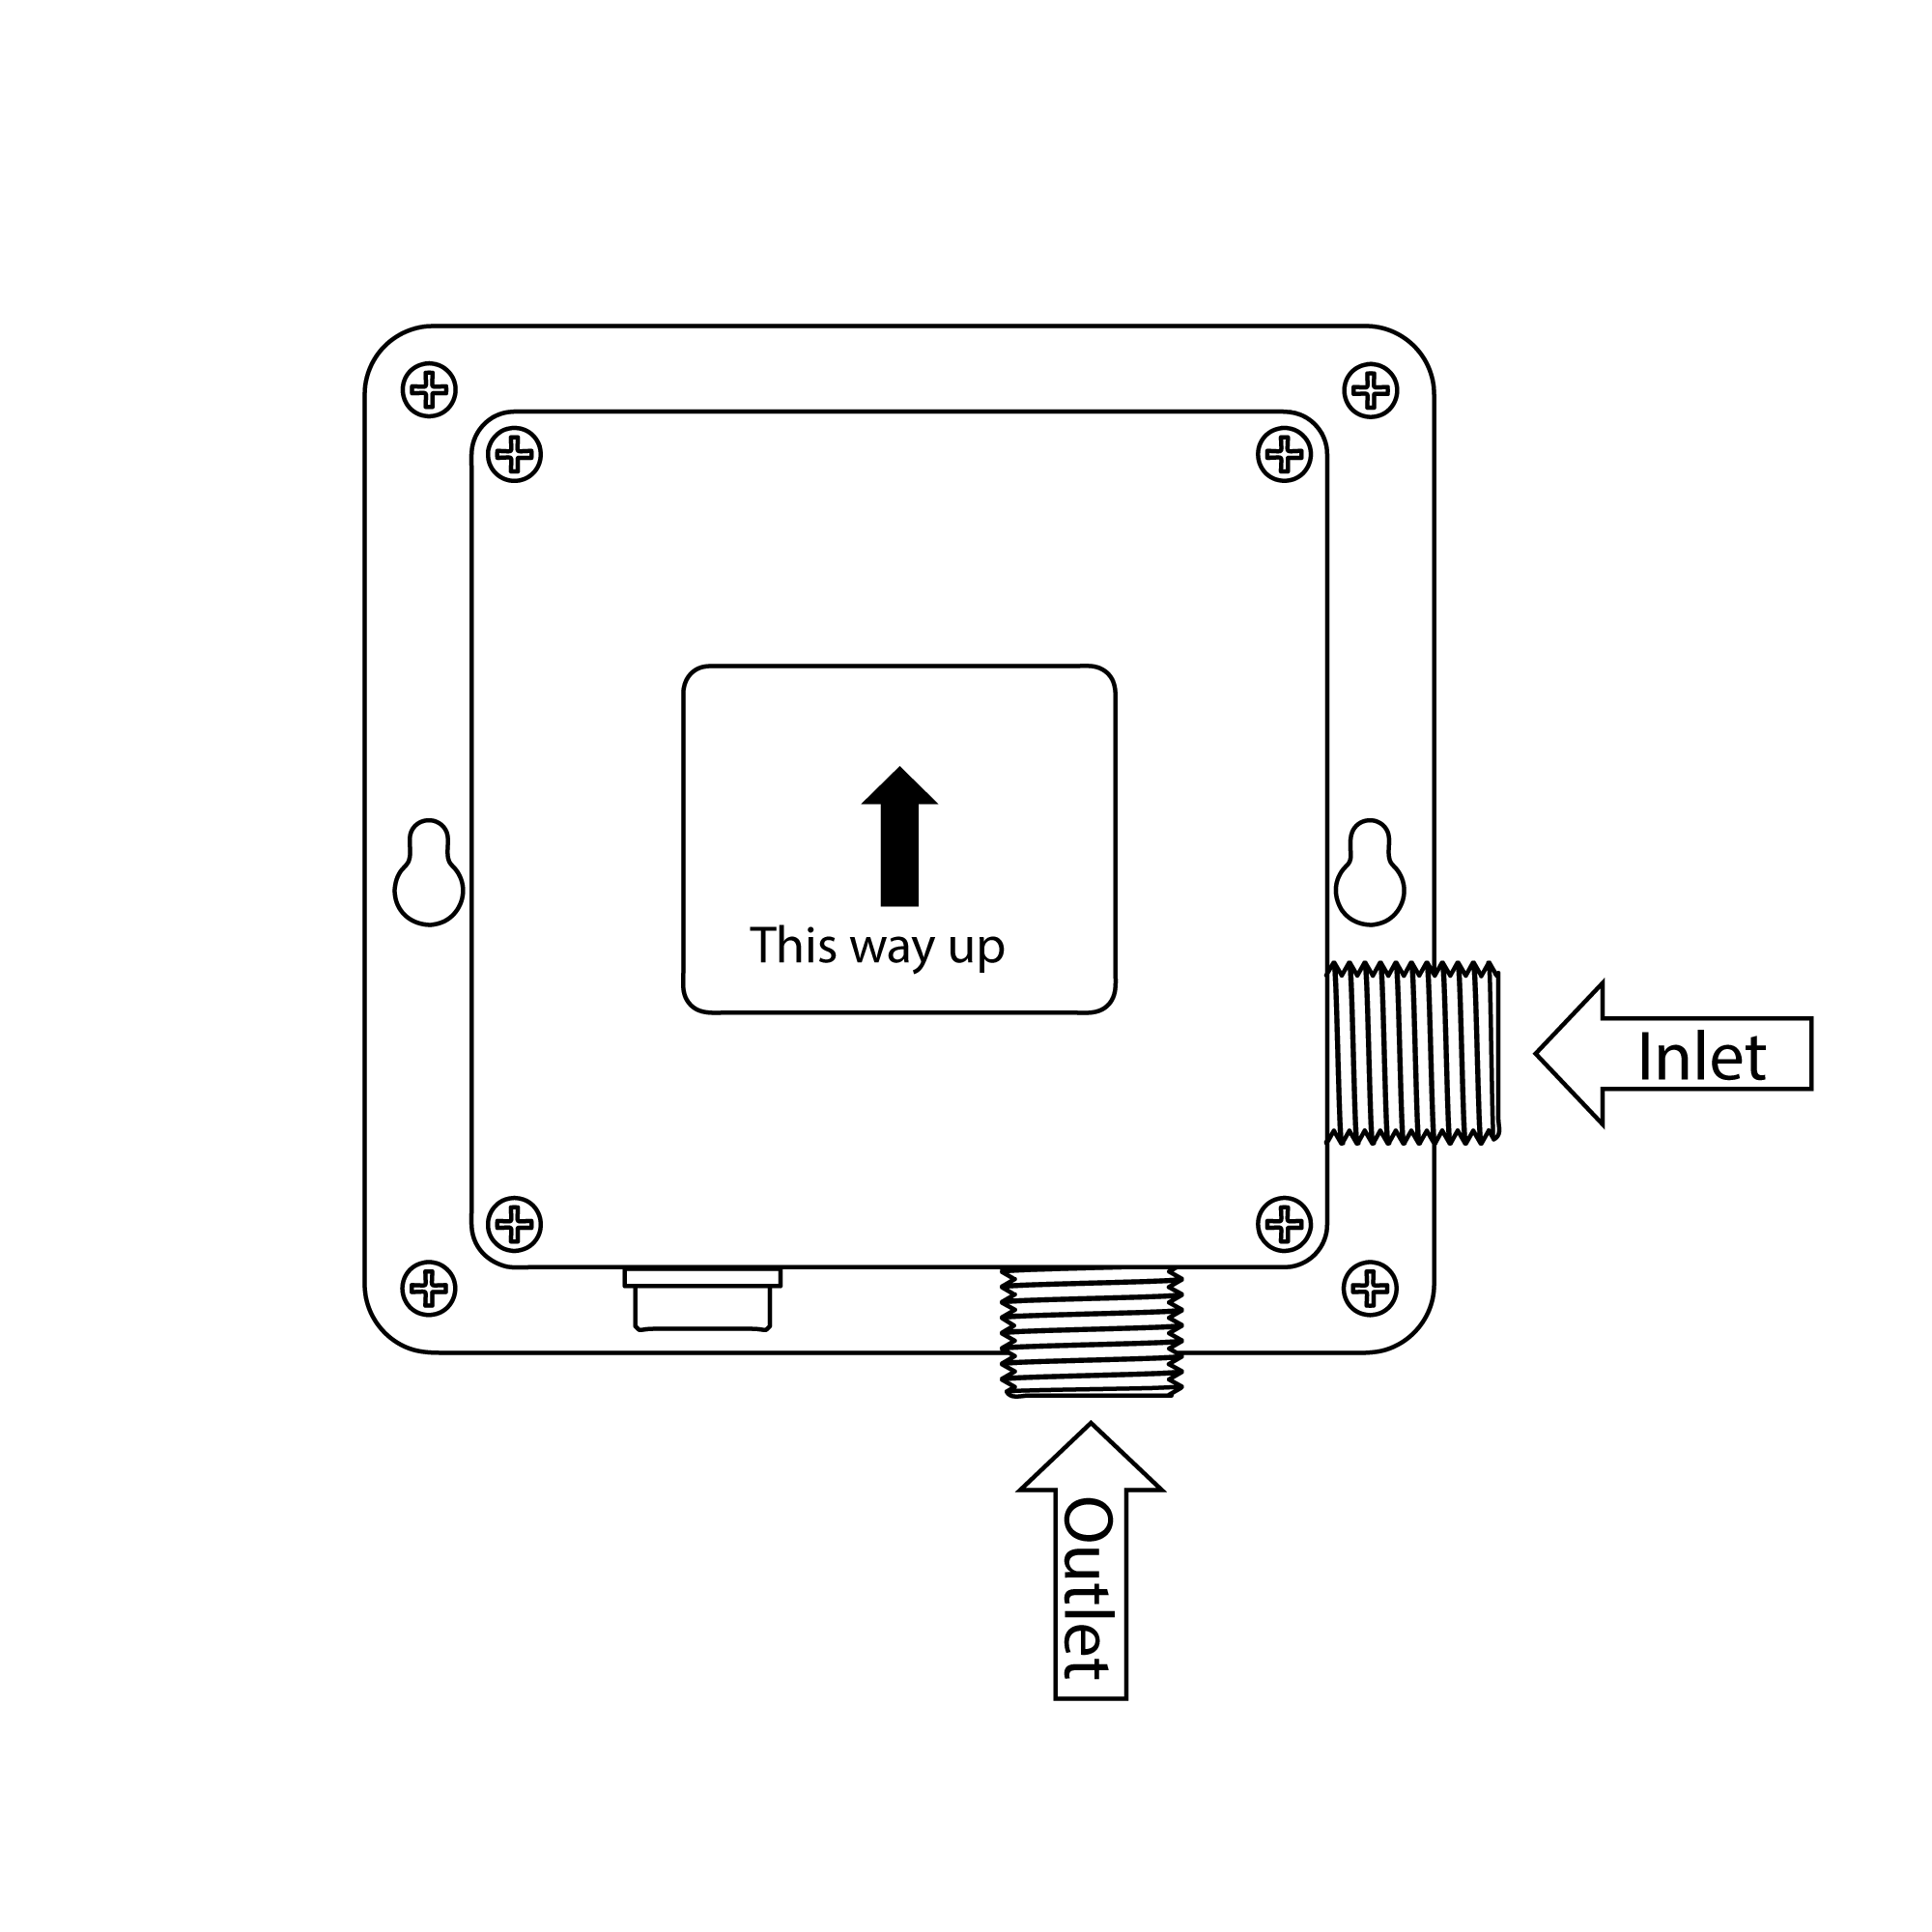 | | 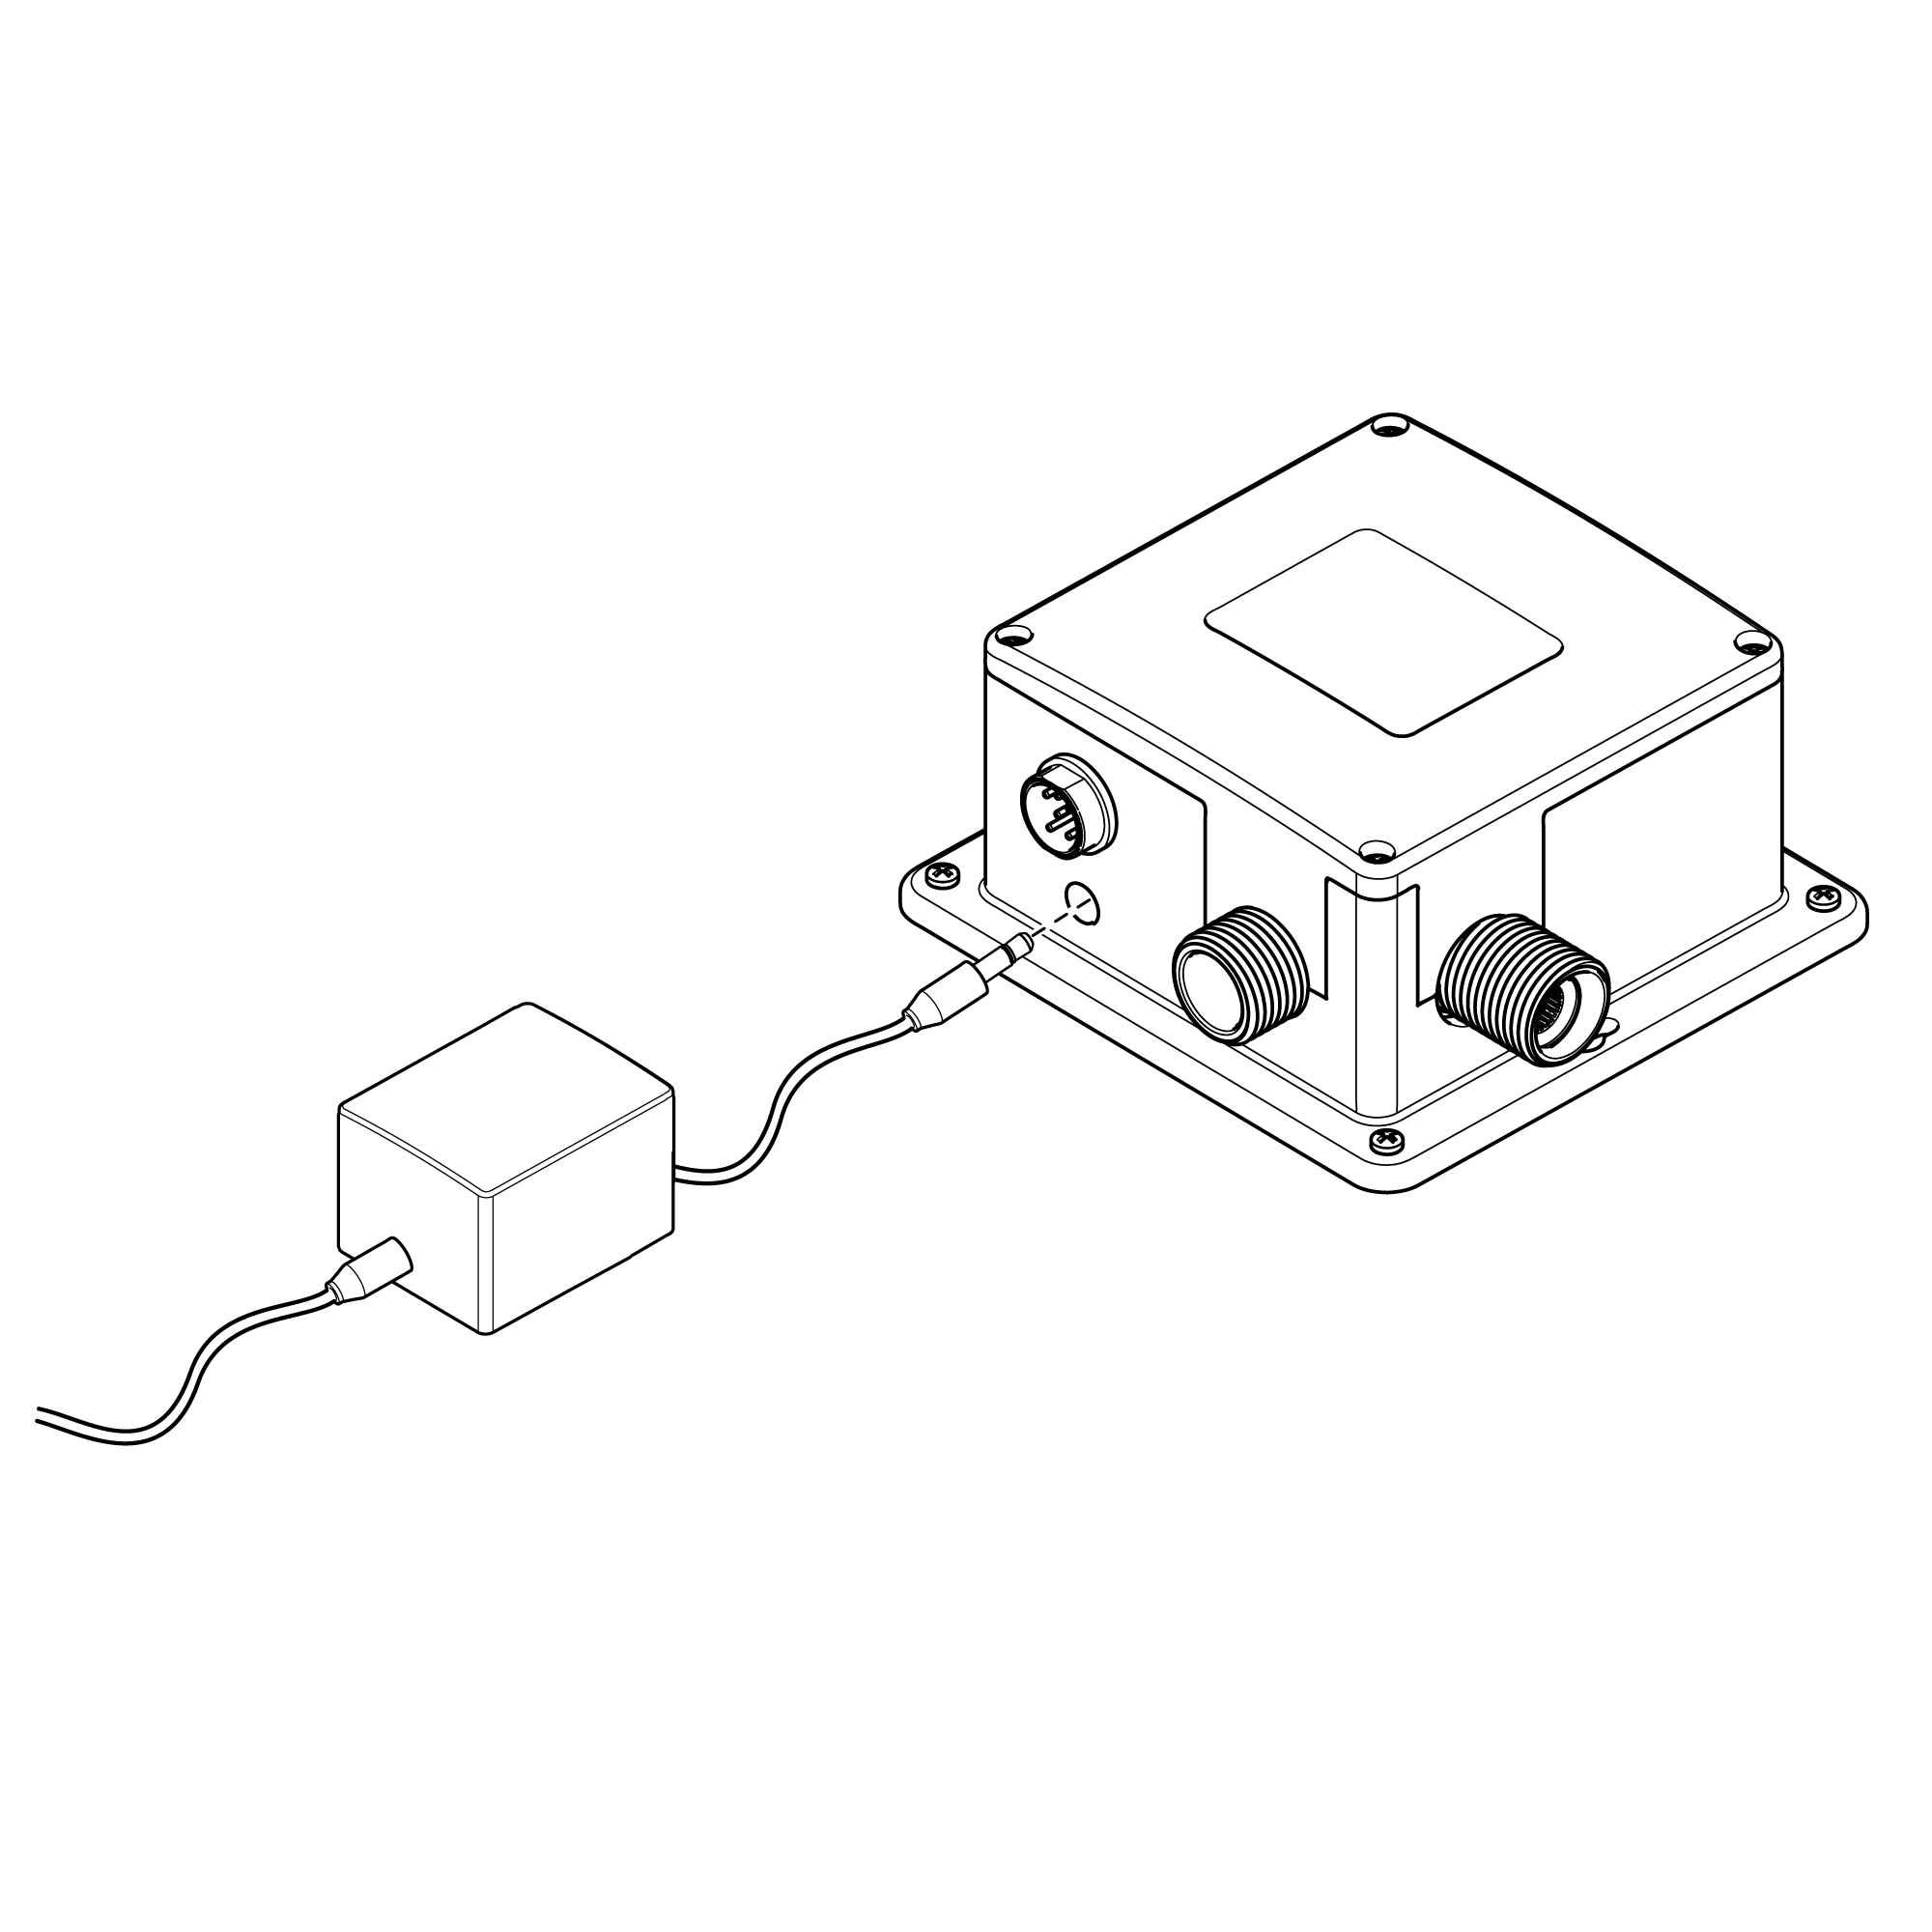 | 5" size
| |
| | Step 5: | | Step 6: | 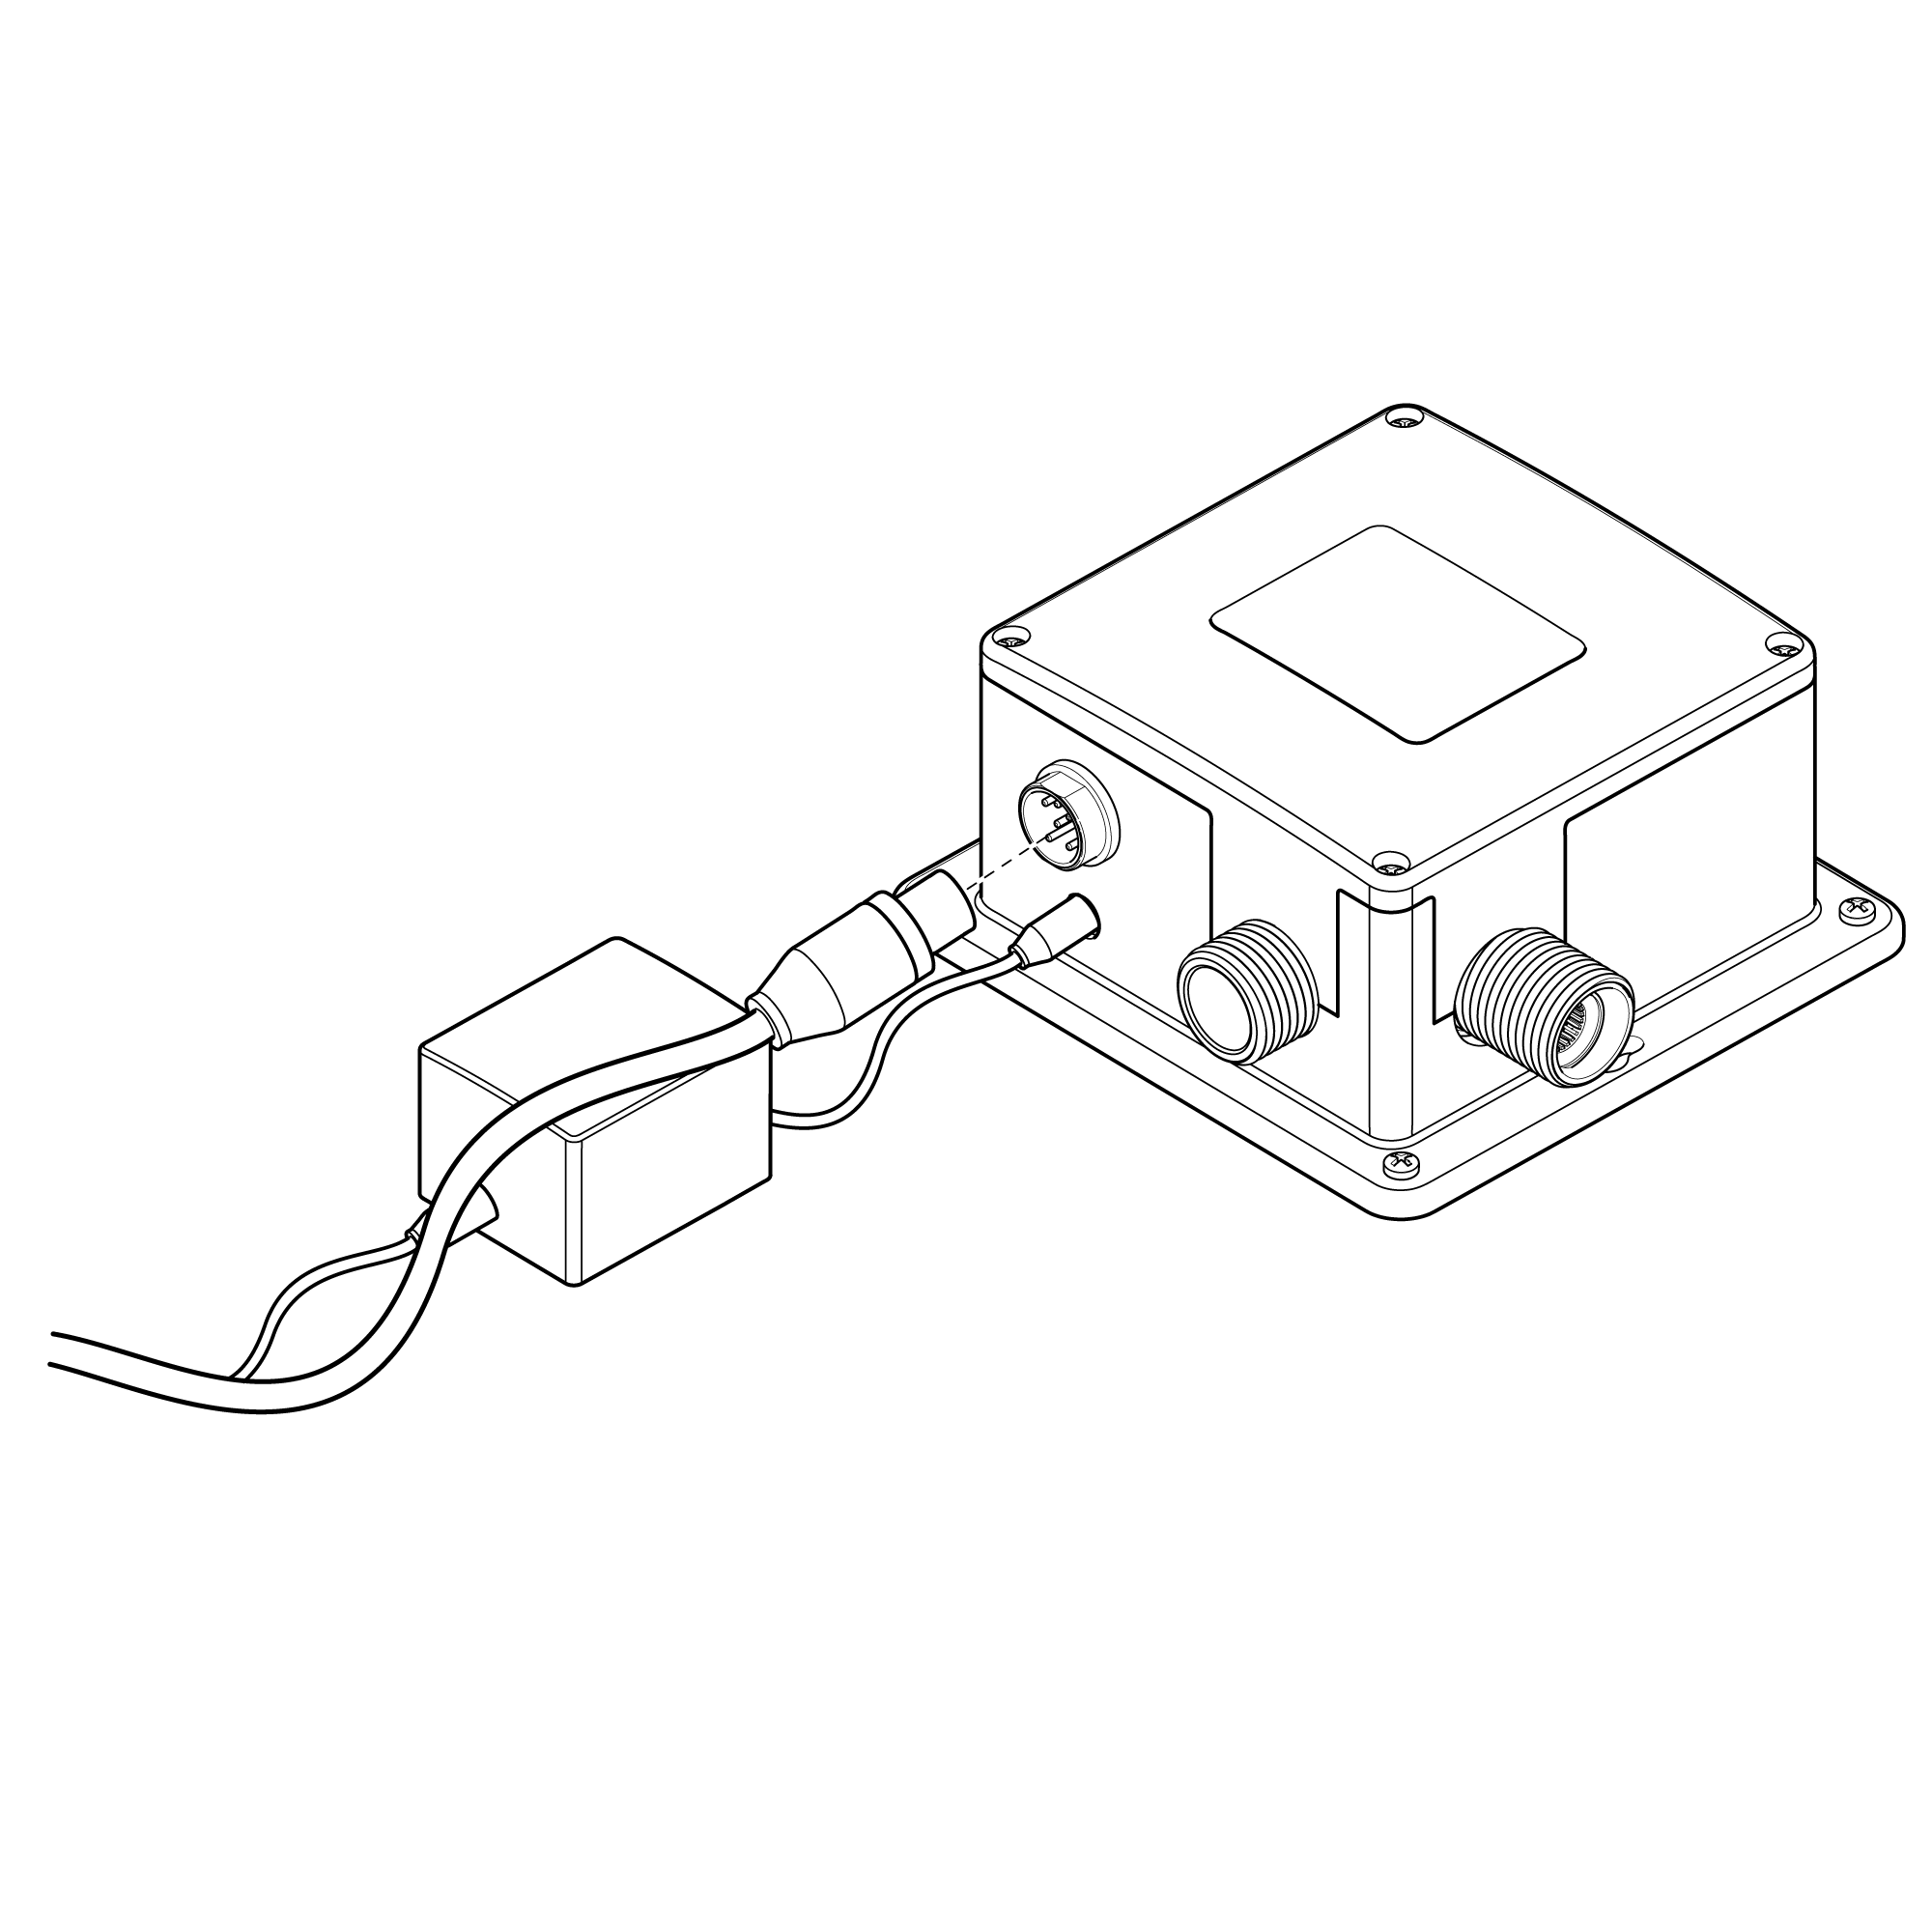 | | 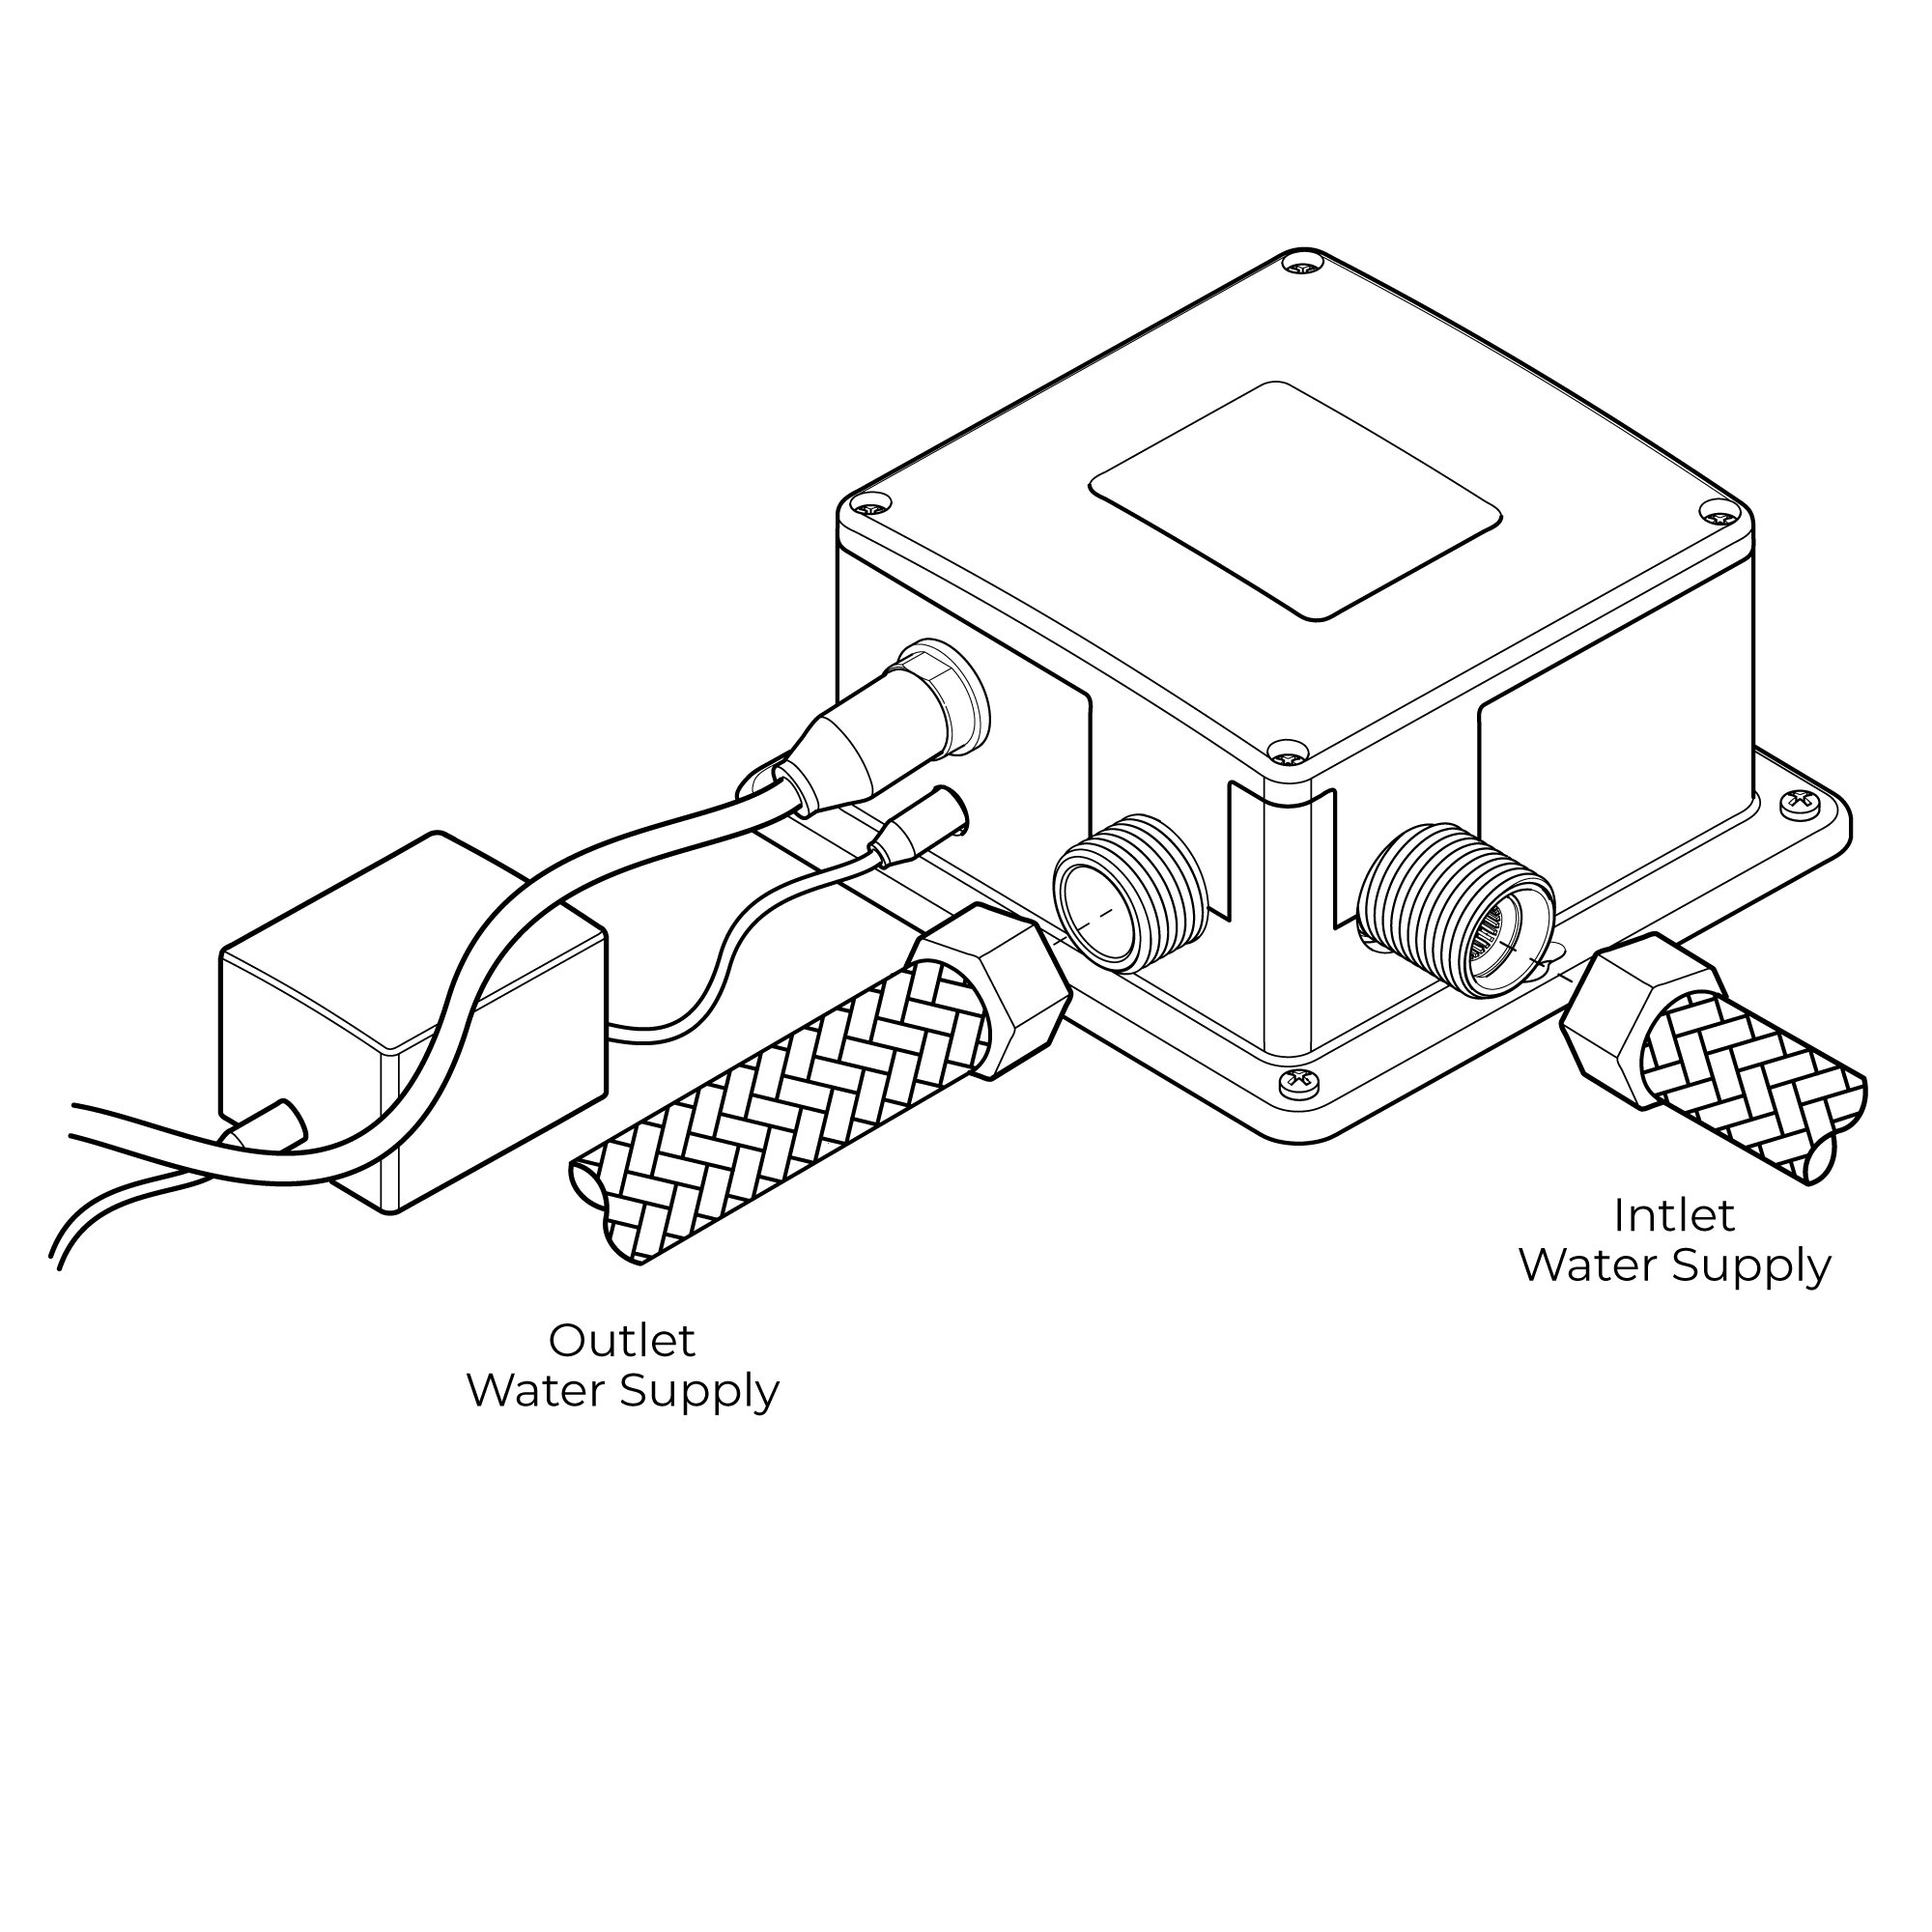 |
| | | | Step 7: | | | 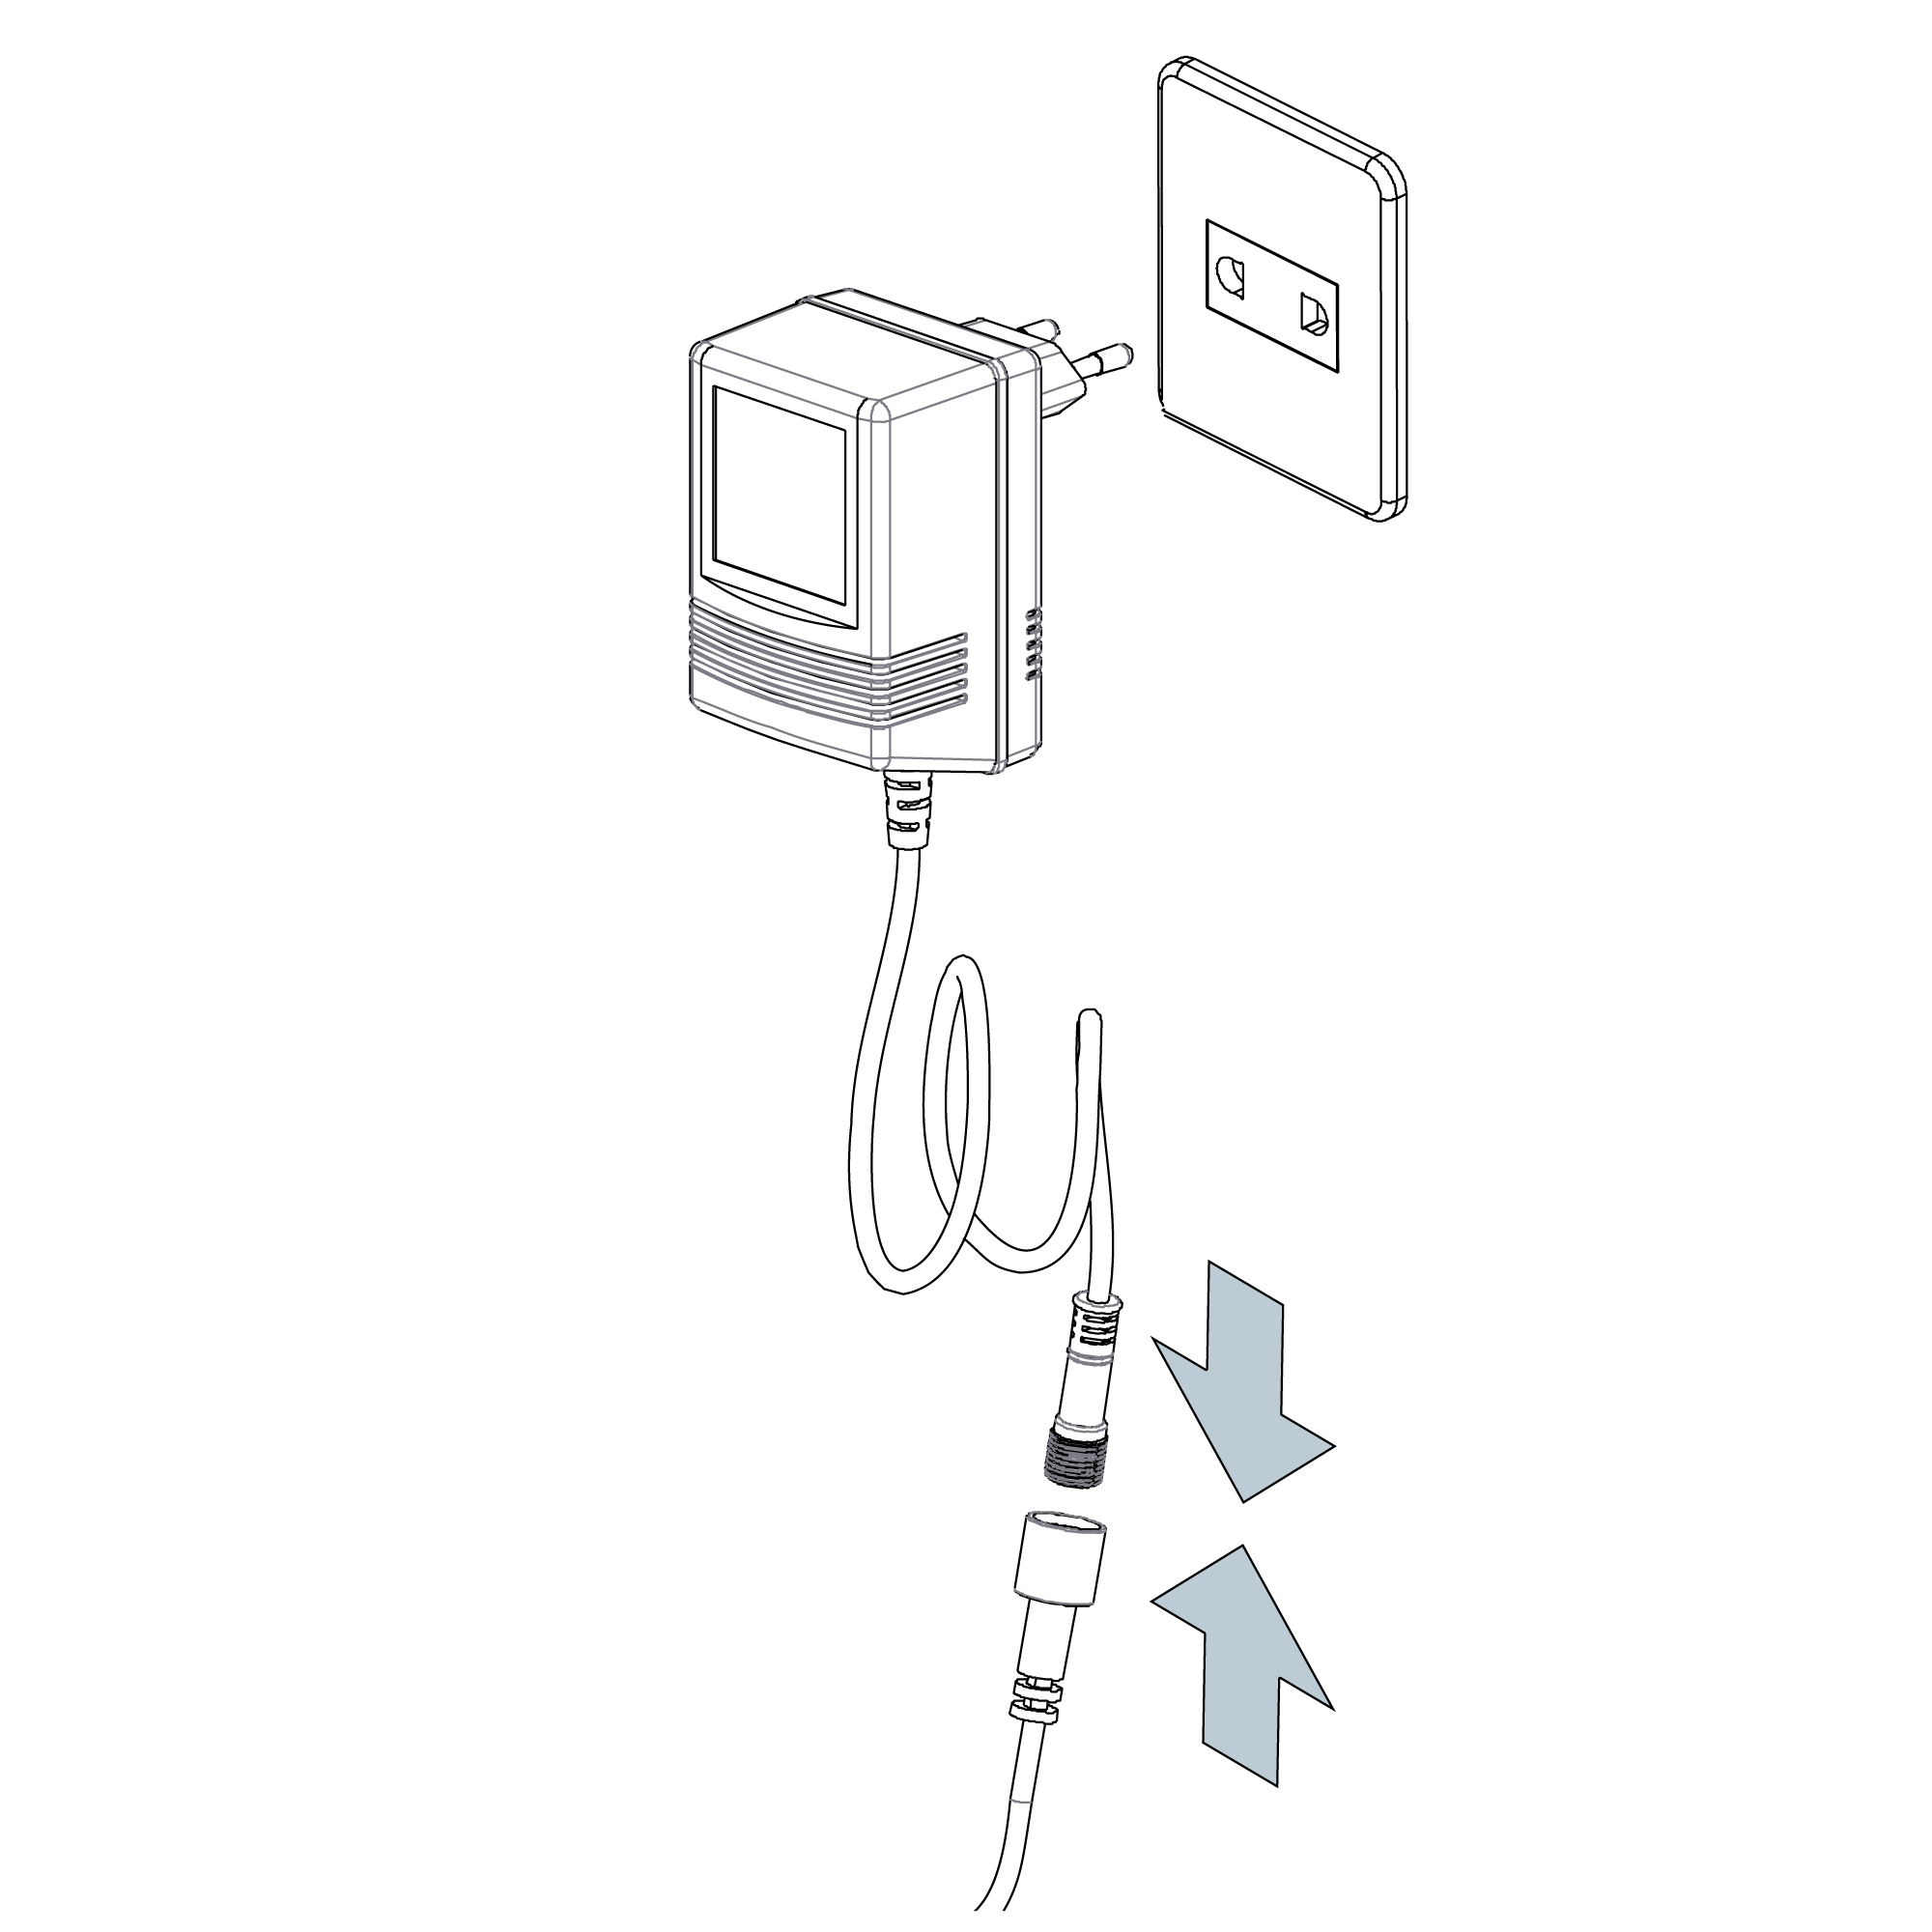 | | | | | |
Control Box Installation
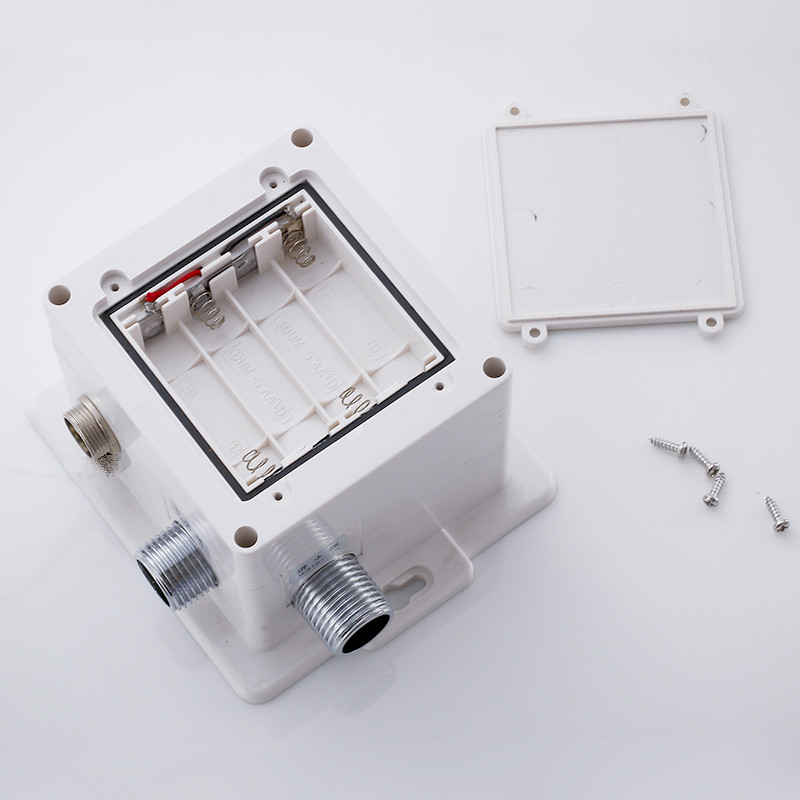
1. Remove the four screws from the control box. Remove the control box cover. Remove the battery box from the control box, and gently remove the screw from the battery box cover. Install AA batteries in the orientation shown. Note: Use only alkaline AA batteries. Re-install the battery box cover, matching the alignment arrows together. Set the battery box back into the control box, and re-install the control box cover using the previously removed screws.
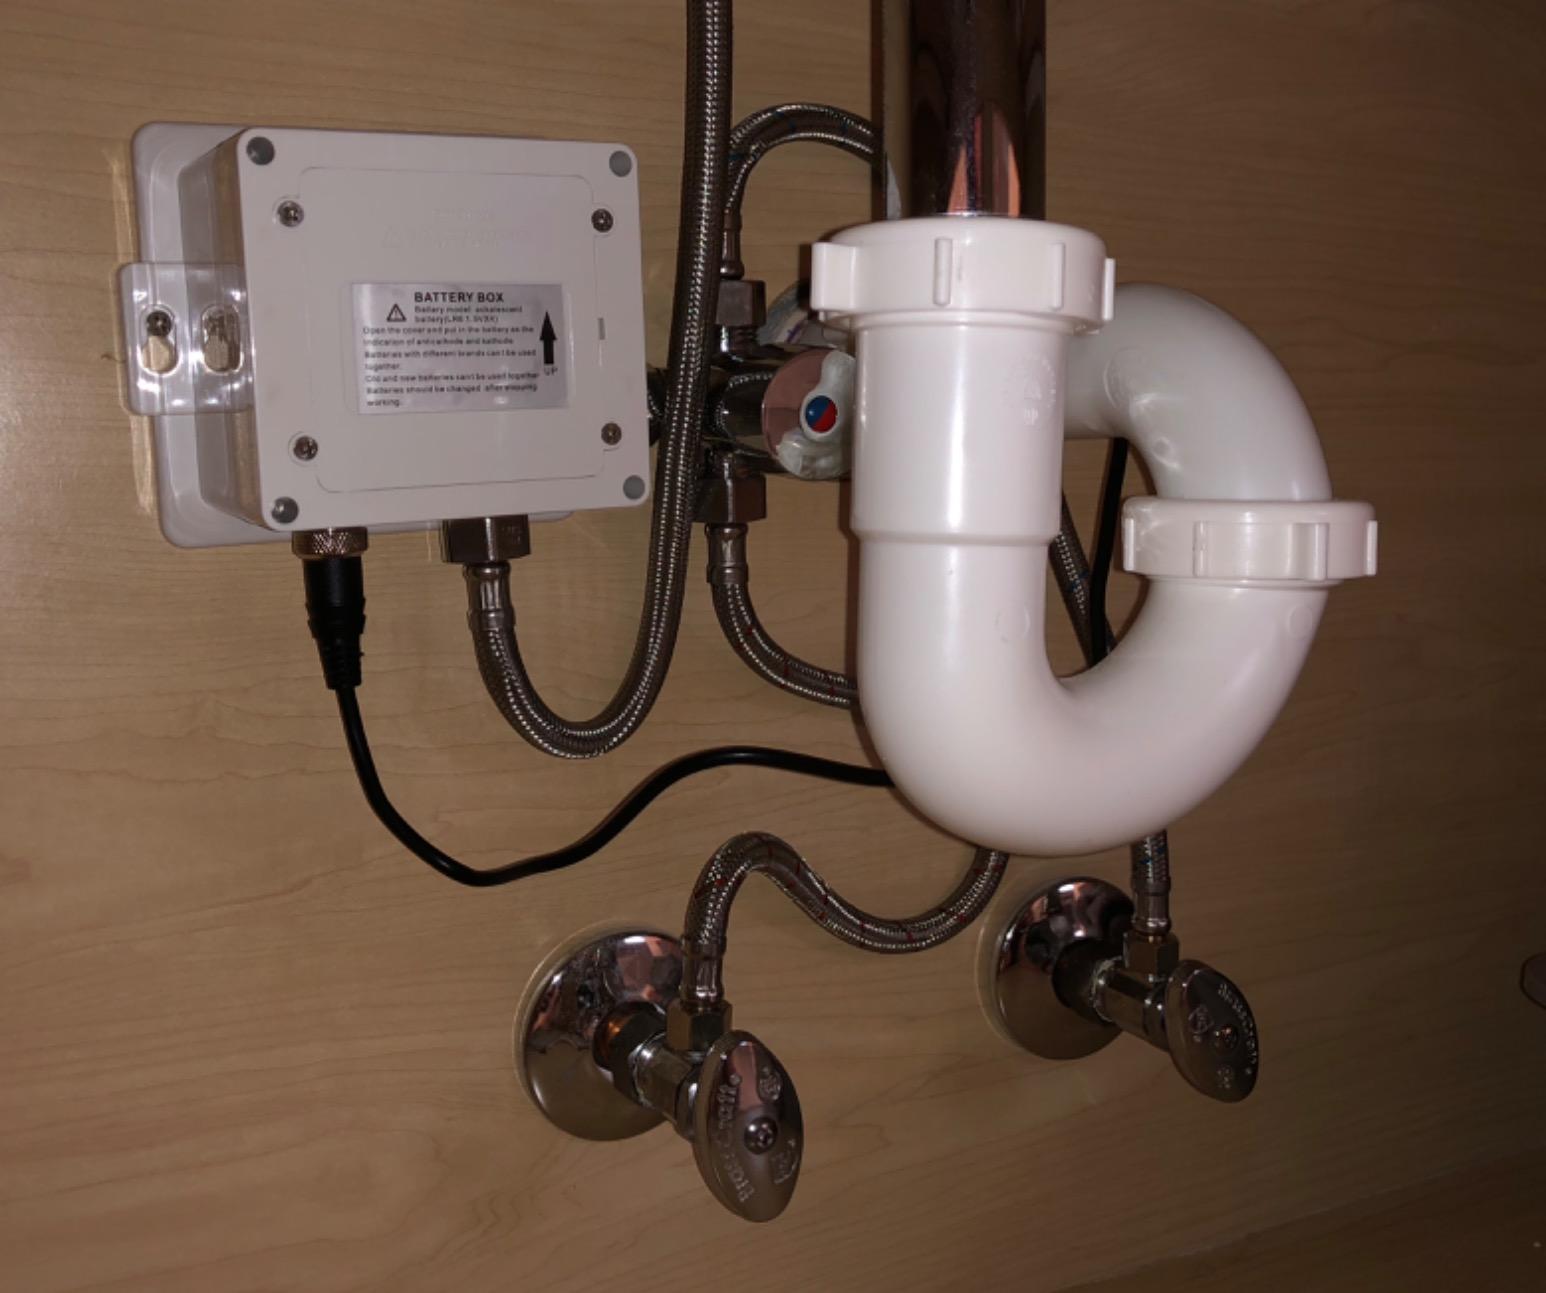
2. Choose a location under the sink basin to mount the control box, such that the sensor cable, flexible hose, and incoming water supply all connect to the control box. Under the sink basin, drill a hole minimum 3/4” to fit the sensor cable and flexible hose from the spout. Feed the sensor cable and flexible hose through the hole.
3. Mount the control box to the wall in the orientation shown. Drill four 1/8" (3mm) holes, and push drywall anchors into each hole. Secure the control box to the wall with the drywall screws.
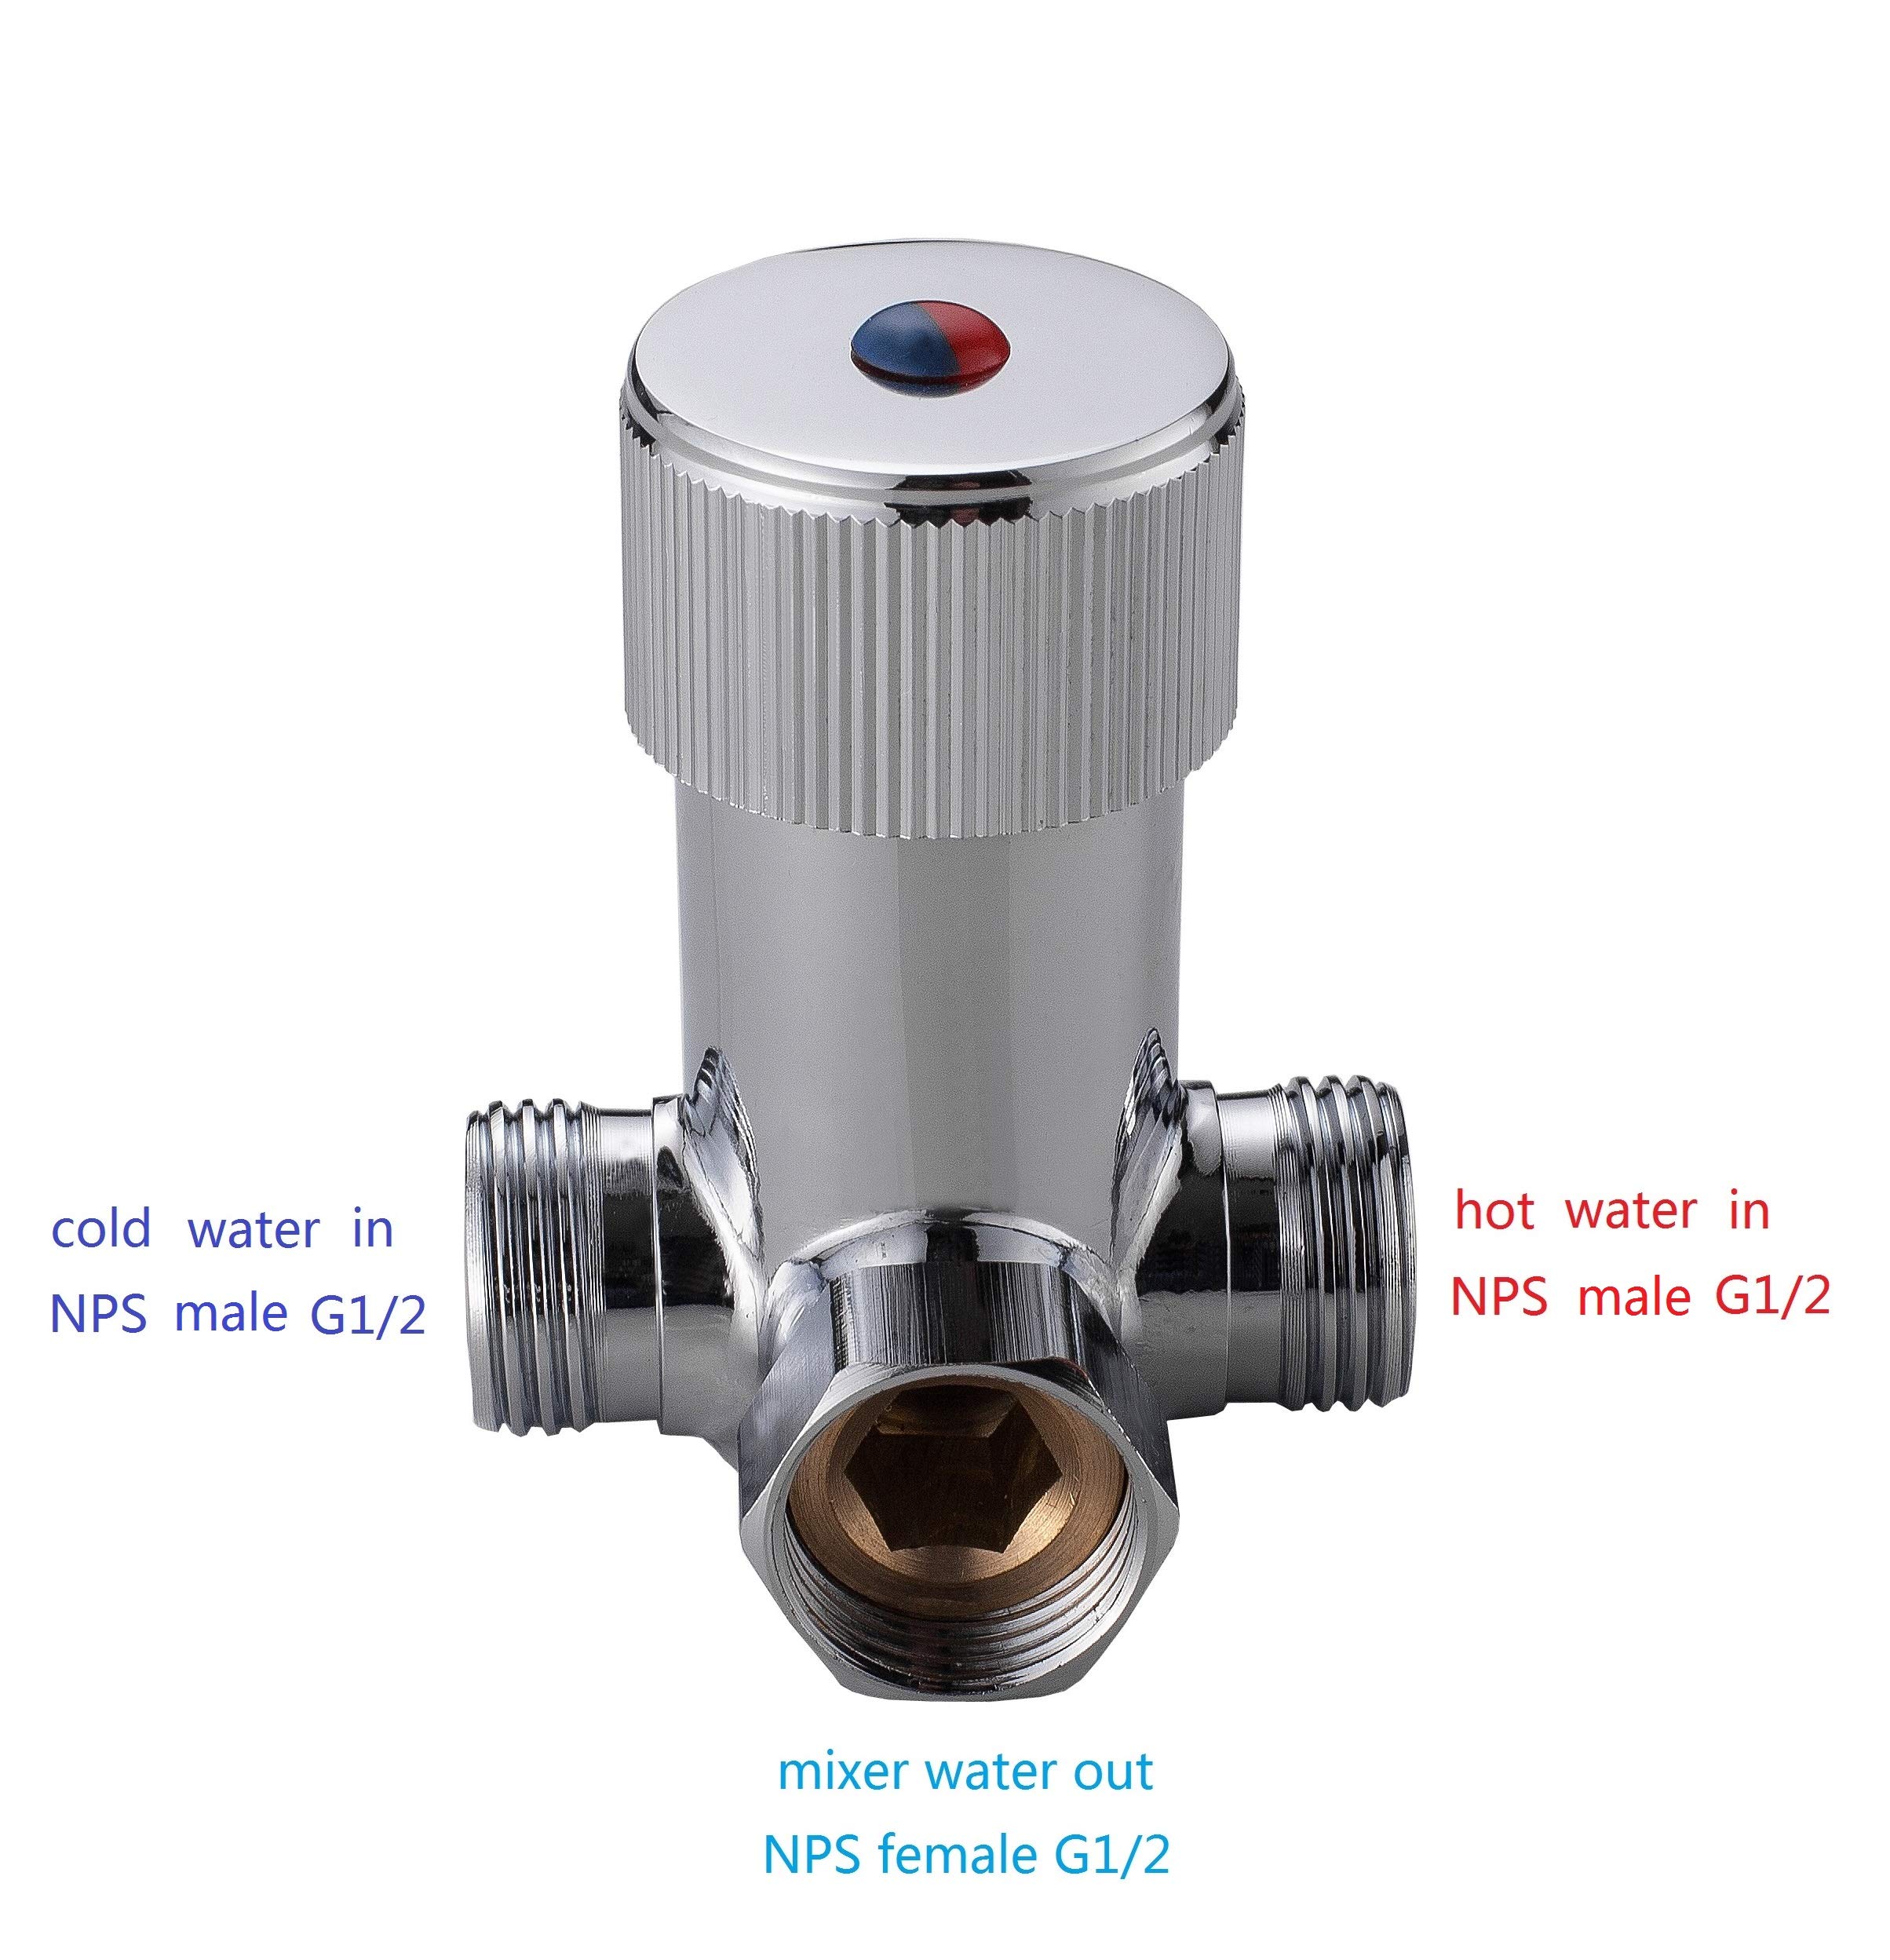
4. Connect the incoming water supply line to the control box, at the connection marked Inlet.
5. Thread on the swivel nut to the hose by hand. Tighten with a wrench.
6. Connect the faucet hose to the control box, at the connection marked Outlet.
7. Slide sensor cable connector over the sensor cable connector on the control box and tighten by hand.
Note: Prior to connecting the sensor cable to the control box, open the water supply stop valve and ensure the sink basin is completely clean and clear of objects, or the sensor will not correctly calibrate. Please wait approximately 60 seconds after connecting the sensor cable for sensor calibration to complete and to begin using the faucet.
| | |
|
Inserting Batteries
Your infrared spout is supplied with a back up battery pack (batteries not included). In the event of a power failure the batteries will override the mains power supply to ensure the spout continues to function.
Before fitting the power supply box into position on the wall/floor, batteries (not included) will need to be fitted.
1. Remove Power Supply Box Cover - Remove all four screws in each corner of the power supply box and remove the cover.
2. Remove Battery Box - Remove the battery case from the power supply box and remove the screw in the center of the case.
3. Insert Batteries - Insert 4 x AA batteries (not included) into the battery box ensuring they are inserted the correct way.
4. Replace Battery Box - Replace the battery case cover. Replace and tighten the screw. Insert the battery case back into the power supply box.
5. Replace Power Supply Cover - Replace the power supply cover and tighten all 4 screws ensuring they are all fully tightened.
Electrical Connections
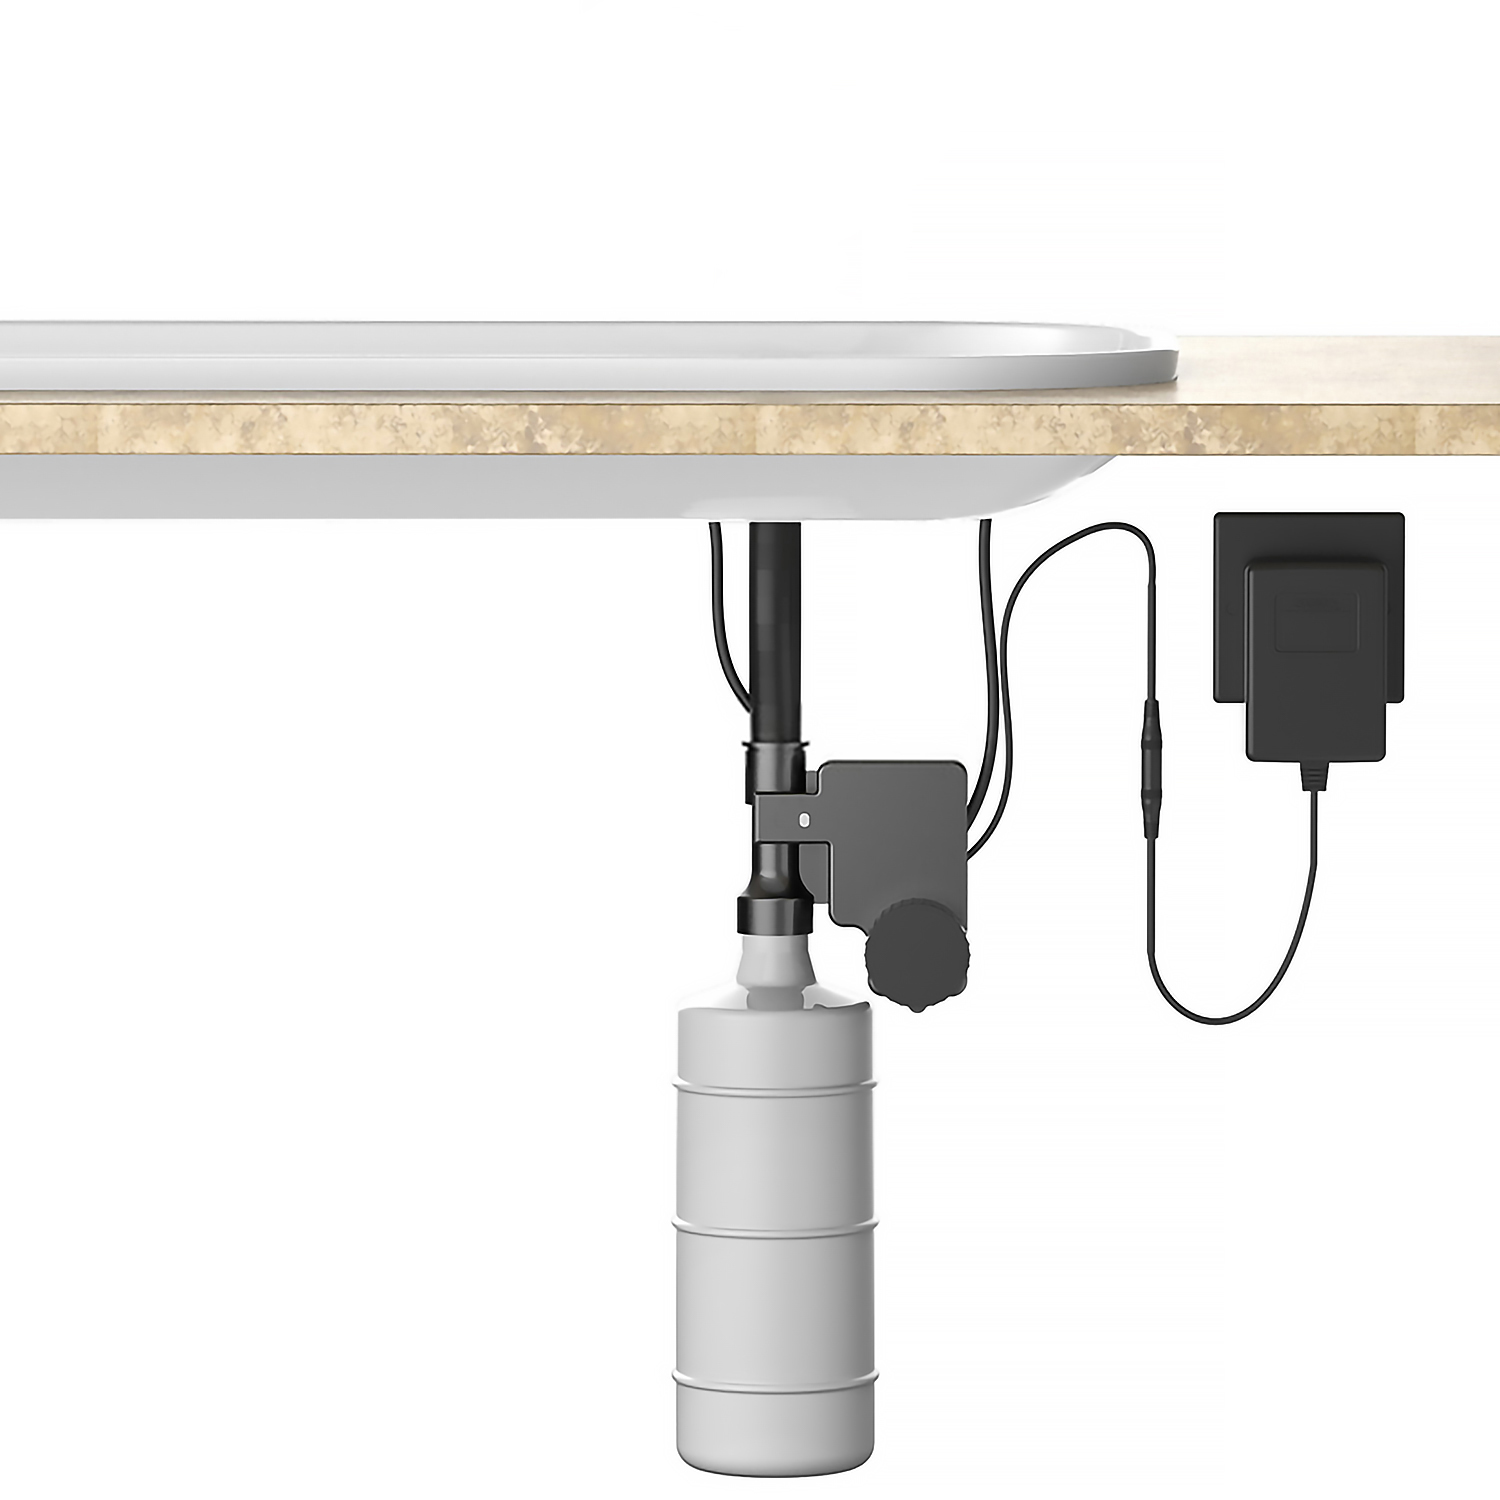
1. Position Power Supply Box - Position the power supply box onto the wall surface below the sink/work surface where it is easily accessible.
Note: Ensure that the power supply box is fitted the correct way up and that the flexible hose will reach from the underside of the spout to the power supply box.
Using suitable fixings for the wall type secure the power supply box to the wall.
2. Plug-In Power Cable - Plug the power cable into the power supply box.
3. Connect The Sensor Cable - Plug the sensor cable from the spout into the power supply box to activate the infrared senor.
Water Connections
Connecting Water Supply - A blended water supply is required to the inlet of the power supply box. Before connecting the water supply to the power supply box flush through the pipework to ensure removal of debris. Once flushed through turn off the mains water supply and close any isolating valves.
Inlet Connection - The inlet connection on the power supply box is a 1/2” BSP male threaded connection. Connect a 1/2” BSP female connector to the inlet connection ensuring a suitable sealing washer is used to create a watertight connection.
Outlet Connection - The outlet connection is a standard 1/2” BSP male threaded connection. Connect the flexi hose to the outlet connection, ensuring it is tightened fully.
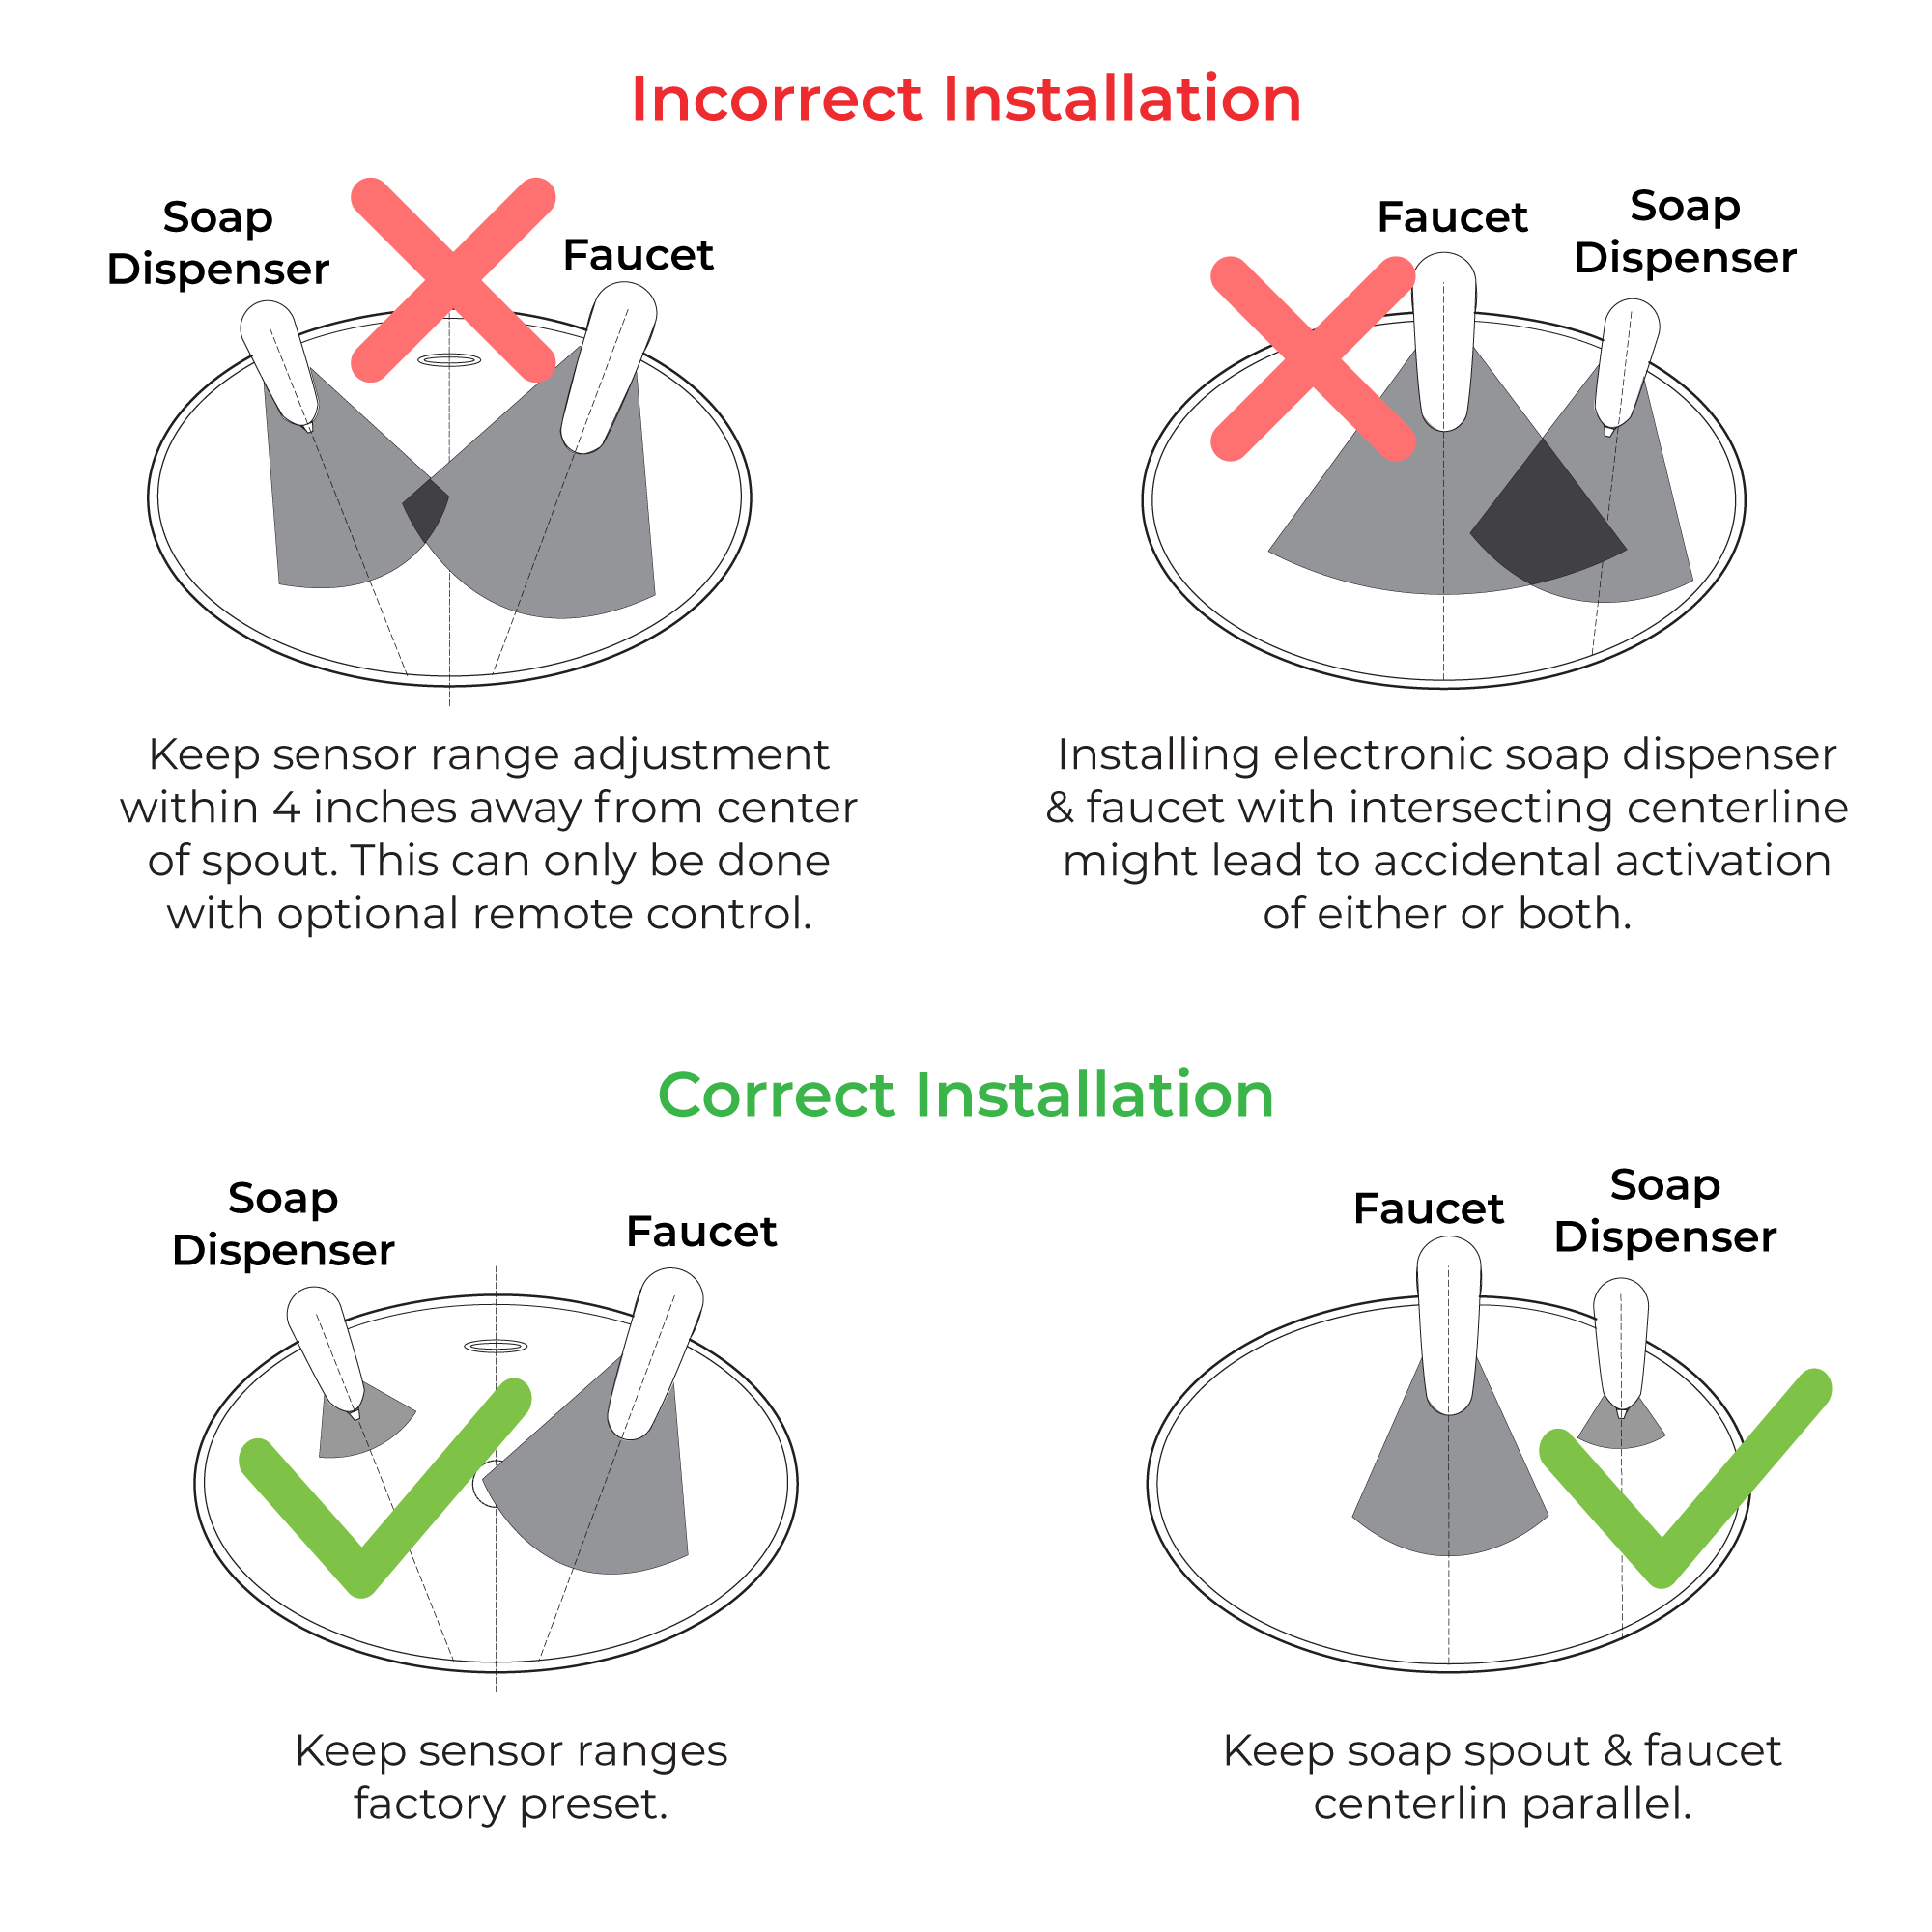
Sensor Range
This machine can automatically adjust the inductive range within 10 seconds of electrification. Don't use inductor during this period in order for the inductor to automatically adjust to a suitable inductive range.
Set Water Flow Time-Out
The machine will shut off the water when washing time exceeds 1.5 minutes foreign matter induces continuously in inductive areal. If follow-up washing is needed, re-induce after removing hands for 2 seconds.
Notes
1. Please use the AA type alkaline battery (1.5v for each).
2. Fix the battery correctly. Should not be mix use the batteries with different brands, the new and old and if use non-alkaline battery, the battery life is short in 1-2 months.
3. After installation of the battery, the solenoid valve will do its self-testing.
4. After providing the power, in 10sec, the machine will self adjust the sensor distance, so during this period, do not make it work.
5. If the sensor distance is short, please move away the barrier for 5-6 mins, the machine will adjust to normal.
6. If the sensor distance from far to near, and water flows continuously, the machine will self-adjust the distance after 5 mins. | | |
| | |
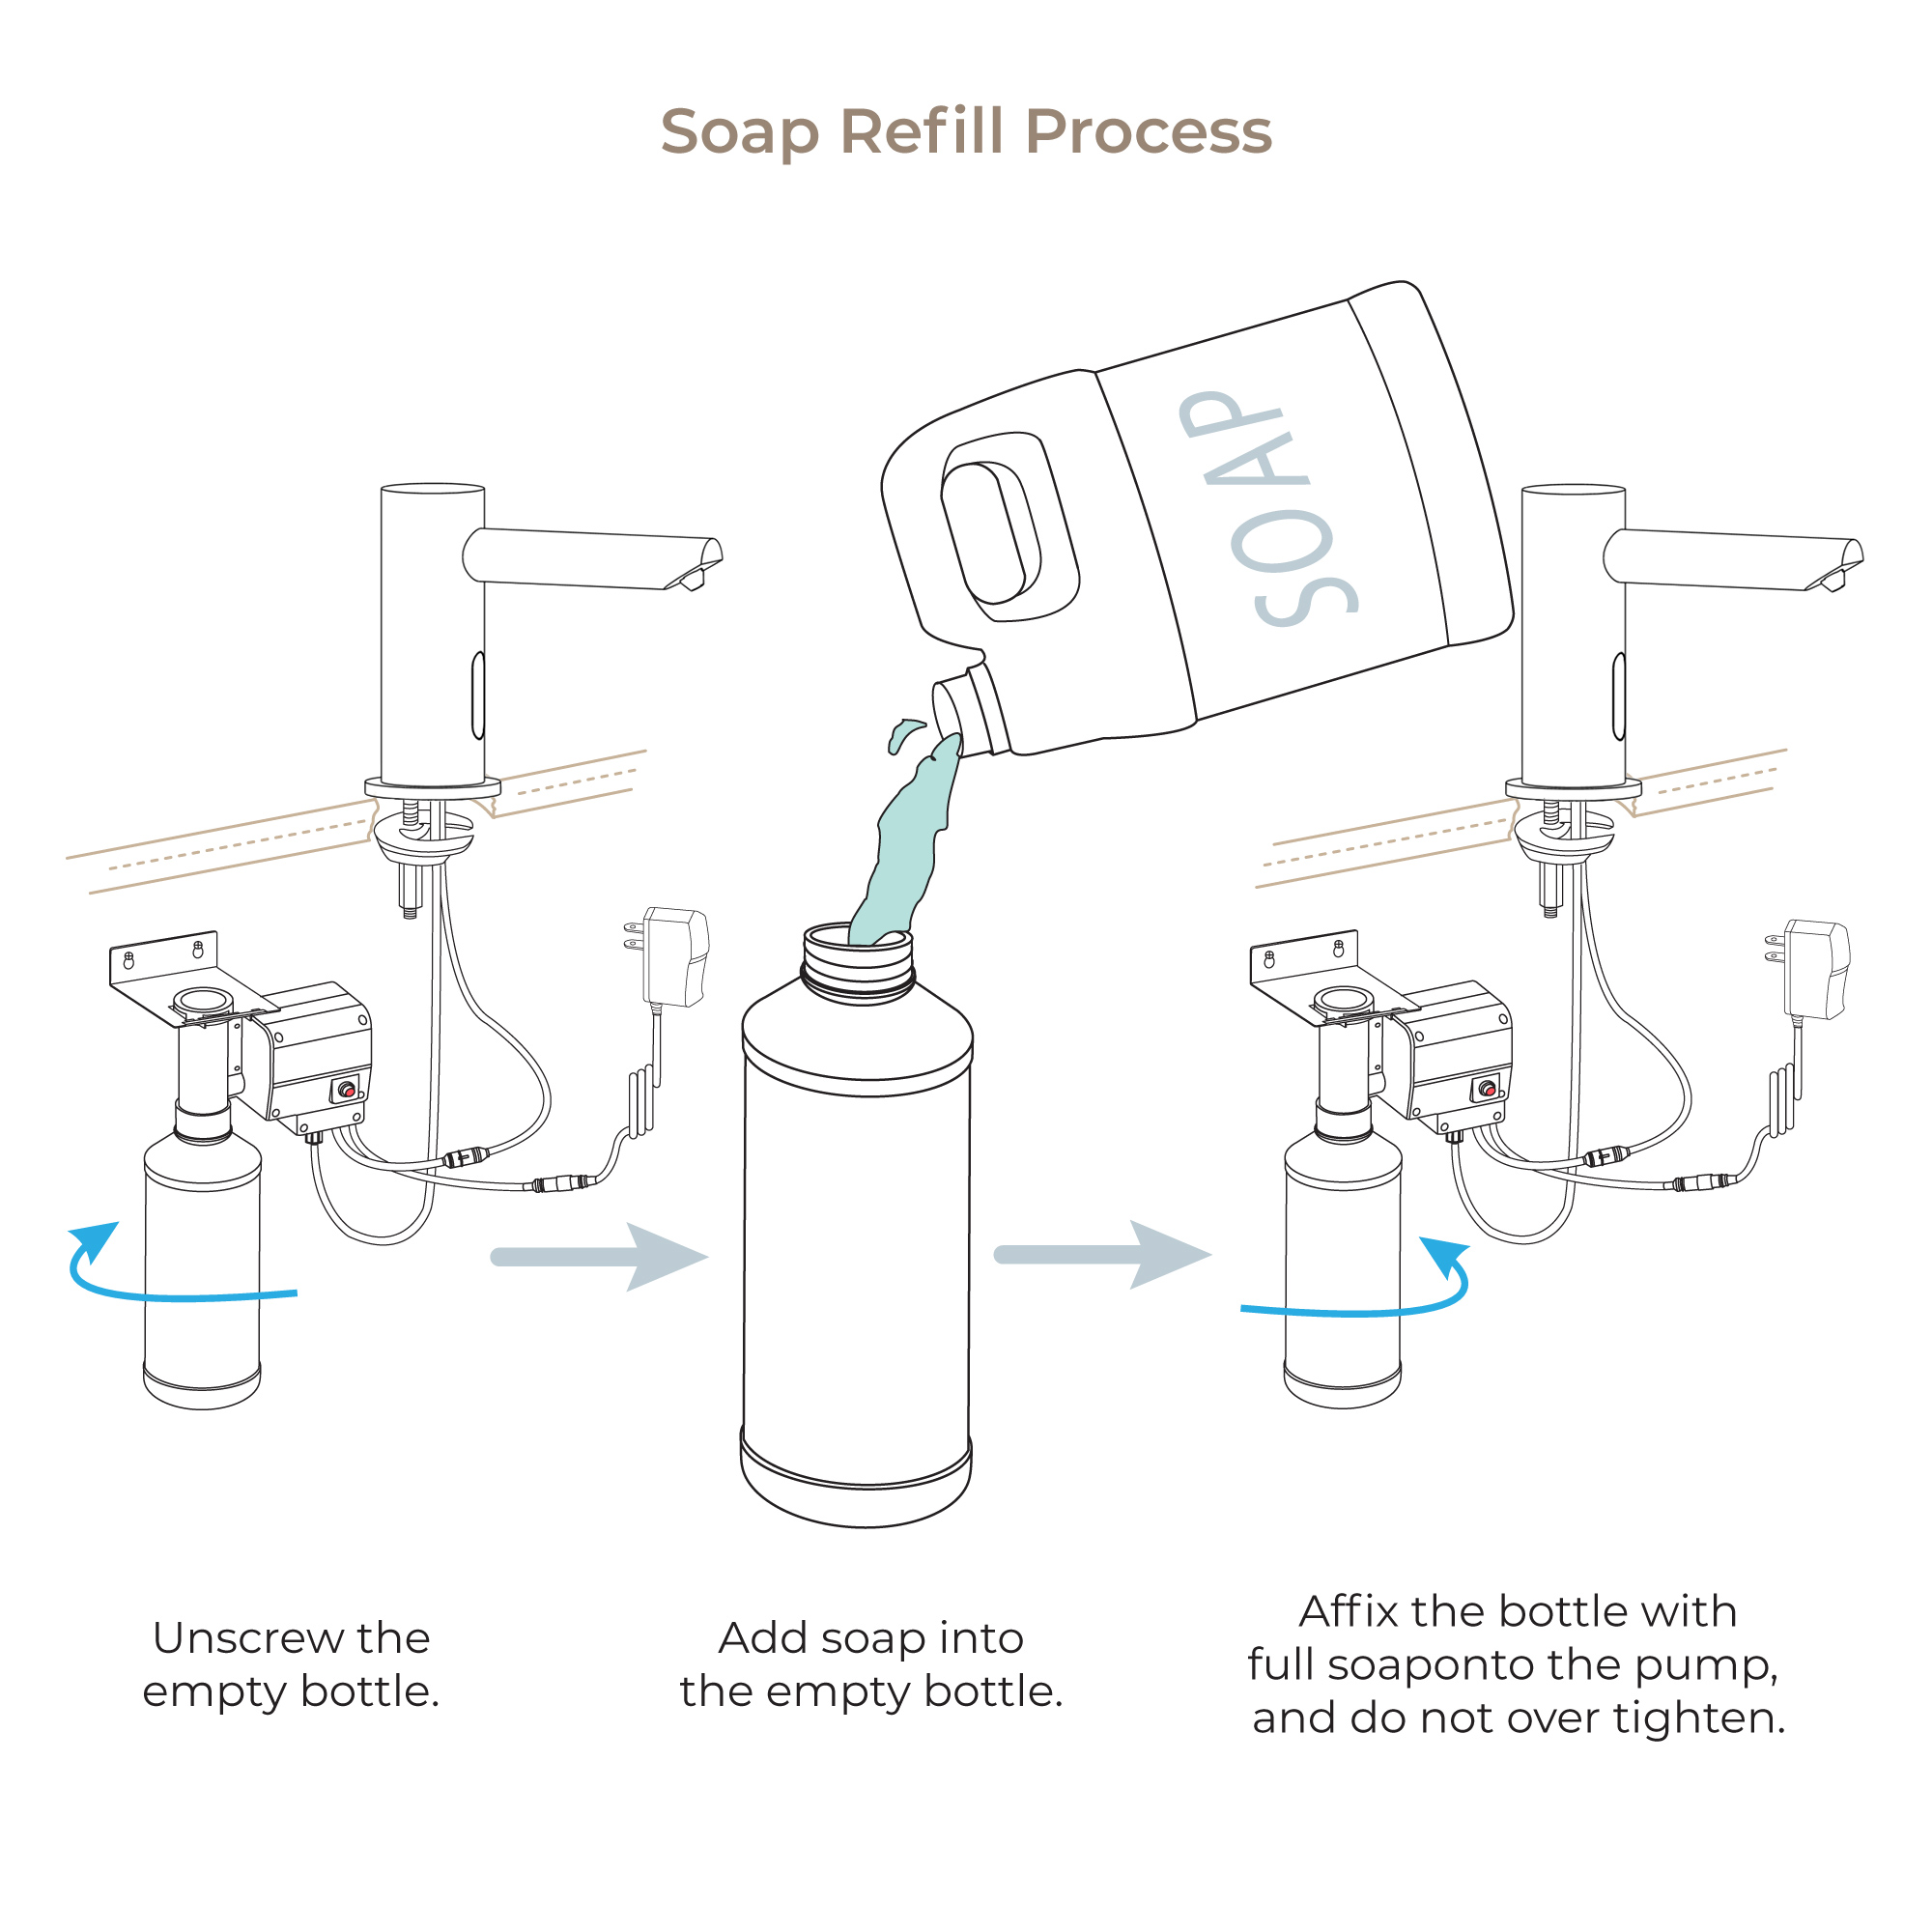
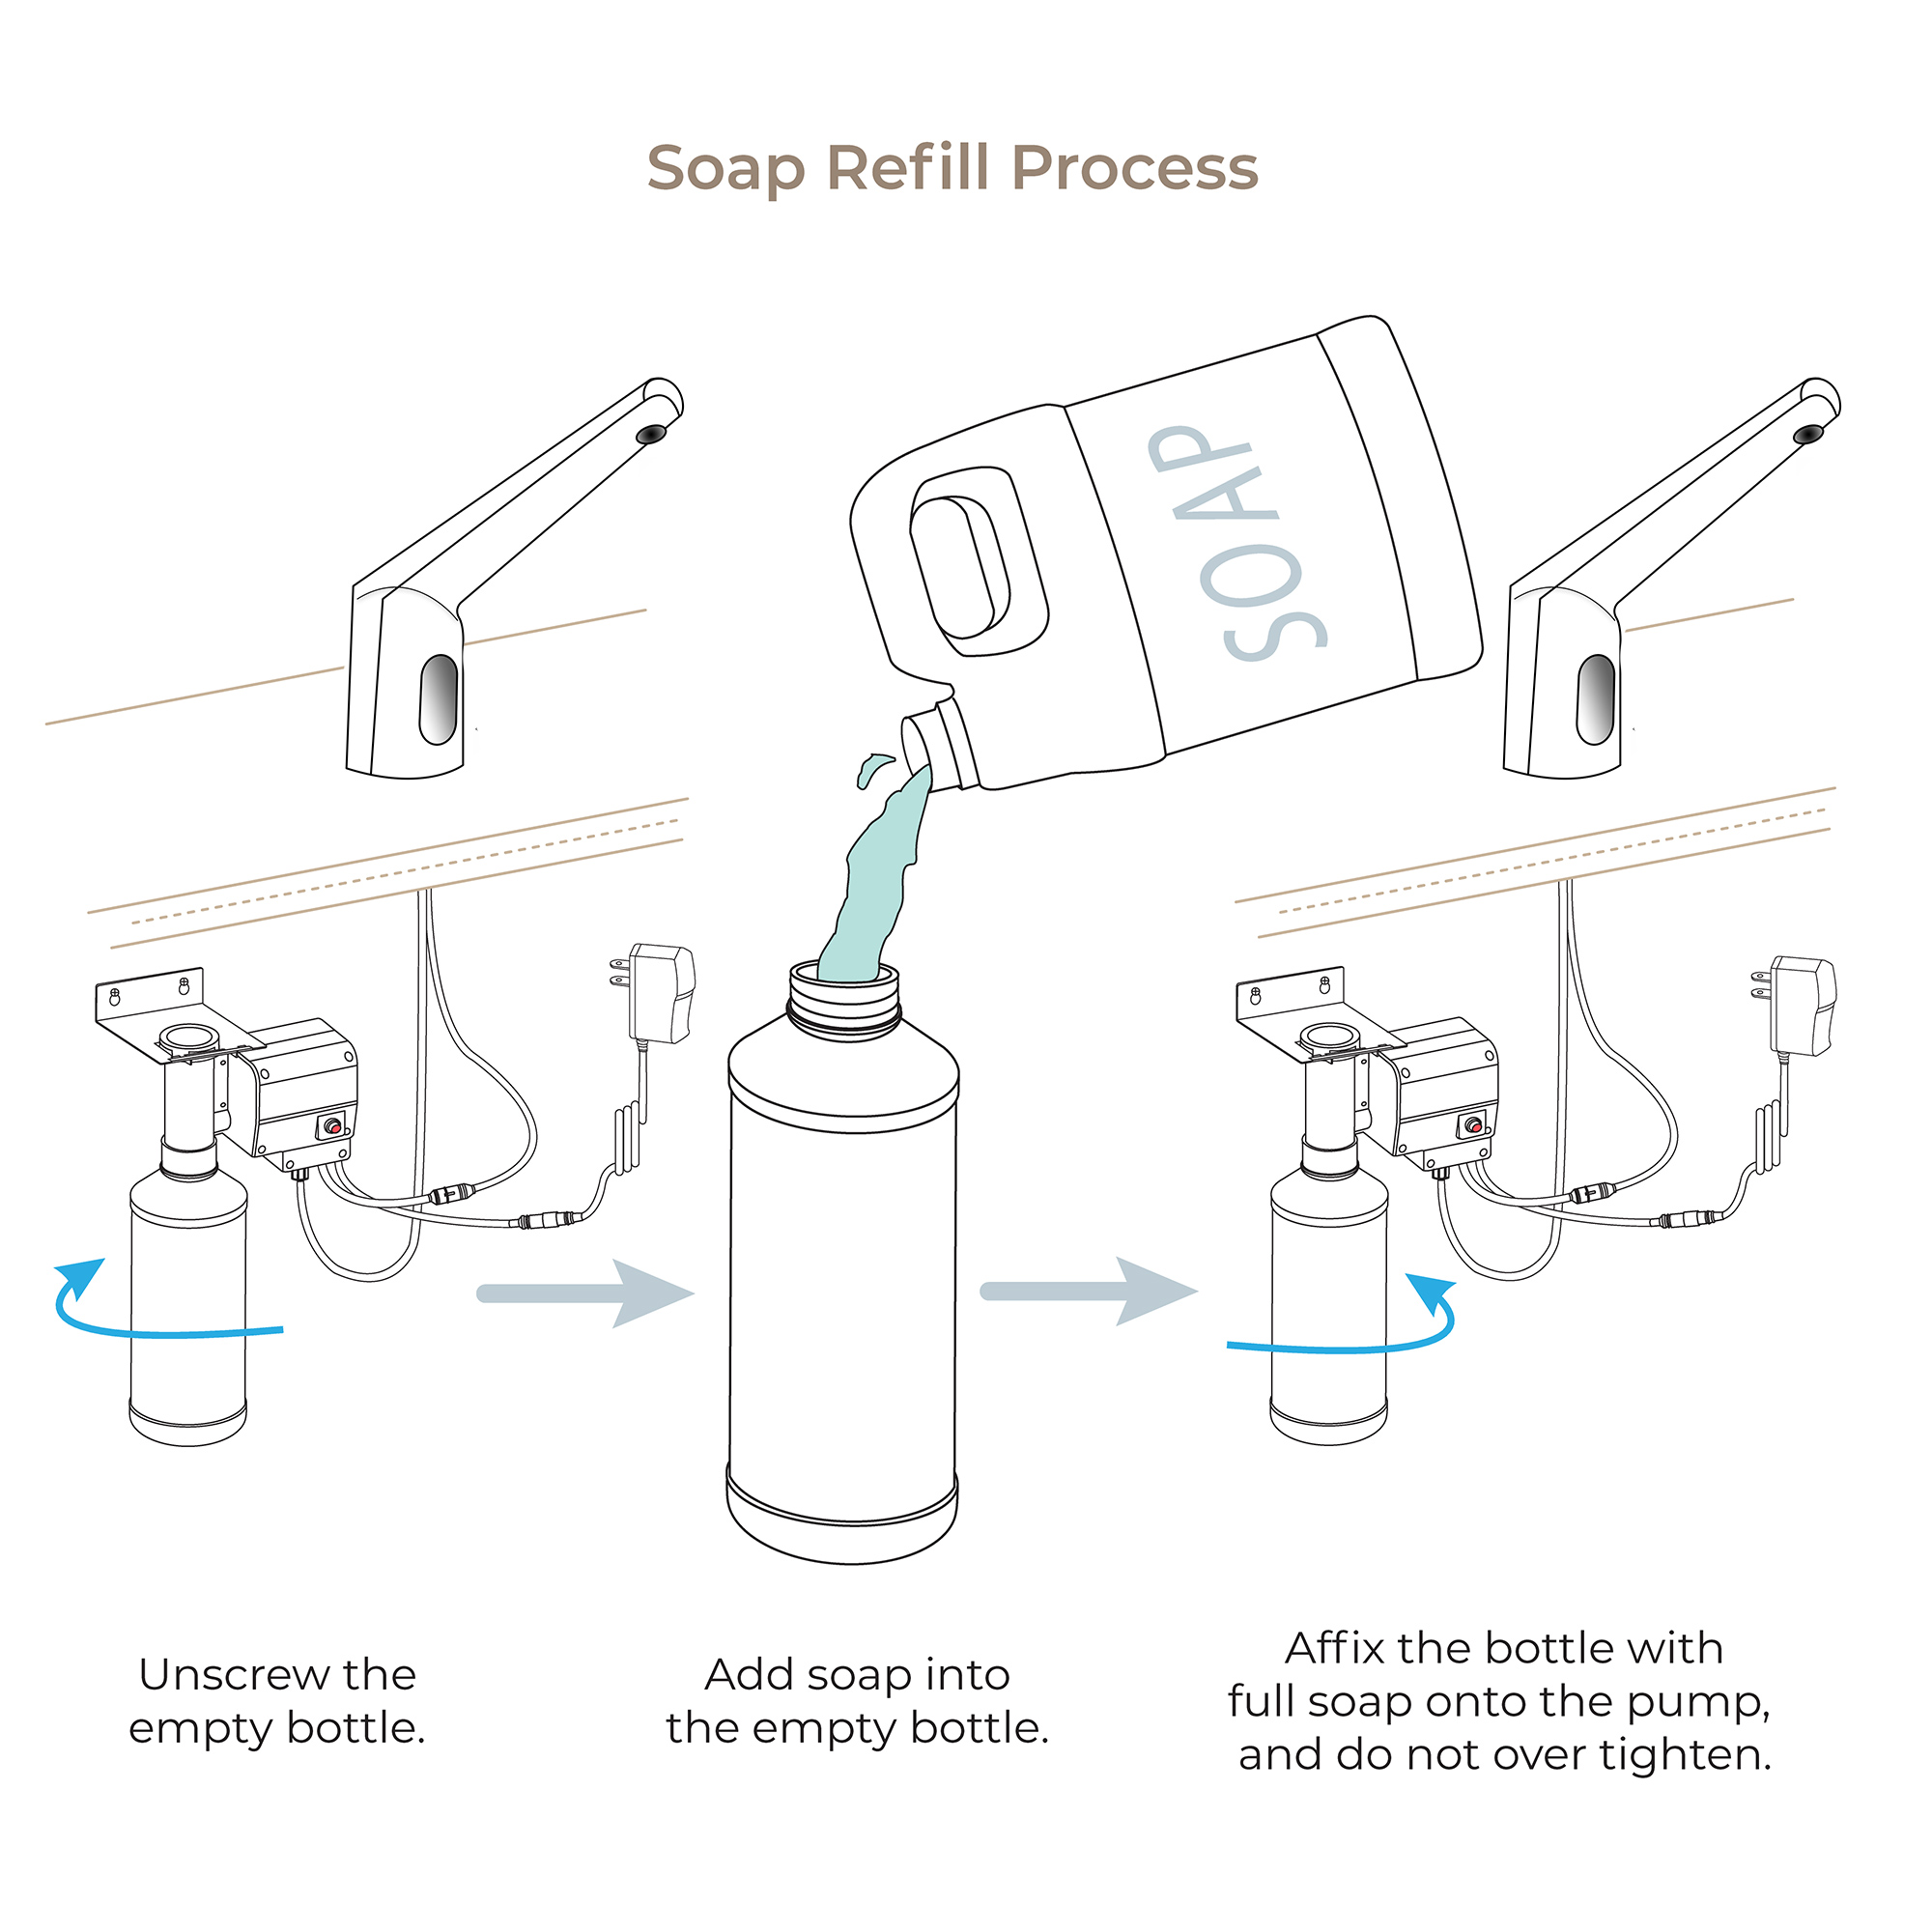
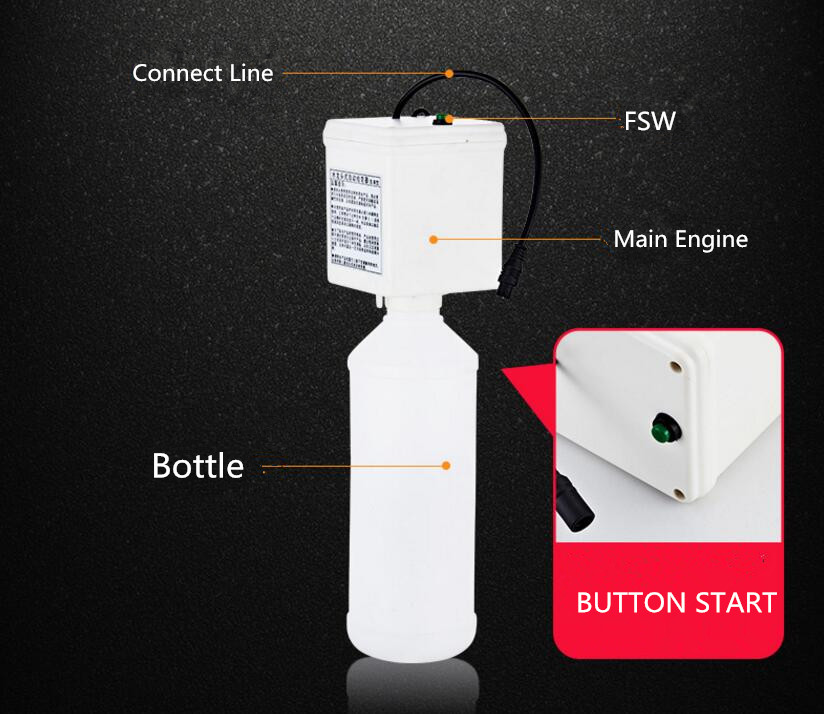
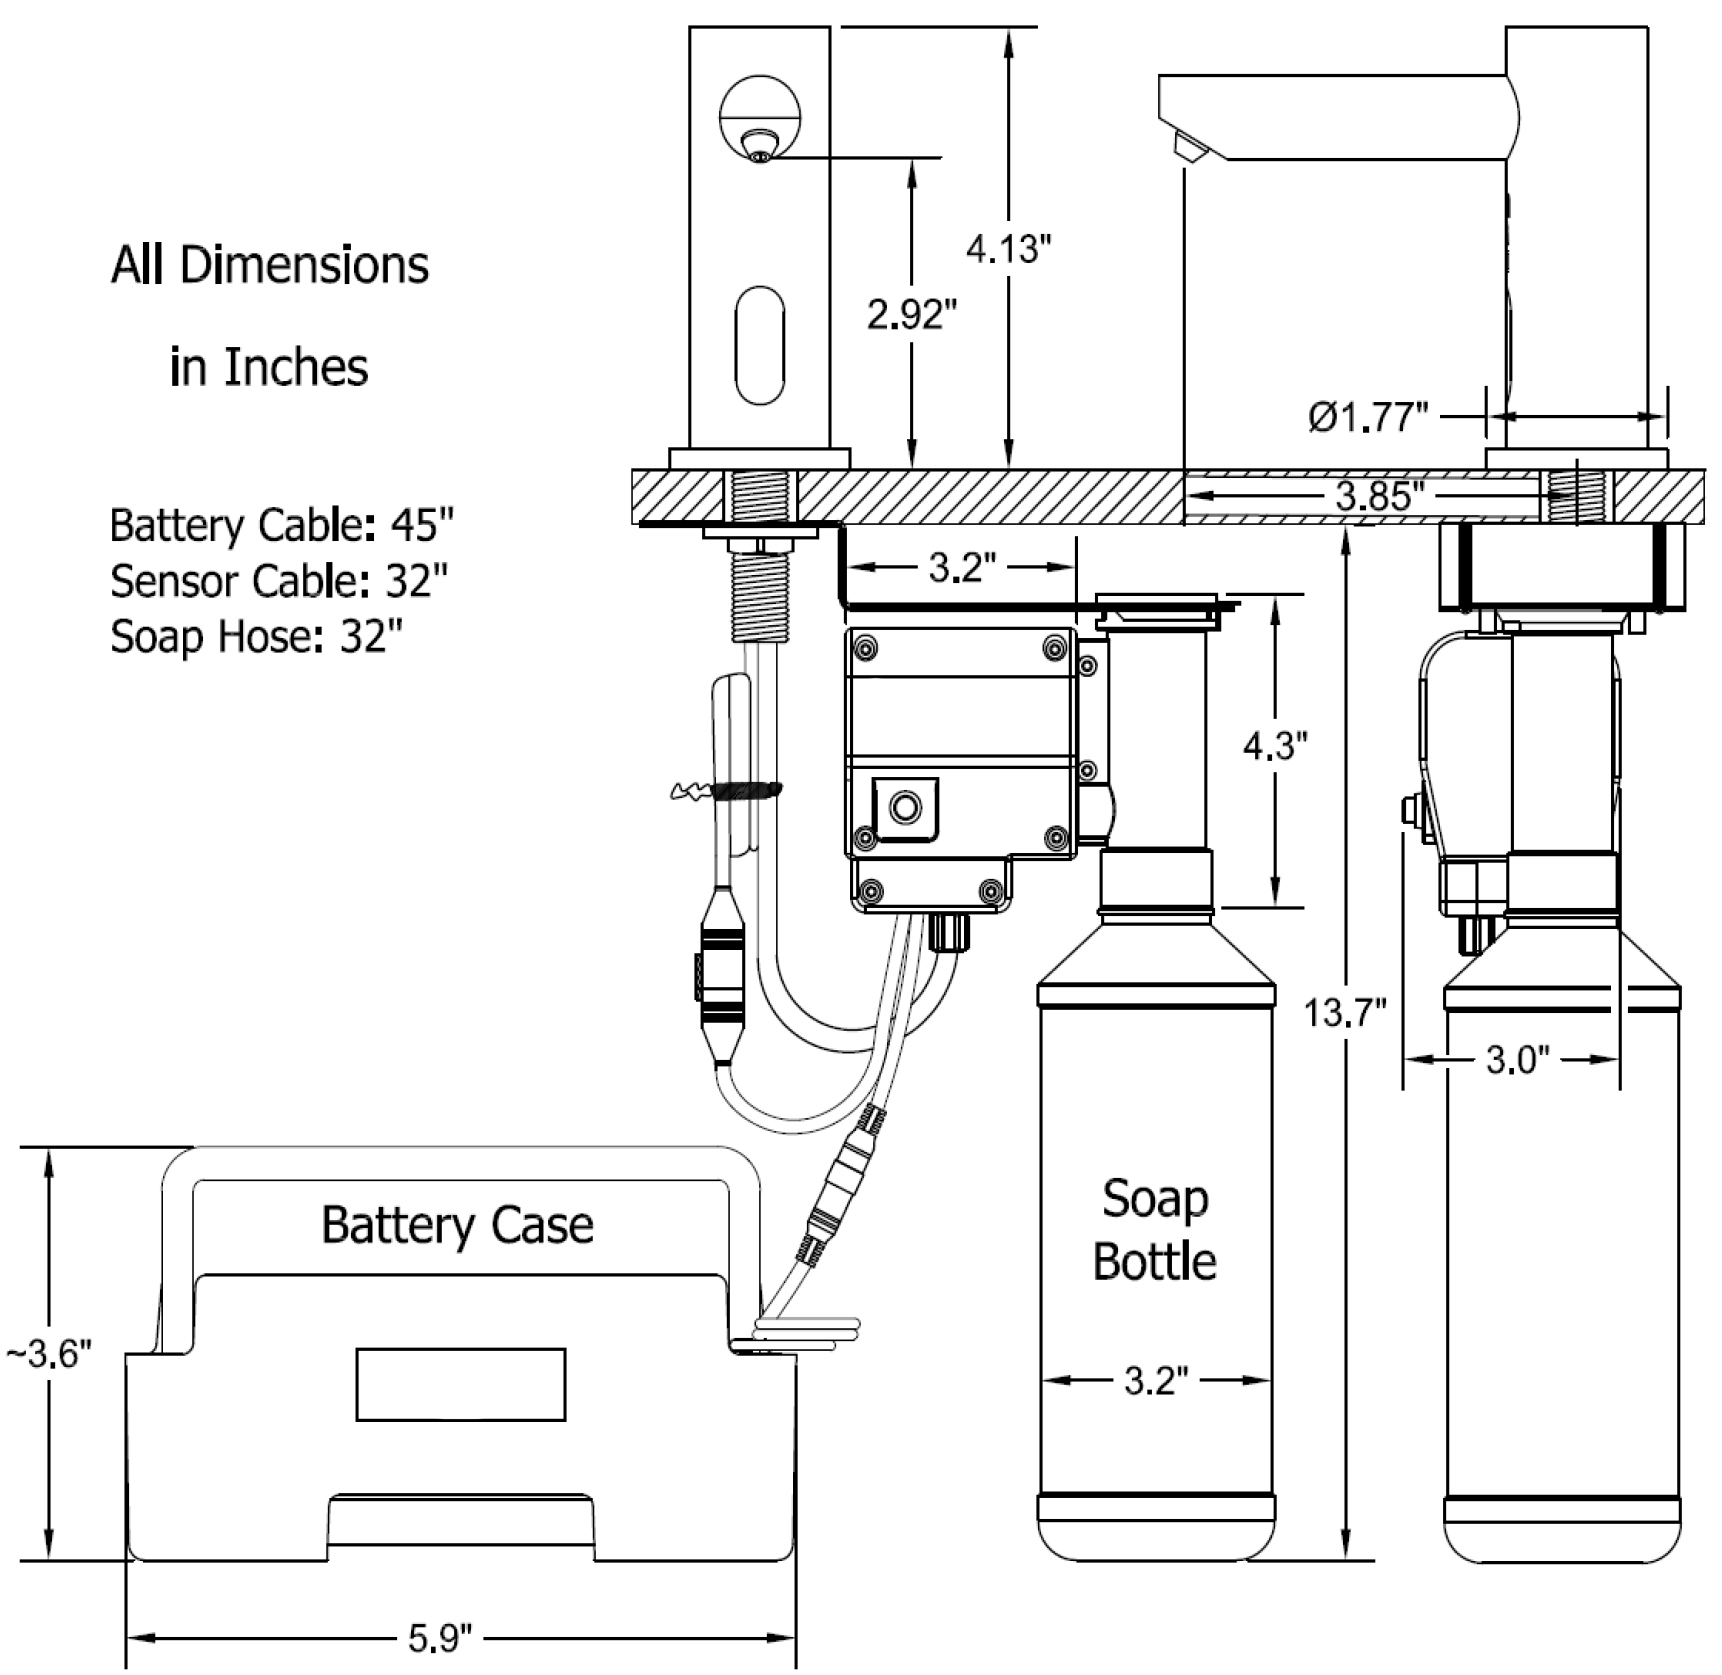
Automatic Soap Dispenser Installation Instructions
|
auto soap
|
Soap Bottle Size
|

|
|
|
|
|
|
|
|
|

|
|
|
|
|
|
|
|
Step 1:
|
sensor
|
Step 2:
|
|
 |
|
|
|
|
|
|
|
|
Step 3:
|
|
Step 4:
|
|
|
|
|
|
|
|
|
|
|
Step 5:
|
|
Step 6:
|
|
|
|
|
|
|
|
|
|
|
Step 7:
|
|
Step 8:
|
|
|
|
|
|
| | | |
Features:
More Hygienic
The proximity sensor removes the need to touch the spout, reducing the spread of germs and reducing the chance of cross-infection.
Battery Override
Your infrared soap dispenser is supplied with a backup battery pack. In the event of a power failure, the product will automatically switch to battery-operated mode to ensure the spout continues to function.
Low Battery Warning
When the batteries run low and the power falls below 3.9V the sensor light will flicker to indicate the batteries are running low and need replacing.
When the batteries are exhausted the sensor light will not light up.
Installation
1. Fit The Spout
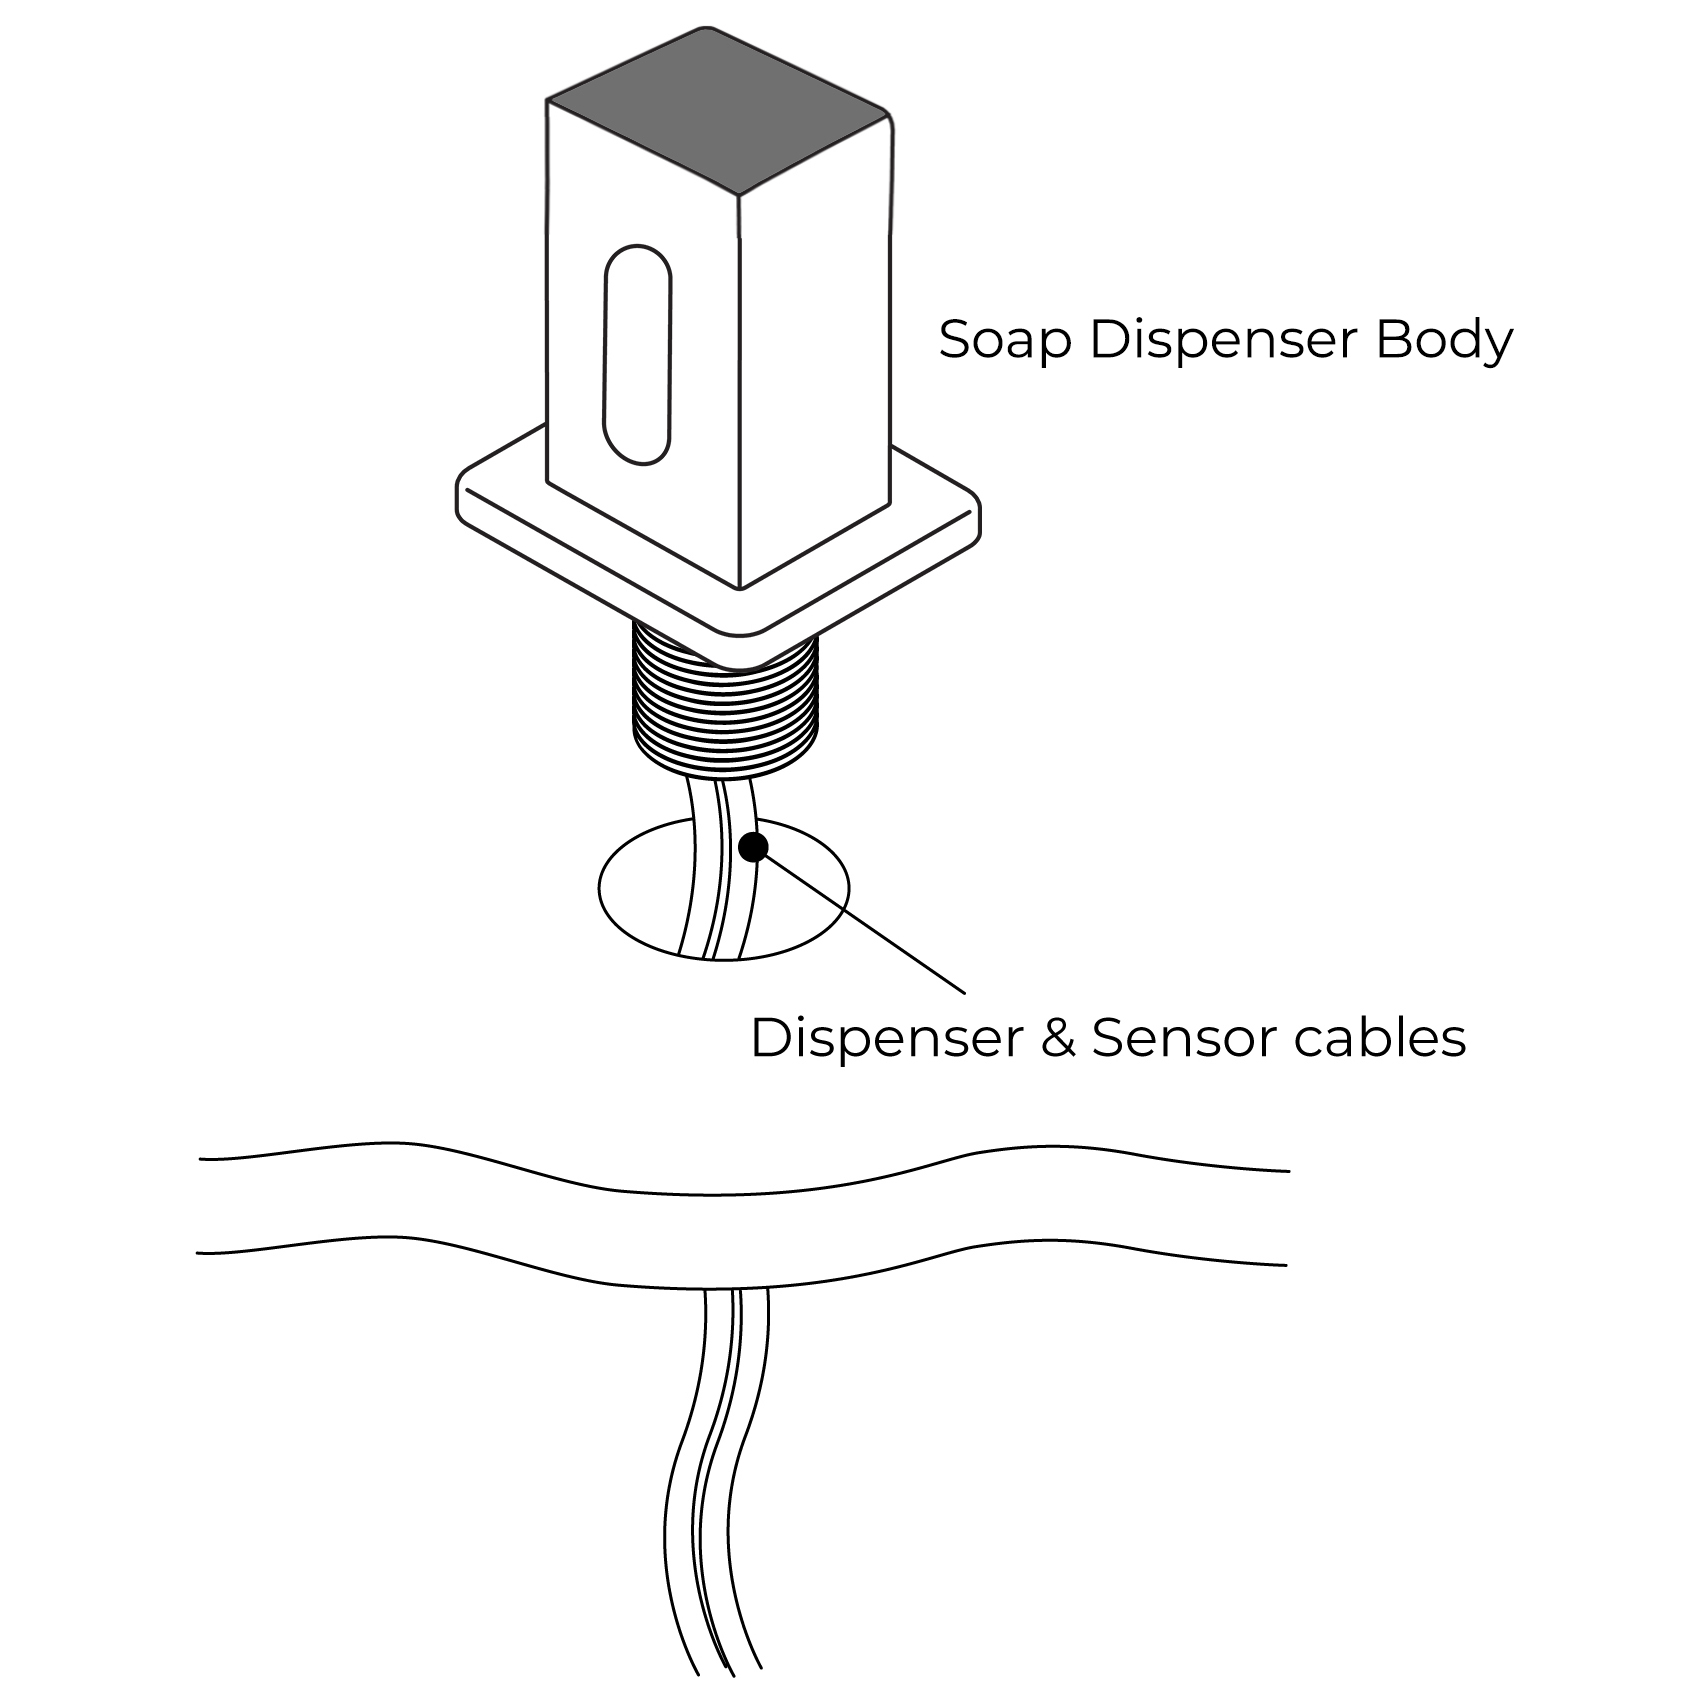
Fit the spout to the sink/basin ensuring the dispensing cable and sensor cable are threaded through the hole in the sink/basin.
2. Secure Spout to Sink / Basin
Screw the metal back nut onto the thread of the spout upto the underside of the sink/basin.
Tighten backnut using a suitable spanner.
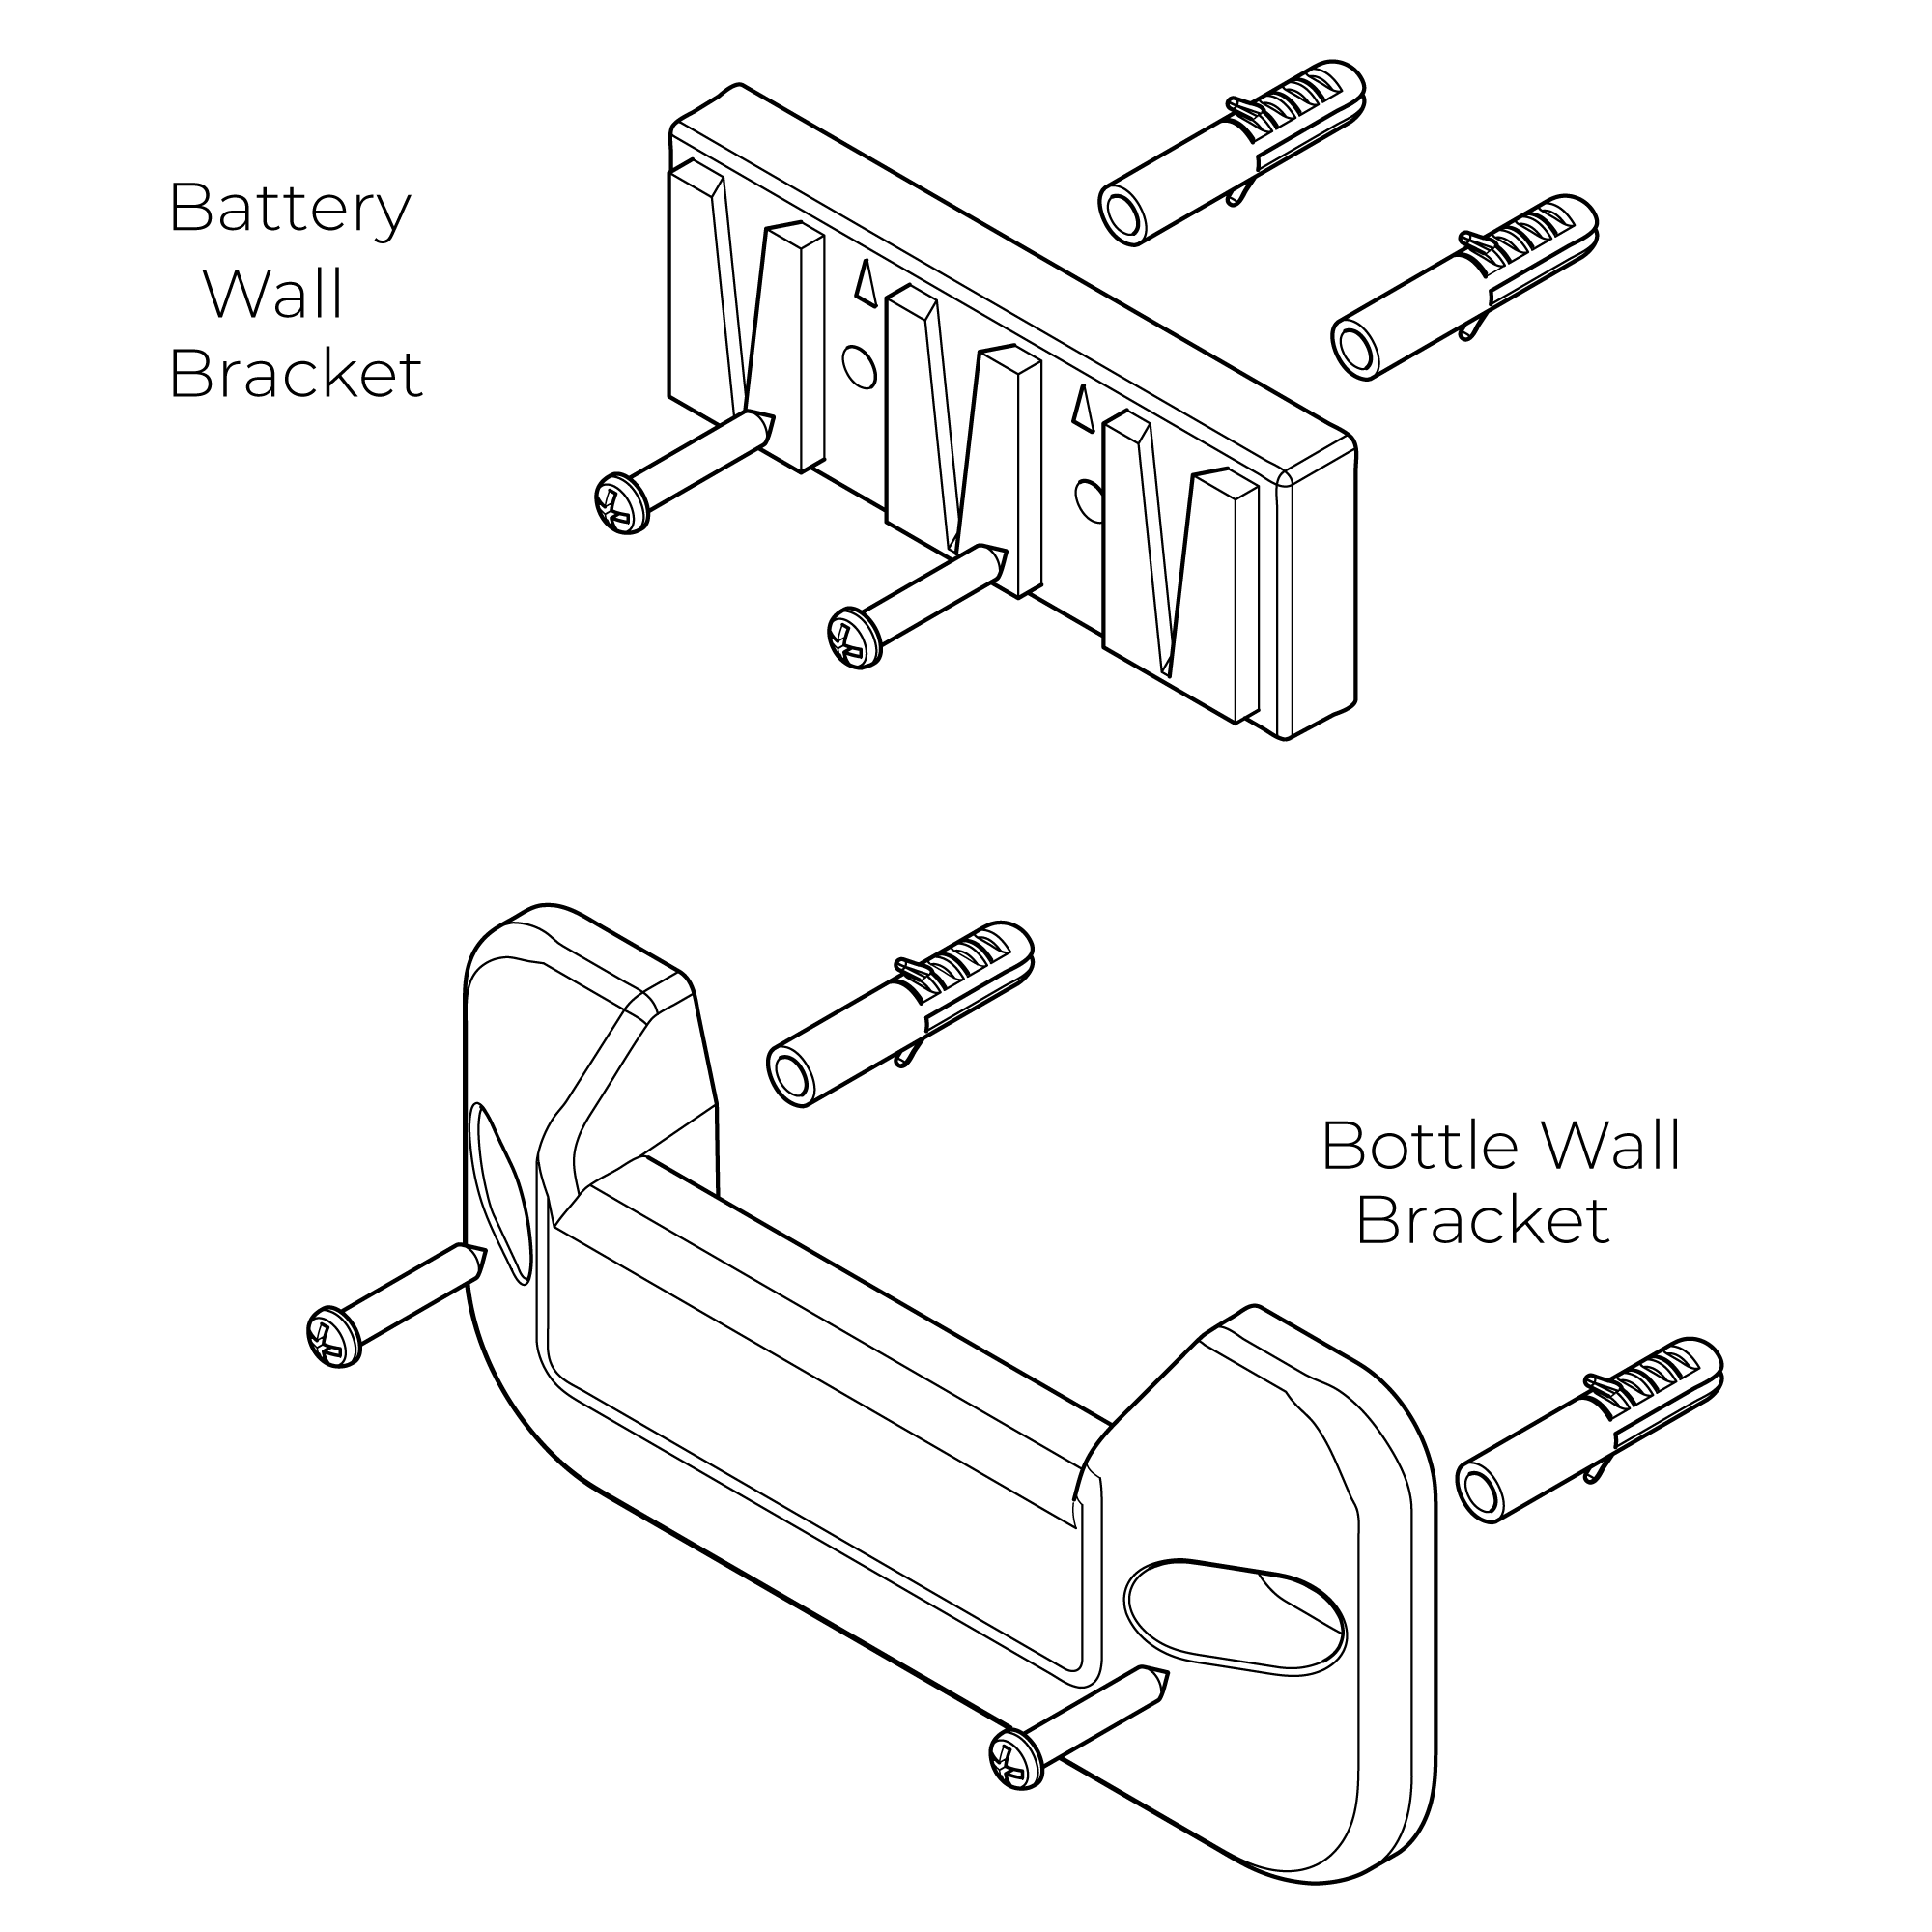
3. Fit Wall Brackets
Position the brackets onto the wall surface and mark the position of the fixing holes.
Remove the brackets and drill suitable holes for the wall plugs supplied.
Before drilling into walls, check that there are no hidden electrical wires, cables or water supply pipes. This can be checked with the aid of an electrical detector:
If power tools are used do not forget to:
- Wear eye protection
- Unplug equipment after use
Fit the wall plugs and position the brackets into position and secure using the screws provided.
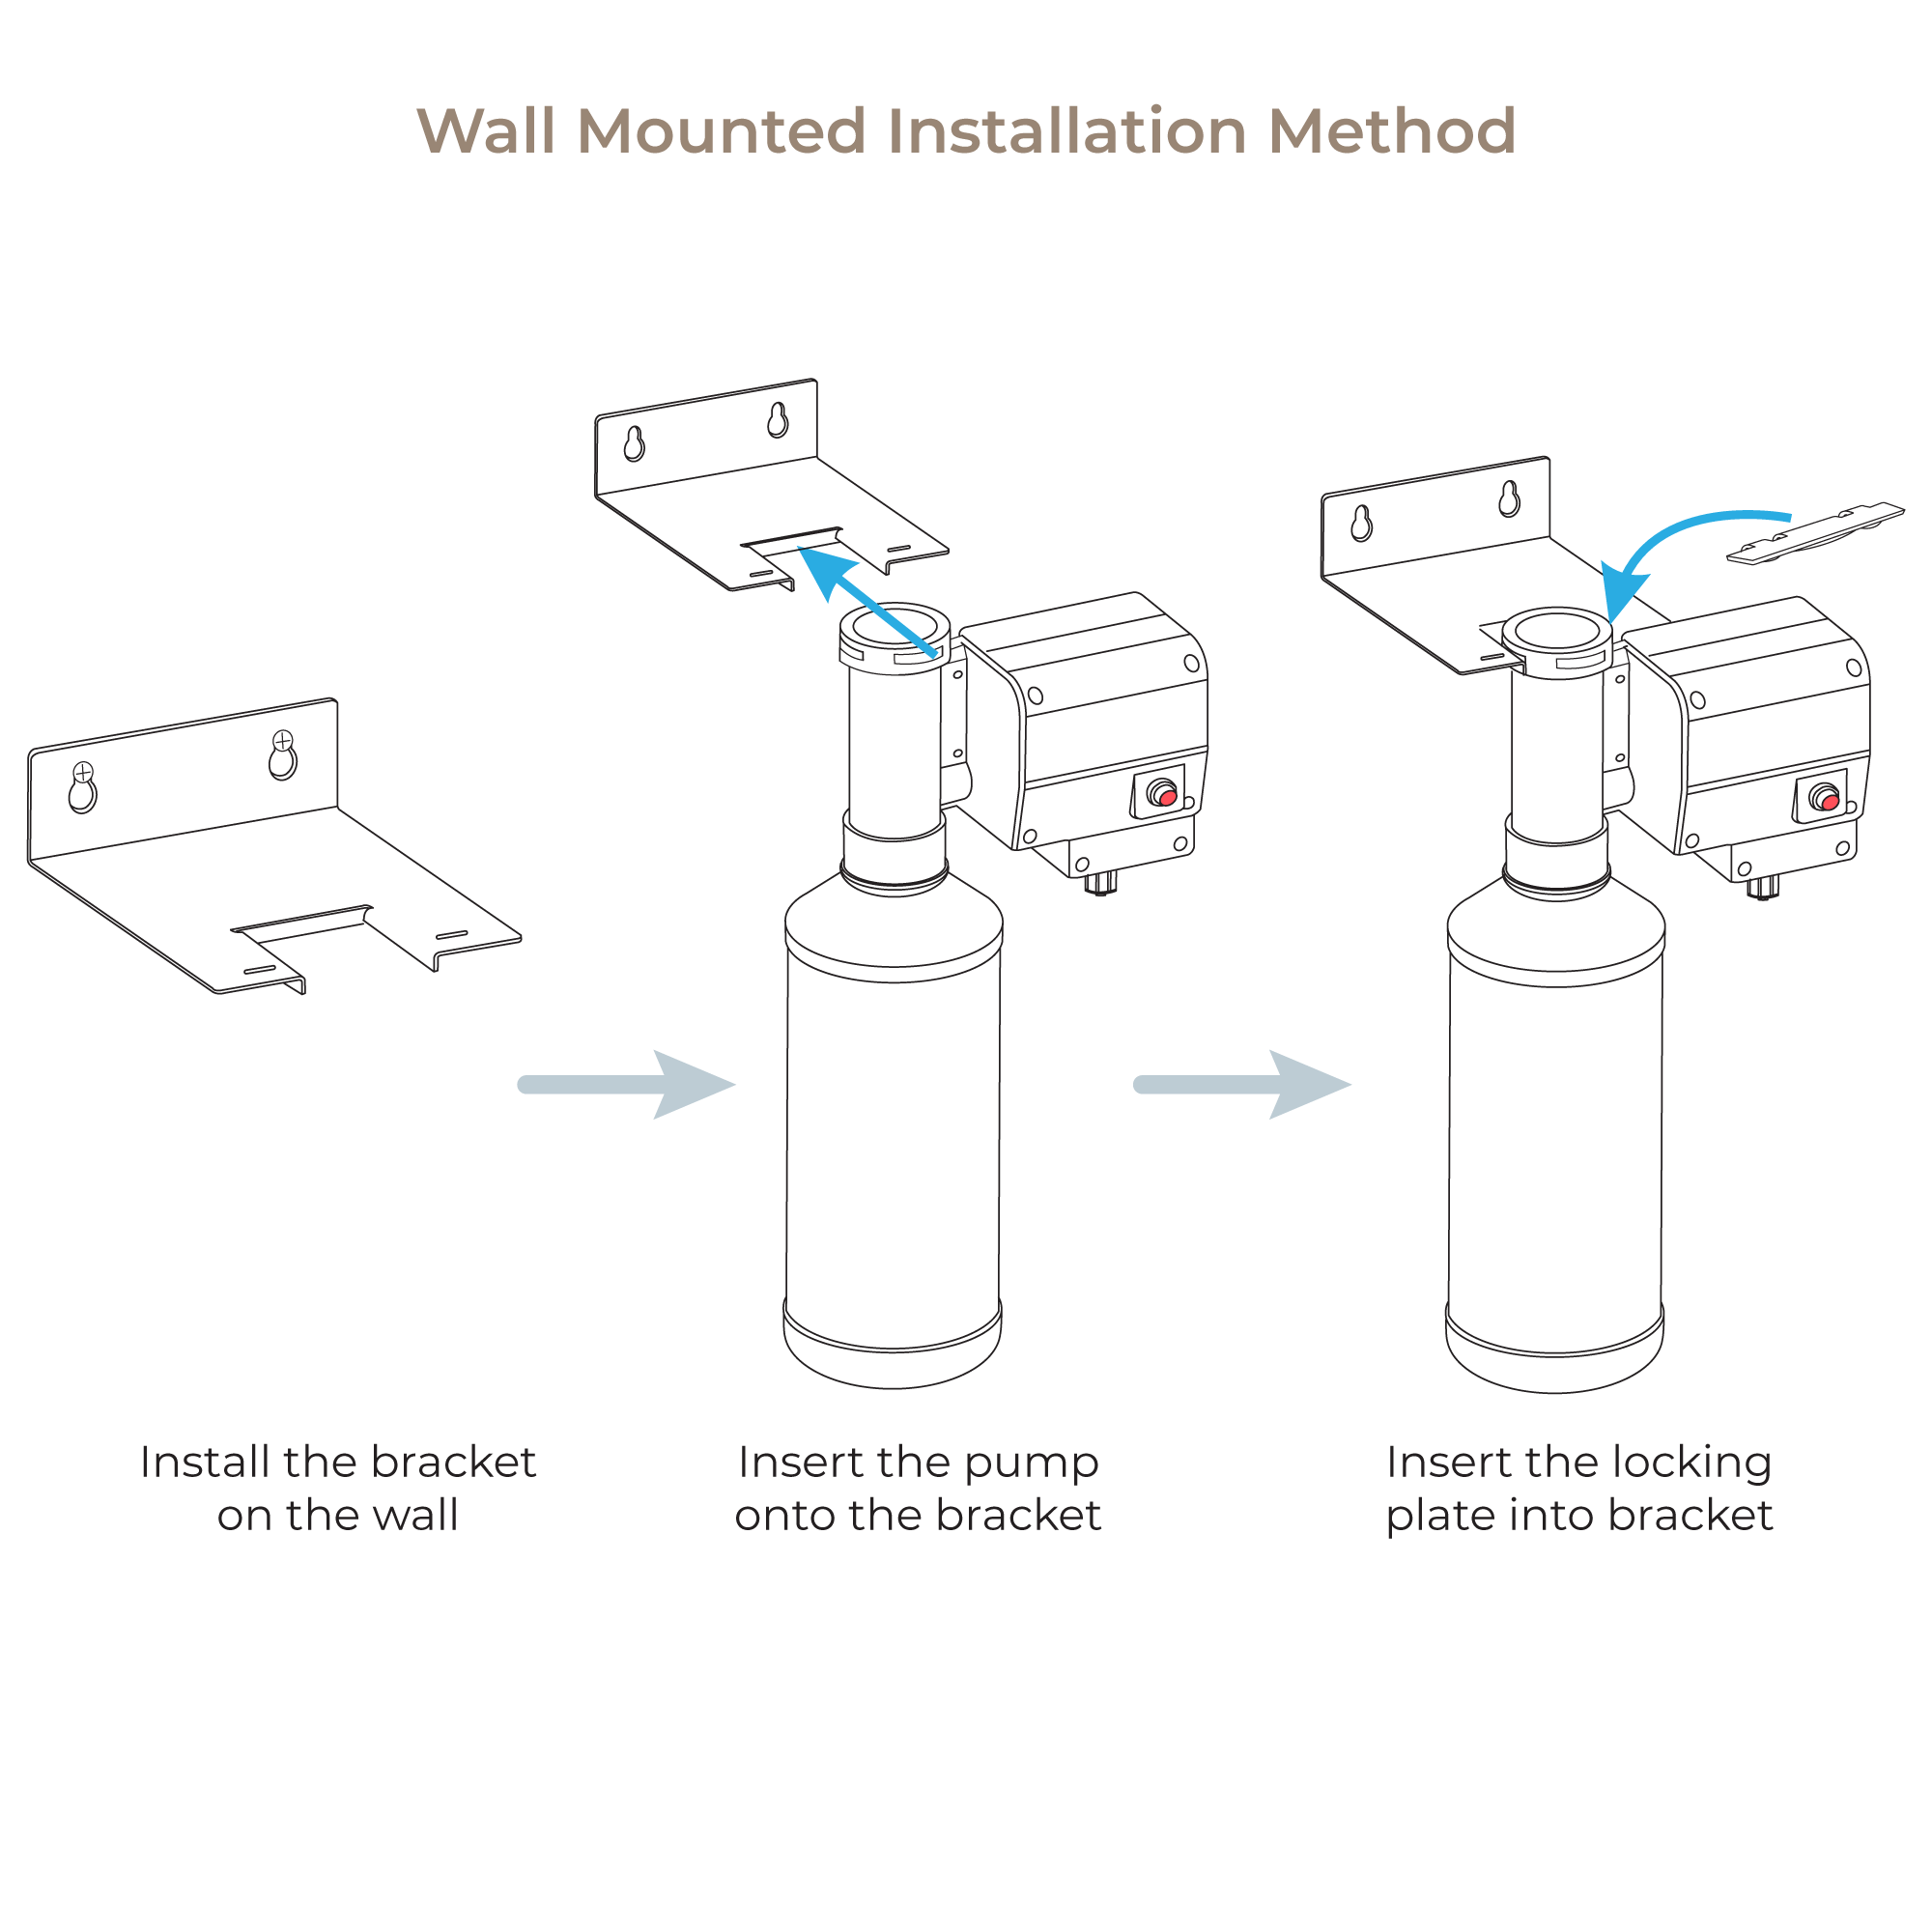
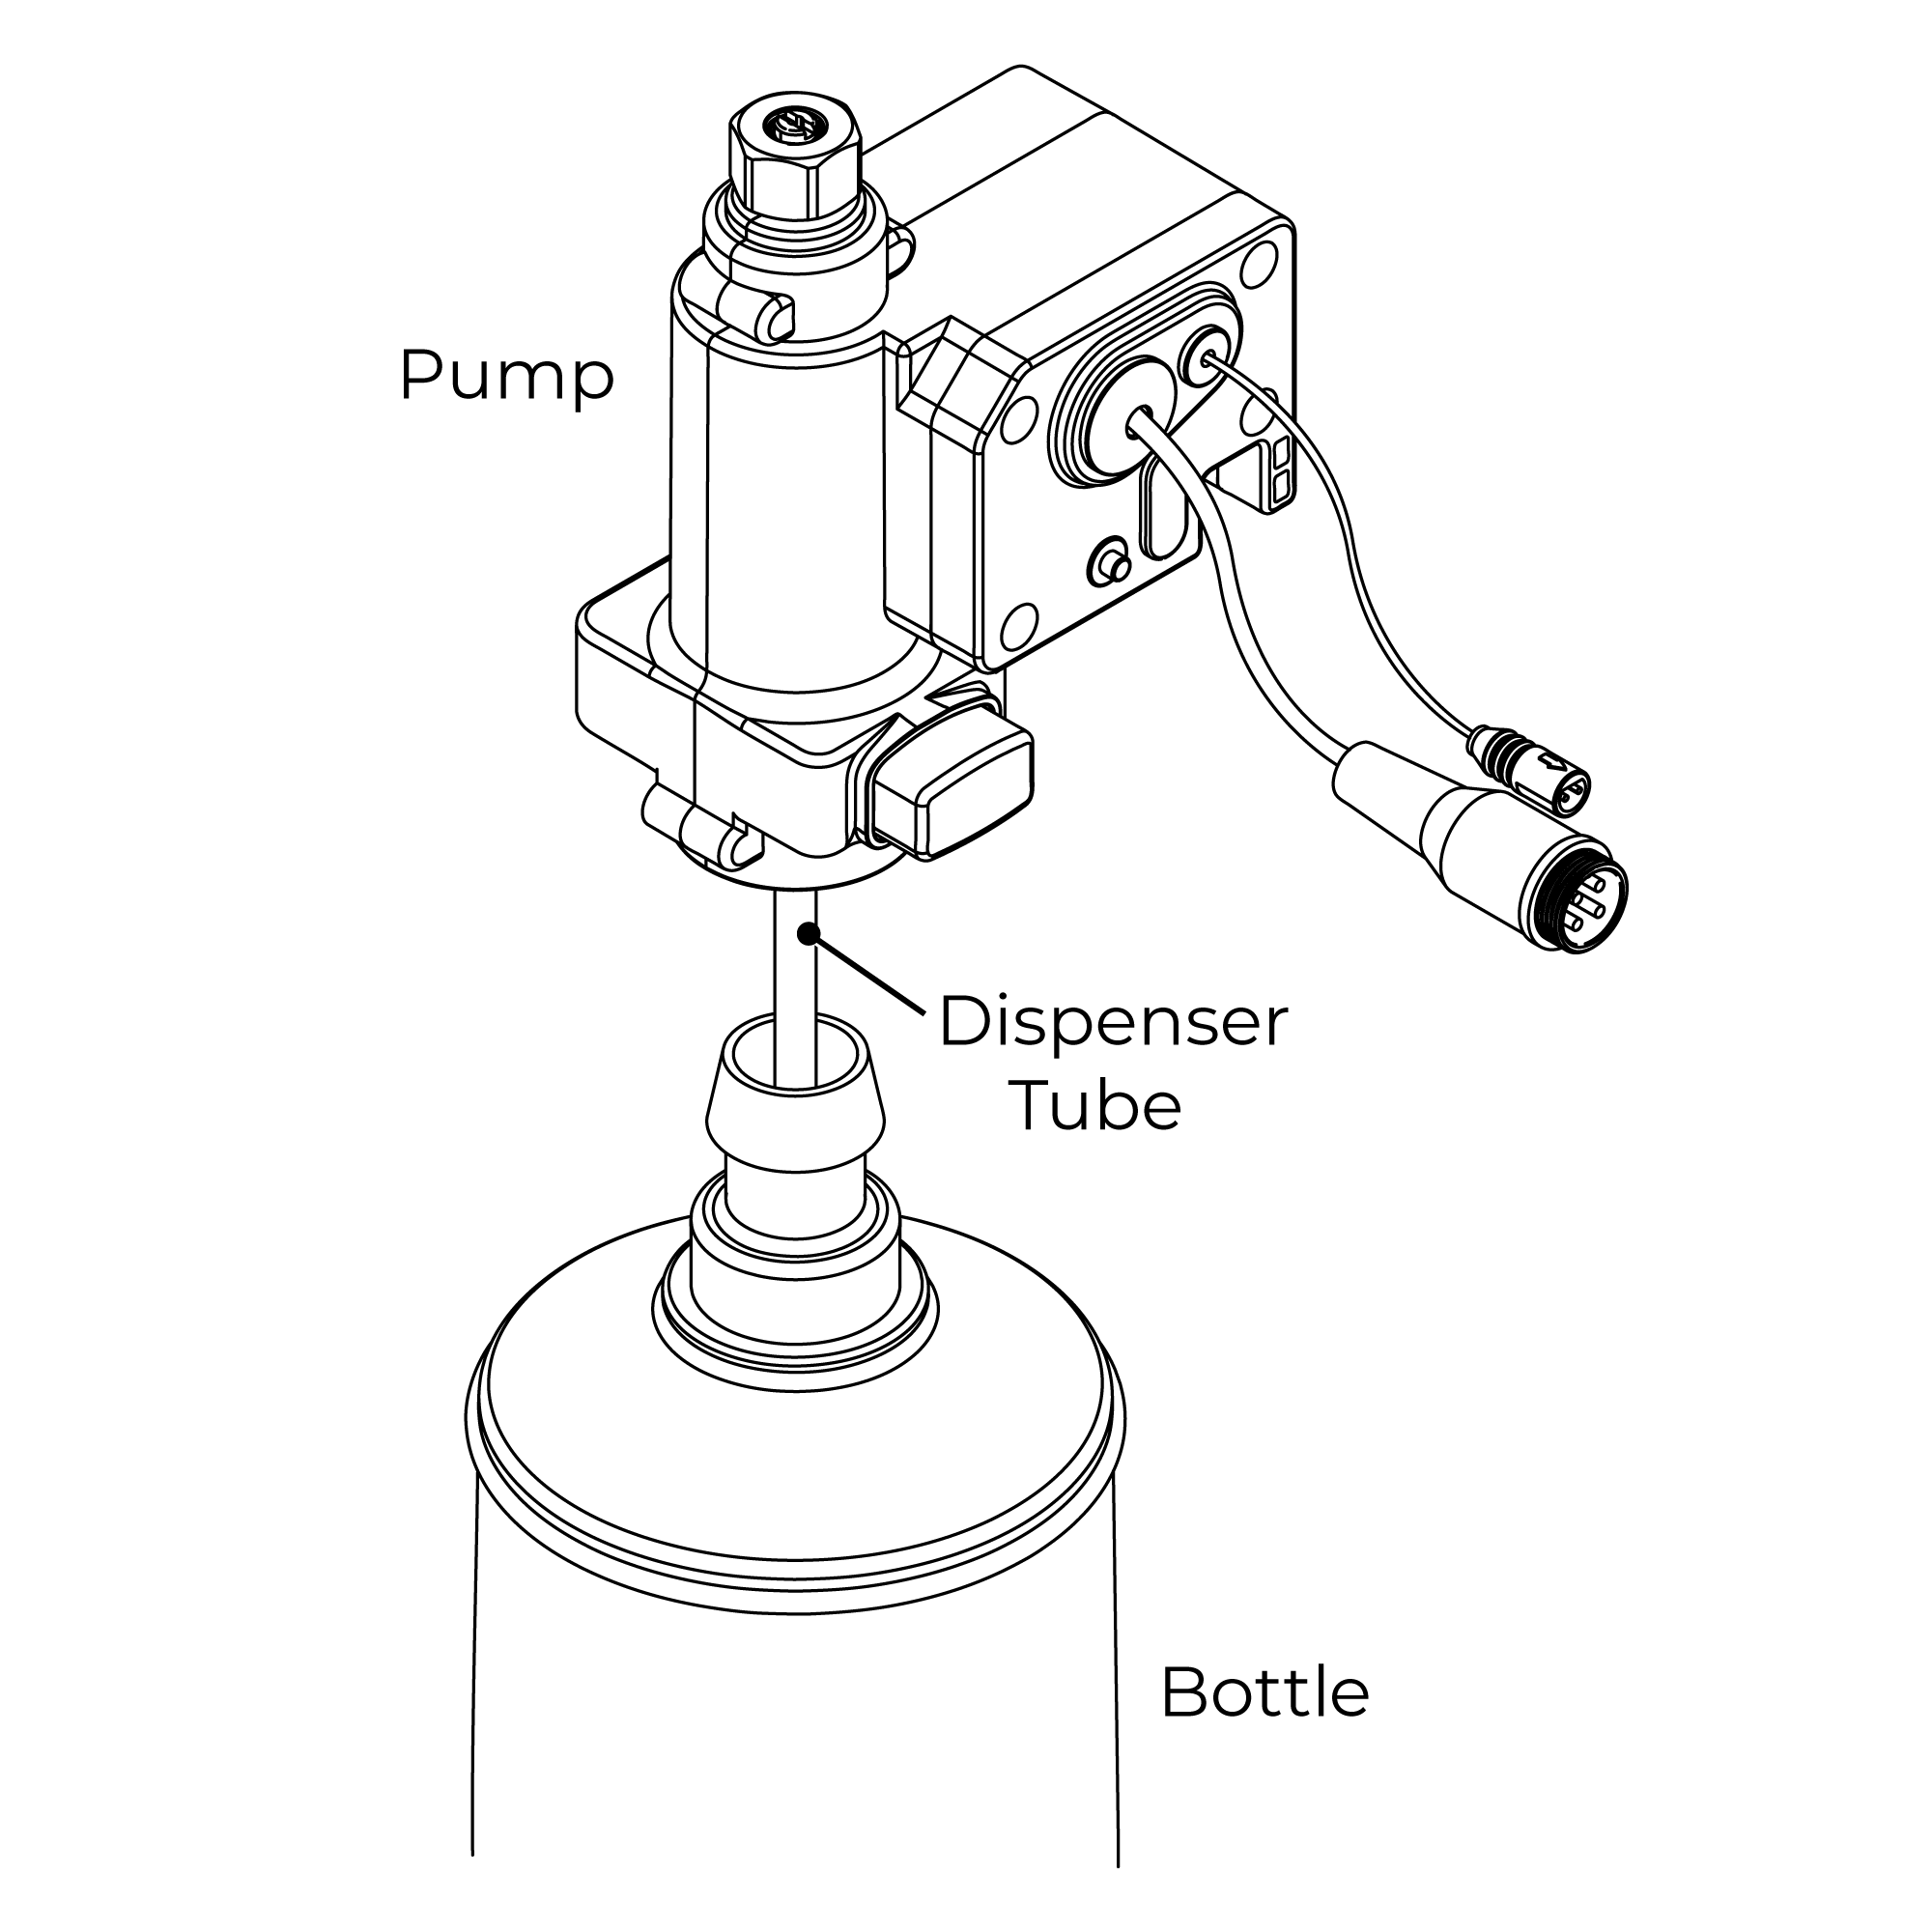
4. Attach Pump to Bottle
Ensure the dispenser tube is located inside the bottle and push the pump down firmly onto the bottle until a loud ‘click’ is heard.
To remove the pump from the bottle press the release button in on the side of the pump and pull the pump from the bottle.
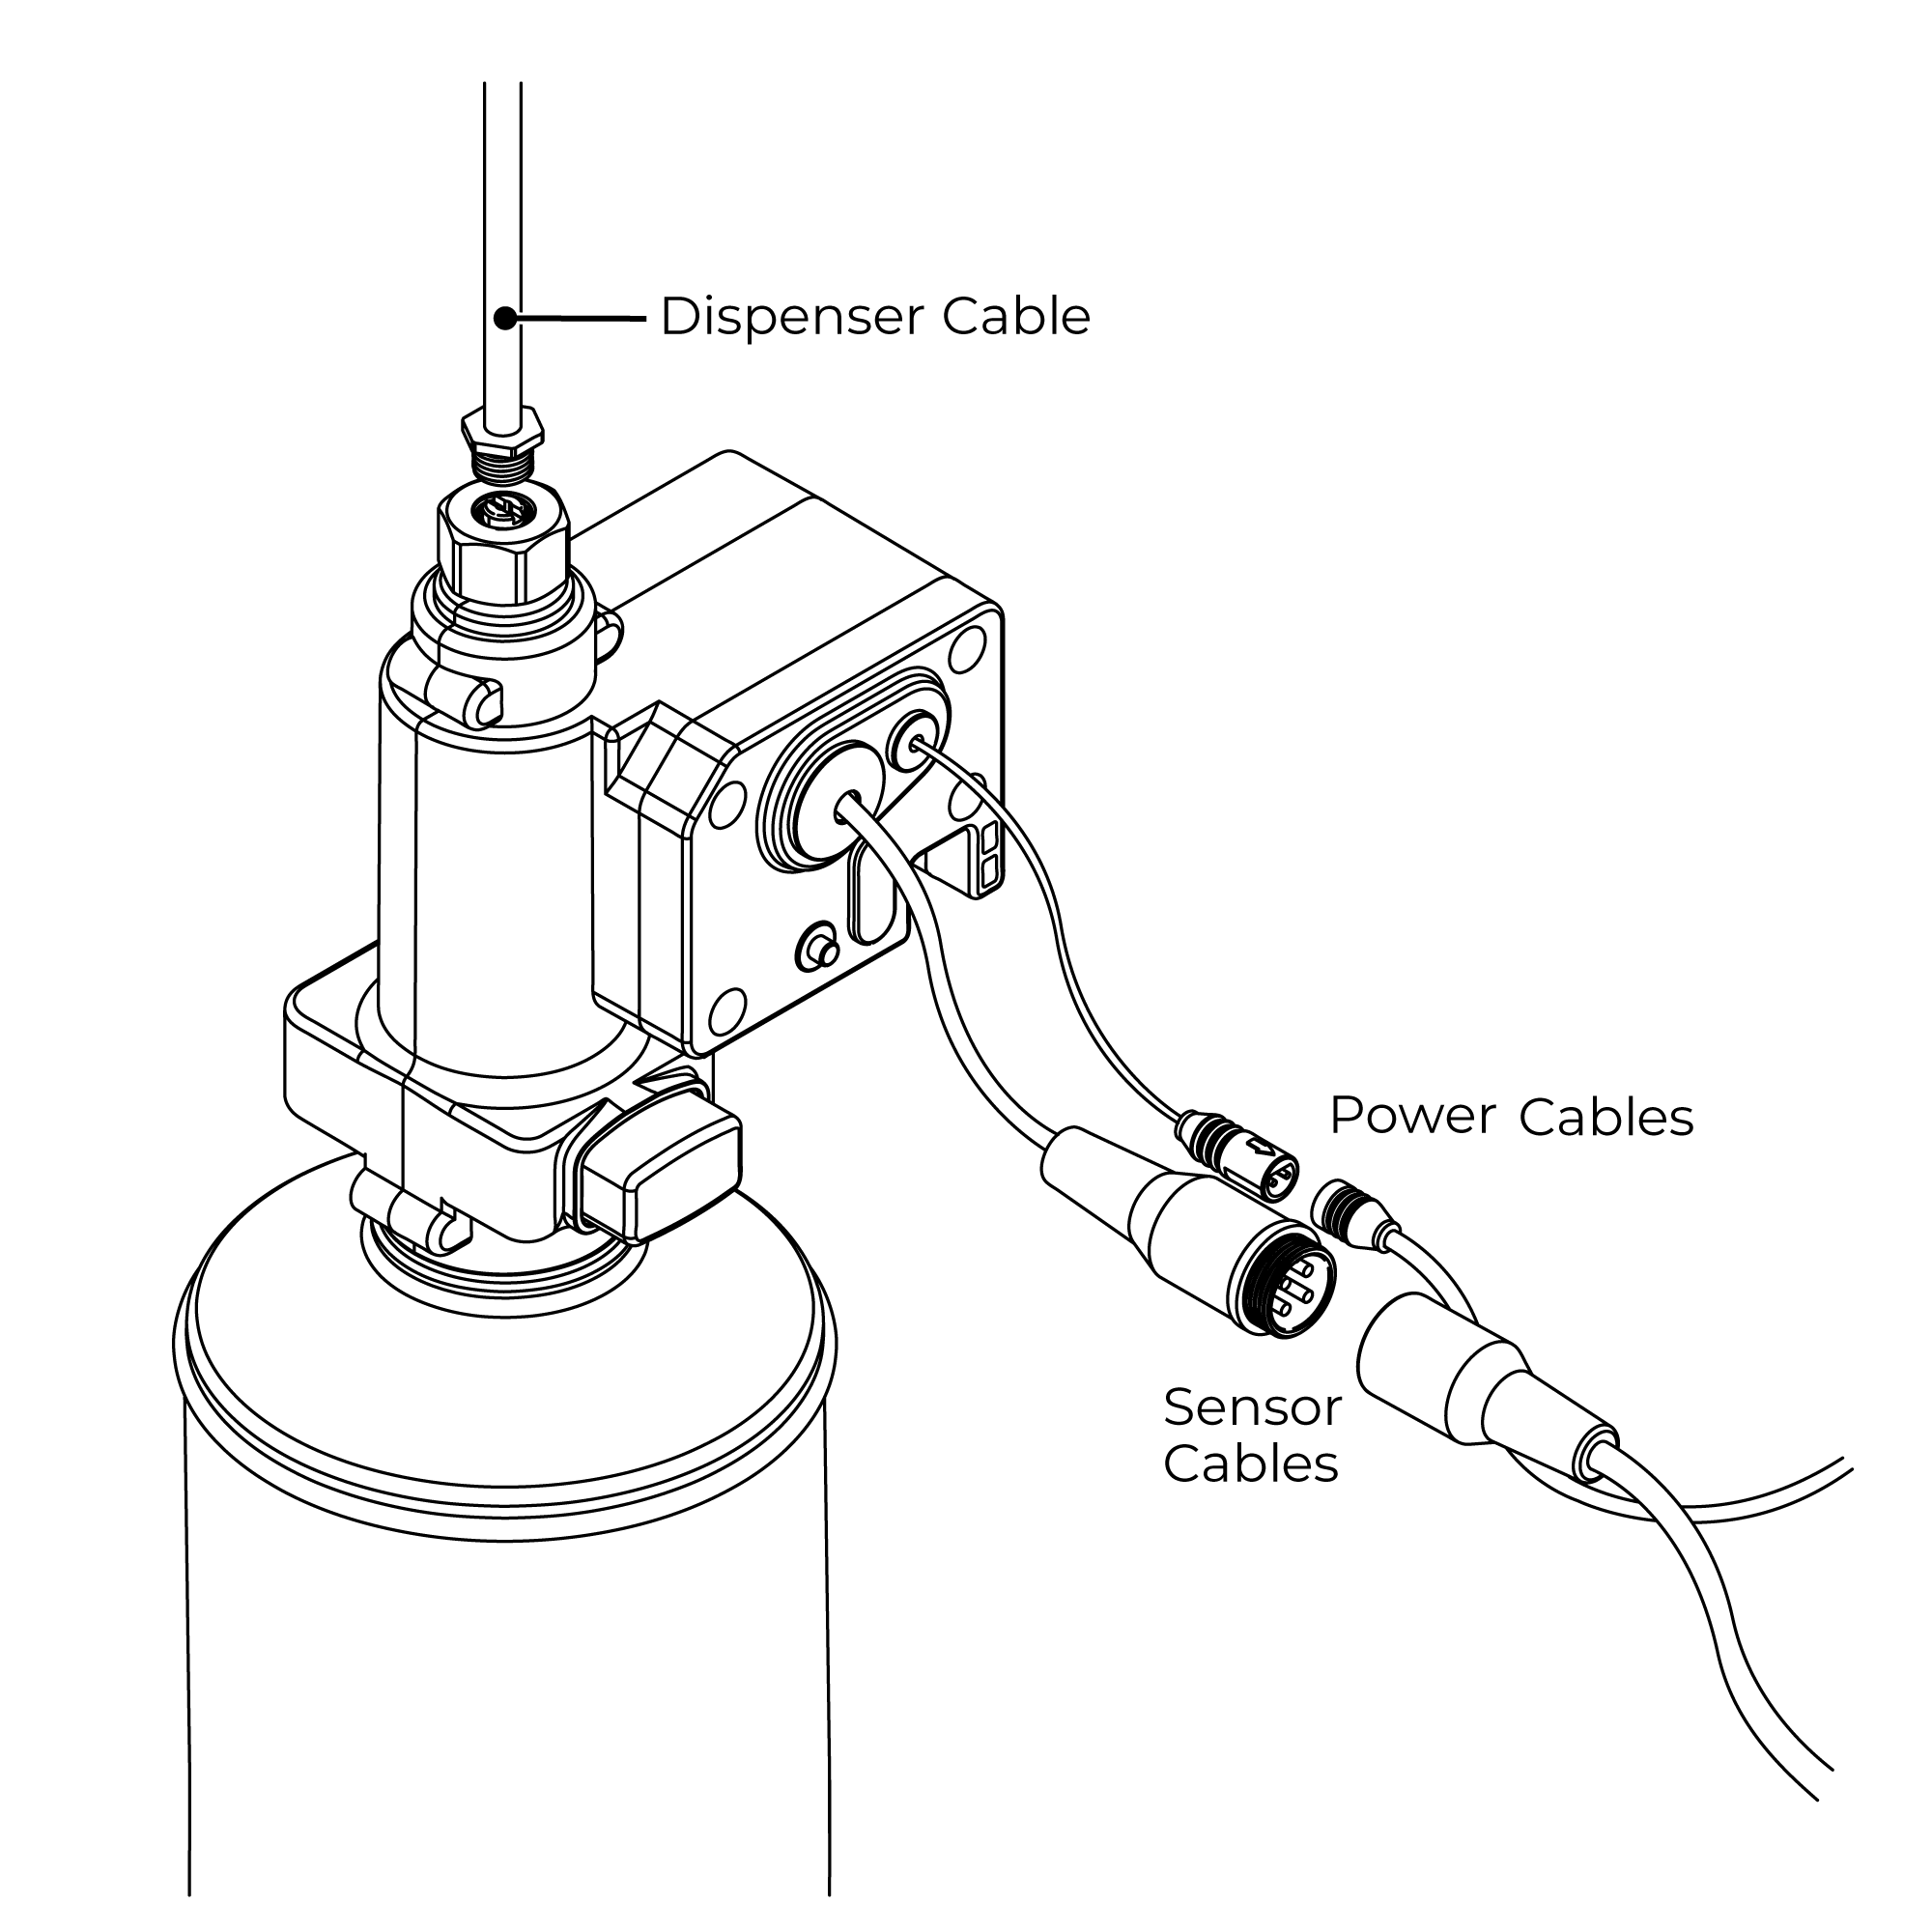
5. Connect Sensor Cable and Dispenser Cable
Connect the sensor cable from the spout to the sensor cable on the pump. Push the two connections together and tighten the connecting ring to ensure the two connections are locked together.
Connect the dispensing cable from the spout into the top connection on the pump.
Push the threaded connection of the dispensing cable into the connection on the pump and tighten the nut ensuring it is fully tightened.
A suitable spanner may be used to tighten the nut.
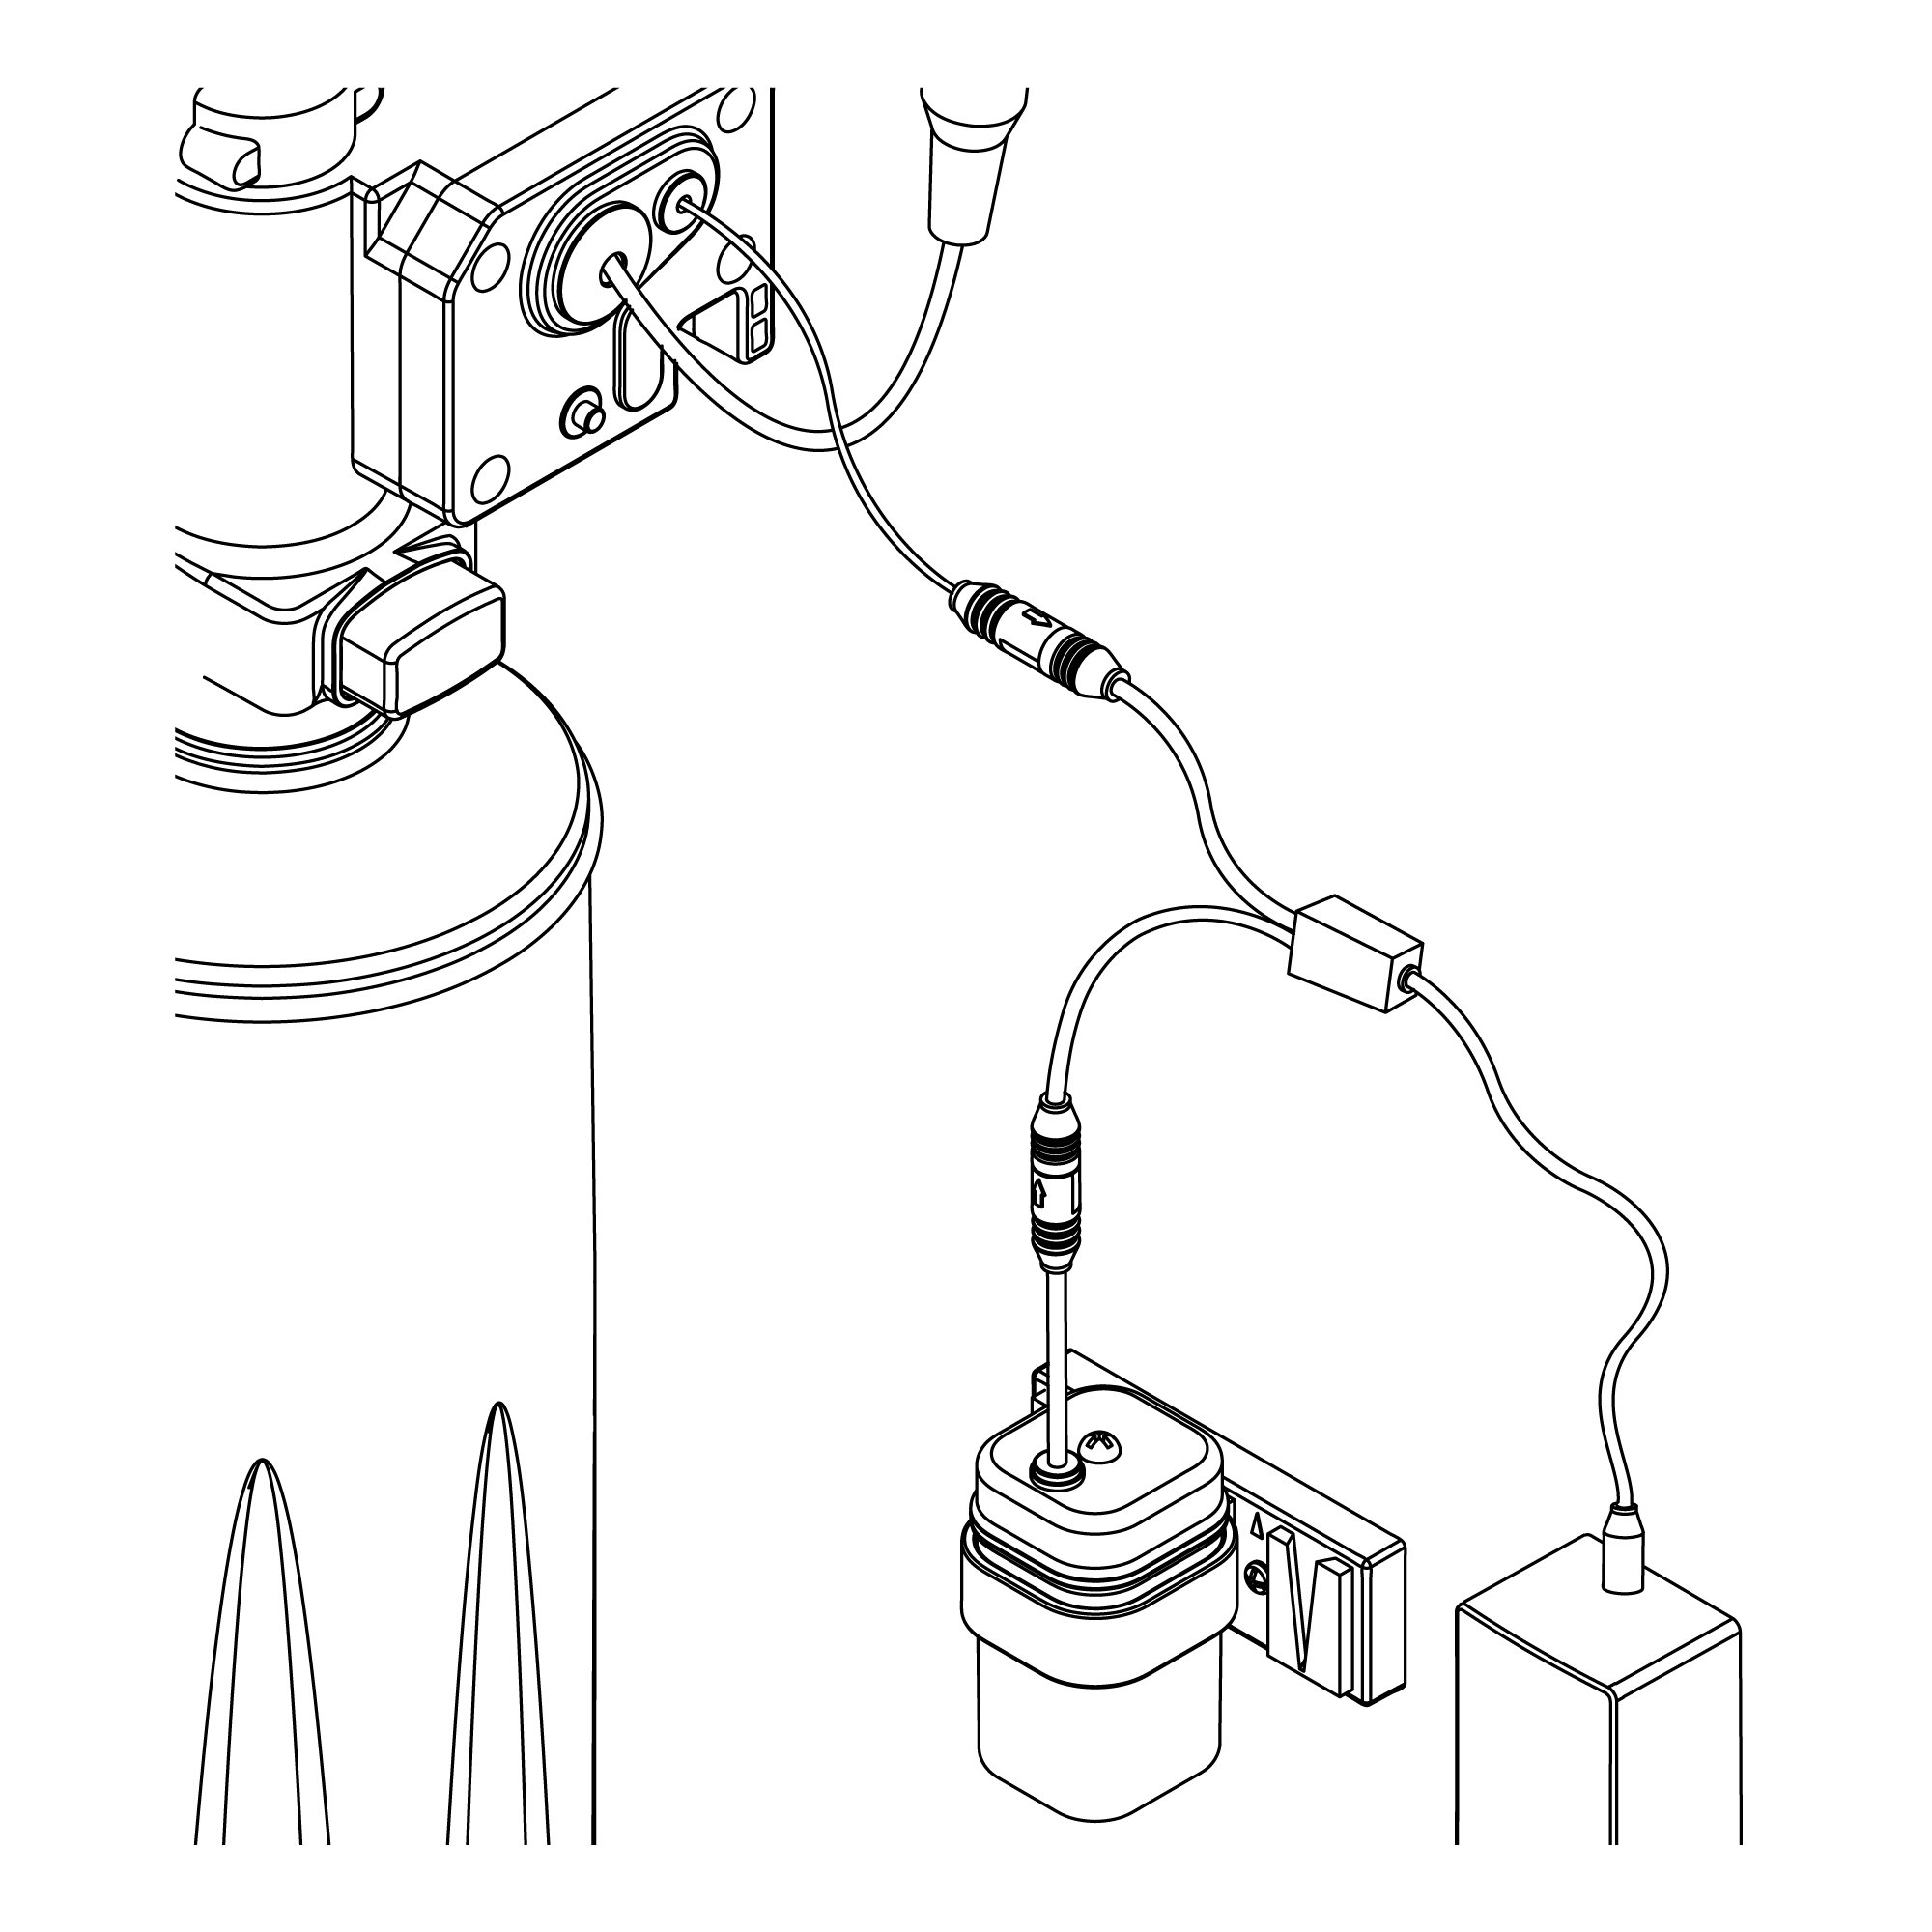
6. Place Pump into Bracket
The pump has a cut-out section which the wall bracket slots into.
7. Connect Power Supply Cable
Before starting any electrical work ensure the power supply is isolated.
Wire the electrical power cable into a switched fused spur off the ring main.
The blue wire should be wired to the neutral connection and the brown wire should be connected to the live connection.
Important: The power lead must be permanently connected to the fixed wiring of the mains supply using the factory supplied power cable.
Plug the power cable into the power cable on the pump.
8. Inserting Batteries
Remove the battery cover by loosening the screw in the top of the cover.
Insert 4 batteries into the battery box ensuring they are inserted the correct way.
Replace the battery box cover and tighten the screw. Insert the battery box into the holder.
Push the holder into the battery box wall bracket.
Commissioning
Commissioning Sequence
Before using the soap dispenser for the first time the following sequence must be carried out.
Fill the bottle full of soap.
Locate the dispense button on the side of the pump. Press and hold the button until soap is dispensed from the spout. This will ensure the dispenser tube and cable are full of soap.
Operation
Using the Automatic Soap Dispenser
Place the hands under the spout within the sensing range.
Once the users' hands have been detected a small amount of soap will be dispensed from the spout into the users' hands.
|
|
|
|
|
|
Features: 1. Material: Brass faucet body, beauty & fashion. 2. Anti-blocking: Independent R&D soap pump, design multiple anti-blocking measures. 3. Impurity filter: Built-in filter unit,effectively filter the impurities and protect the soap pump, in this way can prolong the pump working life. 4. Button function: fast filling the soap bottle only pressing the button. 5. Saving resources: save 30% soap solution, and be easy to clean, save time and save water. 6. Hygienic: No touch the faucet body,effectively prevent us from mutual bacterial infections. 7. Moisture-proof seal: Electronic control unit is adopted professional moisture resistance sealant technology.
CARE AND MAINTENANCE - General Instructions
1. Fill the soap bottle with soap for the first use.
2. Press and hold the button until soap is dispensed from the nozzle.
3. Place hand below the nozzle to dispense soap into the palm of hand.
CARE AND MAINTENANCE
If the soap dispenser fails to function correctly, firstly check all connections are tight and free from air leaks. If dispenser still fails to function, place manifold into a bottle of warm water. Pump the warm water through the dispenser to dislodge any dried soap residue and then refit manifold into soap bottle.
Water marks and soap residue on polished chrome surfaces are best cleaned using warm water and a mild detergent. Use a stainless steel cleaner for brushed stainless steel soap dispensers. Never use an abrasive cloth to remove stubborn stains. Dry with a soft clean cloth.
|
|
|
•
ALWAYS mount the soap tank feeding the dispenser/s BELOW the level of the dispensers
• NEVER mount the soap tank feeding the dispenser/s ABOVE the level of the dispensers
Also please note:
The soap type and brand used in these dispensers should not be altered throughout the life of the dispenser as mixing soaps can affect their chemical characteristics and cause them to become more aggressive. If another soap type or brand is needing to be used then the previous type must be thoroughly flushed through and cleaned from the soap dispensers and system prior to its use.
|
|
|
|
|
|
|
| |
 | |
| | | |
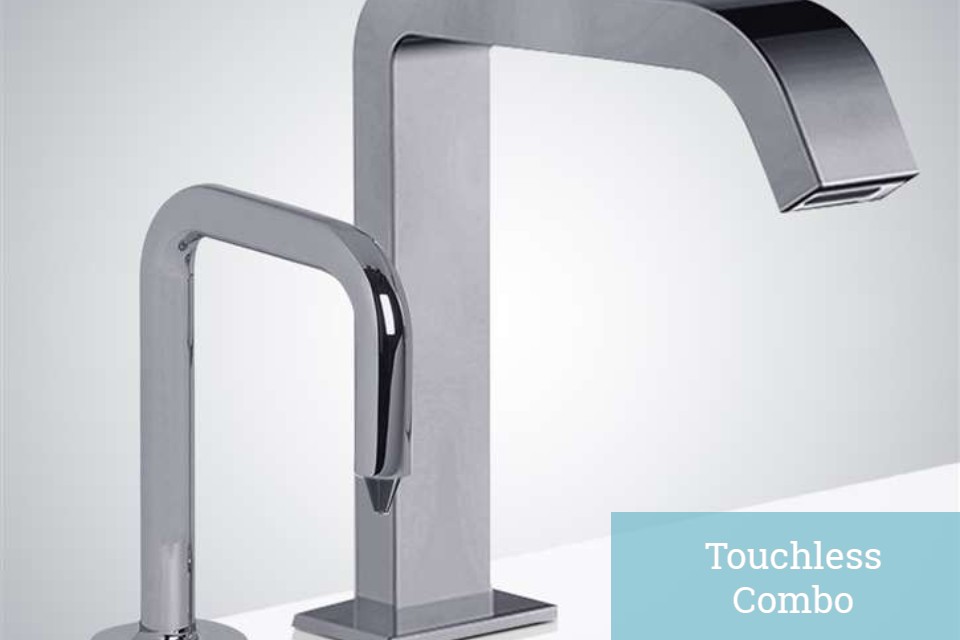
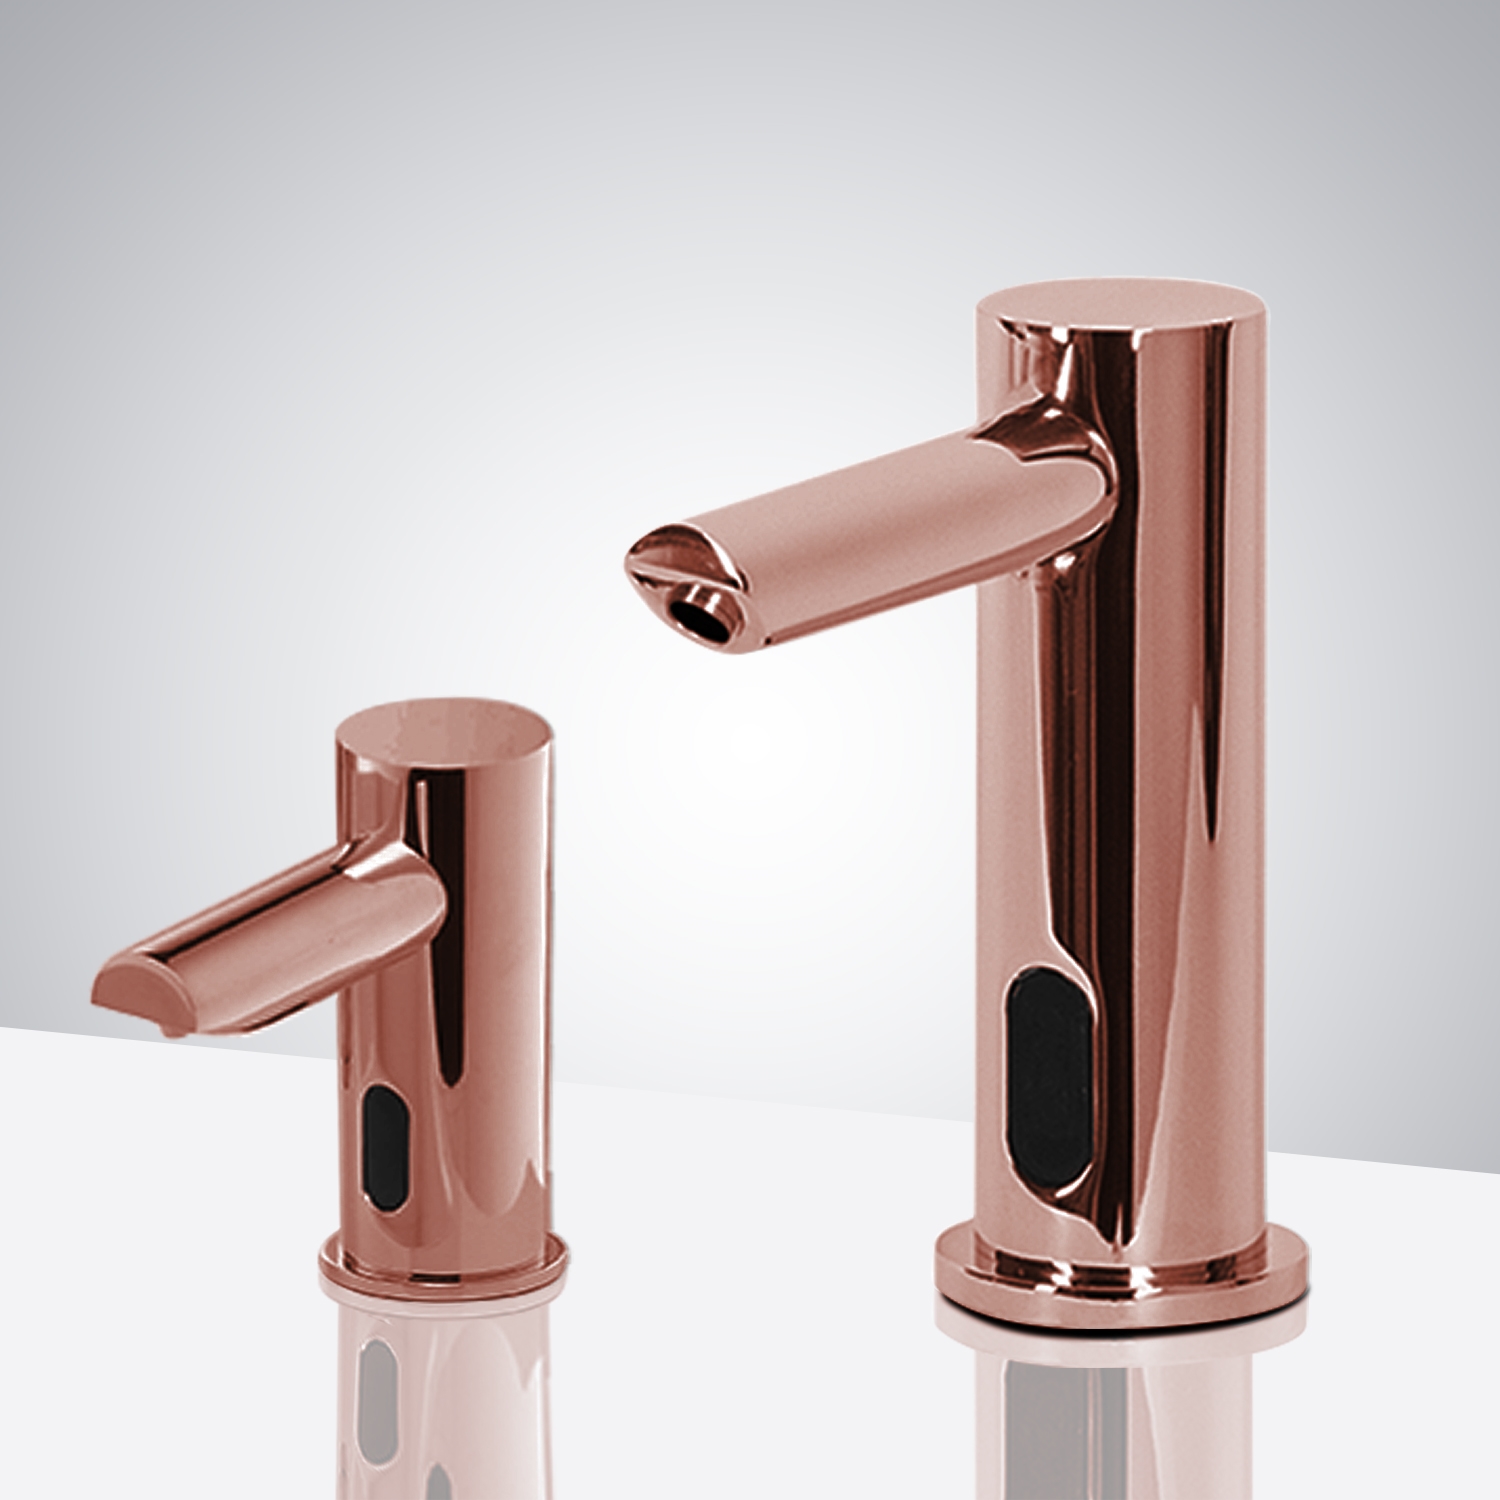
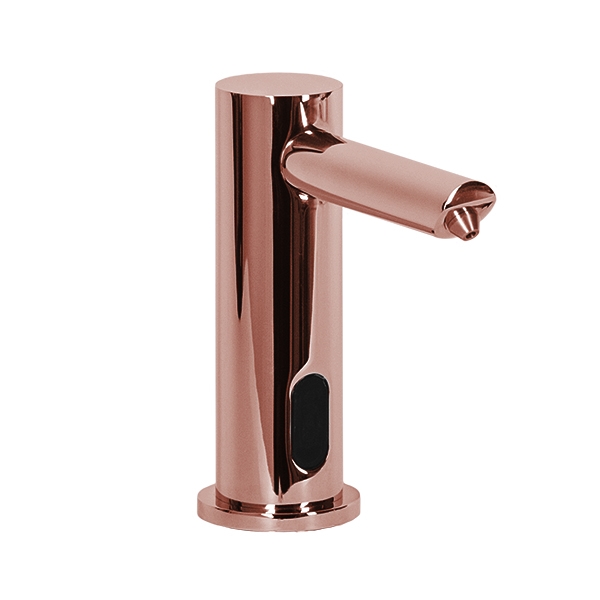
Fontana Fontana Rose Gold Commercial Automatic Dual Touchless Sensor Faucet And Soap Dispenser
Minimize waste of water, by using the automatic faucet. Immediately reduces water waste by eliminating unnecessary and unattended water flow.The automatic faucet provides water only when needed. Additionally, since these faucets are preset to shut off after approximately 30 seconds, accidental flooding can't occur if a person leaves it running. And, because they are hands-free, they help reduce the spread of germs and keep the vanity area clean. Fits all standard US plumbing. Uses 4AA Alkaline Batteries (purchase separately).
Features:
- Motion detection touchless sensor faucet operation
- Sensitive Sensor with Infrared AI Smart-Chip
- Factory set to 30-second Auto Shutoff (can be adjusted).
- Water Pressure: 0.5 - 7.0 KGS/cm , 10 - 125 psi
- Solid Brass Construction, Polished Chrome Finish
- Easy to Install - Instructions Included
- Water resistant solenoid enclosure
- Advanced energy saving design for long lasting battery life
- Comes complete with Hoses & Accessories
- Power Supply: AC110V And DC6V (batteries not included)
- AC/DC power option.
- ADA Compliant.
- Easily can be installed in new or retrofit applications.
- Usage: Commercial / Residential
|
|
|