Fontana Reno Bluetooth Smart Musical Shower Set LED Ceiling Square Shower Set
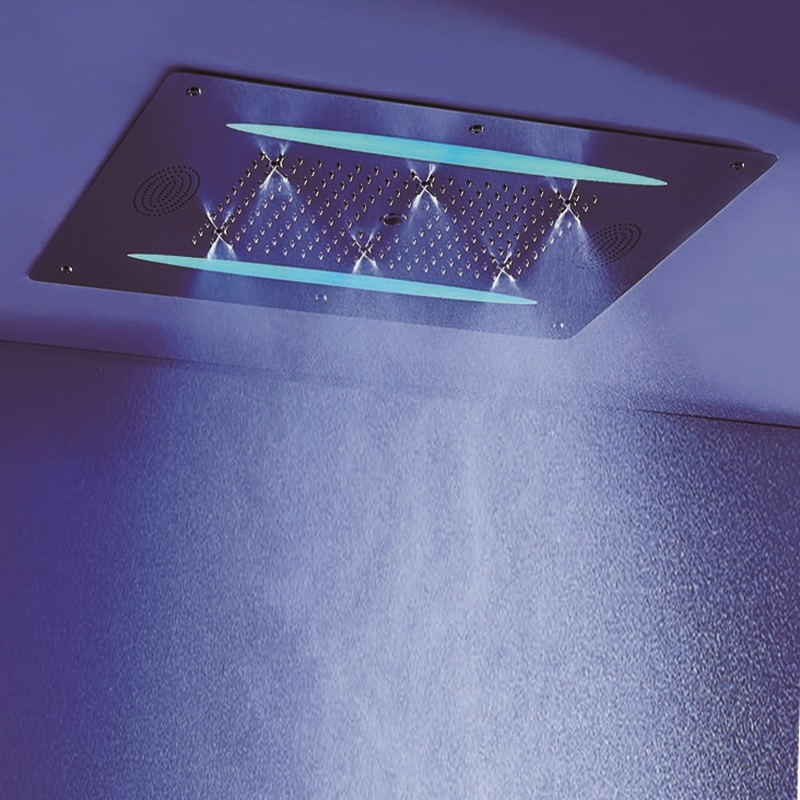
The FontanaShowers design makes this Smart Bluetooth Musical Shower Set luxury shower head led ceiling square mirror finish bathroom product accessories, music FM radio and Bluetooth overhead shower perfect complement to today's modern home. This Smart Musical Shower Set led ceiling square mirror finish shower set was designed to bring a modern and fun feel into any bathroom. Built from premium materials and finished with elegance. Easy-to-install and leak-free. The design was inspired by the FontanaShowers. Be sure, when it comes to new bathroom sink faucets, FontanaShowers is offering shape, finish and styles you're looking for.
Reno Smart Musical Shower Set LED Ceiling Square Shower Set Features:
Brand Name: FontanaShowers
Model Number: FS9813
Type: LED Shower Head
Installation Type: Ceiling Mount
Style: Double
Surface Finish: Mirror Finish
Installation of Shower Head: Embedded Ceiling Shower Head
Material of Shower Head: SUS304 Stainless Steel, Mirror Finish
Shape: Square Shower
Water pressure: 3 Bar
Material: Stainless Steel
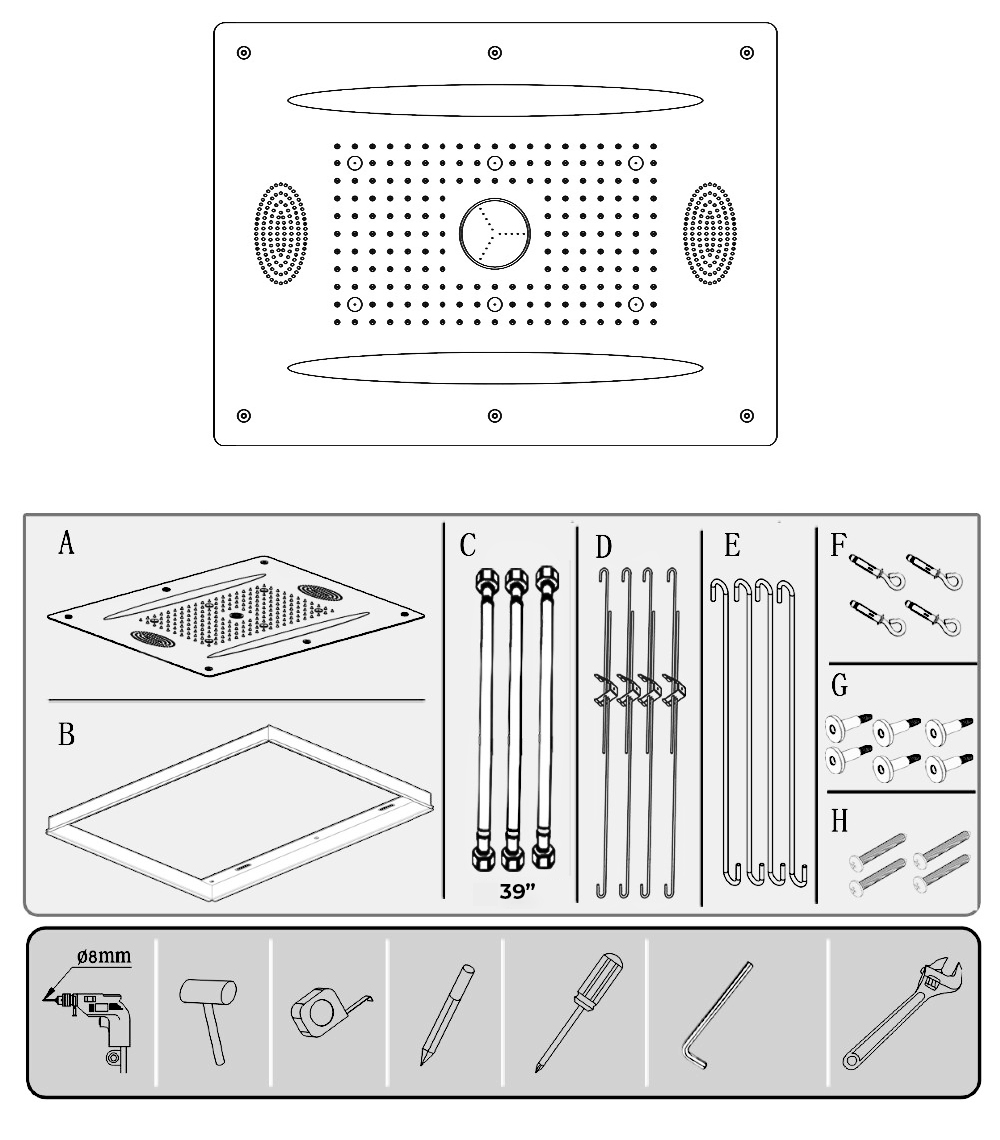
Size of Shower Head: 31.4"x23.6"
Functions: FM Radio and Bluetooth Shower Head
Functions of Shower Head: Rain Shower, Bubble Shower, Mist Shower
The Voltage For LED Lights: 90~260V
|
|
FontanaShowers®Product Warranty Information
- Before you begin, please read the installation instructions below. Observe all local building and safety codes.
- Unpack and inspect the product for any shipping damages. If you find damages, do not install.
- Please note all showers must be installed by a professional and certified plumber otherwise warranty might be voided.
|
shower
|
|
Shower Head Installation Instructions
|
shower
|
|
|
|
|
|
|
|
|
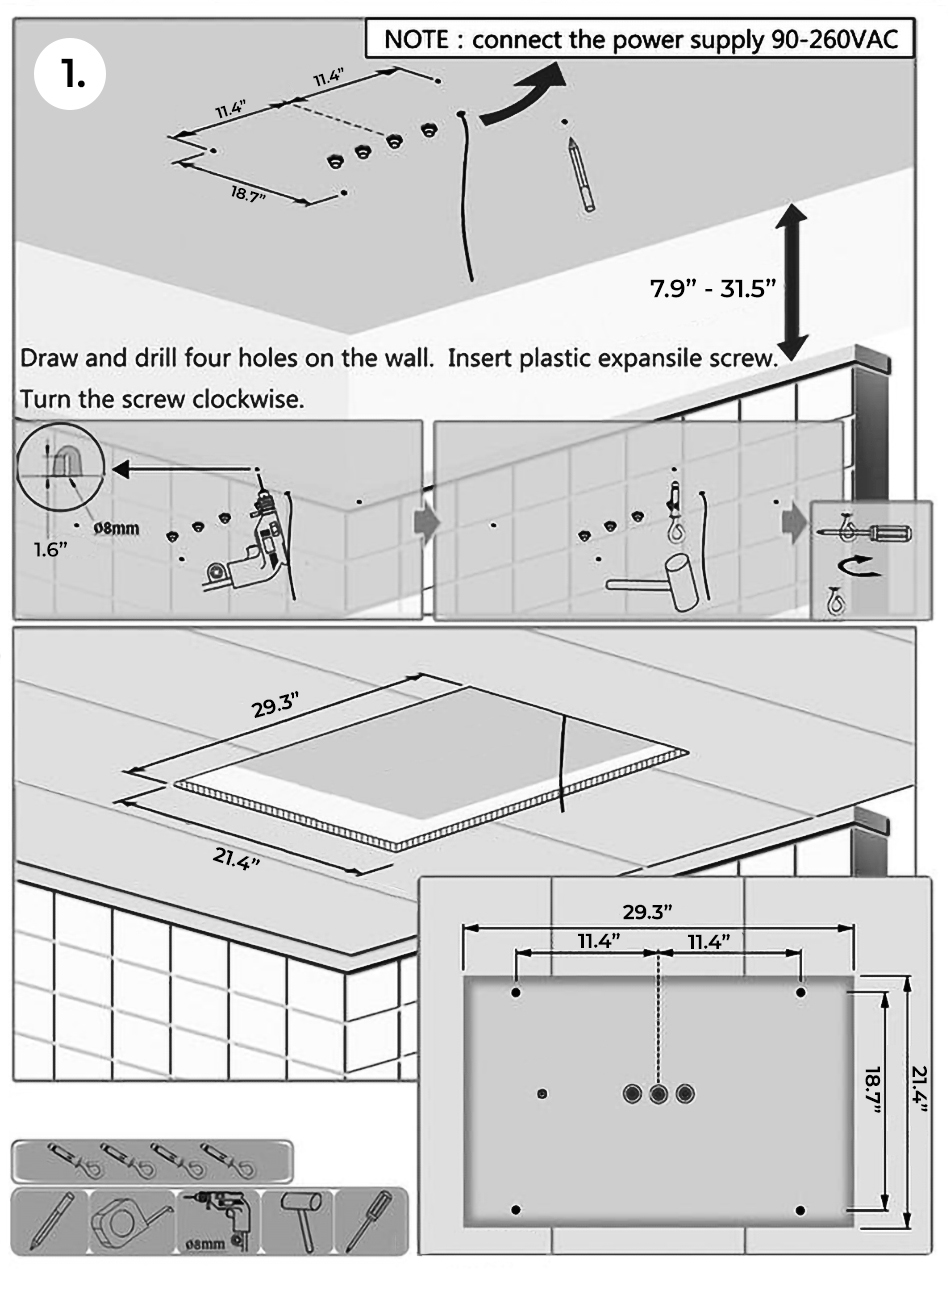
Step 1:
|
|
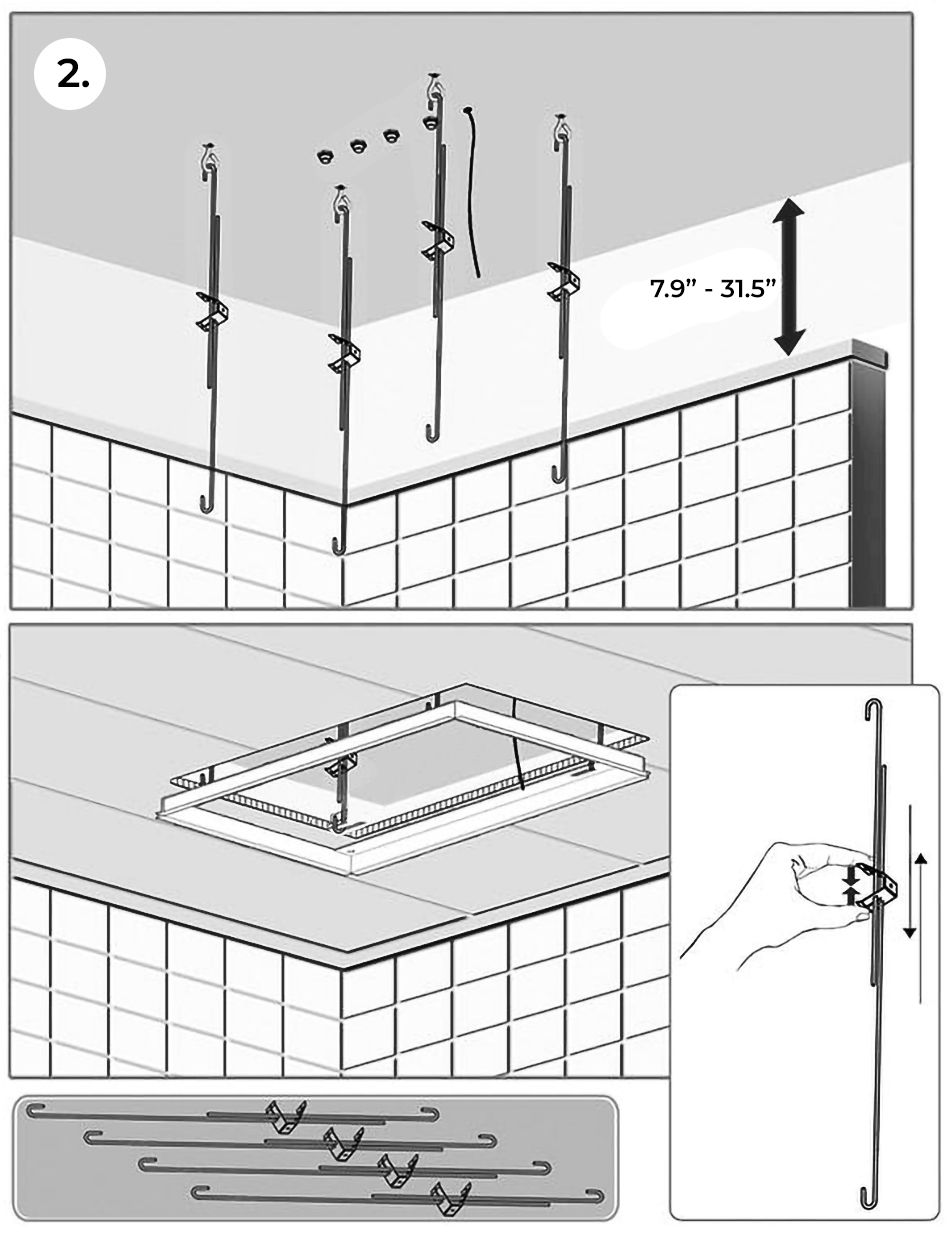
Step 2:
|
|
|
|
|
|
|
shower
Installation
|
|
|
|
|
|
|
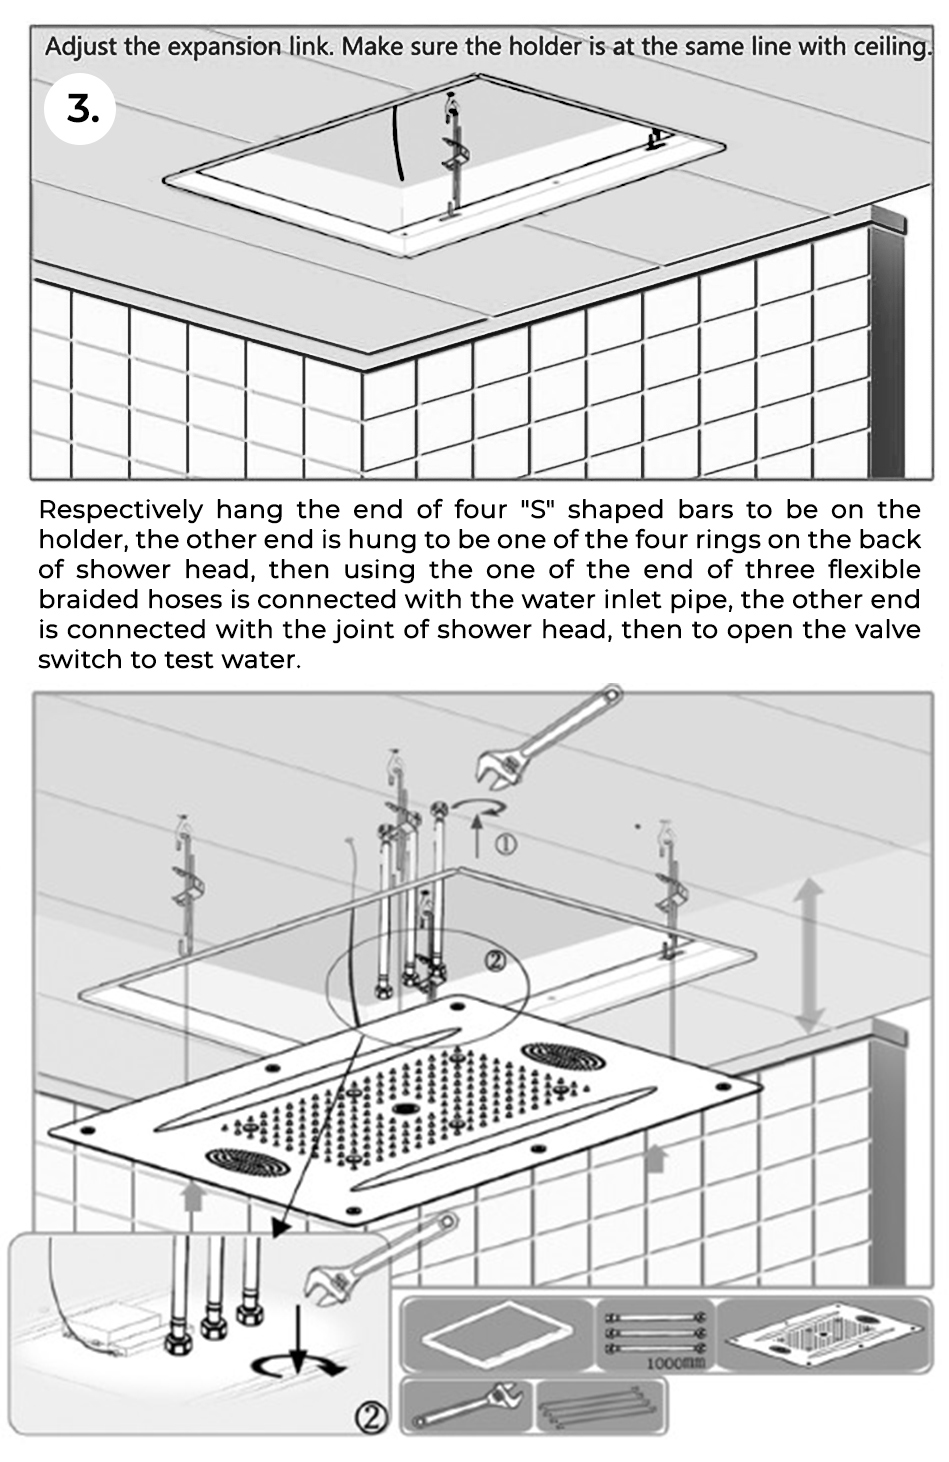
Step 3:
|
|
Step 4:
|
|
|
|
|
|

|
|
|
|
|
|
|
|
Step 5:
|
|
|
|
|
|
|
|

|
|
|
|
|
|
|
|
|
|
|
|
|
|
|
|
|
|
|
|
|
|
|
|
|
|
|
|
|
|
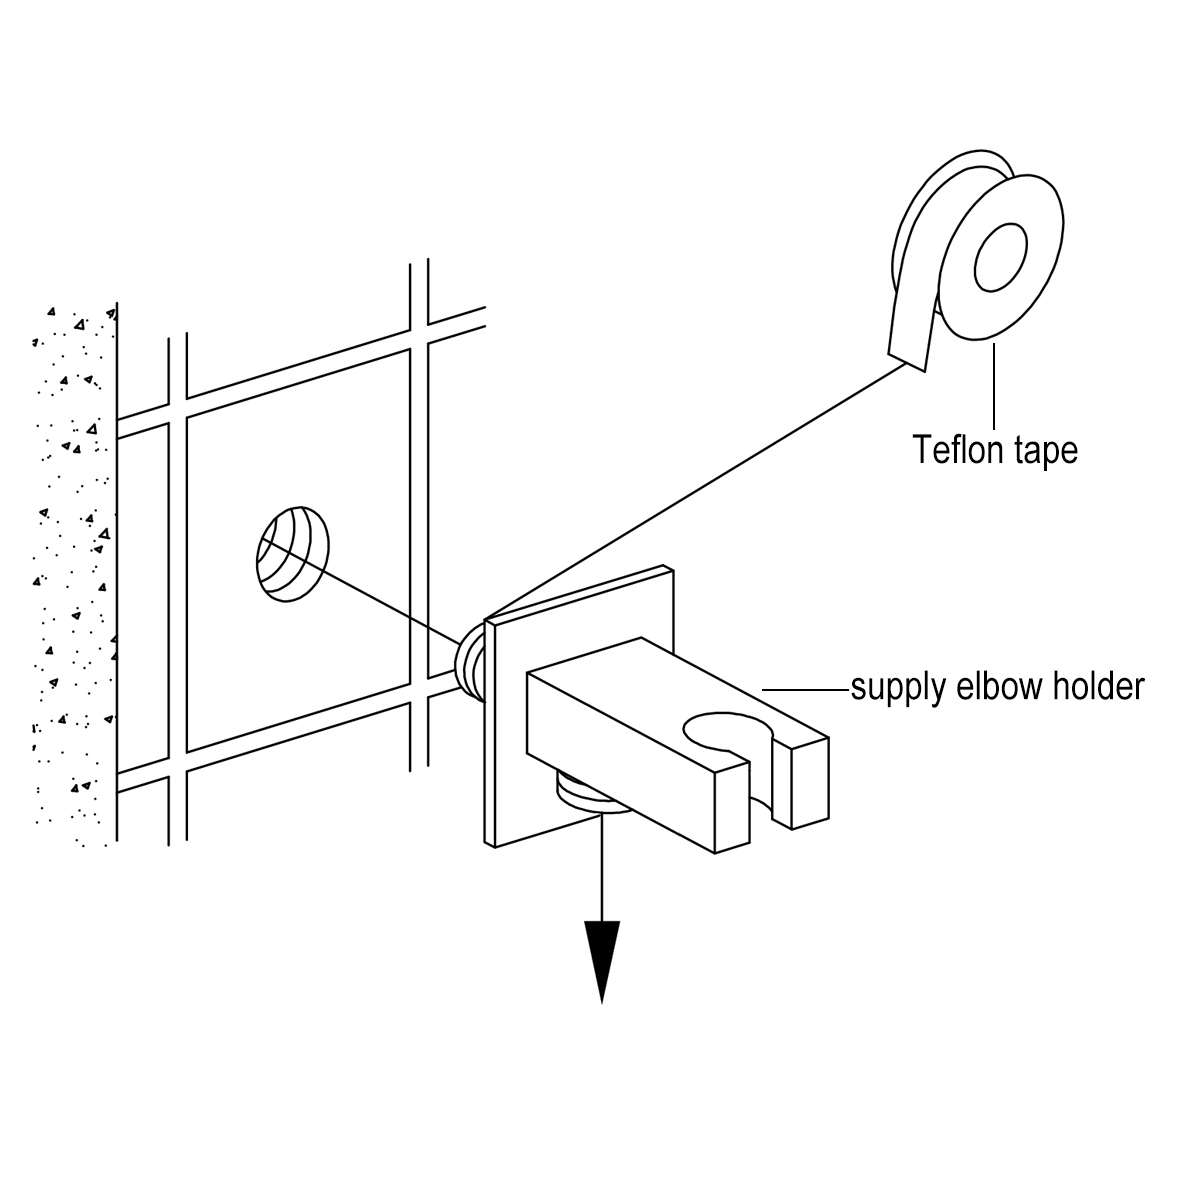
Hand Held Shower Installation Instructions
|
Step 1:
|
|
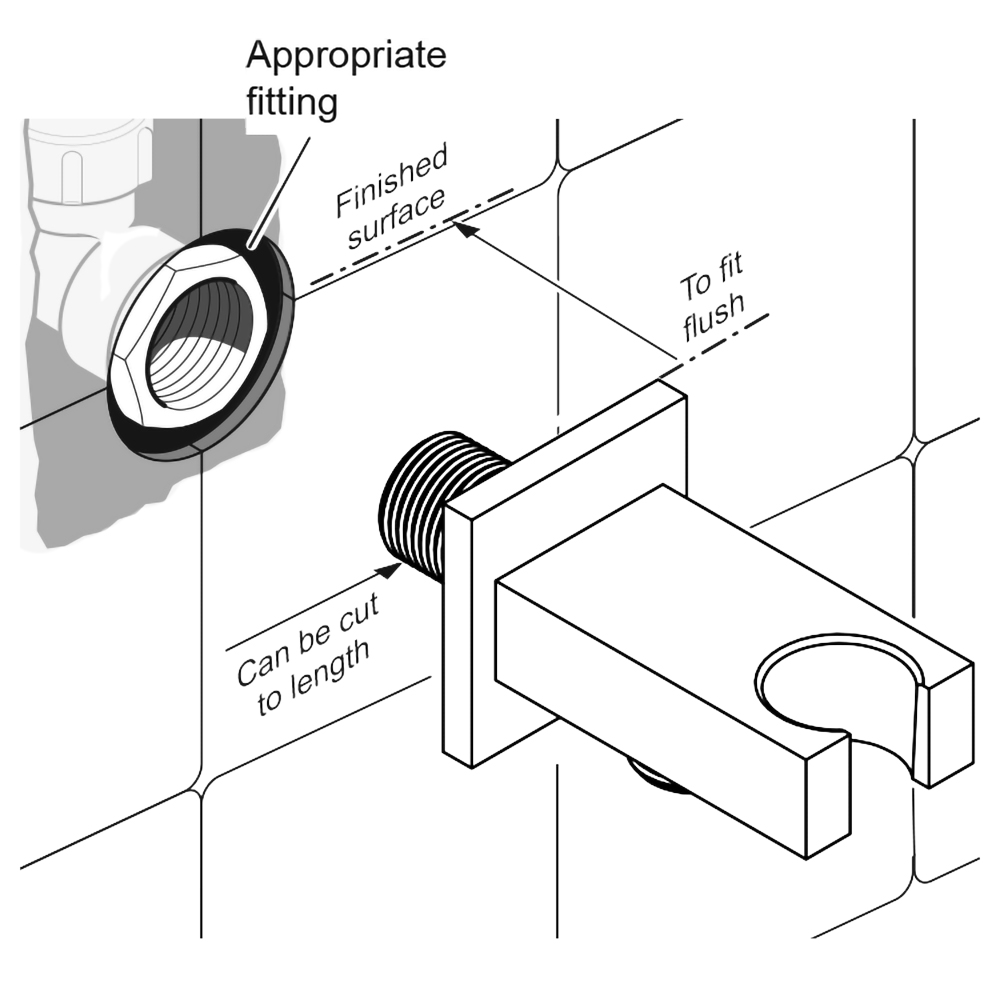
Step 2:
|
|
|
|
Hand
Held
Shower
|
|
Hand
Held
Shower
|
|
|
Handheld Shower
|
|
|
|
|
|
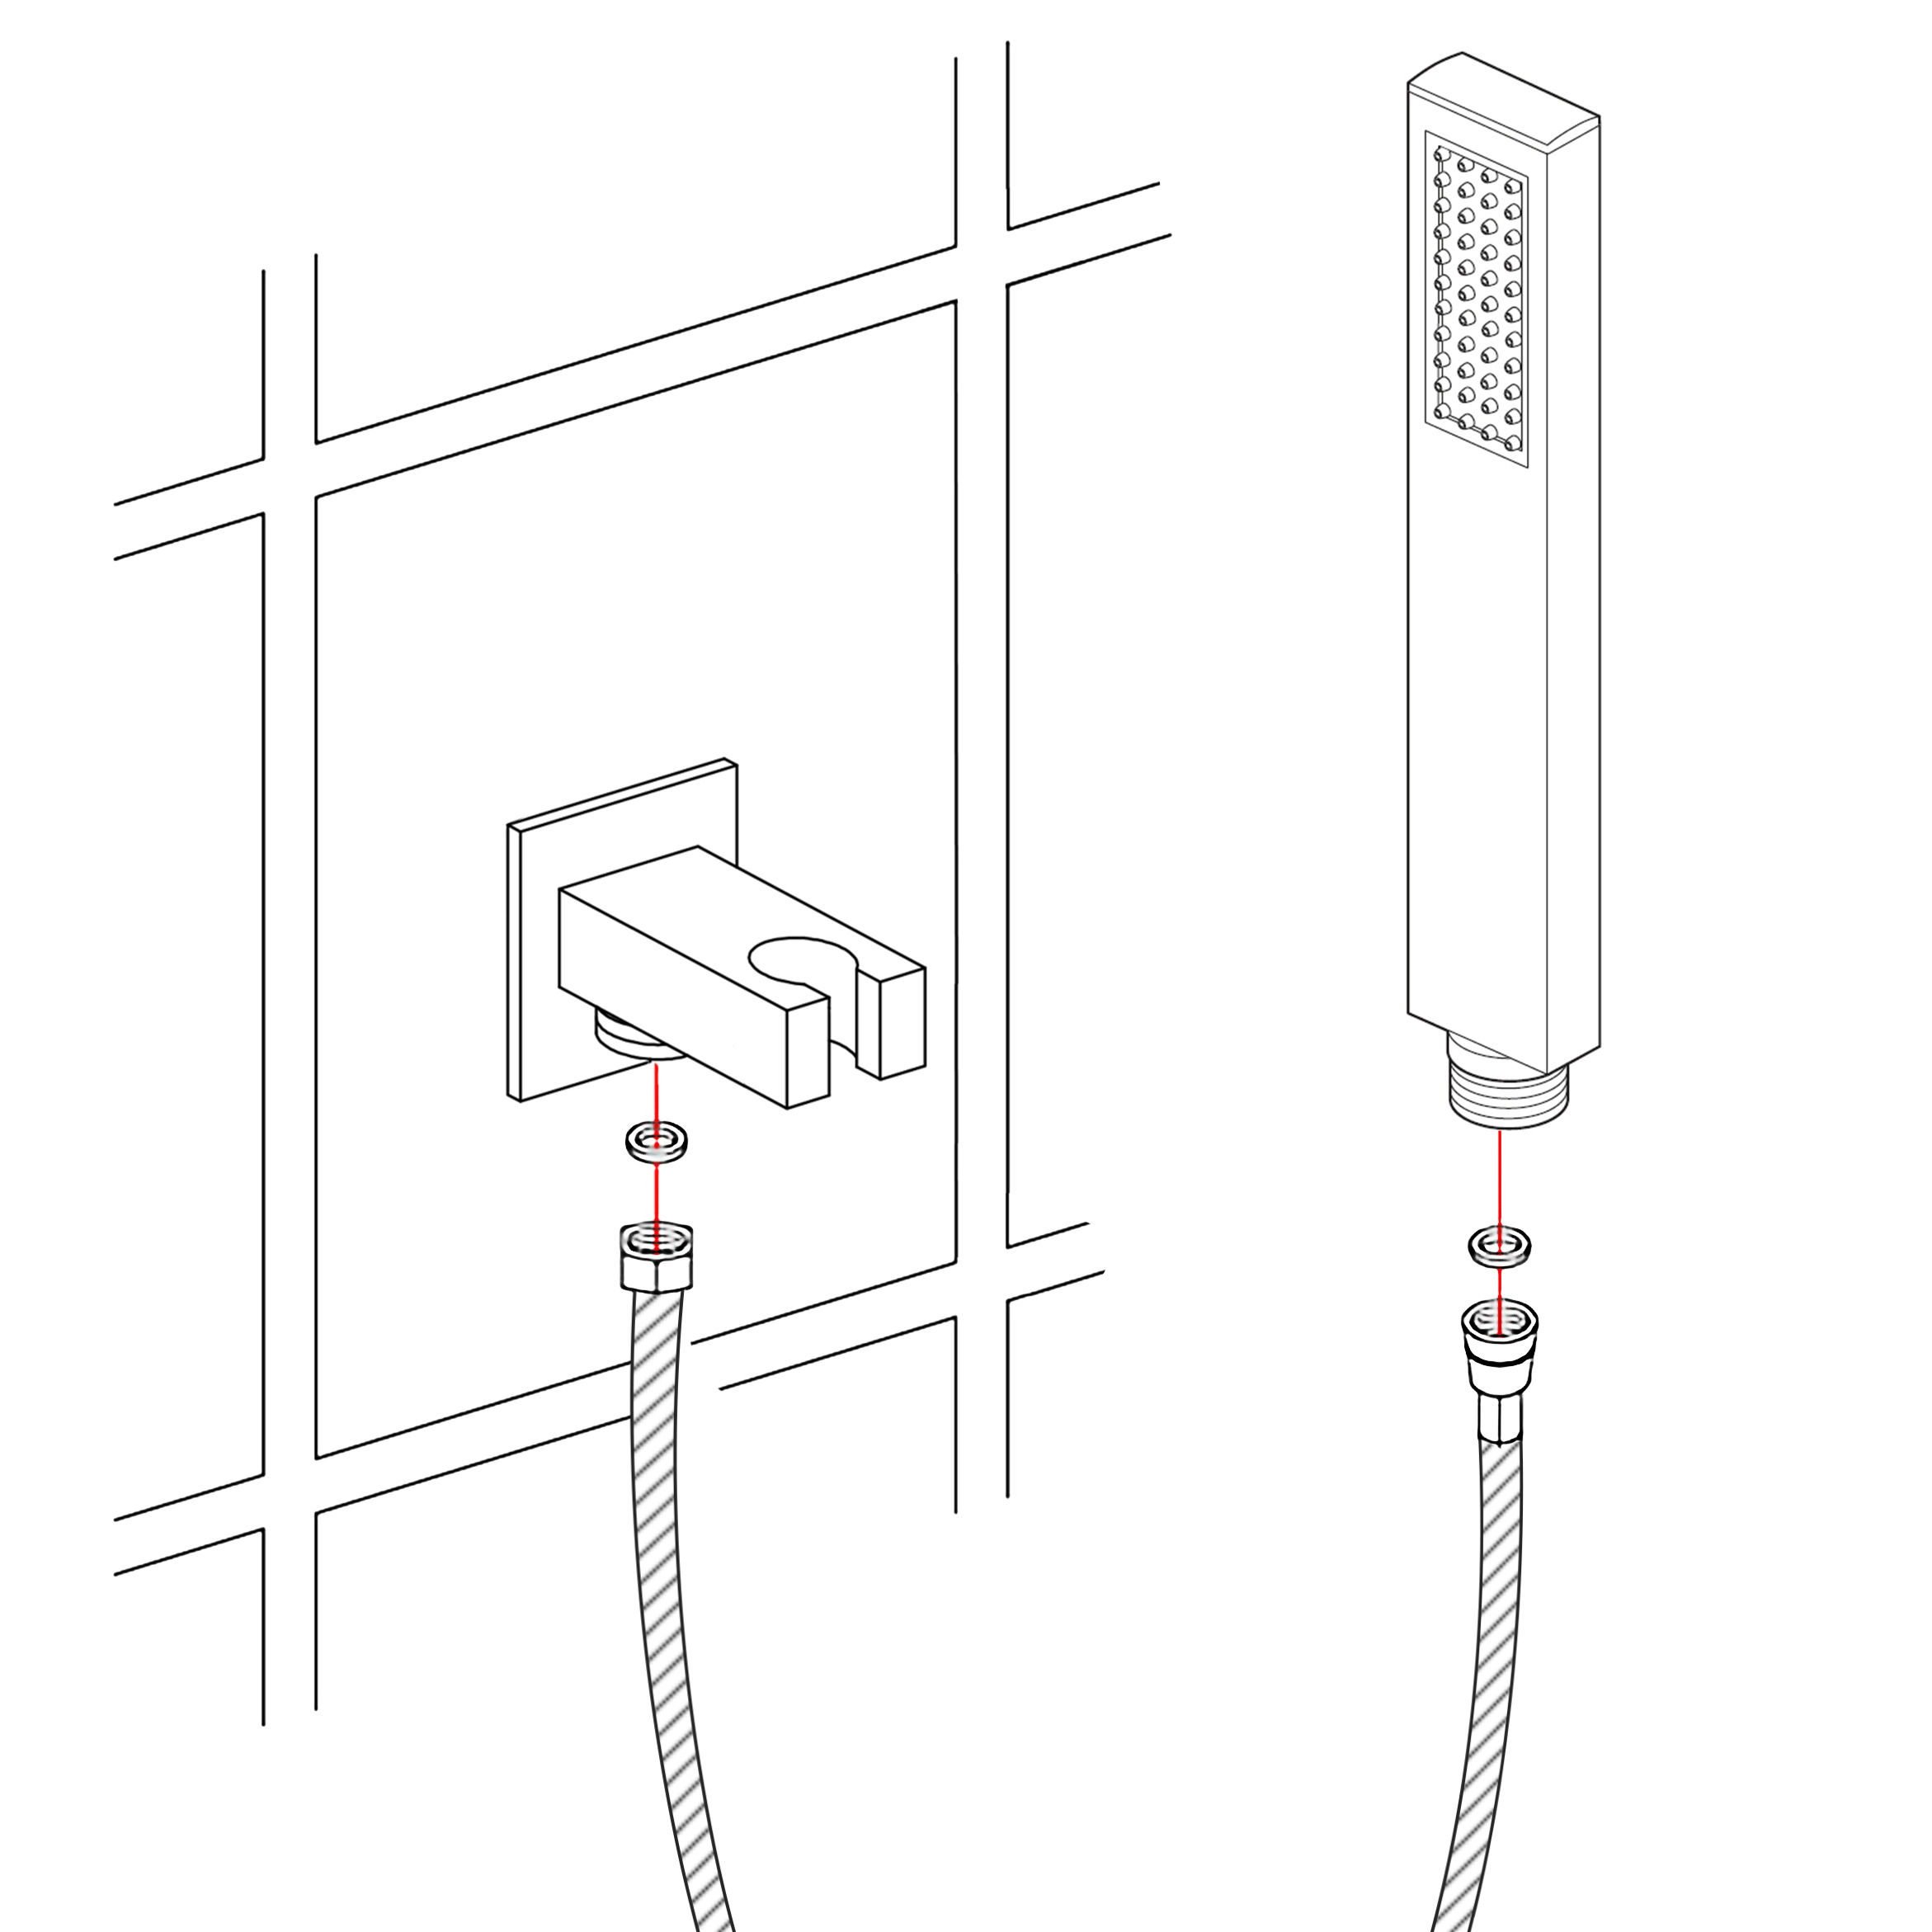
Step 3:
|
|
|
|
|
|
|
|
|
|
Shower Body Jets Installation Instructions

|
Step 1:
|
|
|
Step 2:
|
|

|
Body sprays
|
|
|

|
|
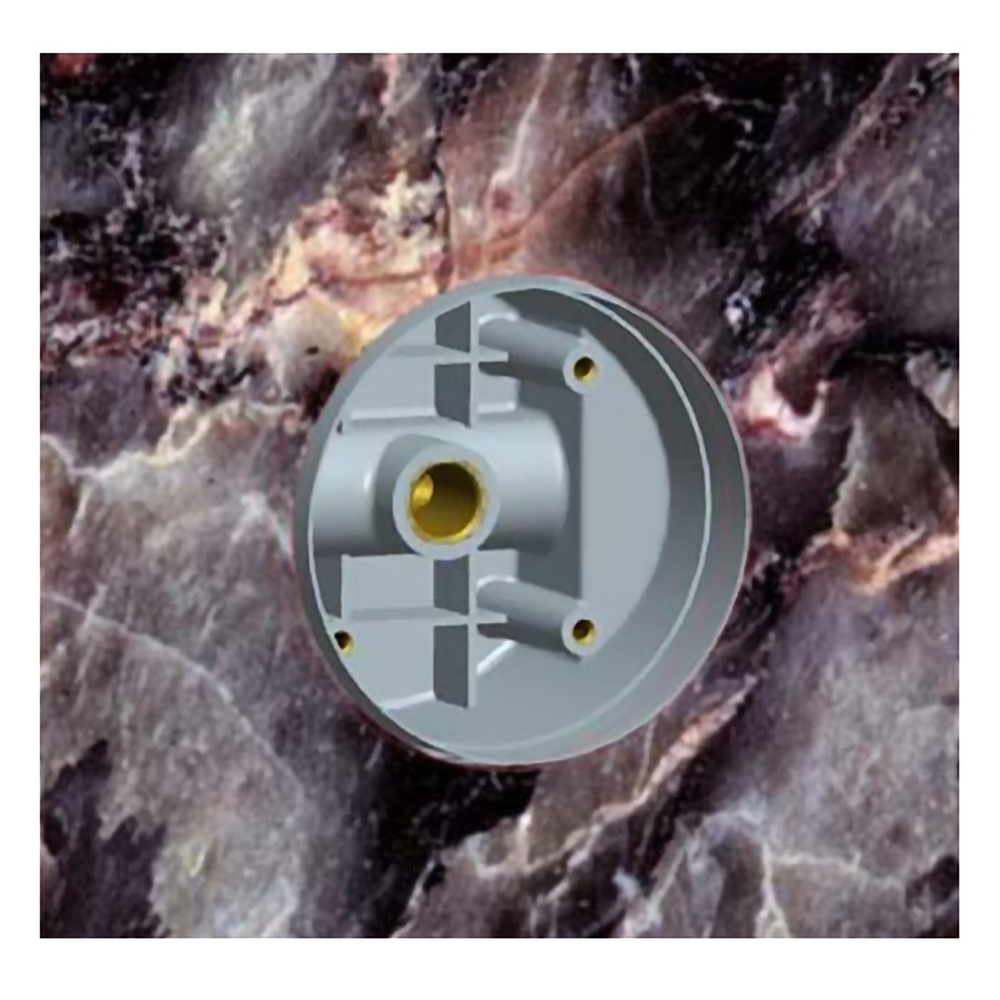
To revolve the nozzles and 4 sets M4 screws by counterclockwise rotation, and then take out nozzles and panel.
|
|
|
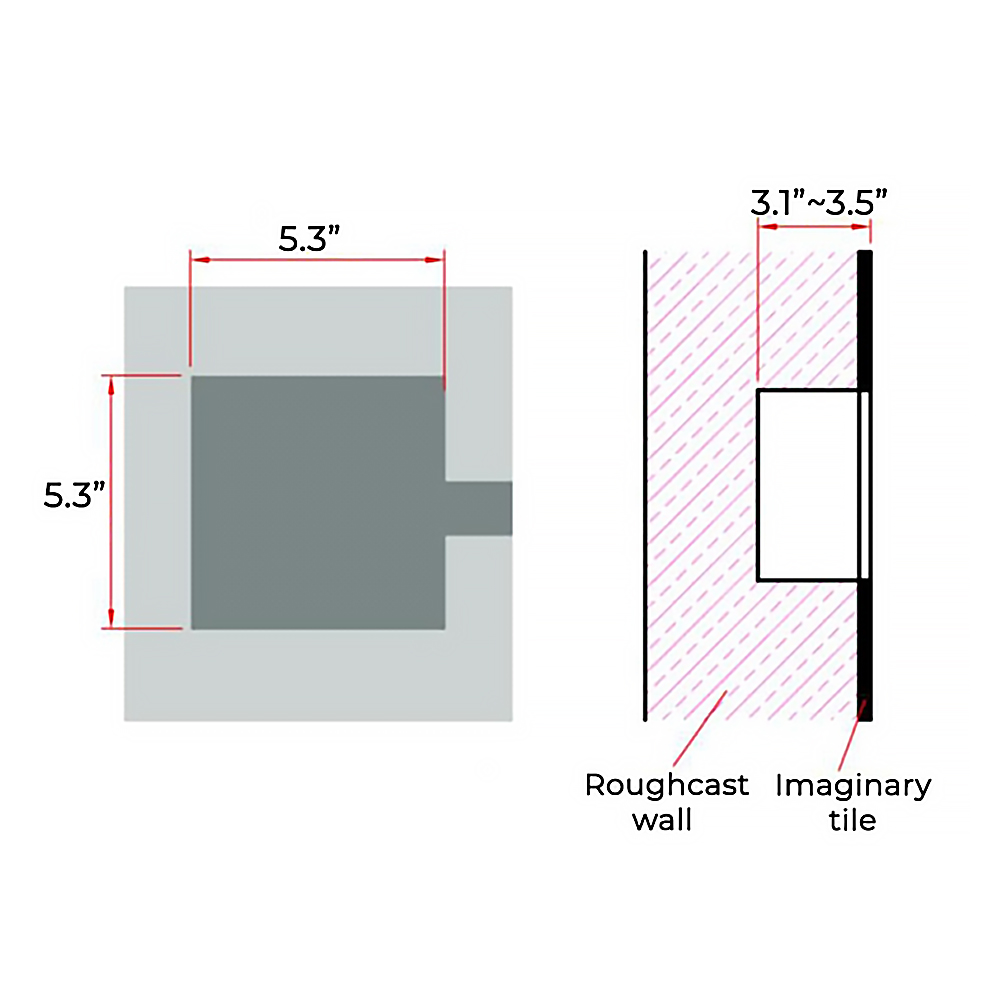
According to the using situation, to dig a concealed hole in the right position, the size is bigger than 5.3" x 5.3", the depth of the opening wall is 3.1" - 3.5" distance the tile end.
|
|
Body Spray Installation Instructions
|
|
|
|
|
|
Step 3:
|
|
|
Step 4:
|
|
|
|
|

|
|
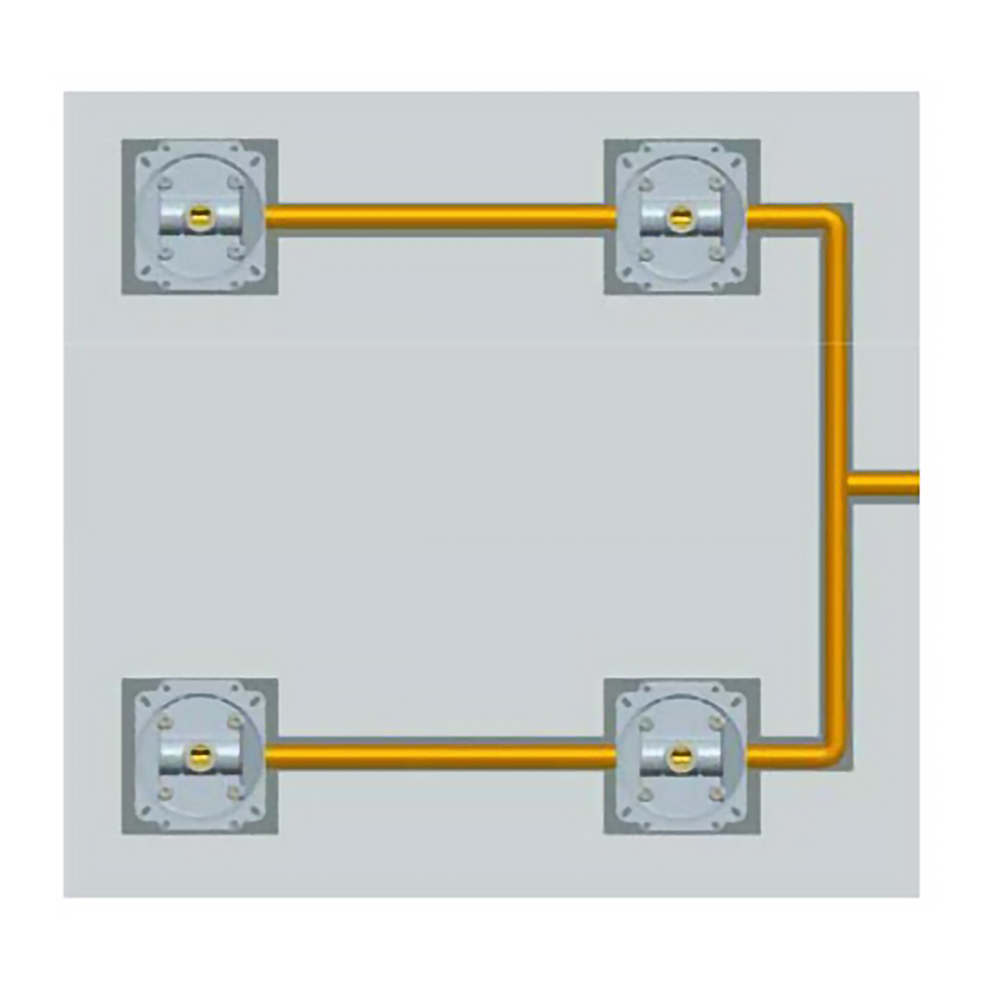
To set up pipelines according to using situation, to connect pipelines and the concealed box, and then test the water, make sure pipelines no leakage water.
|
|
|
To place the concealed box in the wall, and make sure the same level using leveling instrument, then drill to open a positioning hole, and then bury the expansion tube.
|
|
|
Body Spray Installation Instructions
|
|
|
|
|
|
Step 5:
|
|
|
Step 6:
|
|

|
|
|
|
|
|
To fix concealed box using self-tapping screws with gaskets, and maintain the same level.
|
|
|
Fill cement in the external groove of the concealed box, Stick tile well.
|
|
|
Body Spray Installation Instructions
|
|
|
|
|
|
Step 7:
|
|
|
Step 8:
|
|
|
|
|

|
|
|
To recess, the higher part of the conceal box as not to interfere with the tile, make sure that if you cave cut the box that is free of burrs.
|
|
|
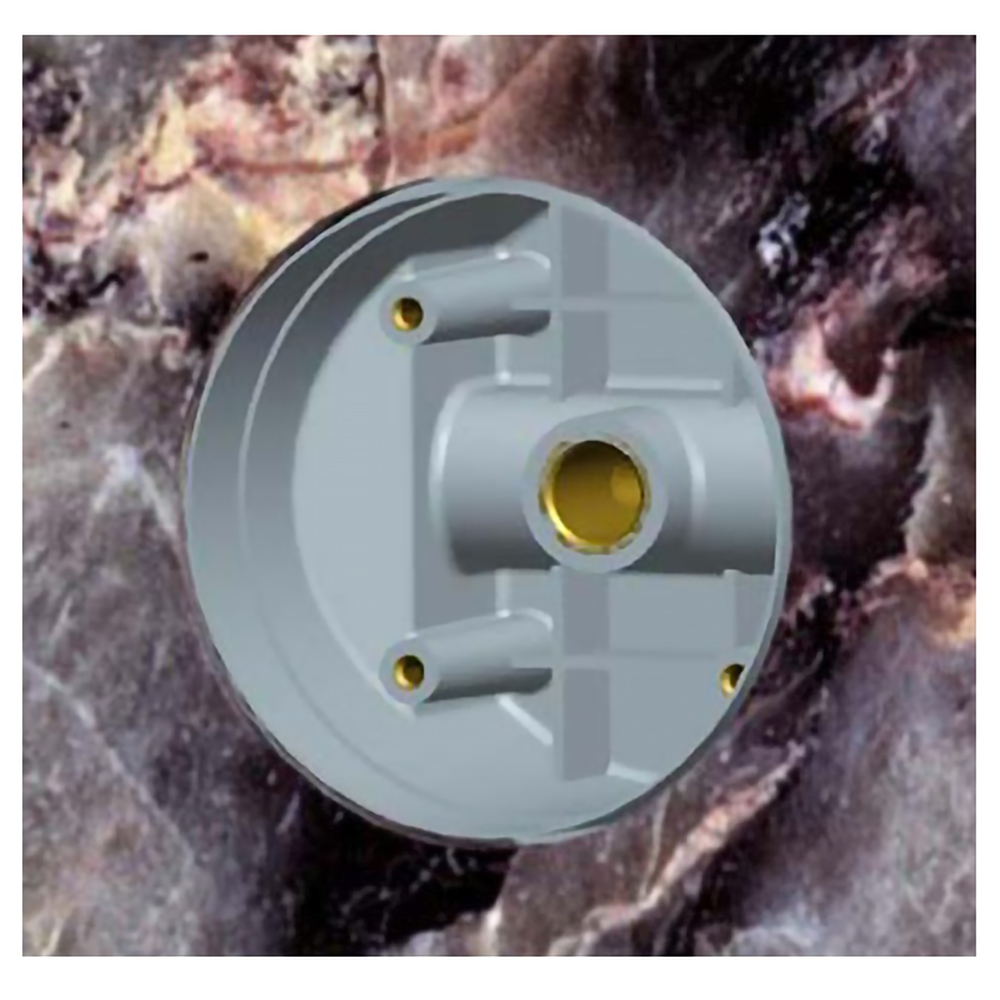
To revolve the nozzles and 4 sets M4 screws by clockwise, to install the nozzles and the nozzle panel on the plastic concealed box.
|
|
|
Body Spray Installation Instructions
|
|
|
|
|
|
|
|
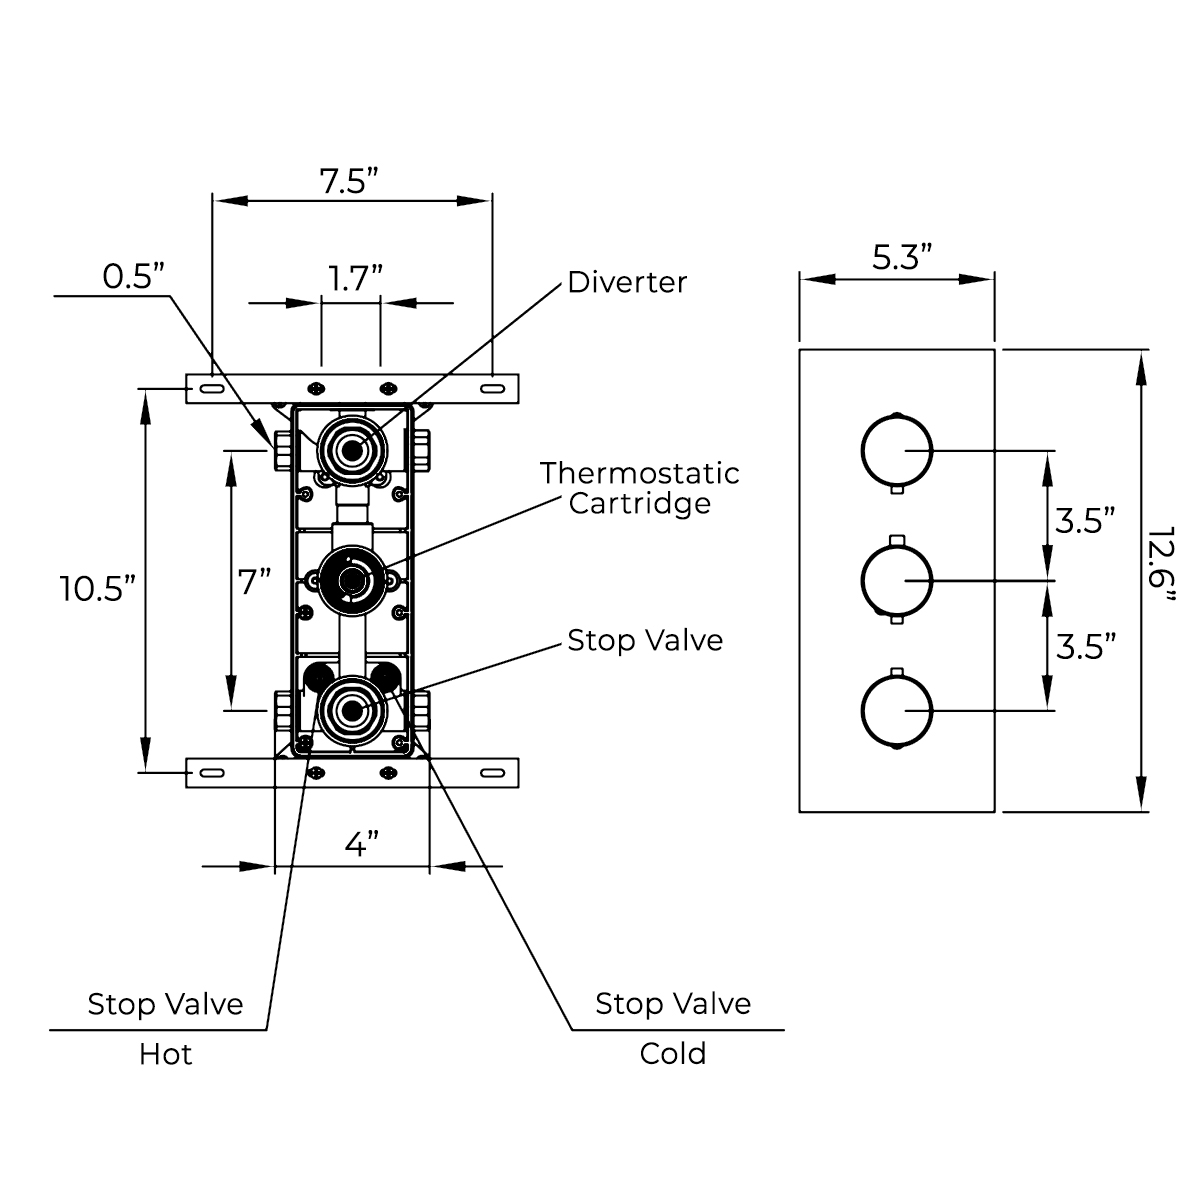
Shower Thermostatic Mixer Installation Instructions
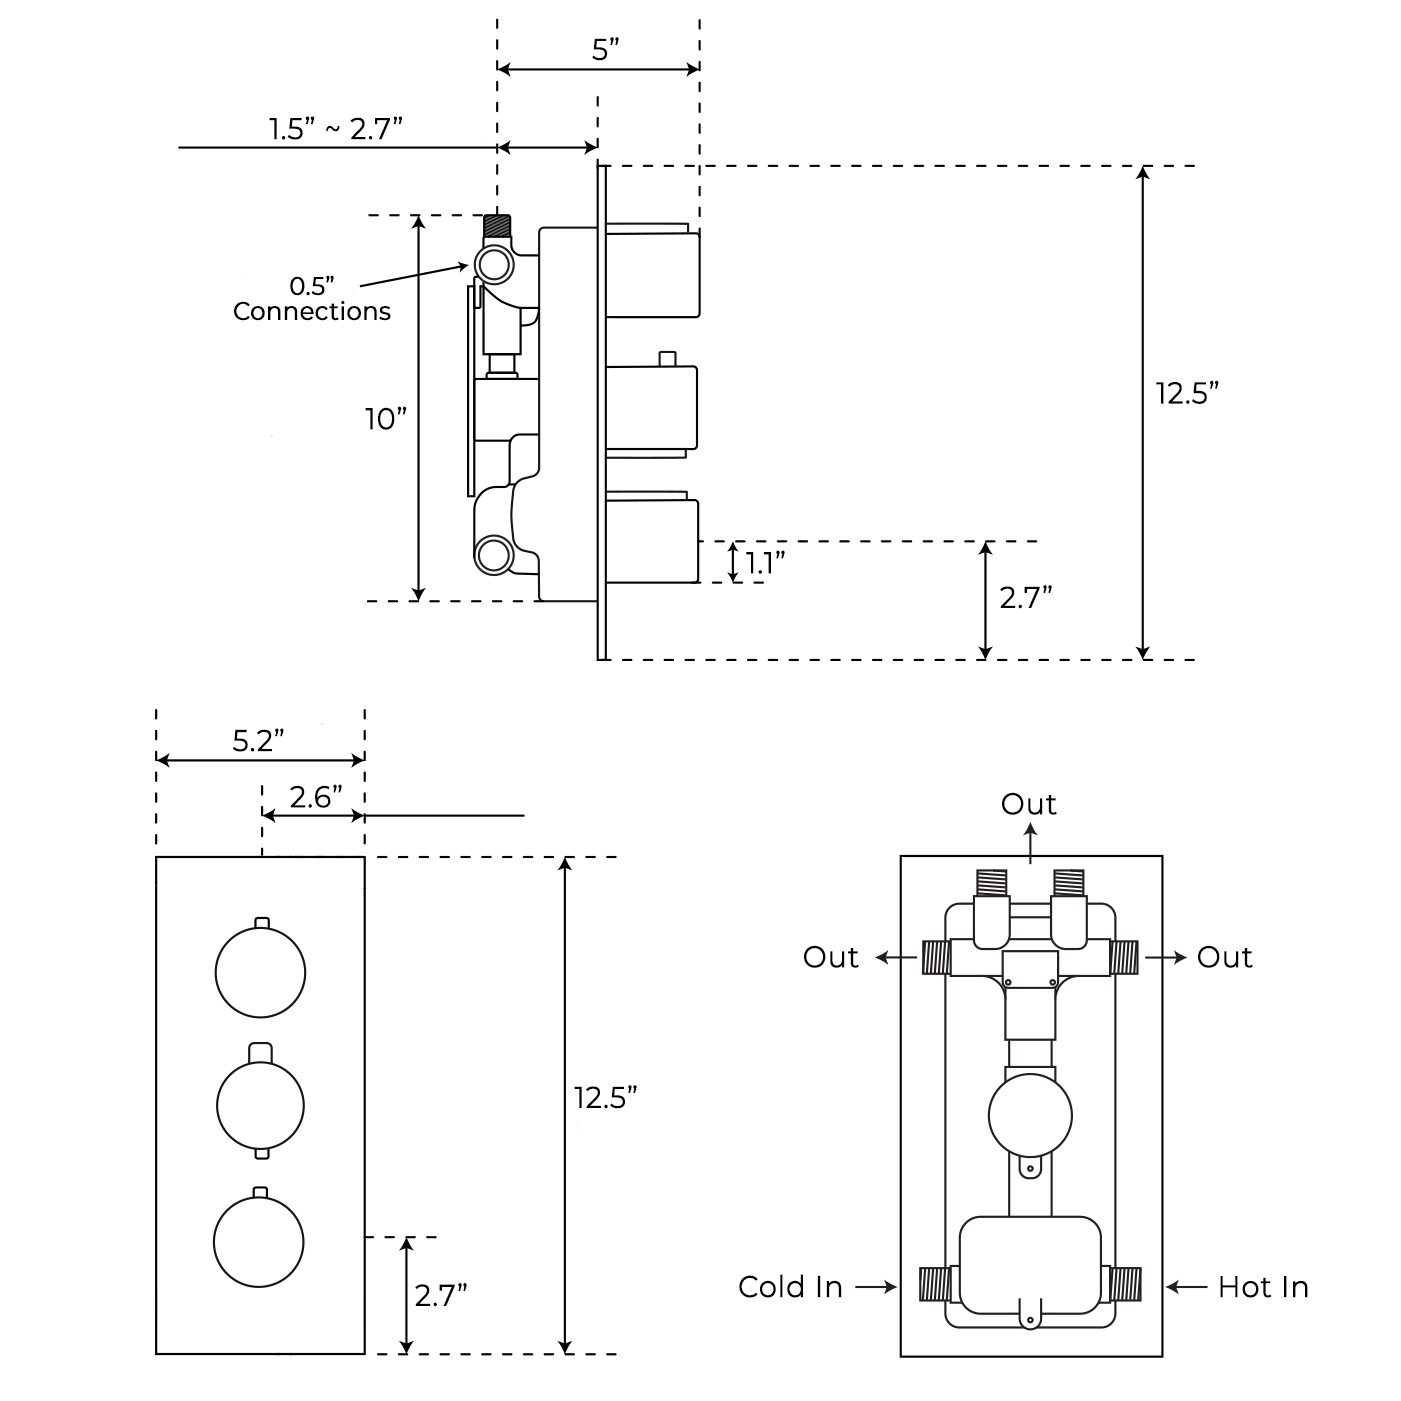
Mixer Installation Instructions
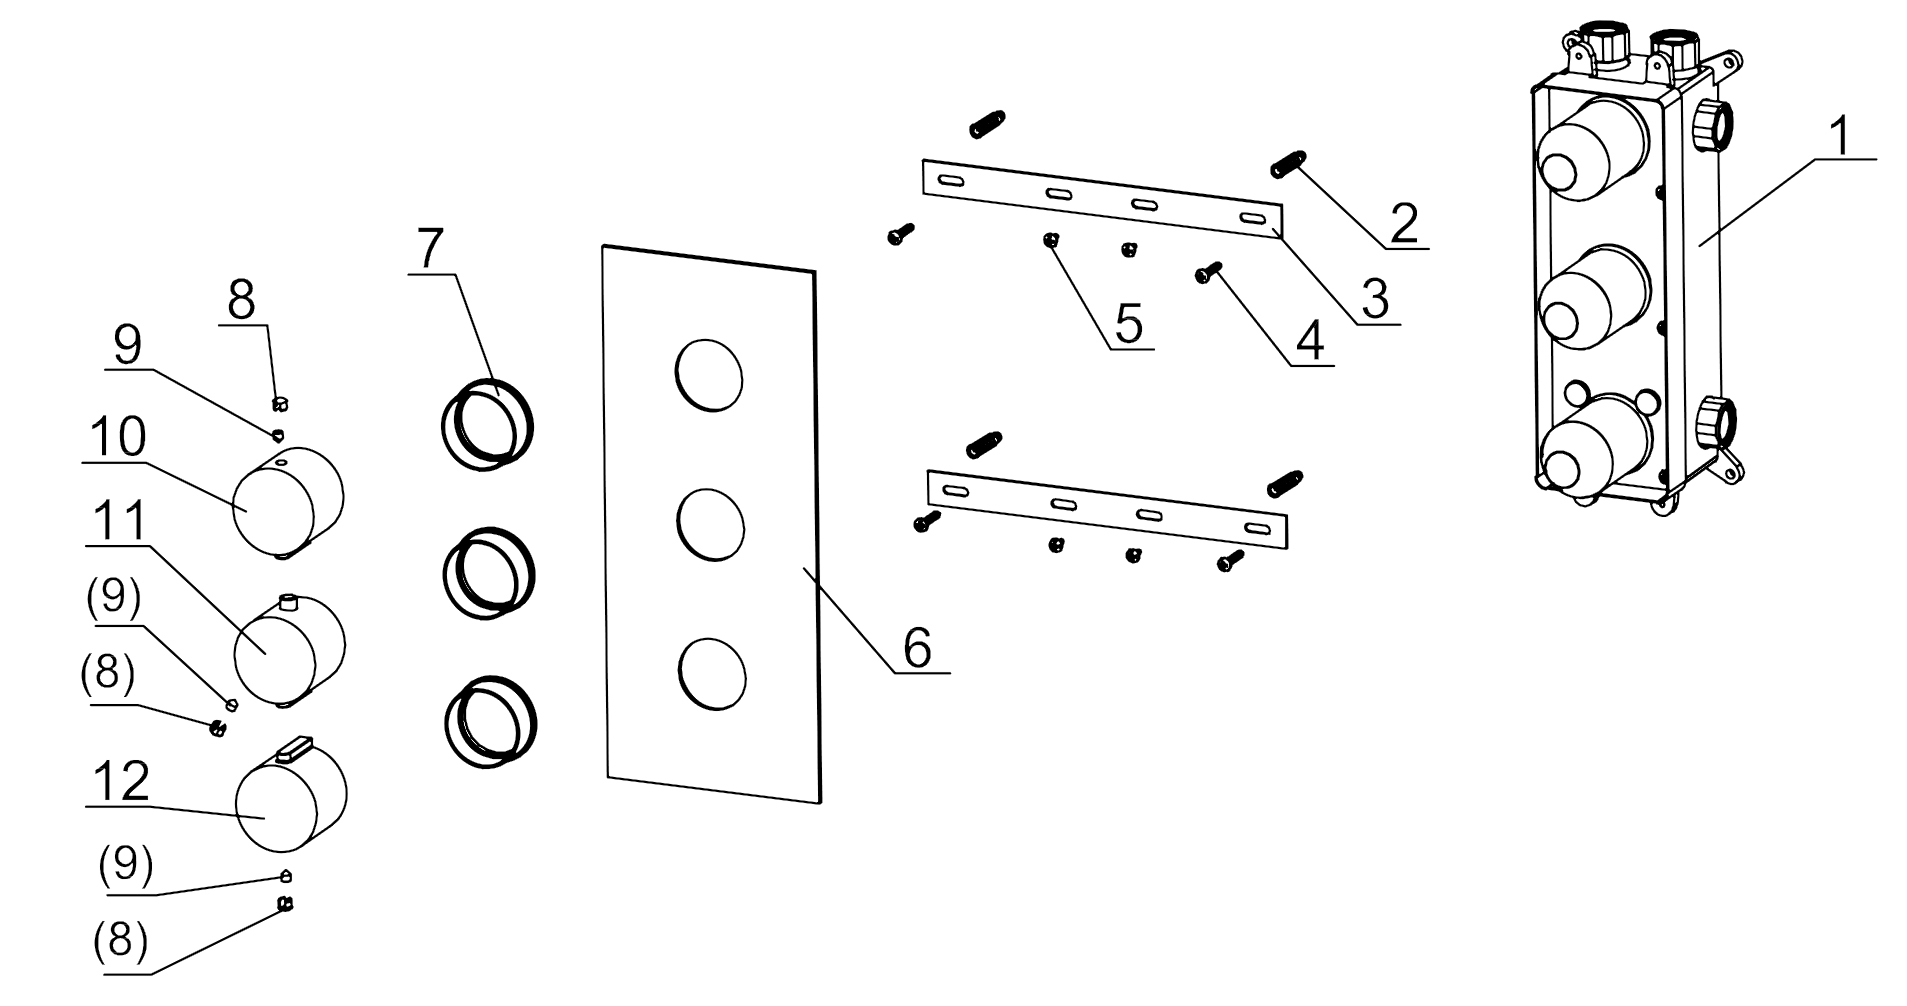
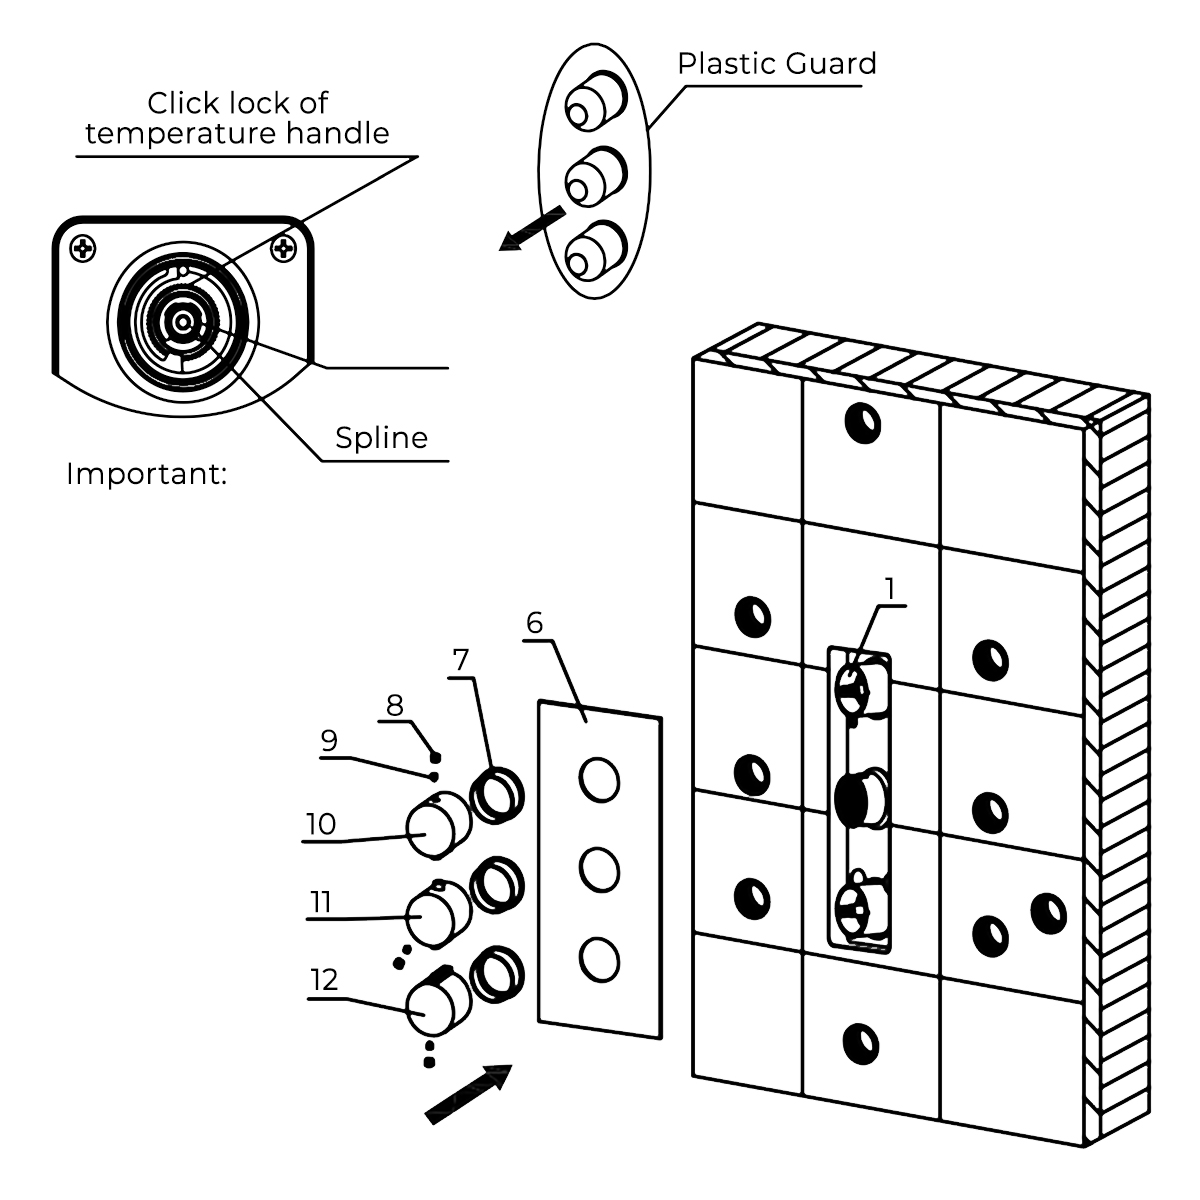
Parts:
1. Rough-In Body x1
2. Anchor x4
3. Positioning Bar x2
4. Tapping Screw 1 x4
5. Tapping Screw 2 x4
6. Plate x1
7. Cover x3
8. Button x3
9. Screw 1 x3
10.Diverter Handle x1
11. Temperature Handle x1
12. Volume Handle x1
|
Shower
Mixer
|
|
|
|
|
|
|
Step 1:
|
|
Step 2:
|
|
|
Shower
Mixer
|
|
|
|
|
|
|
|
Shower Valve Mixer Installation Instructions
|
|
|
|
|
Step 3:
|
|
Step 4:
|
|
|
|

|
|
|
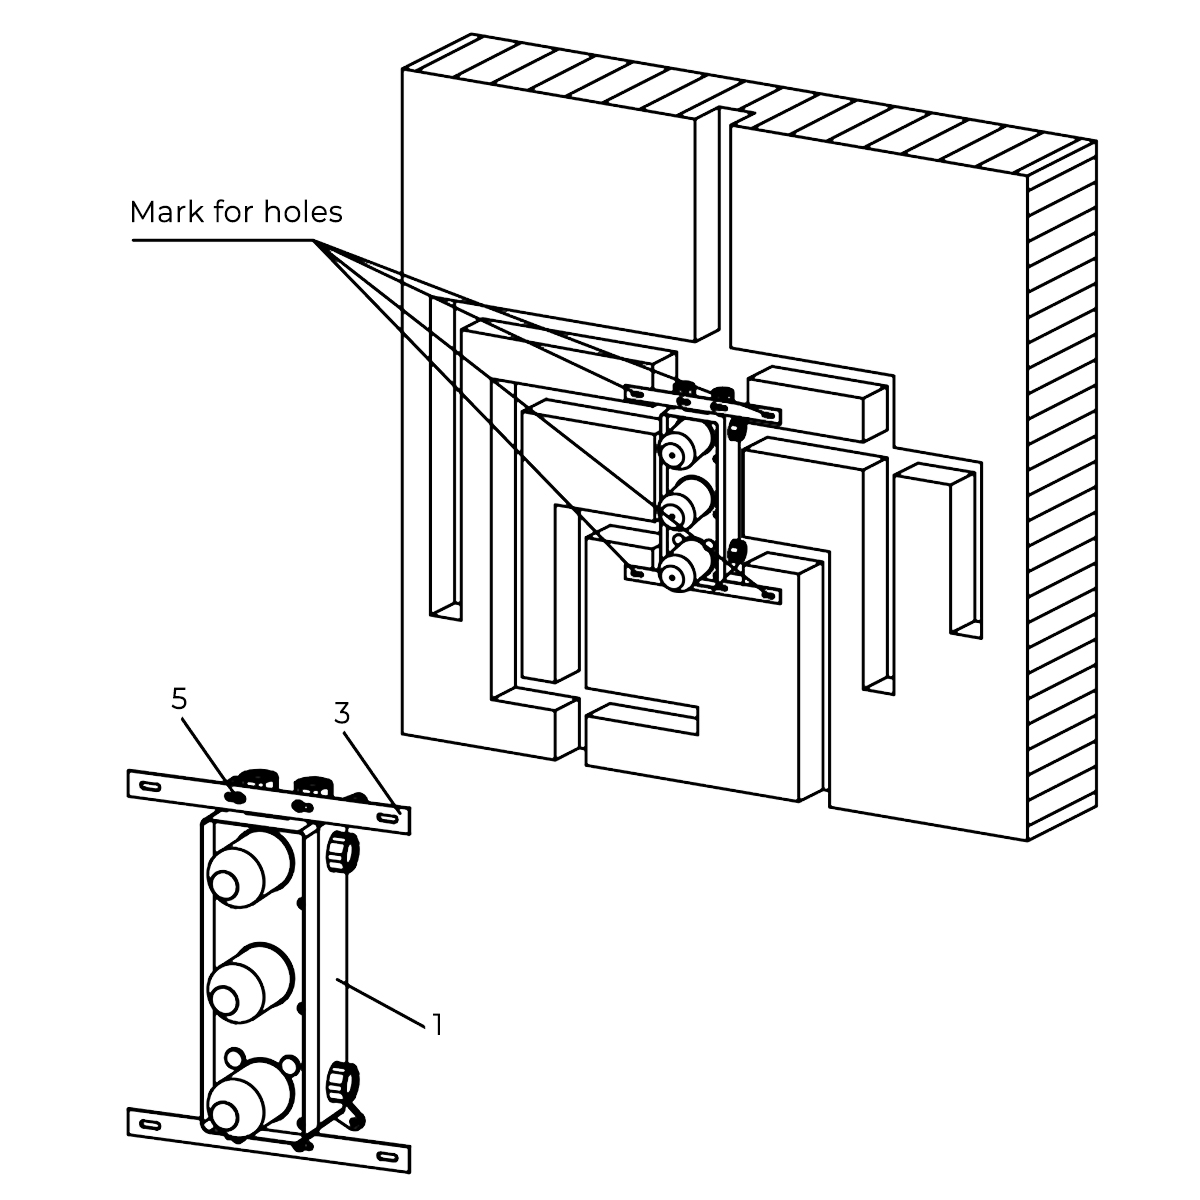
Attach the positioning bar to the rough-in body (4,5) with tapping screws. Mark the location of the mounting holes.
|
|
Remove the rough-in body and drill pilot holes at the locations marked in the previous step. Insert anchors.
|
|
|
Shower Valve Mixer Installation Instructions
|
|
|
|
|
Step 5:
|
|
Step 6:
|
|
|
|
|
|
|
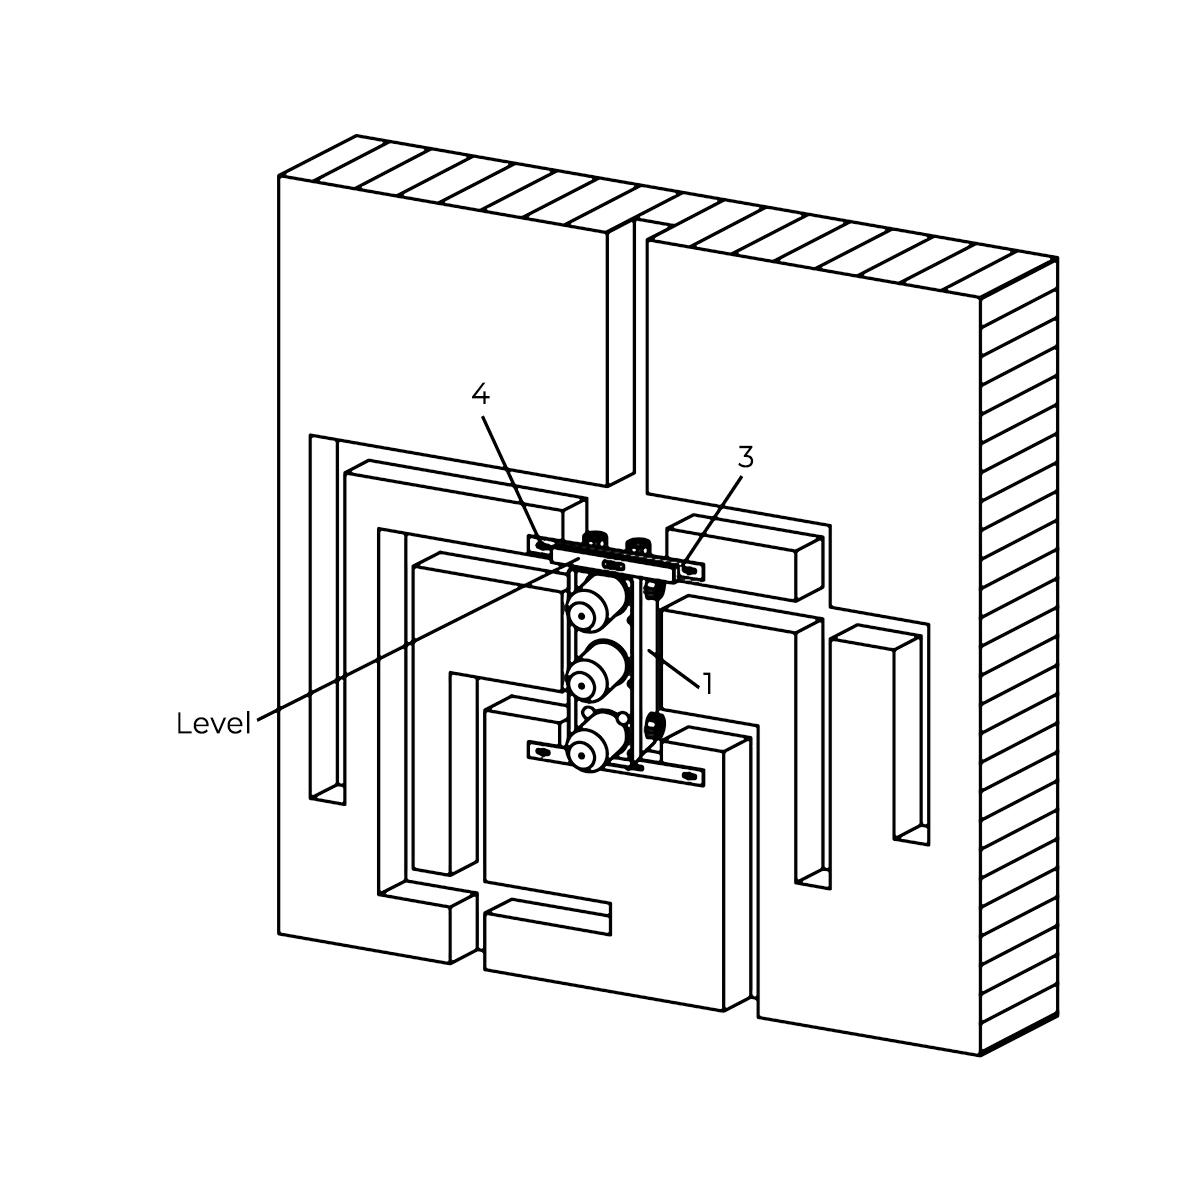
Attach the rough-in body to the wall.
|
|
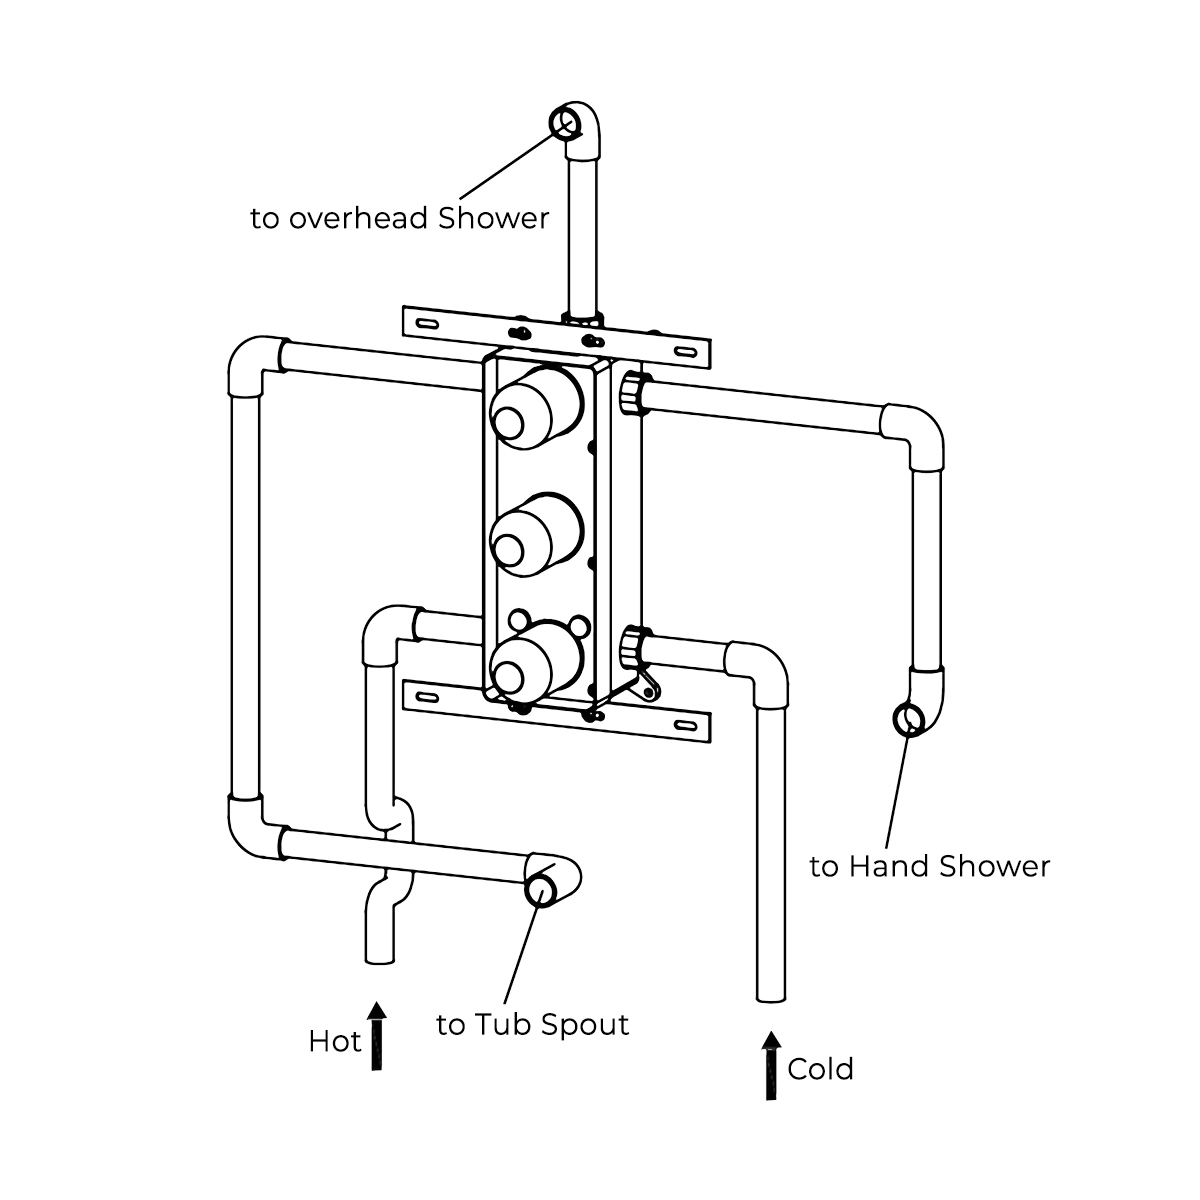
Connect the rough-in body to the water supply pipes according to the diagram.
|
|
|
Shower Valve Mixer Installation Instructions
|
|
|
|
|
Step 7:
|
|
Step 8:
|
|
|
|
|
|
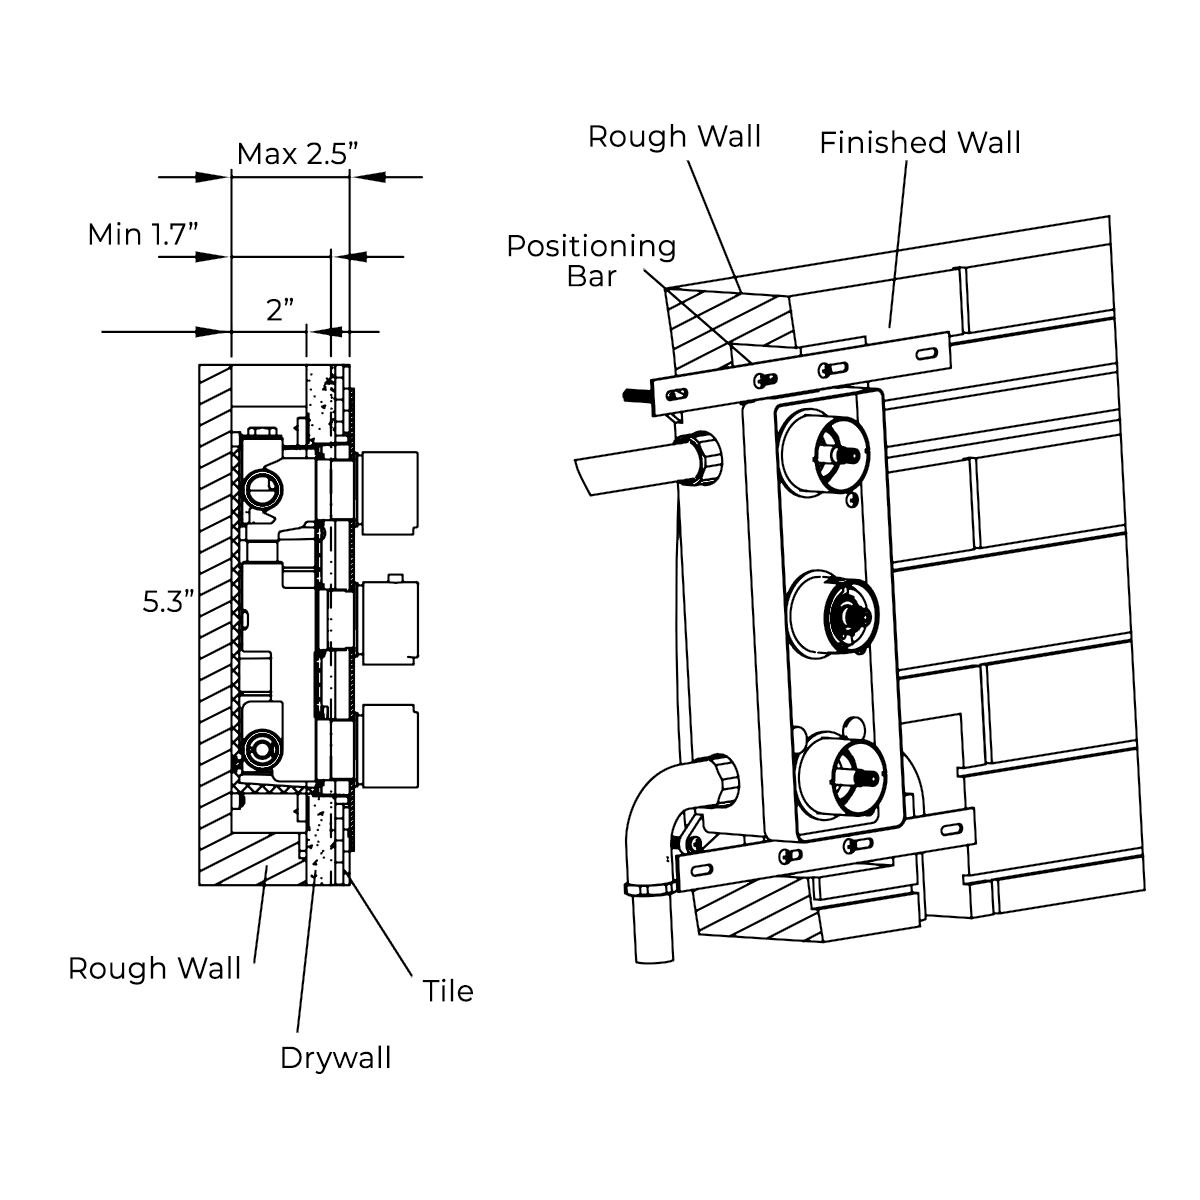
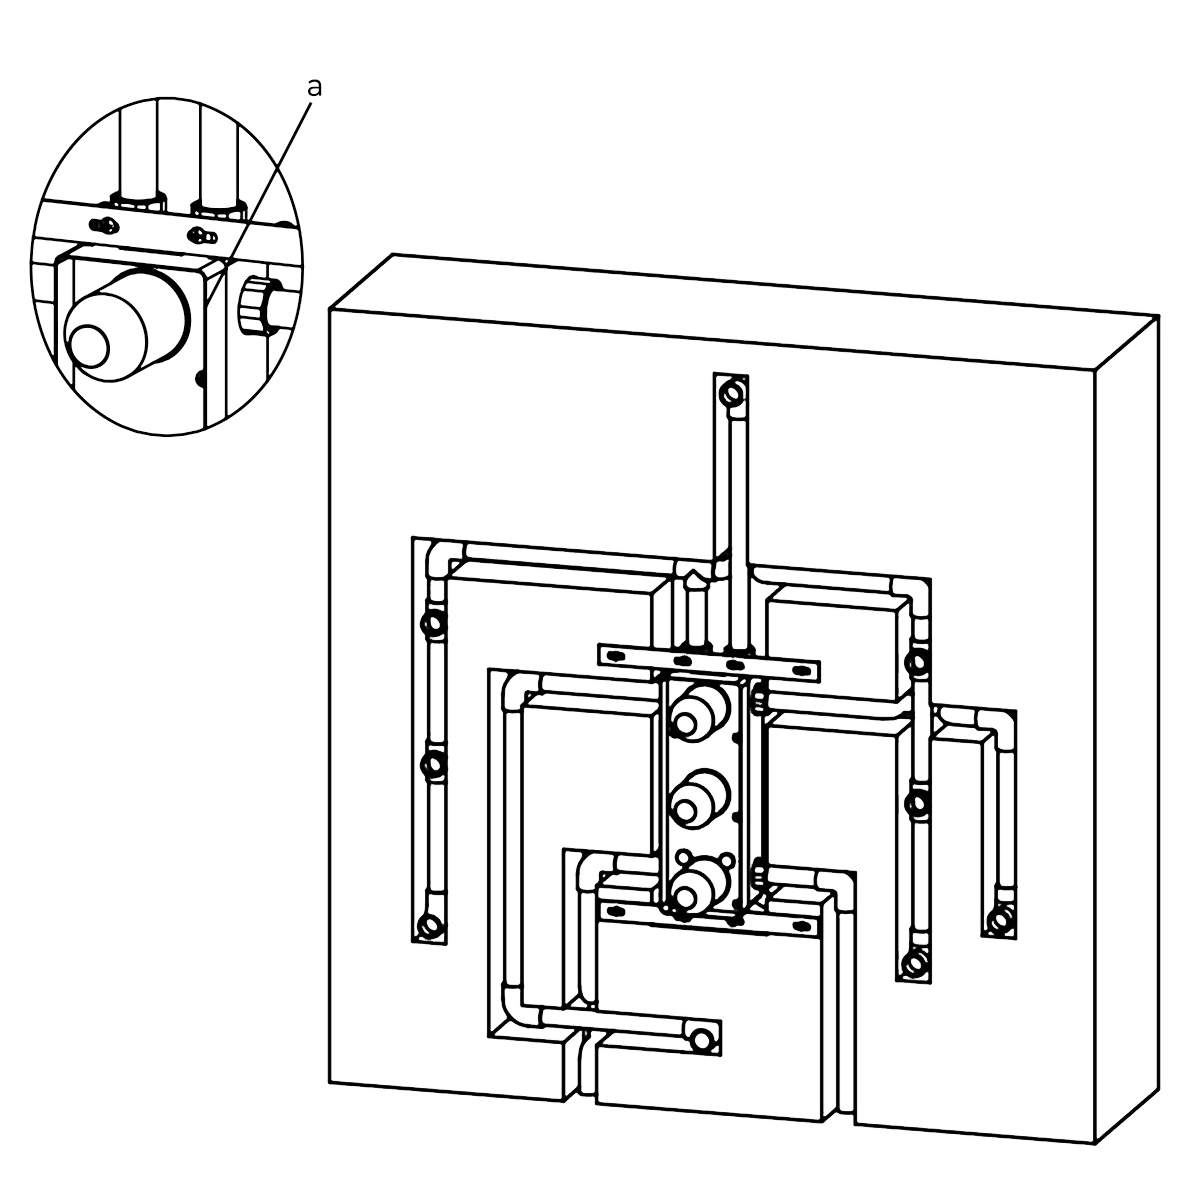
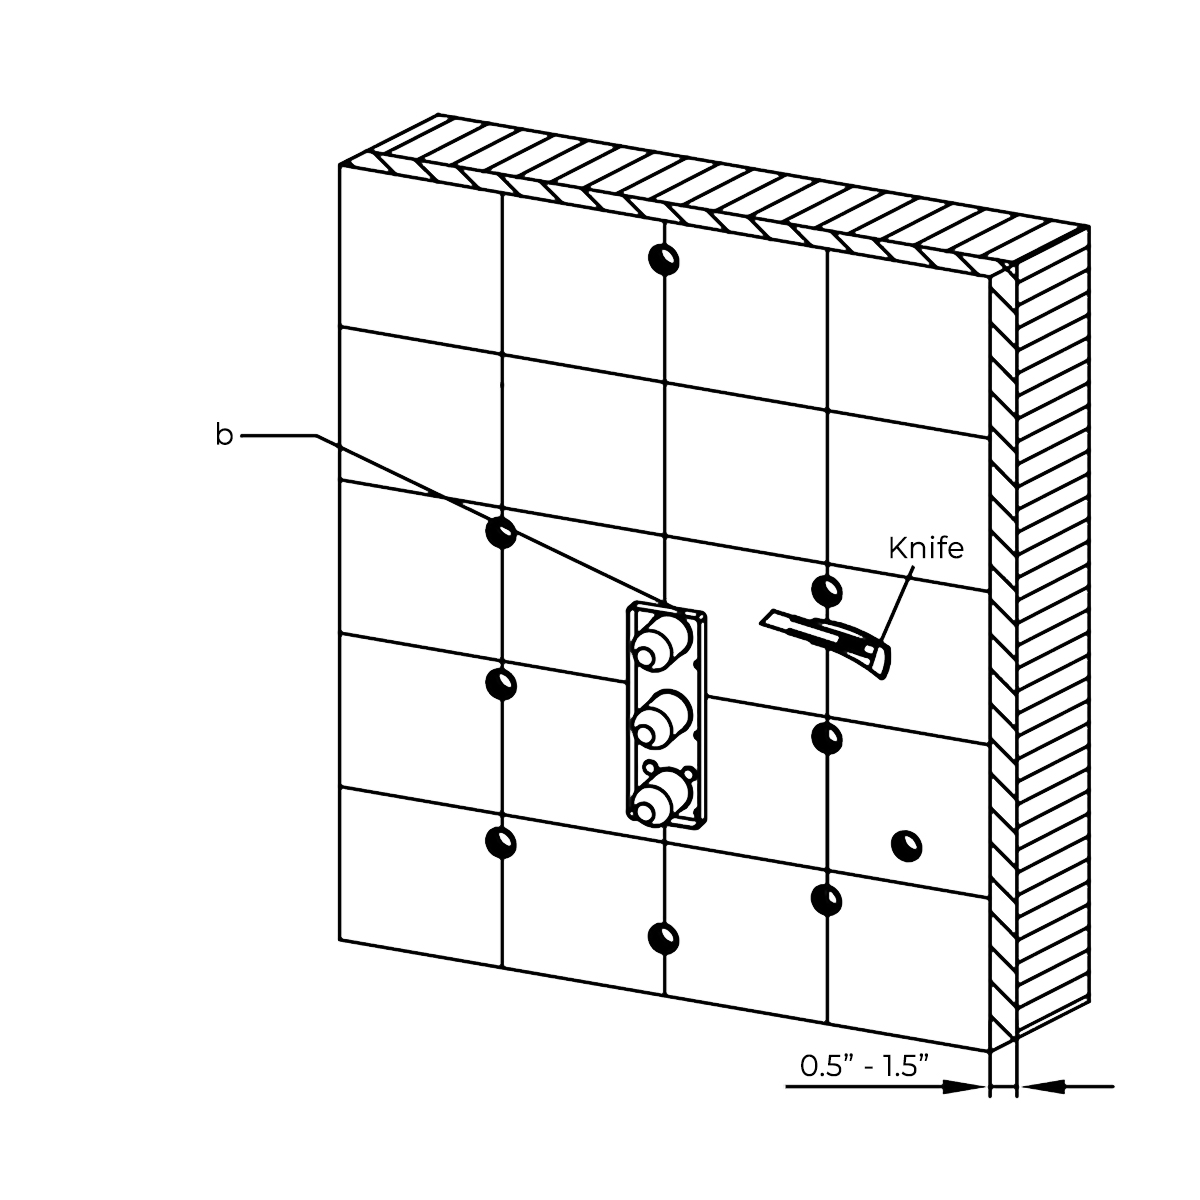
Finish the wall surrounding the shower with a thickness of 1/2"-1-1/2".
a) Finished wall surface should not exceed the upper edge of the installation box.
|
|
If the tile exceeds the edges of the installation box, trim the tile as necessary to install the trim plate.
b) Trim the tile around the installation box as necessary.
|
|
|
Shower Valve Mixer Installation Instructions
|
|
|
|
|
Step 9:
|
|
|
|
|
|
|
|
|
Remove the plastic guard and place the trim plate over the installation box. Install the screws covers, handles and buttons.
|
|
|
|
Shower Valve Mixer Installation
|
How to install the Shower Set with Wall Mount Showerhead, Hand Held Shower and Shower Mixer
|