How to install Fontana Leo 3-Way Black LED Digital Display Smart Thermostat Shower Mixer | FS10116
|
|
|
Visit Product Page 
|
|
Installation Instructions for Bathroom Shower 3 Functions Mixer
- Before you begin, please read the installation instructions below. Observe all local building and safety codes.
- Unpack and inspect the product for any shipping damages. If you find damages, do not install.
- Please note all products must be installed by a professional and certified plumber otherwise warranty might be voided.
|
shower
|
|

|
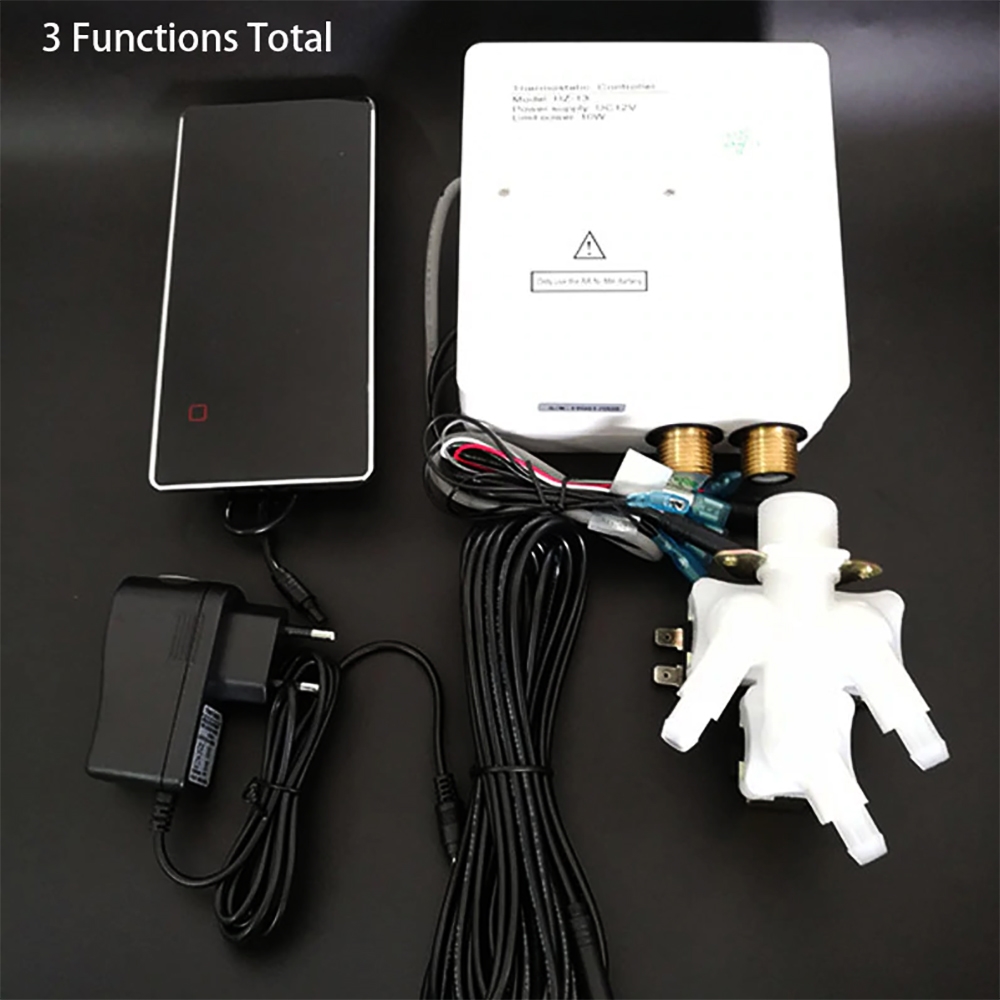
Digital Shower Mixer Controller Installation Instructions
|
Step 1:
|
shower
control
|
Step 2:
|
|

|
|
|
|
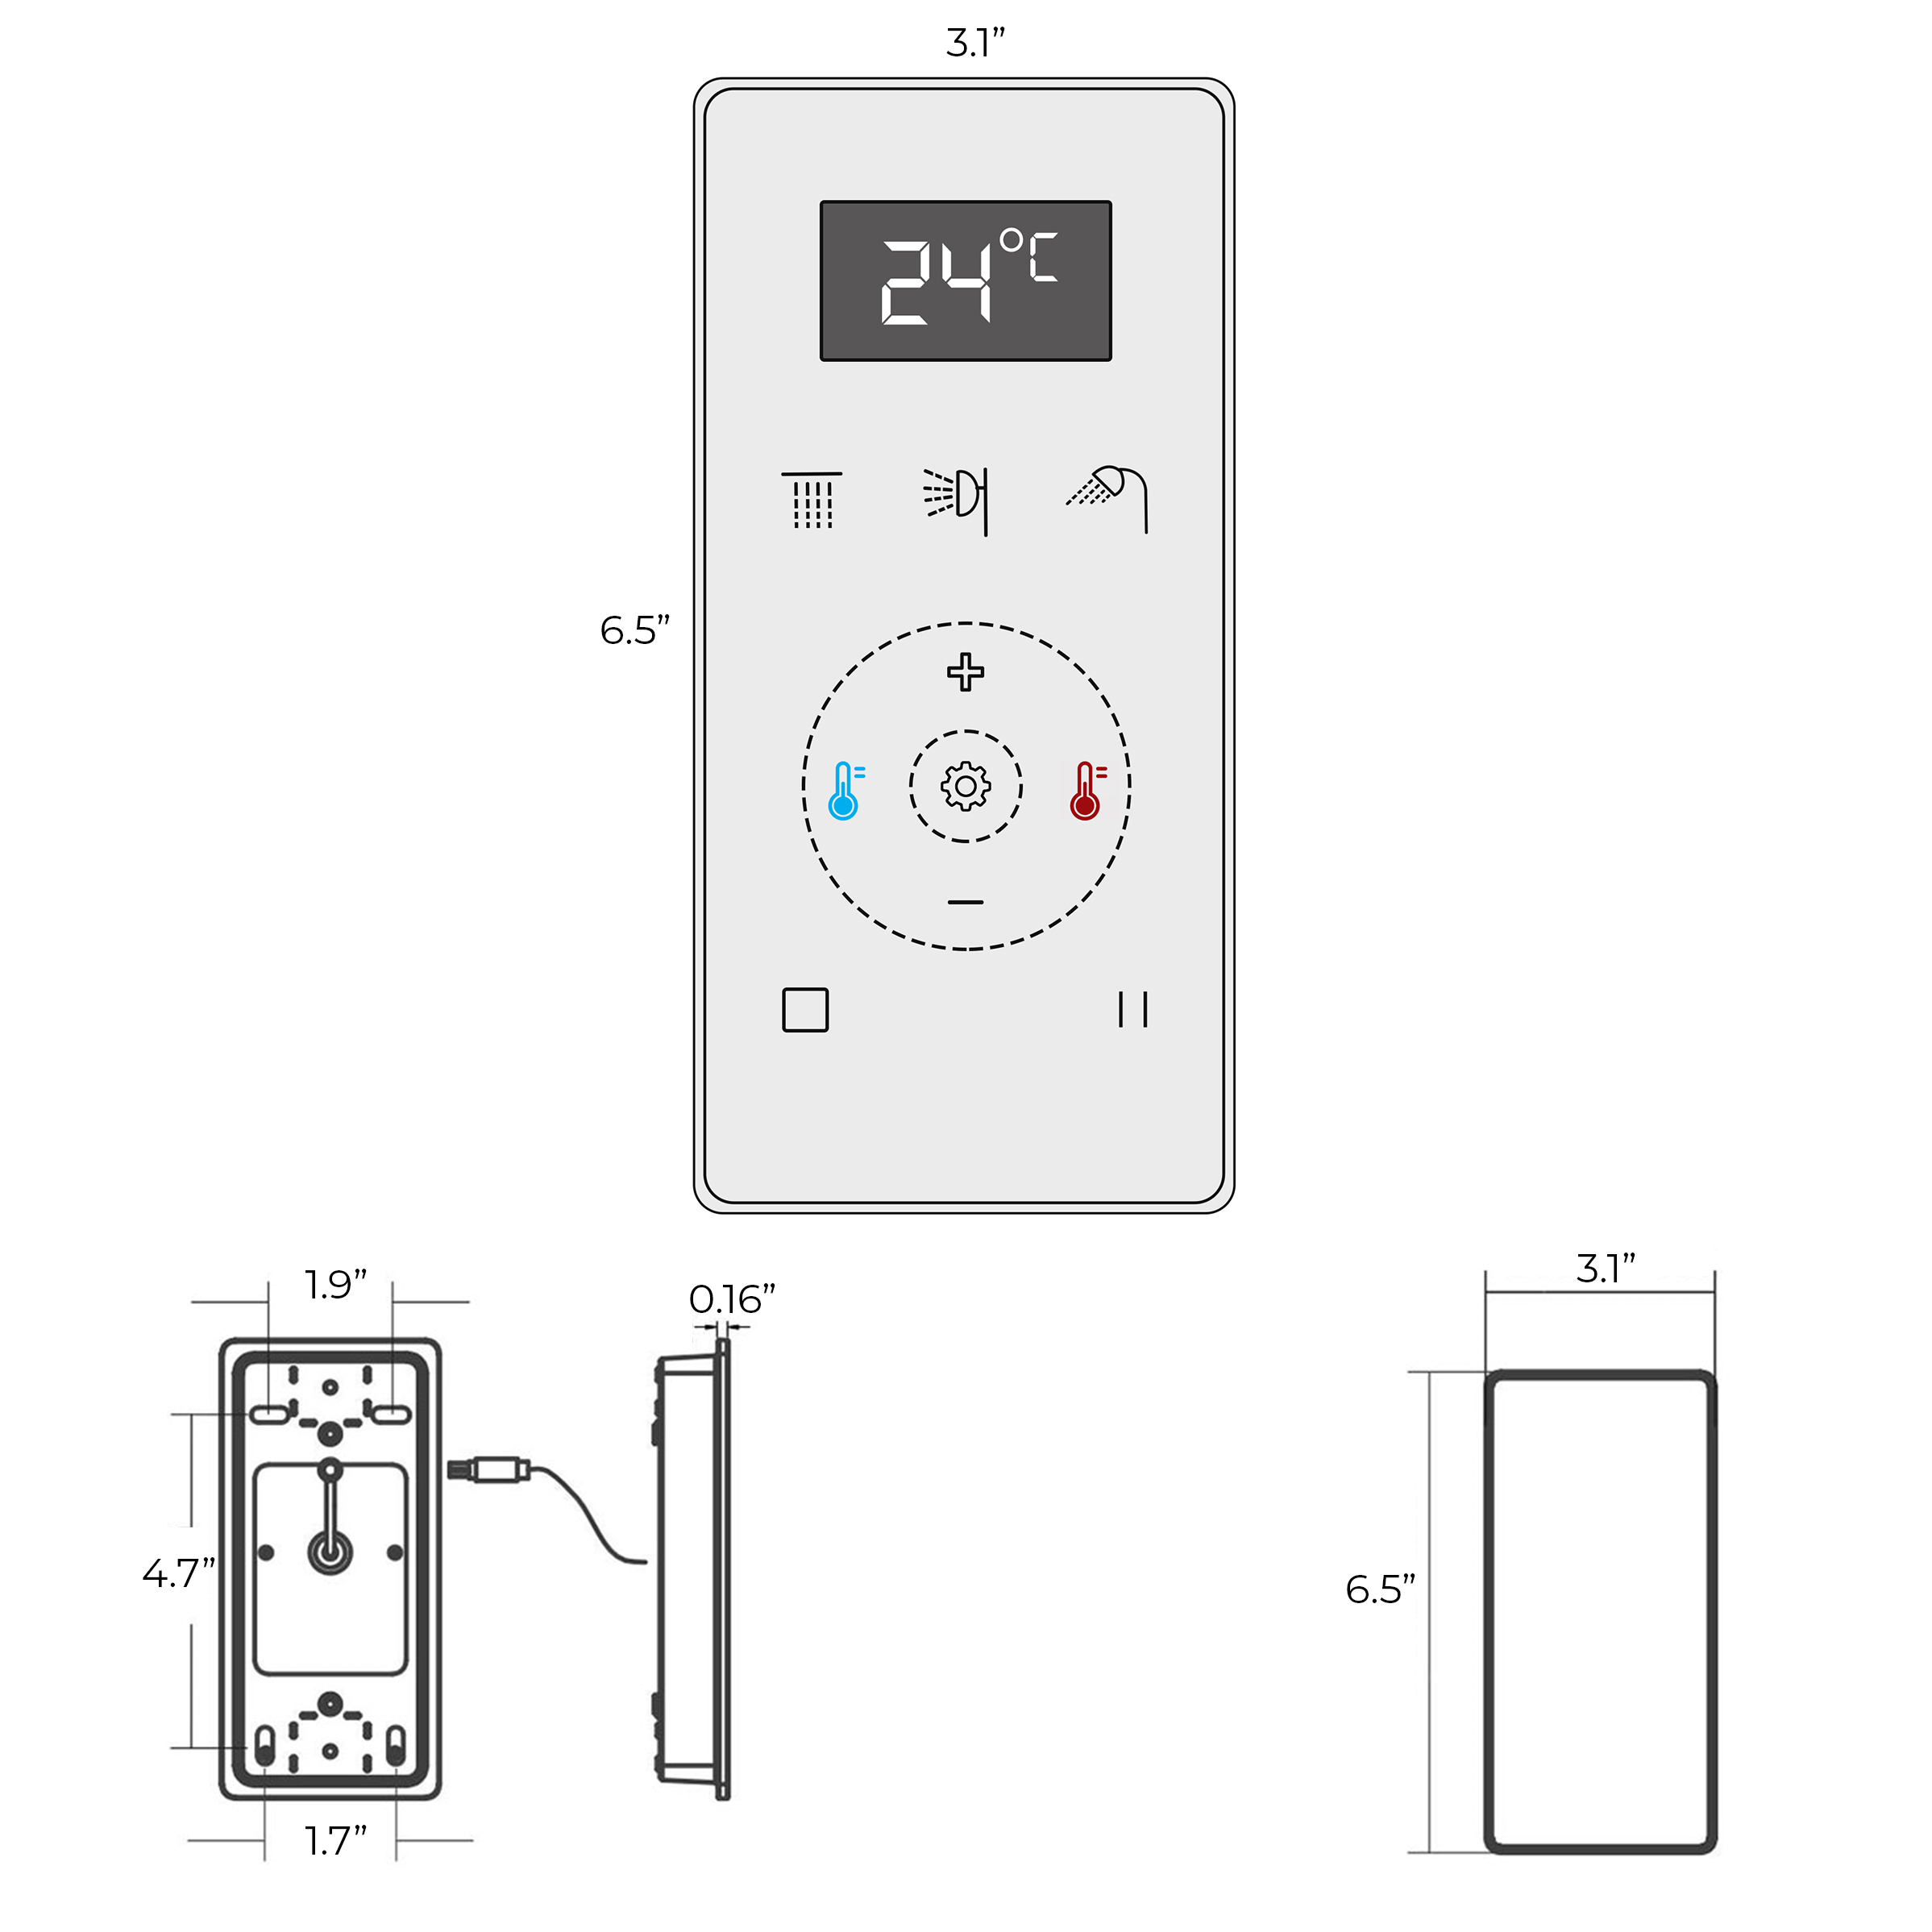
Dimensions
|
|
Control Box
|
|
|
Step 3:
|
|
Step 4:
|
|
|
|
|
|
|
|
|
|
|
|
|
|
|
|
Step 5:
|
|
Step 6:
|
|
|
|

|
|
|
|
|
|
|
|
|
|
|
|
Step 7:
|
|
Step 8:
|
|

|
|

|
|
|
|
|
|
|
|
|
|
|
|
Step 9:
|
|
Step 10:
|
|
|
|
|
|
|
|
Connections Structure
|
|
|
|
|
|
|
|
Instructions
|
|
|
|
|
Step 11:
|
|
Step 12:
|
|
|
|

|
|
|
|
|
|
|
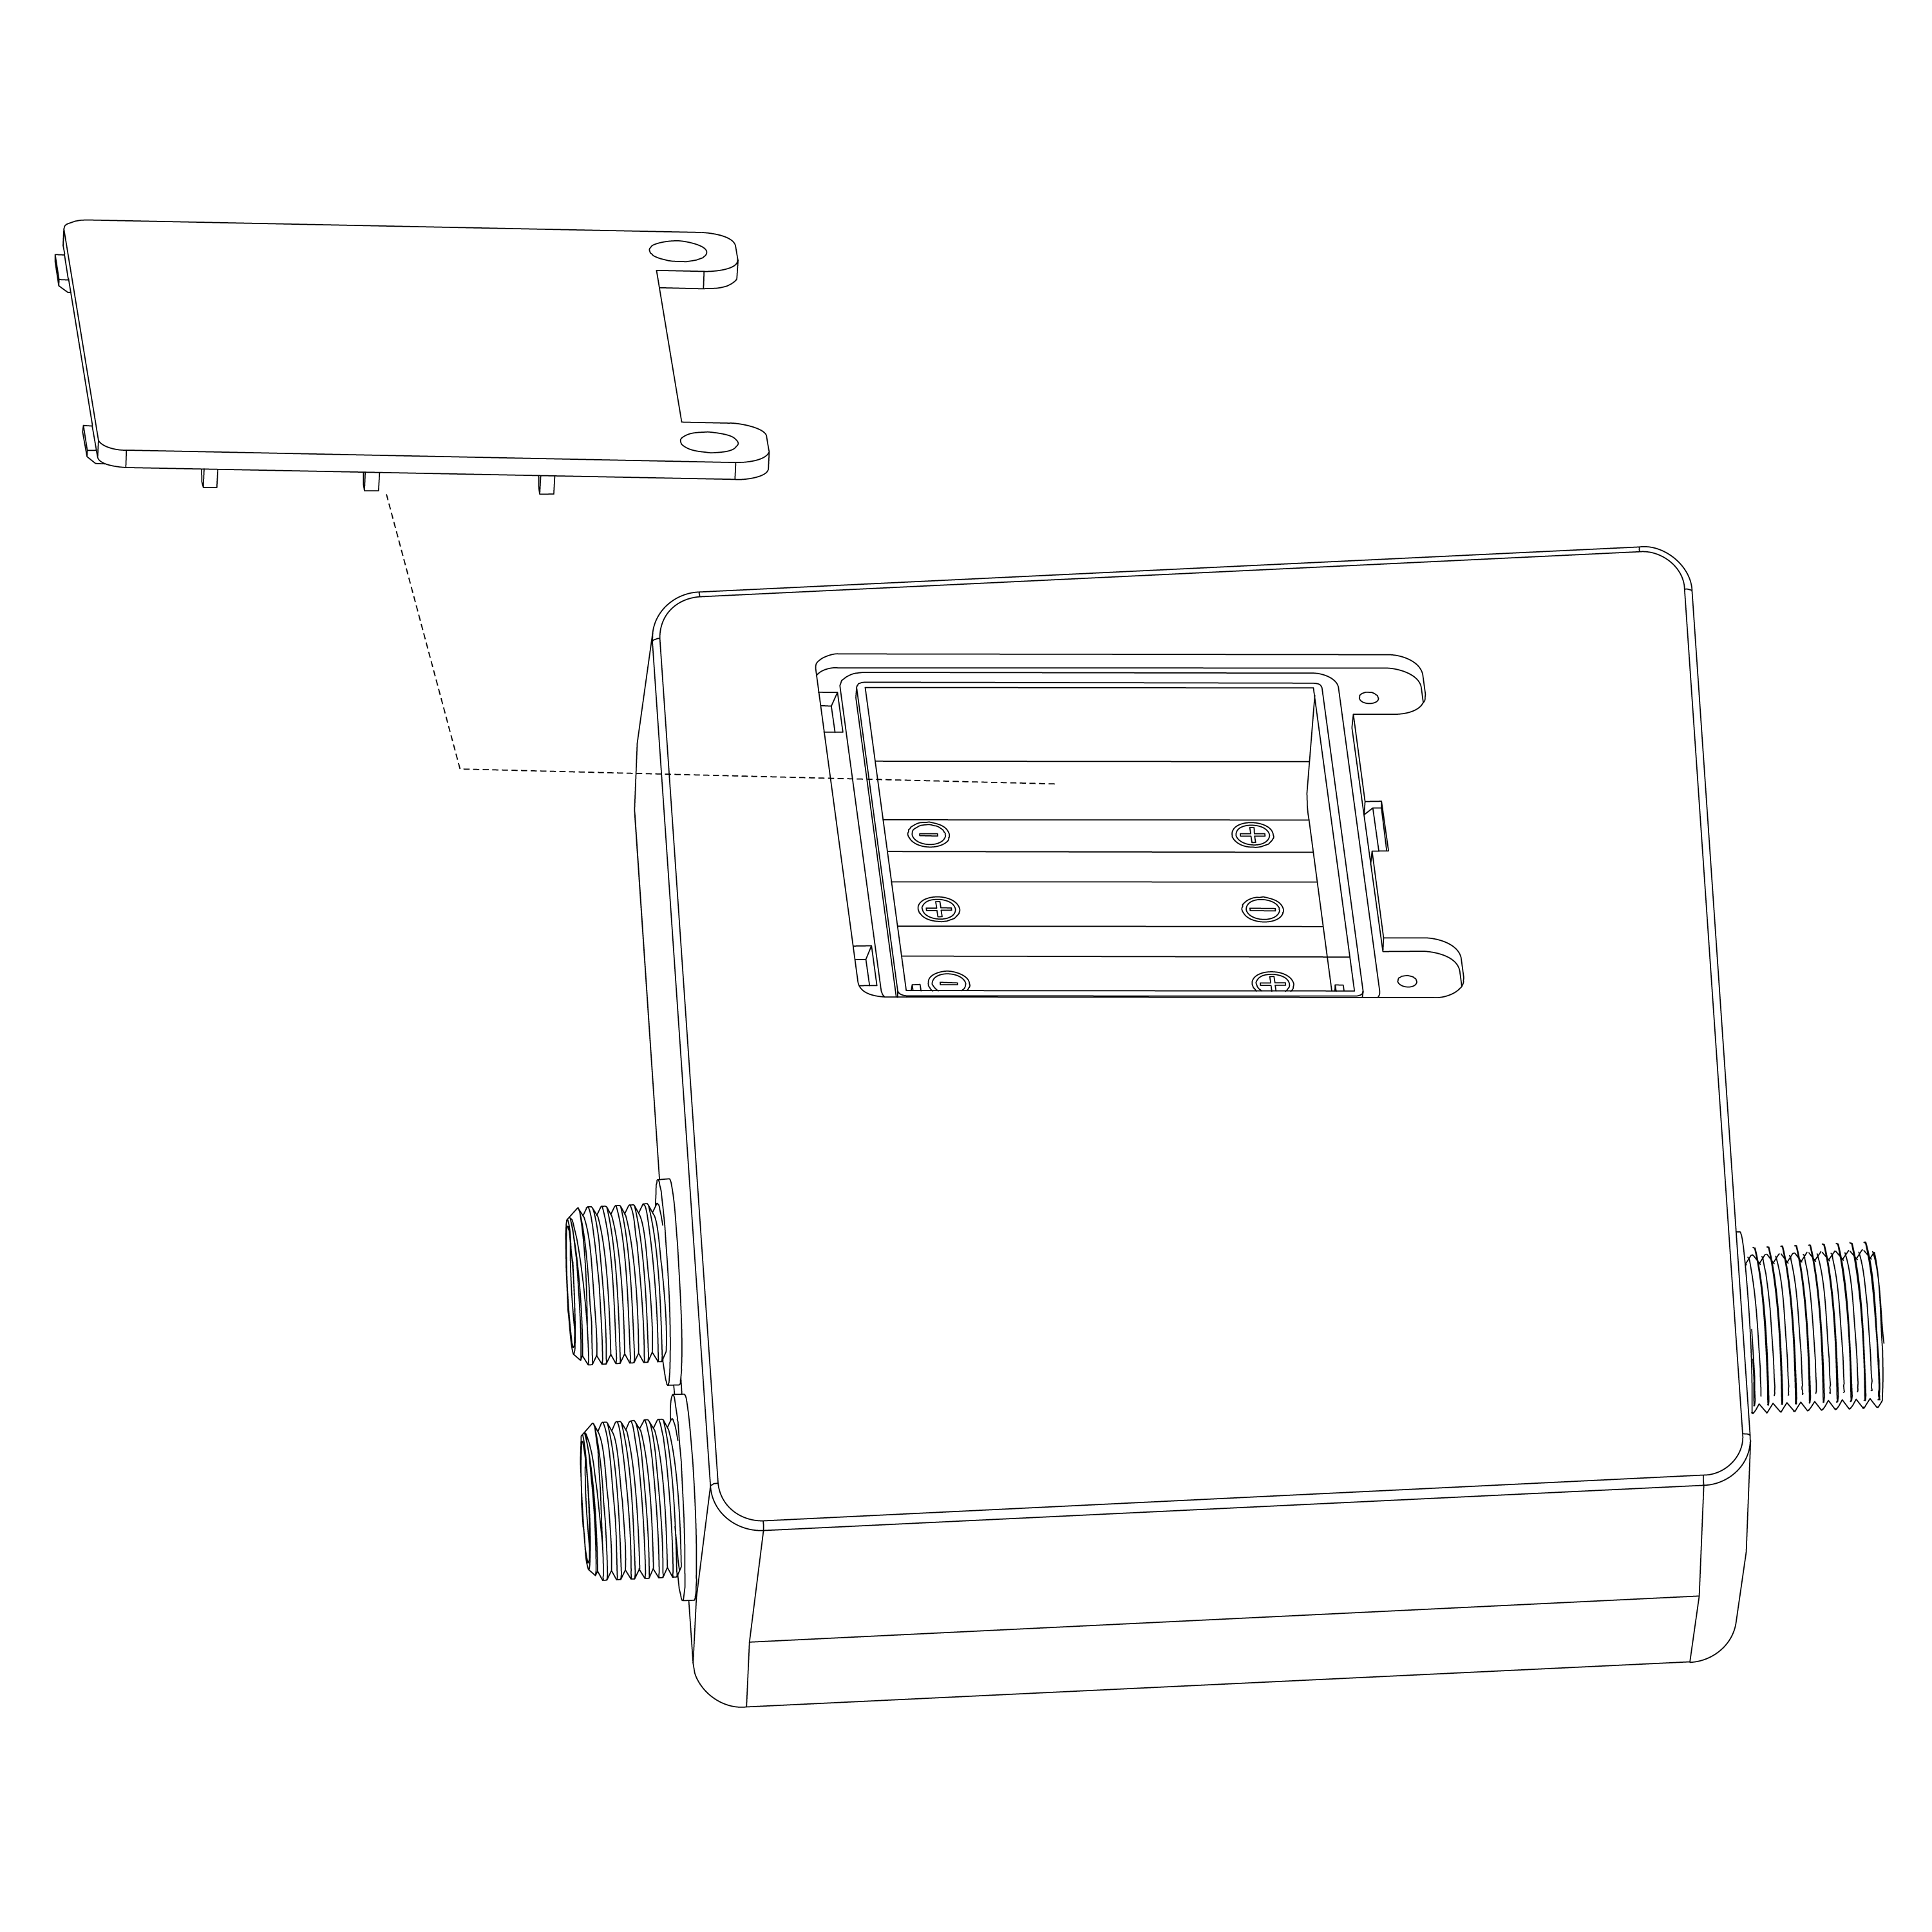
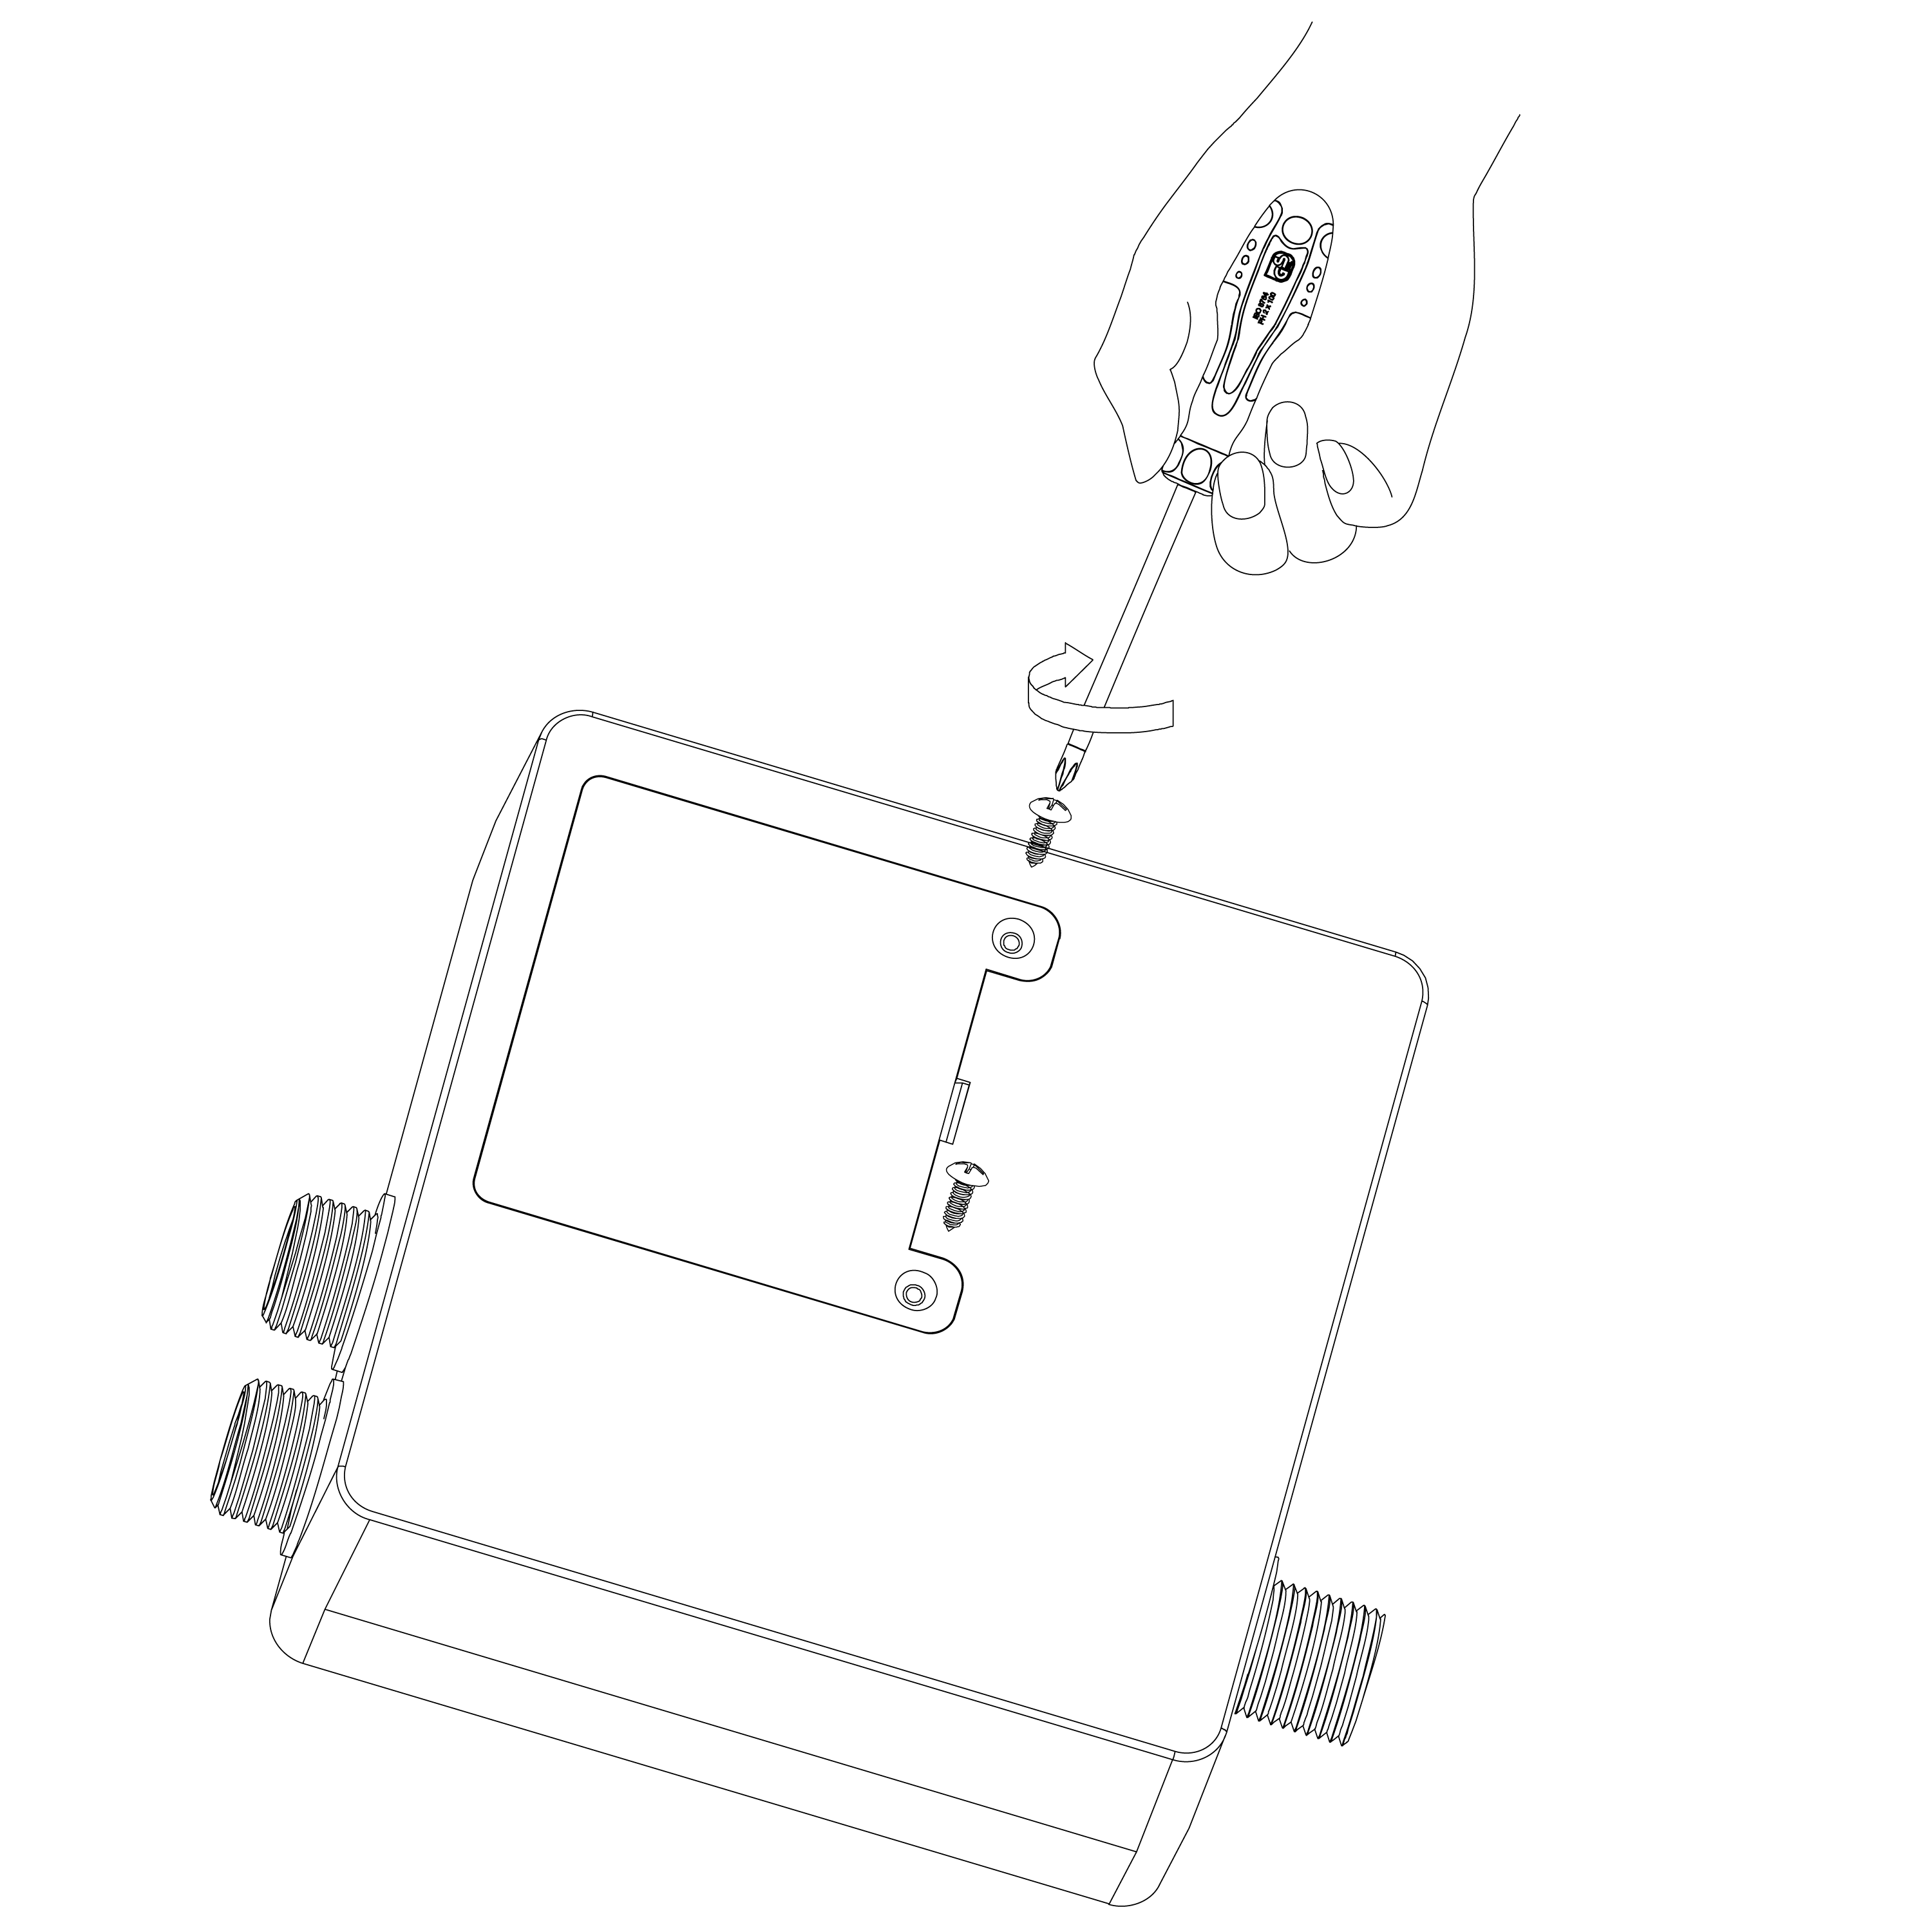
Step 13: (Host Box)
|
|
Step 14: (Operation)
|
|

|
|
|
|
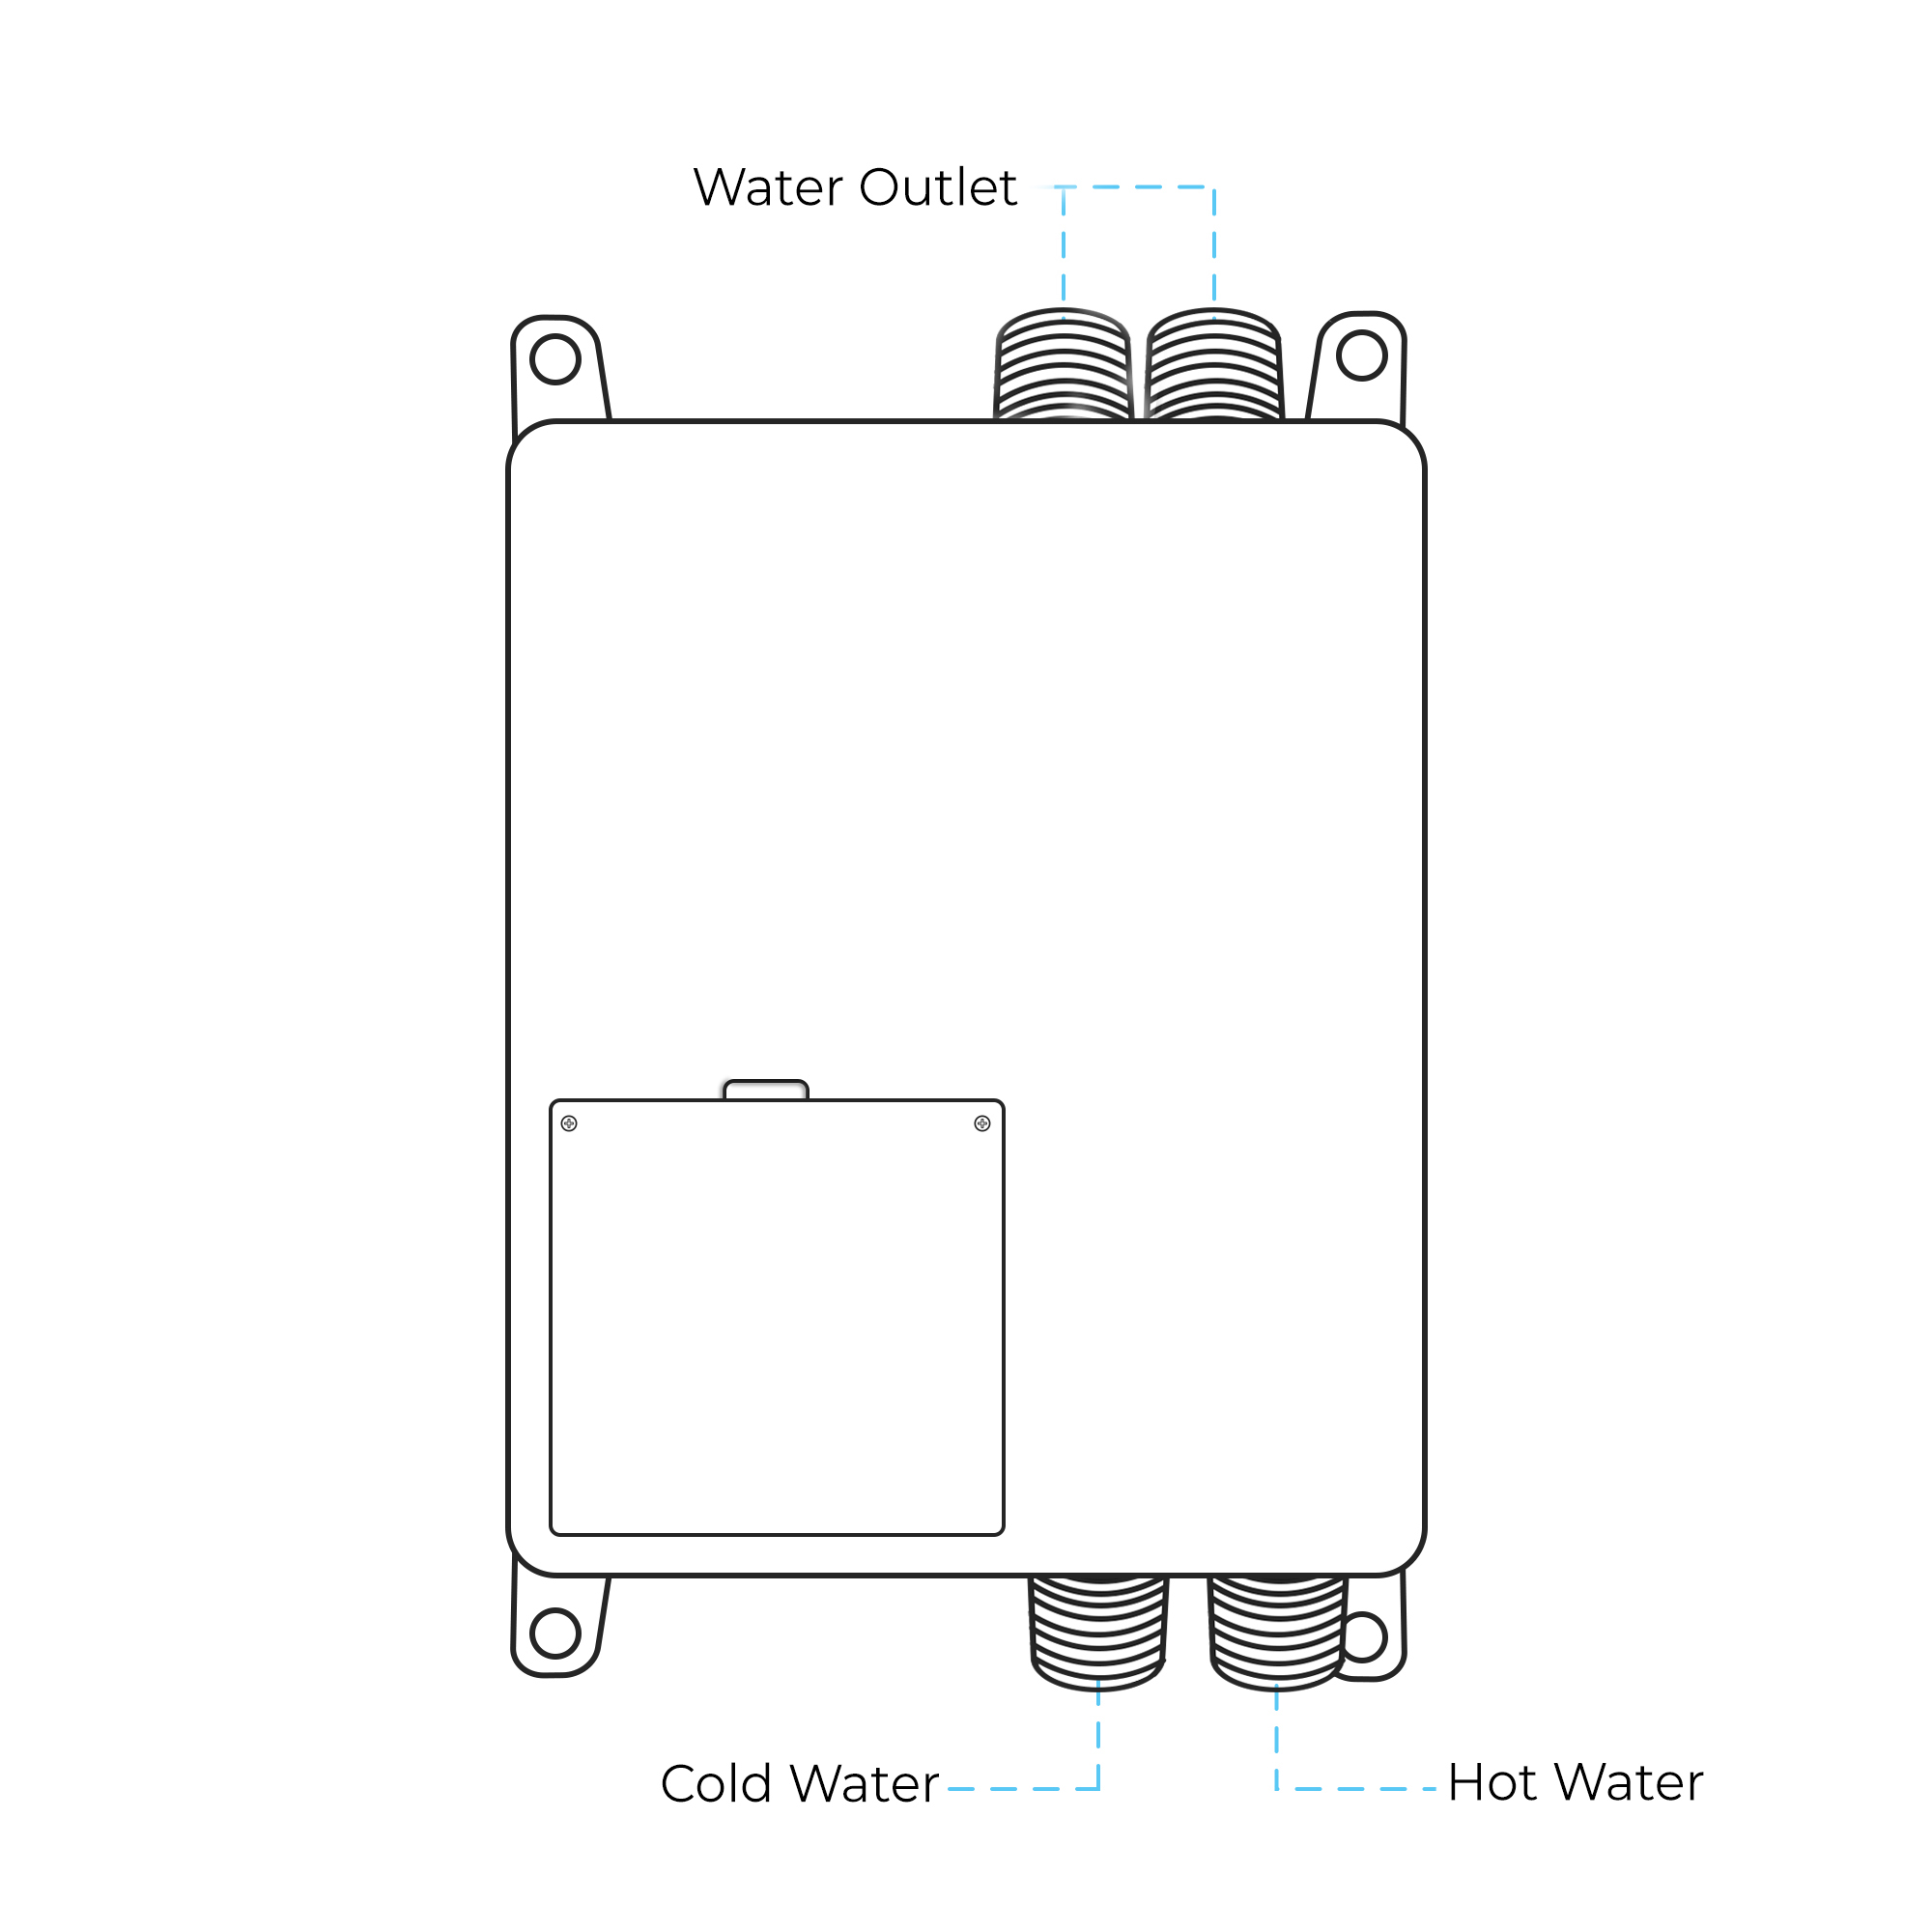
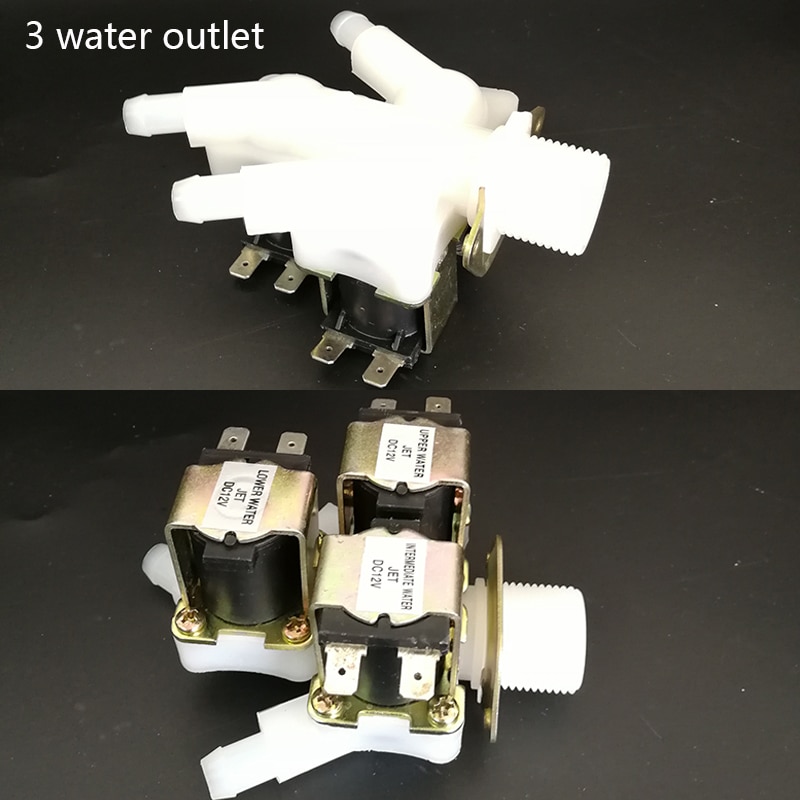
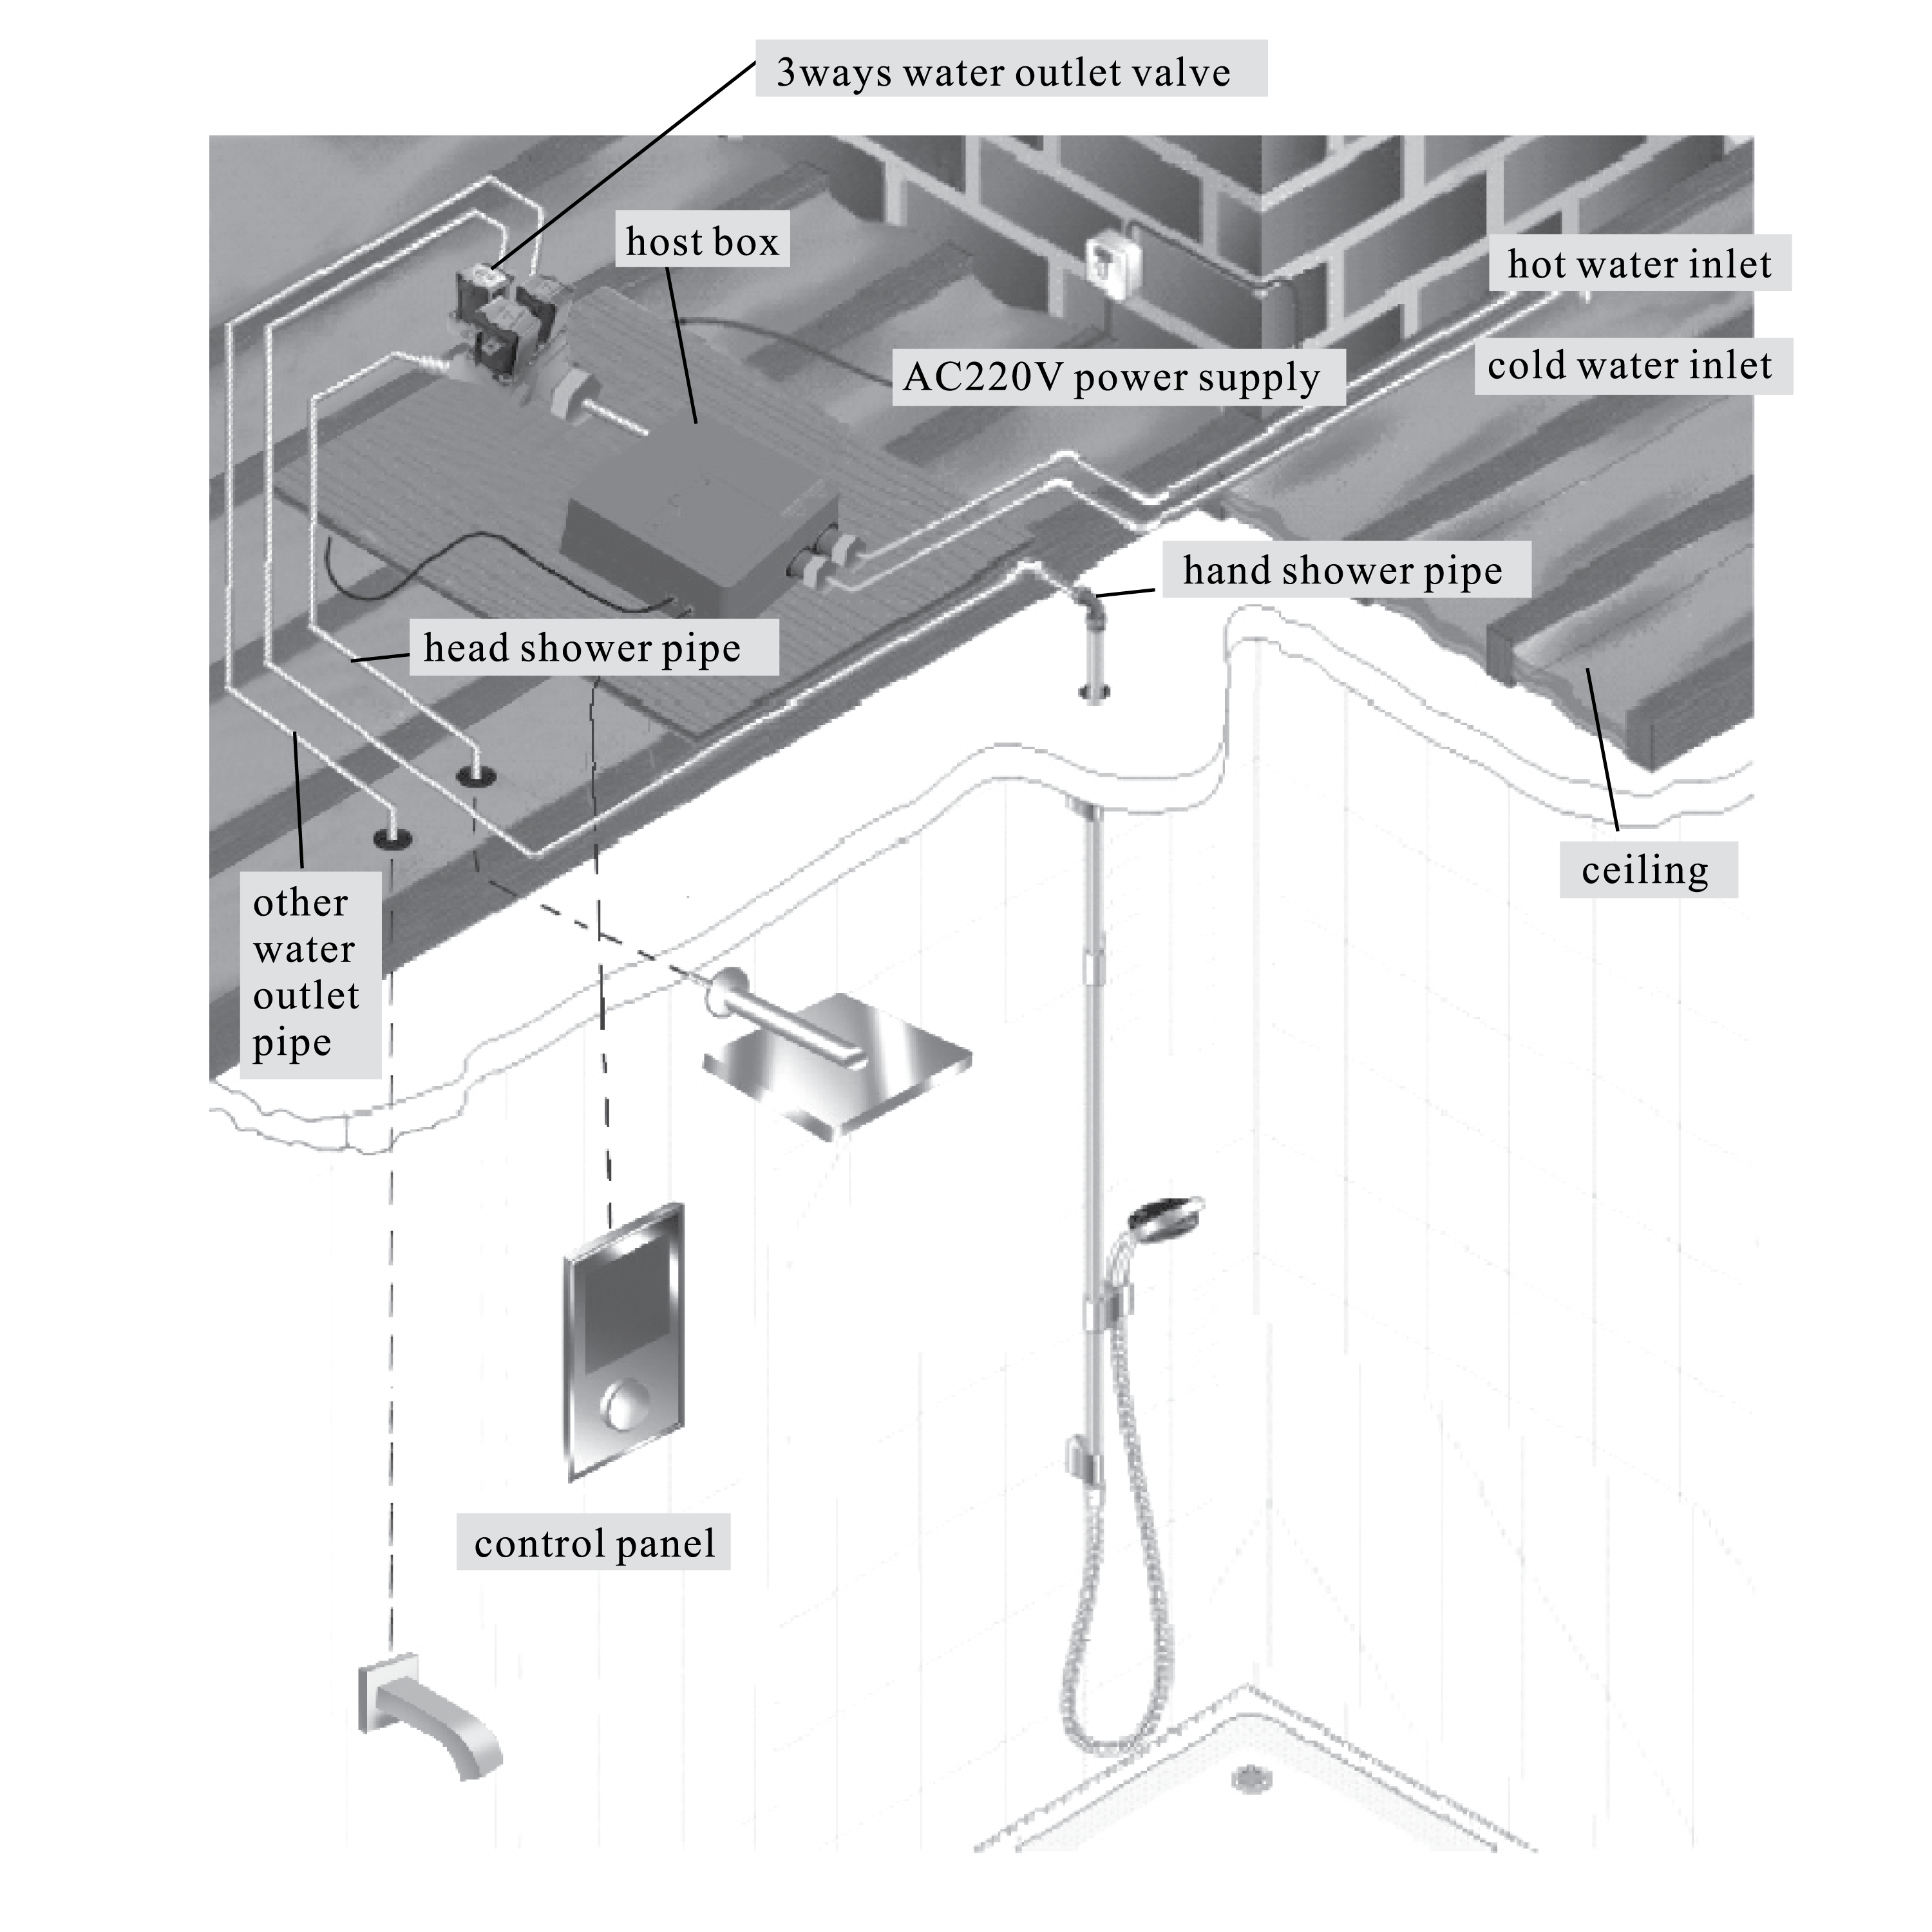
1. Hand shower's mixer water outlet
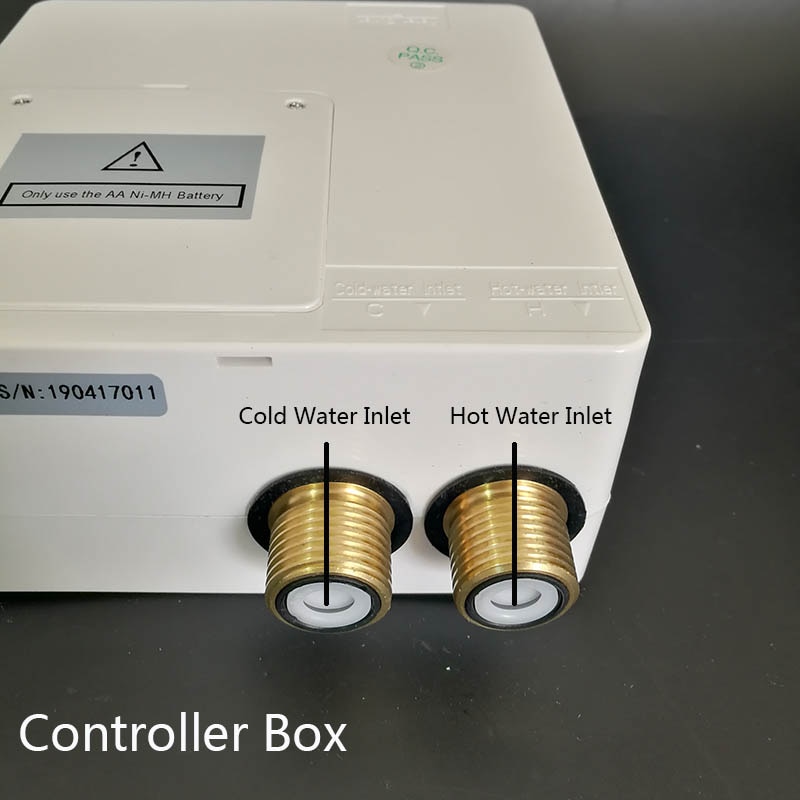
2. Hot water inlet 3. Cold water inlet
4 & 5. The Control Cable
6. The host box installation bracket
7. 3 way water outlet valve
8. The control panel installation bracket
|
|
|
|
|
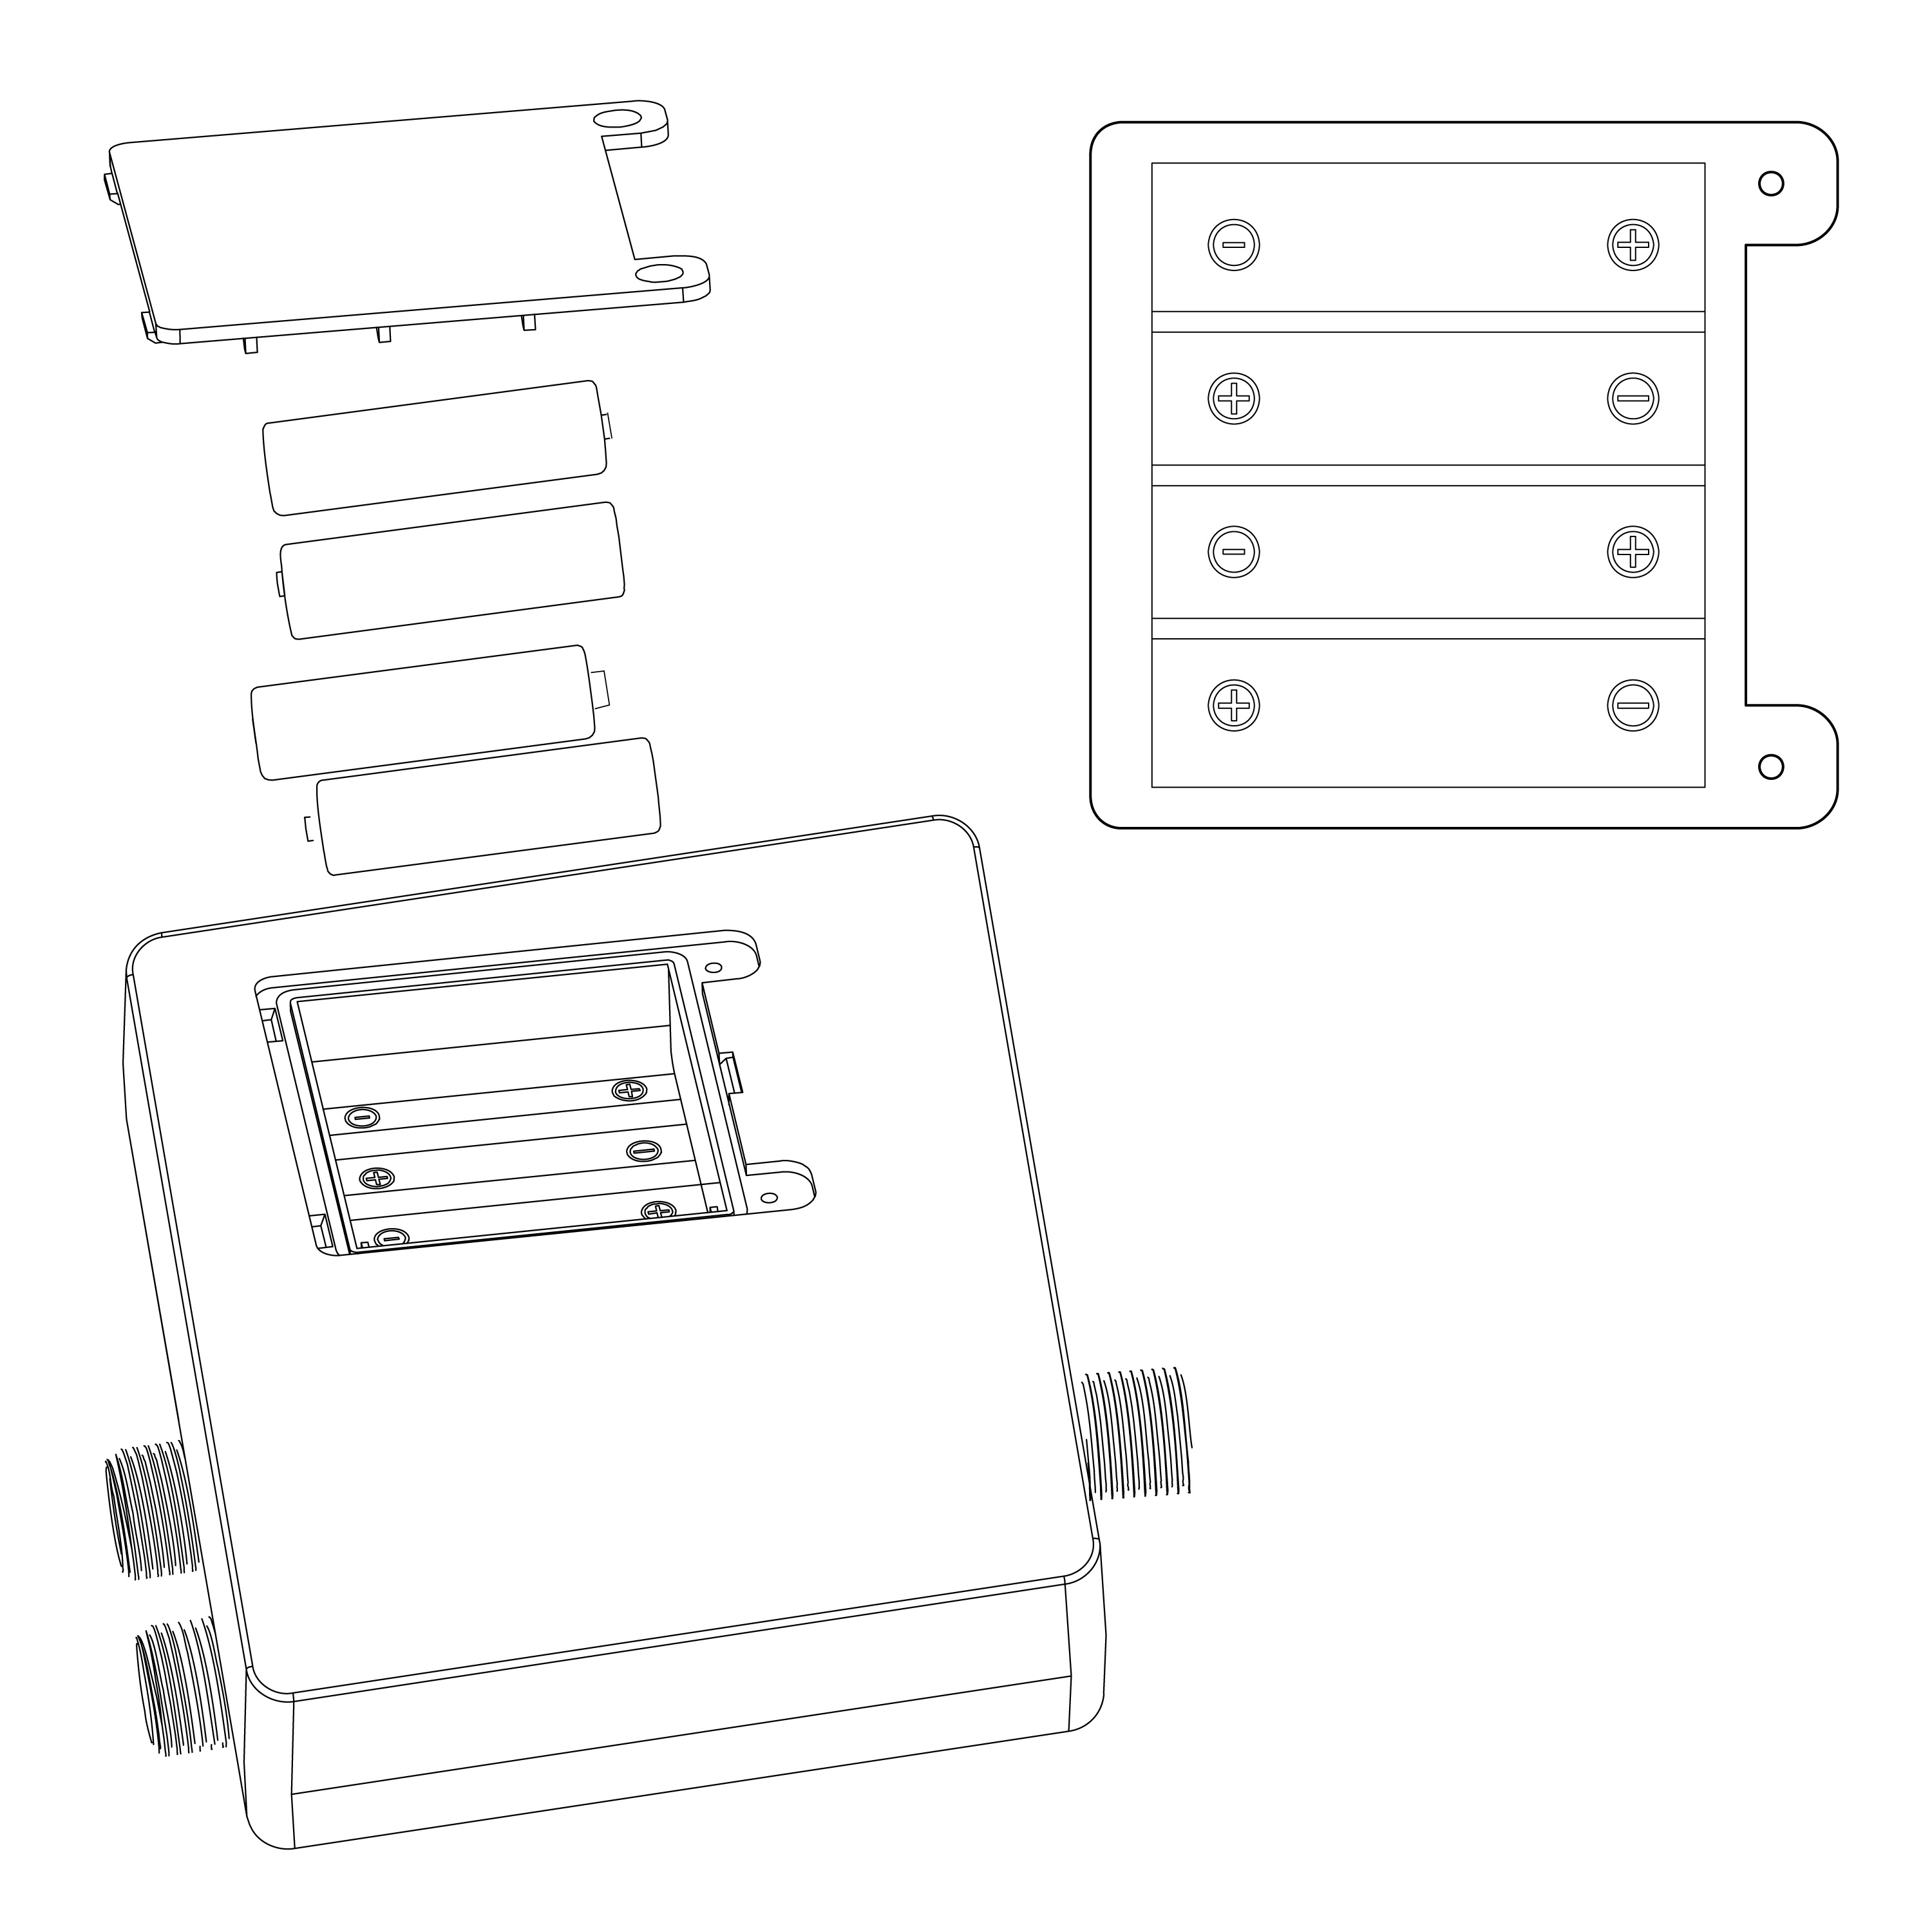
Step 15: (Battery Installation)
|
|
Step 16:
|
|
|
|
|
|
|
|
|
|
|
Step 17:
|
|
Step 18: (Installation of Control Panel)
|
|
|
|

|
|
|
|
|
|
|
Step 19:
|
|
Step 20:
|
|
|
|

|
|
|
|
|
|
|
Step 21:
|
|
Step 22: Recess mounted into wall
|
|
|
|

|
|
|
|
|
|
|
Step 22:
|
|
Step 23:
|
|
|
|
|
|
|
|
|
|
|
|
|
|
|
|
|
|
|
|
|
|
|
|
|
|
|
Notice
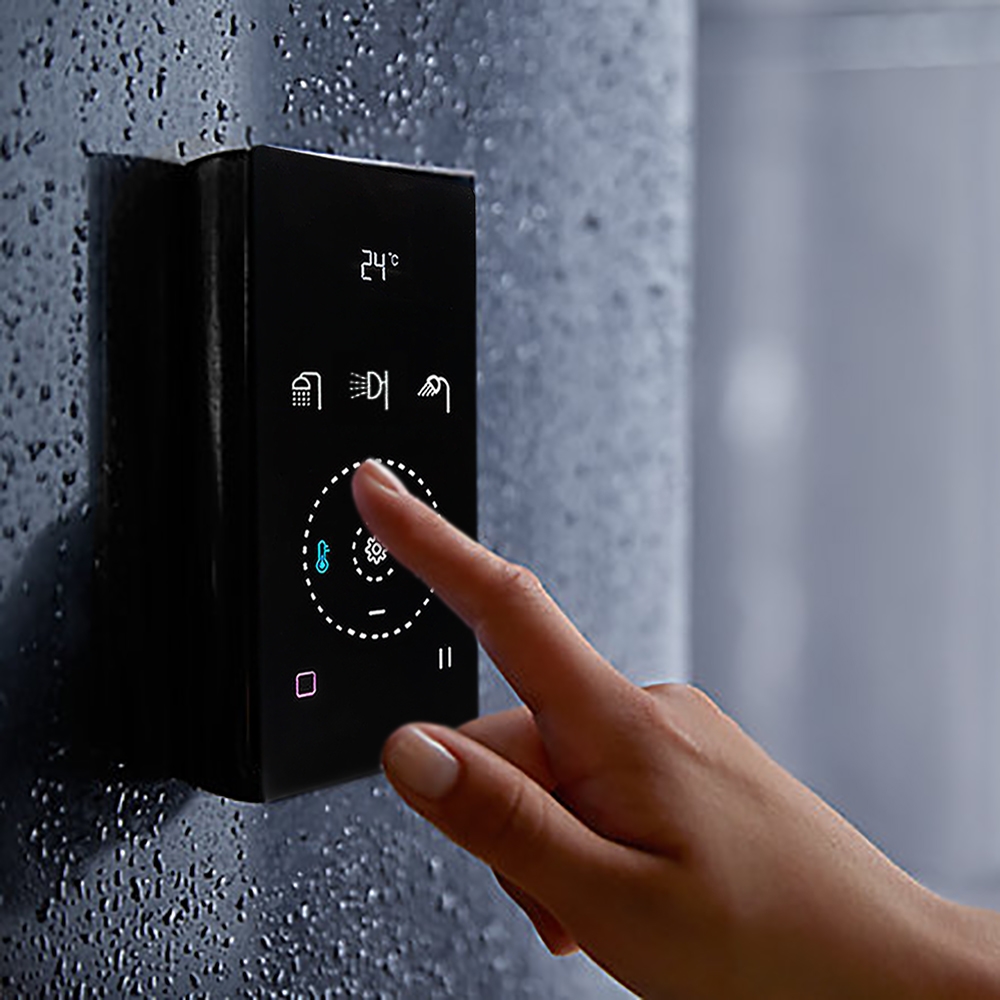
1. The control panel is sensitive, when installing it, please avoid to let it face directly to the water from the hand shower and the head shower, because water will get it misoperation or lock the control panel.
2. The touch button is the best sensitive area.
3. The touch panel has water splash protection technology. When the system detects misoperation, no response and need about 1 second to recover.
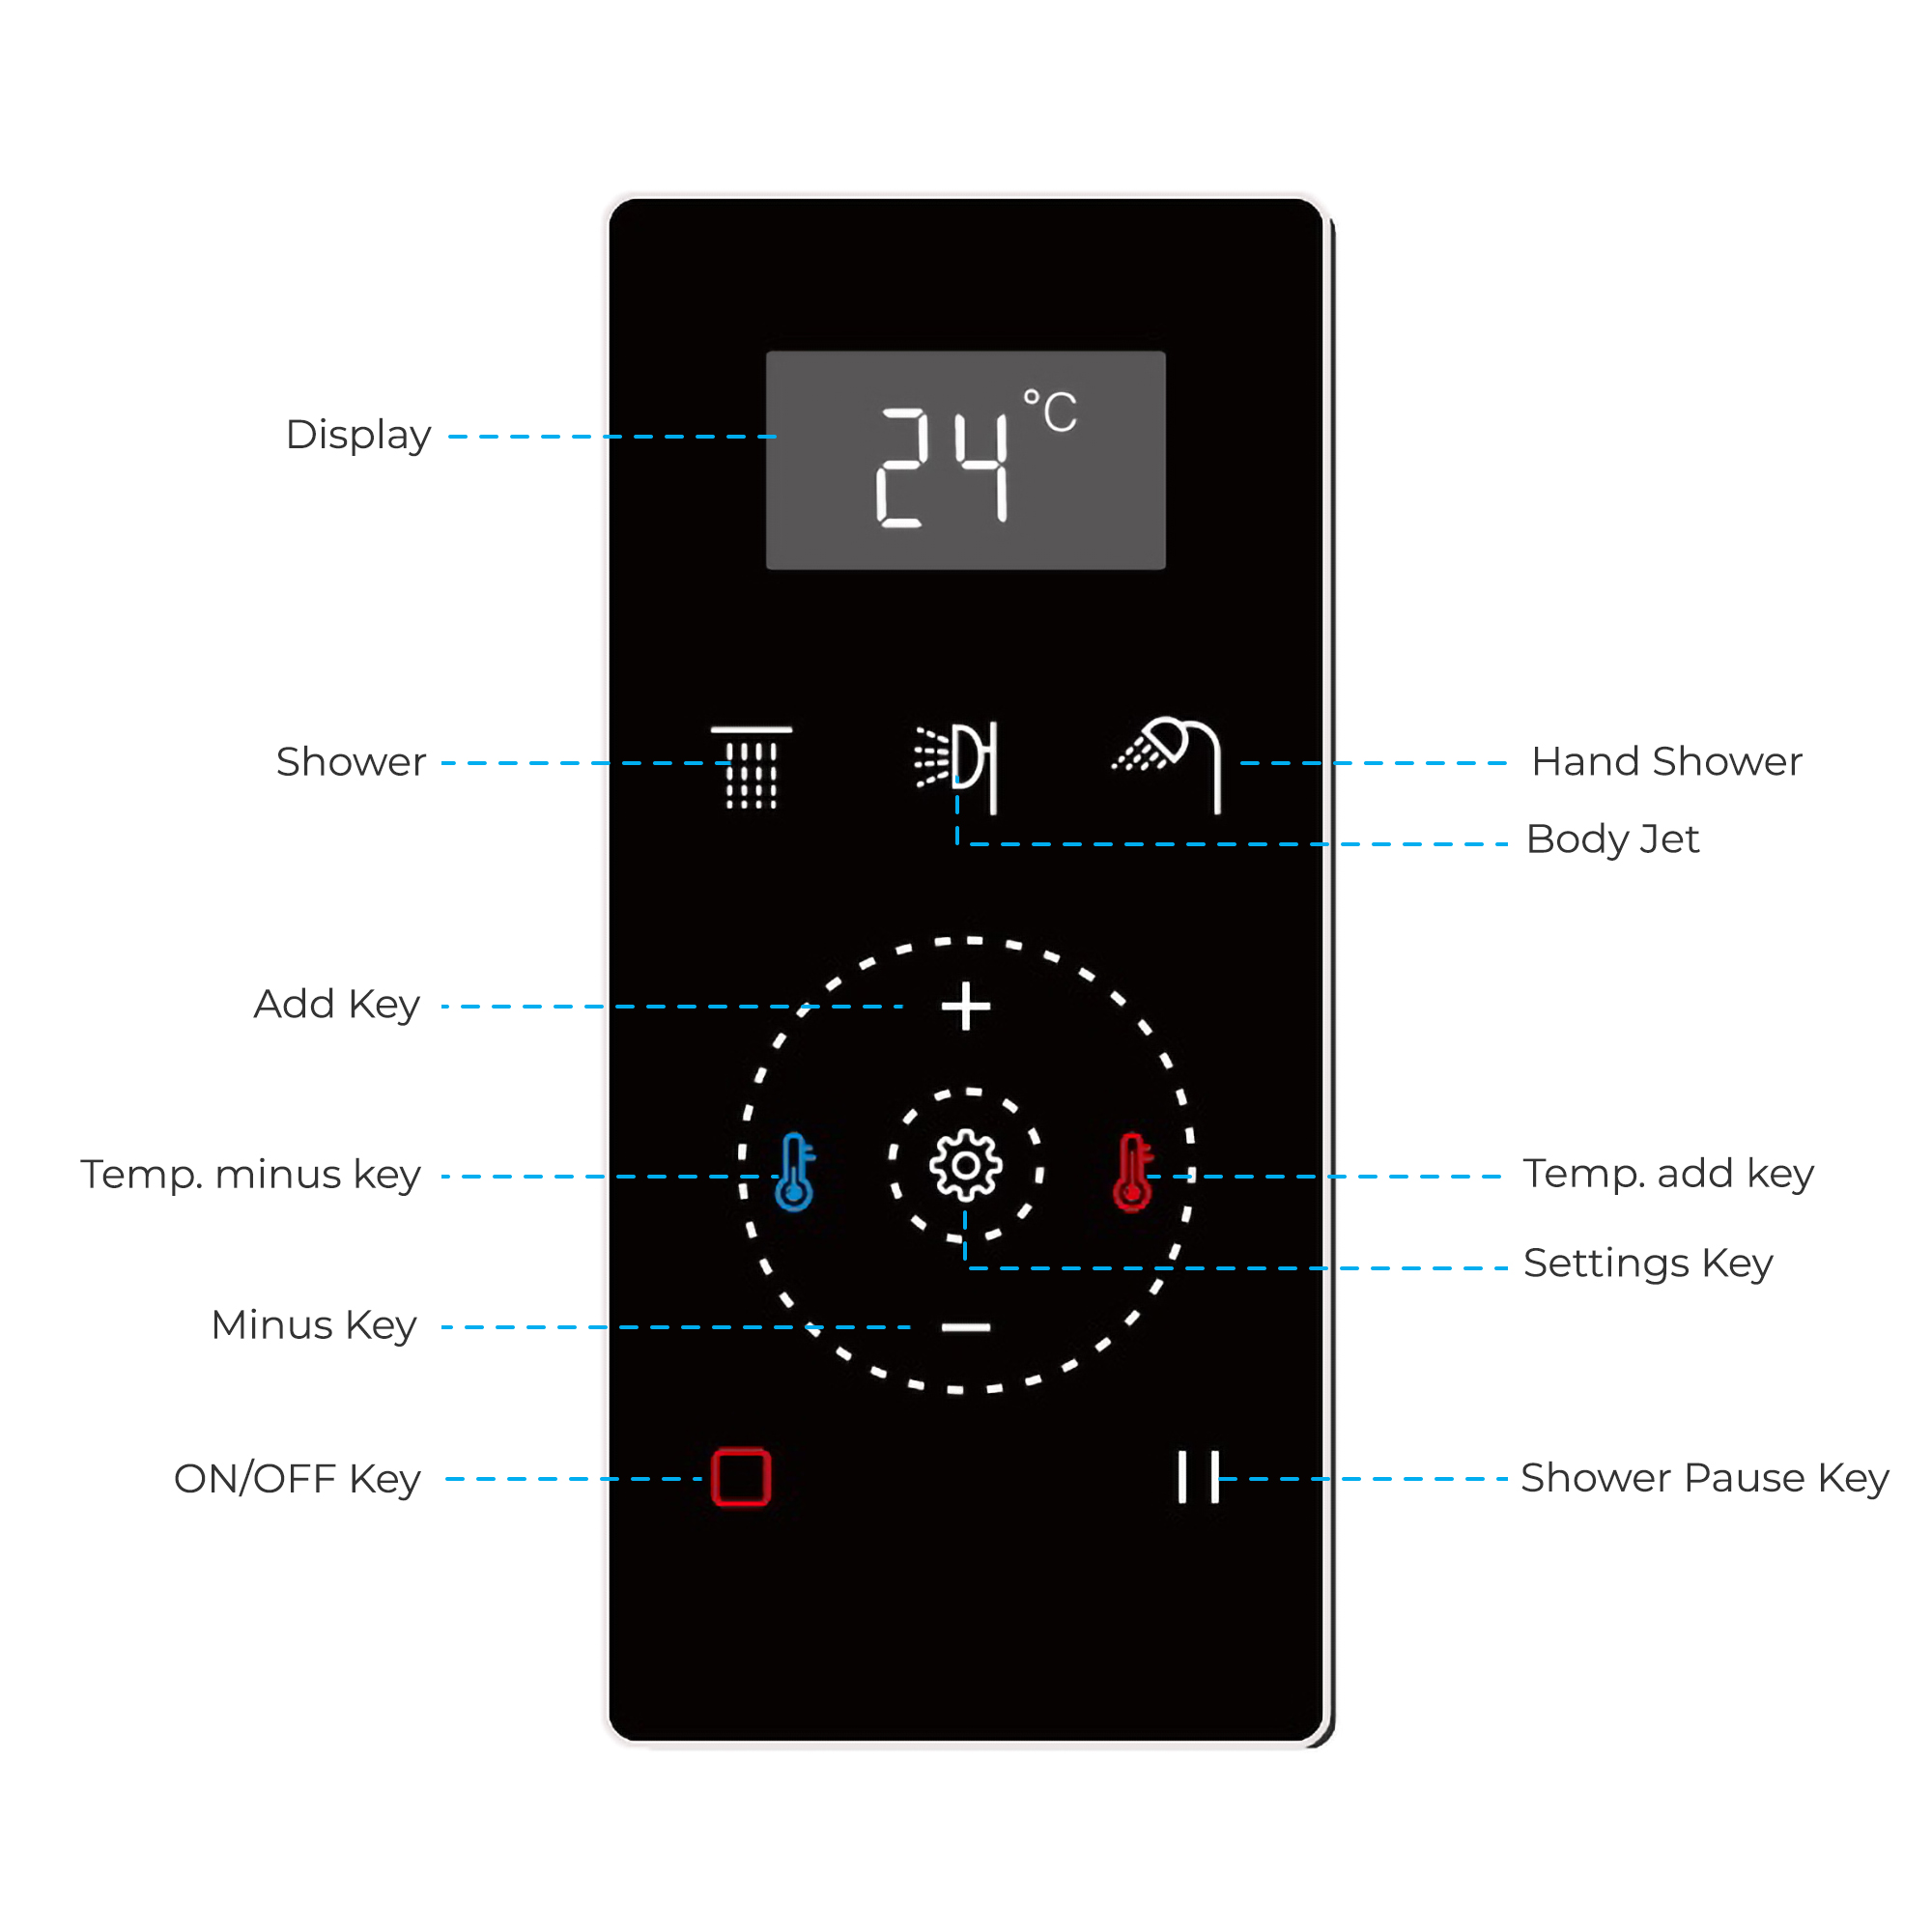
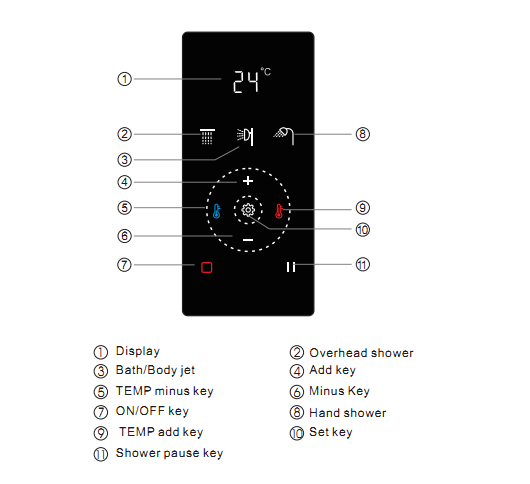
Function
1. Water TEMP adjust 2. Hand shower 3. Shower Head 4. Water flow adjust
Operation
1. Standby
After electrify, when all the functions are off, system will enter into standby mode automatically and display would be off.
2. Power on
When under standby mode, shortly press ON/OFF key to enter into system, display will show the current water TEMP. The first boot effluent setting temperature defaults to 38°C, while default water flow the maximum flow is L8.
The power on default mode is hand shower and the backlit is 3 bright while the backlit of other sprays are dark. To choose another shower mode after power on, in power off 20 minutes to boot. Otherwise it will still use current shower mode to ocean the water. When it power off over 20 minutes or the system is cut off the electricity. the system will recover to hand shower mode.
3. Power off
Alter booting, the system starts the countdown according to the set boot time; system will be off automatically when timing countdown to “0” or shortly press ON/OFF key.
4. Lock
After power on, without any operation in 20 seconds. it enter lock state. Display show “Key”, in addition ON/OFF key and Shower Pause key, other key without any response. Press shortly ON/OFF key to unlock.
5. Water TEMP display and setting
When system is on, the default water TEMP is 38°C, display will show the current water TEMP. If Shortly press TEMP minus key or TEMP add key it will enter into water TEMP setting mode with “SET” on. At this moment, if shortly press water TEMP minus key or one time, water TEMP will decrease by 1°C. If shortly press water TEMP add key for one time, water TEMP will increase by 1°C. When no operation on water TEMP adjustment within 3 seconds, it will exit water TEMP setting mode. Water TEMP setting range 12°C – 48°C. Set temperature will be save in the system, the next boot the system automatically calls the save set temperature (save the setting temperature is not affected by power system).
After water TEMP adjust as 25°C, if shortly press water TEMP minus key for one time. it will enter into cold water mode. When exit TEMP setting. If it is cold water mode now, display will show cold water mode with “Lo”.
6. Cold water mode
Close hot water for the cold water mode, fitted only open the cold water inlet. After turn on cold water mode, shortly press Temperature Add key will exit cold water mode and return to the former thermostat water TEMP. TEMP will be 25°C.
Power off when it is cold water mode, the system will automatically quit out. Power on again the system will recover the default thermostat TEMP 38°C.
7. Water flow display and setting
When system is on. shortly press Add key and Minus key to set the flow. Water flow rate is set by water flow level. If shortly press Minus key for one time, it will decrease by 1 level, if shorty press Add key for one time. it will increase by 1 level. When no operation on water flow adjustment within 3 seconds, it will exit water flow setting mode and show as the current water TEMP. Water flow setting range is 1-8 level. When you have finished setting up the effluent, the effluent grade will be save automatically. Next boot time will transfer the save effluent grade. Not use the default anymore.
8. Power on time setting
In the state of power on. shortly press Set key, the system will change to power on time setting mode. Display show as figure 7. Shortly press Add key to increase 1 minute. shortly press Minus key to decrease 1 minute. Without any operation within 3 seconds. It will quit the setting. It will be saved the time after power on. Power on time setting range: 1-60minutes. The default power time is 30 minutes.
9. Overheat protection
When system is on. If outlet water TEMP is over 49°C and last for 3 seconds. system will shutdown automatically. LCD screen display overheating protection tips and according to the current temperature cycle 1 second intervals.
10. Spray mode selection
When system is on, shortly press 1 to enter into overhead shower mode, while the backlit of overhead shower is bright. shortly press 2 to enter into bath/body jet made. while the backlit of body jet is bright shortly press 3 to enter into hand shower mode, while the backlit of hand shower is bright. The backlit of spray mode which is not selected is dark.
When start spray. shortly press Shower pause key the current spray will be suspended. and the bodily backlit of the current spray will be flashing; at this moment, if shortly press Shower pause key or shortly press the current flashing spray key (for example. if suspended 1, press 1 again) will restore the current spray water outlet: If it is in a suspended state, shortly press other spray button, it will switch to other spray mode and let the water out.
Battery Installation
On systems with batteries. when main power supply when the battery charging status. only when the battery power, In the display area the upper right corner of the battery, when the main power supply, battery power or the system without battery. the battery con Is not shown. When the battery power appears low battery. The electric icon is flash. When the electric is low than grade 1. The con shows low battery the lowest state When you detect the lowest electricity after 5 seconds. The system will off automatically.
Fault indicator
On the screen shows 'EE'. It means connection failure. Please check the connection panel with the host communication lines.
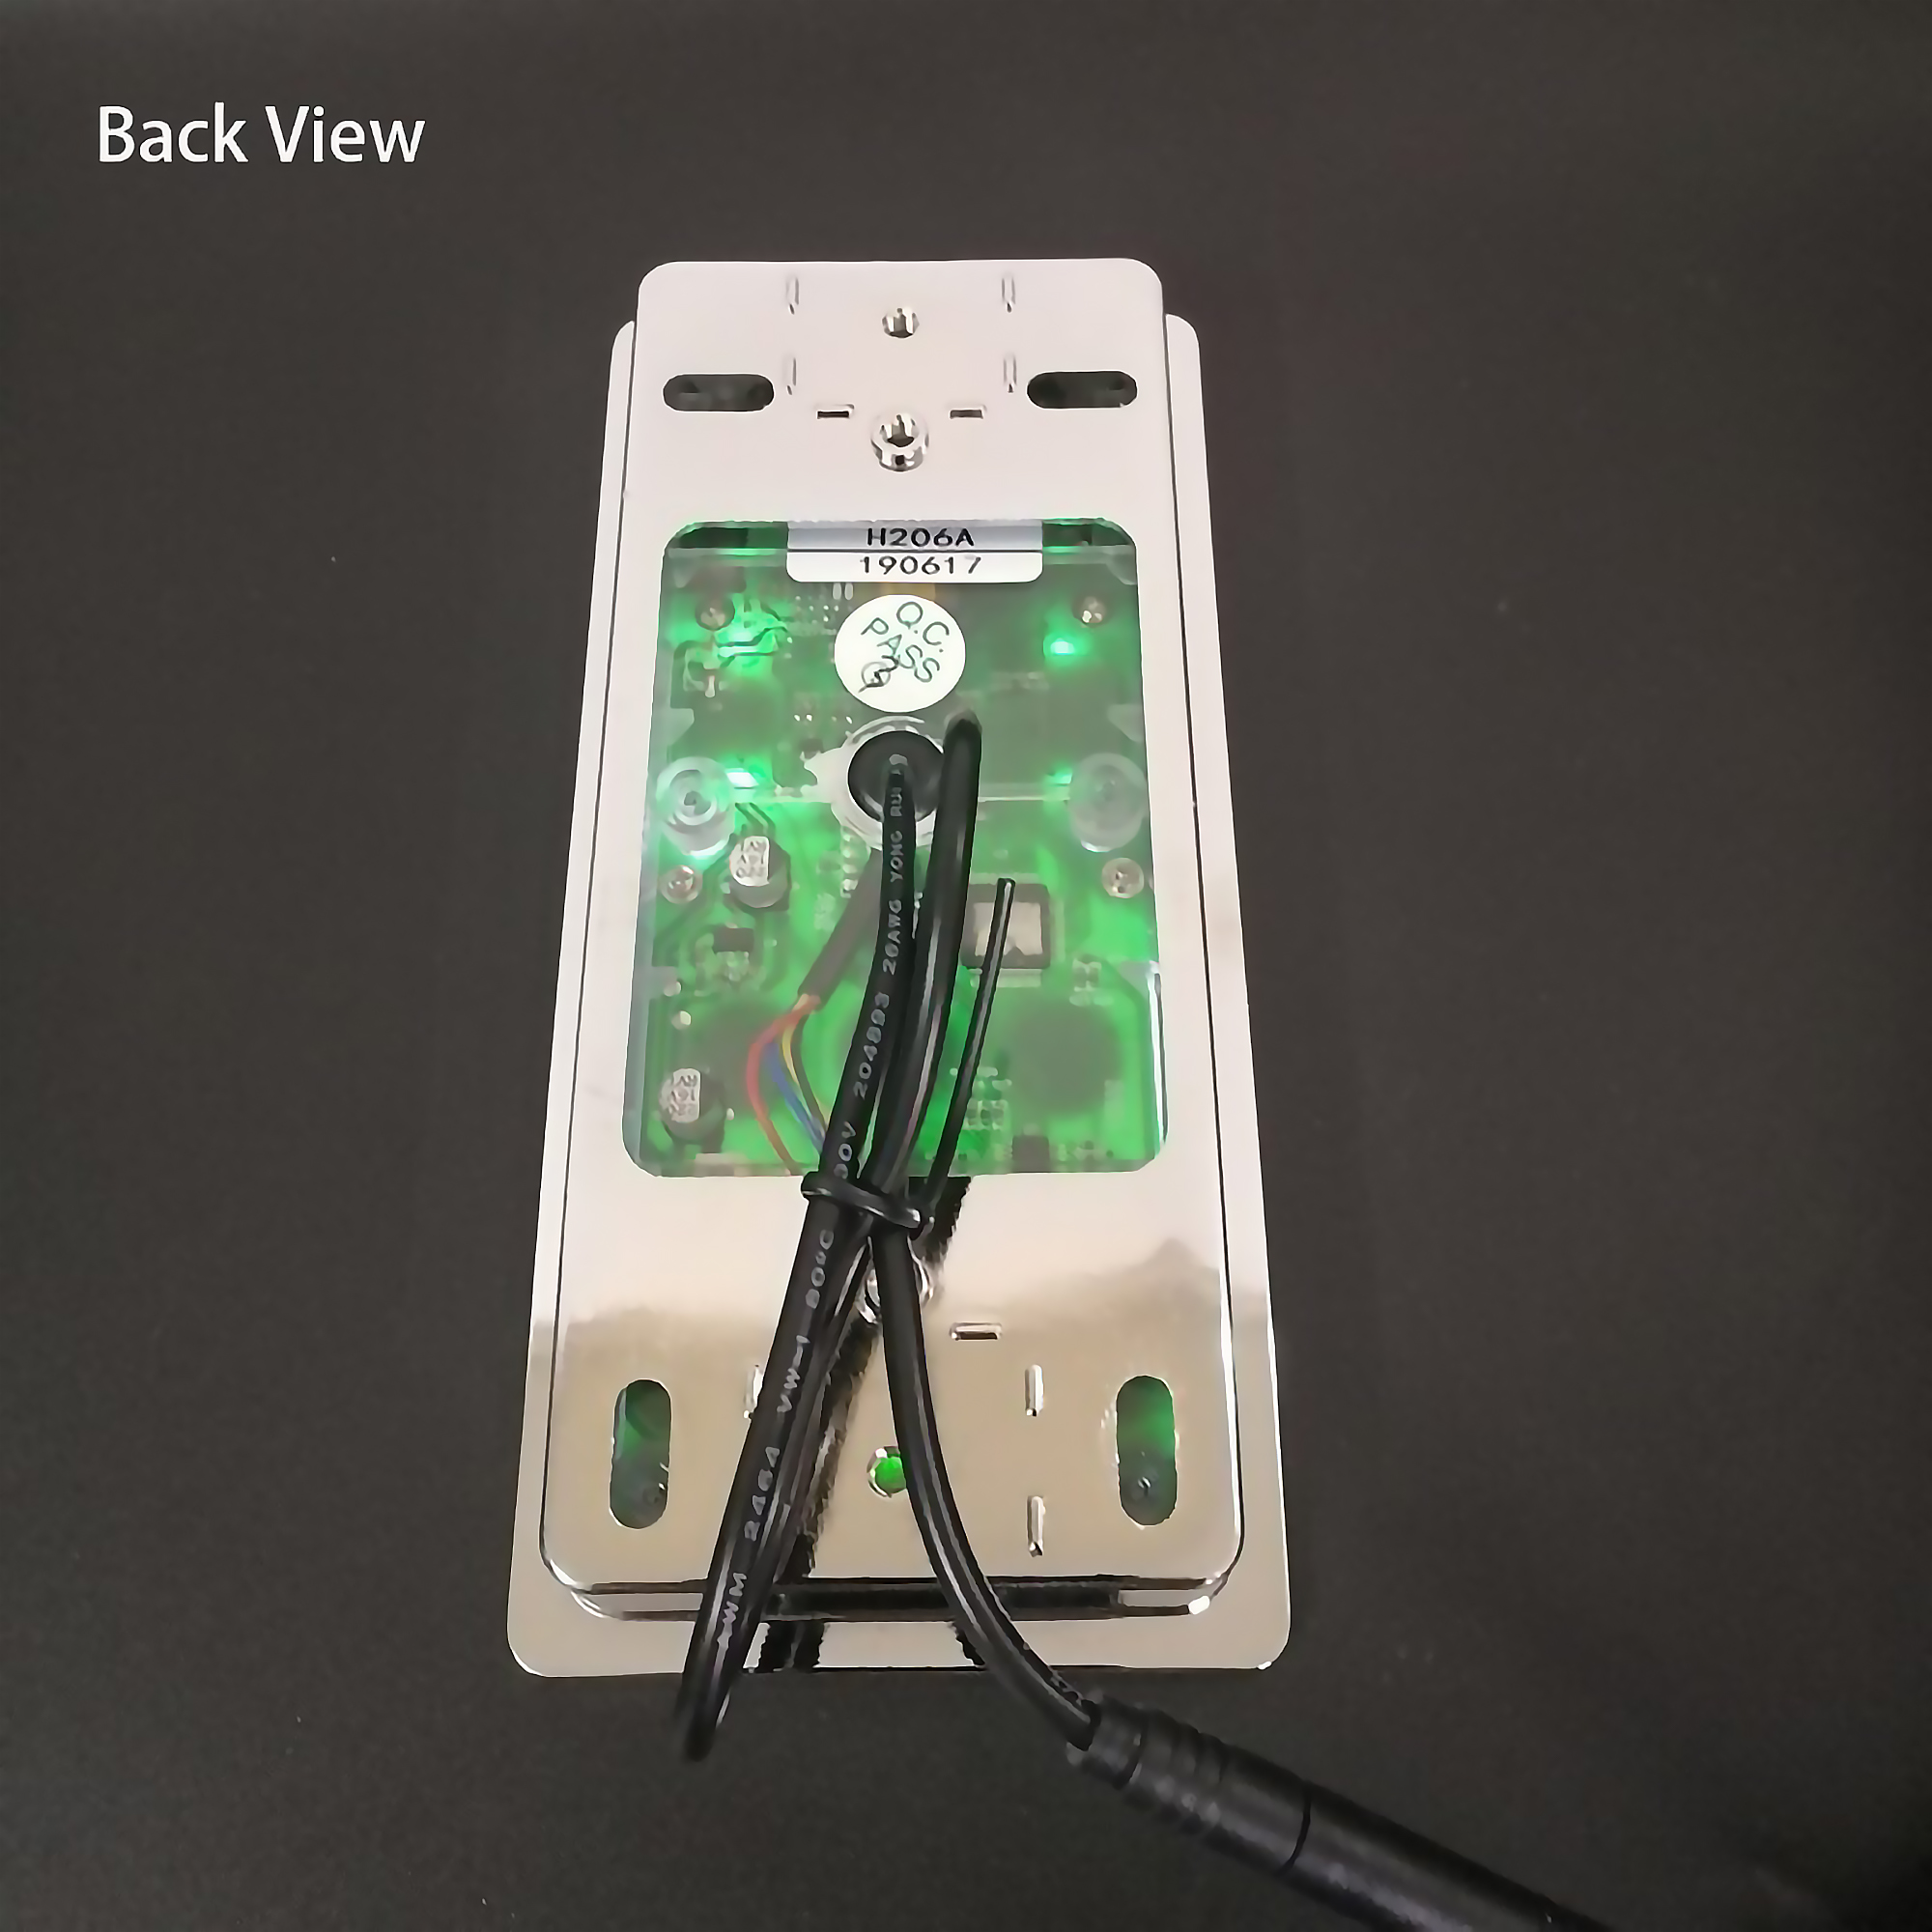
Installation of the Control Panel
1. Build the control panel into the shower panel
Step 1: Open a hole on the shower panel, putting some glass cement around the back of the control panel and fit it in the hole of the shower panel.
Step 2: Fasten the mounting bracket onto the back of the control panel by screws.
Step 3: Install the host box on the back of the shower panel, connect the cold water and hot water pipe, hand shower, and head shower's pipes.
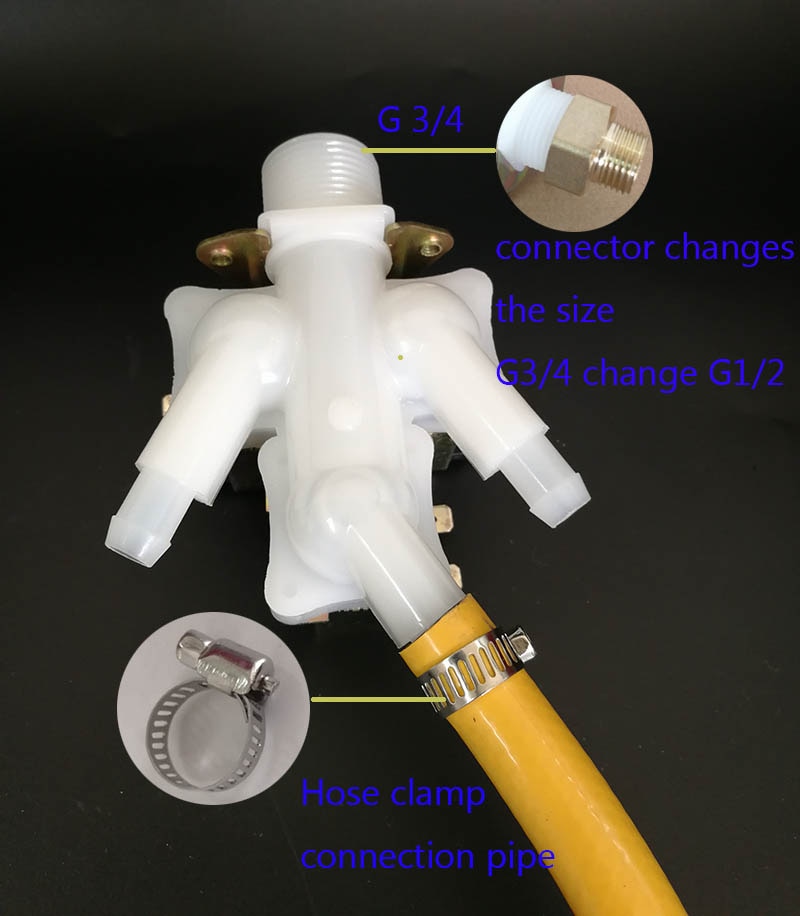
1. Connect the G1/2" hot and cold water inlet pipes to the host box, tighten it and make sure connection is well sealed.
2. Connect the G1/2" water inlet pipe of the faucet to the water outlet pipe of the host box, tighten it and make sure connection is well seated.
Caution:
• When installation, the hot water pipe, and the cold water pipe cannot mix up. Otherwise, the system cannot work.
• When you tighten the connector nut, torque should not exceed 8NM, GB 2.5NM is OK, otherwise, it will damage the connector of the mixing valve and lead to water leaking.
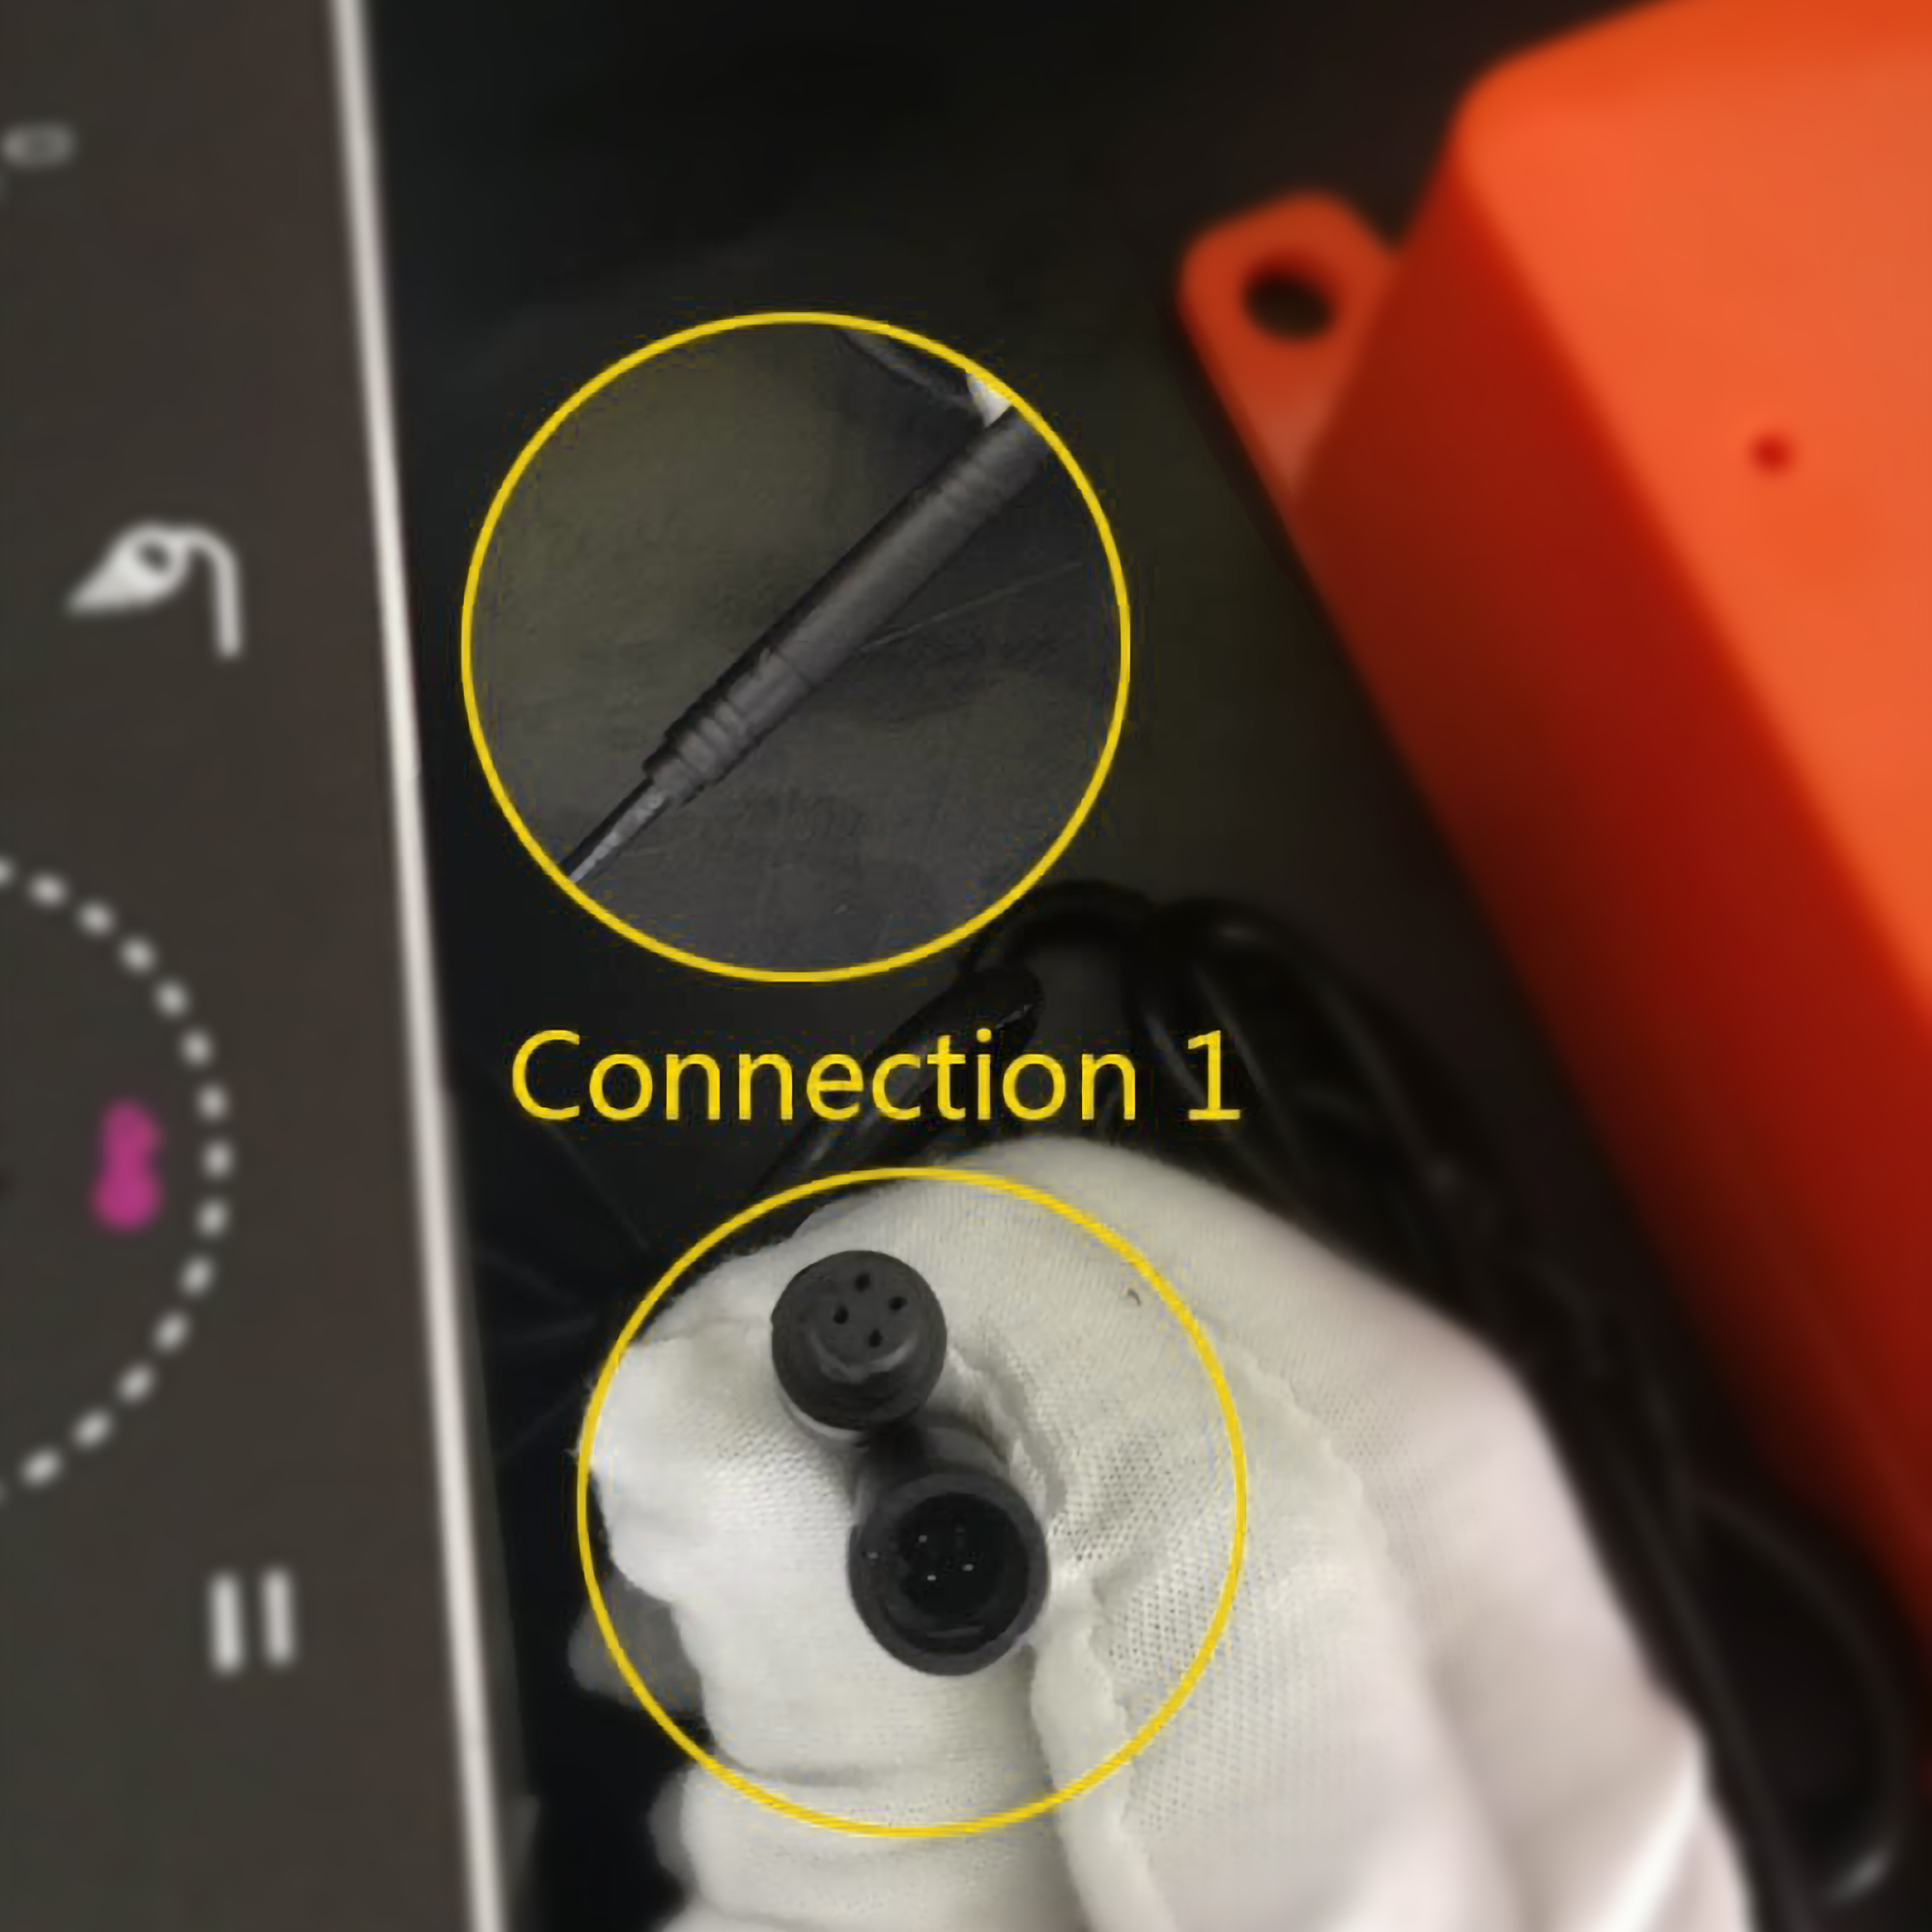
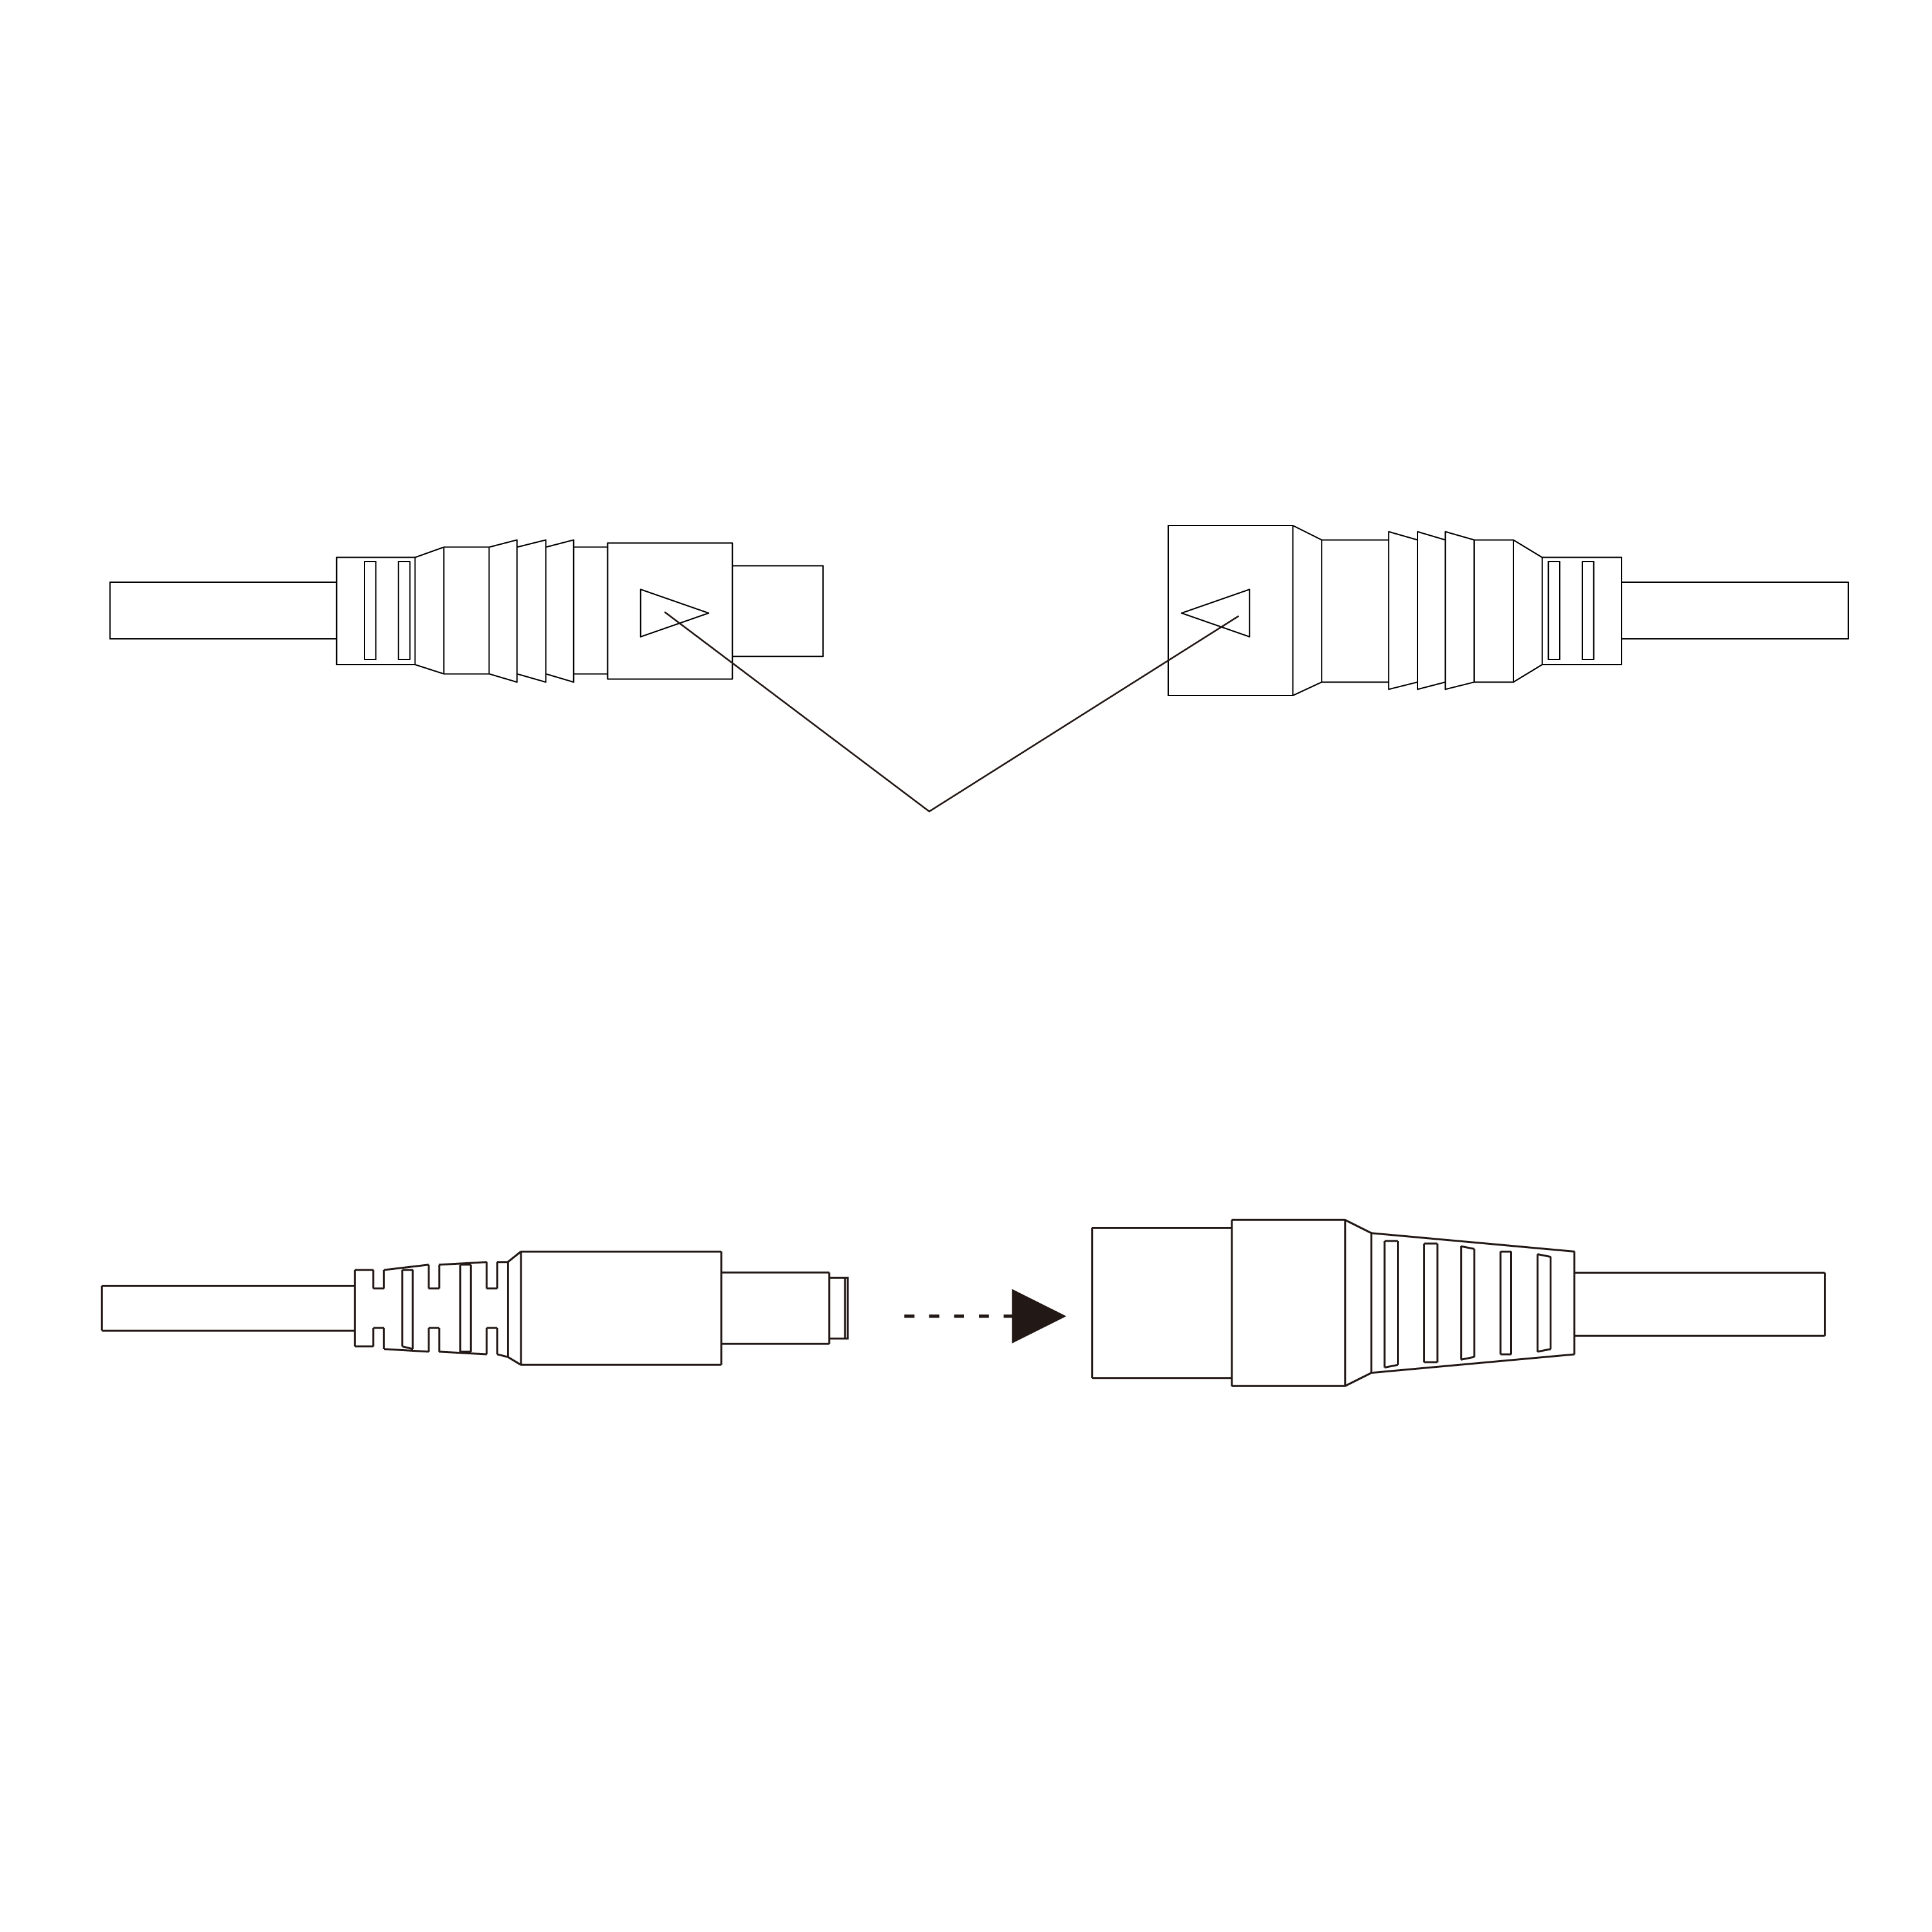
Step 4: Connect the host box control cable with the control cable of shower faucet.
Caution: When connecting the two control cables, you must follow the arrow mark which is shown in the cable joint. If not, it will damage the cable joint.
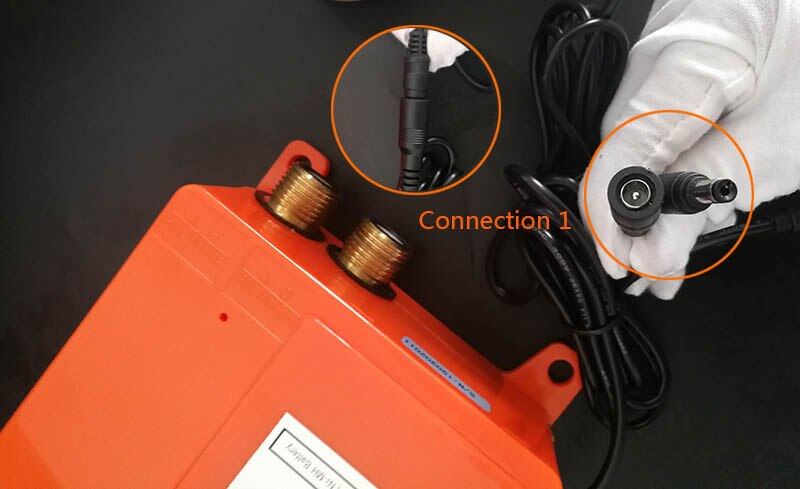
Step 5: Connect the power supply cable of the host box with the adapter.
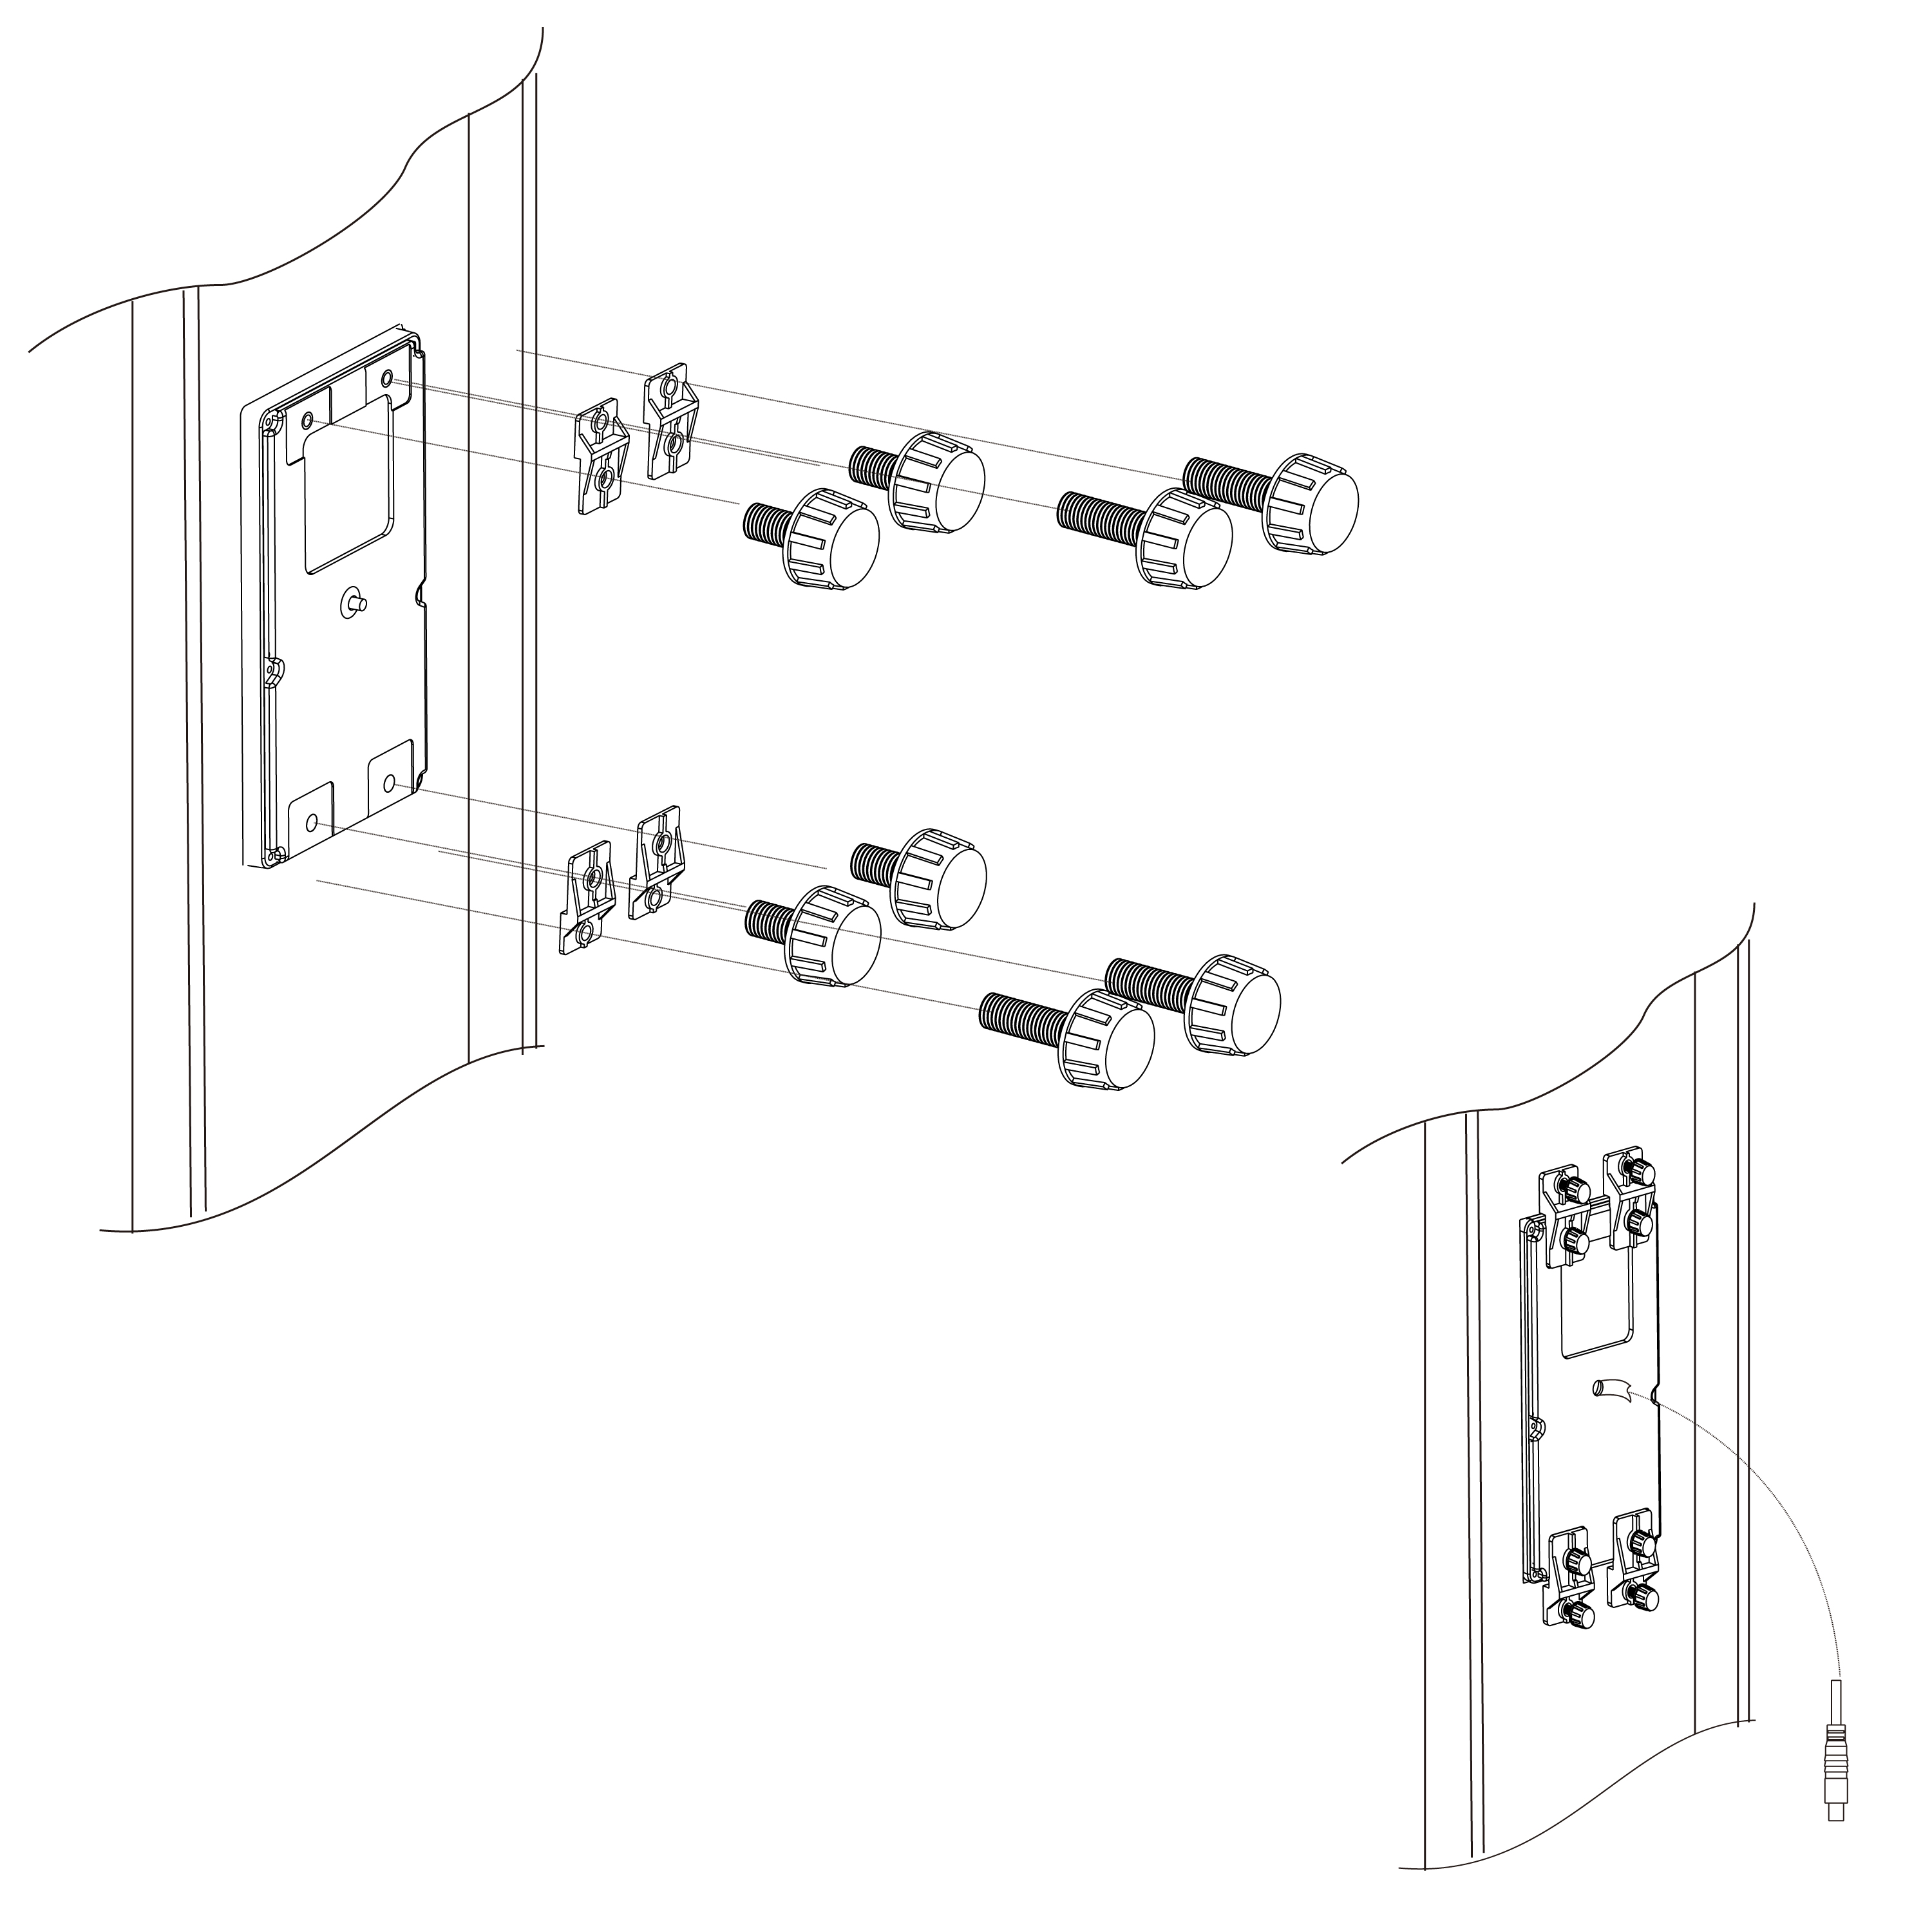
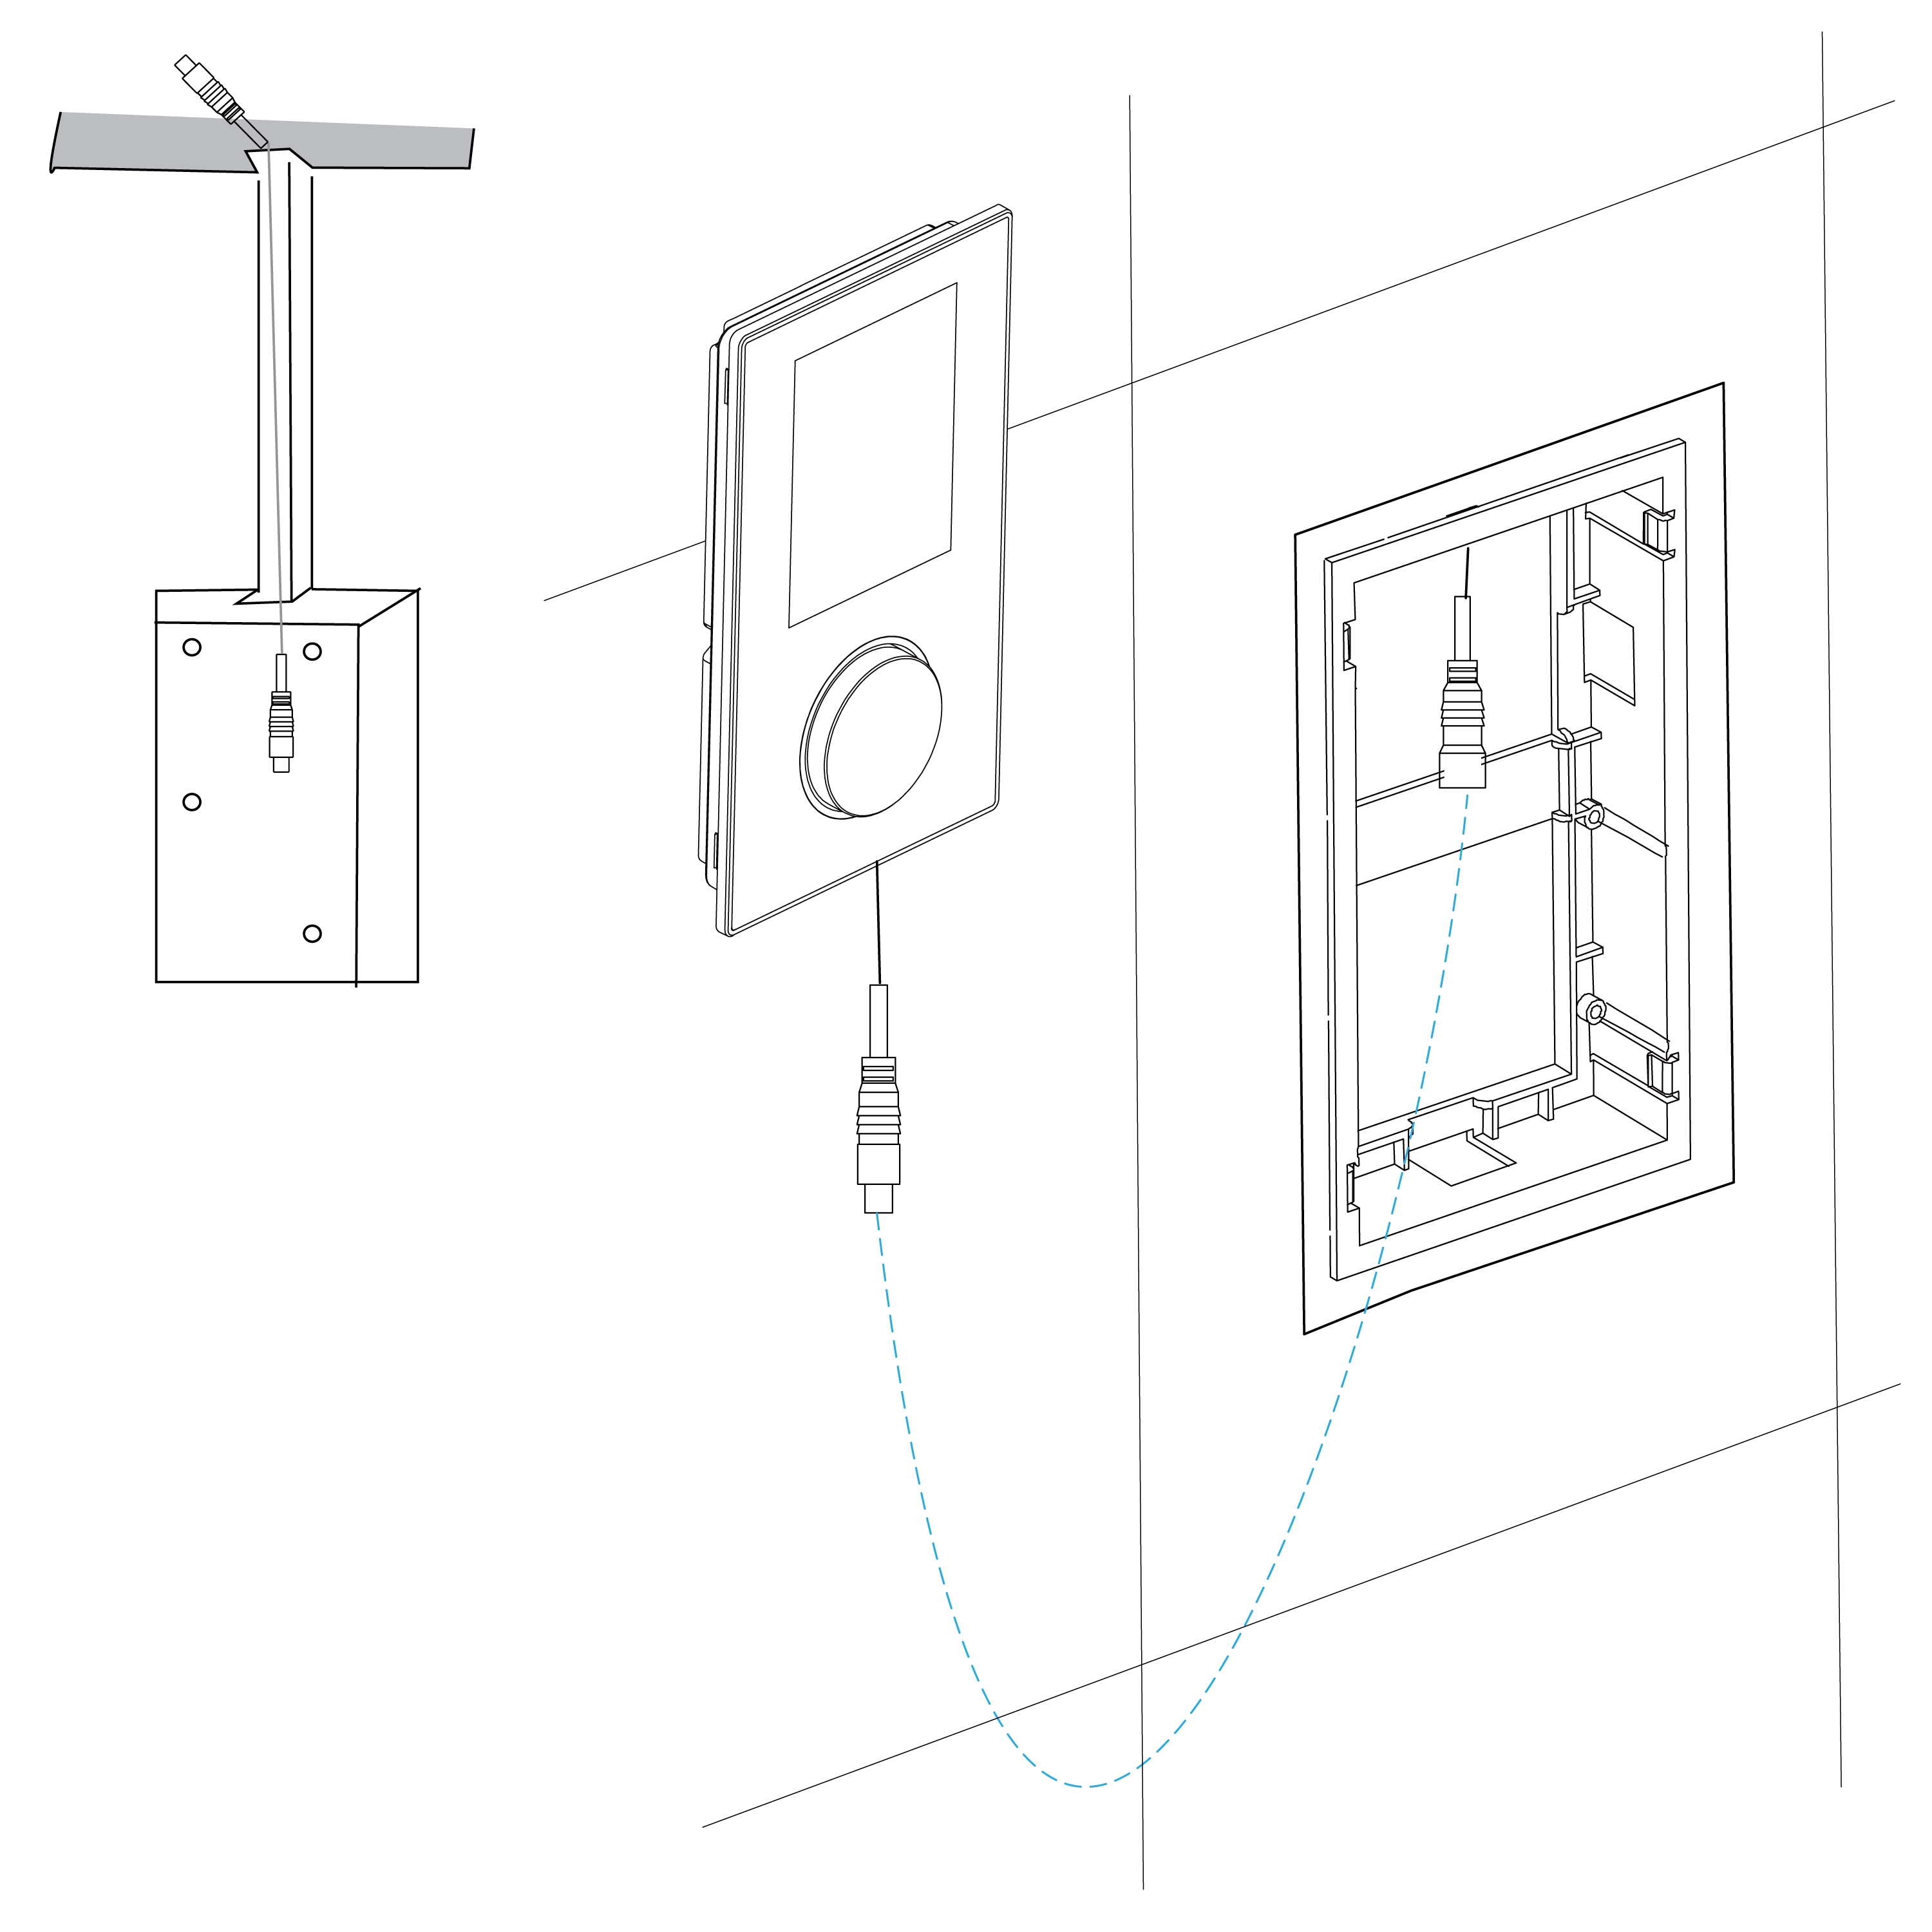
Recess mounted into the wall
A: The installation of control panel
Step 1: Open a slot in the wall for the host box, and prepare the cable pipe for the control cable of the host box.
Step 2: Drill four holes by 6mm diameter on the upside hole for install the wall bracket and put the plastic screw into the hole.
Step 3: Drill four holes by 8mm diameter on the downside hole for the host box installation and put the expansion screws into the hole.
Step 4: Leading the control cable plus from the cable slot and fix it before mounting the control panel.
Step 5: Make sure the control panel bracket is concave the wall surface with 0.5-1mm difference.
Step 6: Connect the control cable between the host box and the control panel, put some silicon on the back case of the control panel and put it on the bracket inside the wall to fasten it.
B: The installation of the host box
1.Choose a suitable place as mentioned before, fasten the host box on the wall by 4pcs holes of the host box.
2. Shut off the cold water and hot water supply, lead cold and hot water pipe from the cold, hot water supply to the cold and hot water inlet of the host box.
3. Connect the head shower and hand shower pipe to the marked water outlet of the host box.
4. Connect the power adapter to the power cable of the host box.
5. Connect the control cable between the control panel and the host box.
6. Get AC220V power supply to the power adapter.
7. Switch on the hot and cold water supply, make sure all water pipe connection is tighten before using.
|
|

|
|
|
|
|
|
|
|
|
Technical Parameters
Rated Working condition and characteristic | Related Voltage | AC100-240V |
|
|