How to install Fontana Sierra Light Oil Rubbed Bronze LED Shower System | LED-SHOWER-FB-0522ORB
|
|
|
Visit Product Page 
|
|
Installation Instructions for Bathroom Shower Set
- Before you begin, please read the installation instructions below. Observe all local building and safety codes.
- Unpack and inspect the product for any shipping damages. If you find damages, do not install.
- Please note all products must be installed by a professional and certified plumber otherwise warranty might be voided.
|
shower
|
|

|
Shower Head Installation Instructions

Additional Information:
- The LED lights are powered by water flow and will be activated once the water is turned on.
- The LED light will change its color by detecting water temperature:
- 0-30 °C (32-86 °F): Blue LED
- 30-40 °C (86-104 °F): Green LED
- 40-50 °C (104-122 °F): Red LED
- 50-100 °C (122-212 °F): Flashing Red LED
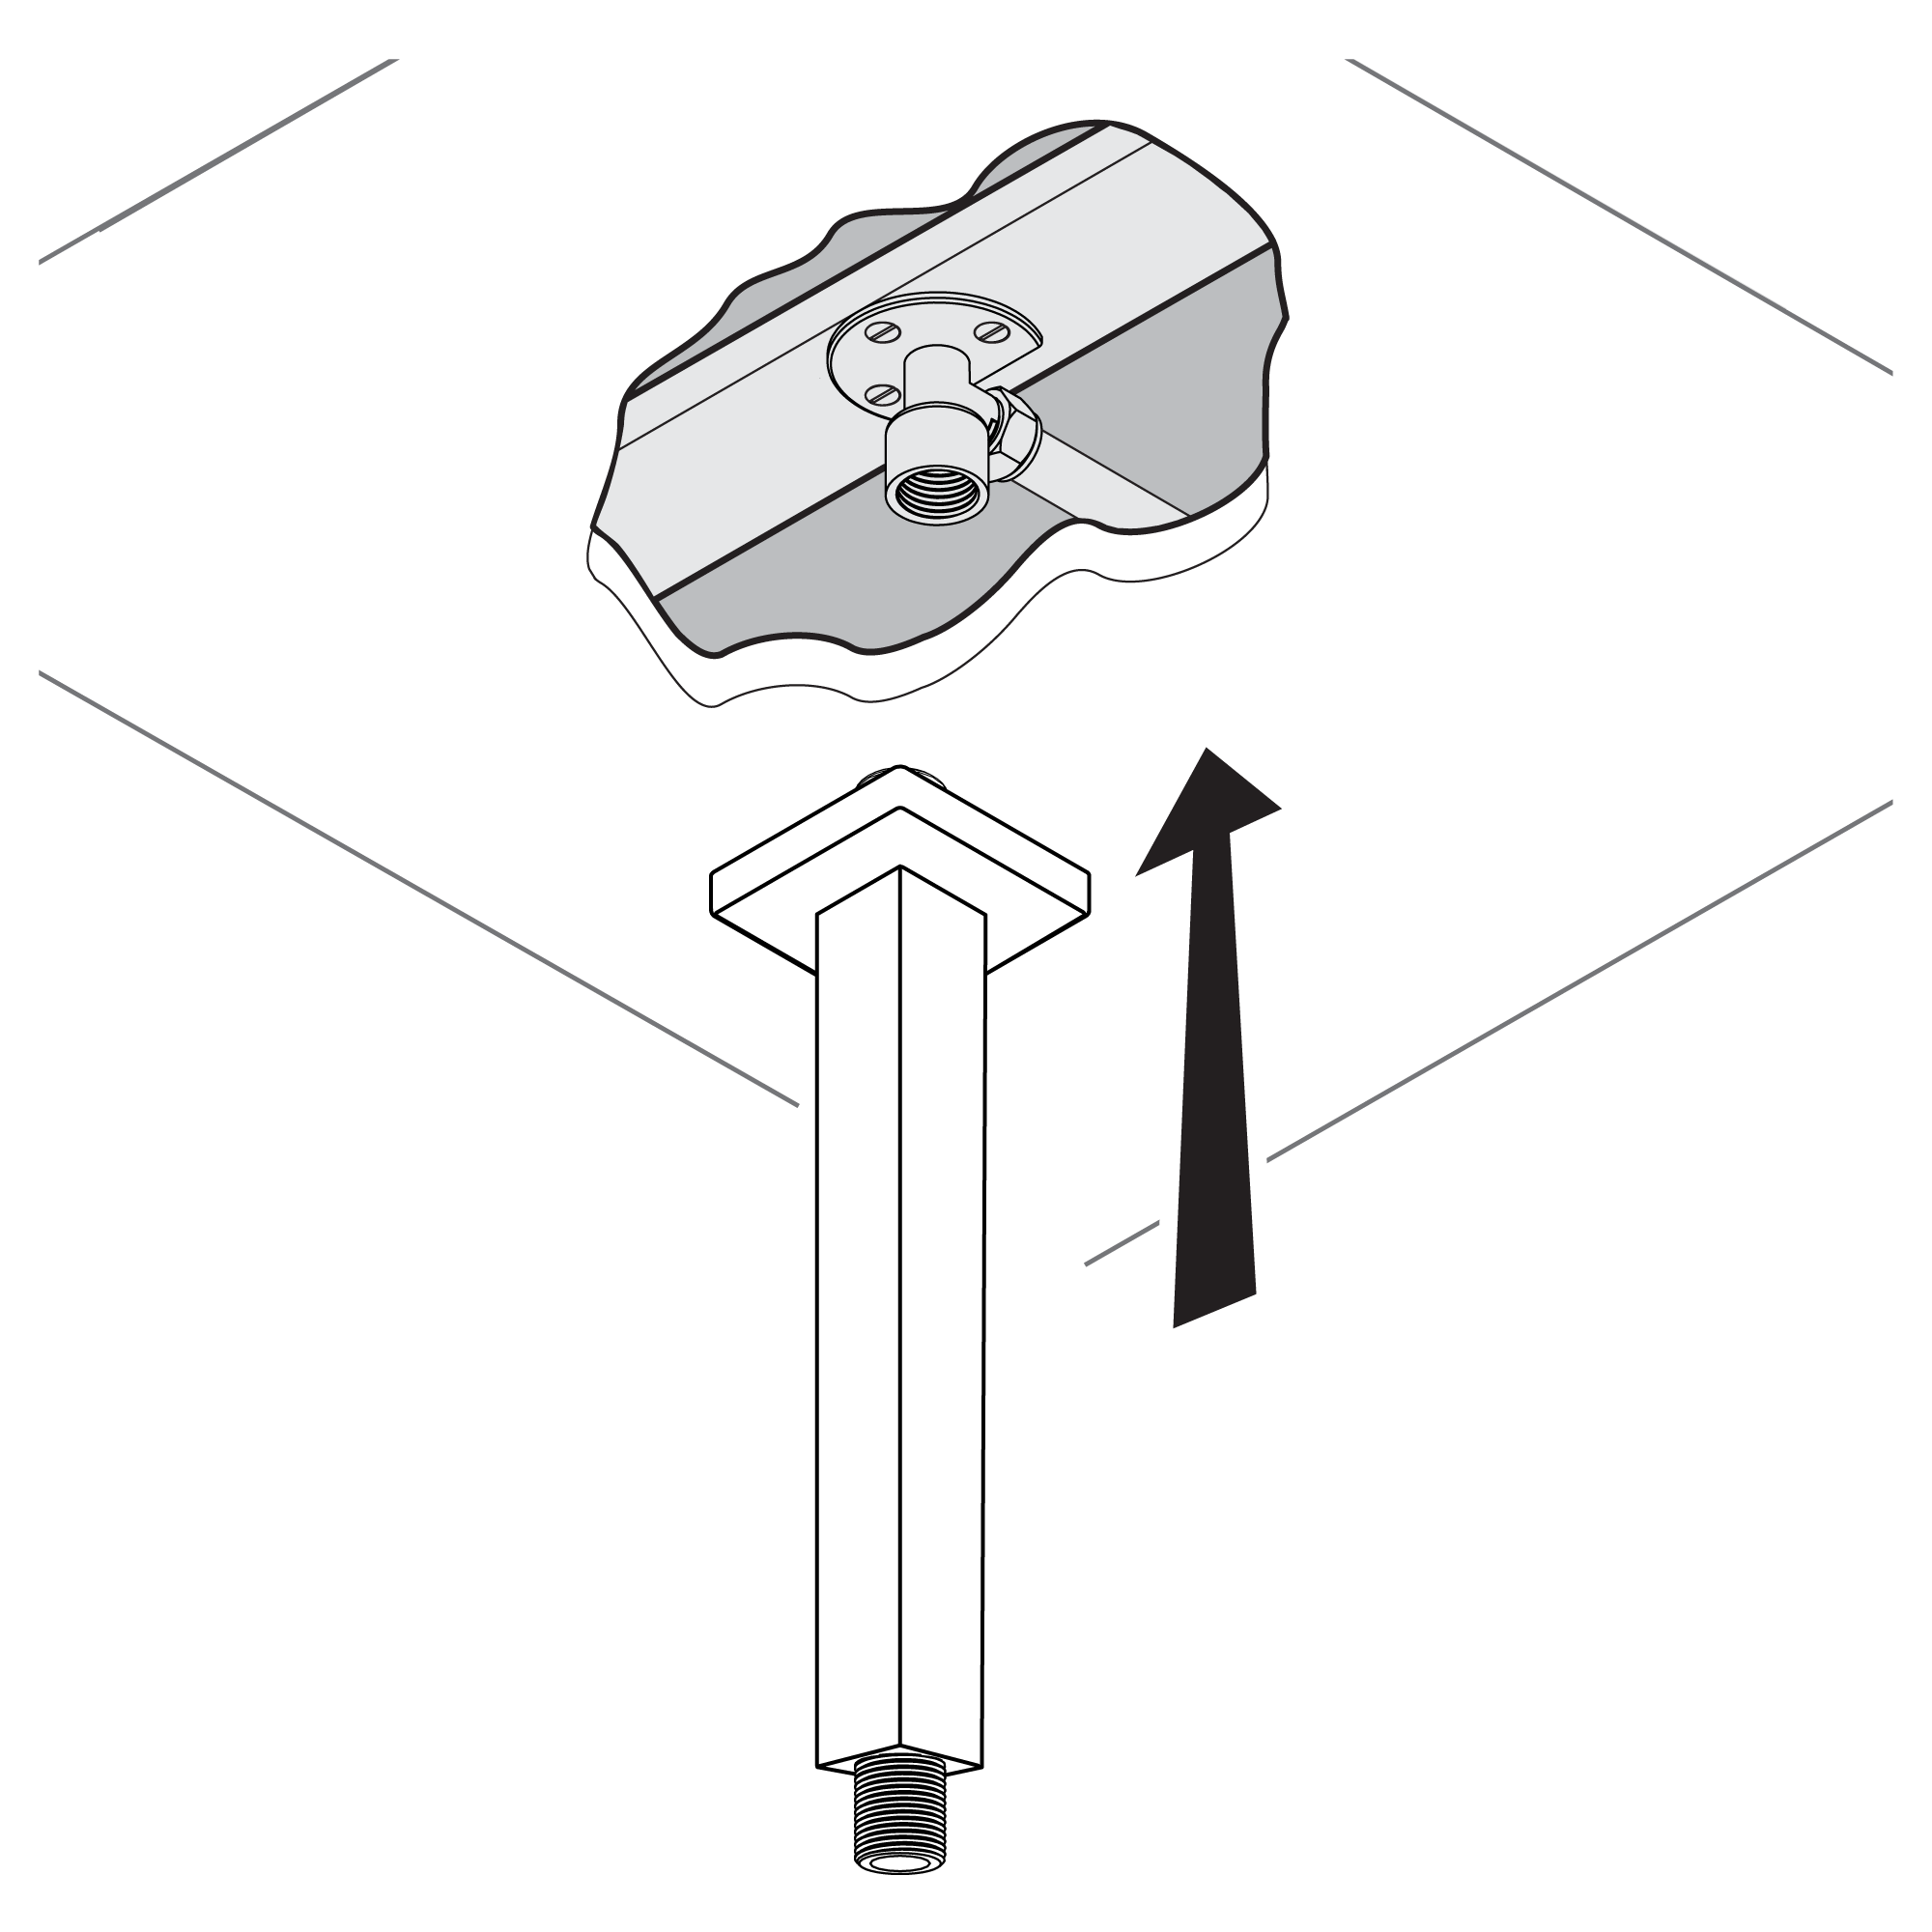
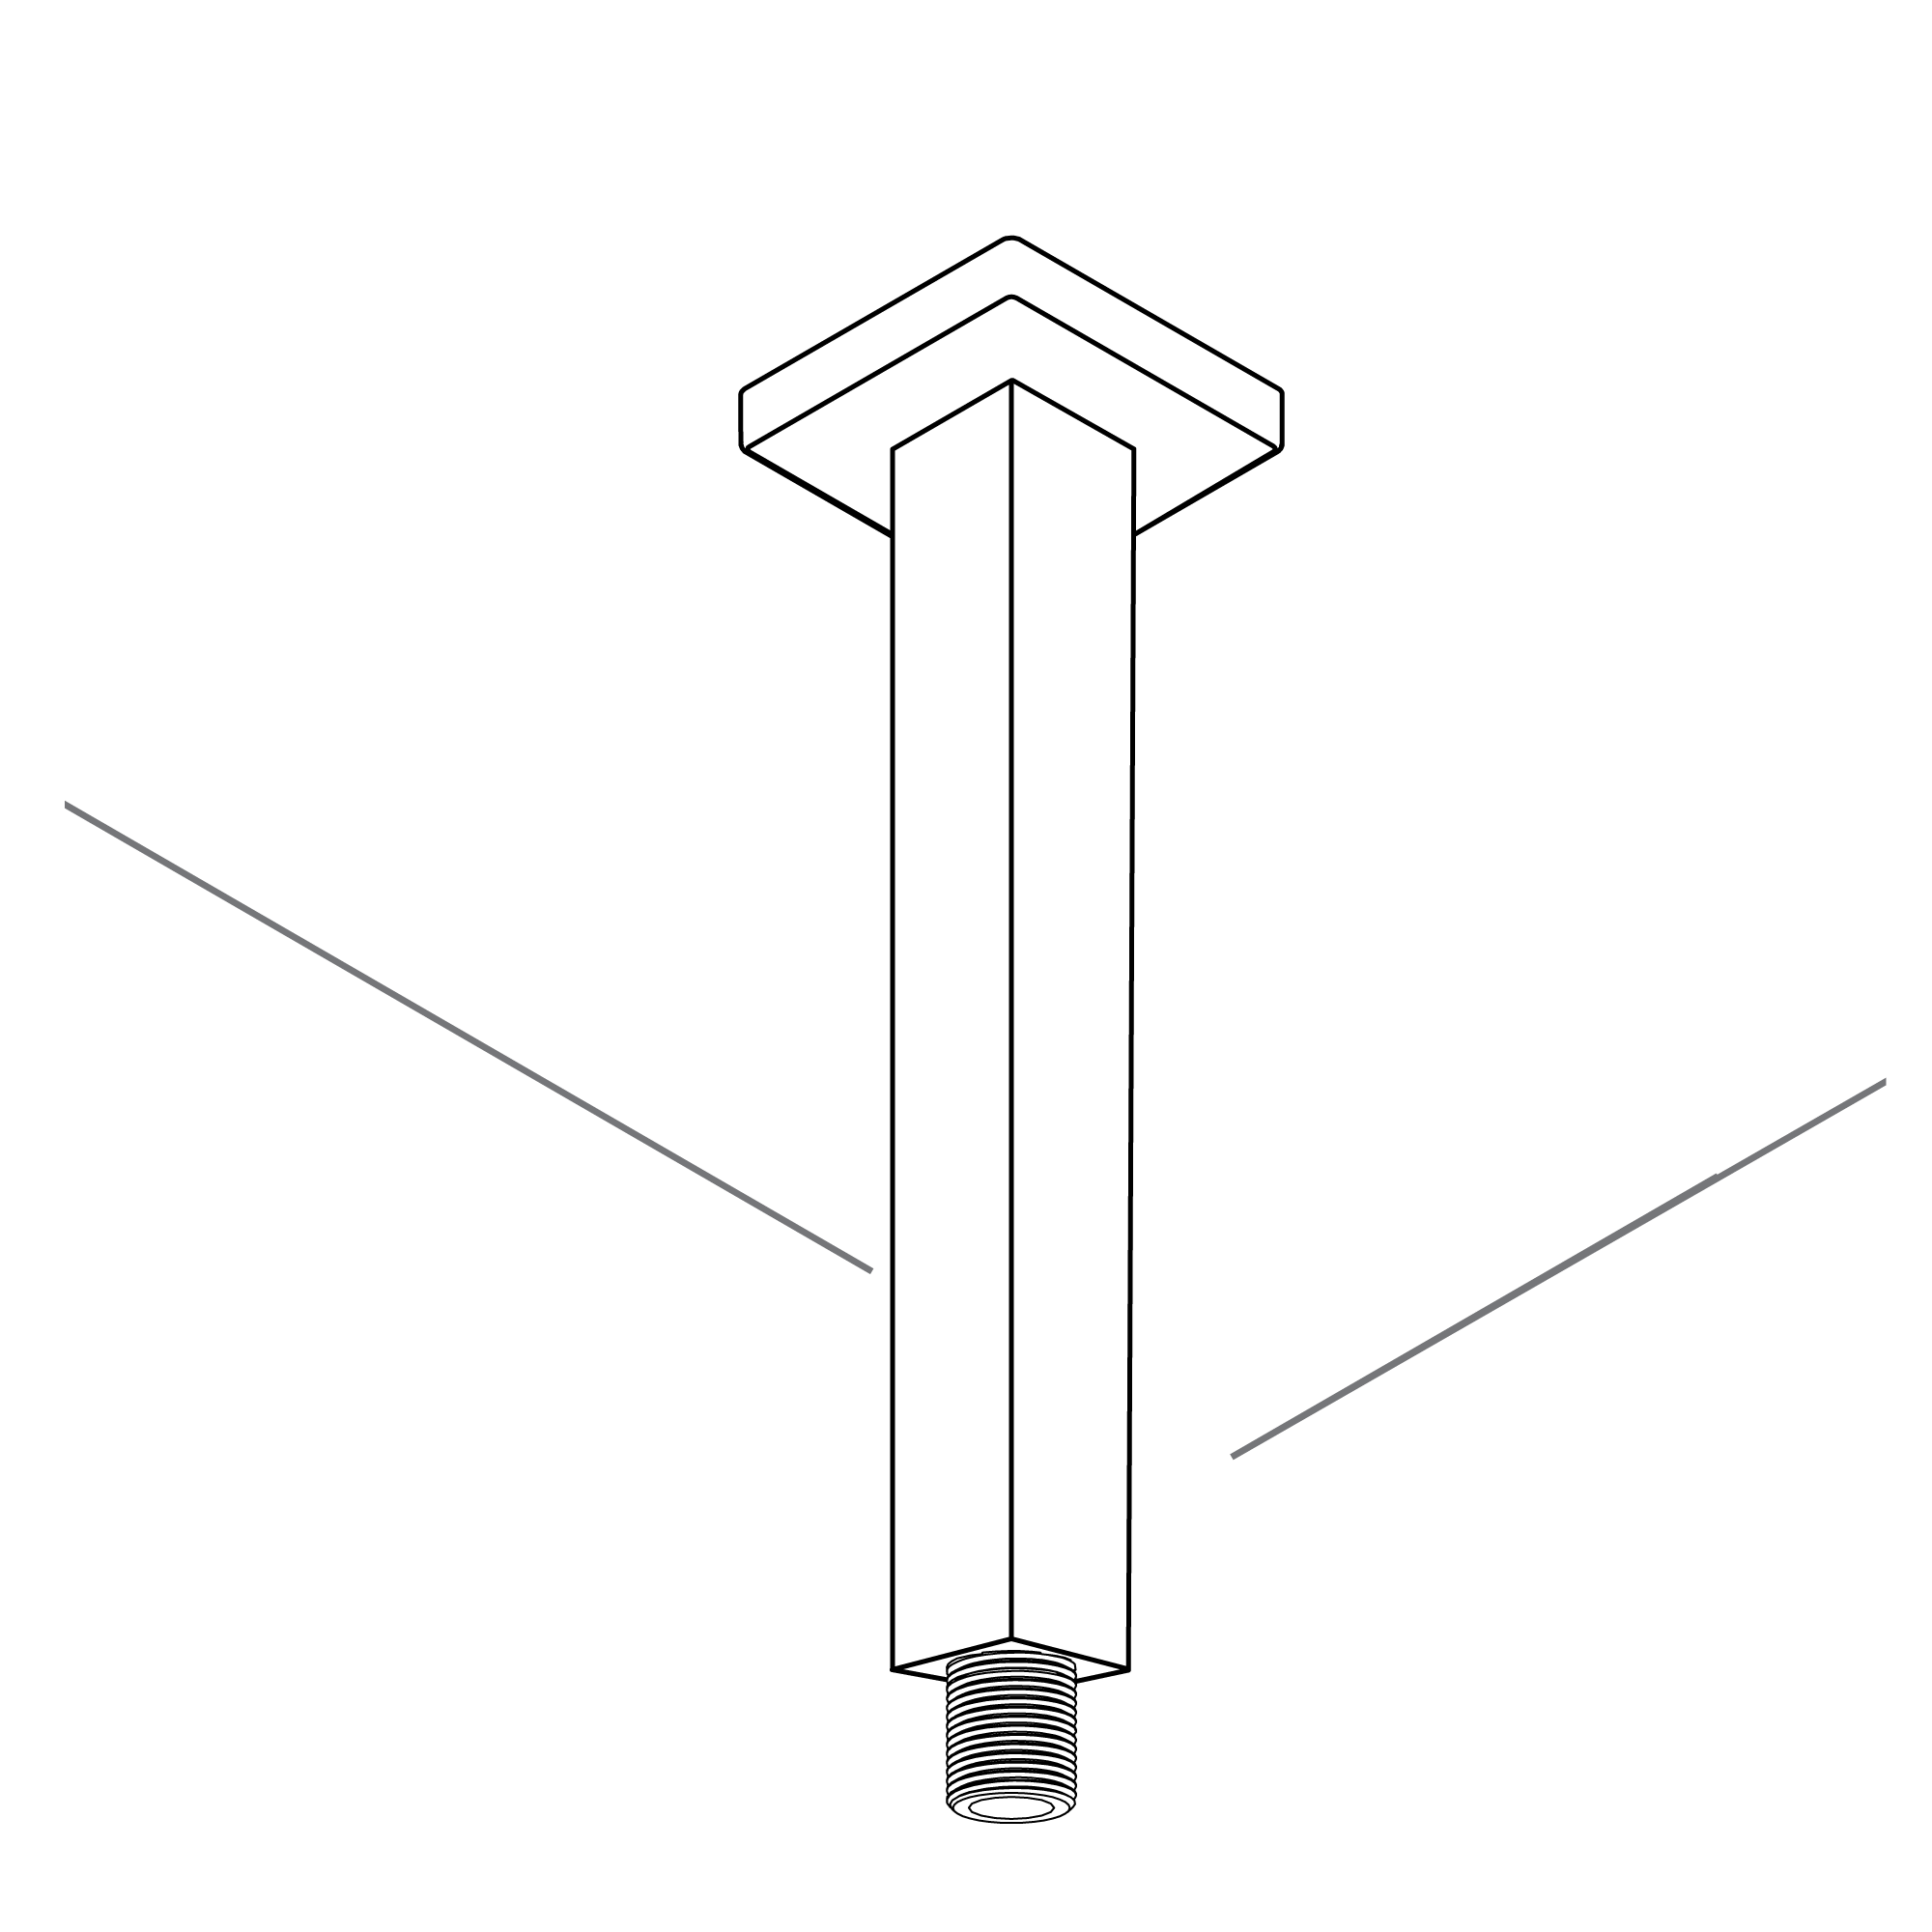
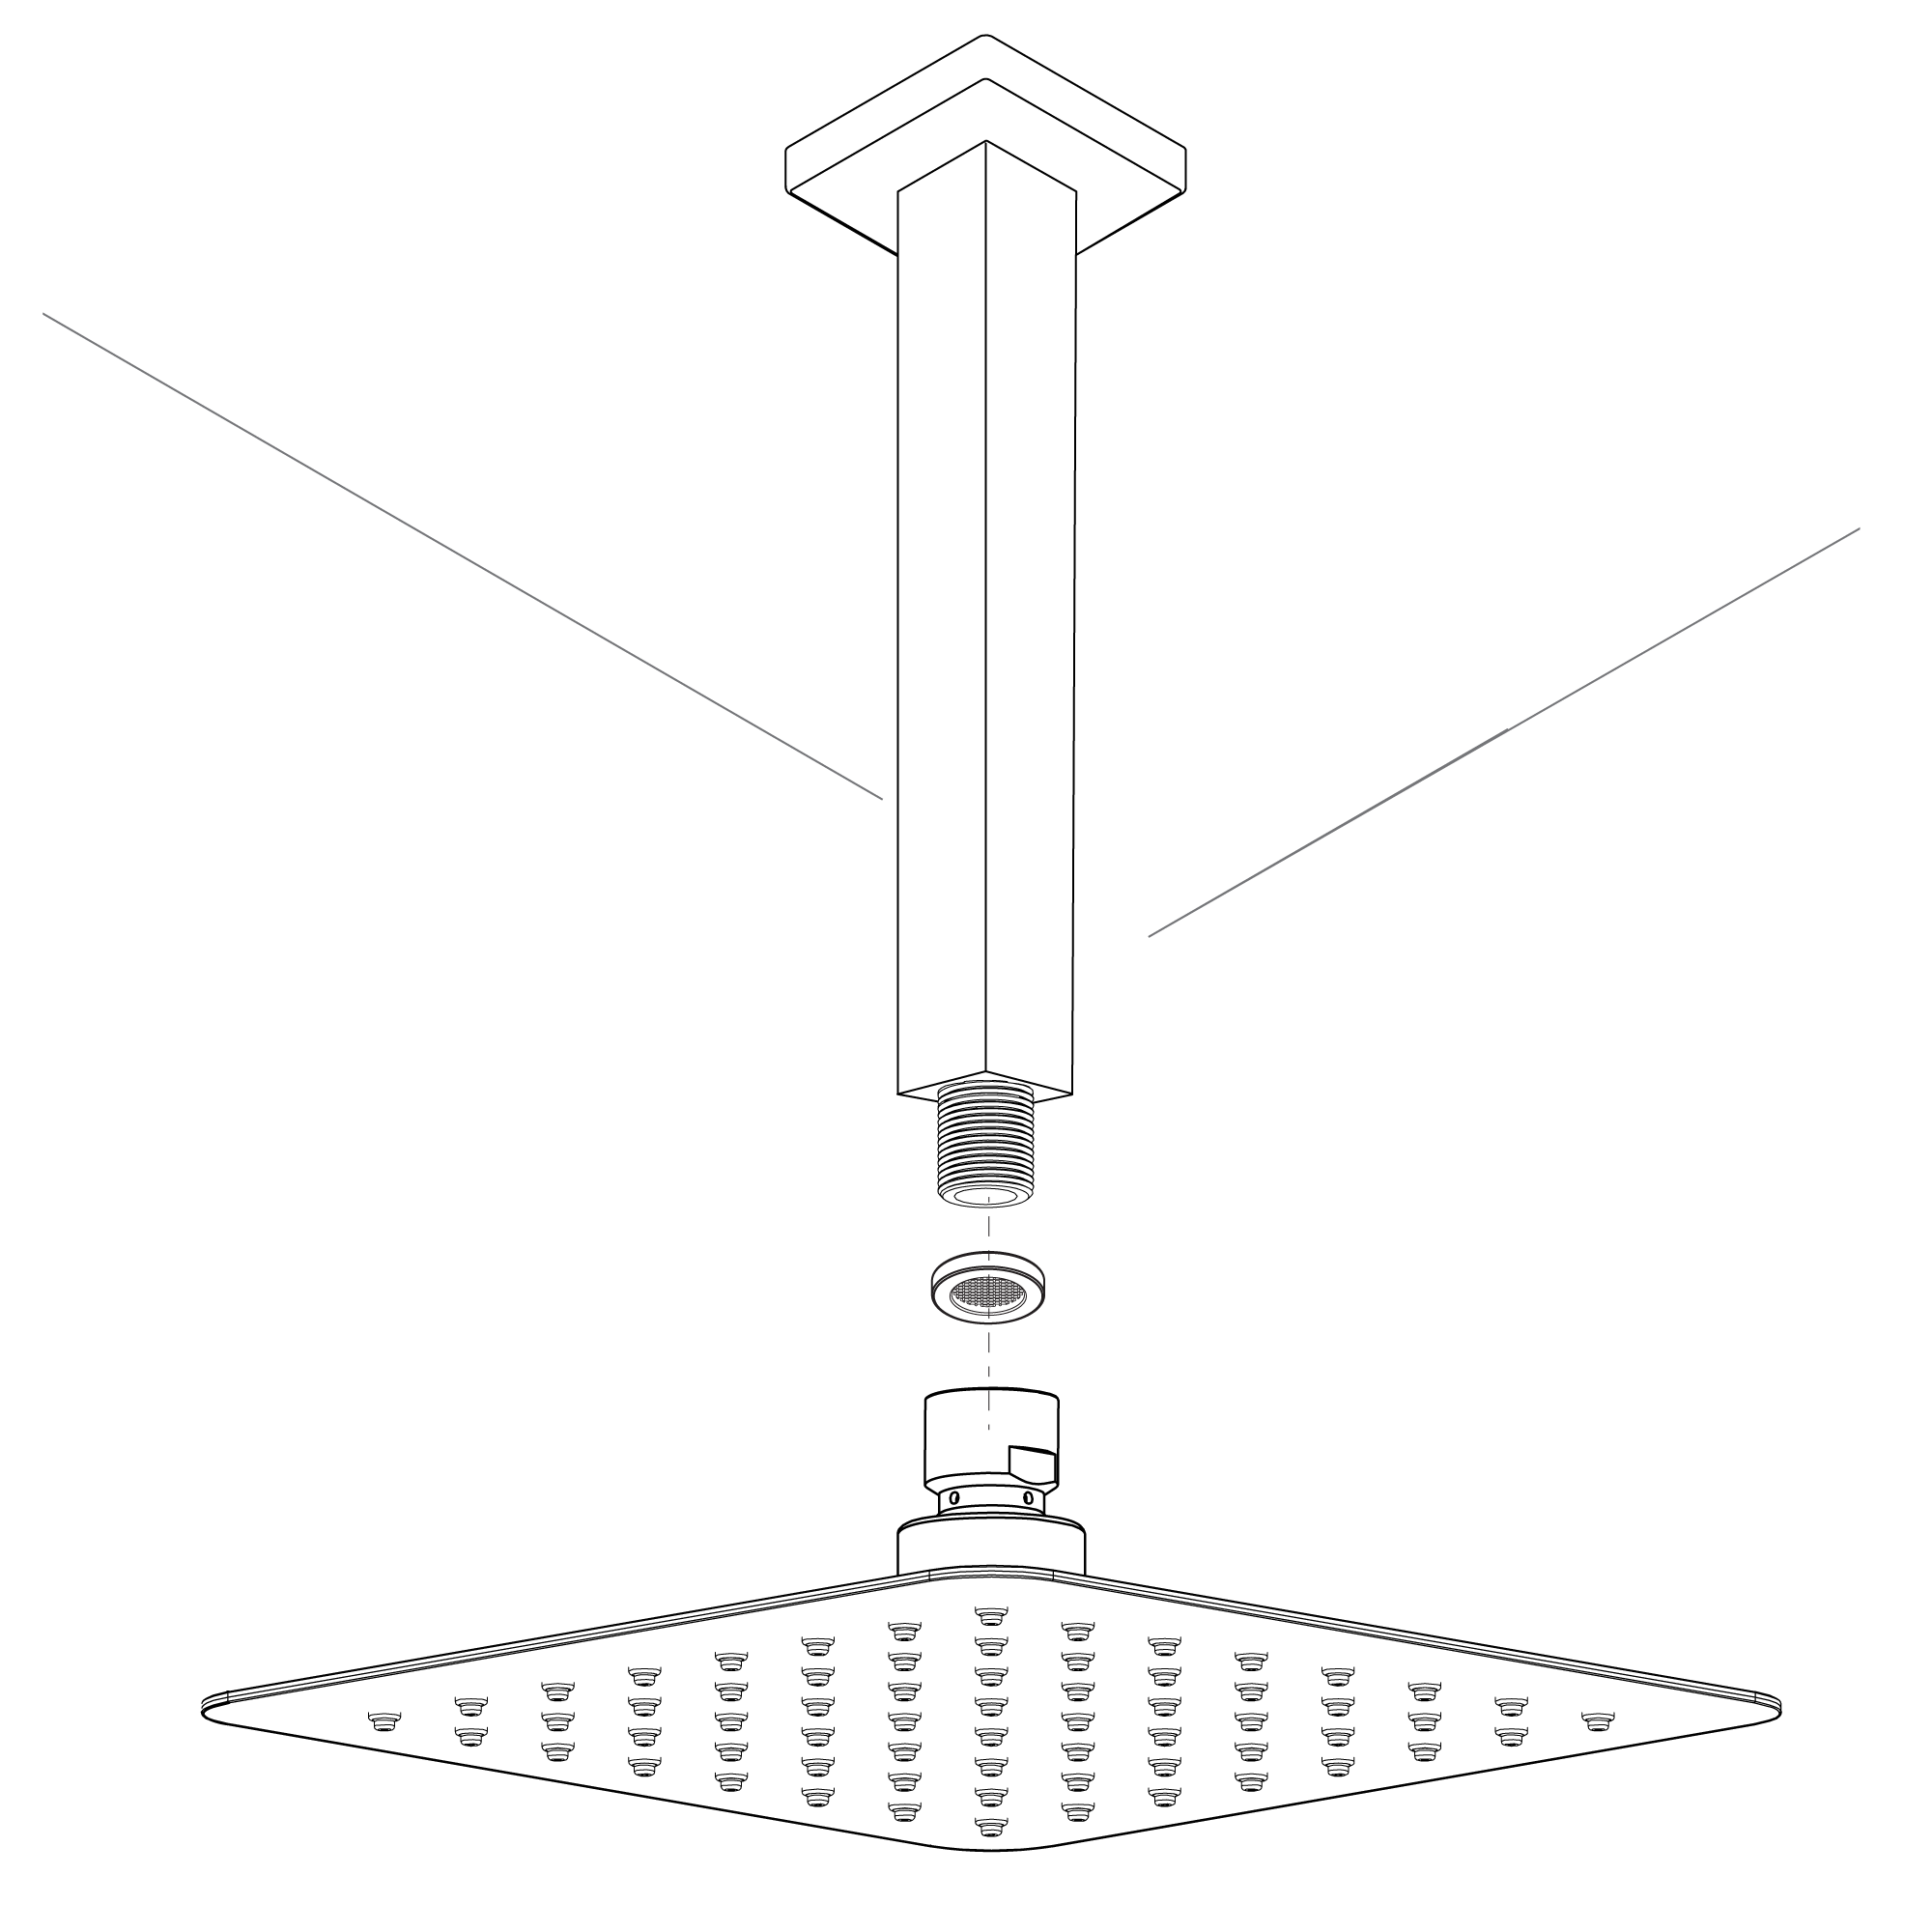
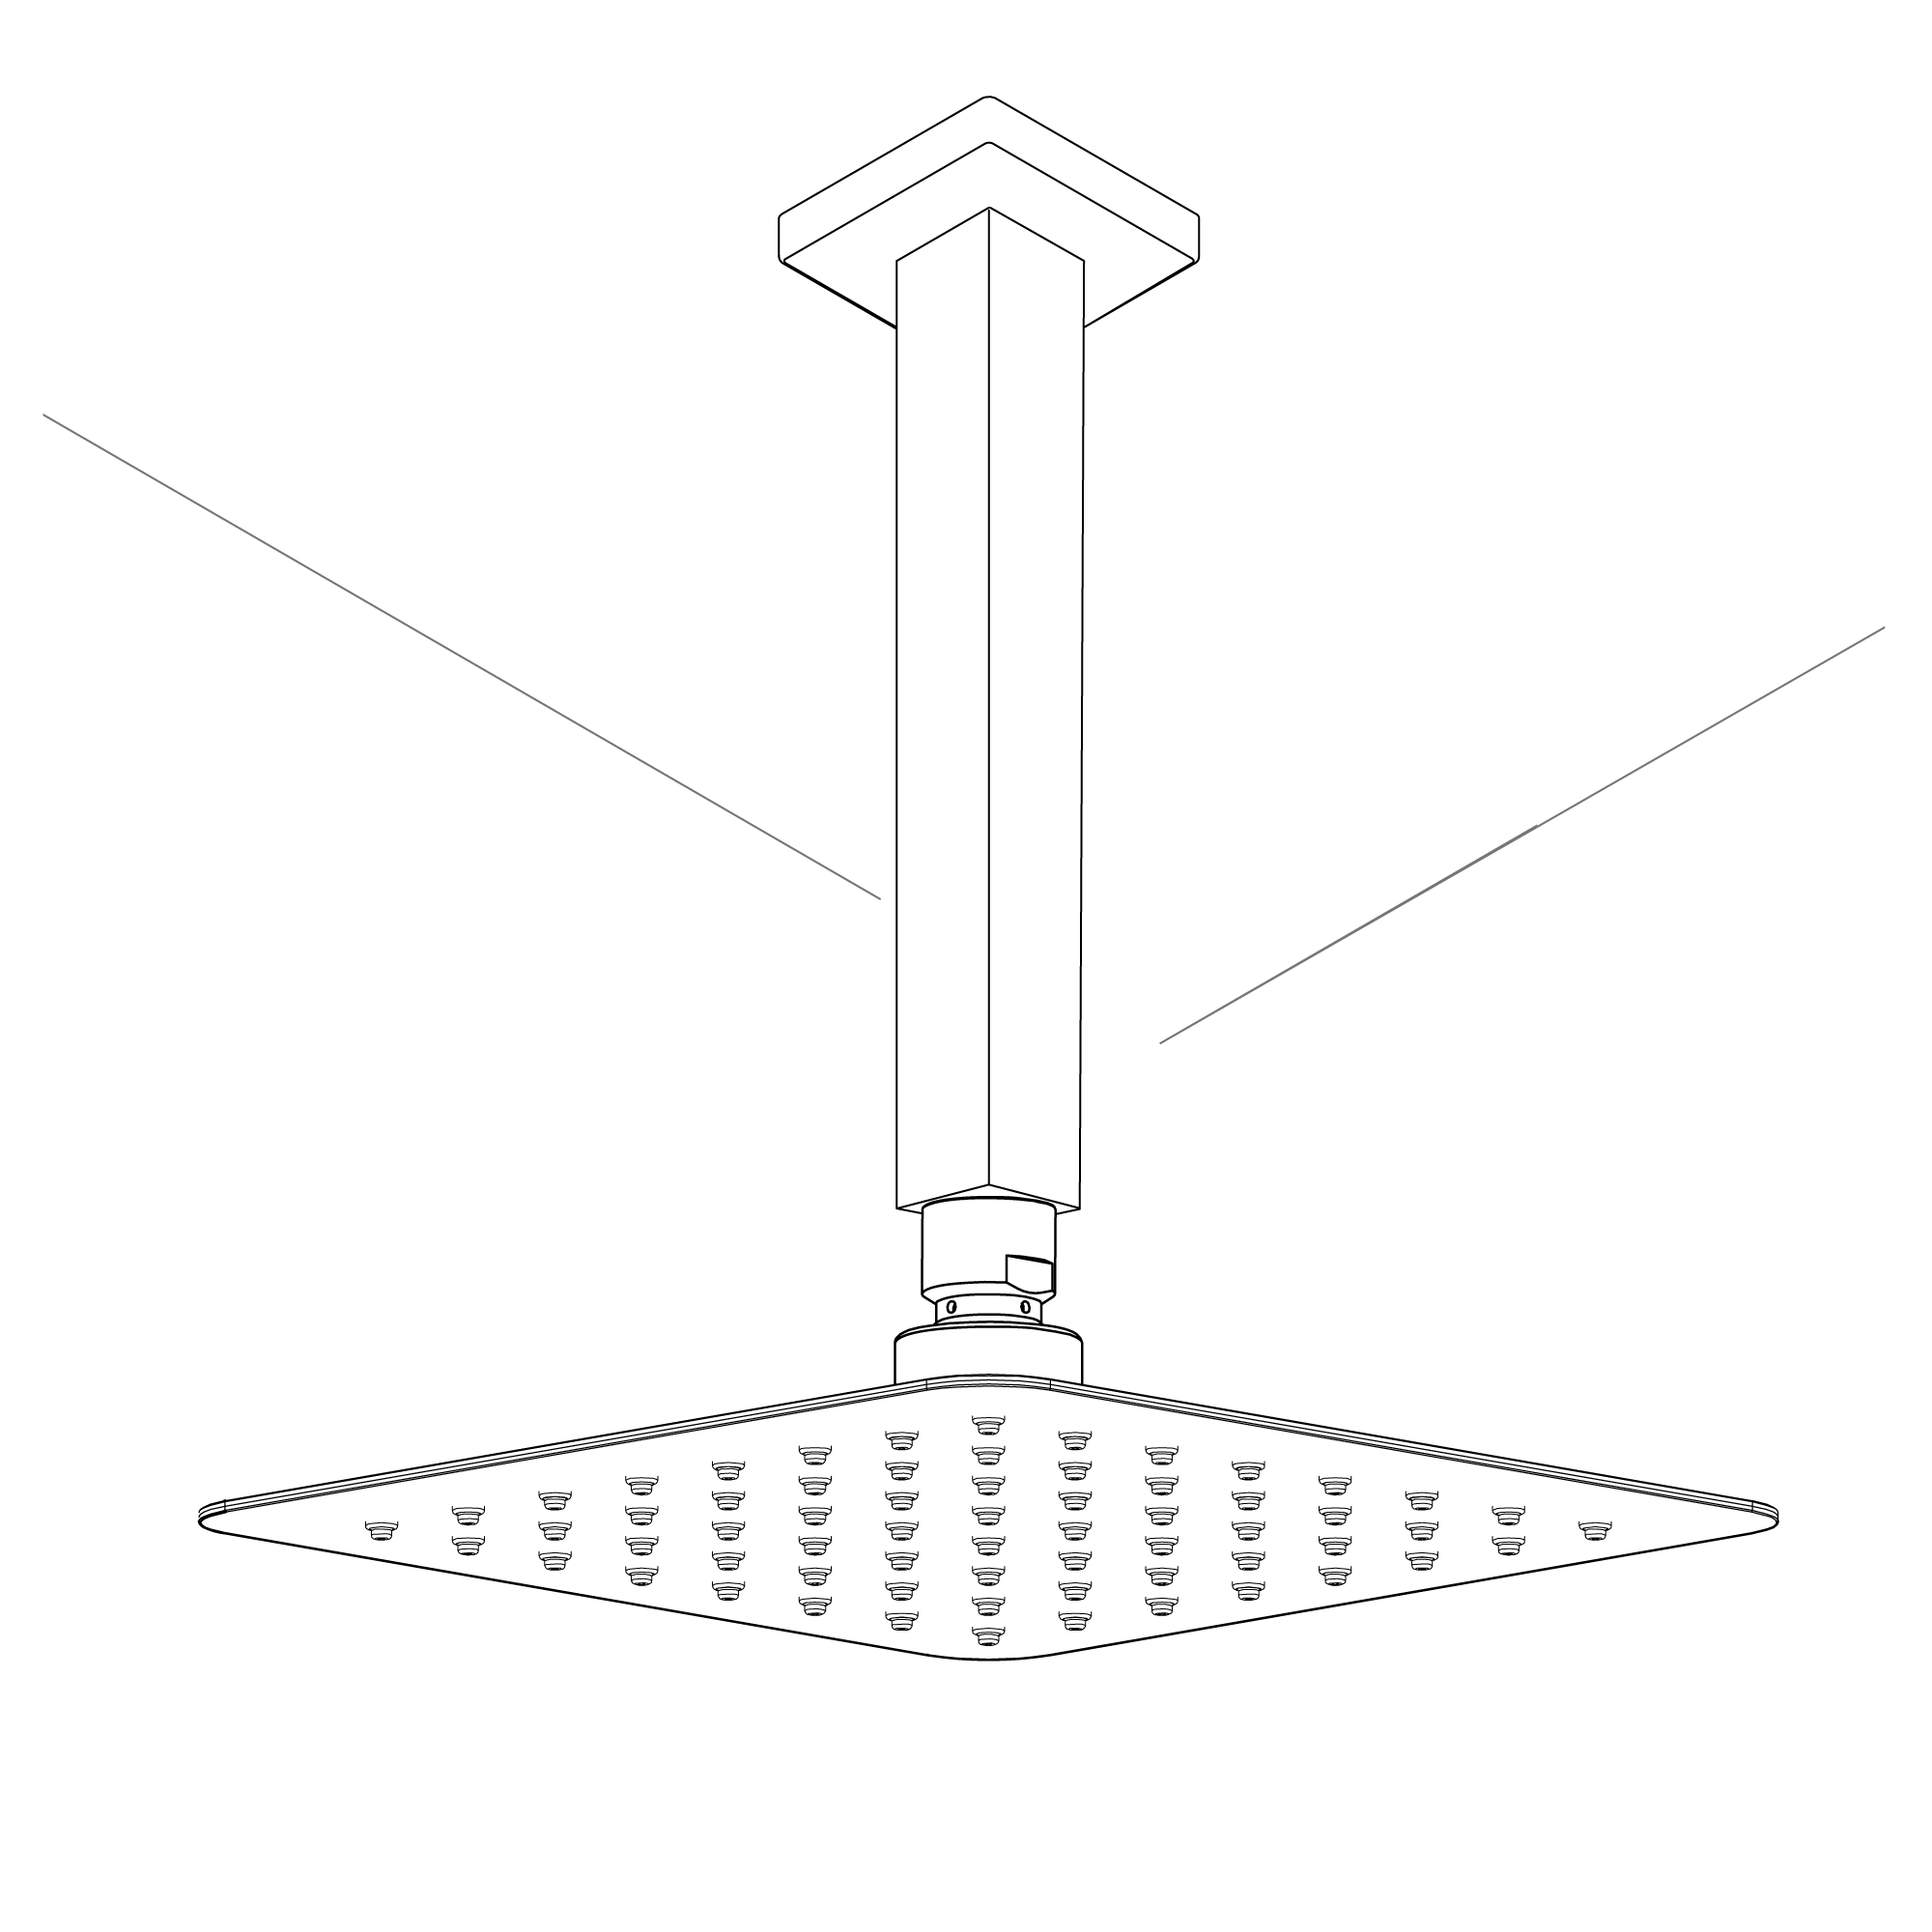
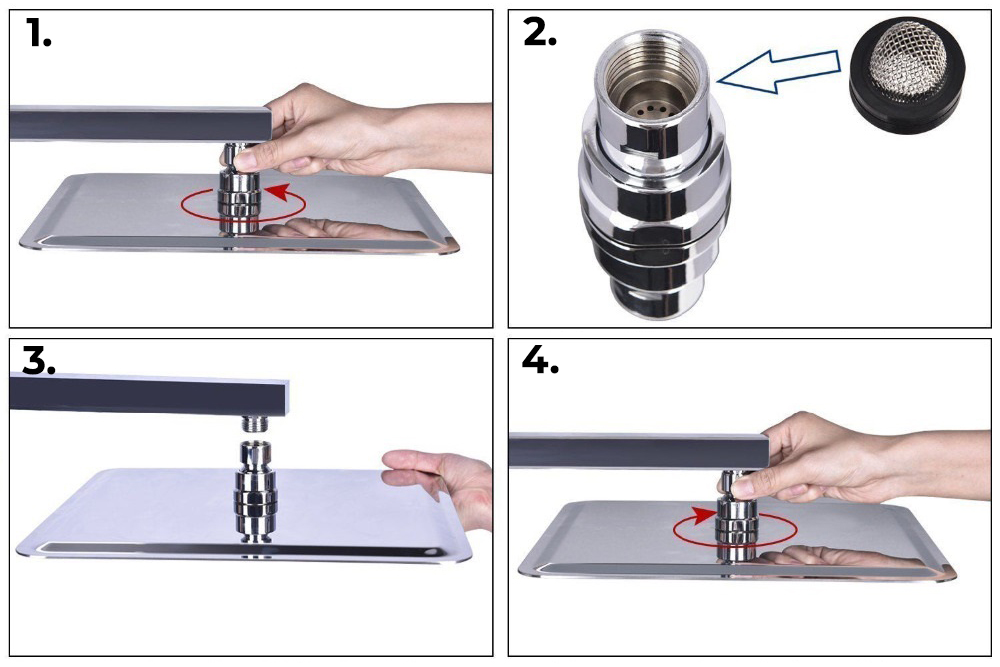
Ceiling Mount Shower Head Installation Instructions
|
|
|
|
|
|
|
|
|
|
Step 1:
|
shower
|
Step 2:
|
|
|
|
|
|

|
|
|
|
|
|
|
|
|
|
|
|
|
|
|
|
Step 3:
|
|
Step 4:
|
|
|
|
|
|
|
|
|
|
|
|
|
|
|
|
|
|
|
|
|
|
Step 5:
|
|
Step 6:
|
|
|
|
|
|
|
|
|
|
|
|
|
|
|
|
|
|
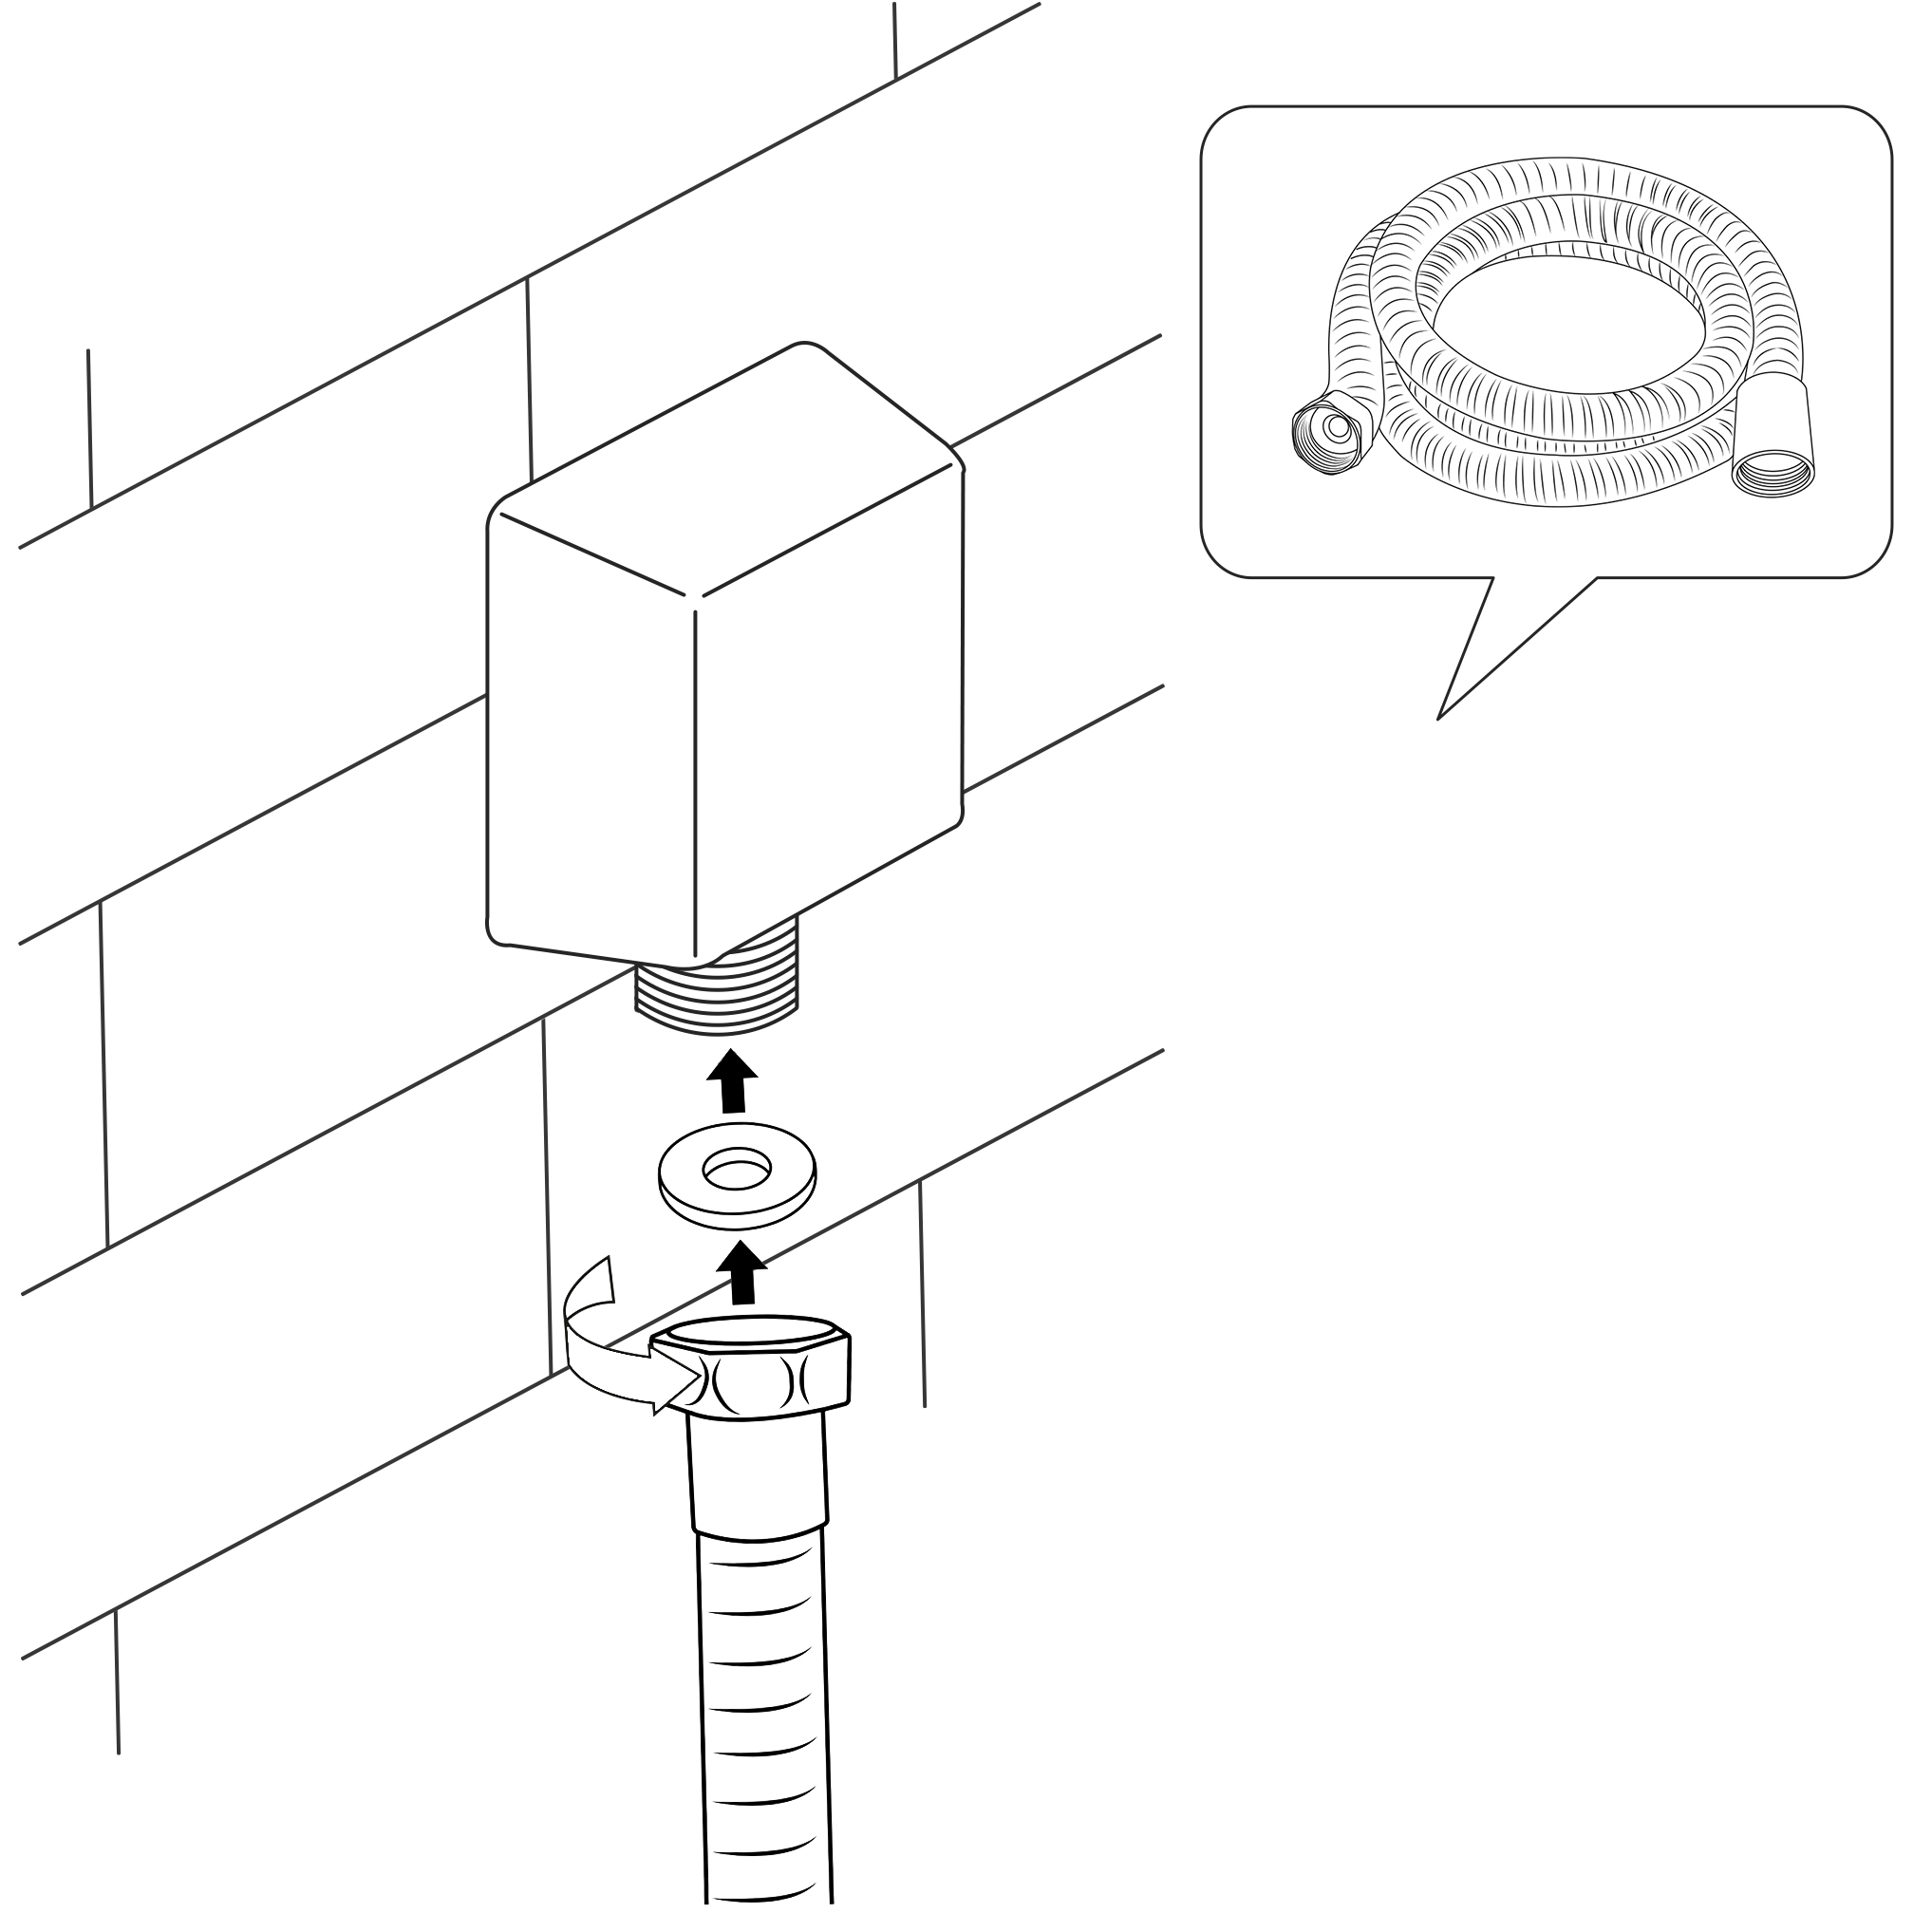
Step 1: Take Out the Old Shower Head
You can easily remove it by hand, but depending on how long the rain showerhead has been installed, you might need to use an adjustable wrench. Hence, if you find it difficult to remove, rotate the showerhead with an adjustable wrench in a counterclockwise direction to unscrew it.
Step 2: Keep the Shower Arm Clean and In Good Shape
After you have removed the head, check the shower arm threads for any debris and old Teflon tape. If you find any, remove it and clean them off thoroughly. It’s best to use a microfiber cloth when cleaning the thread because it removes Teflon tape perfectly and works great to pick up tiny grits.
Once you’re done cleaning, check if it is corroded or leaking. For damaged threads, it will be best you replace it entirely so you can have a comfortable shower experience any time.
Step 3: Time to Add New Teflon Tape
Since you have removed the old Teflon tape, you have to replace it with new ones. The reason is that this tape helps to protect the shower from leaking after installing the showerhead. Now apply the new Teflon tape about 3-5 turns on the thread and tear the end part. Use your hands to smooth it out to keep it leveled to the thread. Keep in mind that when applying the tape, you should go in a clockwise motion so that it doesn’t come off when you attach the head in the same direction.
Step 4: Connect the Showerhead
As said earlier in the tools needed, we’re using the rubber sealing washer that comes with the showerhead. This tool helps to make the showerhead stay watertight and secured on to the thread. Ensure you place it properly before installing it.
After that, reconnect the shower head and tighten it down with your hands. You can employ a chair or ladder to make things easier for you.
Step 5: Tighten the Showerhead
On To the Thread You will need to get the adjustable wrench handy to tighten down the shower very well. But make sure you wrap the threads with a terry cloth, so it doesn’t damage the finish when tightening the showerhead.
Once you have done that, now use the adjustable wrench to tighten down the showerhead. However, don’t over-tight or force it so that it’s easier to remove in the future.
|
|
Wall Mount Shower Head Installation Instructions
|
|
|
|
|
|
|
|
|
|
Step 1:
|
shower
|
Step 2:
|
|
|
|
|
|
|
|

|
|
|
|
|
|
|
|
|
|
|
Step 3:
|
|
Step 4:
|
|
|
|
|

|
|
|
|
|
|
|
|
|
|
|
|
|
|
Step 5:
|
|
Step 6:
|
|
|
|
|
|
|
|
|
|
|
|
|
|
|
|
|
|
|
Step 7:
|
|
Step 8:
|
|
|
|
|
|
|

|
|
|
|
|
|
|
|
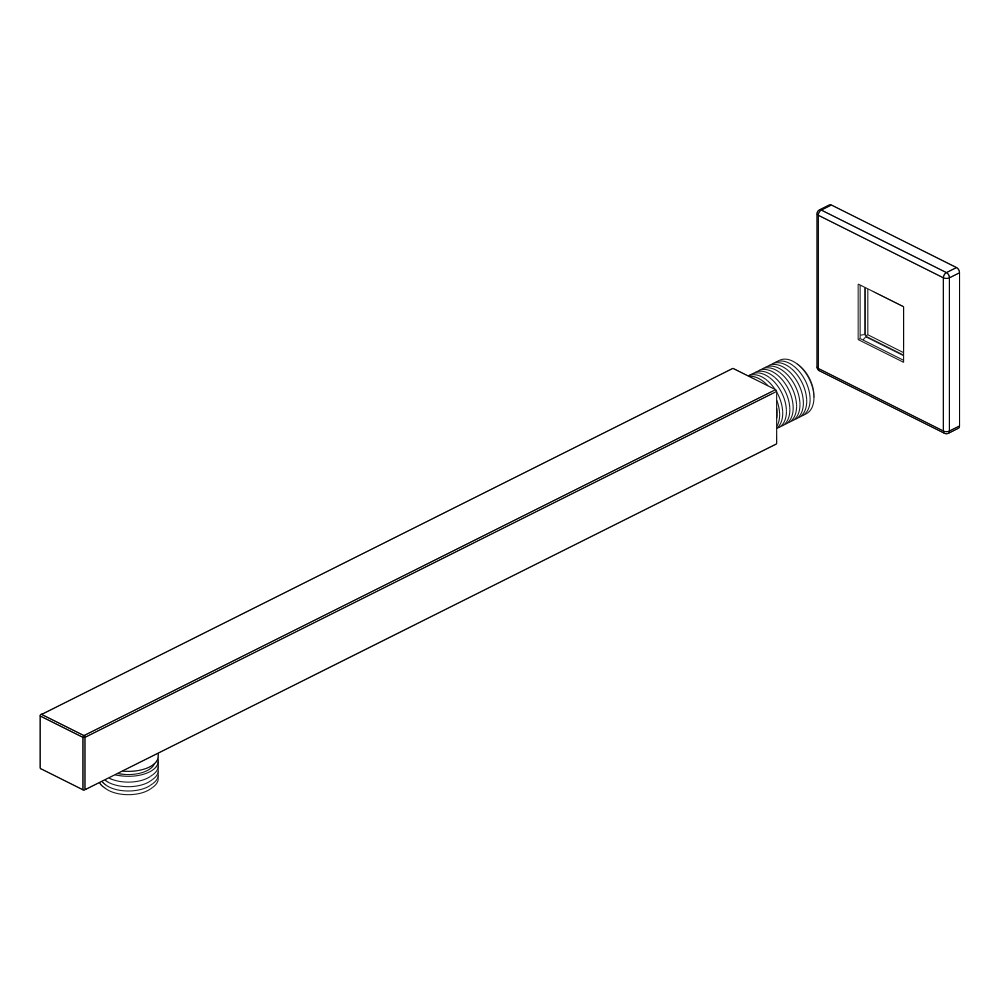
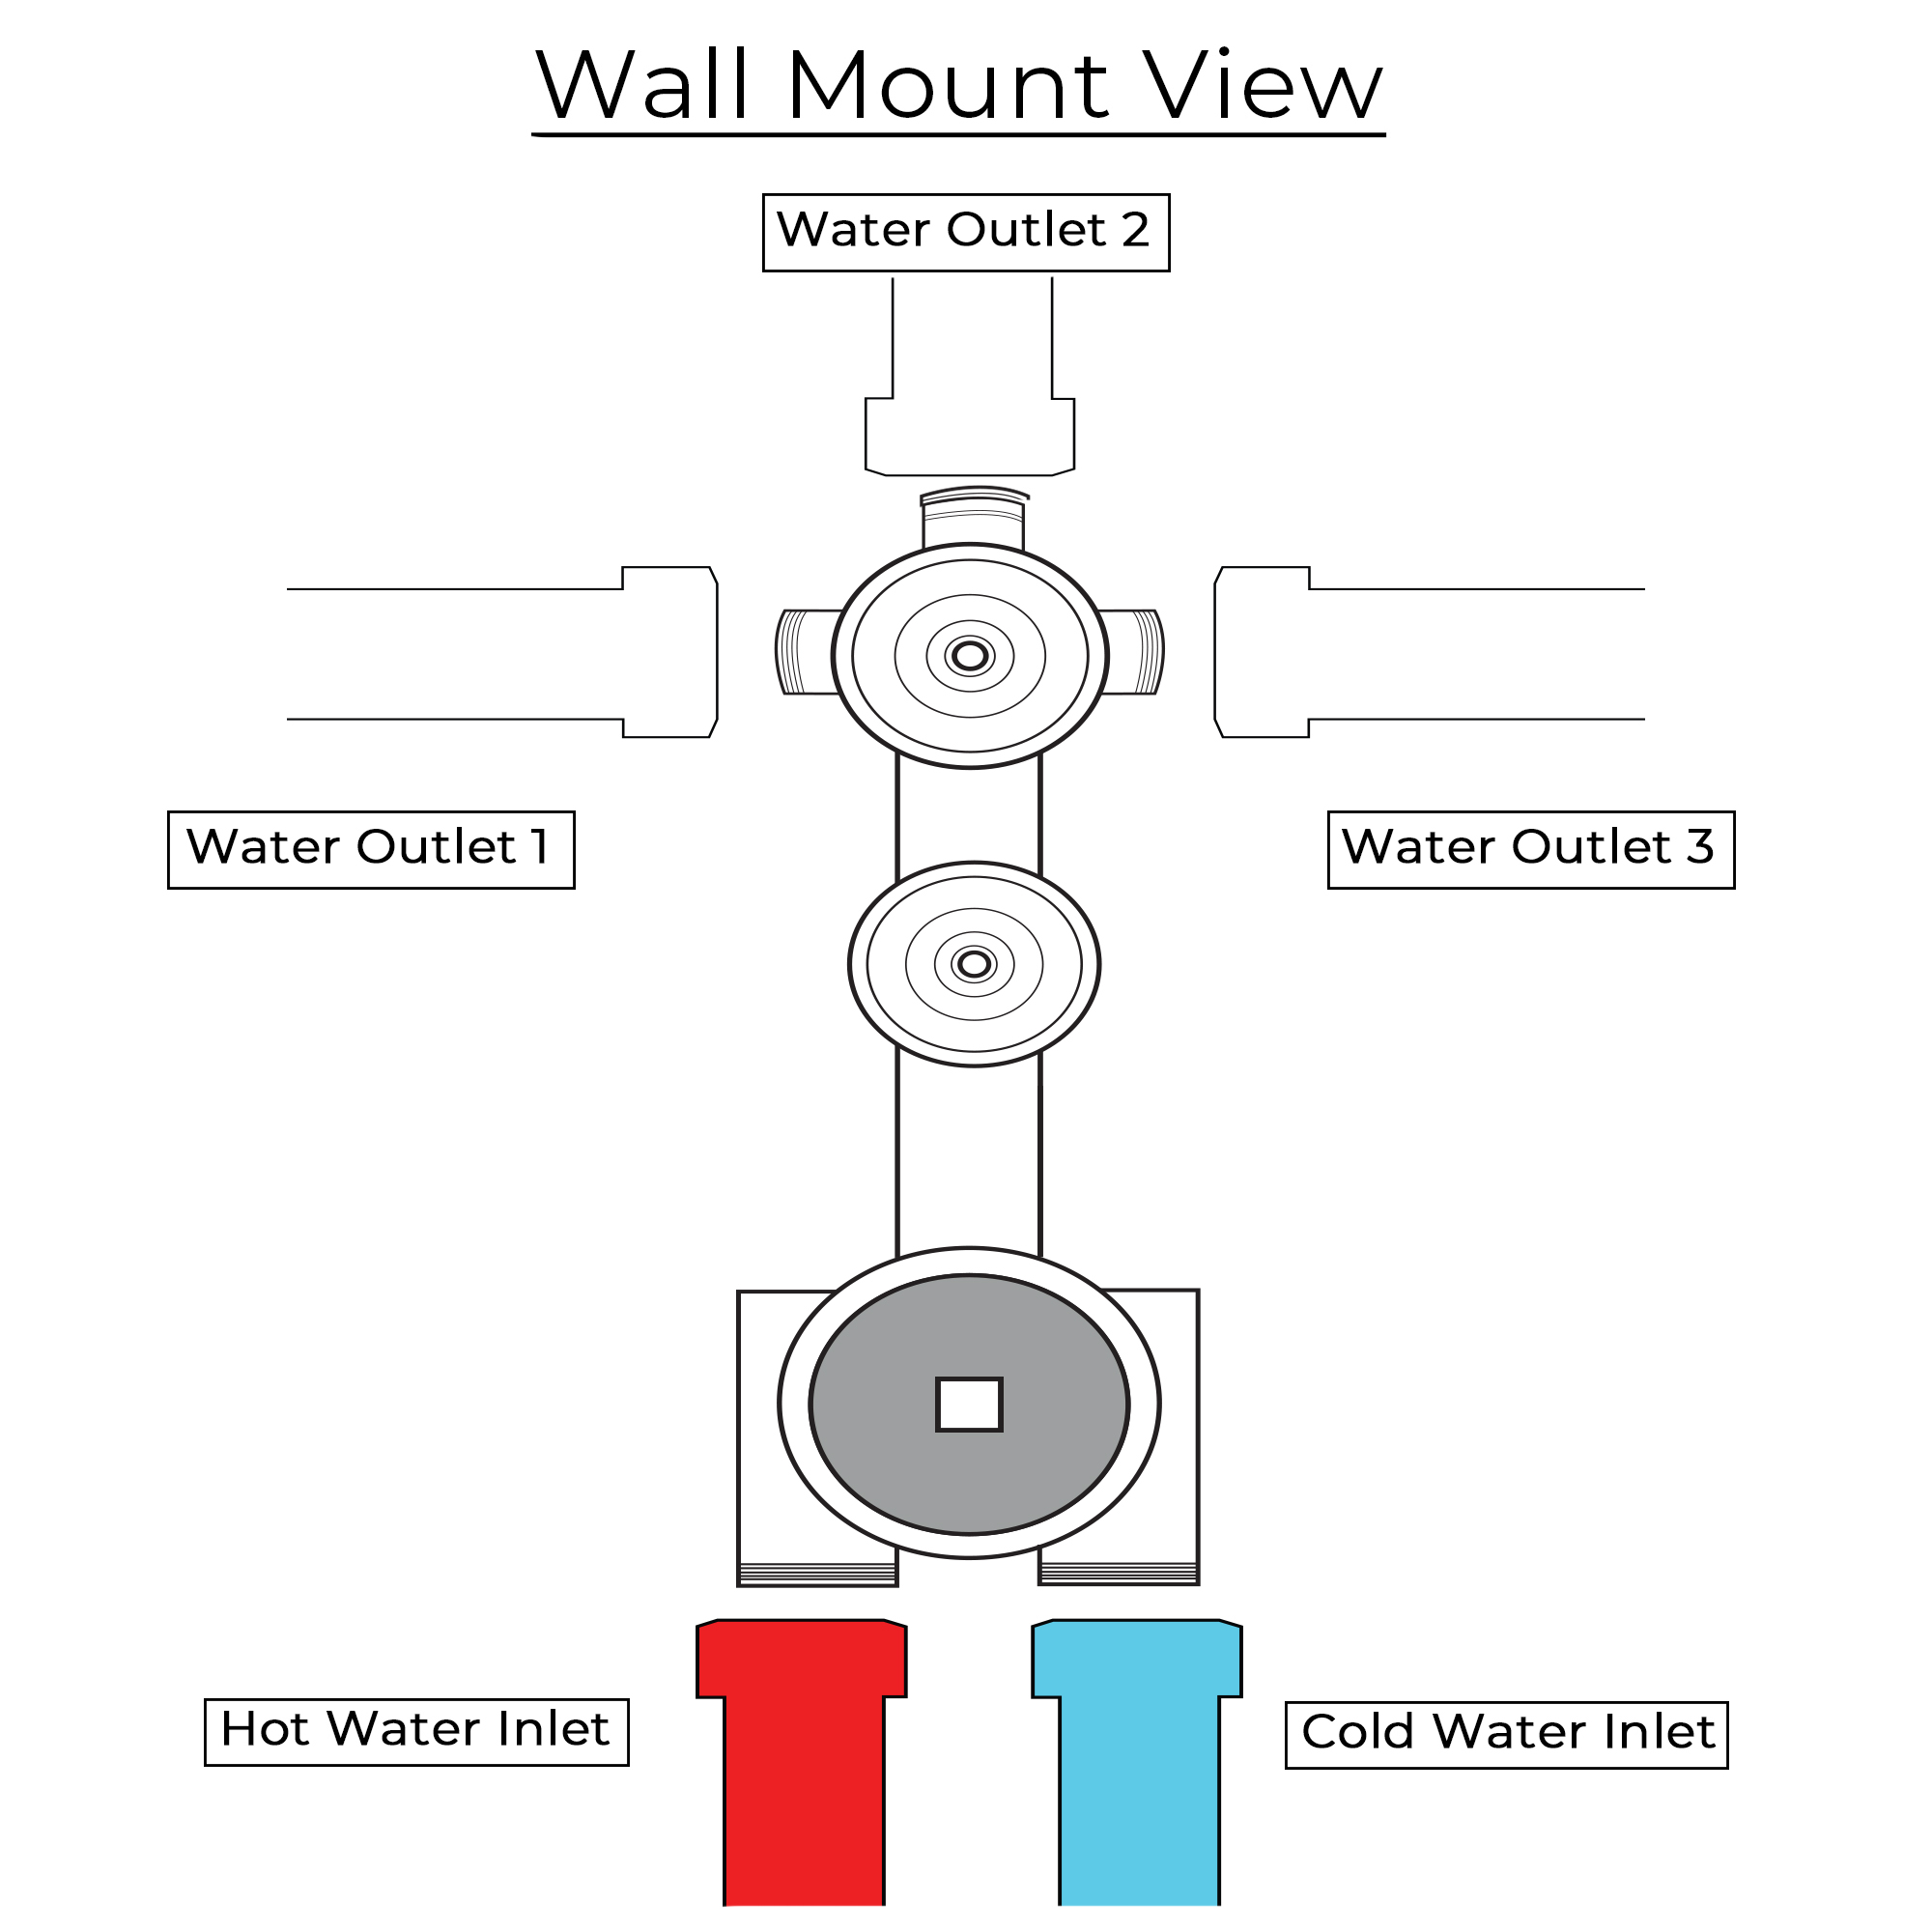
1. Apply plumber's tape to the threads on both ends of the ends of the shower arm and slide on the decorative escutcheon.
2. Insert the new arm into the fitting in the wall and twist to tighten. Finish tightening with your adjustable wrench. Wrap a dry cloth around the shower arm to protect the finish while tightening with an adjustable wrench.
3. Thread the new showerhead onto the arm and hand-tighten. Hold the shower arm in place with groove joint pliers and finish tightening the shower head with your adjustable wrench. Wrap both in a dry cloth to protect the finish.
4. Before securing the decorative escutcheon, turn on the water supply to make sure that all connections are tight and there is no leaking. If no leaks are detected, continue with the installation. If leakage does occur, use your adjustable wrench to tighten the connections as necessary.
5. Apply a bead if silicone sealant to the back of the escutcheon and press firmly into place against the installation surface. Wipe away any excess sealant with your damp cloth.
|
|
|
|
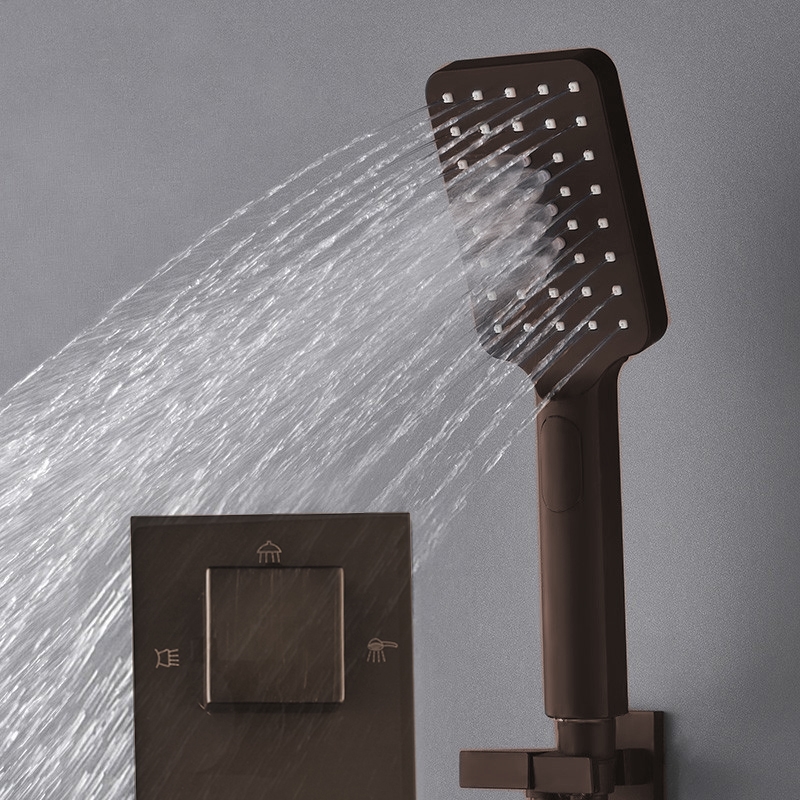
Hand Held Shower Installation Instructions
|
Step 1:
|
|
hand shower
|
Step 2:
|
|
|

|
|
|

|
HAND
HELD
SHOWER
|
|
|
|
|
|
|
|
|
Step 3:
|
|
|
|
|
|

|
|
|

|
|
|
|
|
|
|
|
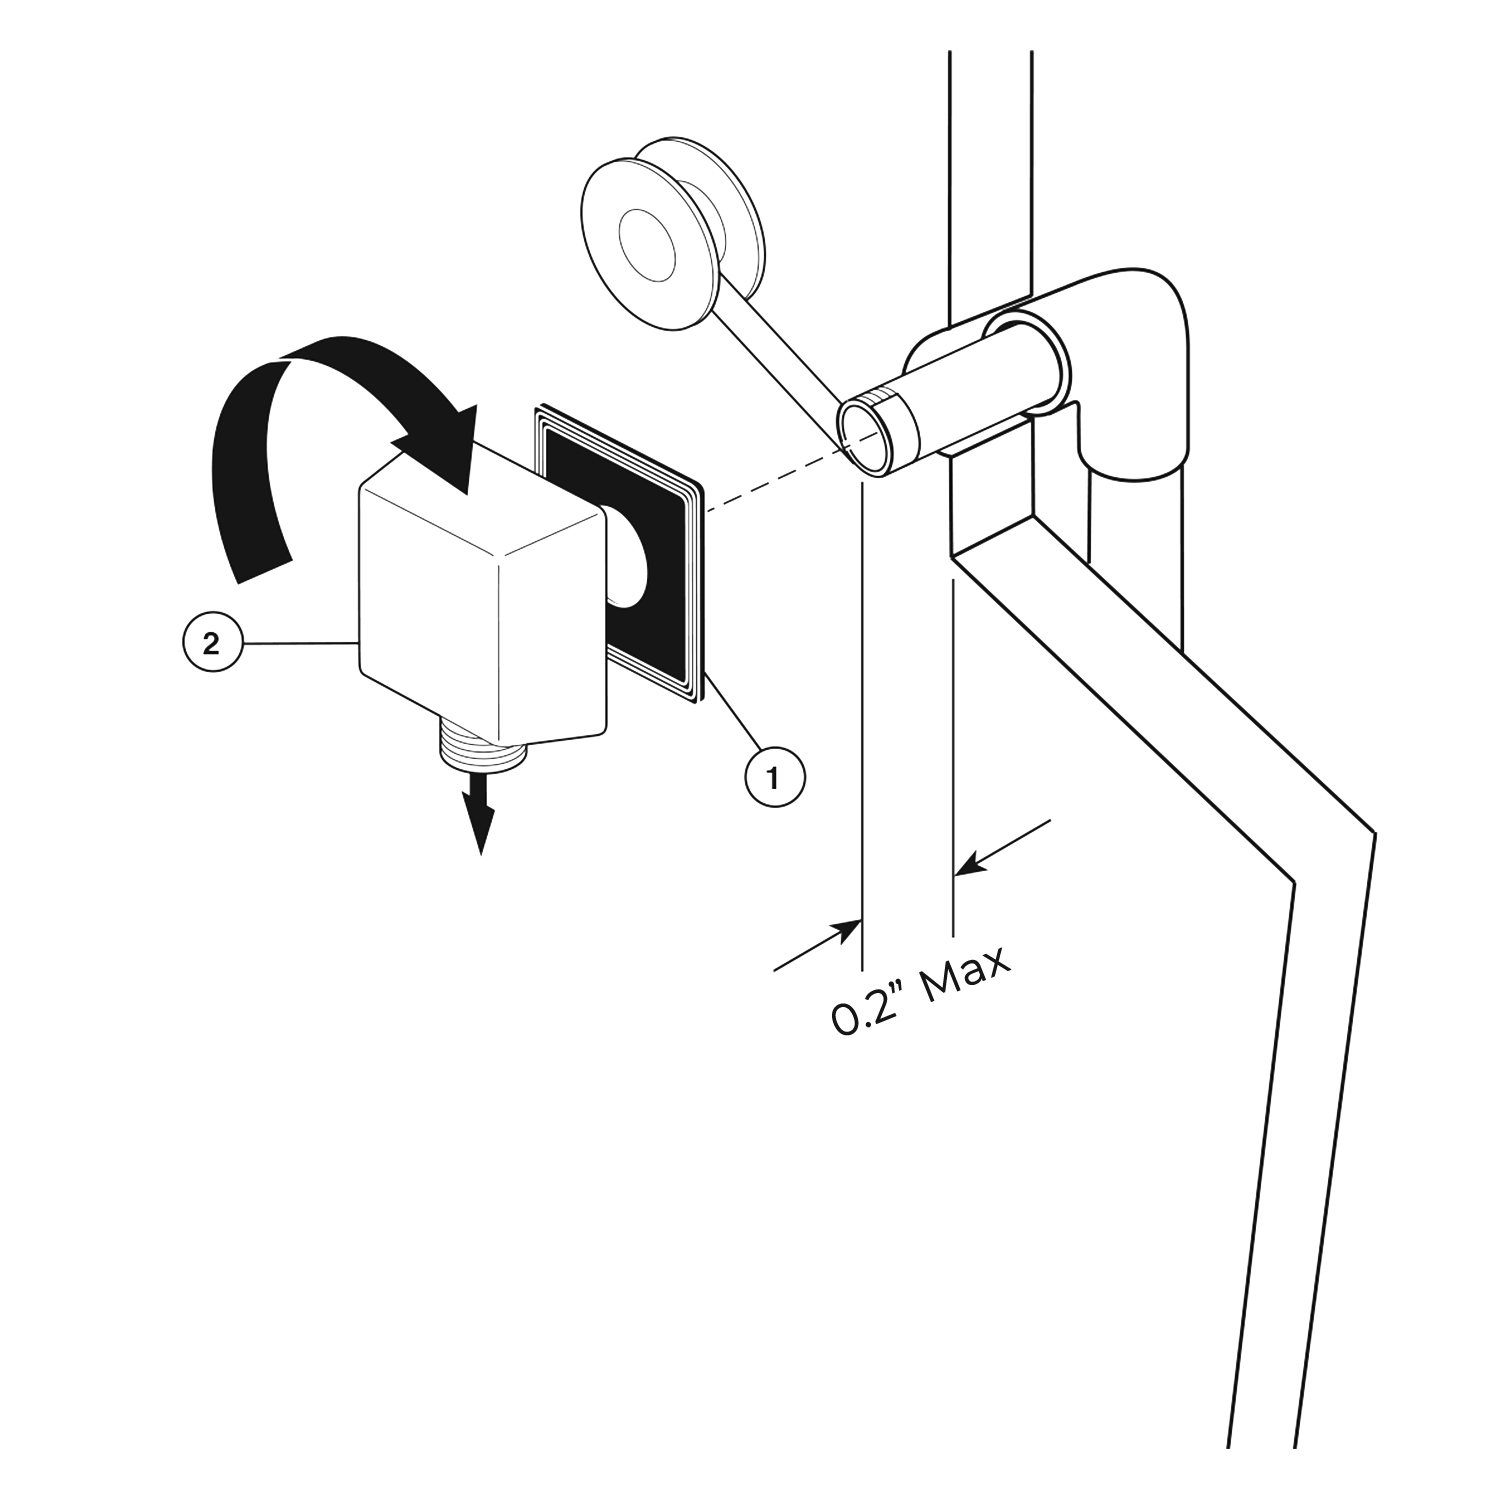
Hand Shower Outlet Installation
Complete the outlet pipework ensuring it ends in an appropriate 15mm x 1/2" BSP female thread elbow.
Note:
This fitting is not supplied as variations in installations require the selection of a suitable solder or compression fitting.
• Install the 'Wall Outlet', thread long male 1/2" BSP into the appropriate female fitting using PTFE tape to give a watertight joint.
Note: The thread can be cut to size if required. Make sure that all debris is removed from the connector and the section that has been cut is dressed correctly, before installation.
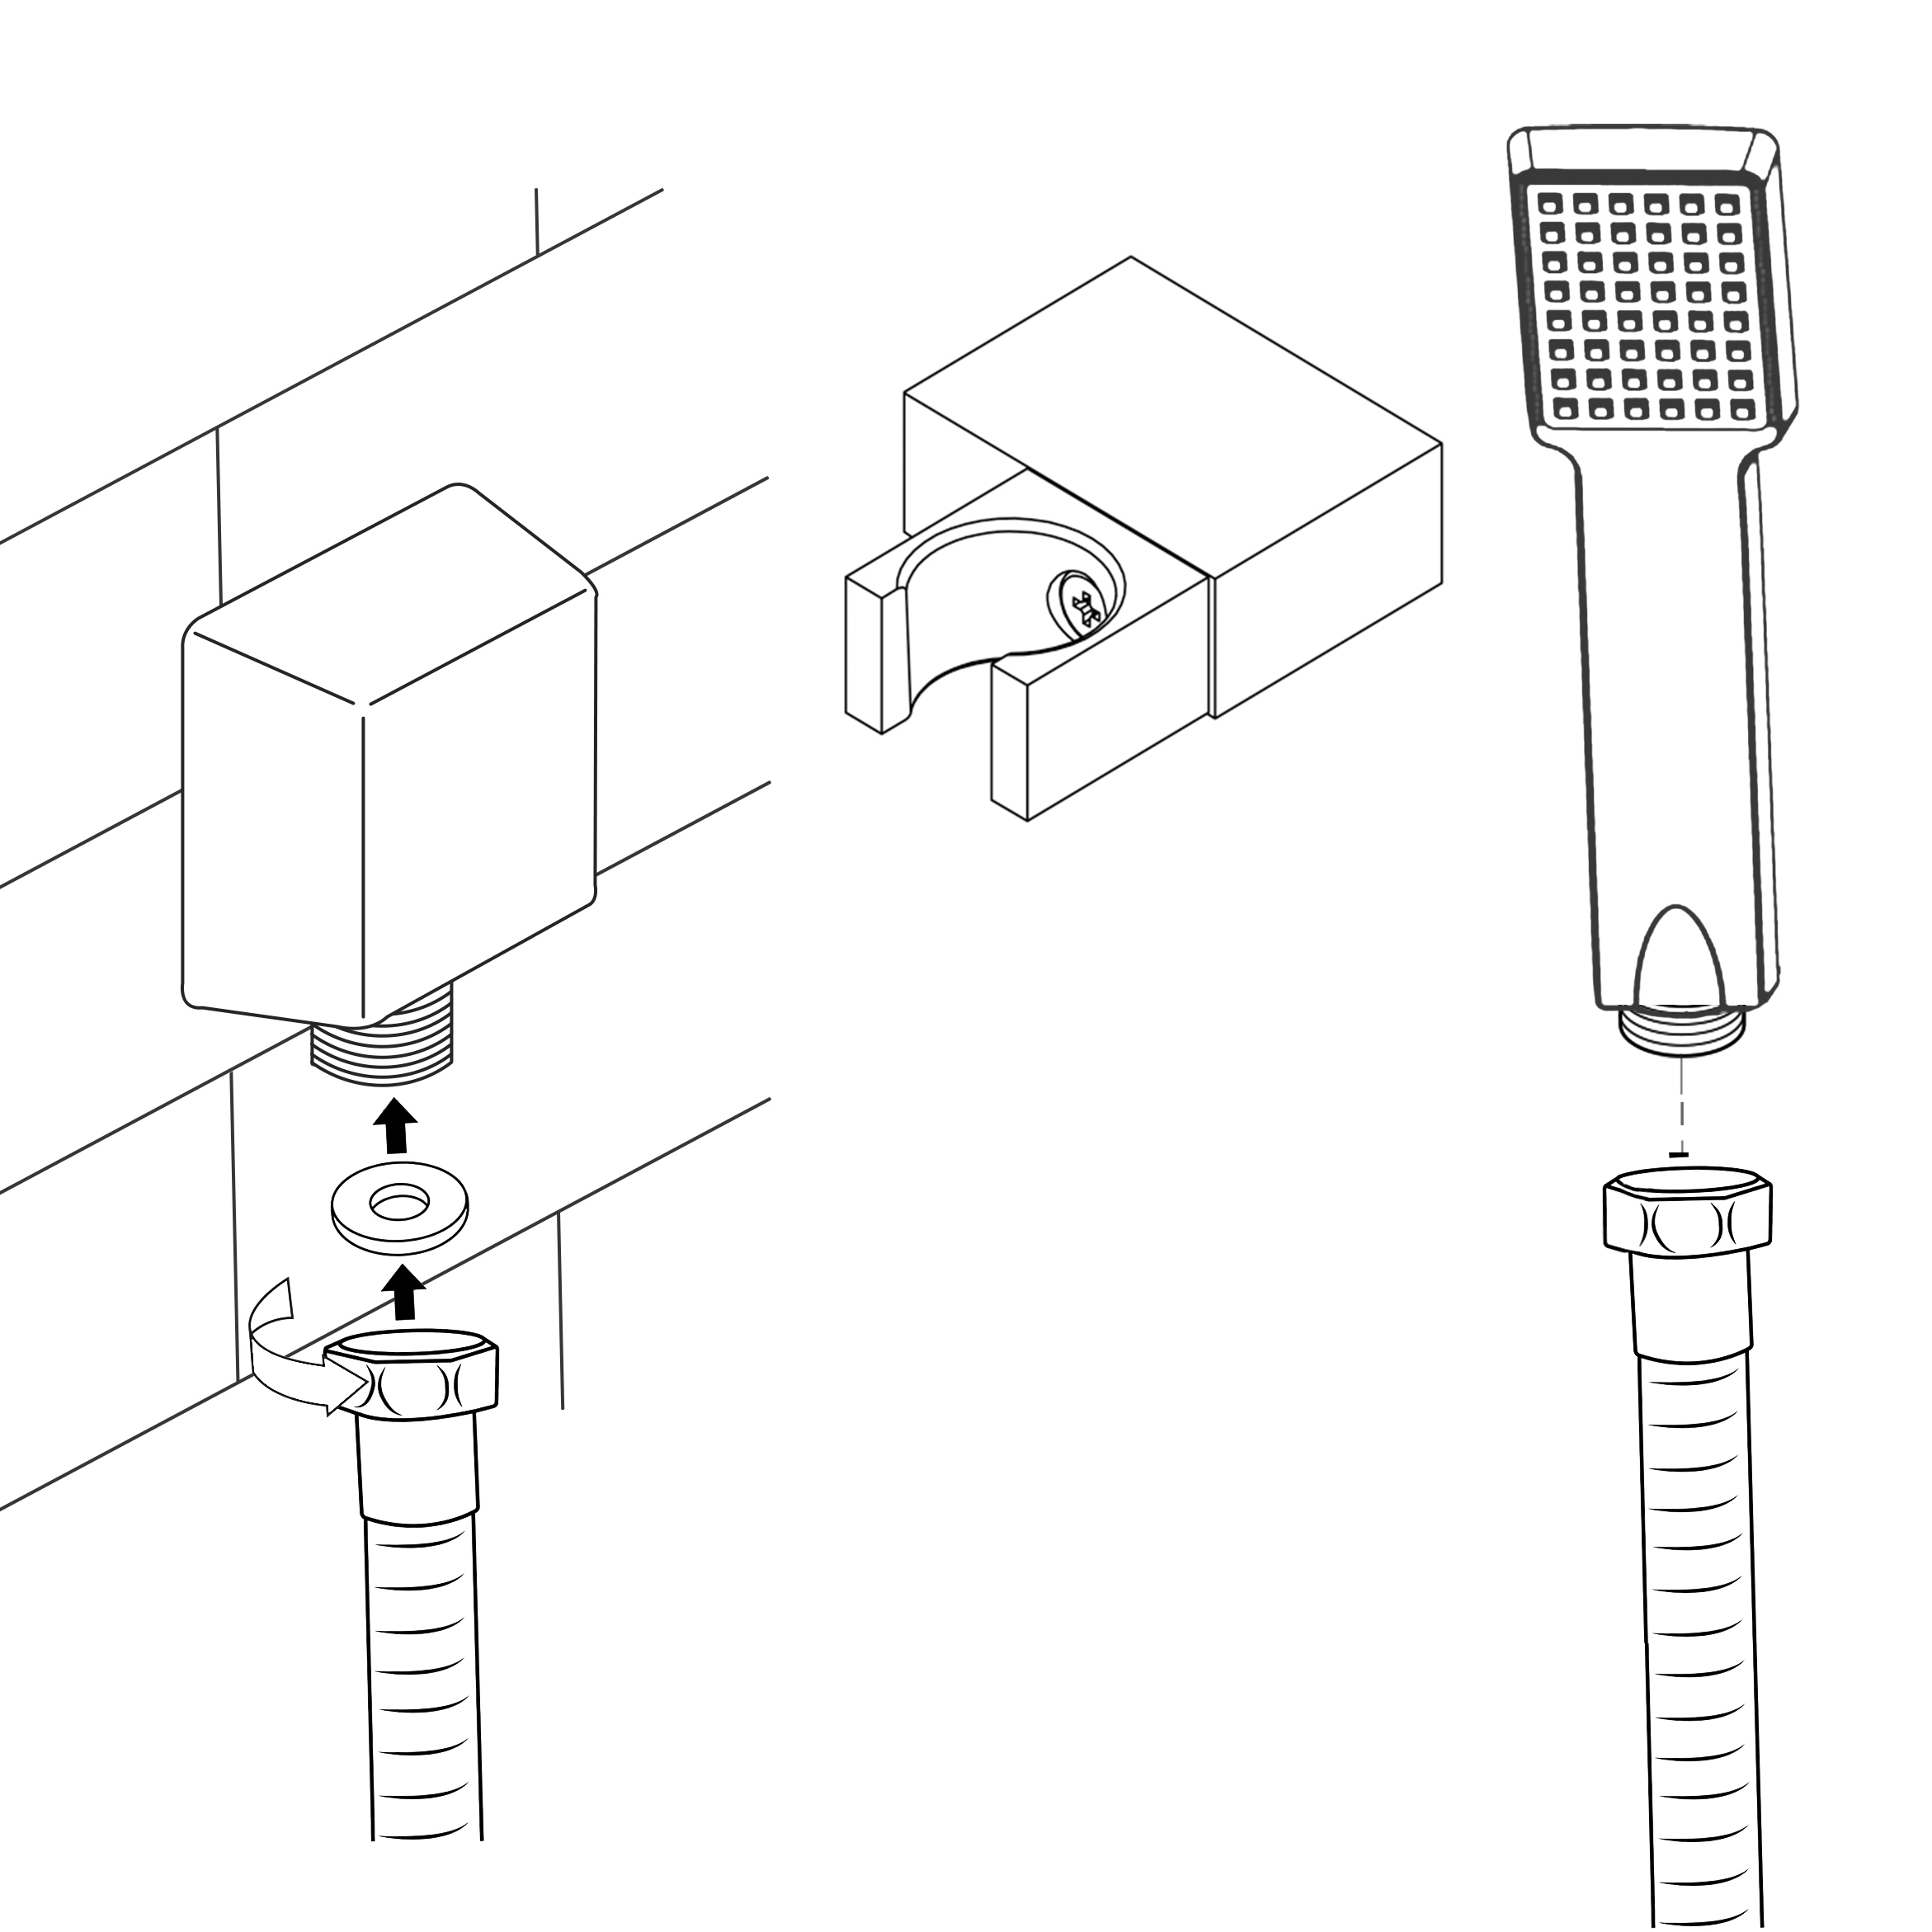
Shower Wall Holder Installation
Decide the position for the shower head holder on the wall within the bath showering area and proceed as follows:
• Hold the hand shower head holder fixing plate in a suitable position on the wall, mark out the position of the holder. Mark the two locating holes, these are 17mm center.
• Drill and plug the wall. Use an appropriate masonary drill, but if the wall is plasterboard or a soft building block, use special wall plugs and an appropriate drill bit.
• Slide the inserts onto the screws in the orientation. Secure the inserts by tightening the screws.
• Slide the hand shower head holder body onto the inserts and secure by tightening the grub screw facing down.
|
|
|
|
|
|
|
|
|
|
|
|
|
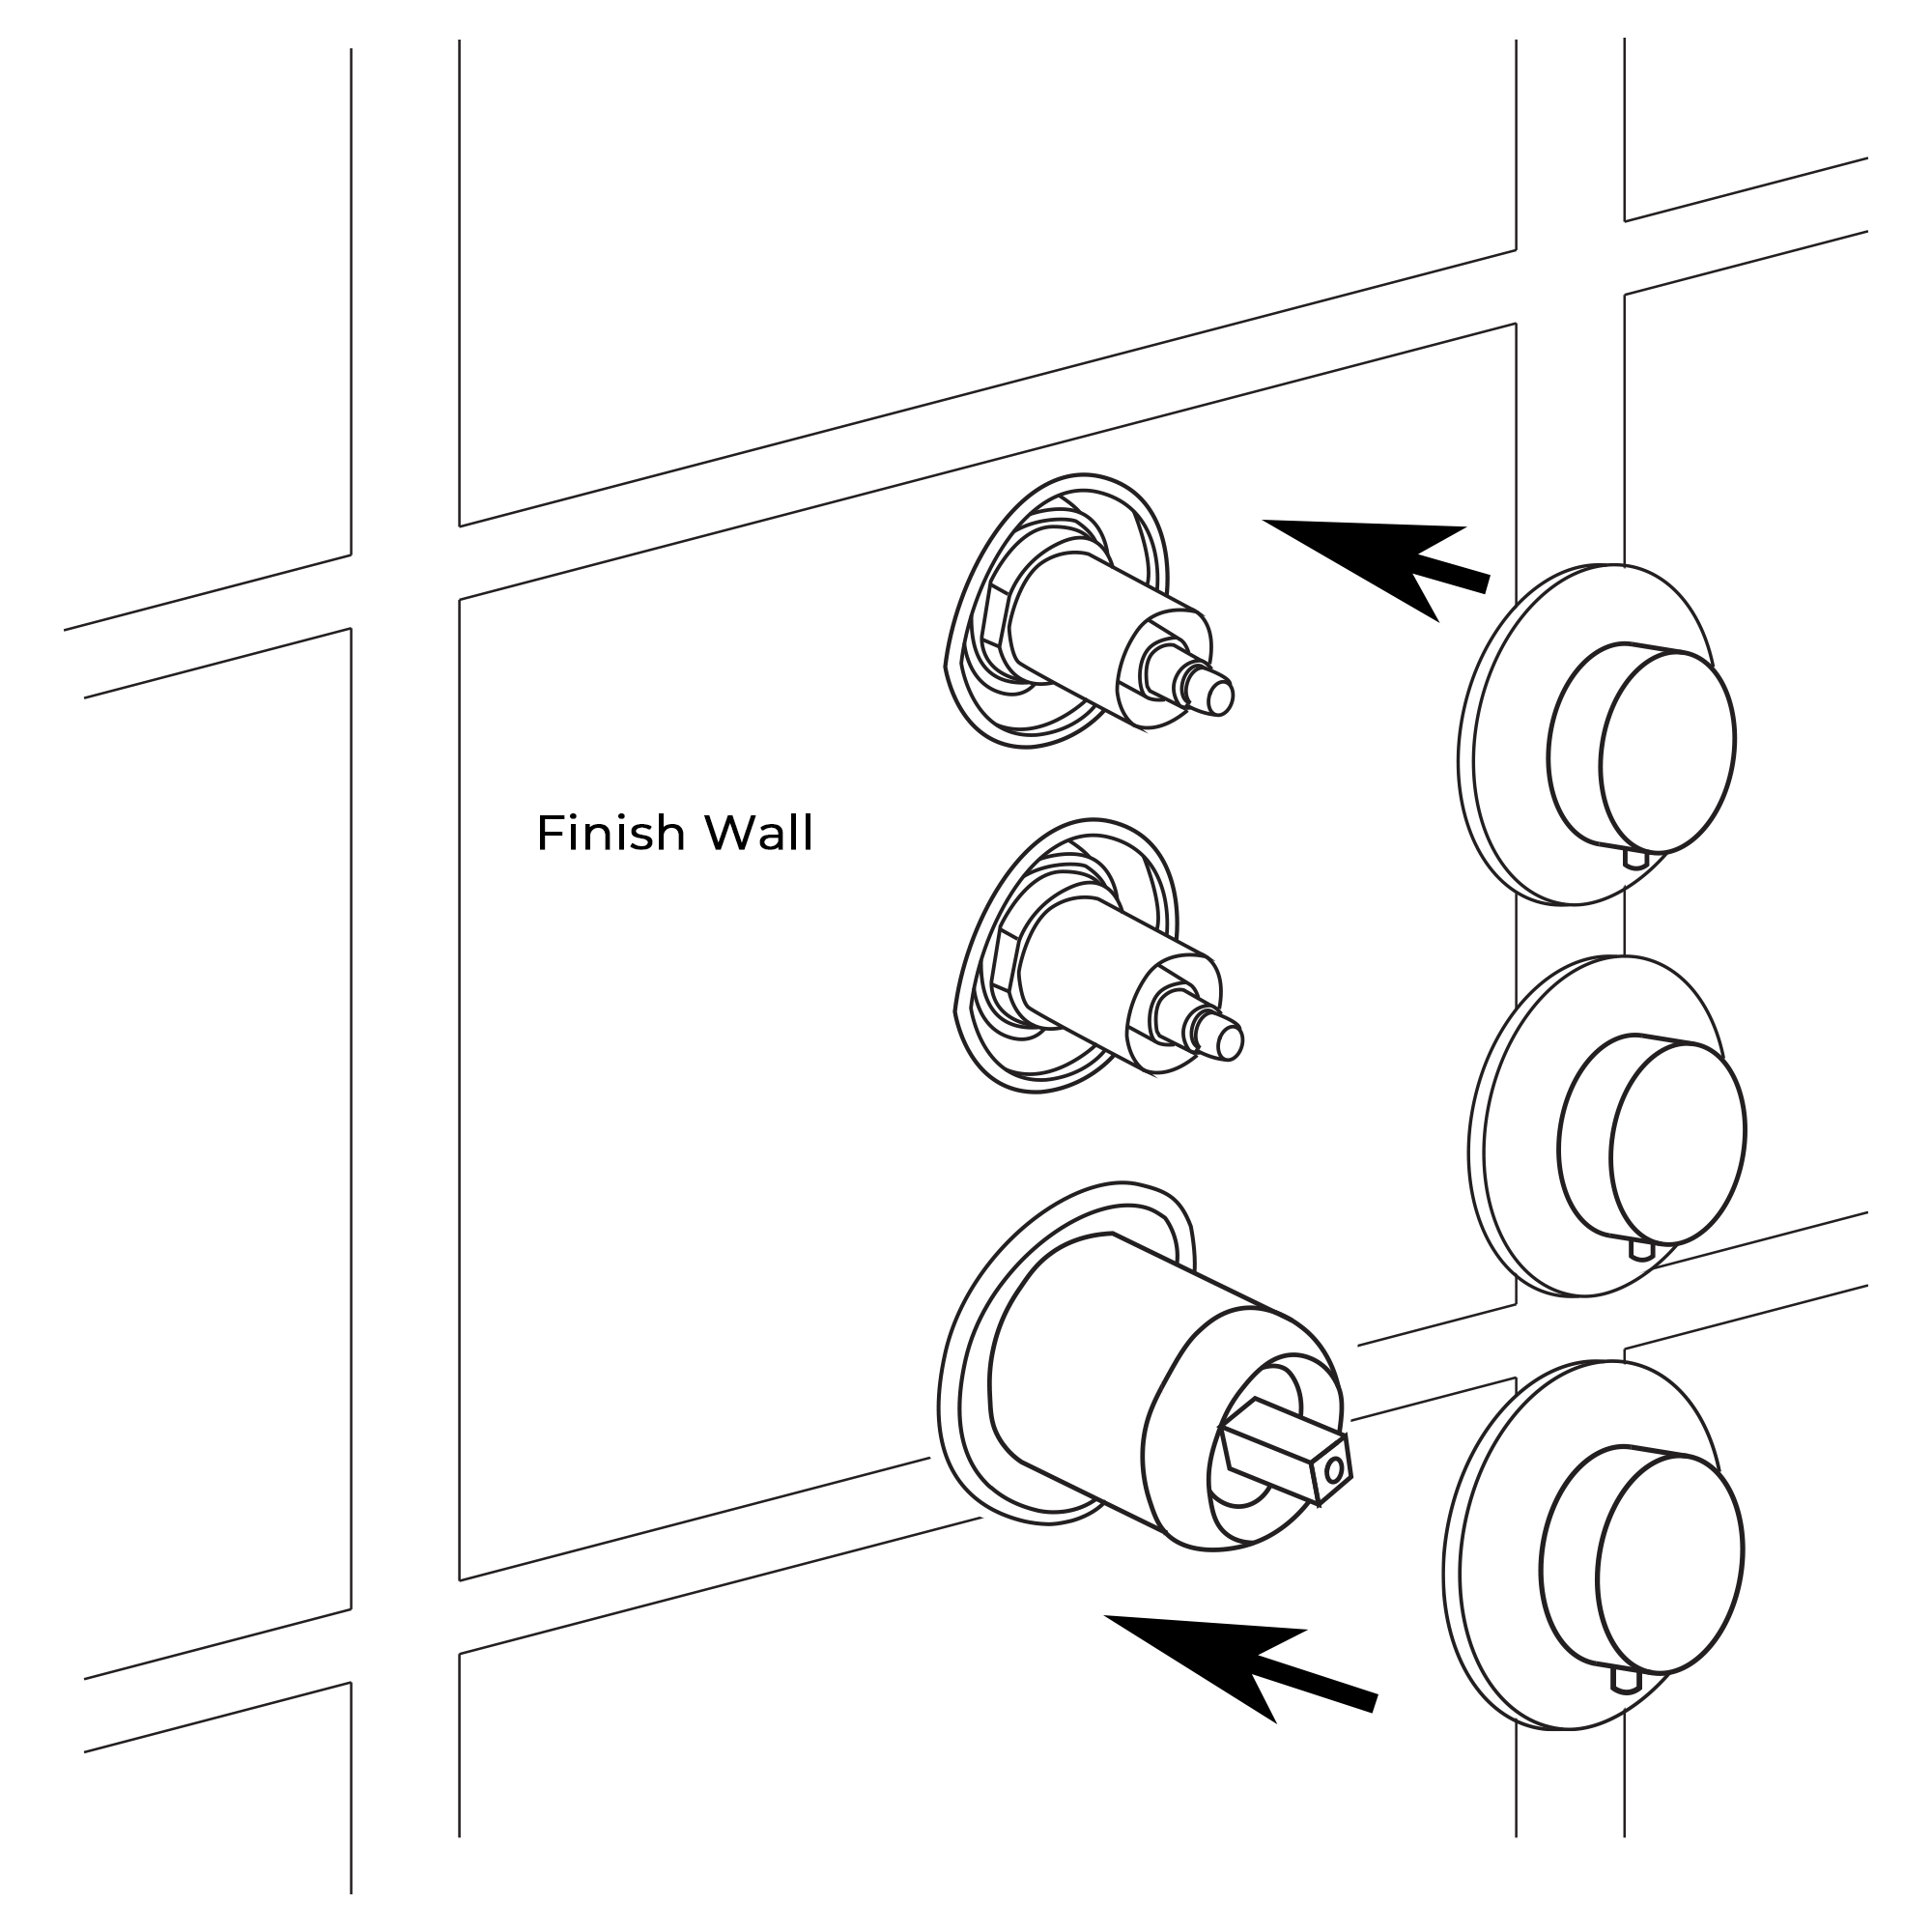
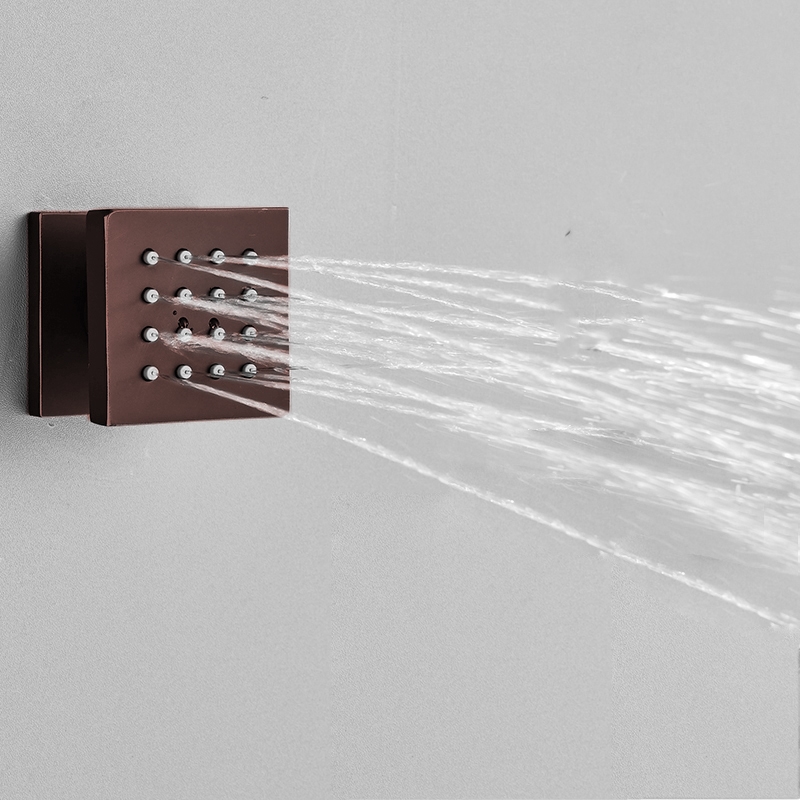
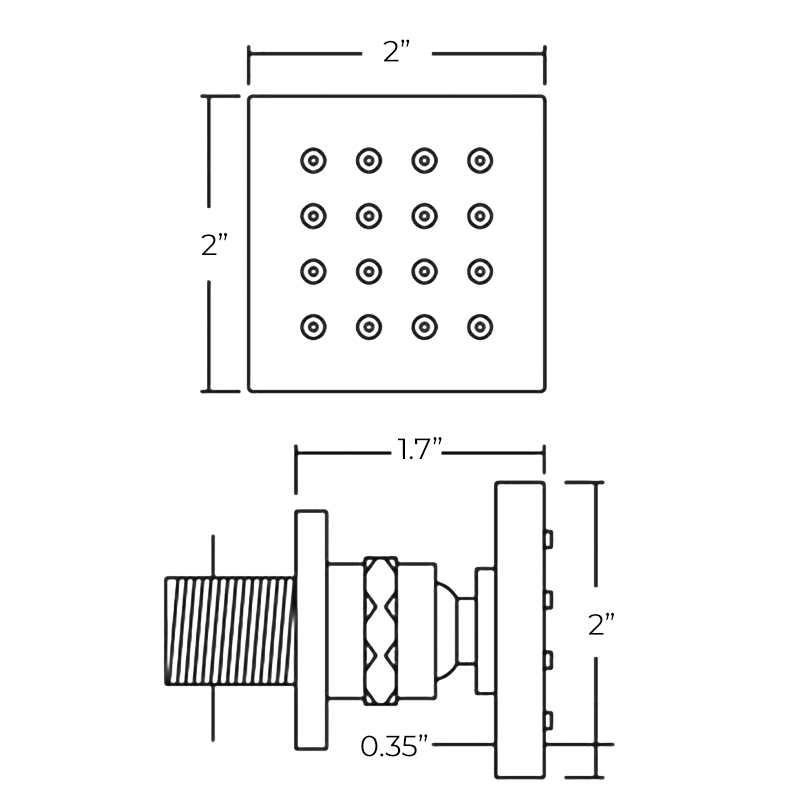
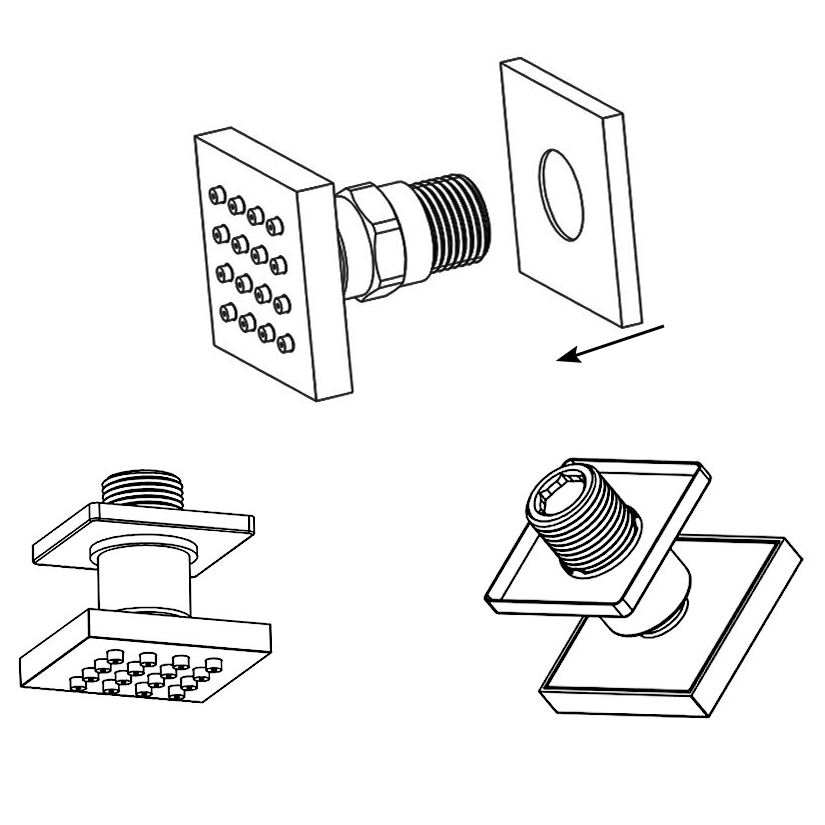
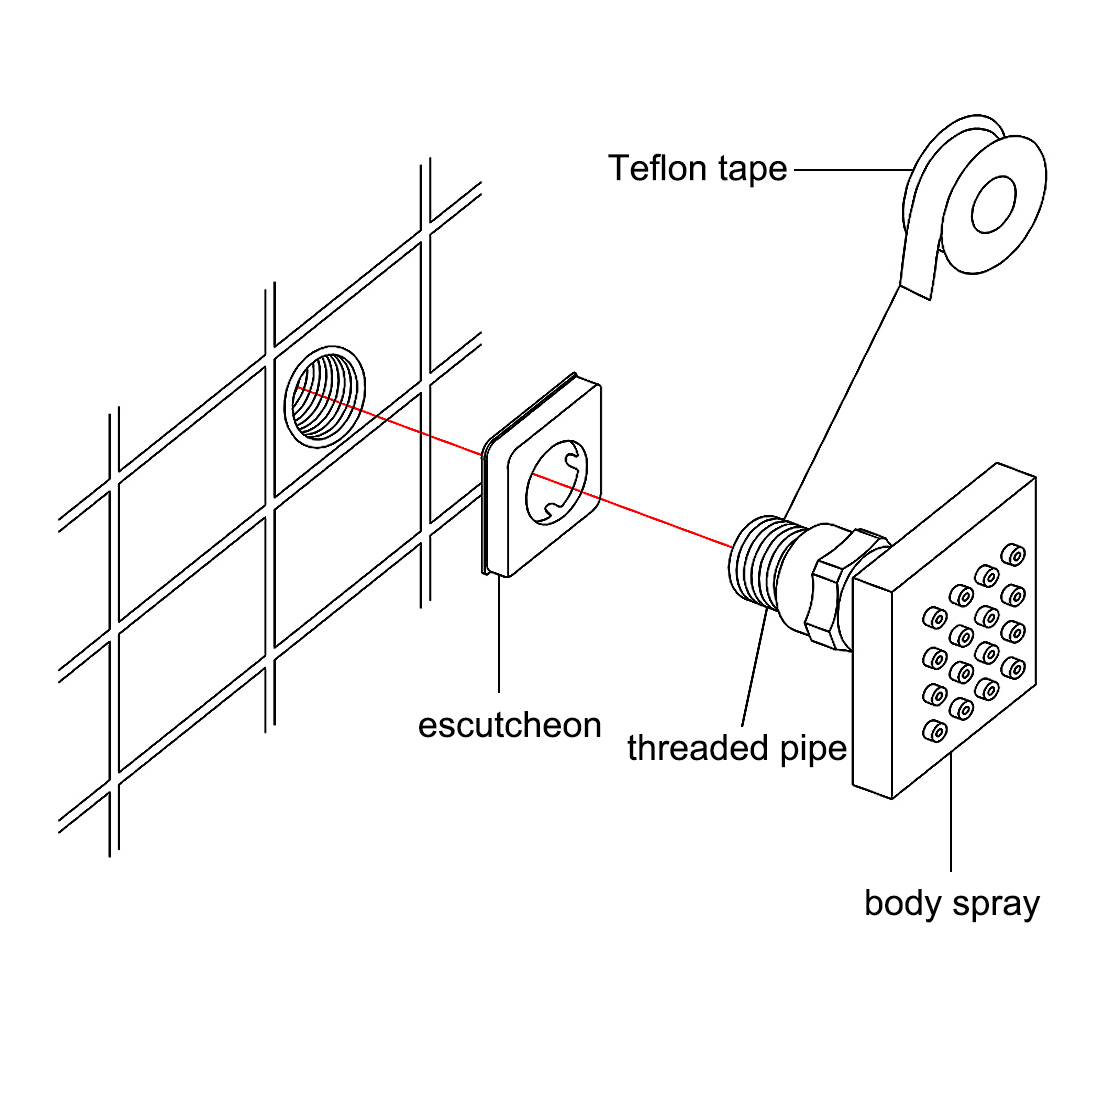
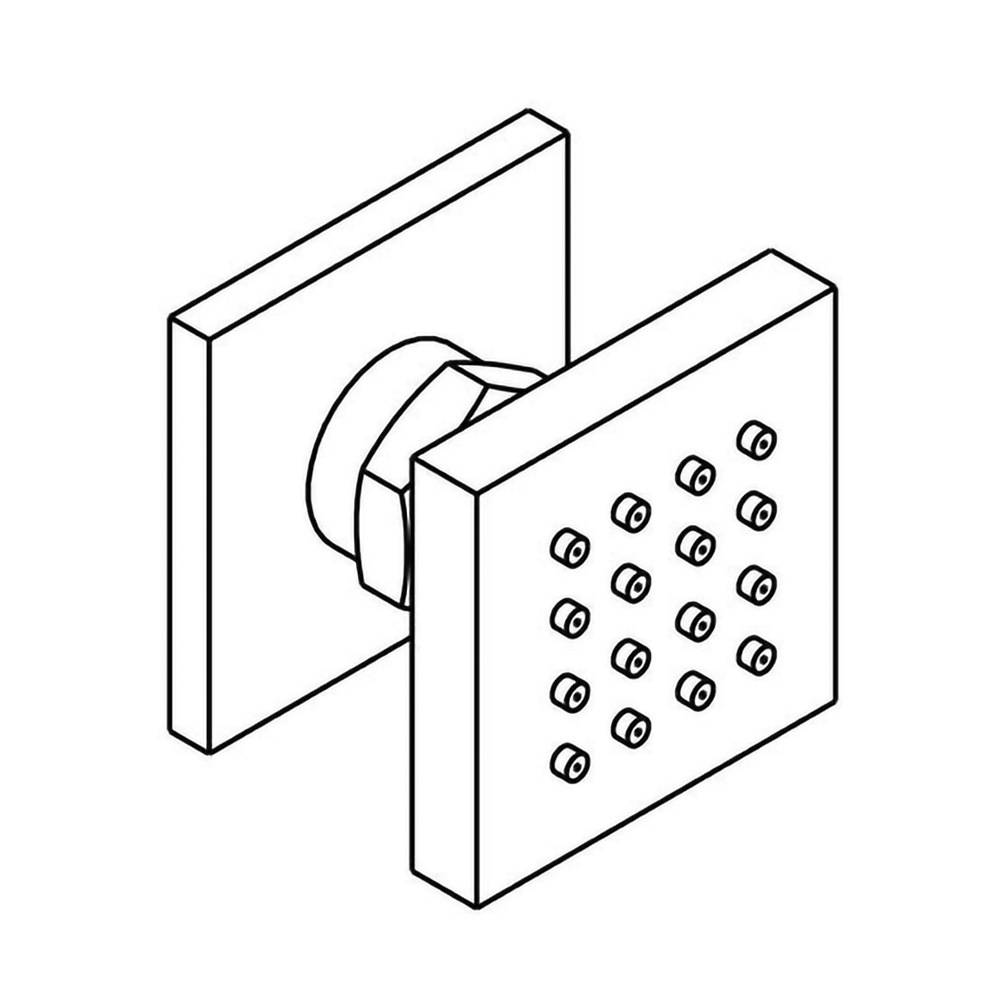
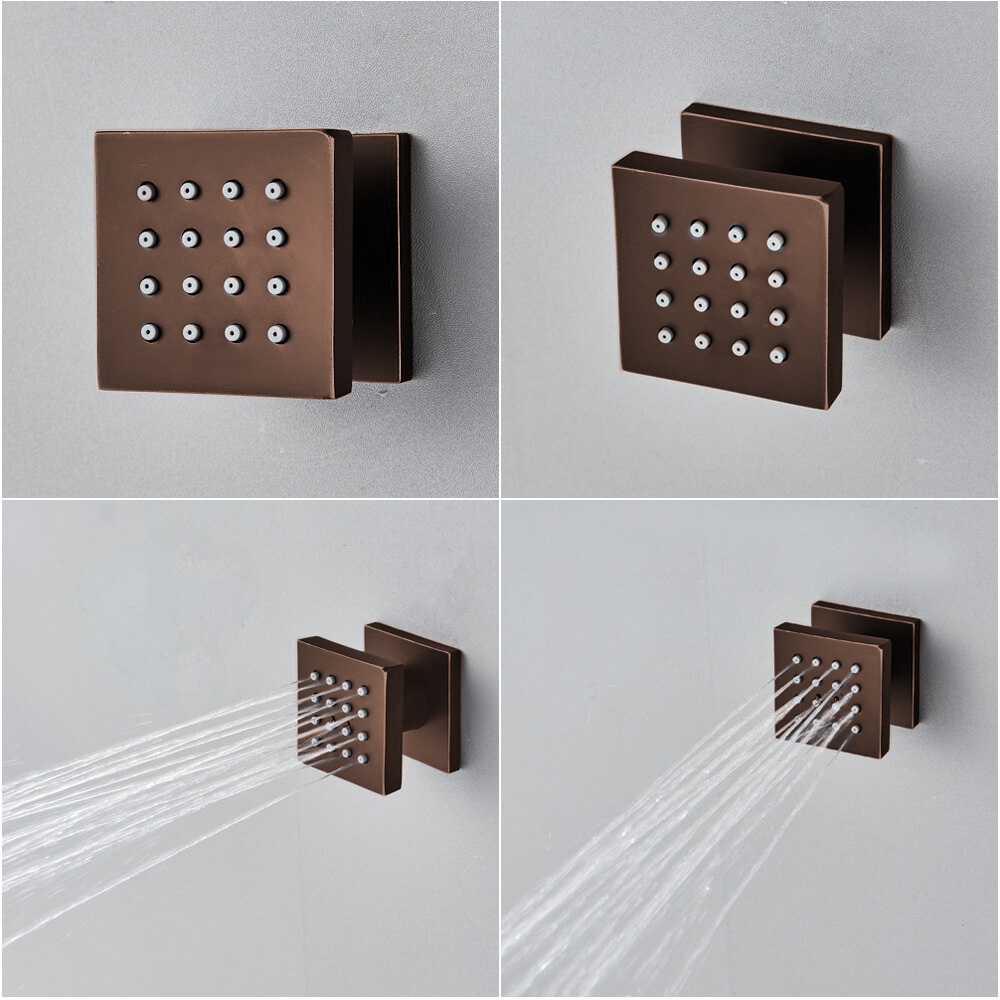
Shower Body Jets Installation Instructions
|
Step 1:
|
|
Body
Sprays
|
Step 2:
|
|
|
|
|
|
installation
|
|
|
|
|
|
|
|
|
|
|
|
|
|
Step 3:
|
|
|
Step 4:
|
|
|
|
|
|
|
|
|
|
|
|
|
|
|
|
|
|
|
Step 5: (Pressure Balancing Loop)
|
|
|
|
|
|
|

|
|
|
|
Rough-in Suggestion:
This installation requires a 1/2" male threaded pipe fitting to extend 1/4" beyond the finished surface. The plumber should install a properly anchored 1/2" female pipe fitting (i.e. a drop-ear ell) recessed into the wall, into which a brass pipe nipple of proper length can be fitted once the finished wall is complete.
Note: The hole size opening should be 1.5" max diameter.
Bodyspray placement:
Custom shower systems are sized to the user or users. Bodysprays are normally placed at the upper back, middle back, and upper thigh. Always position bodysprays according to the preferences of the user(s).
Pressure Balancing Loop:
If installing bodysprays in a bank of 3 or fewer, a pressure balancing loop is not necessary.
If installing bodysprays in a bank of 4 or greater, a pressure balancing loop must be used to keep the pressure even between the bodysprays.
|
|
|
|
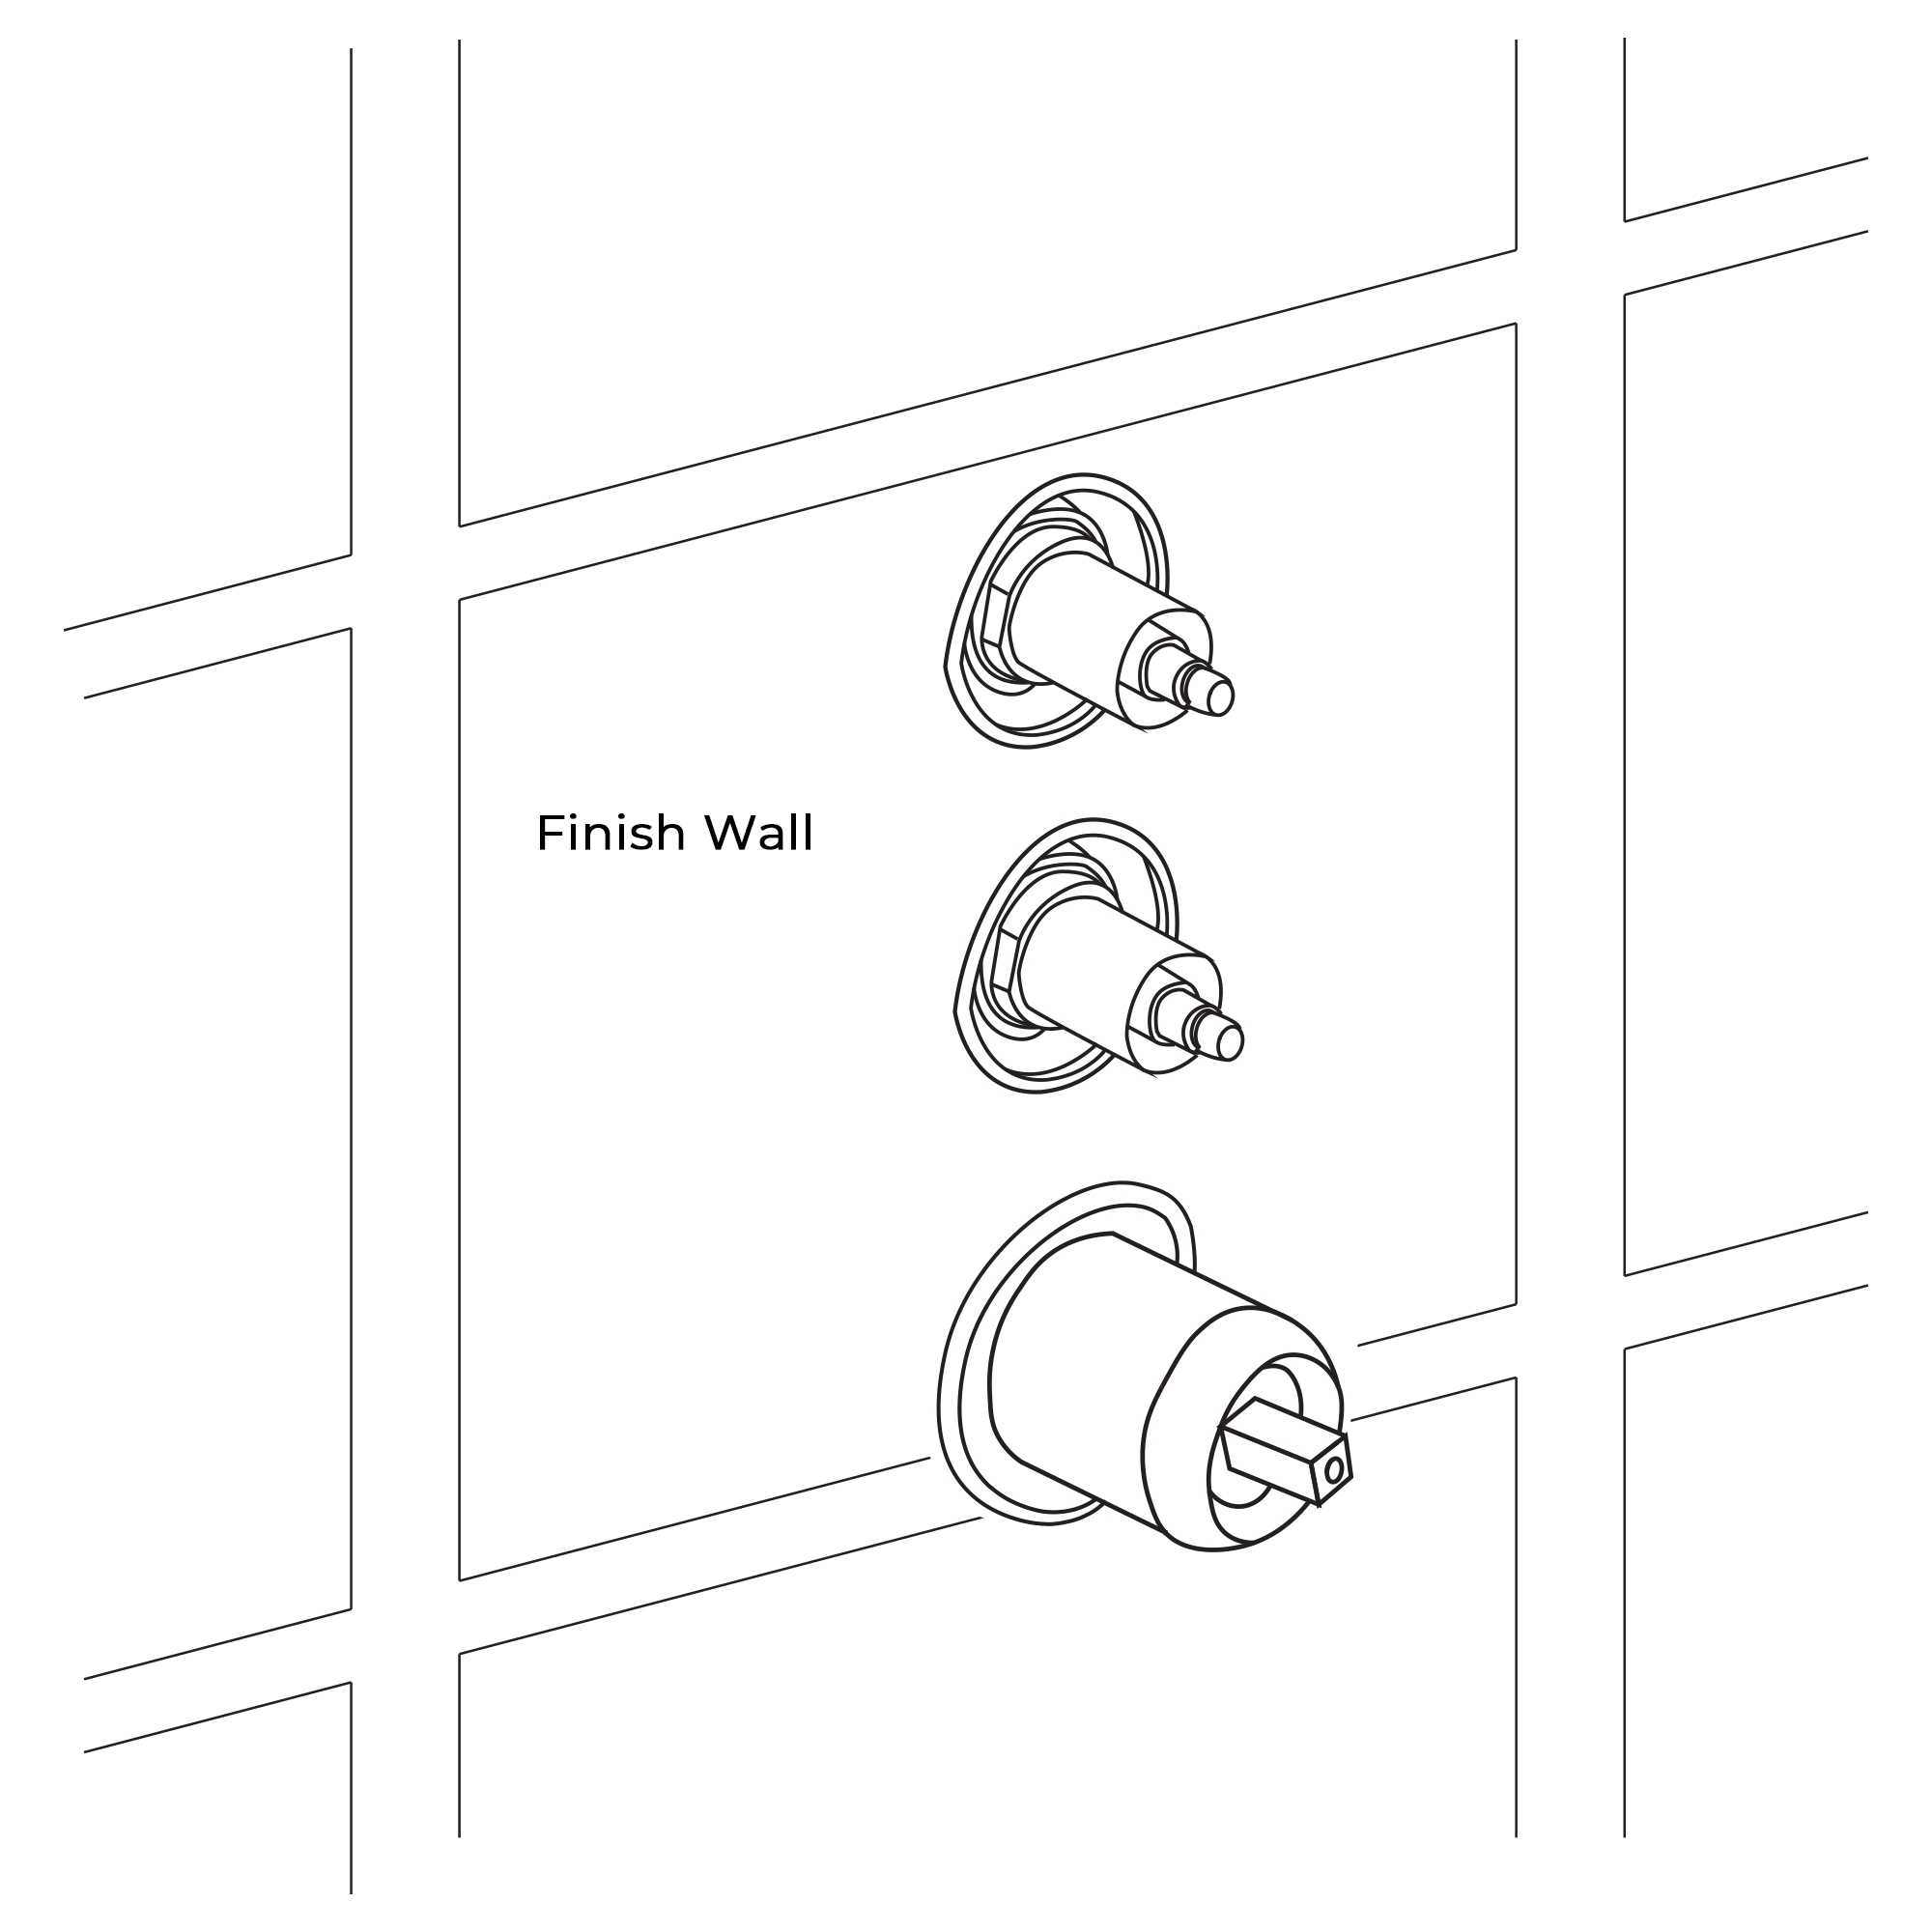
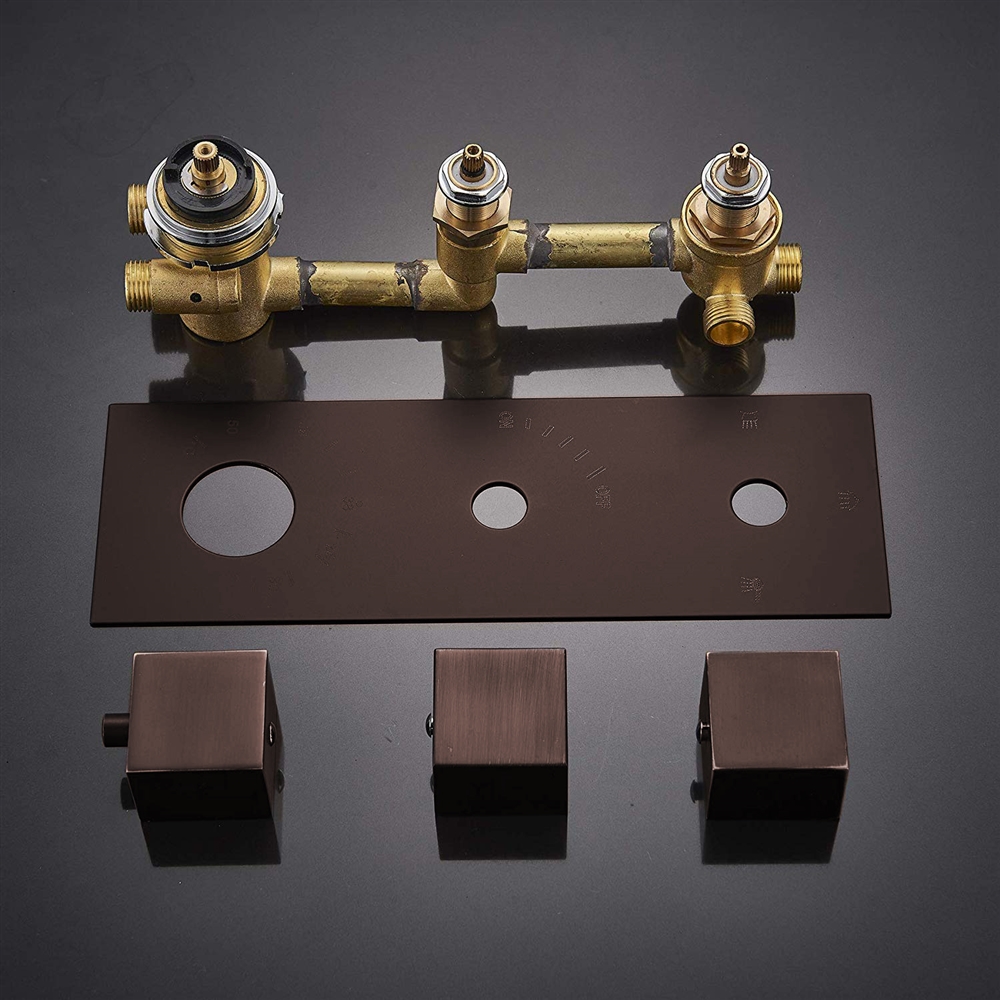
Shower Mixer Installation Instruction
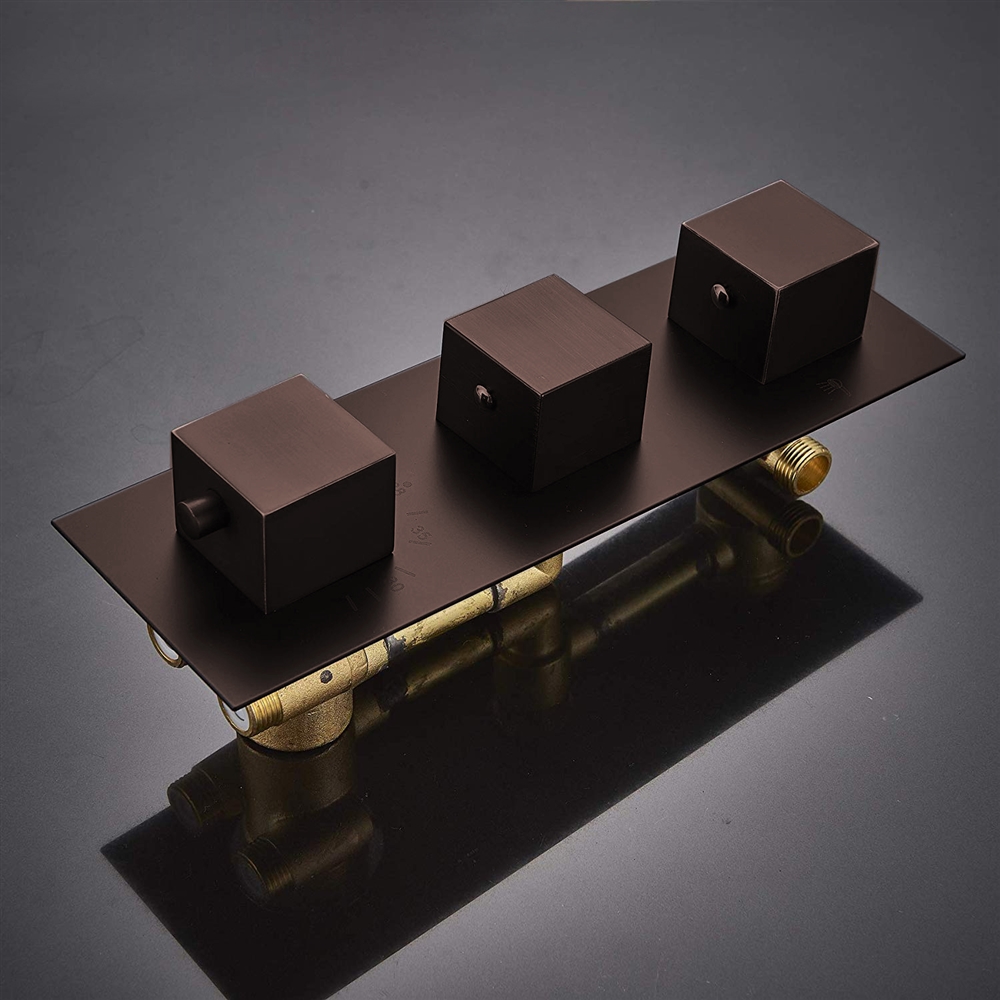
Shower Mixer Installation Instruction
1) Fix the shower valve into the wall with screws. Use a level to ensure that the valve is straight and level. (Important: Flush the water supply pipes to remove any dirt and debris before installing the valve body)
2) Wrap Teflon tape around the pipe thread. Connect hot and cold water supply lines and all the in-wall pipes (not included) as desired to the valve. Turn on the water supply and open the cartridge to check for leaks. Then, put on the protective cover.
3) Remove the protective cover when the wall finished wall is completed. Install escutcheon onto the shower valve and press it against the finished wall. Then, install the handle and diverter knob to the valve and tighten set screws with the Allen key and put on the indication button.
Function: Check connections for leaks and check function of fitting. Flow is diverted automatically from shower outlet to bath inlet when the fitting is closed.
|
|
|
|
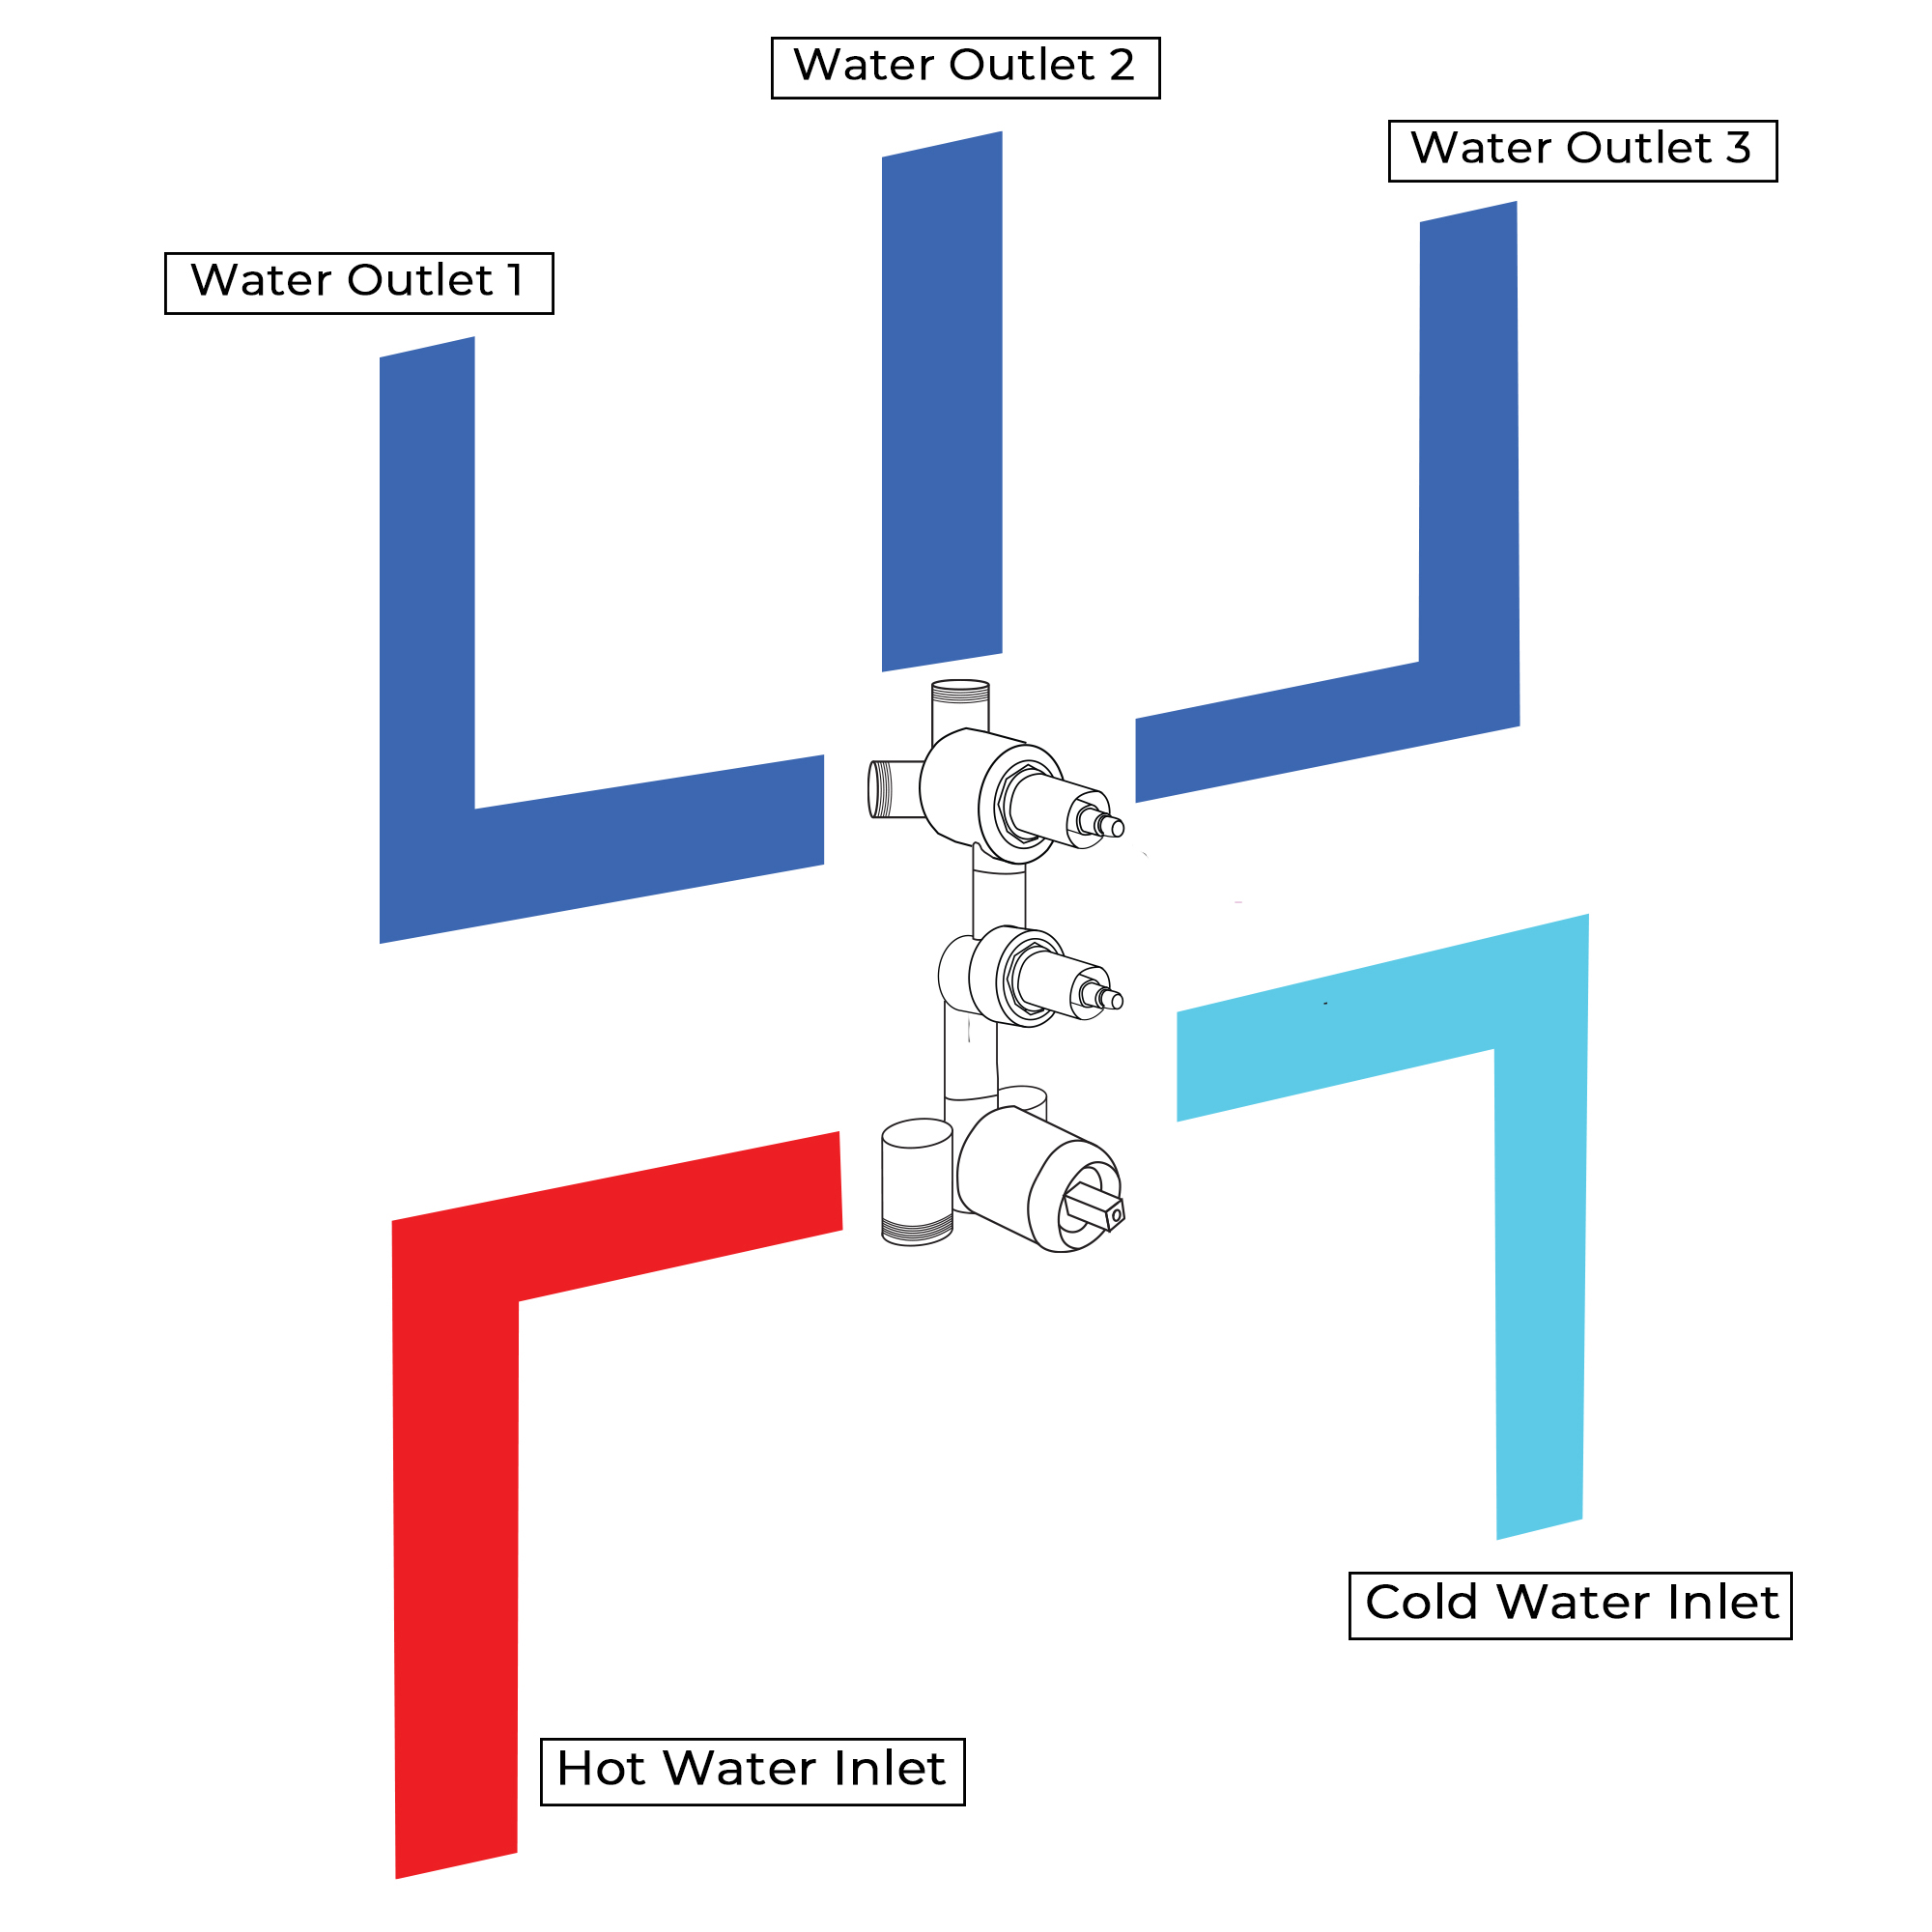
Shower Mixer Wall Mount View Connection
|
|
Shower Mixer Connection Overview
|
|
Shower
Mix
|
|
 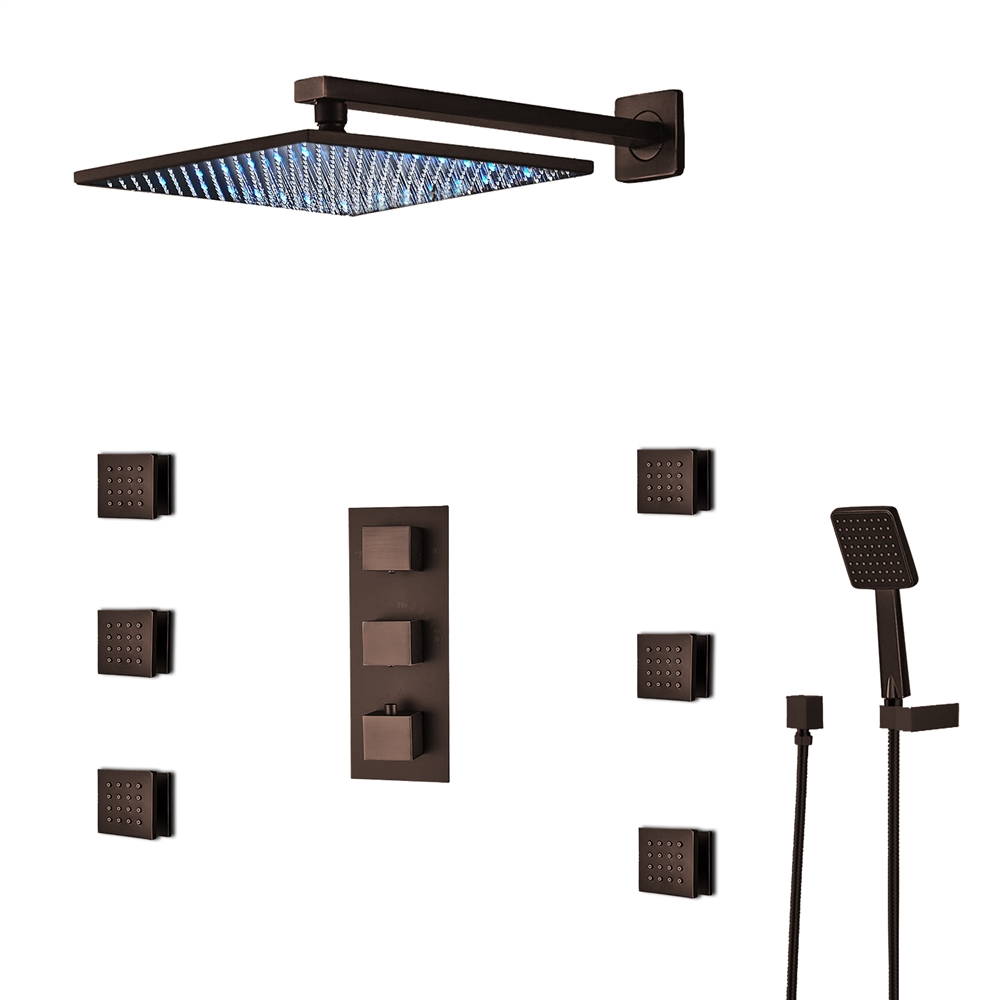 
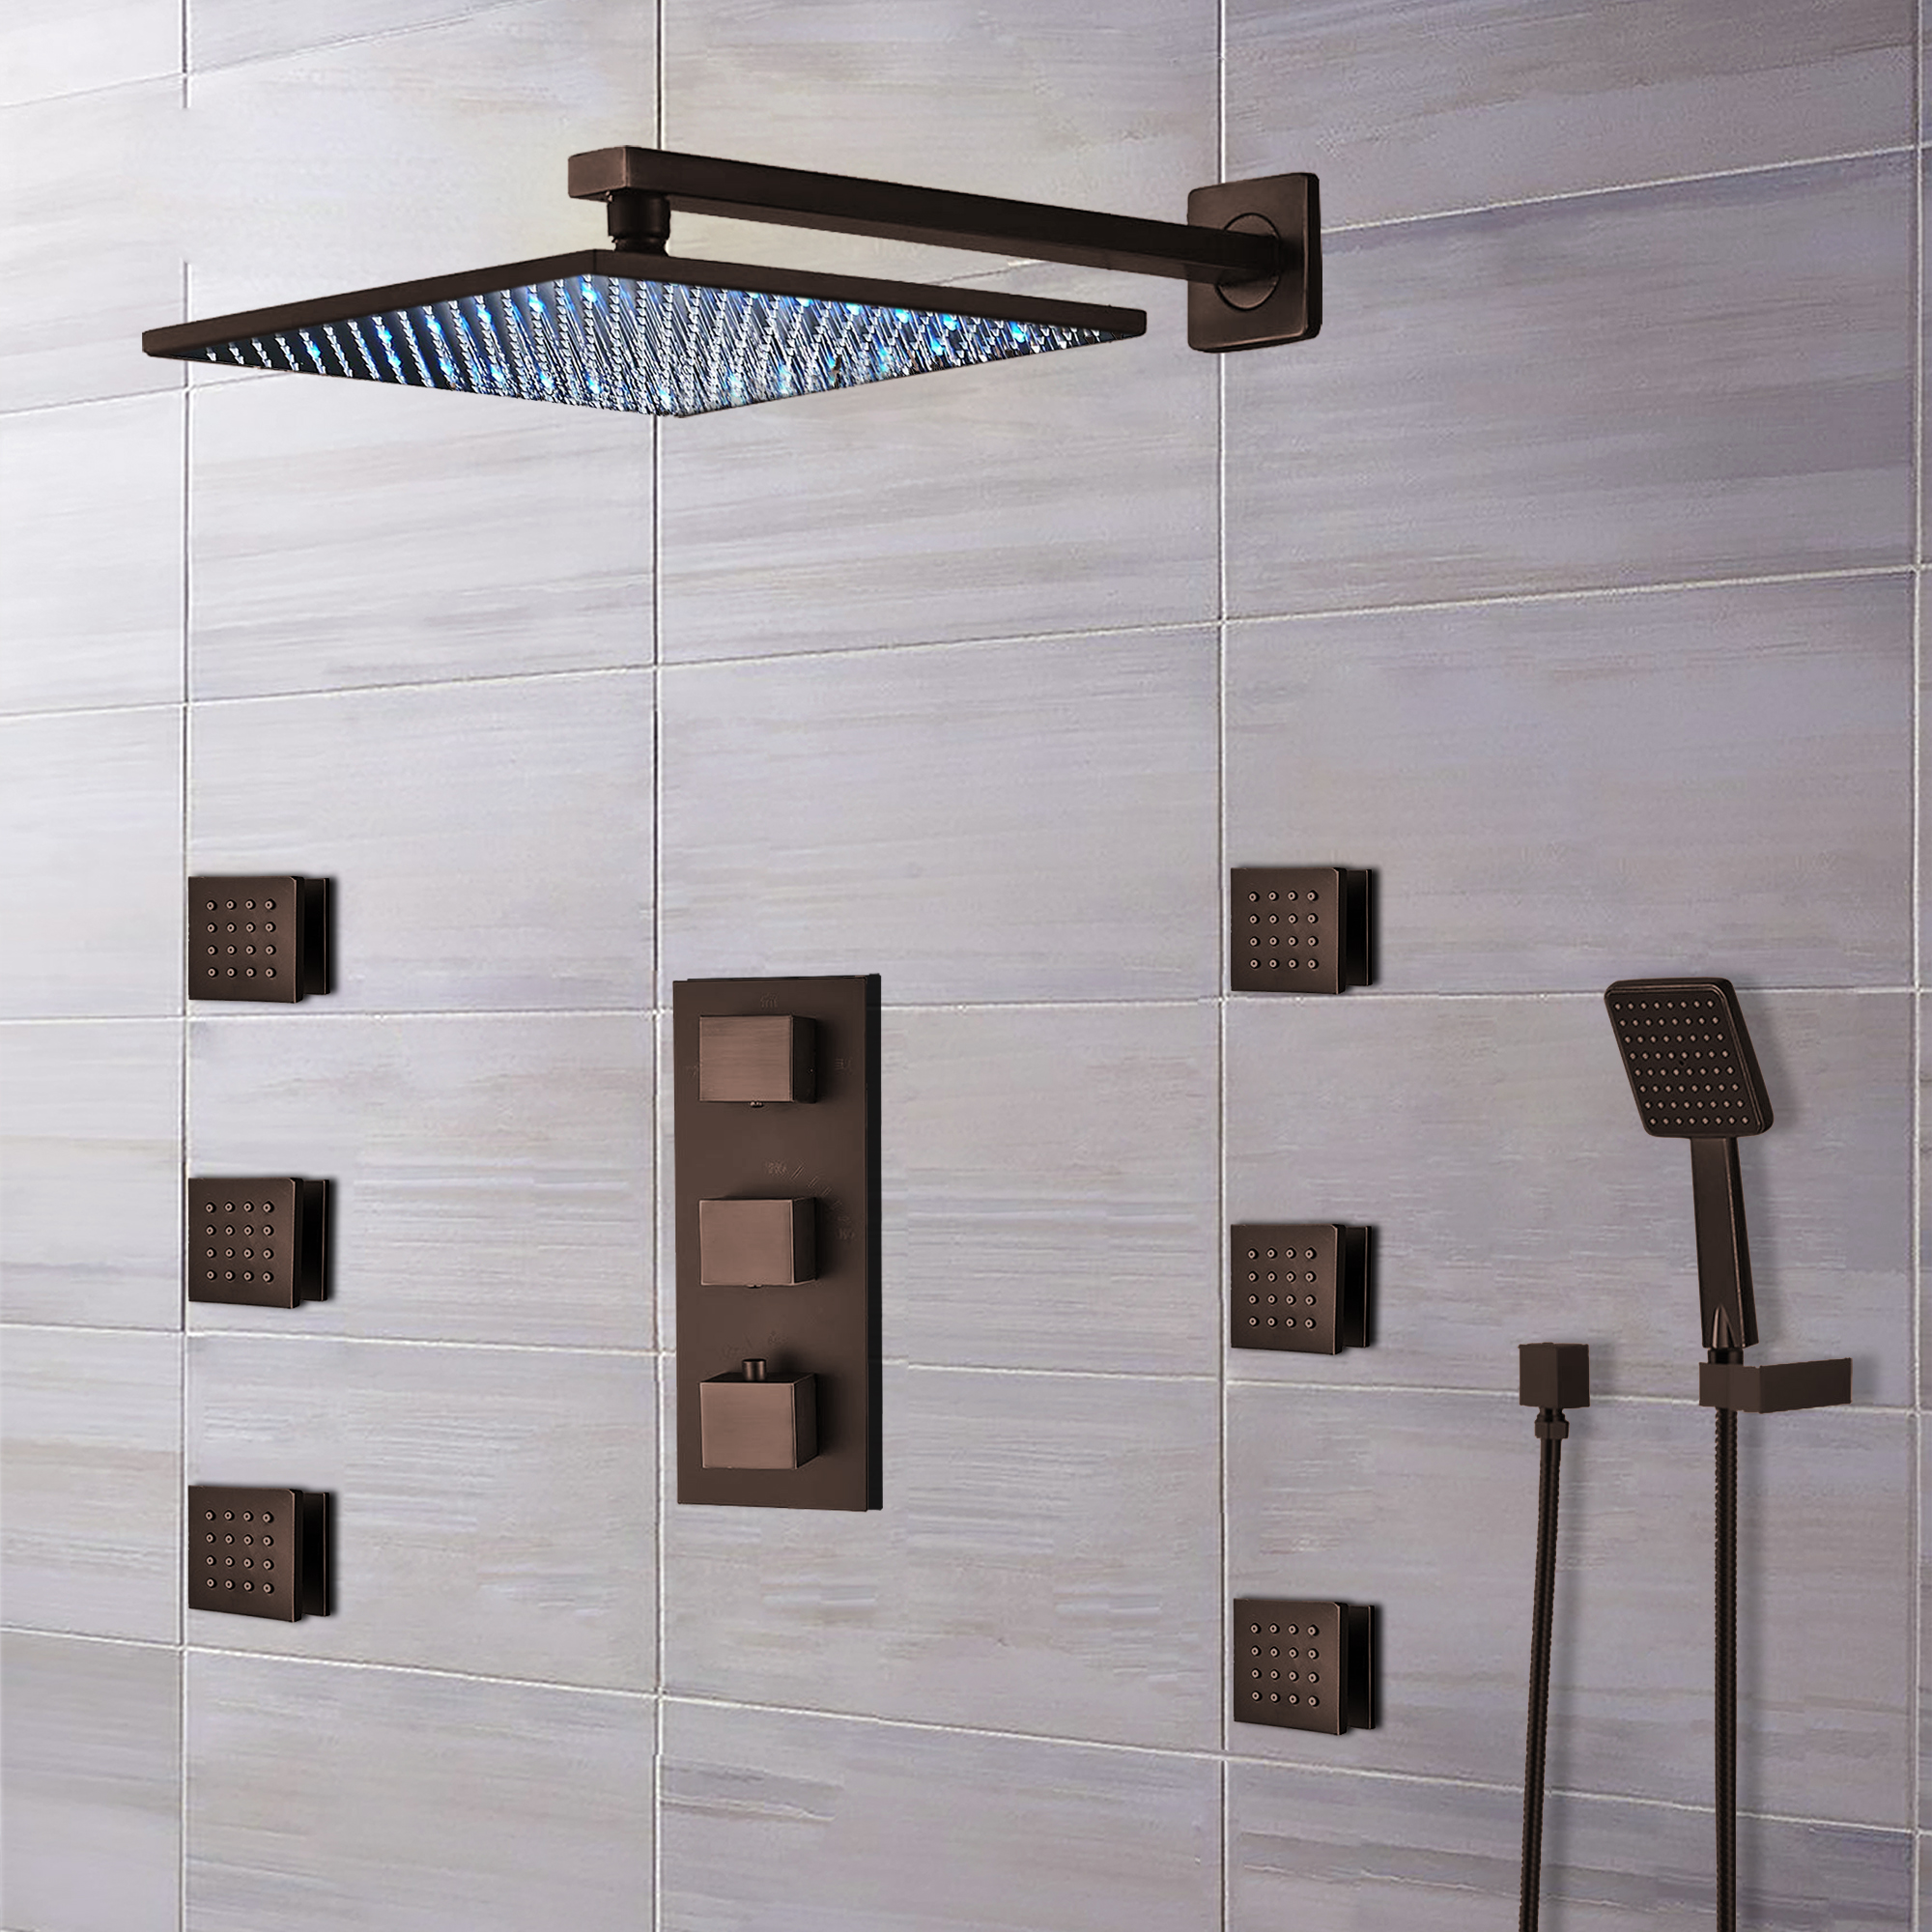
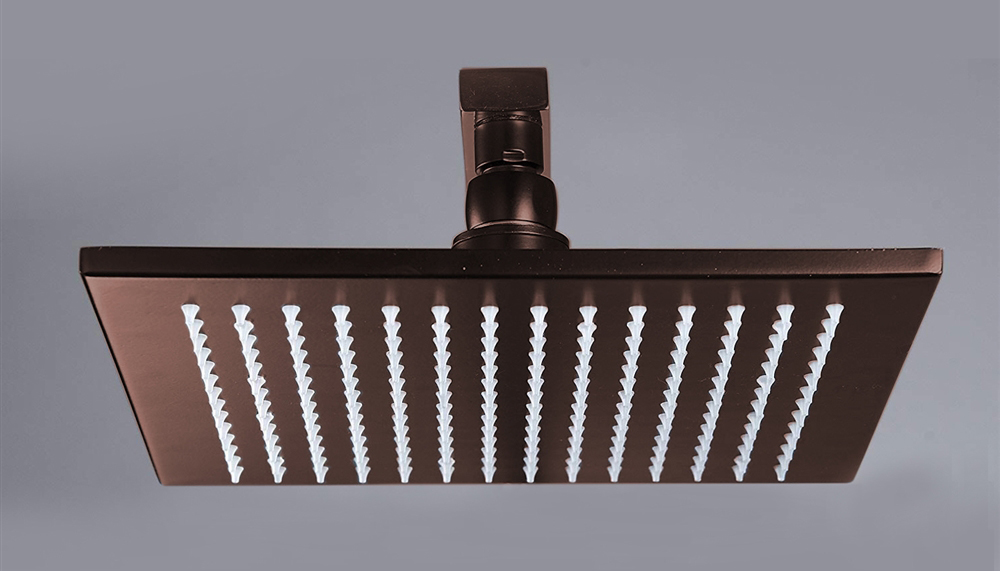
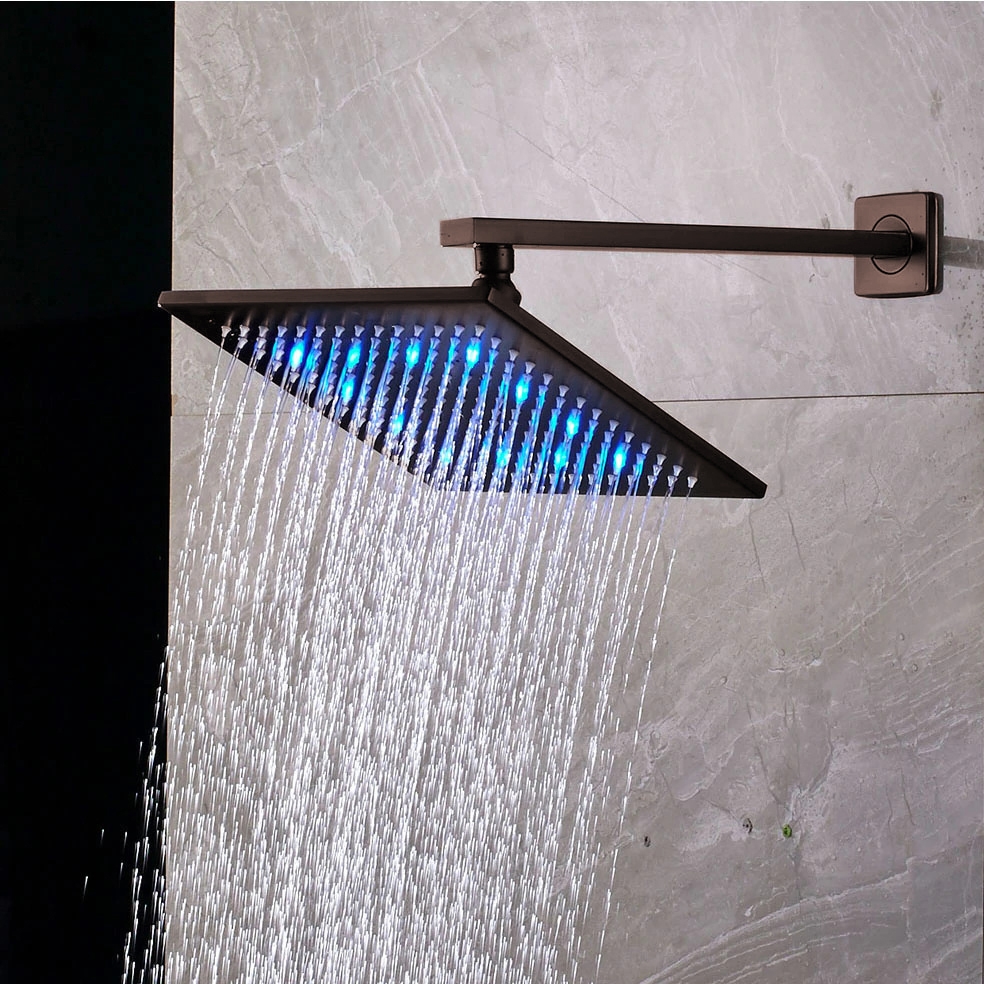
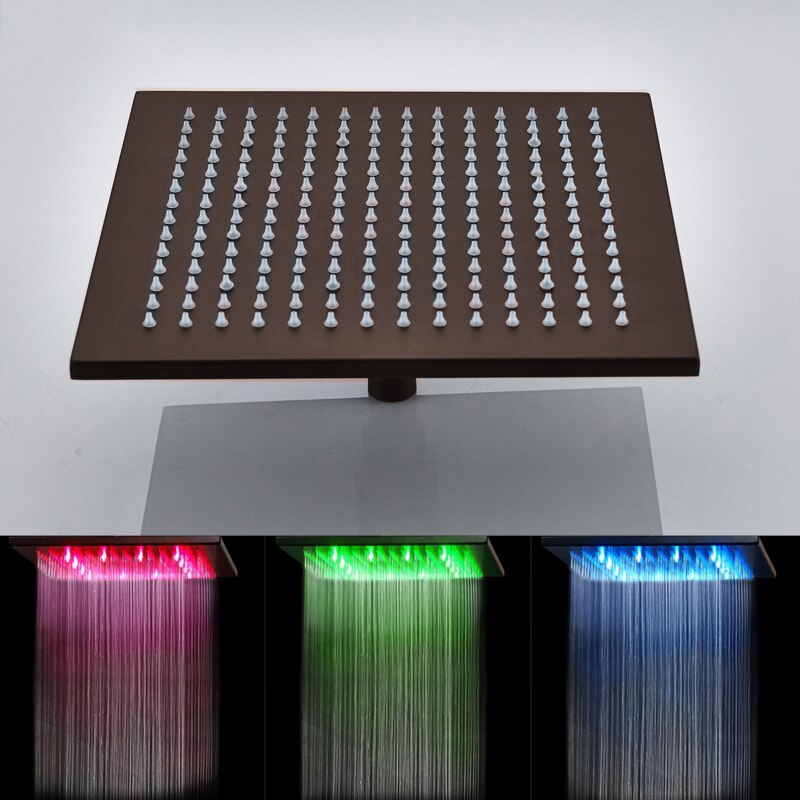
Fontana Sierra Light Oil Rubbed Bronze LED Shower System
Step into your new beautiful light Oil Rubbed Bronze shower with Built-in hydro-powered device powers the LED lights, which provide visual shower temperature to reduce water waste. The shower head will automatically change color according to water temperature. Lights are based on water pressure and will activate when you turn on the water. This shower system comes equipped with Six adjustable body massage jets and a handheld shower ensure complete relaxation. This Fontana Sierra Light Oil Rubbed Bronze LED Shower System rainfall shower set mixer with body jets set provides a luxurious showering experience it is the perfect complement to any modern bathroom. The modern design handheld shower, and an easy-to-use mixer valve, both made from high-quality solid brass. Easy for the elderly and children to shower, handheld showerhead, shower mixer valve control, pressure-balanced valves can prevent scalding injuries, in particular to the elderly and children. When it comes to new bathrooms, Fontana Showers offers the shape, finish and styles you're looking for.
Features:
|
Brand Name: Fontana Showers
Model Number: LED-SHOWER-FB-0522ORB
Finish: Light Oil Rubbed Bronze
Style: Contemporary Rain Shower head
Shower head Height (thickness): 0.33"
Shower head Width: Available in 8", 10", 12", 16", or 20"
Shower head Length: Available in 8", 10", 12", 16" or 20"
LED Power Source: Water Flow
LED Color: Blue, Green, Red
Mount Method: Wall or Ceiling Mount
Connection:1/2" US standard
Body Jets: Qty 6 - 2"x2" Solid brass 360° adjustable
Material: Solid Brass
Water temperature is ≤89 °F (≤32 °C): Blue color will show
Water temperature is between 97 to 107 °F (36-42 °C): Green color will show
Water temperature is between 109 to 122 °F (43-50 °C): Red color will show
Water temperature is above 122 °F (>50 °C): Red color will flash
|
|
|
|
|