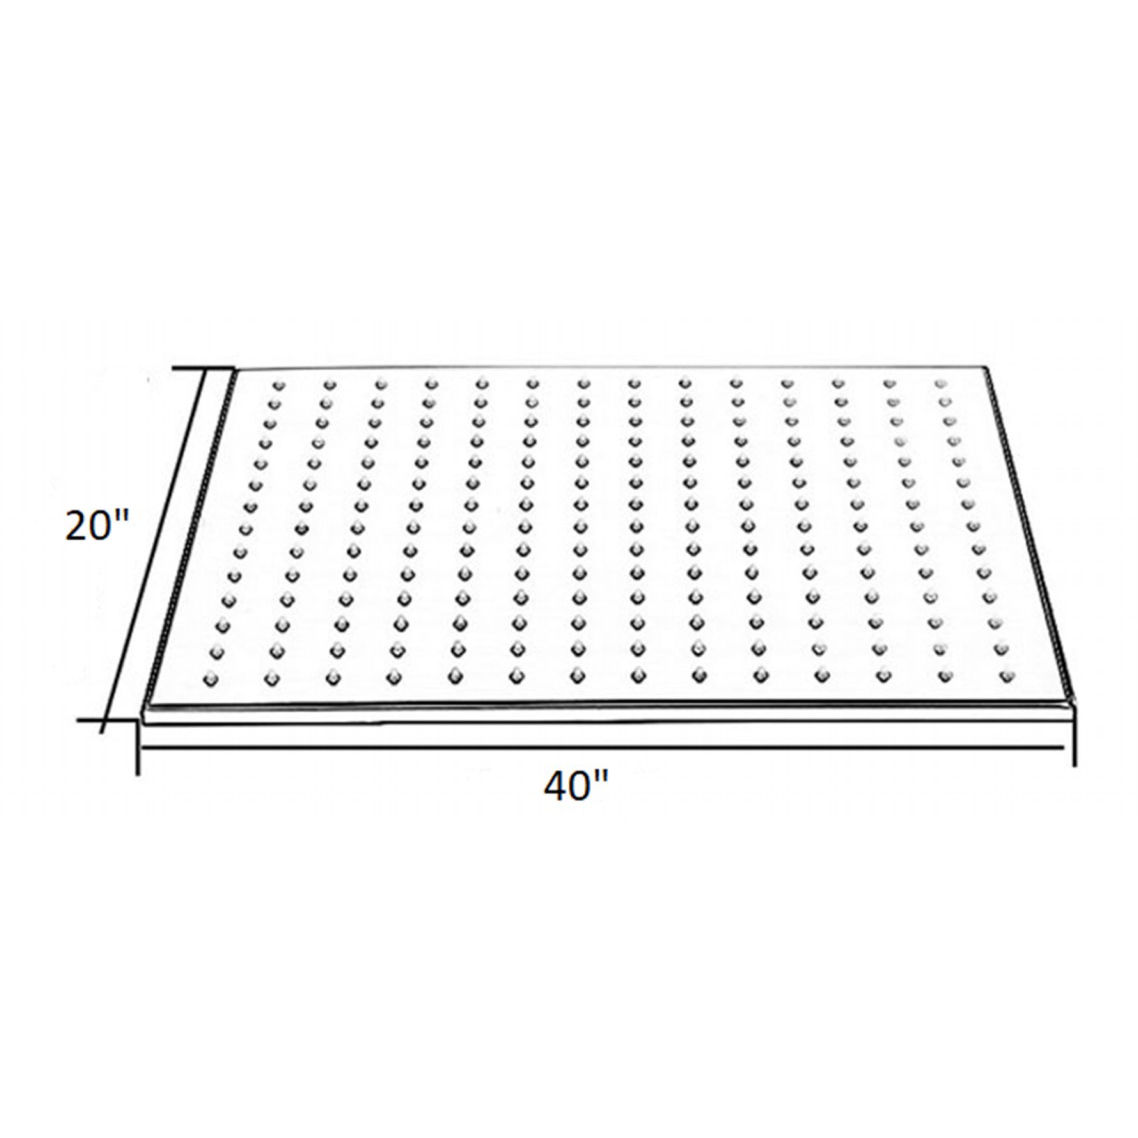
Fontana 20"x 40" Martinique Large Oil Rubbed Bronze Solid Brass LED Rain Showerhead System
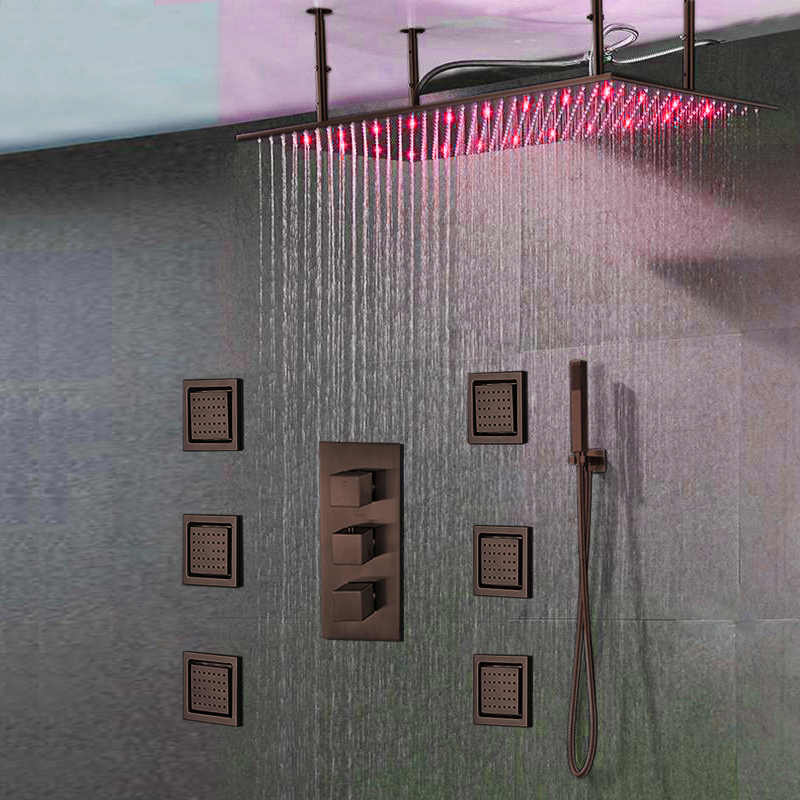
Martinique's oversize rainfall showerhead provides all over coverage. This beautiful solid brass fixture with an oil rubbed bronze finish will look stunning in your bathroom. Six shower adjustable shower jets and a handheld shower for maximum coverage and relaxing massage for tired muscles. Built-in hydro-powered device powers the LED lights, which provide visual shower temperature cues to reduce water waste. The lights will dim and brighten when you lower and raise the pressure so you can set the perfect mood, water, and lighting. When water temperature is ≤89 °F (≤32 °C), Blue color will show automatically. When water temperature is between 97 to 107 °F (36-42 °C), Green color will show automatically. When water temperature is between 109 to 122 °F (43-50 °C), Red color will show automatically. When water temperature is above 122 °F (>50 °C), Red color will flash immediately.
Fontana 20"x 40" Martinique Large Oil Rubbed Bronze Solid Brass LED Rain Showerhead System Features:
|
Brand Name: FontanaShowers
Model Number: FS147LRS
Material: Solid Brass
Finish: Light Oil Rubbed Bronze
Style: Contemporary Rain Showerhead
Shower Arm: Included
Showerhead Size: 20" x 40"
LED Power Source: Water Flow
LED Color: LED colors Blue, Green, Red
Showerhead Style: Contemporary Rain Shower
Mount Method: 4 Ceiling mount arms included
Connection: 1/2" US standard (included)
Body Jets: Included
|
|
FontanaShowers®Product Warranty Information
- Before you begin, please read the installation instructions below. Observe all local building and safety codes.
- Unpack and inspect the product for any shipping damages. If you find damages, do not install.
- Please note all showers must be installed by a professional and certified plumber otherwise warranty might be voided.
|
shower
|
|
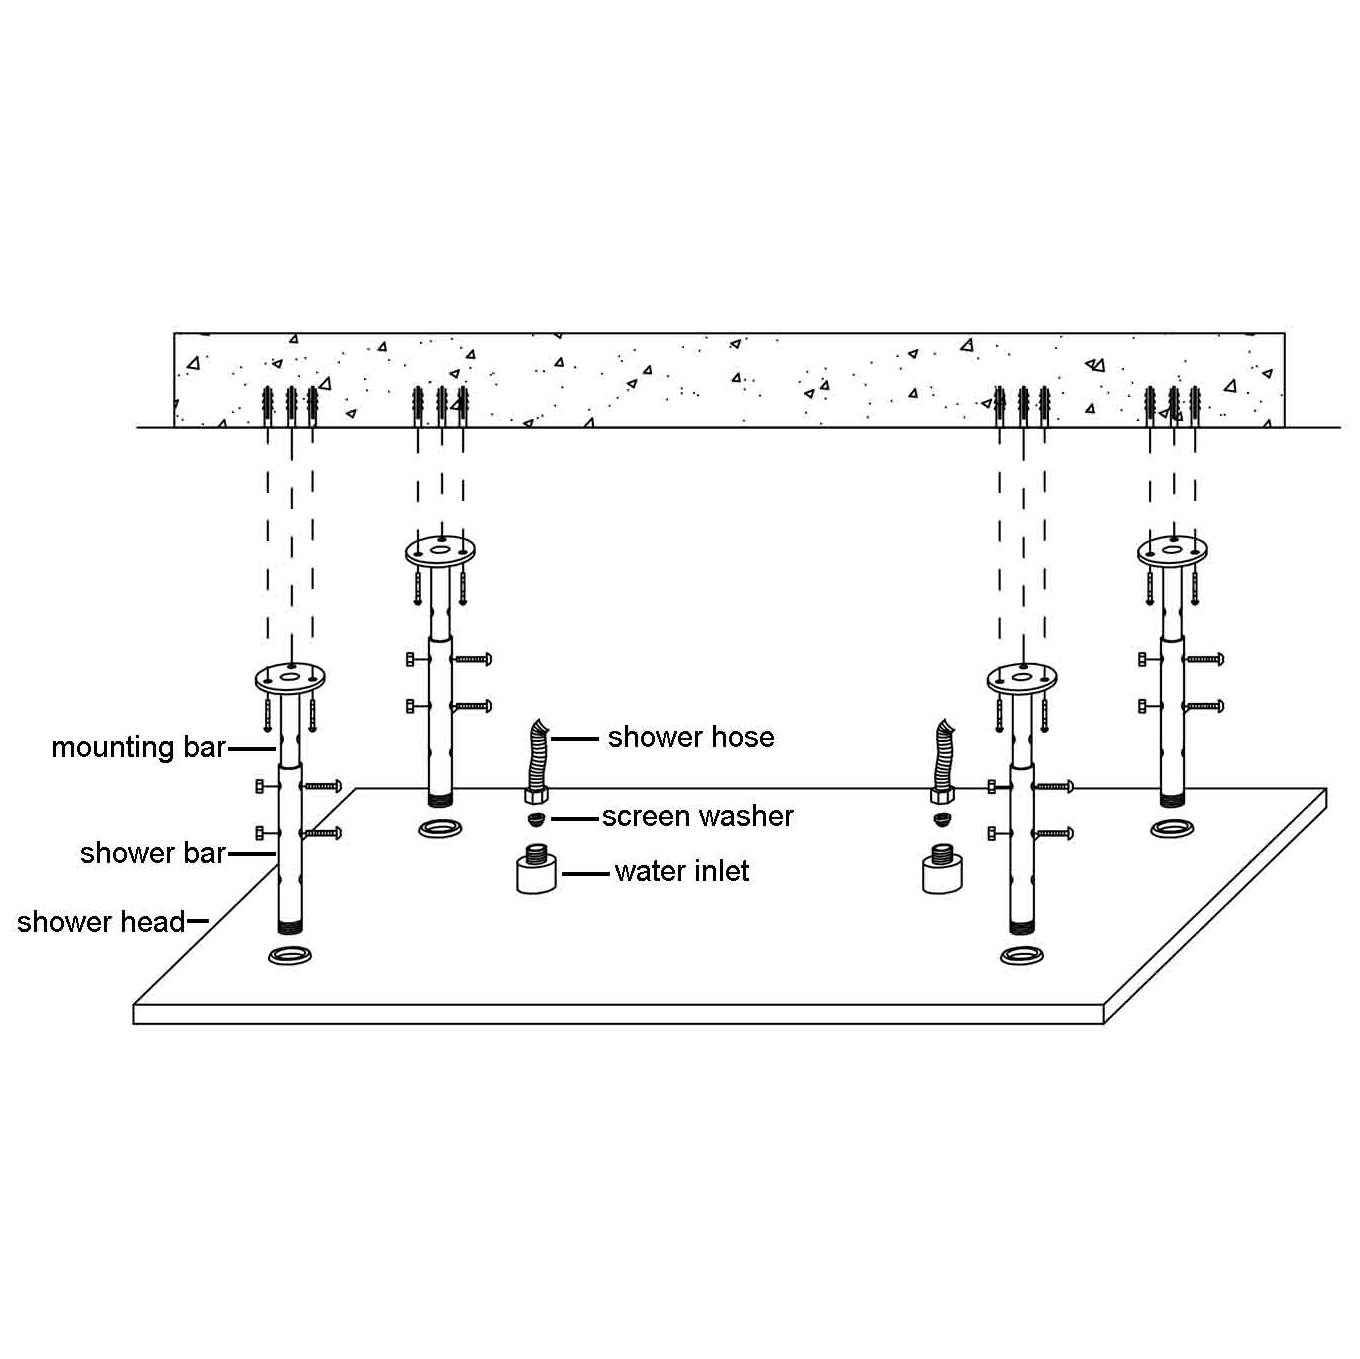
Shower Head Installation Instructions
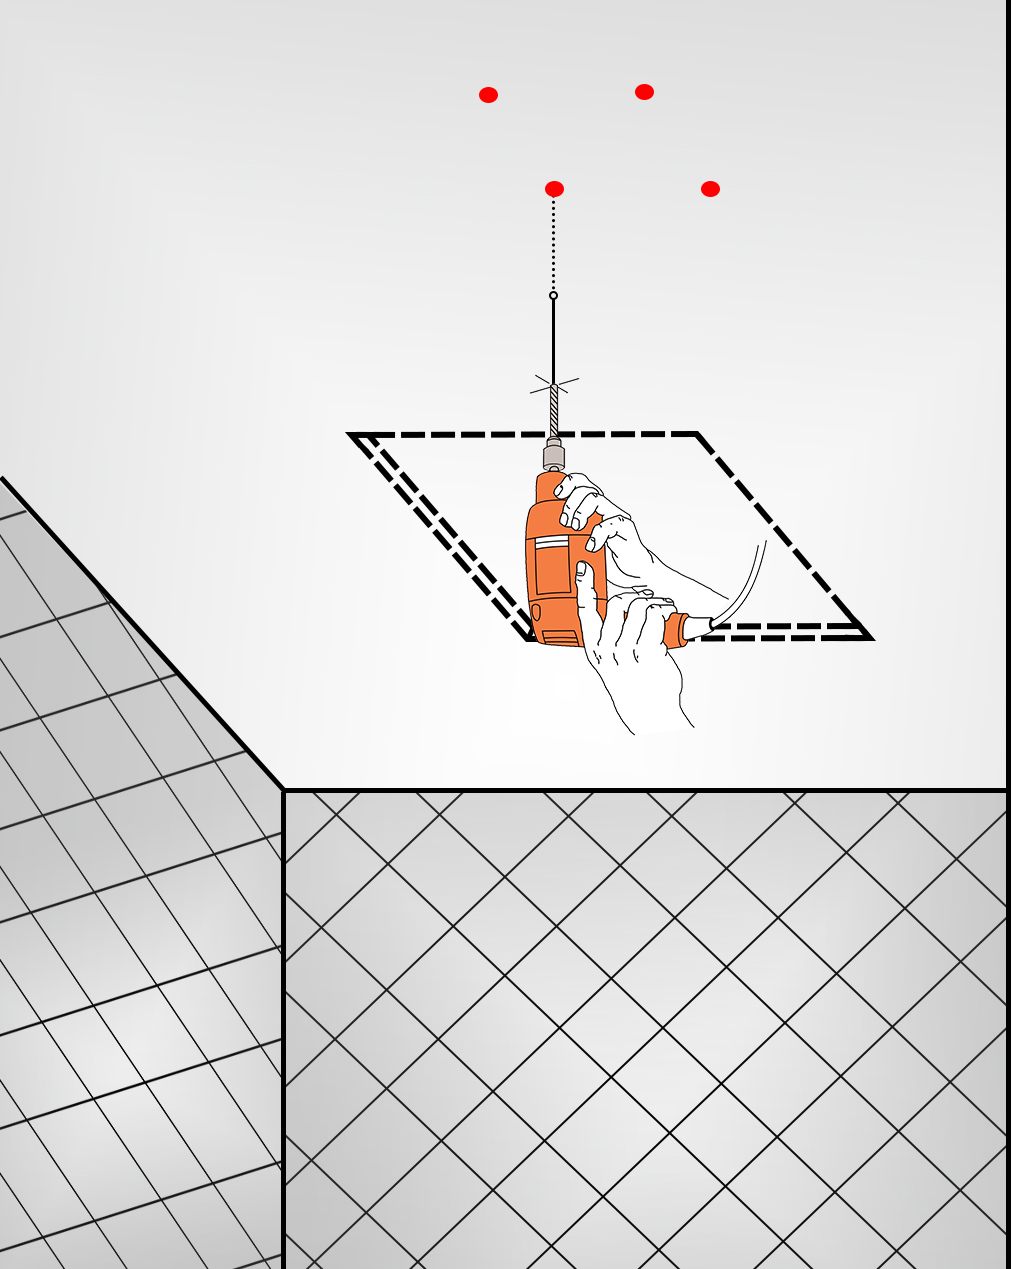
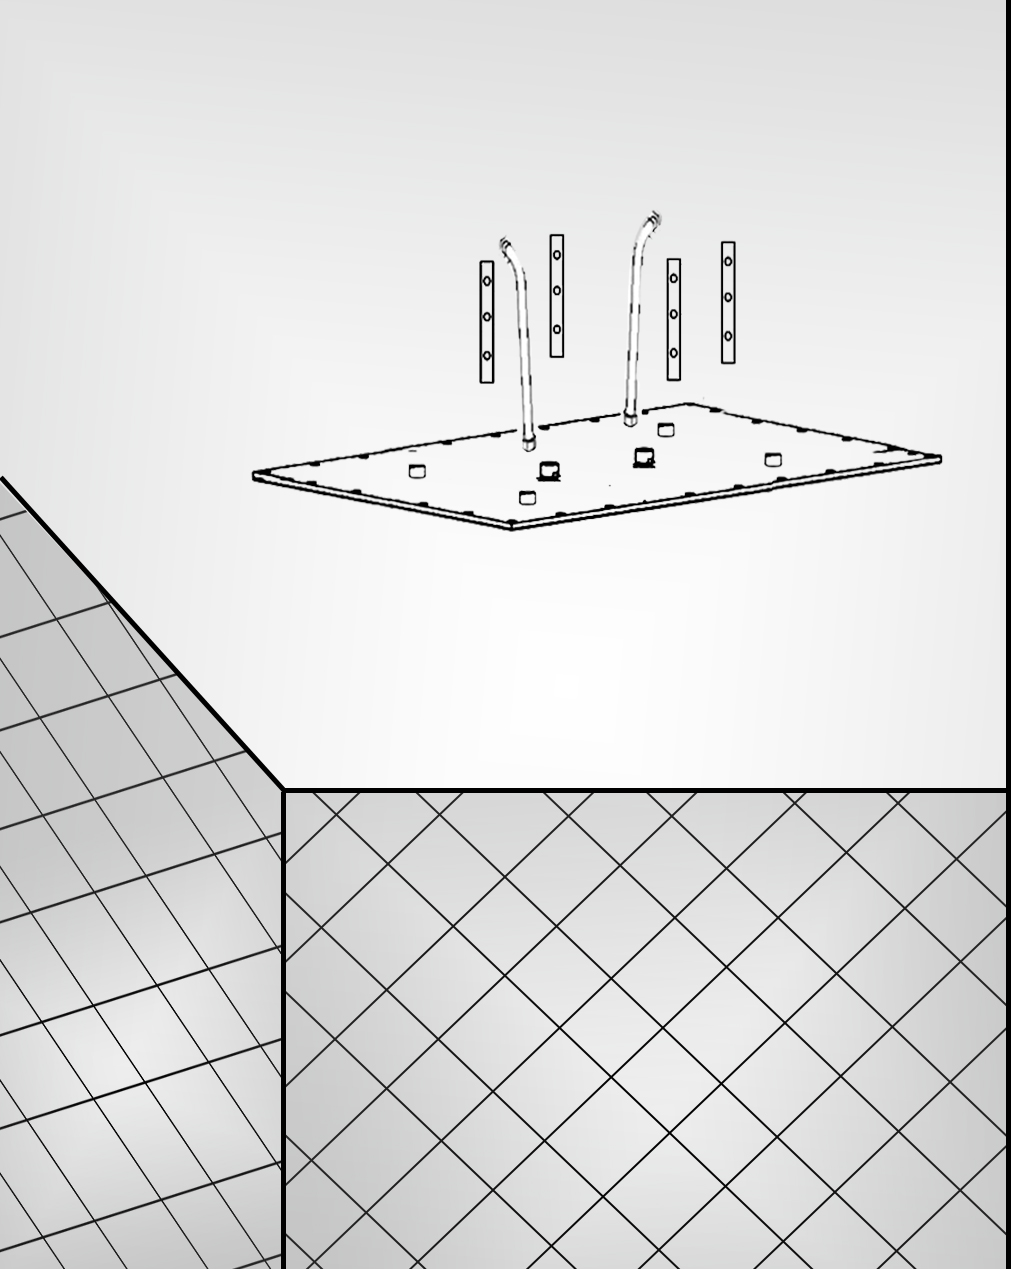
1. Mark the fixing positions and drill holes to suit the anchors.
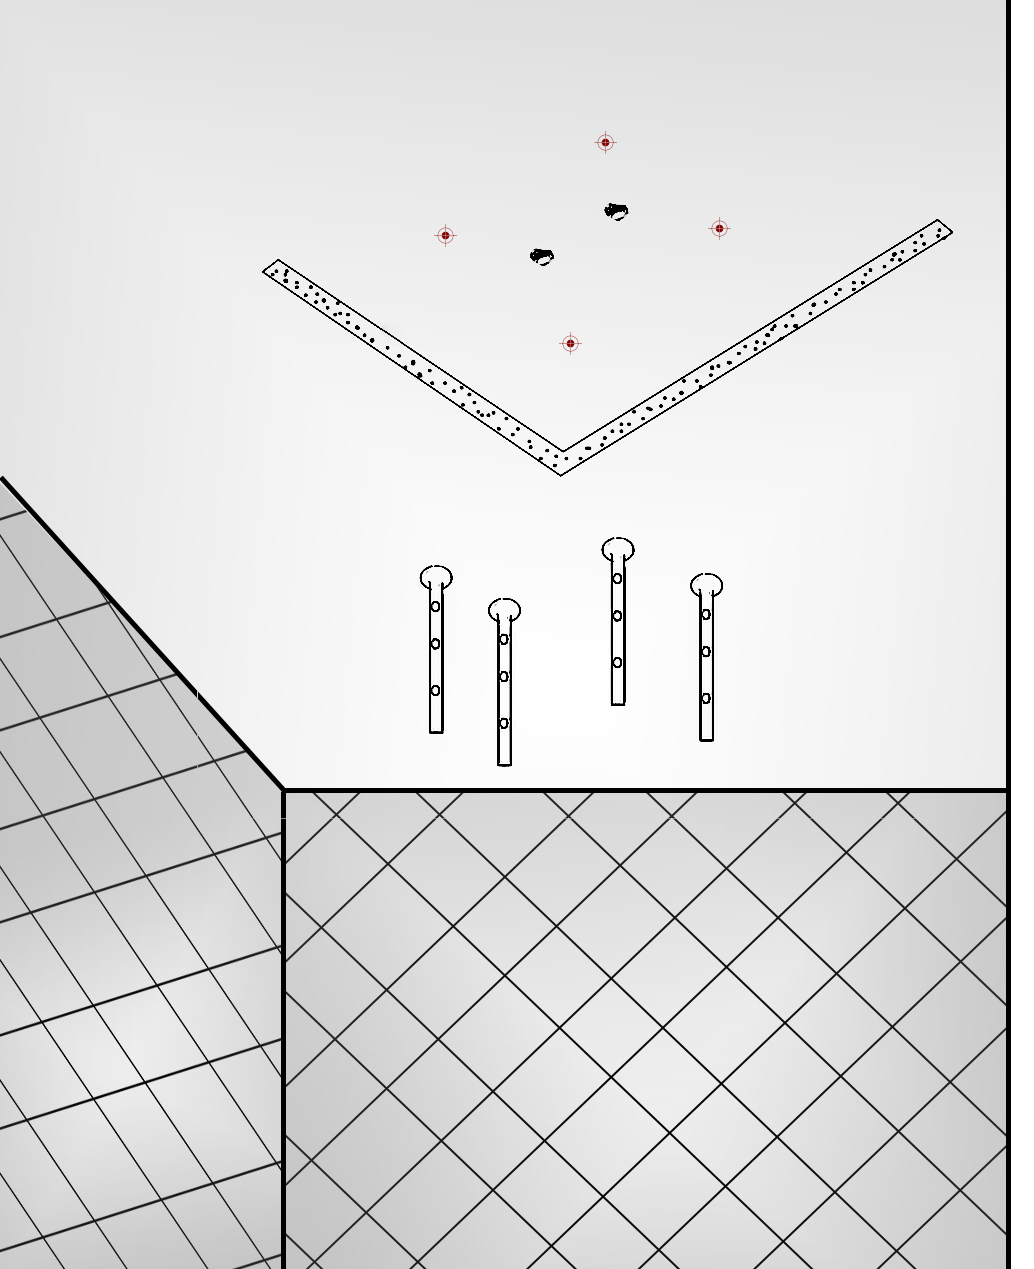
2. Install the anchors and fix the mounting bar to the ceiling with screws.
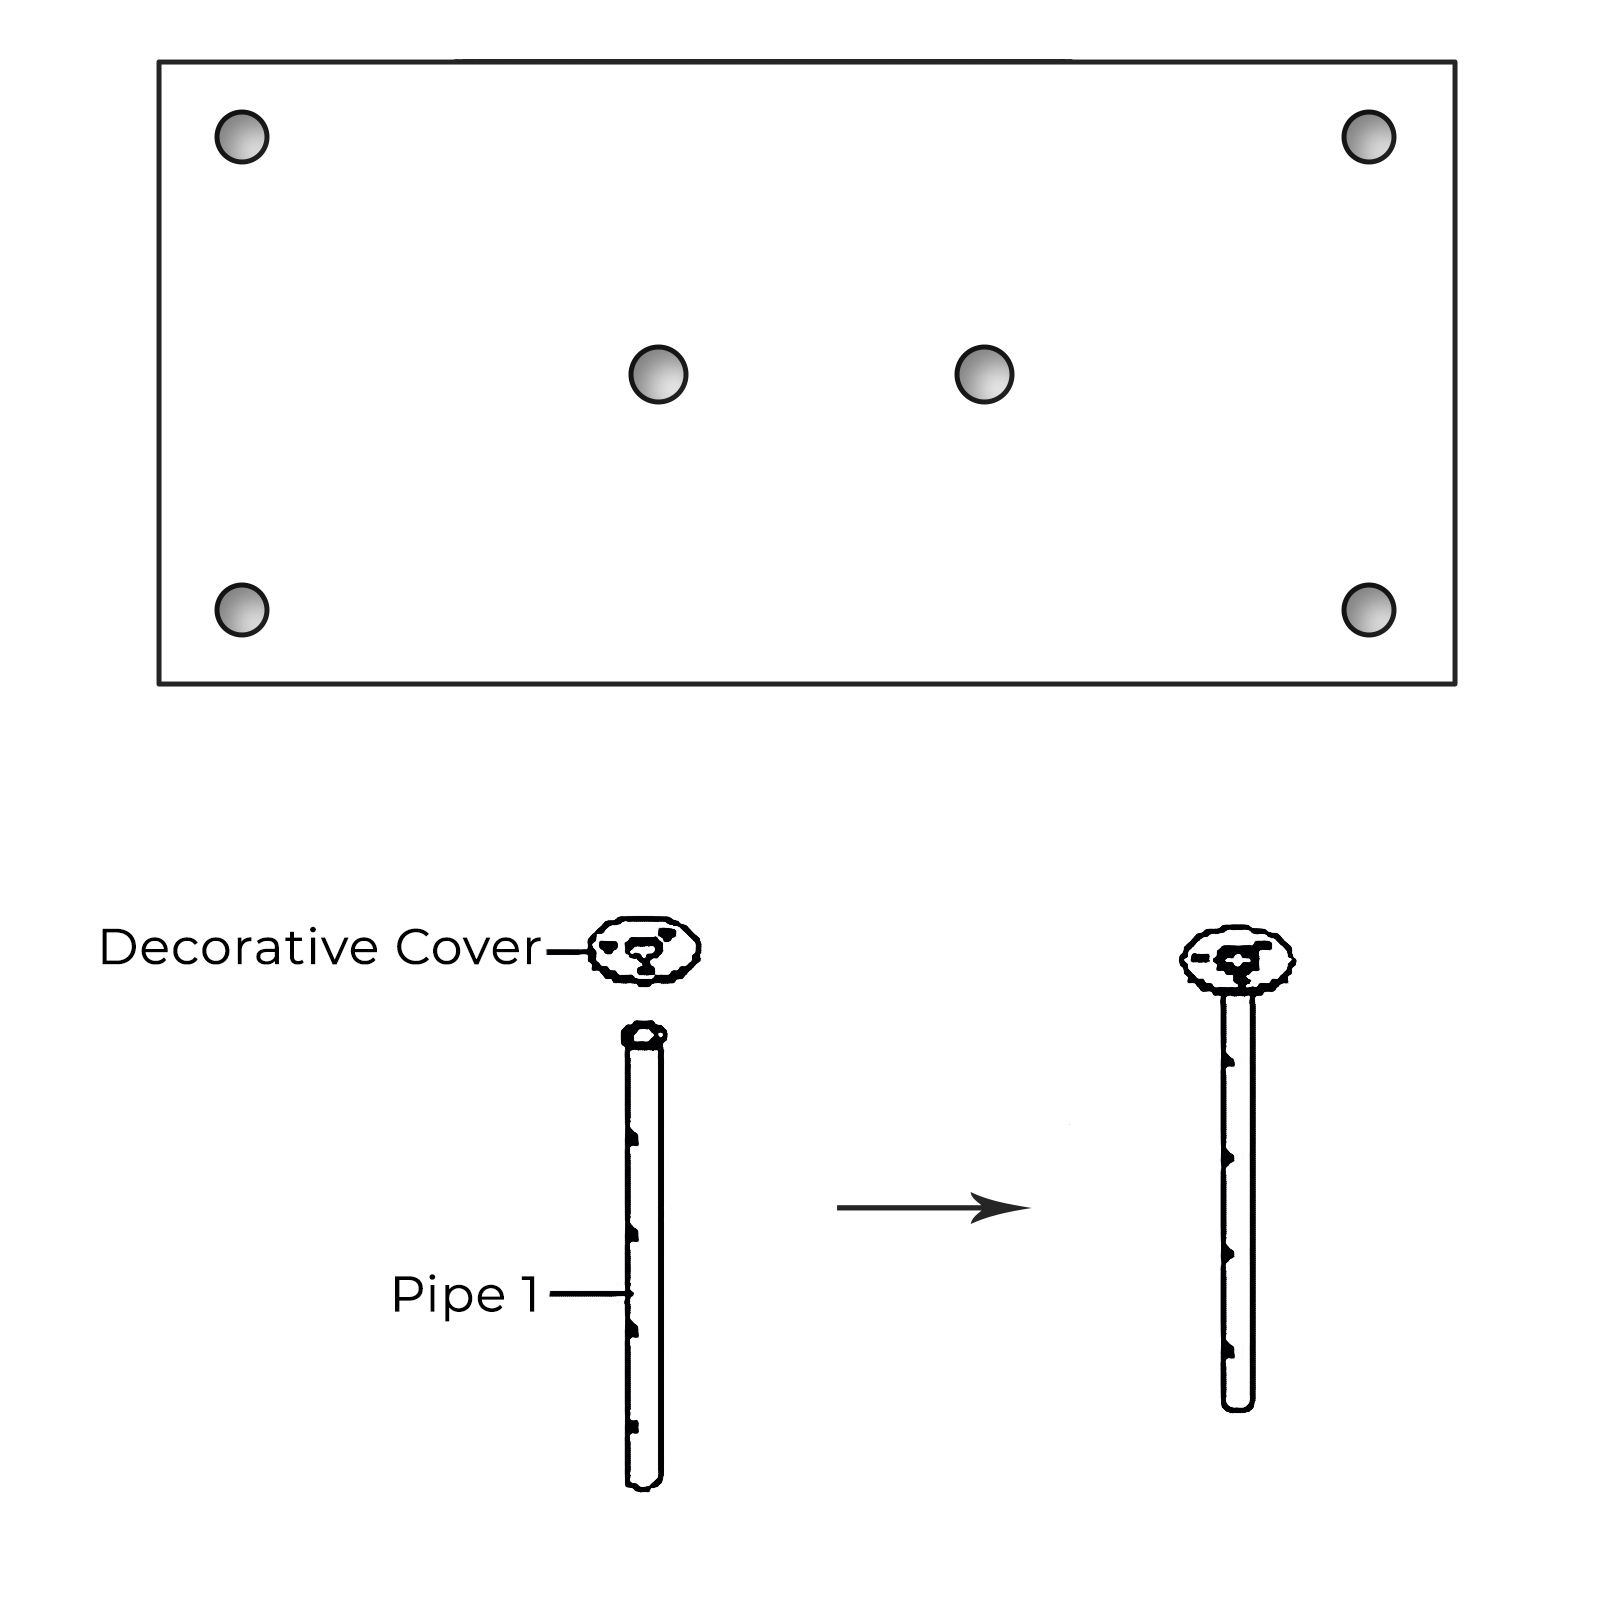
3. Screw the shower bars into the shower head tightly.
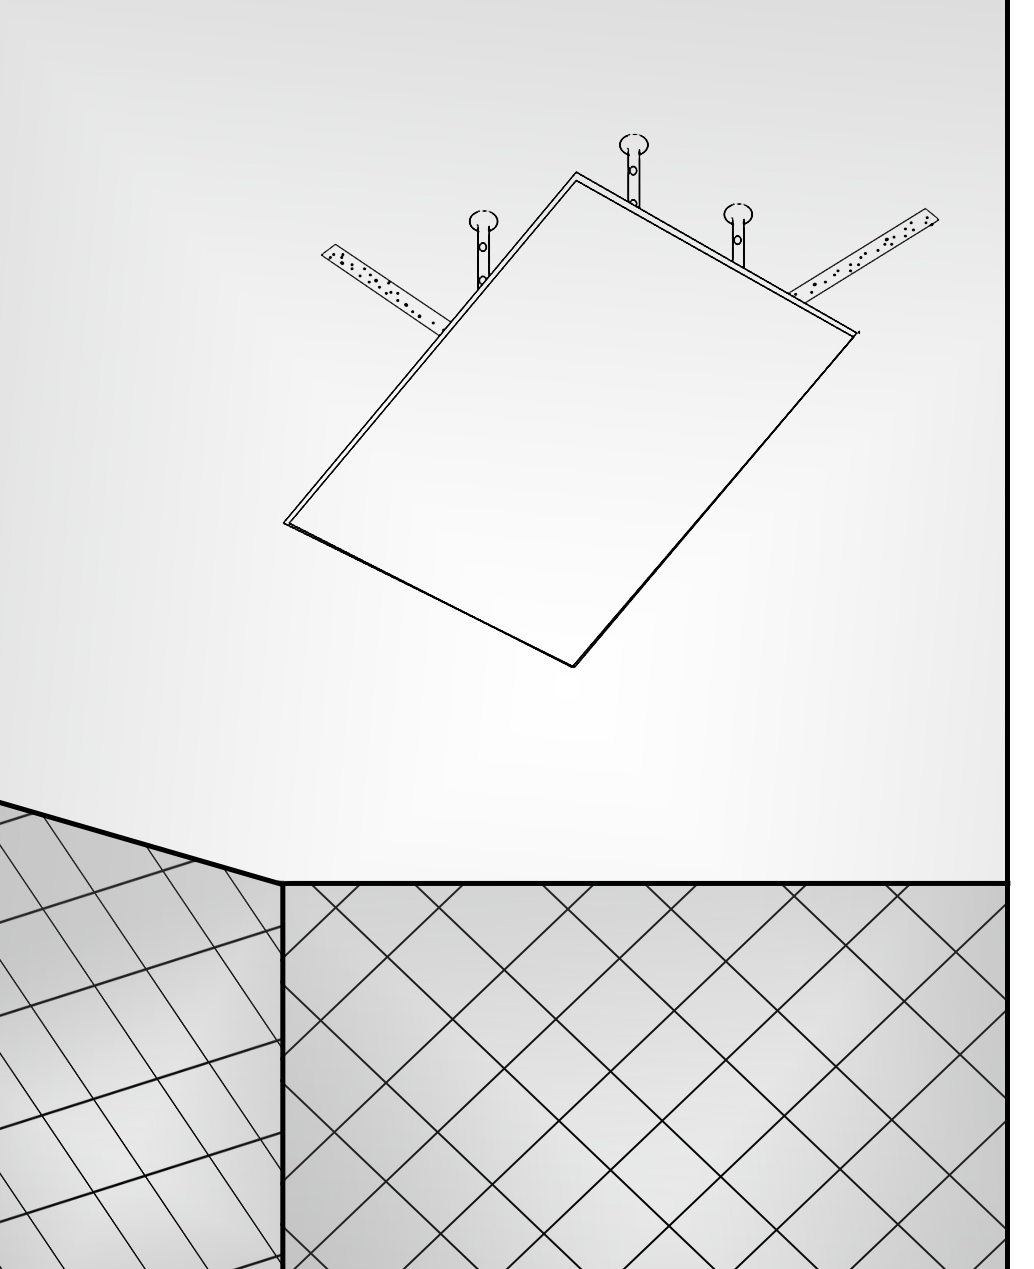
4. Attach the shower bar to the mounting bar and fix screws and nuts to lock shower bar with mountthe ing bar at the desired height.
5. Add screen washers. Screw shower hose (not included) to the water inlet on the showerhead and then to the water outlet in the ceiling.
|
|

|
|
Showerhead Installation Instructions
|
Hand-Held Shower Installation Instructions
|
Step 1:
|
|
Step 2:
|
|
Step 3 & 4:
|
|
Hand
Held
Shower
|
|
Hand
Held
Shower
|
|
|
Handheld Shower
|
|
Handheld Shower
|
|
Handheld Shower
|
|
Step 5:
|
|
Step 6 & 7:
|
|
Step 8:
|
|
|
|
|

|
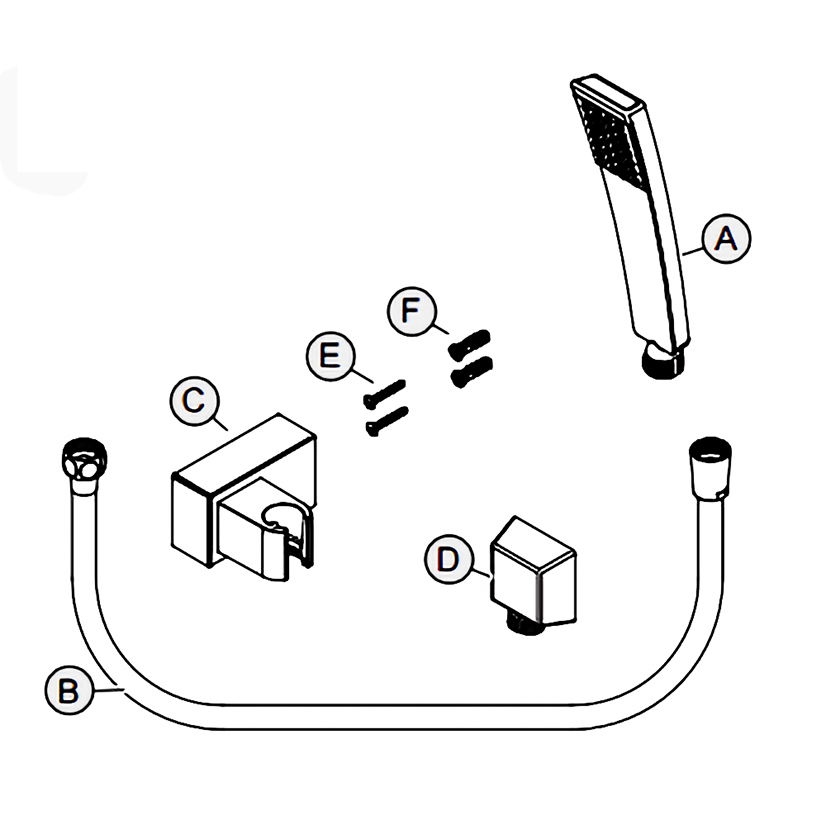
1. Gather All Parts
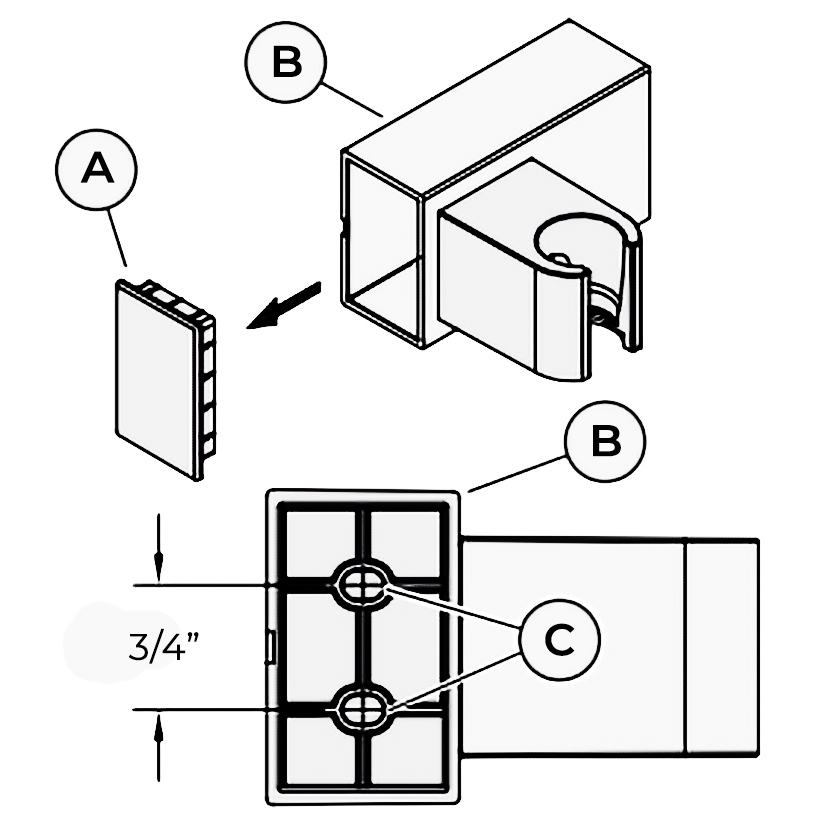
2. Hole Locations For Wall Mount
Remove Front Cover (A) from Wall Mount (B). Use Wall Mount Screw Holes (C) to place the desired location. Using a punch or awl, tap the screw hole locations. Holes must be vertically aligned.
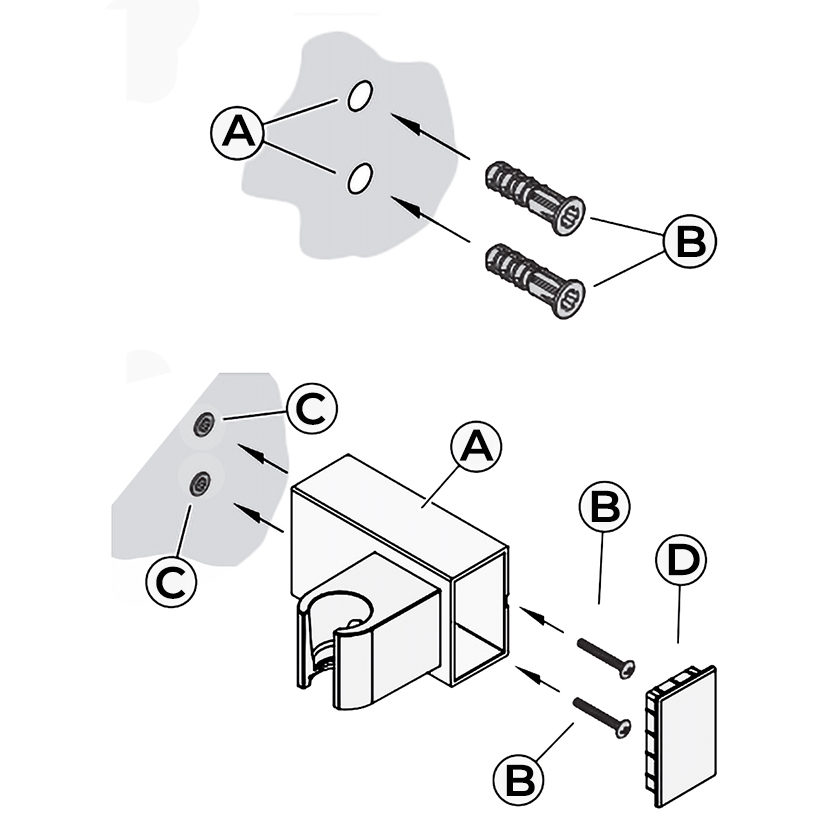
3. Anchor Installation
Drill two 1/4” dia. Holes (A). If installing into a studs drill two 1/8” dia. holes and do not use Anchors (B). Insert Anchors (B) into Holes (A) and tap flush with the wall.
4. Wall Mount Installation
Place Wall Mount (A) into wall and inset Mounting Screws (B) through Wall Mount Holes (C) and tighten until Wall Mount (A) is flush with the wall. Do Not Over Tighten! Insert Front Cover (D) into Wall Mount (A)
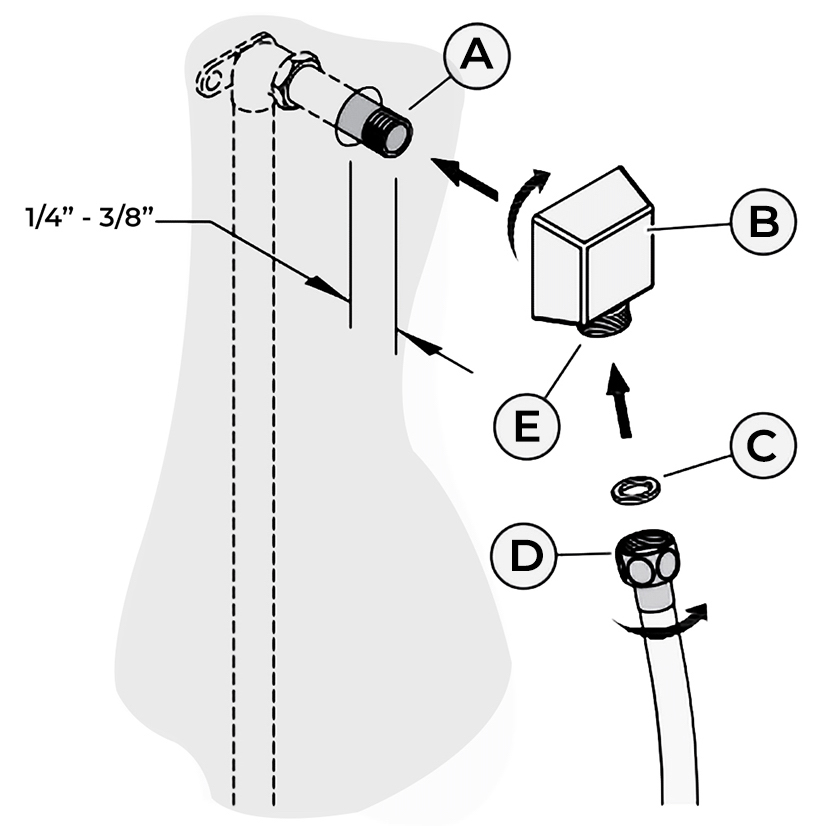
5. Drop Elbow & Hose Installation
Apply PTFE plumbers tape on both ends of Pipe Nipple (A) (not included). Screw Pipe Nipple (A) into the elbow inside the wall. The Pipe Nipple (A) is to project 1/4” – 3/4” from the finished wall. Screw Drop Elbow (B) onto Pipe Nipple (A) and tighten until Drop Elbow (B) is property positioned and flush to the finished wall. Place Rubber Seal (C) inside Hex Hose Fitting (D). Connect Hex Hose Fitting (D) into Drop Elbow Outlet (E) by turning Hex Hose Fitting (D).
6. Unit Startup
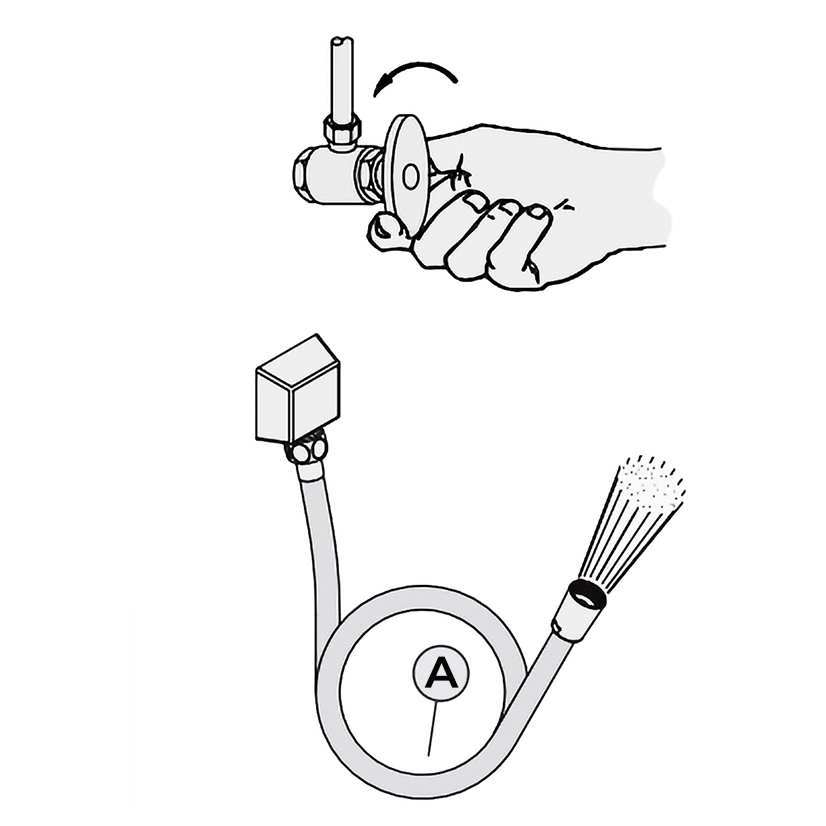
Turn on hot and cold water supplies, and check all connections for leaks.
7. Final Flushing
For final flushing, turn the valve on and allow water to run through the Hose (A) for several minutes. Allow water to run for several minutes until all foreign matter clears the line.
8. Shower Arm Installation
Place Rubber Seal (A) inside Tapered Hose Fitting (B). Conned Hand Shower (C) to Hose (D) by turning Tapered Hose Fitting (B ) clockwise. Warning: Make sure Hand Shower (C) is securely tightened to Hose (D).
|
|
|
|
HandHeld Shower Installation Instructions
|
Shower Body Jets Installation Instructions
|
Step 1:
|
|
|
Step 2:
|
|
|
Body sprays
|
|
|
|
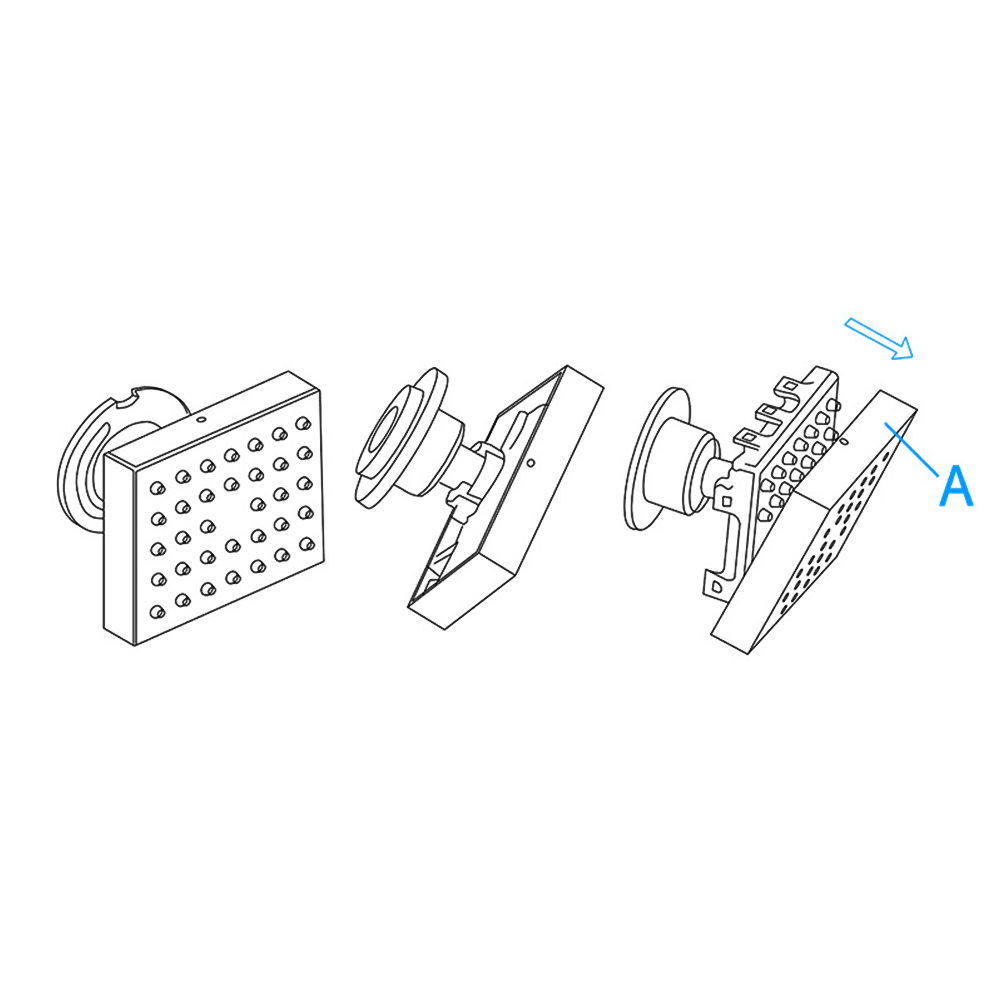
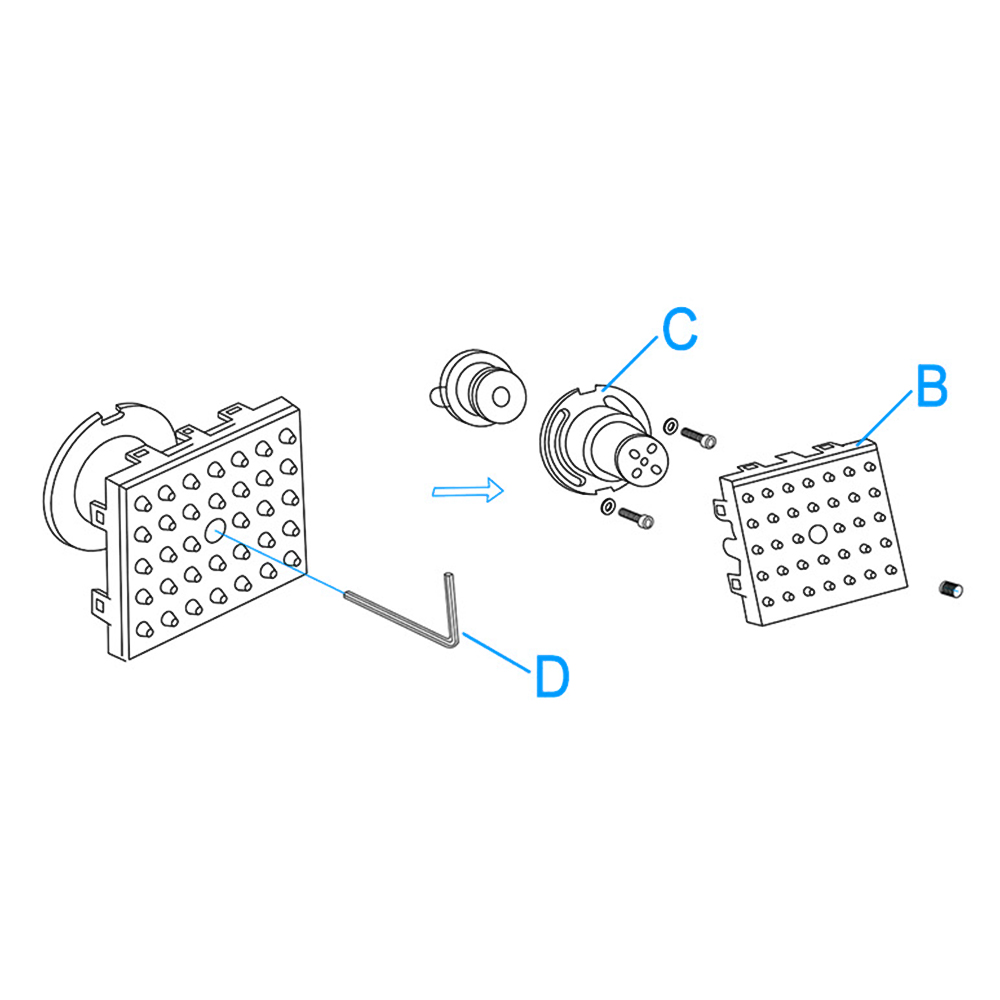
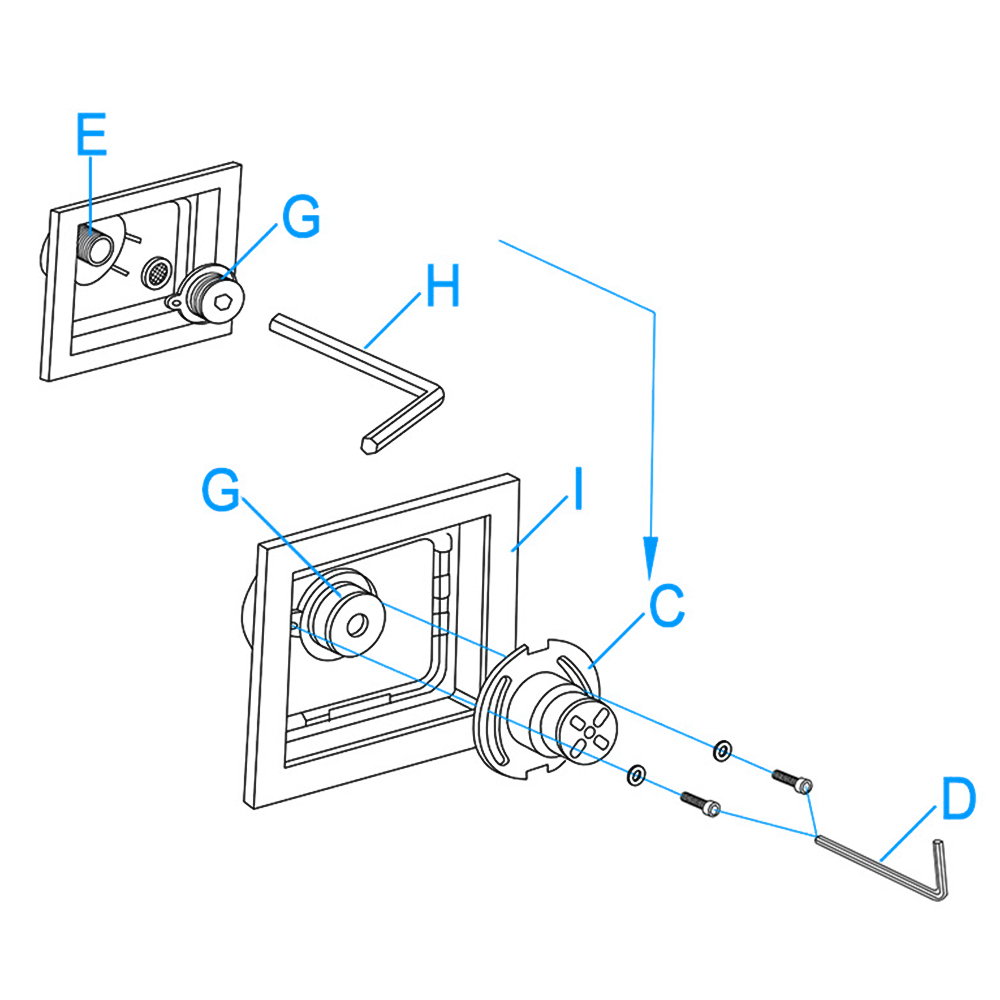
Remove the decorative plate (A) out of the body.
|
|
|
Remove the screws from the outlet face (B) and connector body (C) with the Allen key (D).
|
|
Body Spray Installation Instructions
|
|
|
|
|
|
Step 3:
|
|
|
Step 4:
|
|
|
|
|
|
|
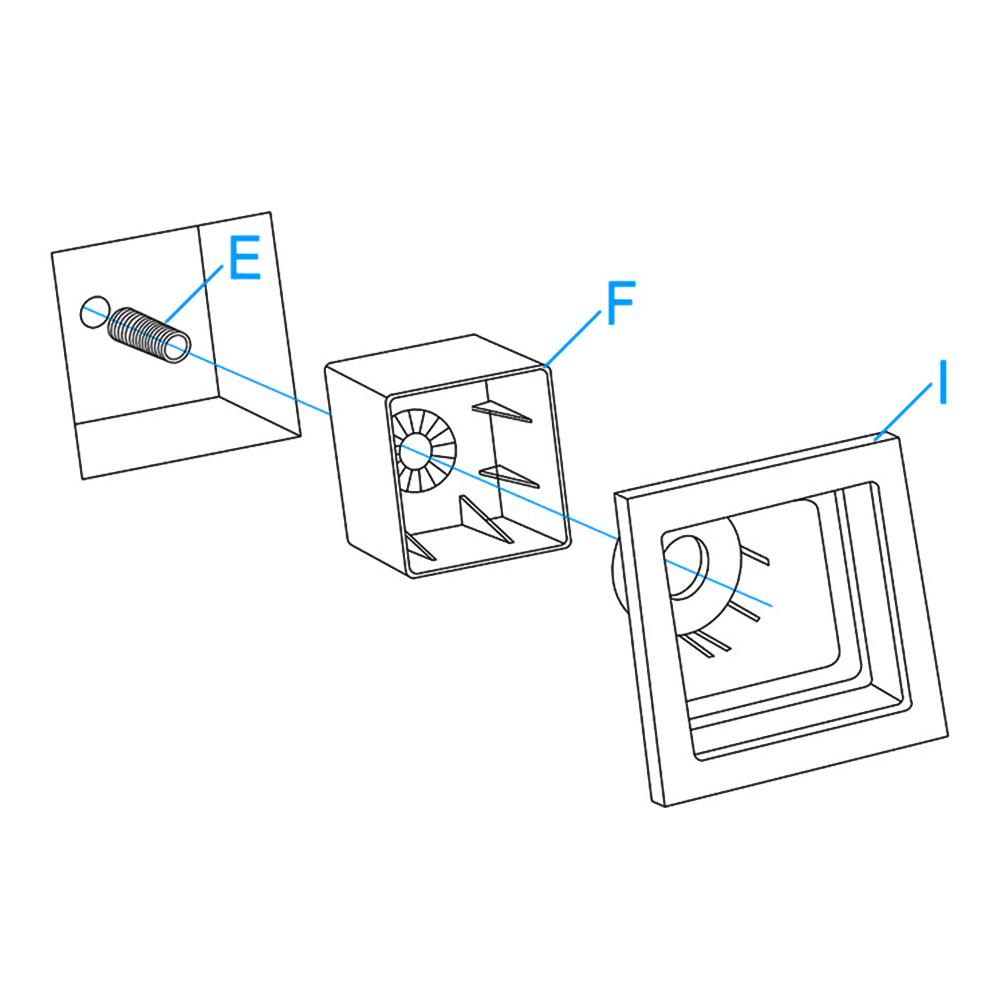
Screw the threaded pipe (E) to the water supply fittings. Push the plastic box (F) into the wall through the threaded pipe (E). Then, install the decorative plate (I) into the plastic box (F). Make sure the position is correct according to the diagram.
|
|
|
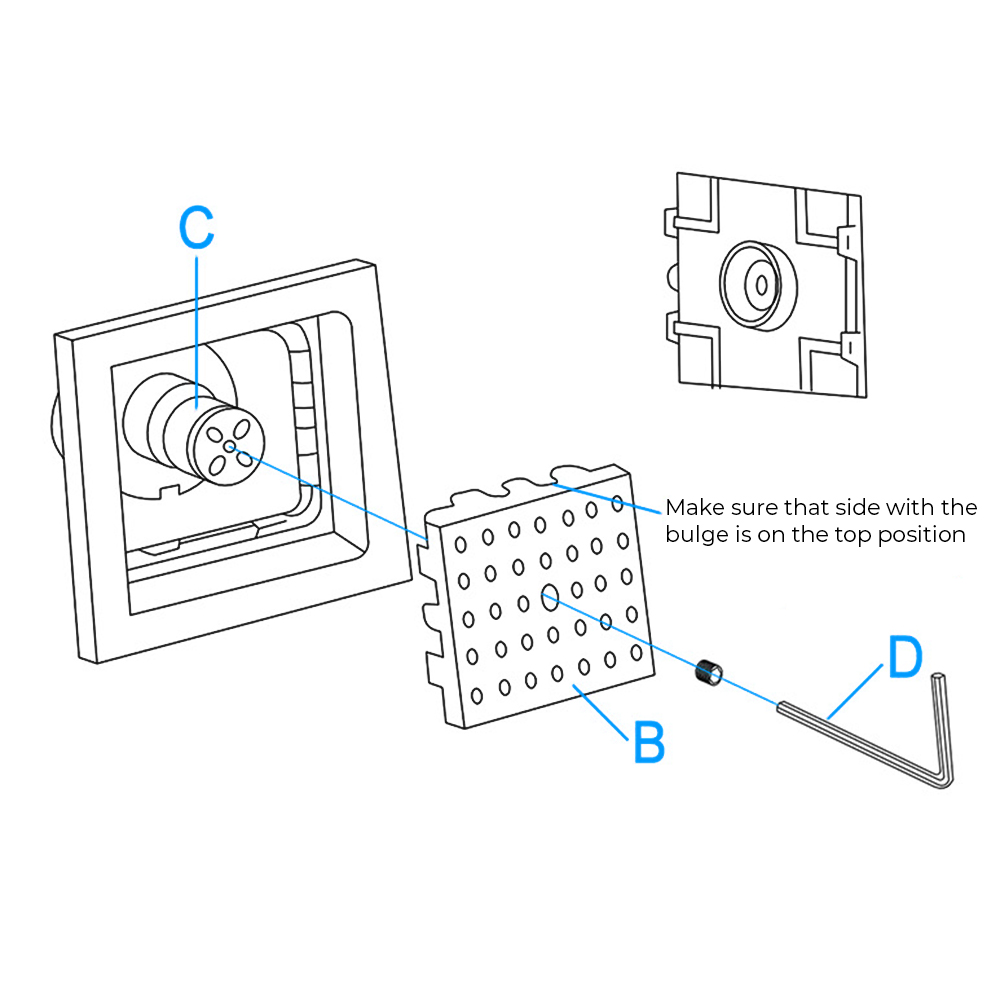
Screw the connector (G) into the threaded pipe (E) with the Allen key (H). Install the connector body (C) to the connector (G). When finish installation, please check to make sure the connection is completed. Then, fix the screws into the body (C) with Allen key (D) and make sure the body (C), connector (G) and decorative plate (I) are tightened. Make sure the one side with the bulge is in the top position.
|
|
|
Body Spray Installation Instructions
|
|
|
|
|
|
Step 5:
|
|
|
Step 6:
|
|
|
|
|

|
|
|
Install the outlet face (B) to the body (C). Make sure the connection of body (C) and outlet face (B) are completed. Tighten the screw through the outlet face (B) into the body (C) with the Allen key (D).
|
|
|
Install the decorative plate (A) into the outlet face (B) tightly. Make sure the hole and the raised dot are in the correct position when you push the decorative plate (A) into the outlet face (B).
|
|
|
Body Spray Installation Instructions
|
|
|
|
|
|
|
|
|
|
|
Thermostatic Mixer Installation Instructions
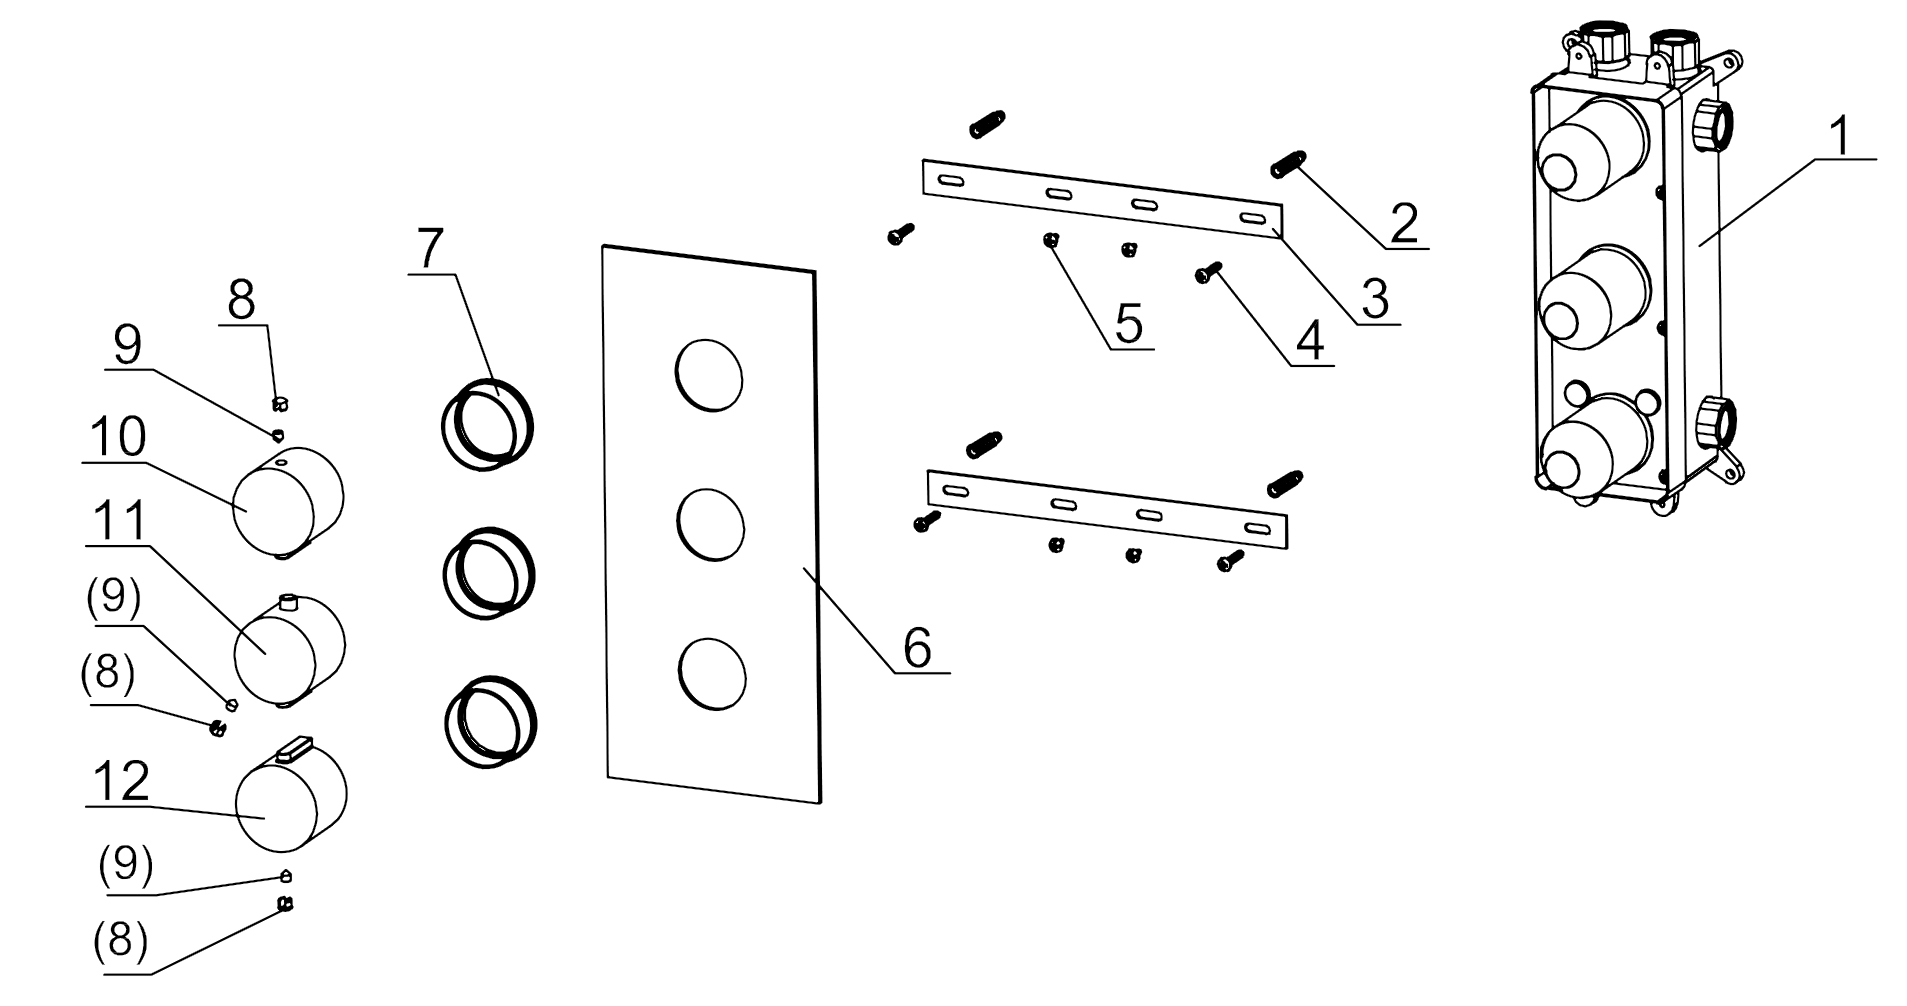
Parts:
1. Rough-In Body x1
2. Anchor x4
3. Positioning Bar x2
4. Tapping Screw 1 x4
5. Tapping Screw 2 x4
6. Plate x1
7. Cover x3
8. Button x3
9. Screw 1 x3
10.Diverter Handle x1
11. Temperature Handle x1
12. Volume Handle x1
|
Shower
Mixer
|
|
|
|
|
|
|
Step 1:
|
|
Step 2:
|
|
|
Shower
Mixer
|
|
|
|
|
|
|
|
Shower Valve Mixer Installation Instructions
|
|
|
|
|
Step 3:
|
|
Step 4:
|
|
|
|

|
|
|
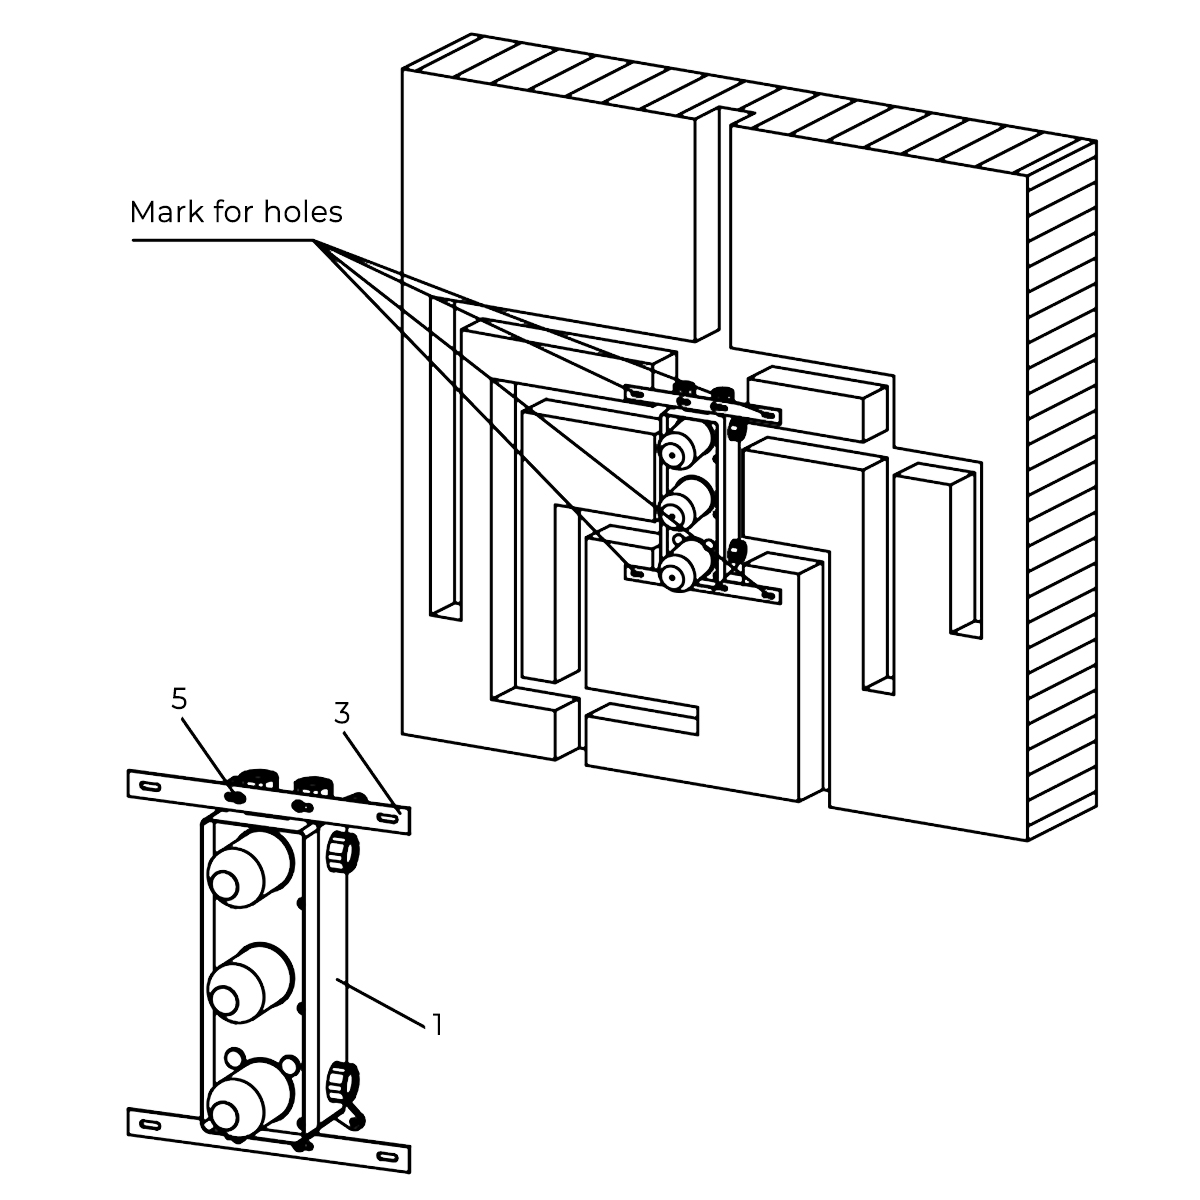
Attach the positioning bar to the rough-in body (4,5) with tapping screws. Mark the location of the mounting holes.
|
|
Remove the rough-in body and drill pilot holes at the locations marked in the previous step. Insert anchors.
|
|
|
Shower Valve Mixer Installation Instructions
|
|
|
|
|
Step 5:
|
|
Step 6:
|
|
|
|
|
|
|
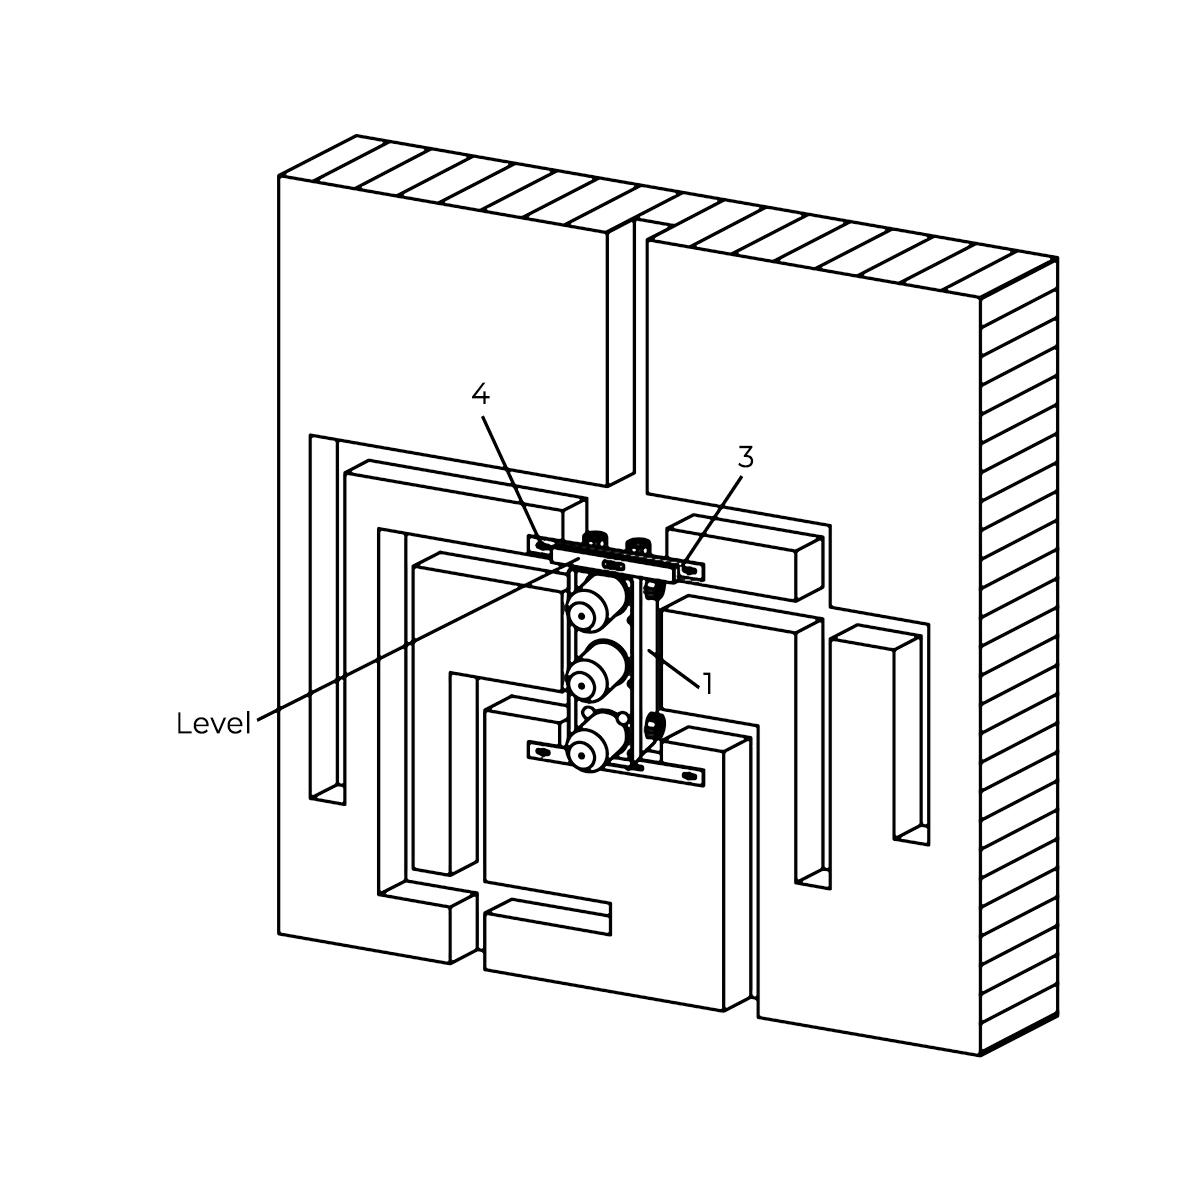
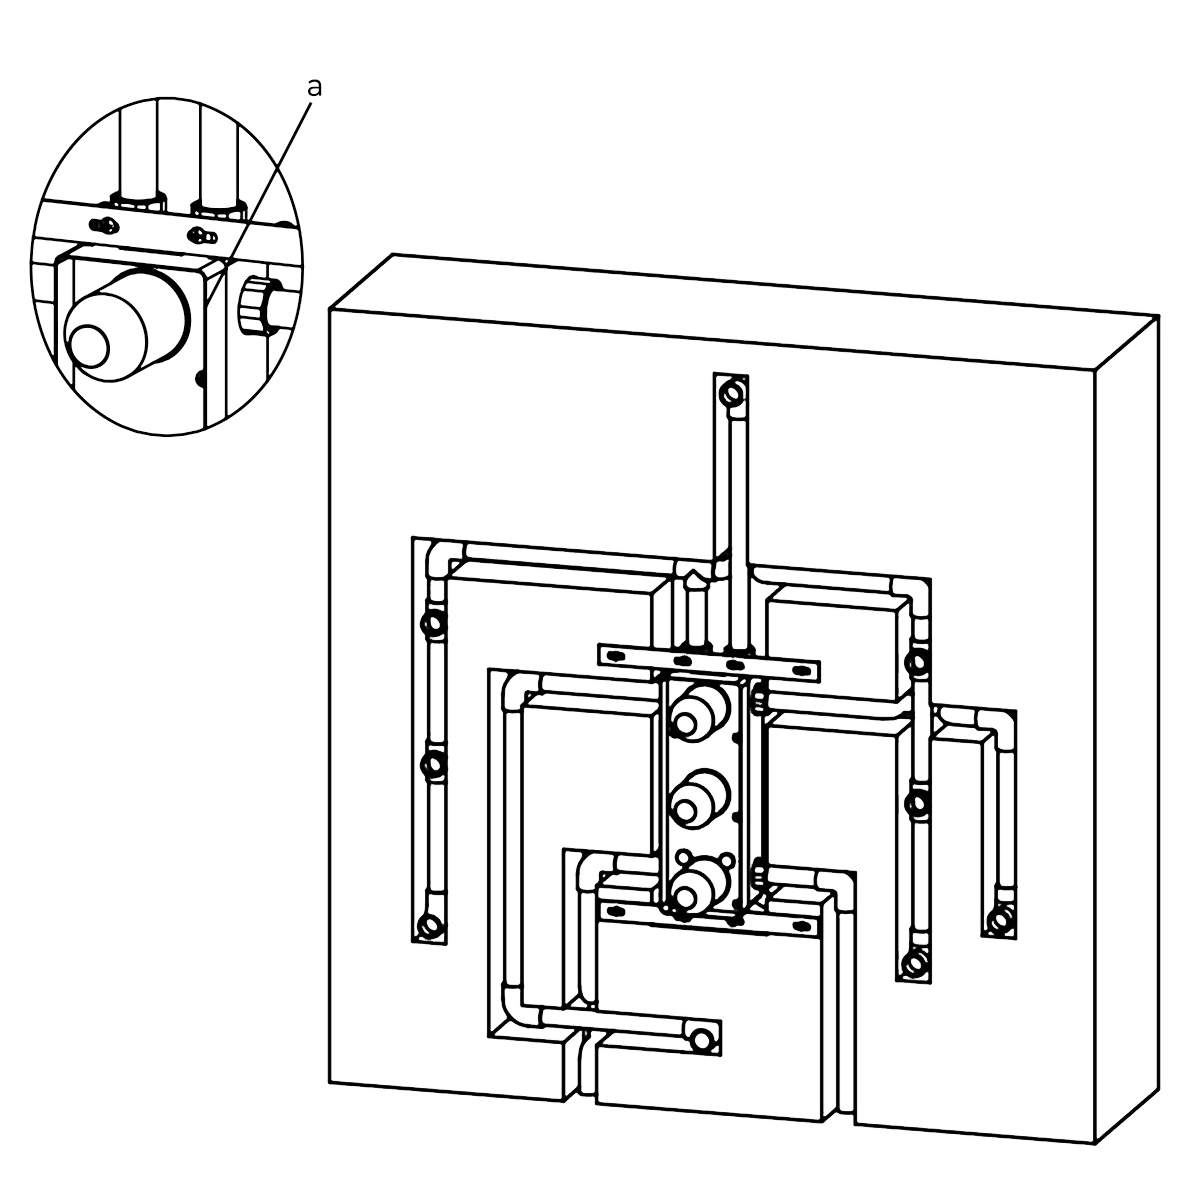
Attach the rough-in body to the wall.
|
|
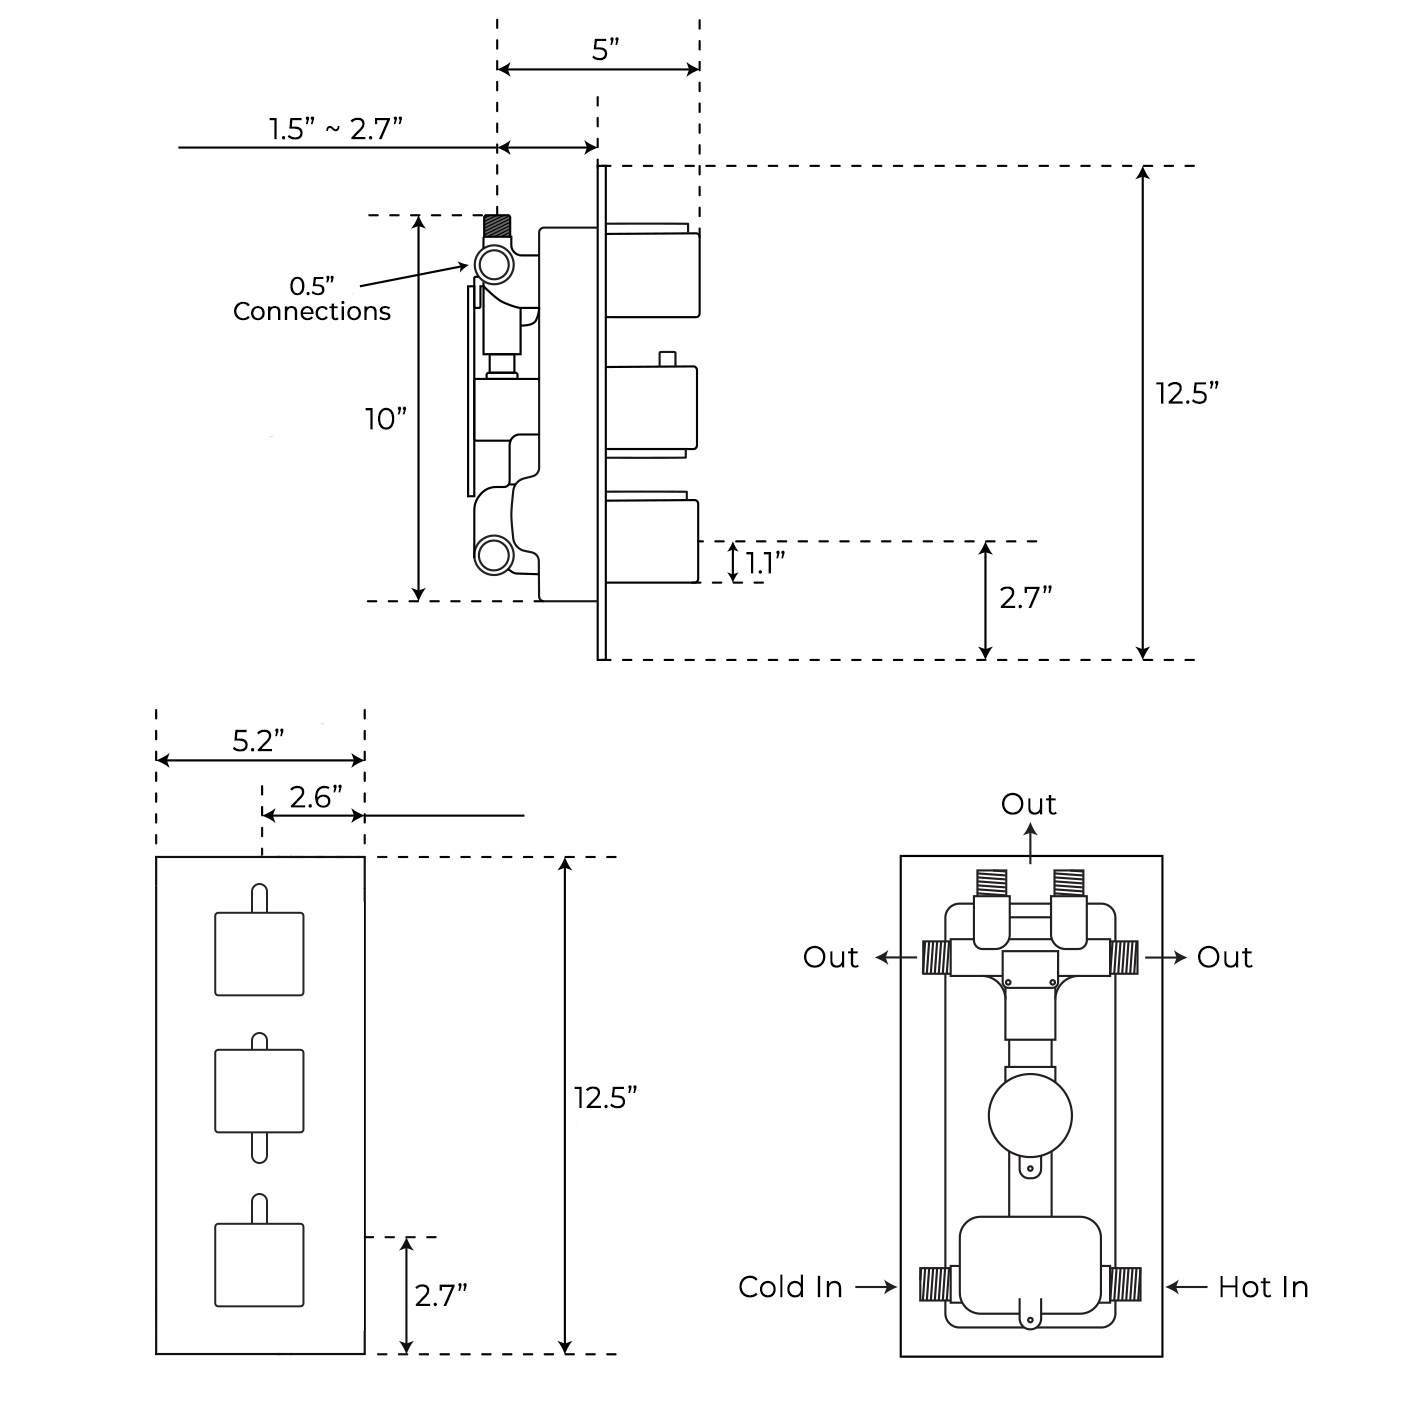
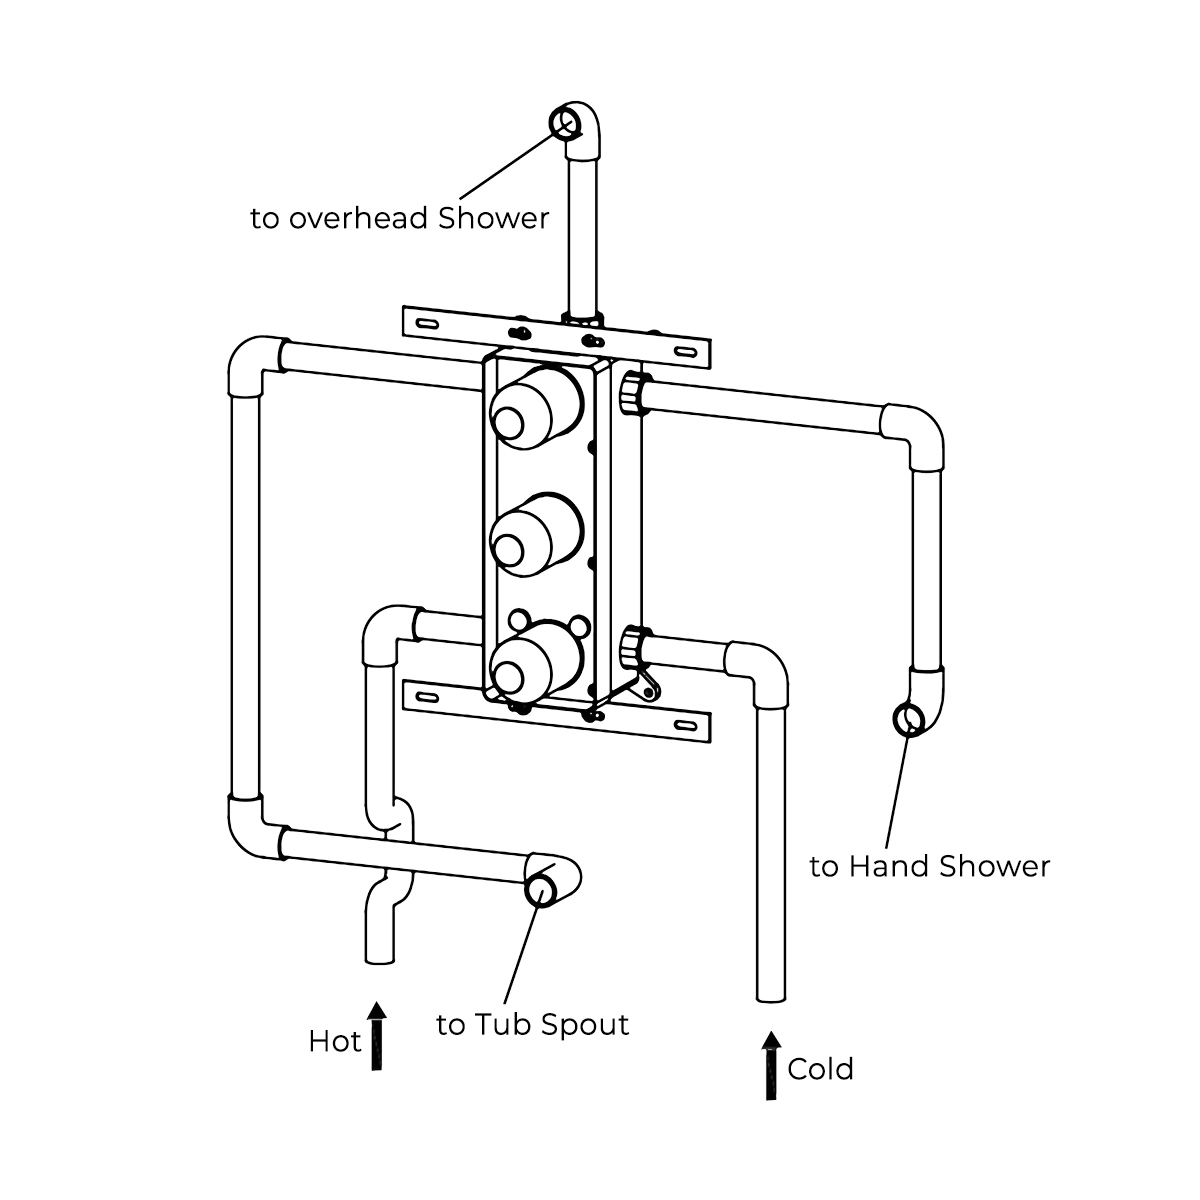
Connect the rough-in body to the water supply pipes according to the diagram.
|
|
|
Shower Valve Mixer Installation Instructions
|
|
|
|
|
Step 7:
|
|
Step 8:
|
|
|
|
|
|
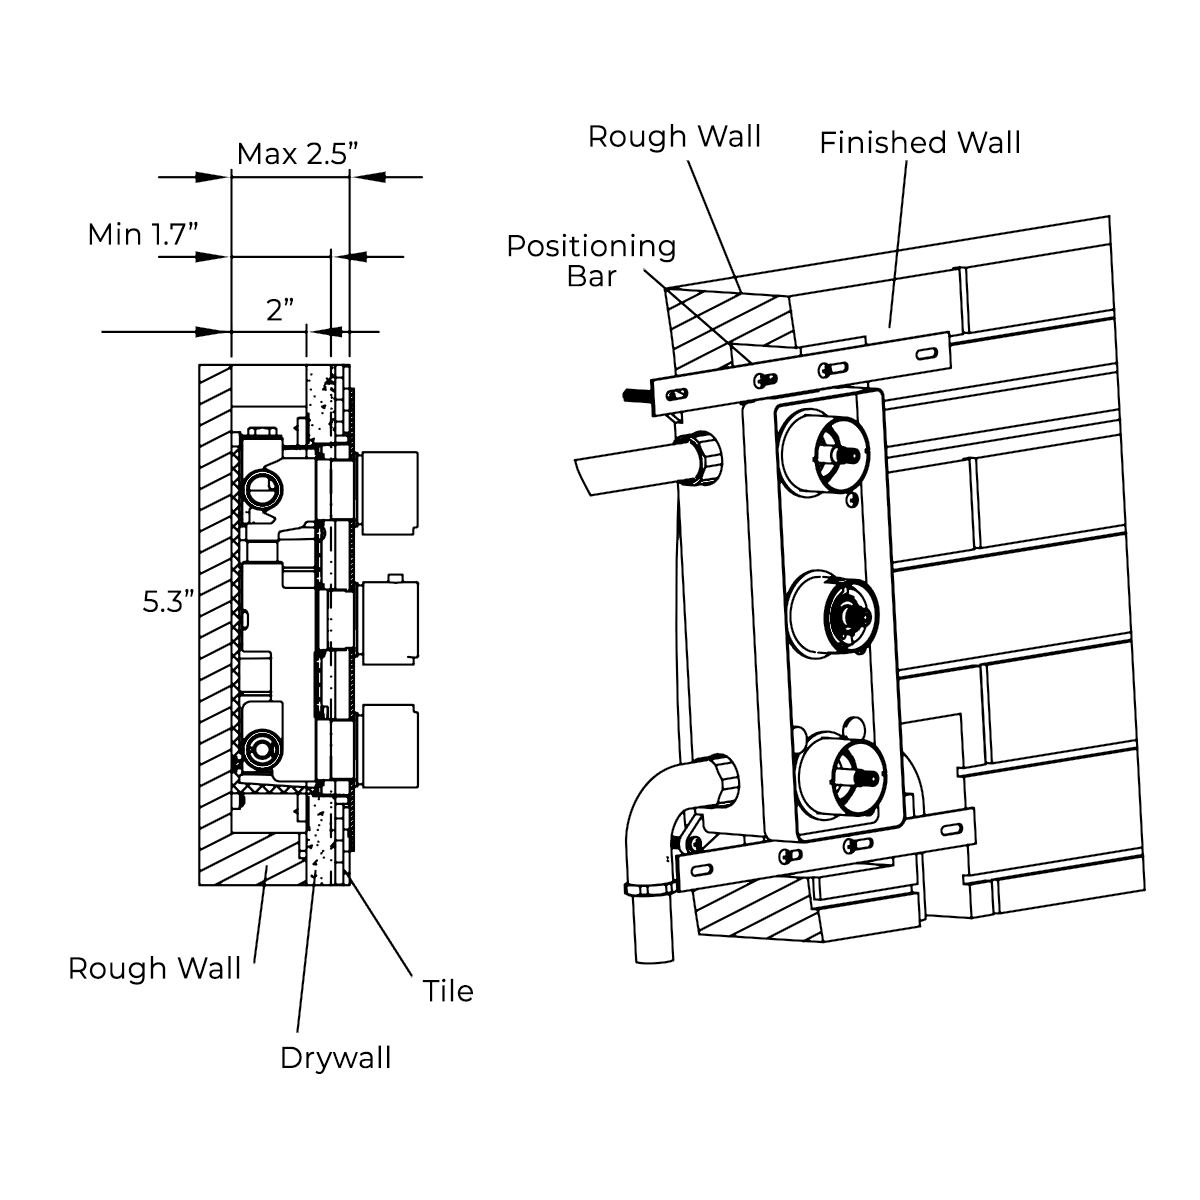
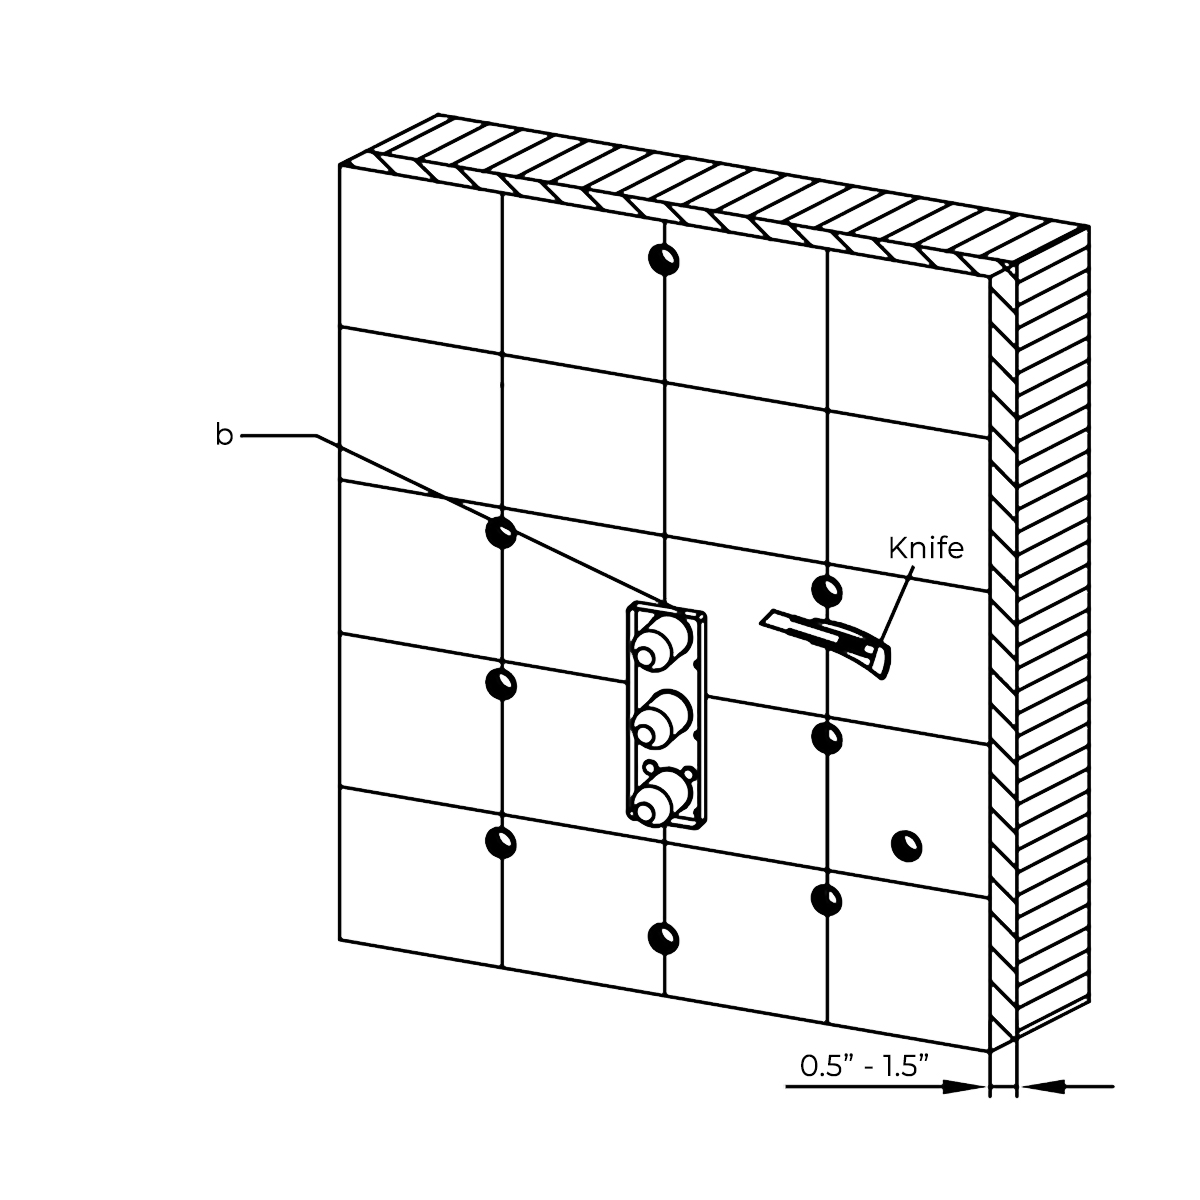
Finish the wall surrounding the shower with a thickness of 1/2"-1-1/2".
a) Finished wall surface should not exceed the upper edge of the installation box.
|
|
If the tile exceeds the edges of the installation box, trim the tile as necessary to install the trim plate.
b) Trim the tile around the installation box as necessary.
|
|
|
Shower Valve Mixer Installation Instructions
|
|
|
|
|
Step 9:
|
|
|
|
|
|
|
|
|
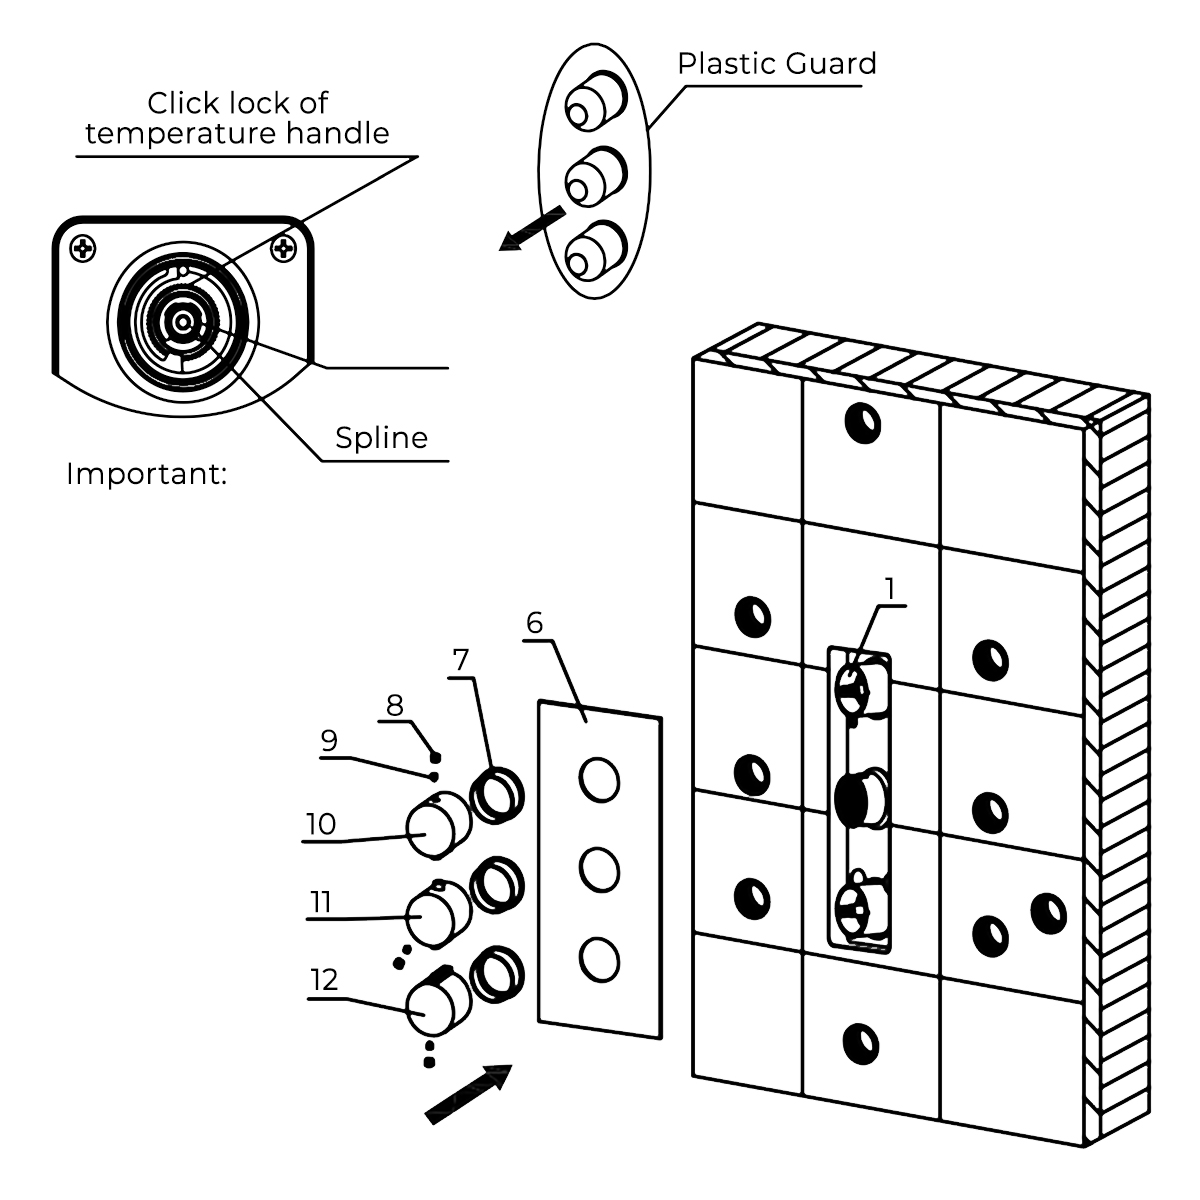
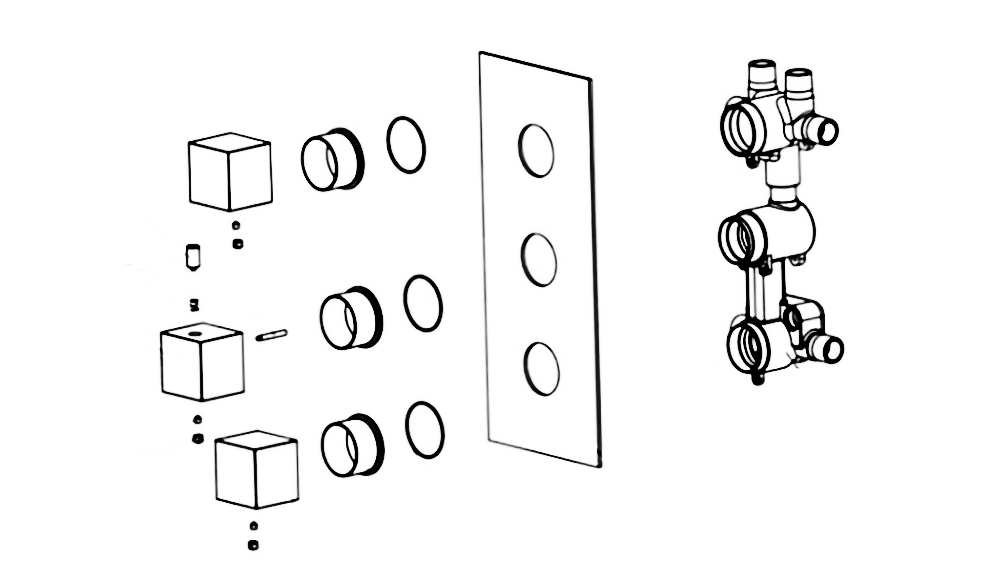
Remove the plastic guard and place the trim plate over the installation box. Install the screws covers, handles and buttons.
|
|
|
|
|
Shower Valve Mixer Installation
|
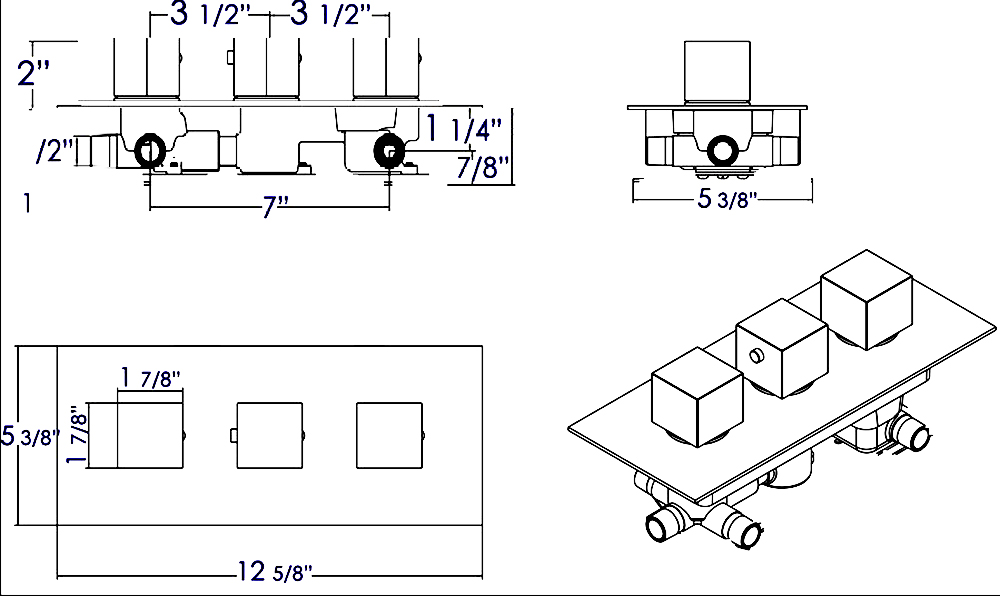
How to install the Shower Set with Wall Mount Showerhead, Hand Held Shower and Shower Mixer
|
|
|