How to install Fontana Brushed Nickel Dual Commercial Sensor Faucet & Automatic Soap Dispenser | FST9892-MD
Easy step by step Installation Instructions for Sensor Faucet & Soap Dispenser Combo
|
|
Visit Product Page 
|
|
- Before you begin, please read the installation instructions below. Observe all local building and safety codes.
- Unpack and inspect the products for any shipping damages. If you find damages, do not install.
- Please note all products must be installed by a professional and certified plumber otherwise warranty might be voided.
|
sensor
|
|
|
Sensor Faucet Installations Instructions
|
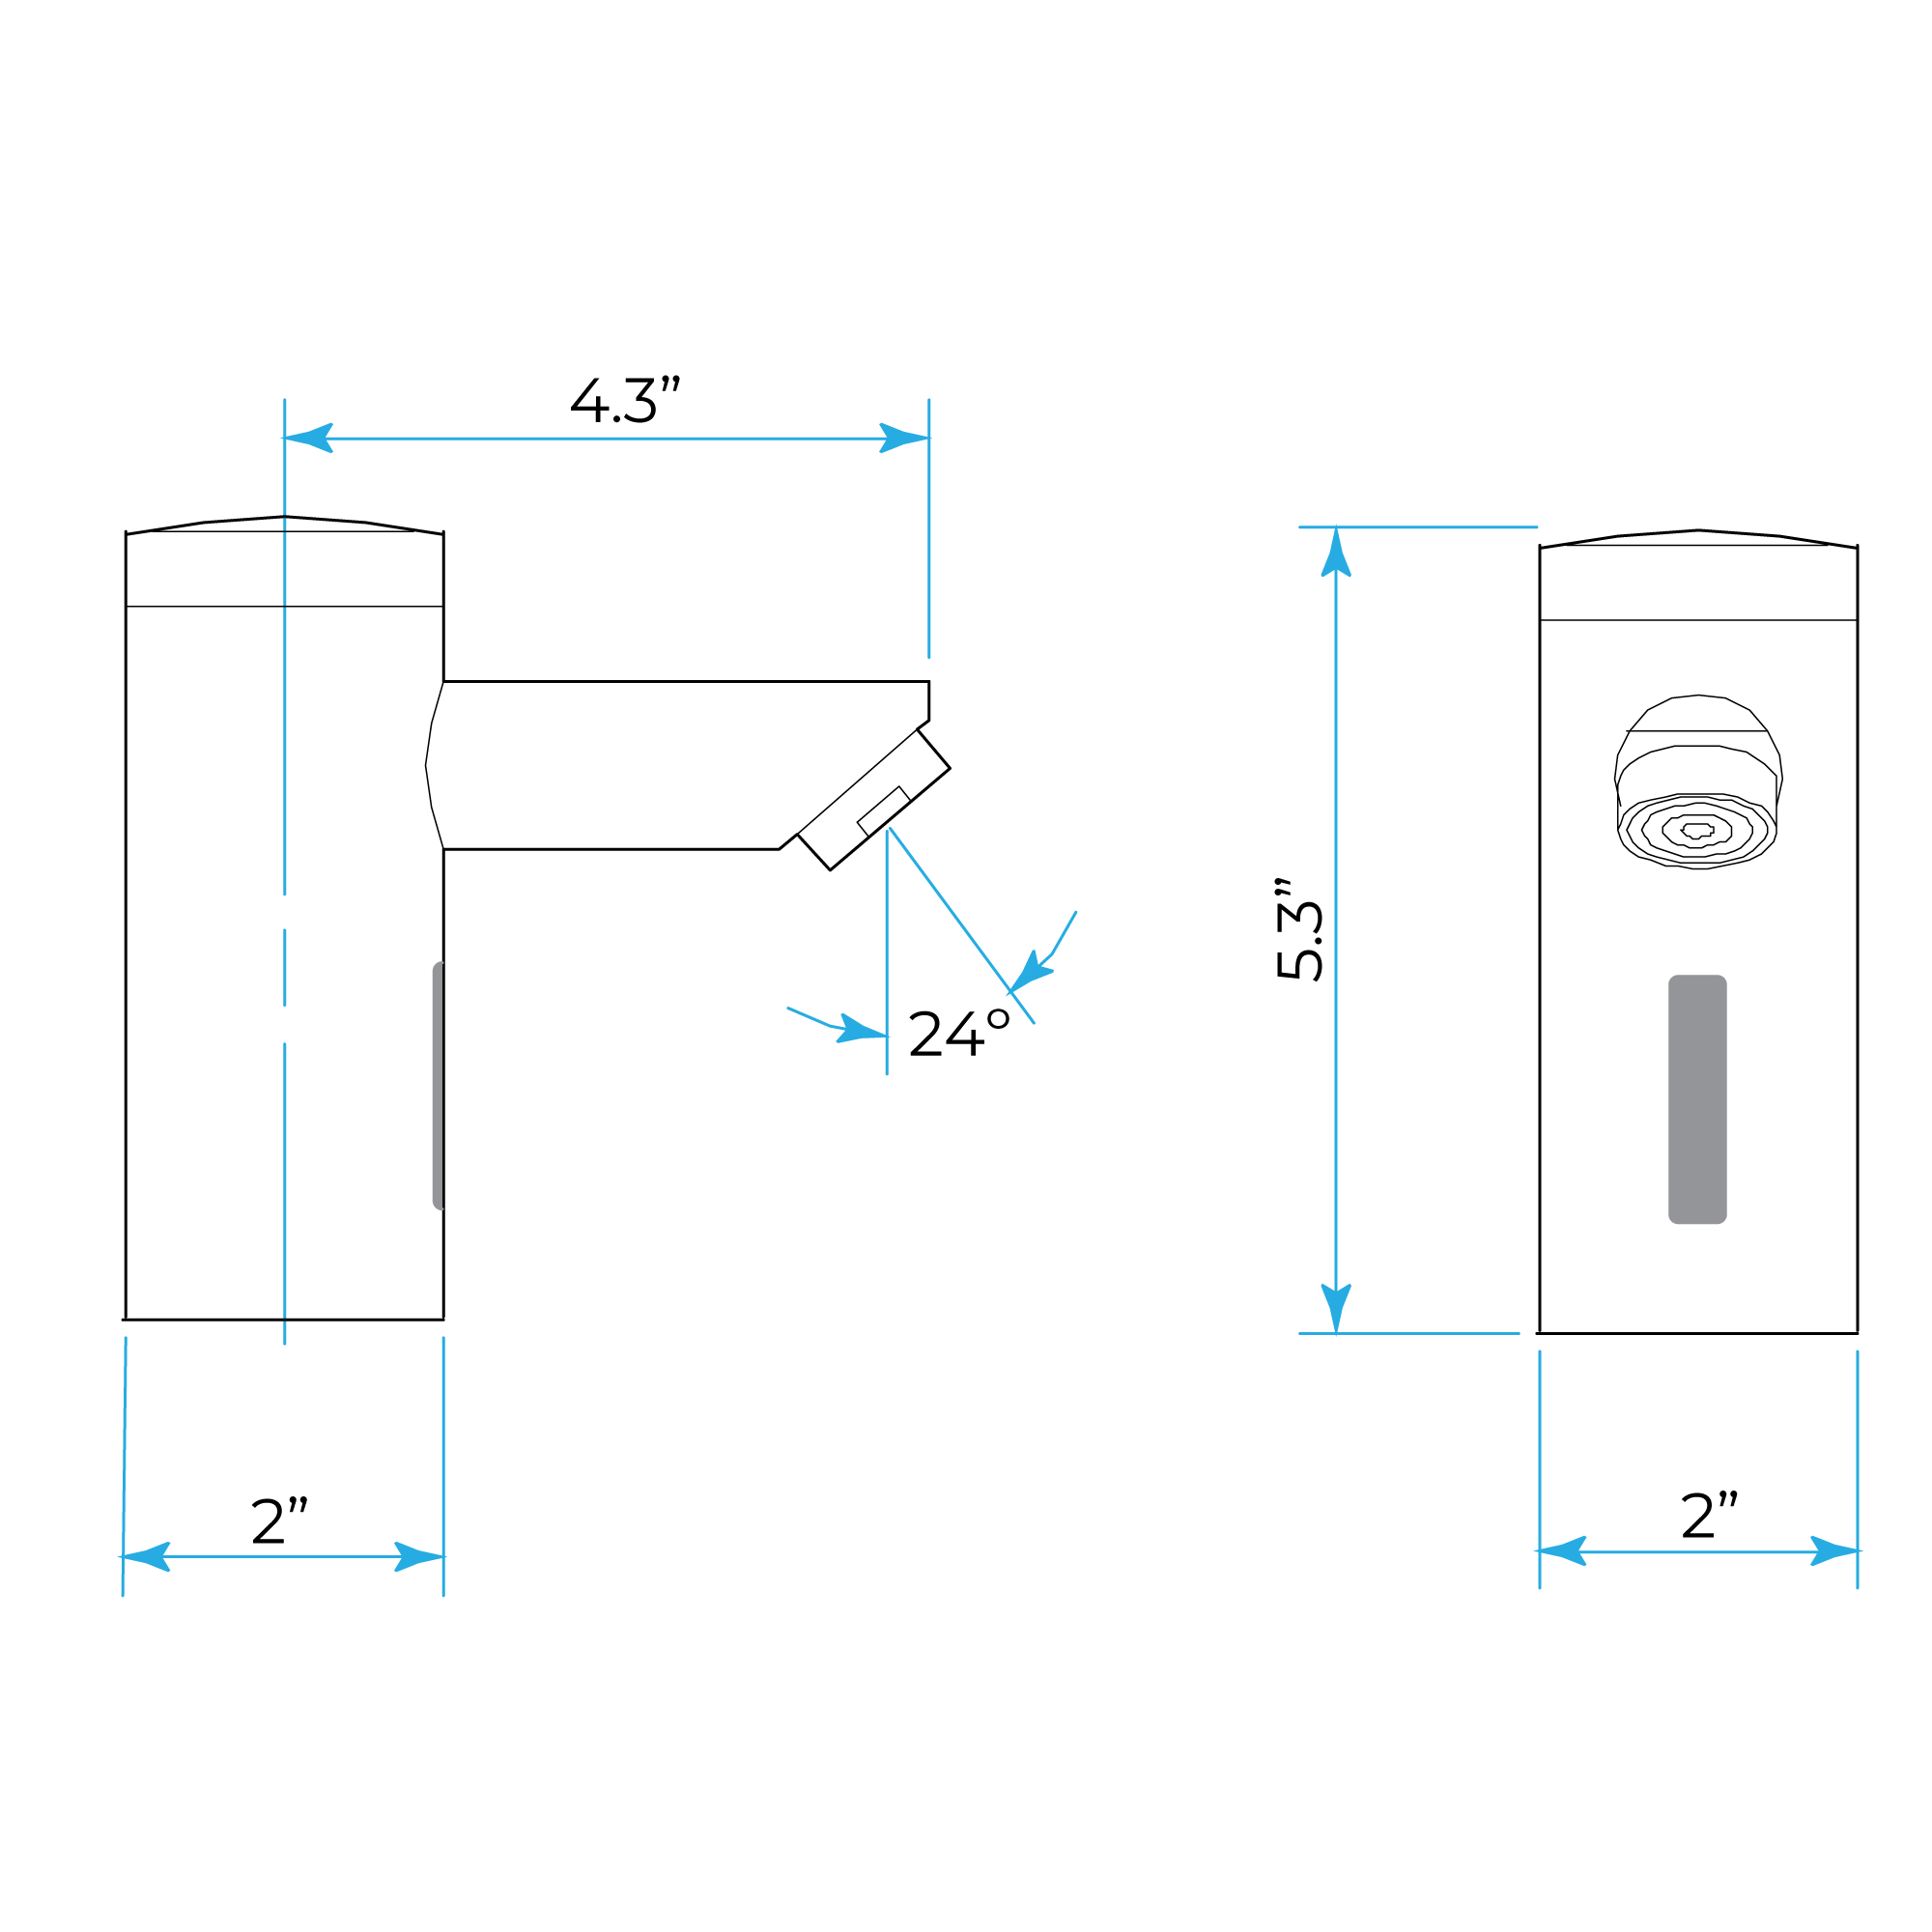
Size:
|
|
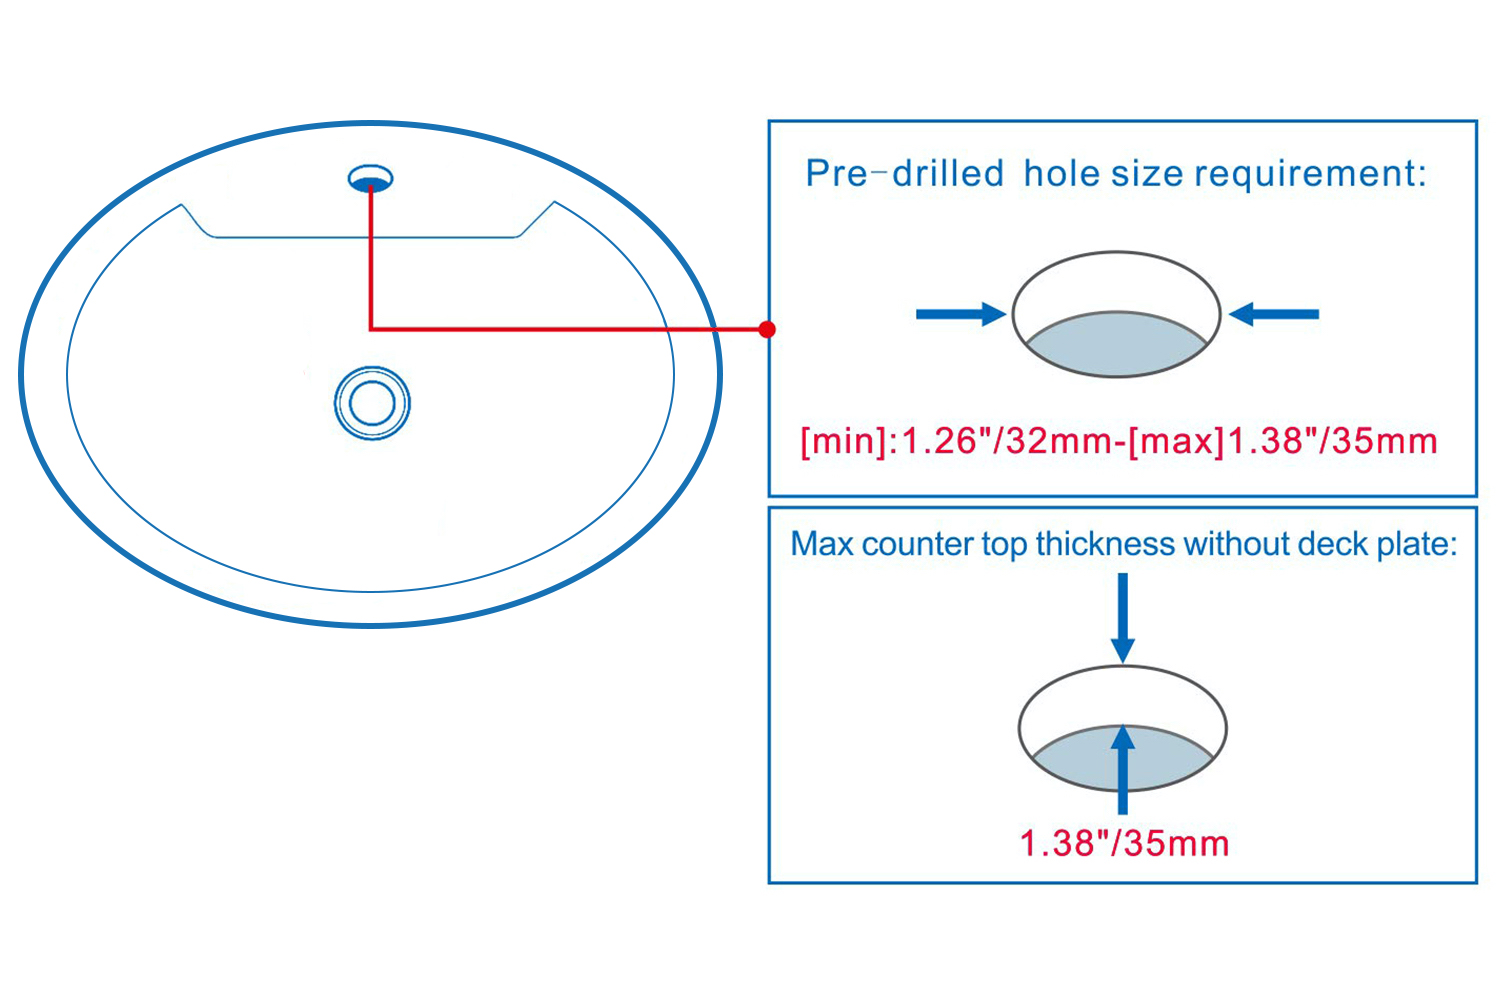
Hole Size:
|
|
|
|
|
|
|
|
|
|
Details:
Flow Rate: 0.5 GPM (2 Lpm) (0.5 GPM)
Spray Type: Aerated (AER)
Sensor Type: Infrared (IR)
Mounting Type: Single Hole
Factory Default Timeout: 30s
Factory Default GPC: 0.25
Self-Adjustment Range: 2" - 14" (51 -356mm)
Sensor Range: 4" - 5" (102 -127mm)
|
Deck Mount Installation
|
|
|
|

|
|
|
|

|
|
|
|
|
|
|
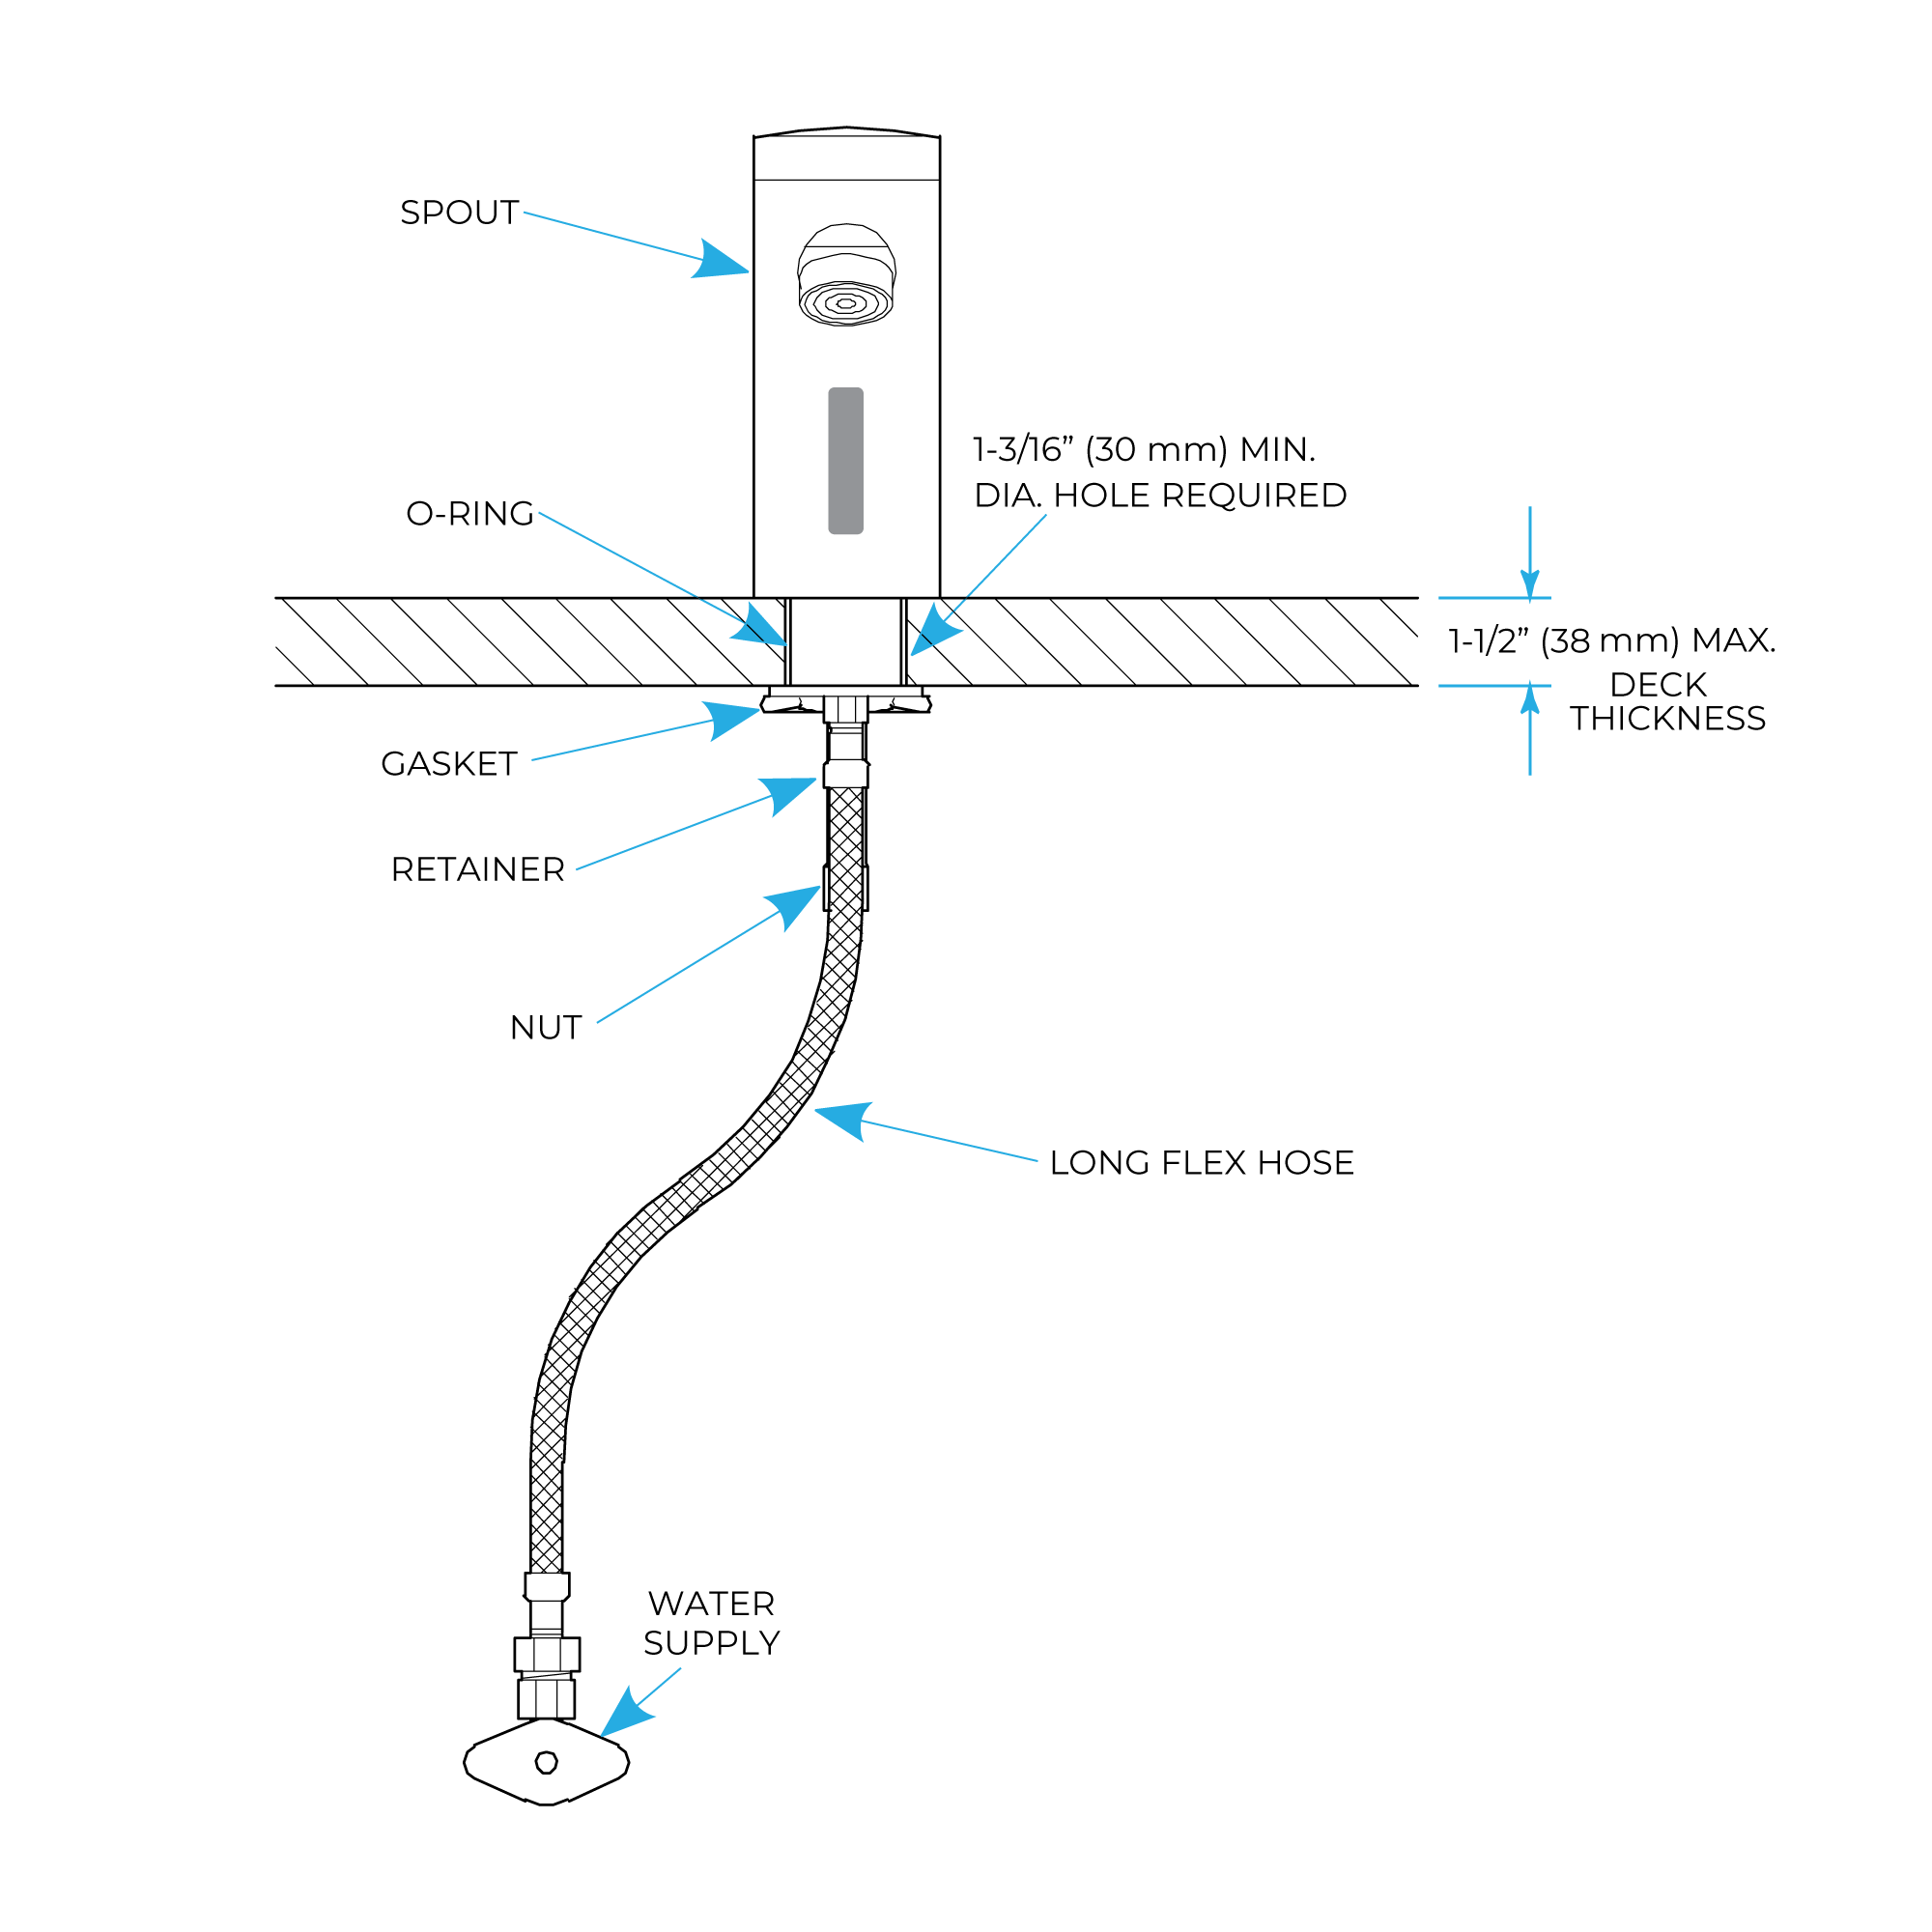
The correct way for Hose
|
|

|
|
|
|
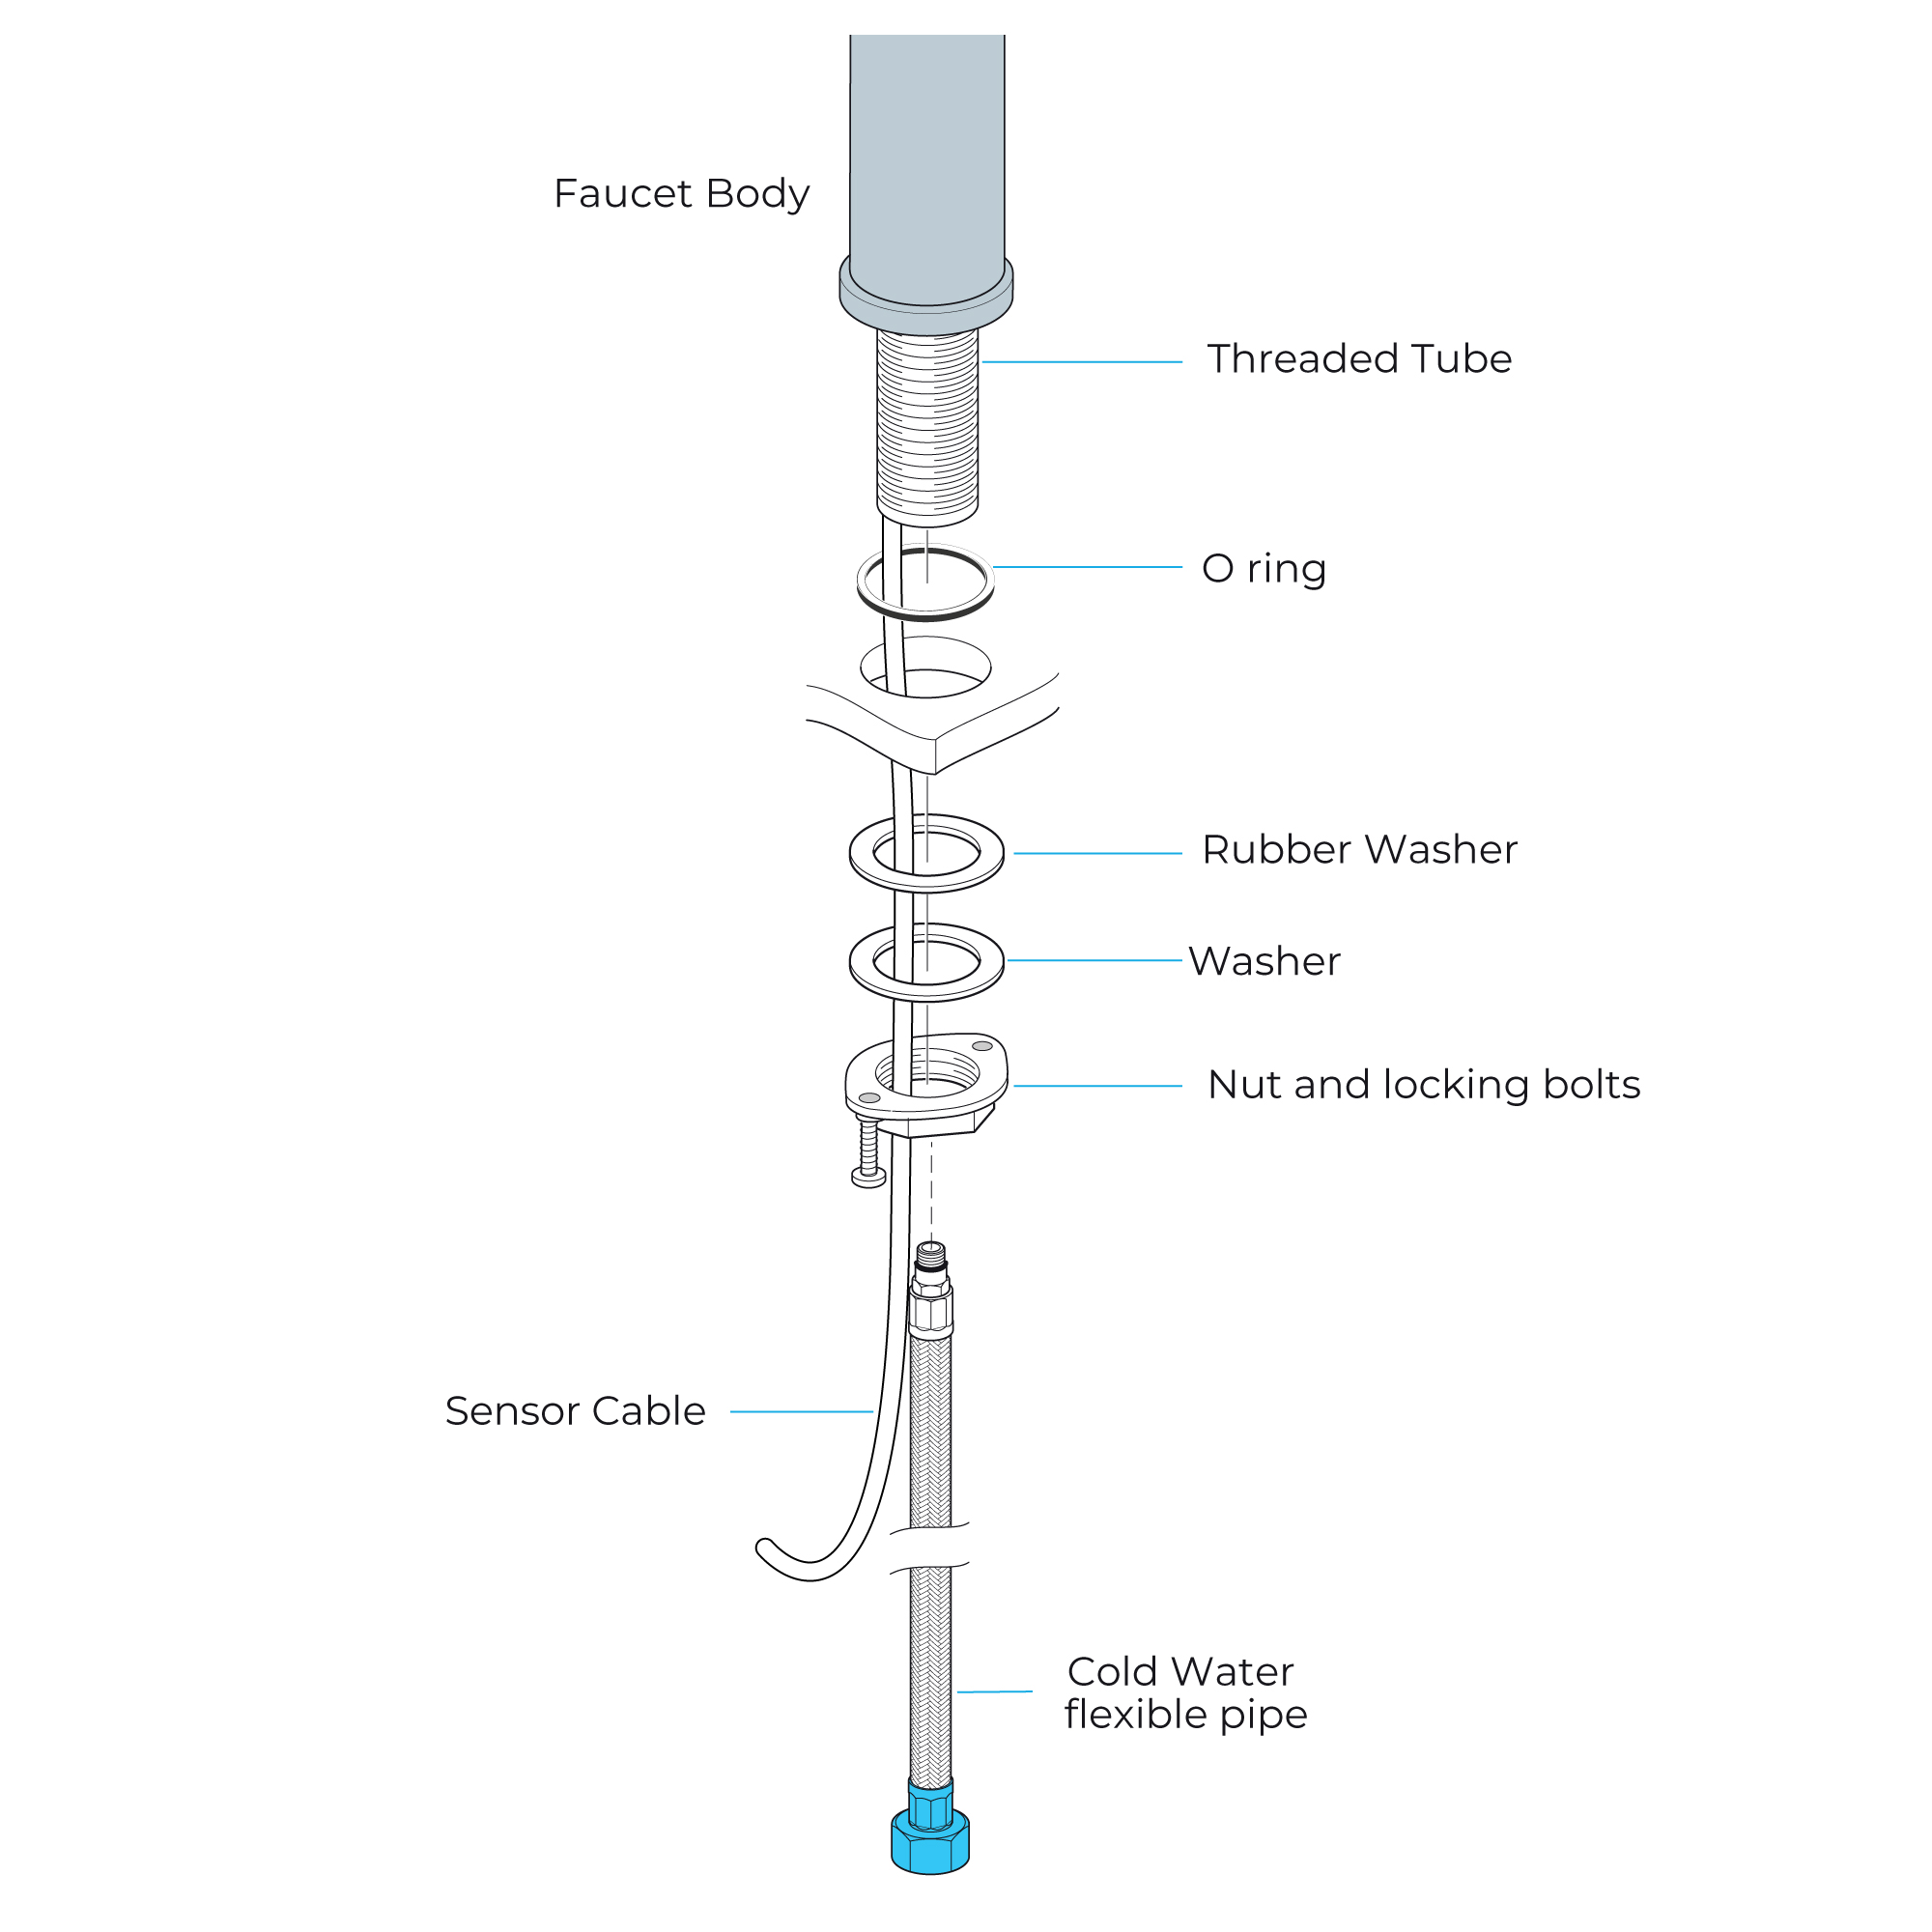
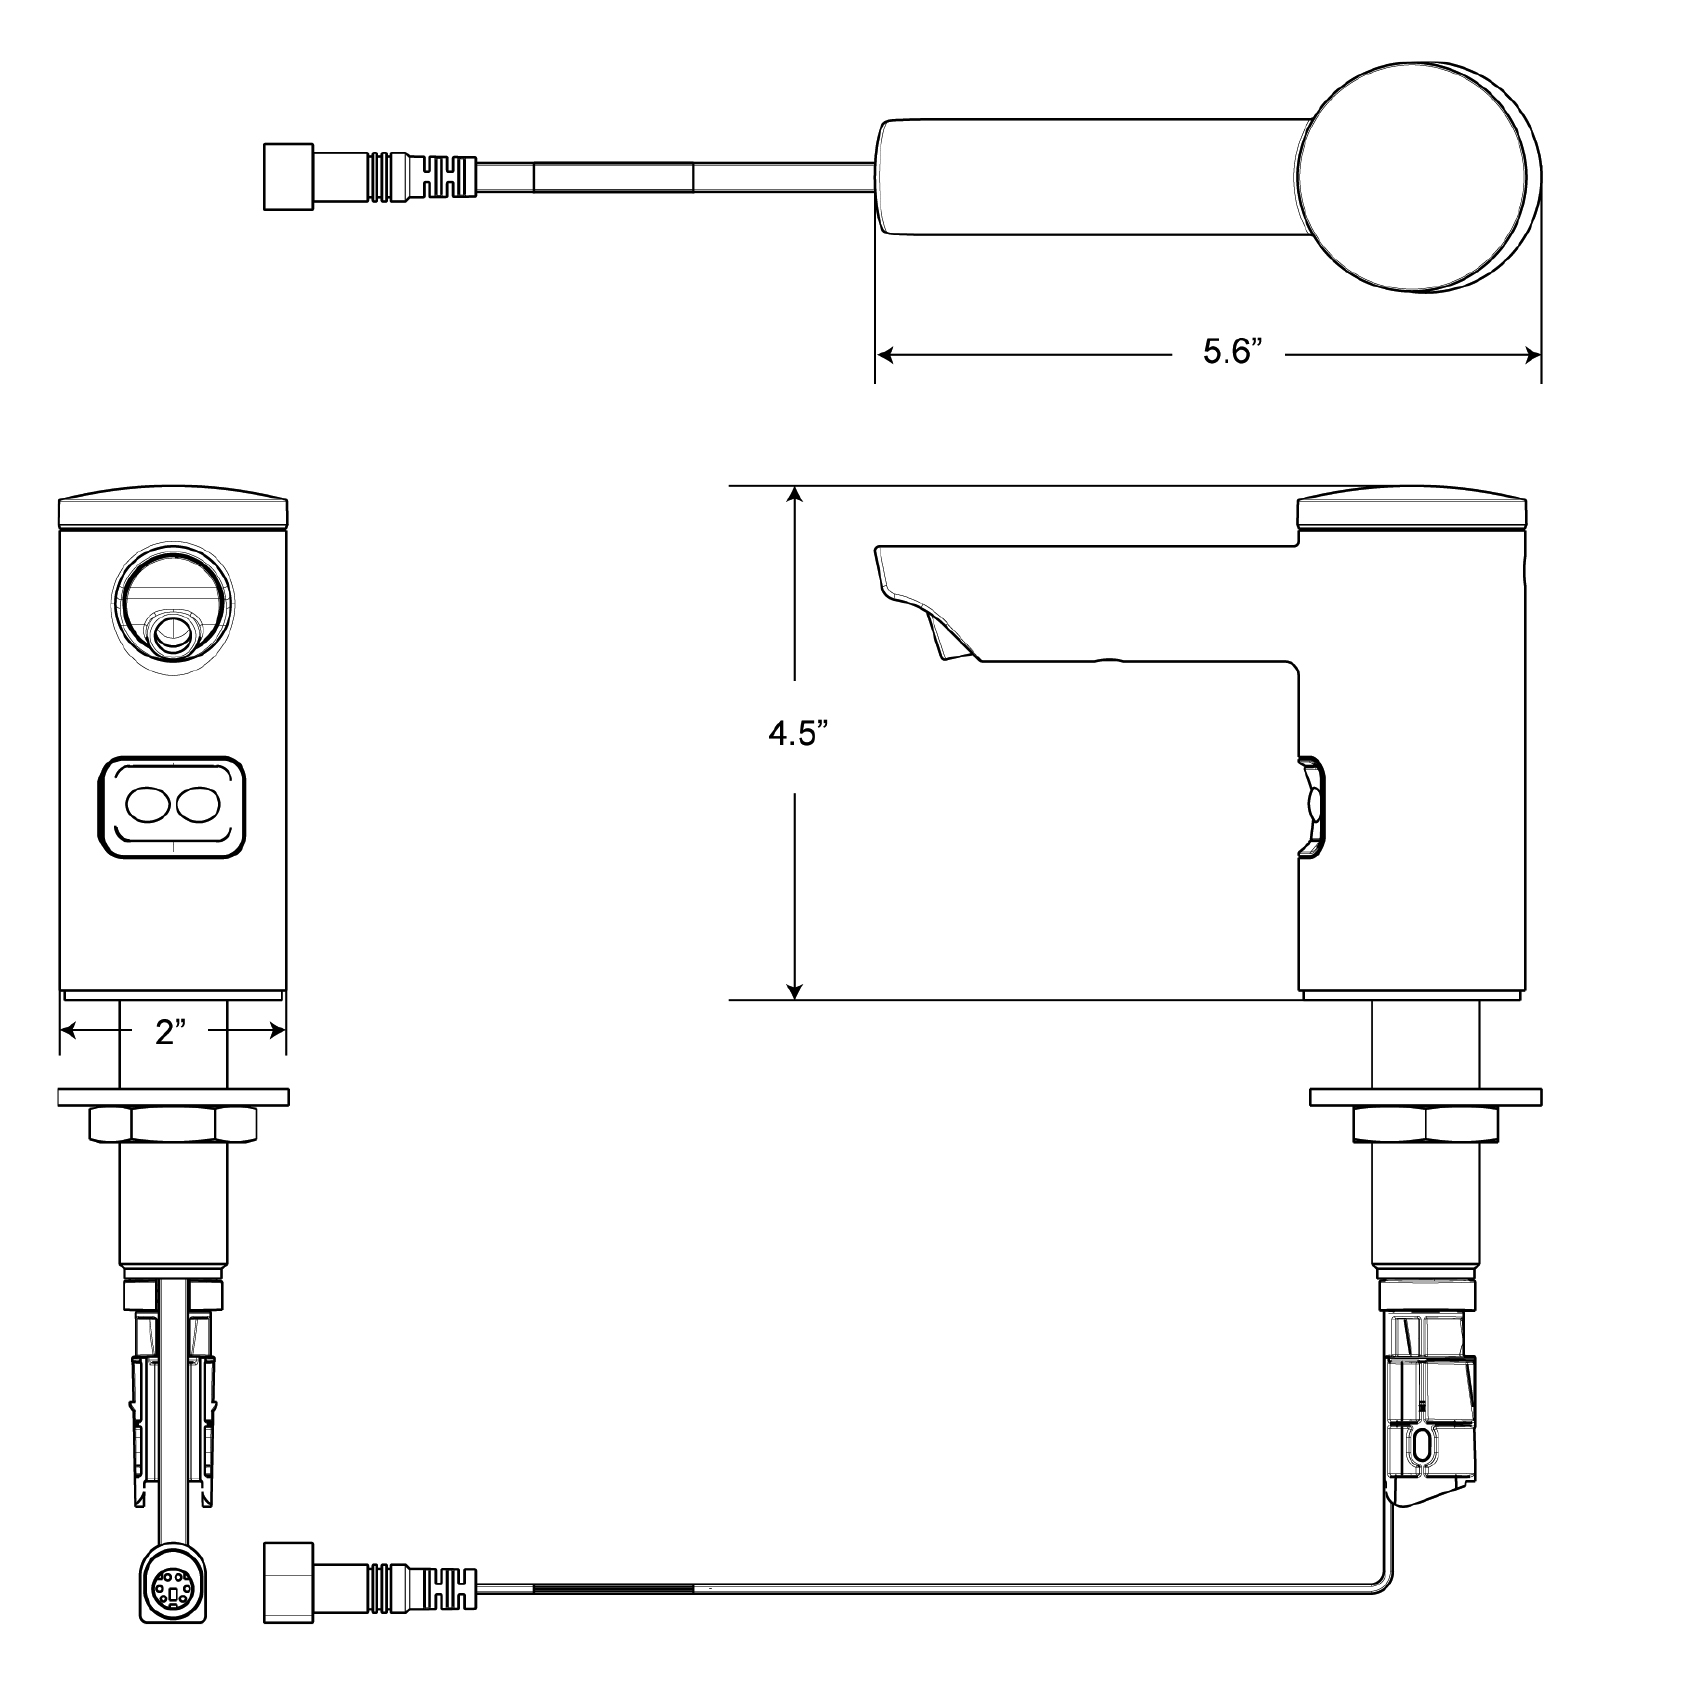
1. Screw the hose into the corresponding screw-hole of the faucet body. Fix the o-ring into the bottom groove of the faucet body.
2. Insert hose, threaded pipe and data cable through the drilled hole of the countertop. Put rubber washer and metal washer onto the threaded pipe, screwing in mounting nut. Adjust the faucet body correctly and tighten the mounting nut with screws.
4. Make Connections to the water supply. Turn on the water supply and flush the water line into a container for one minute.
Important: This flushes away any debris that could cause damage to internal parts.
5. Turn the faucet on for 1 minute to flush any debris.
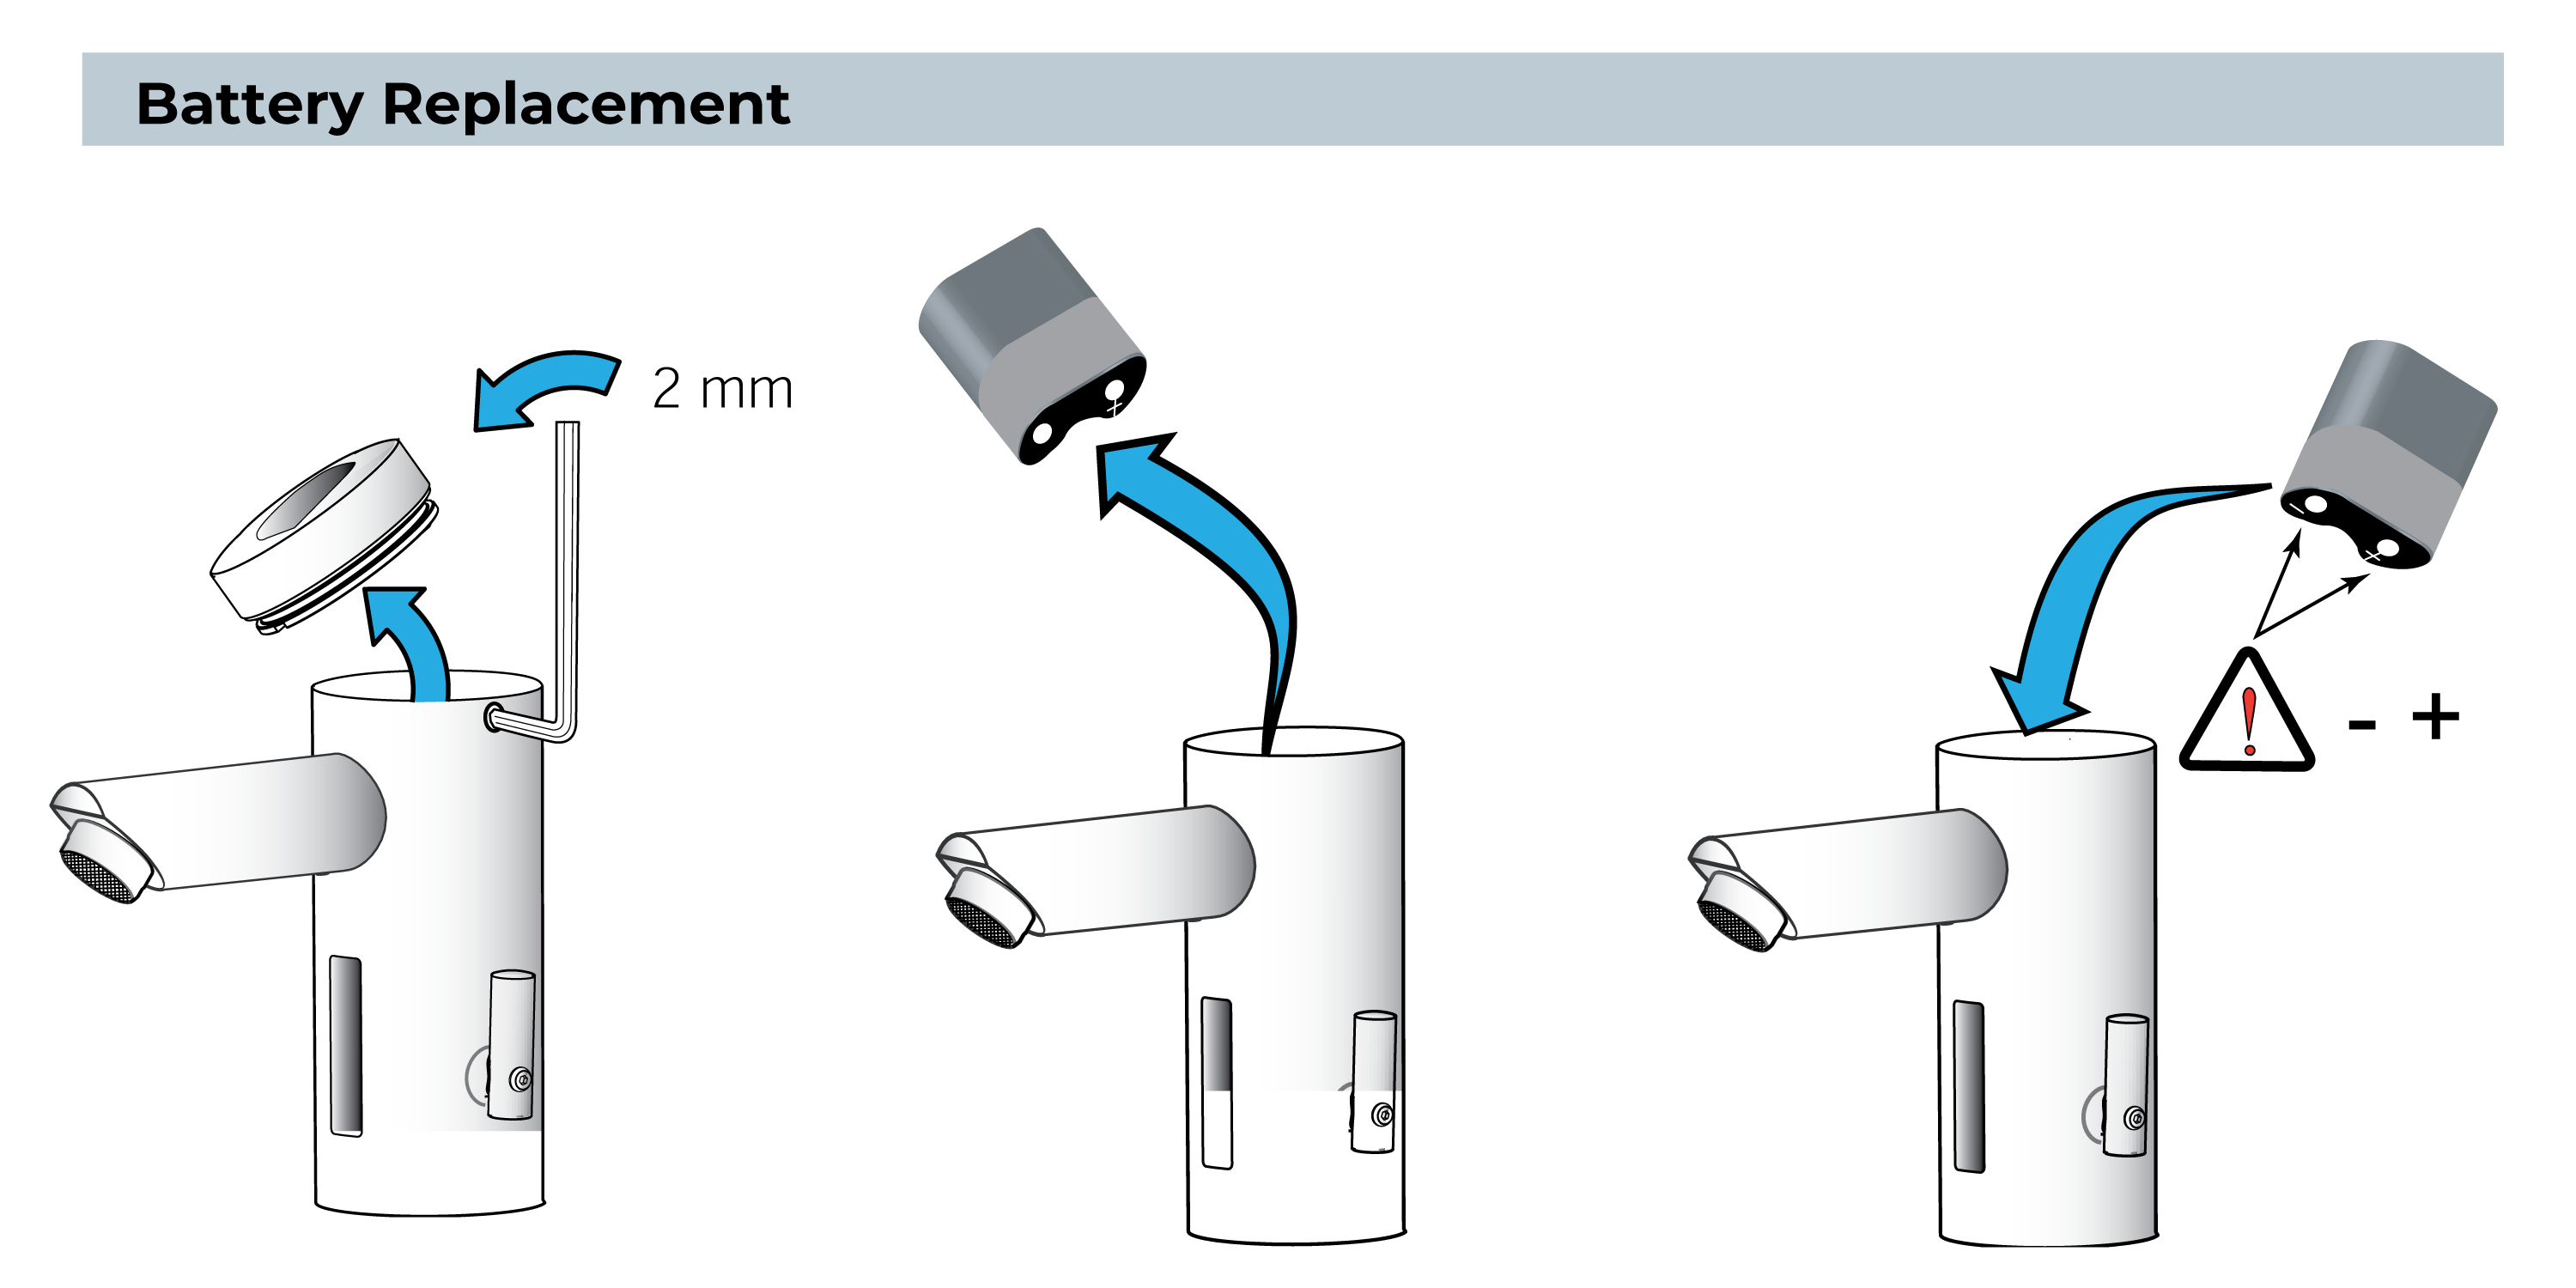
Battery Replacement
NOTE: Replace Battery when red LED indicator flashes each time faucet is in use or when faucet stops functioning.
- Close Supply Stop(s).
- Loosen Screw with hex wrench and remove Cap.
- Move the Battery Retainer tab away from Battery. Remove old Battery. Dispose of properly.
- Insert a new 6 Volt Lithium Battery. The red LED will flash for one (1) minute. Reinstall Battery Cover. If LED doesn’t flash or if it just lights up, remove and then reinsert the Battery. If water flows continuously after inserting the new Battery and opening the Supply Stops, remove and then reinsert the Battery.
- Open Supply Stop(s).
|
|

|
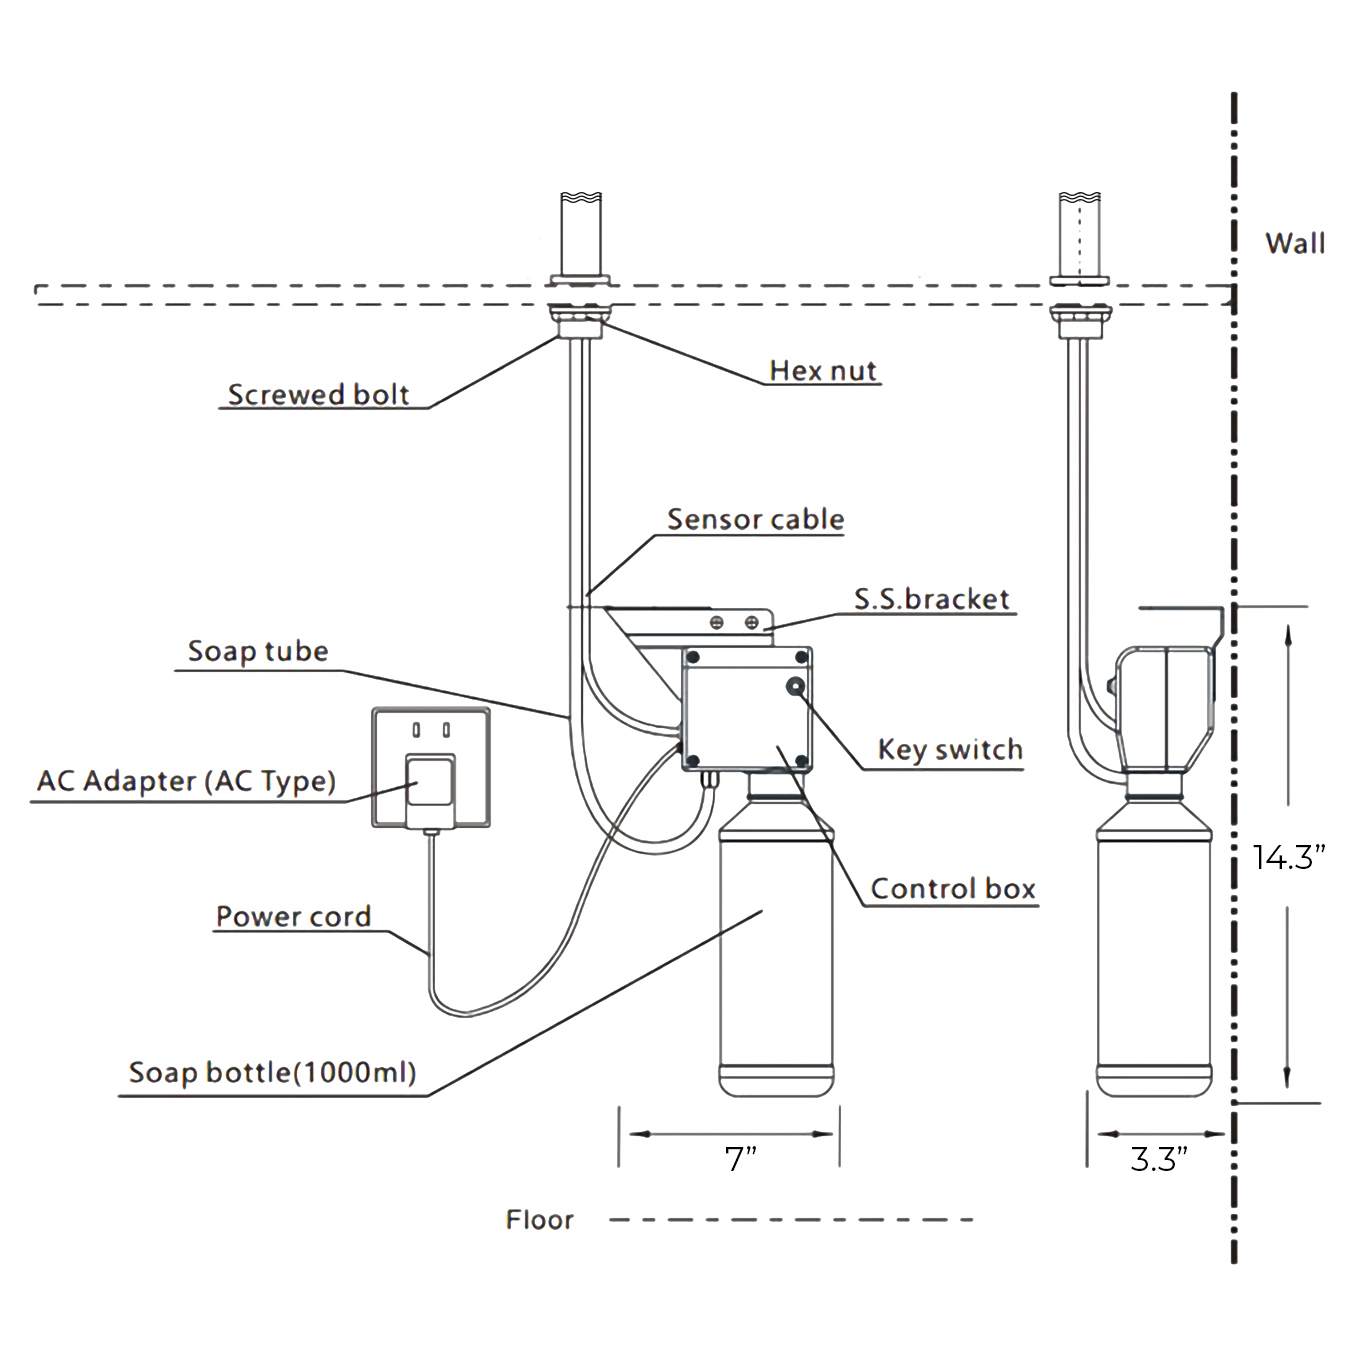
Flexible Connecting Hose
Care must be taken when connecting the flexible connection hose from the power supply box to the spout to ensure it does not bend sharply and kink or twist.
See above for recommended ways to fit the flexible connecting hose.
Important: Failure to follow these guidelines may result in poor performance and damage to the flexible connection hose.
|
|
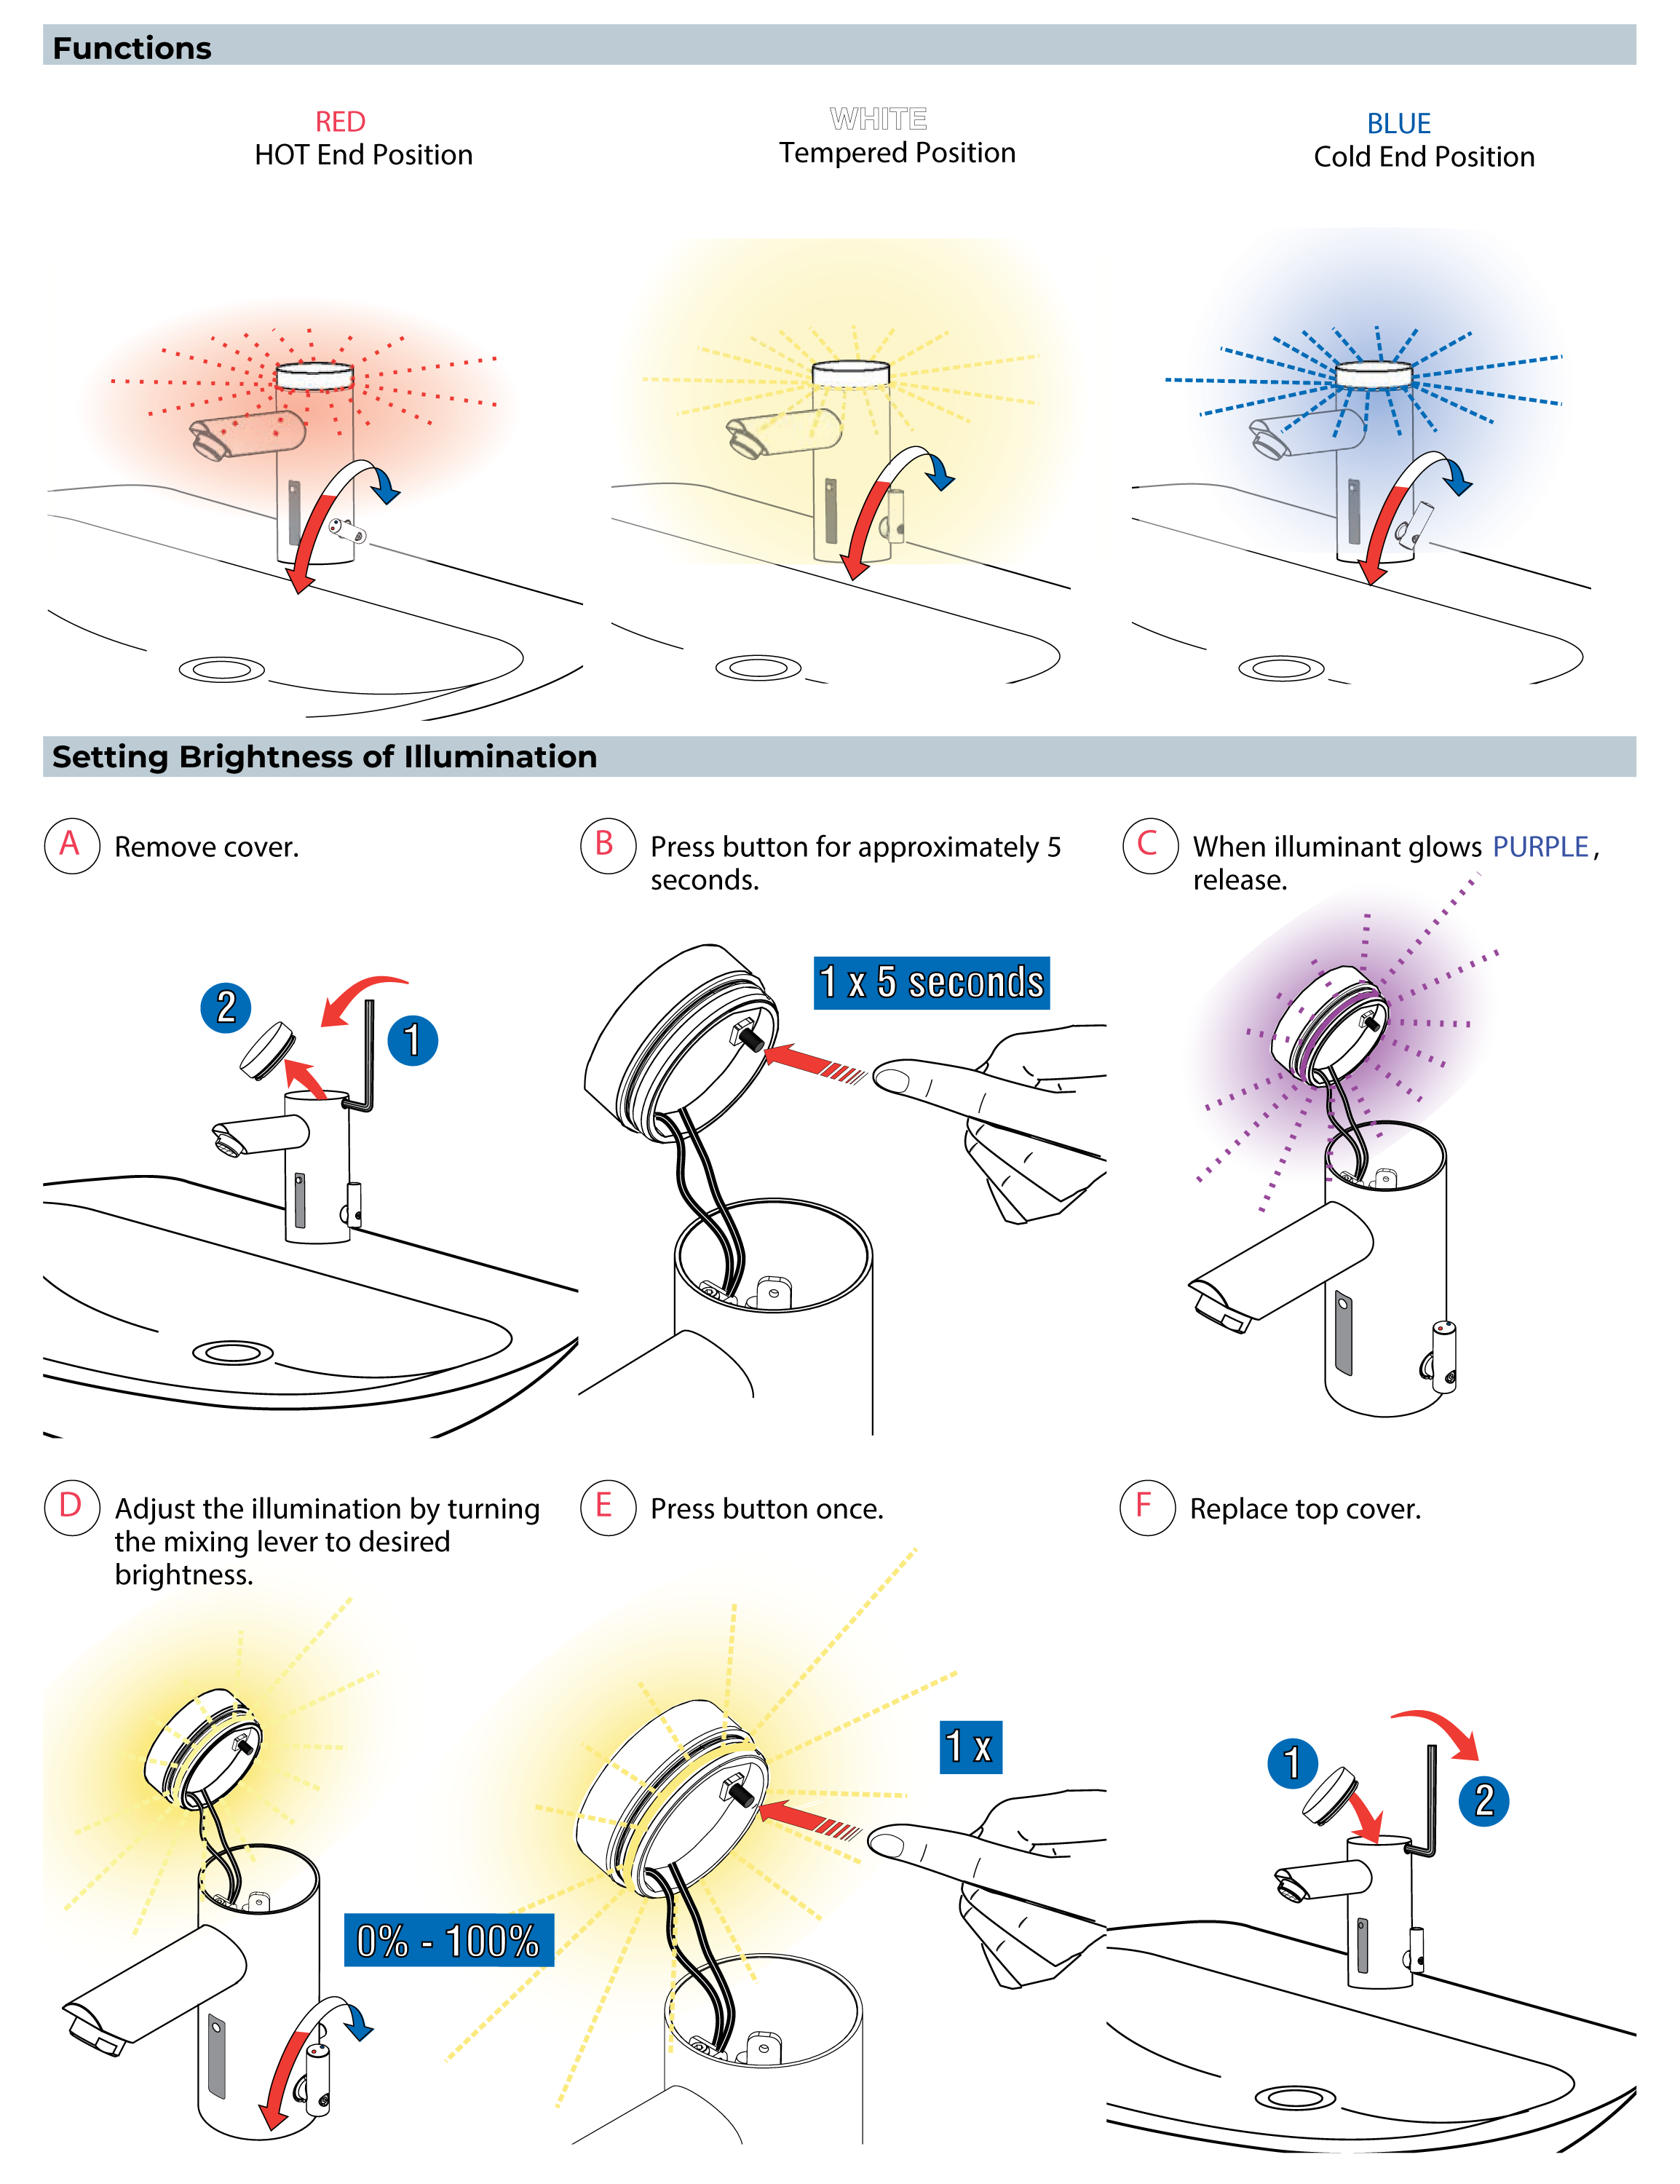
Functions:
- Double Infrared Sensors with Automatic Setting Feature and Microprocessor
- Automatic Self-adapting Sensor Technology
- Magnetic Solenoid Valve
- Water Supply Connection with Flexible High-pressure Hose and
Strainer
|
|
|
Automatic Soap Dispenser Installation Instructions
|
auto soap
|
Soap Bottle Size
|

|
|
|
|
|
|
|
|
|

|
|
|
|
|
|
|
|
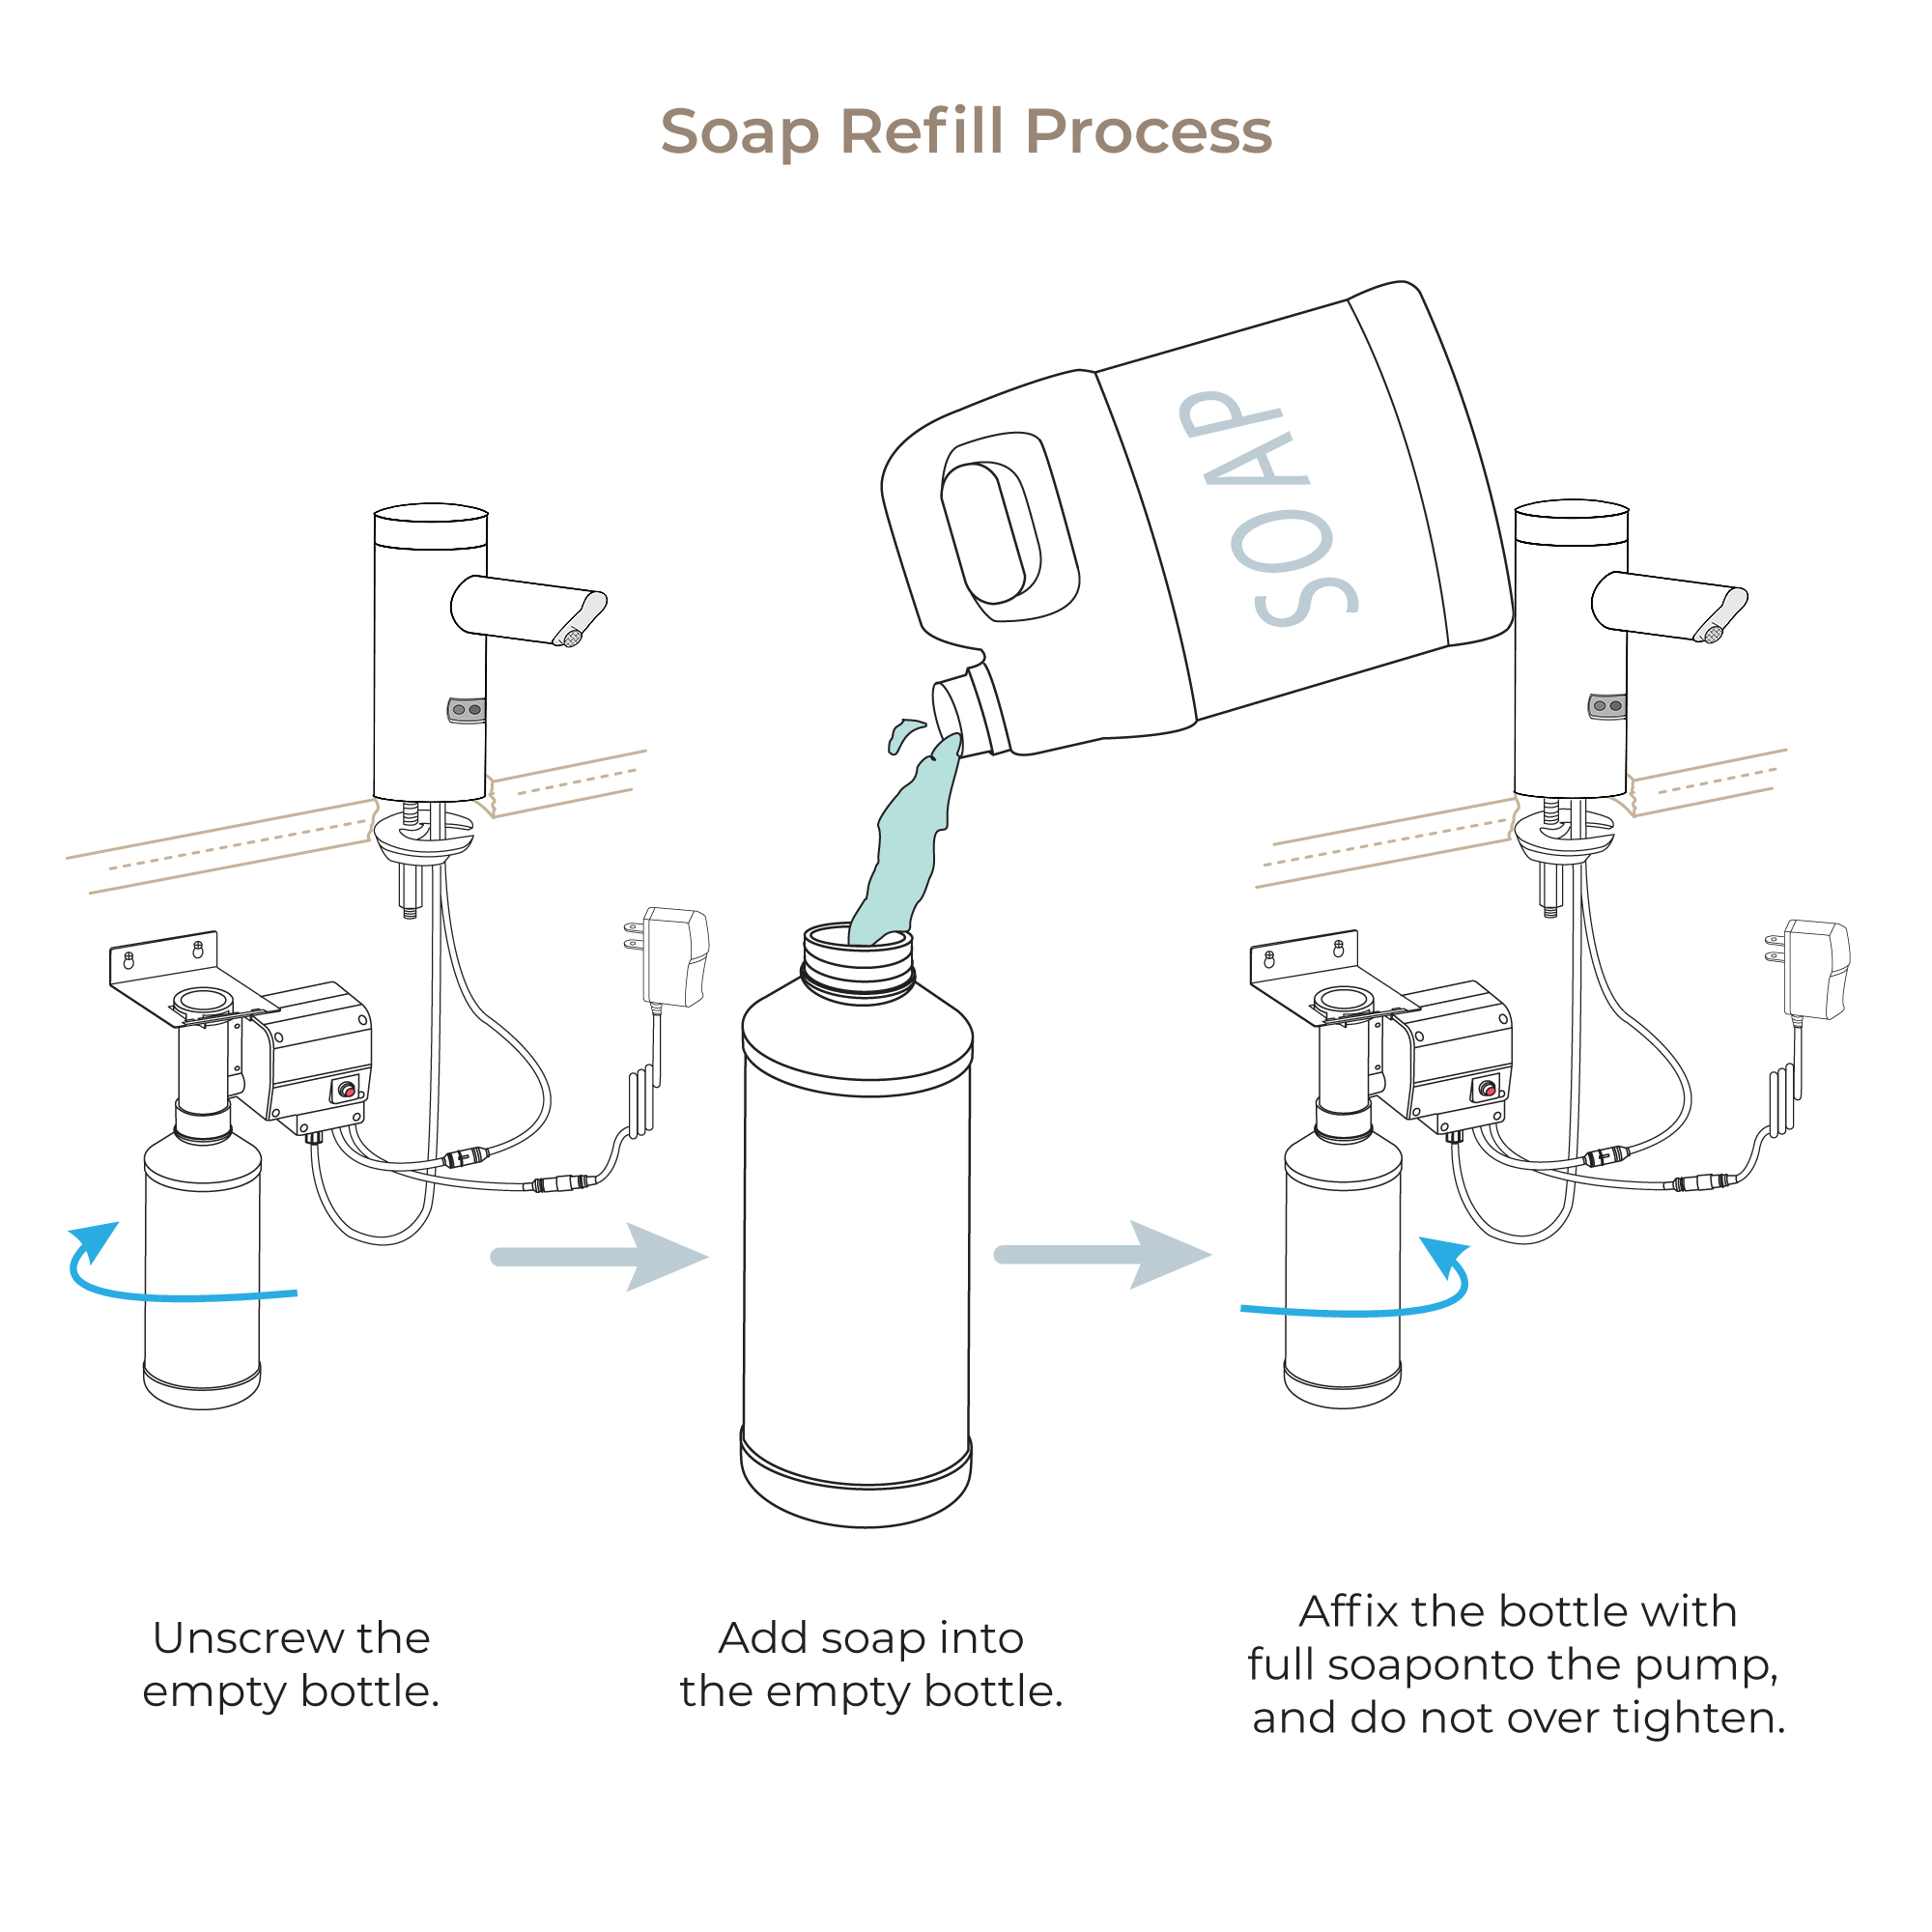
Step 1:
|
sensor
|
Step 2:
|
|
|
|
|
|
|
|
|
|
|
Step 3:
|
|
Step 4:
|
|
|
|
|
|
|
|
|
|
|
Step 5:
|
|
Step 6:
|
|
|
|
|
|
|
|
|
|
|
Step 7:
|
|
Step 8:
|
|
|
|
|
|
| | | |
Features:
More Hygienic
The proximity sensor removes the need to touch the spout, reducing the spread of germs and reducing the chance of cross-infection.
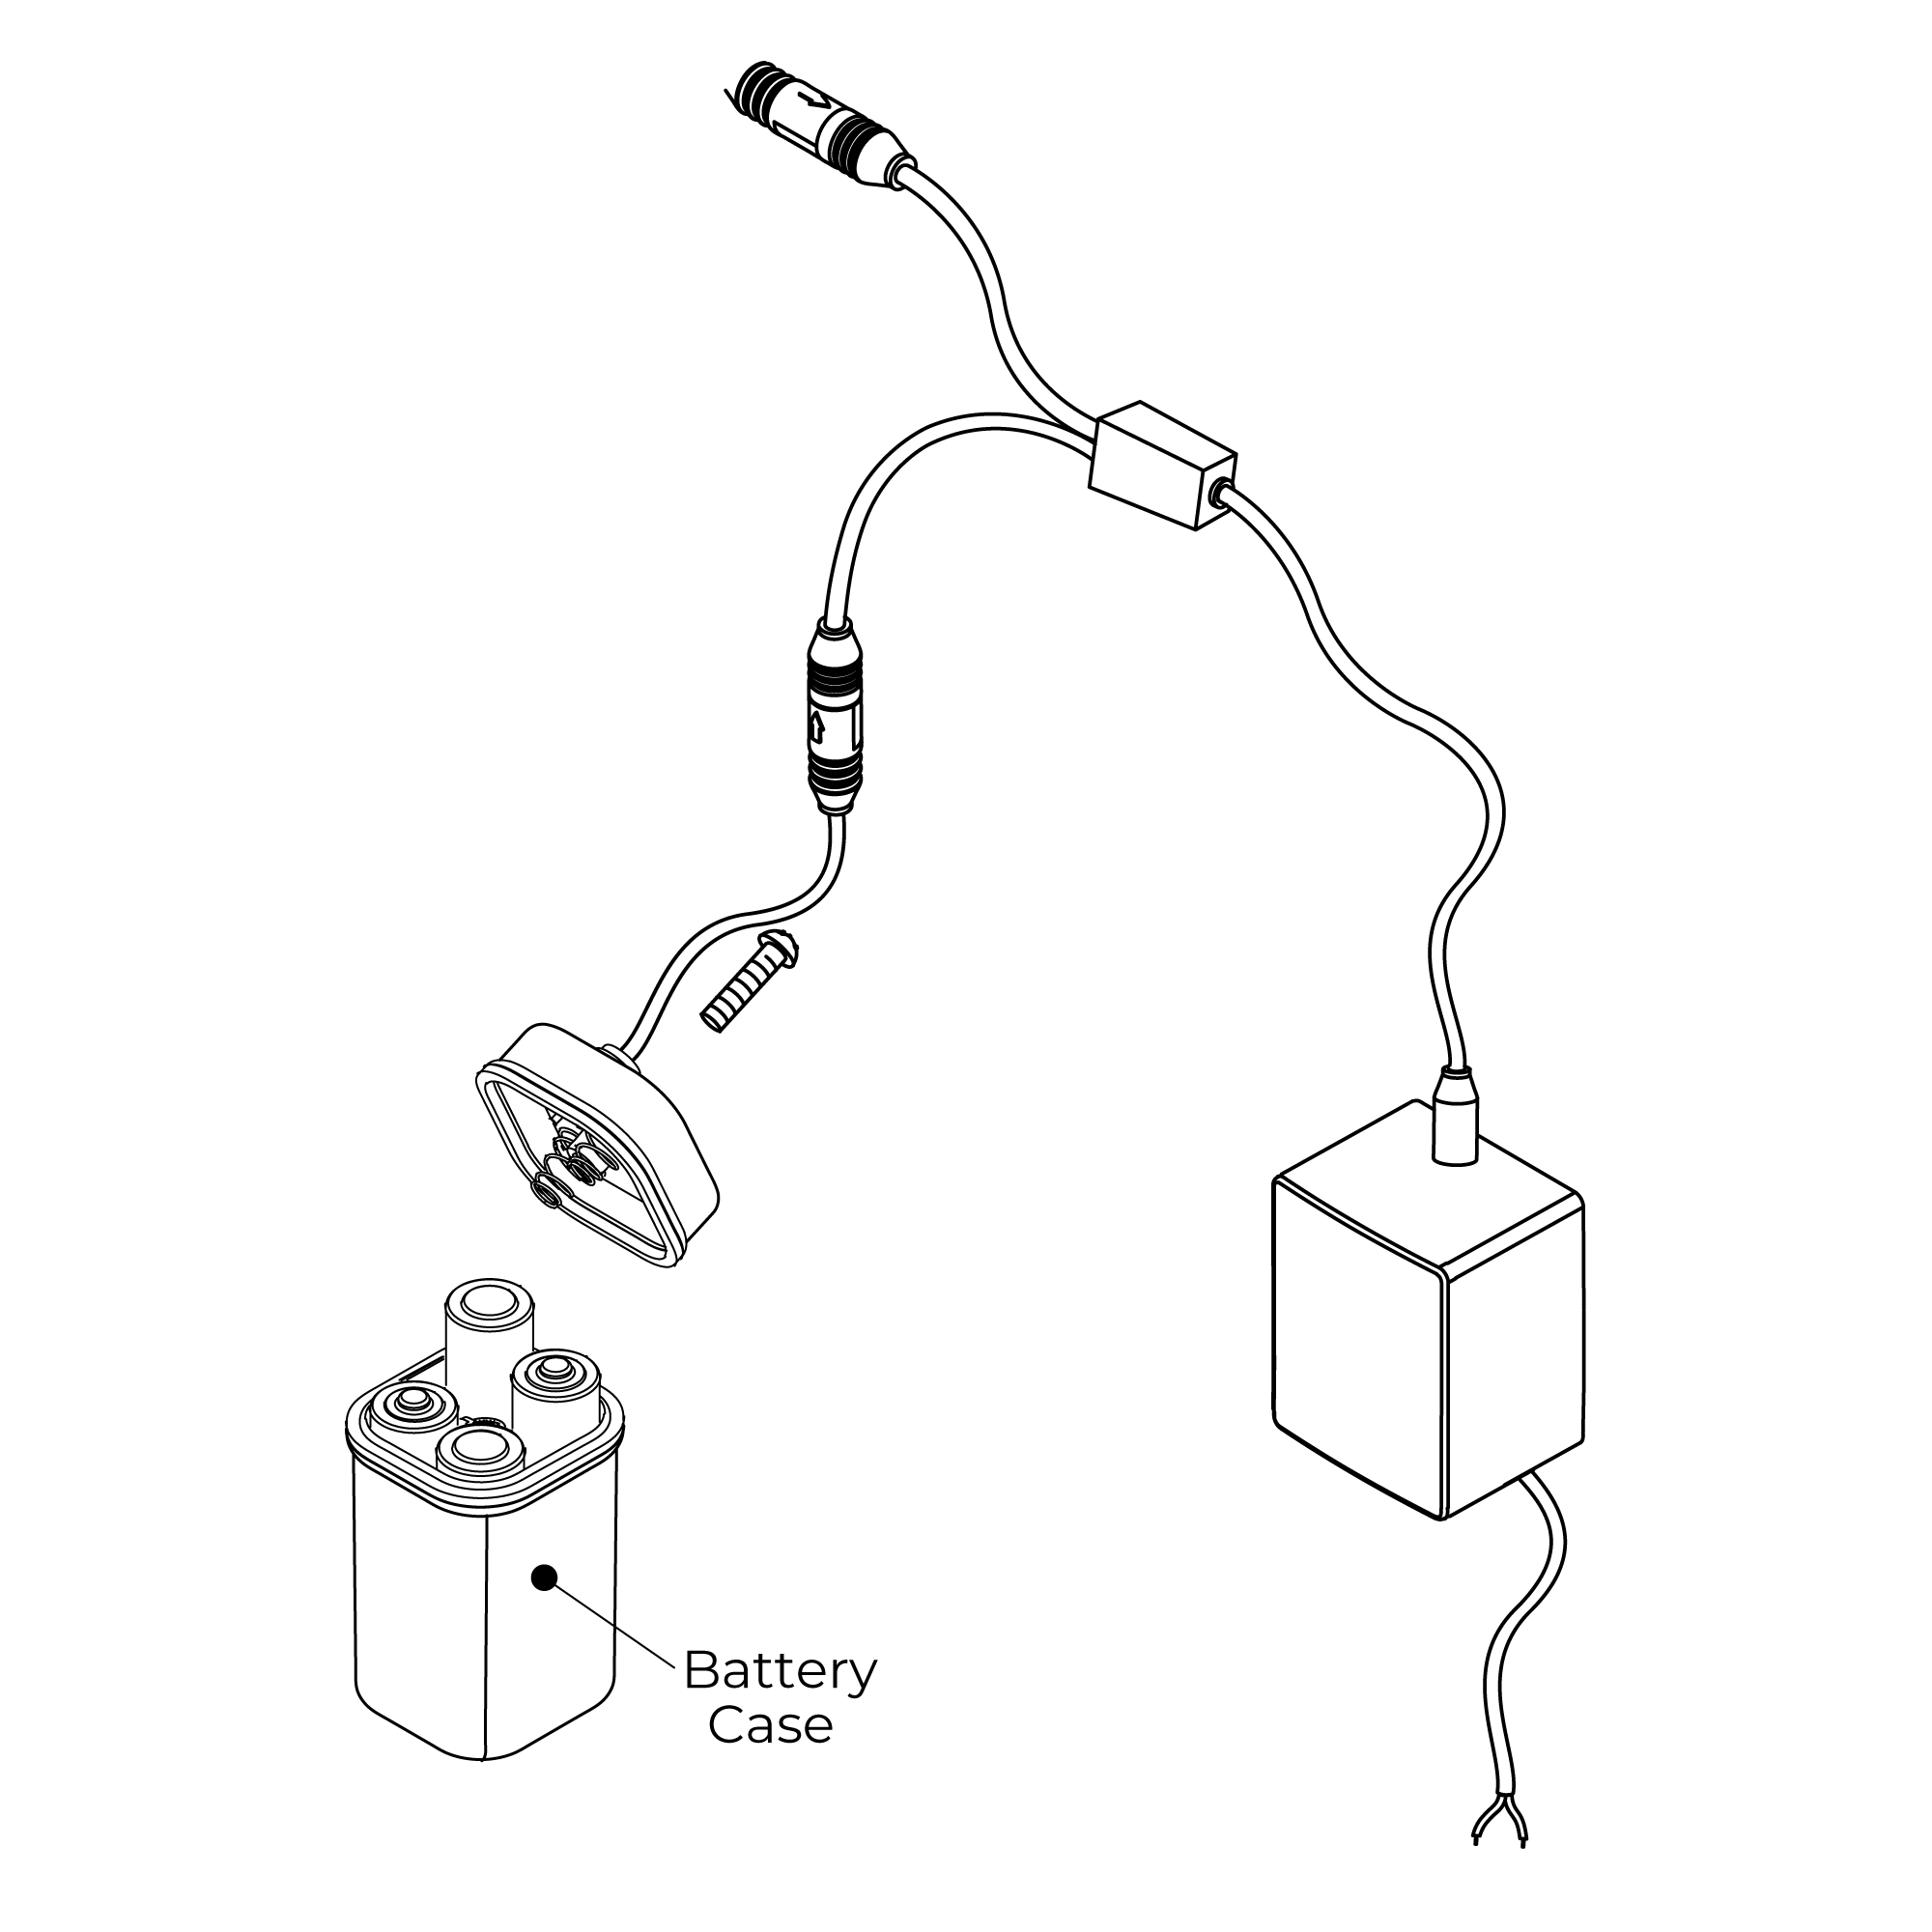
Battery Override
Your infrared soap dispenser is supplied with a backup battery pack. In the event of a power failure, the product will automatically switch to battery-operated mode to ensure the spout continues to function.
Low Battery Warning
When the batteries run low and the power falls below 3.9V the sensor light will flicker to indicate the batteries are running low and need replacing.
When the batteries are exhausted the sensor light will not light up.
Installation
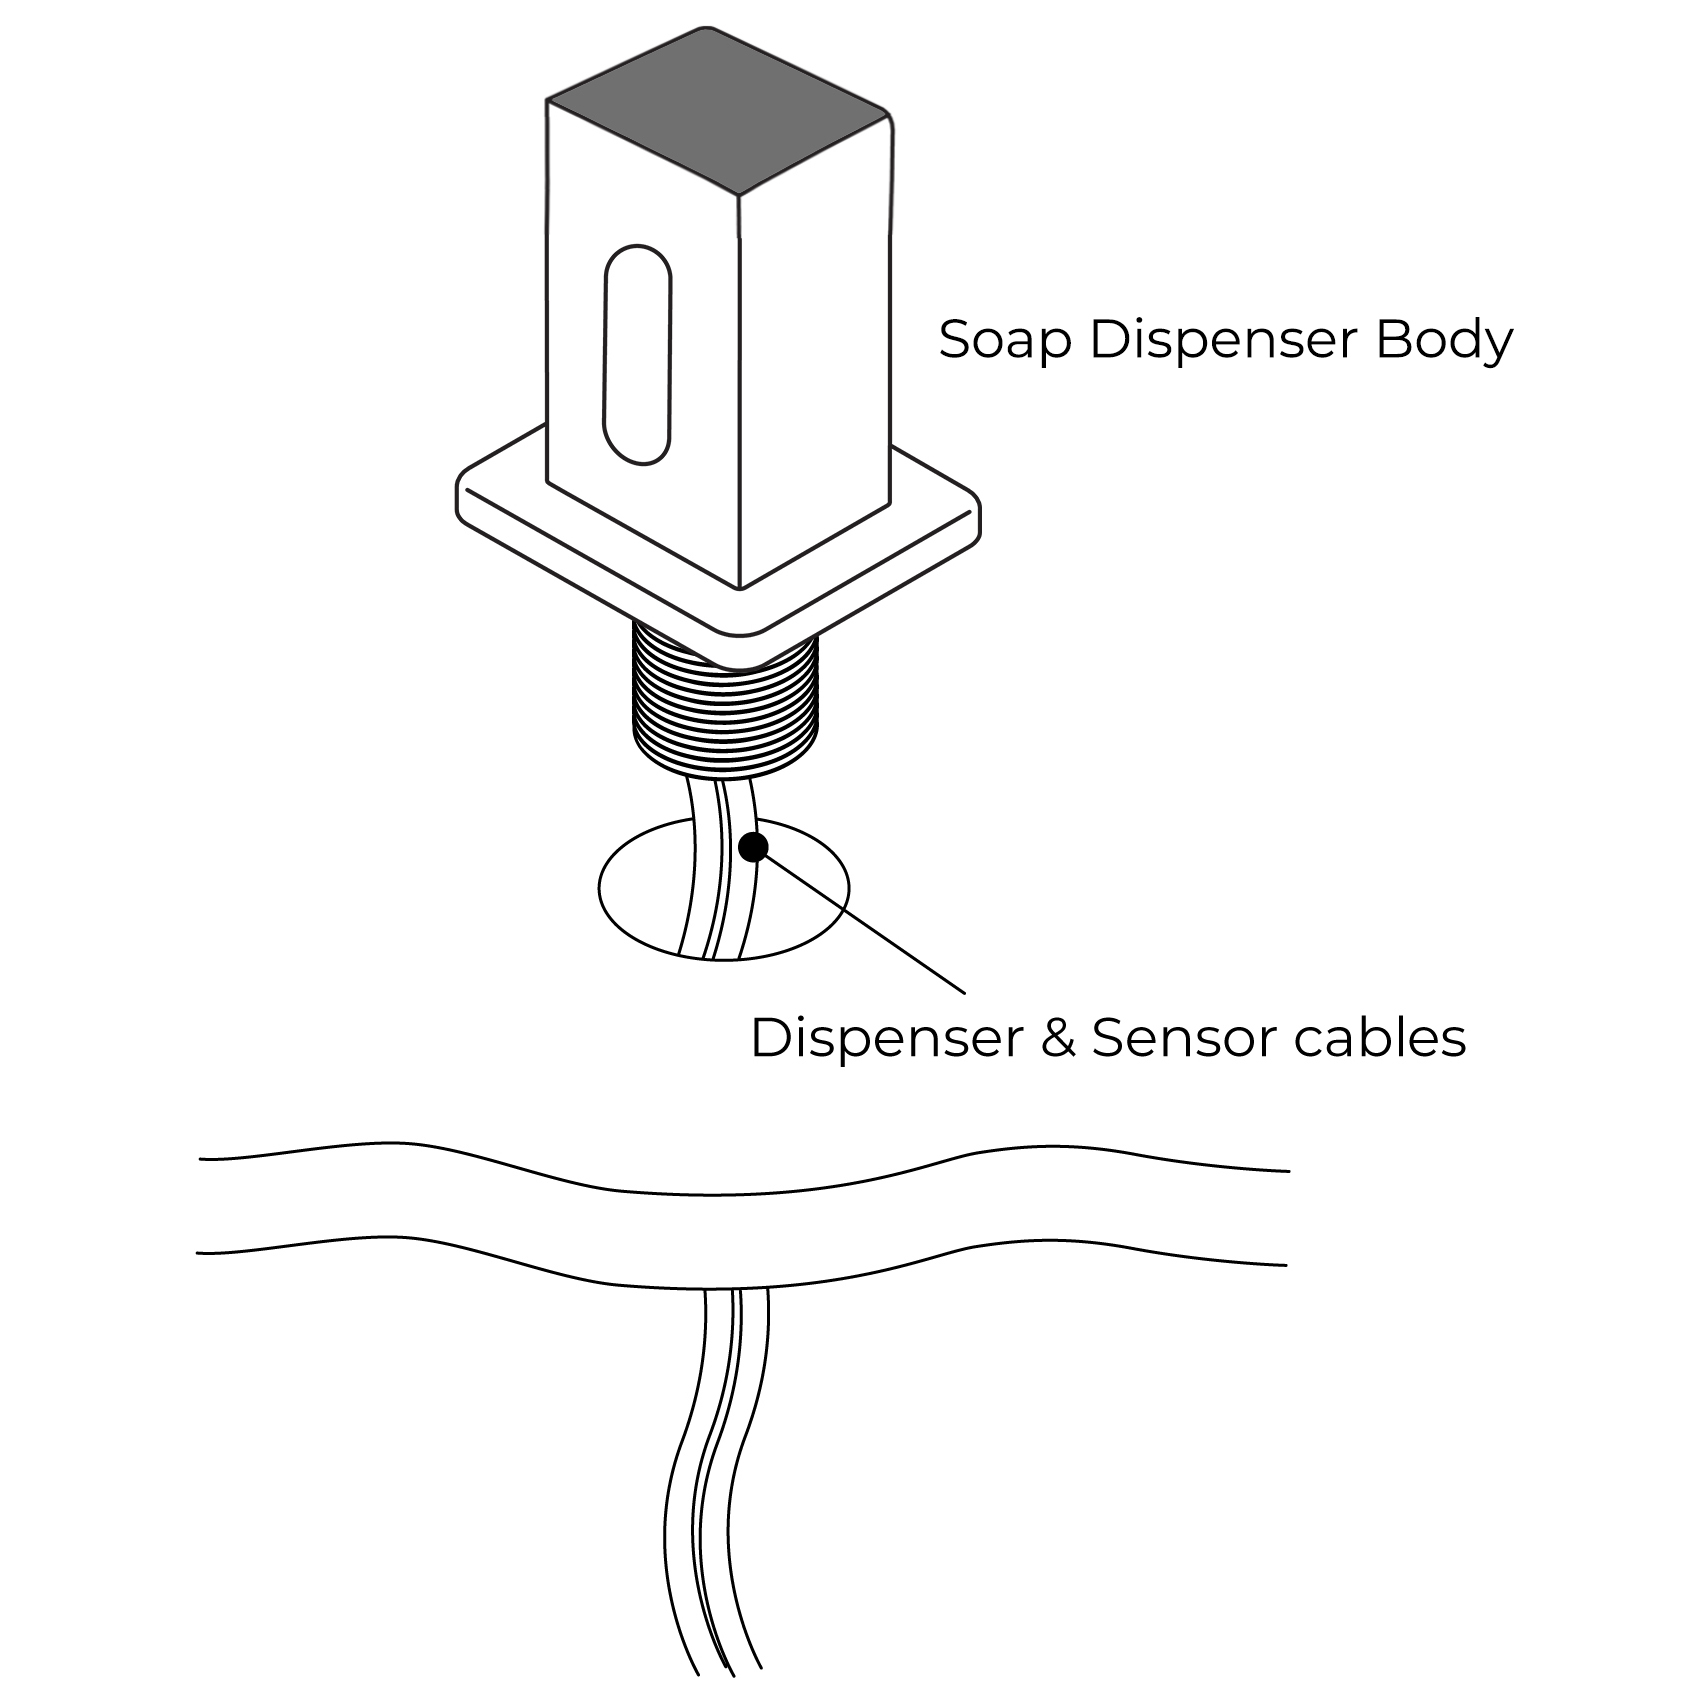
1. Fit The Spout
Fit the spout to the sink/basin ensuring the dispensing cable and sensor cable are threaded through the hole in the sink/basin.
2. Secure Spout to Sink / Basin
Screw the metal back nut onto the thread of the spout upto the underside of the sink/basin.
Tighten backnut using a suitable spanner.
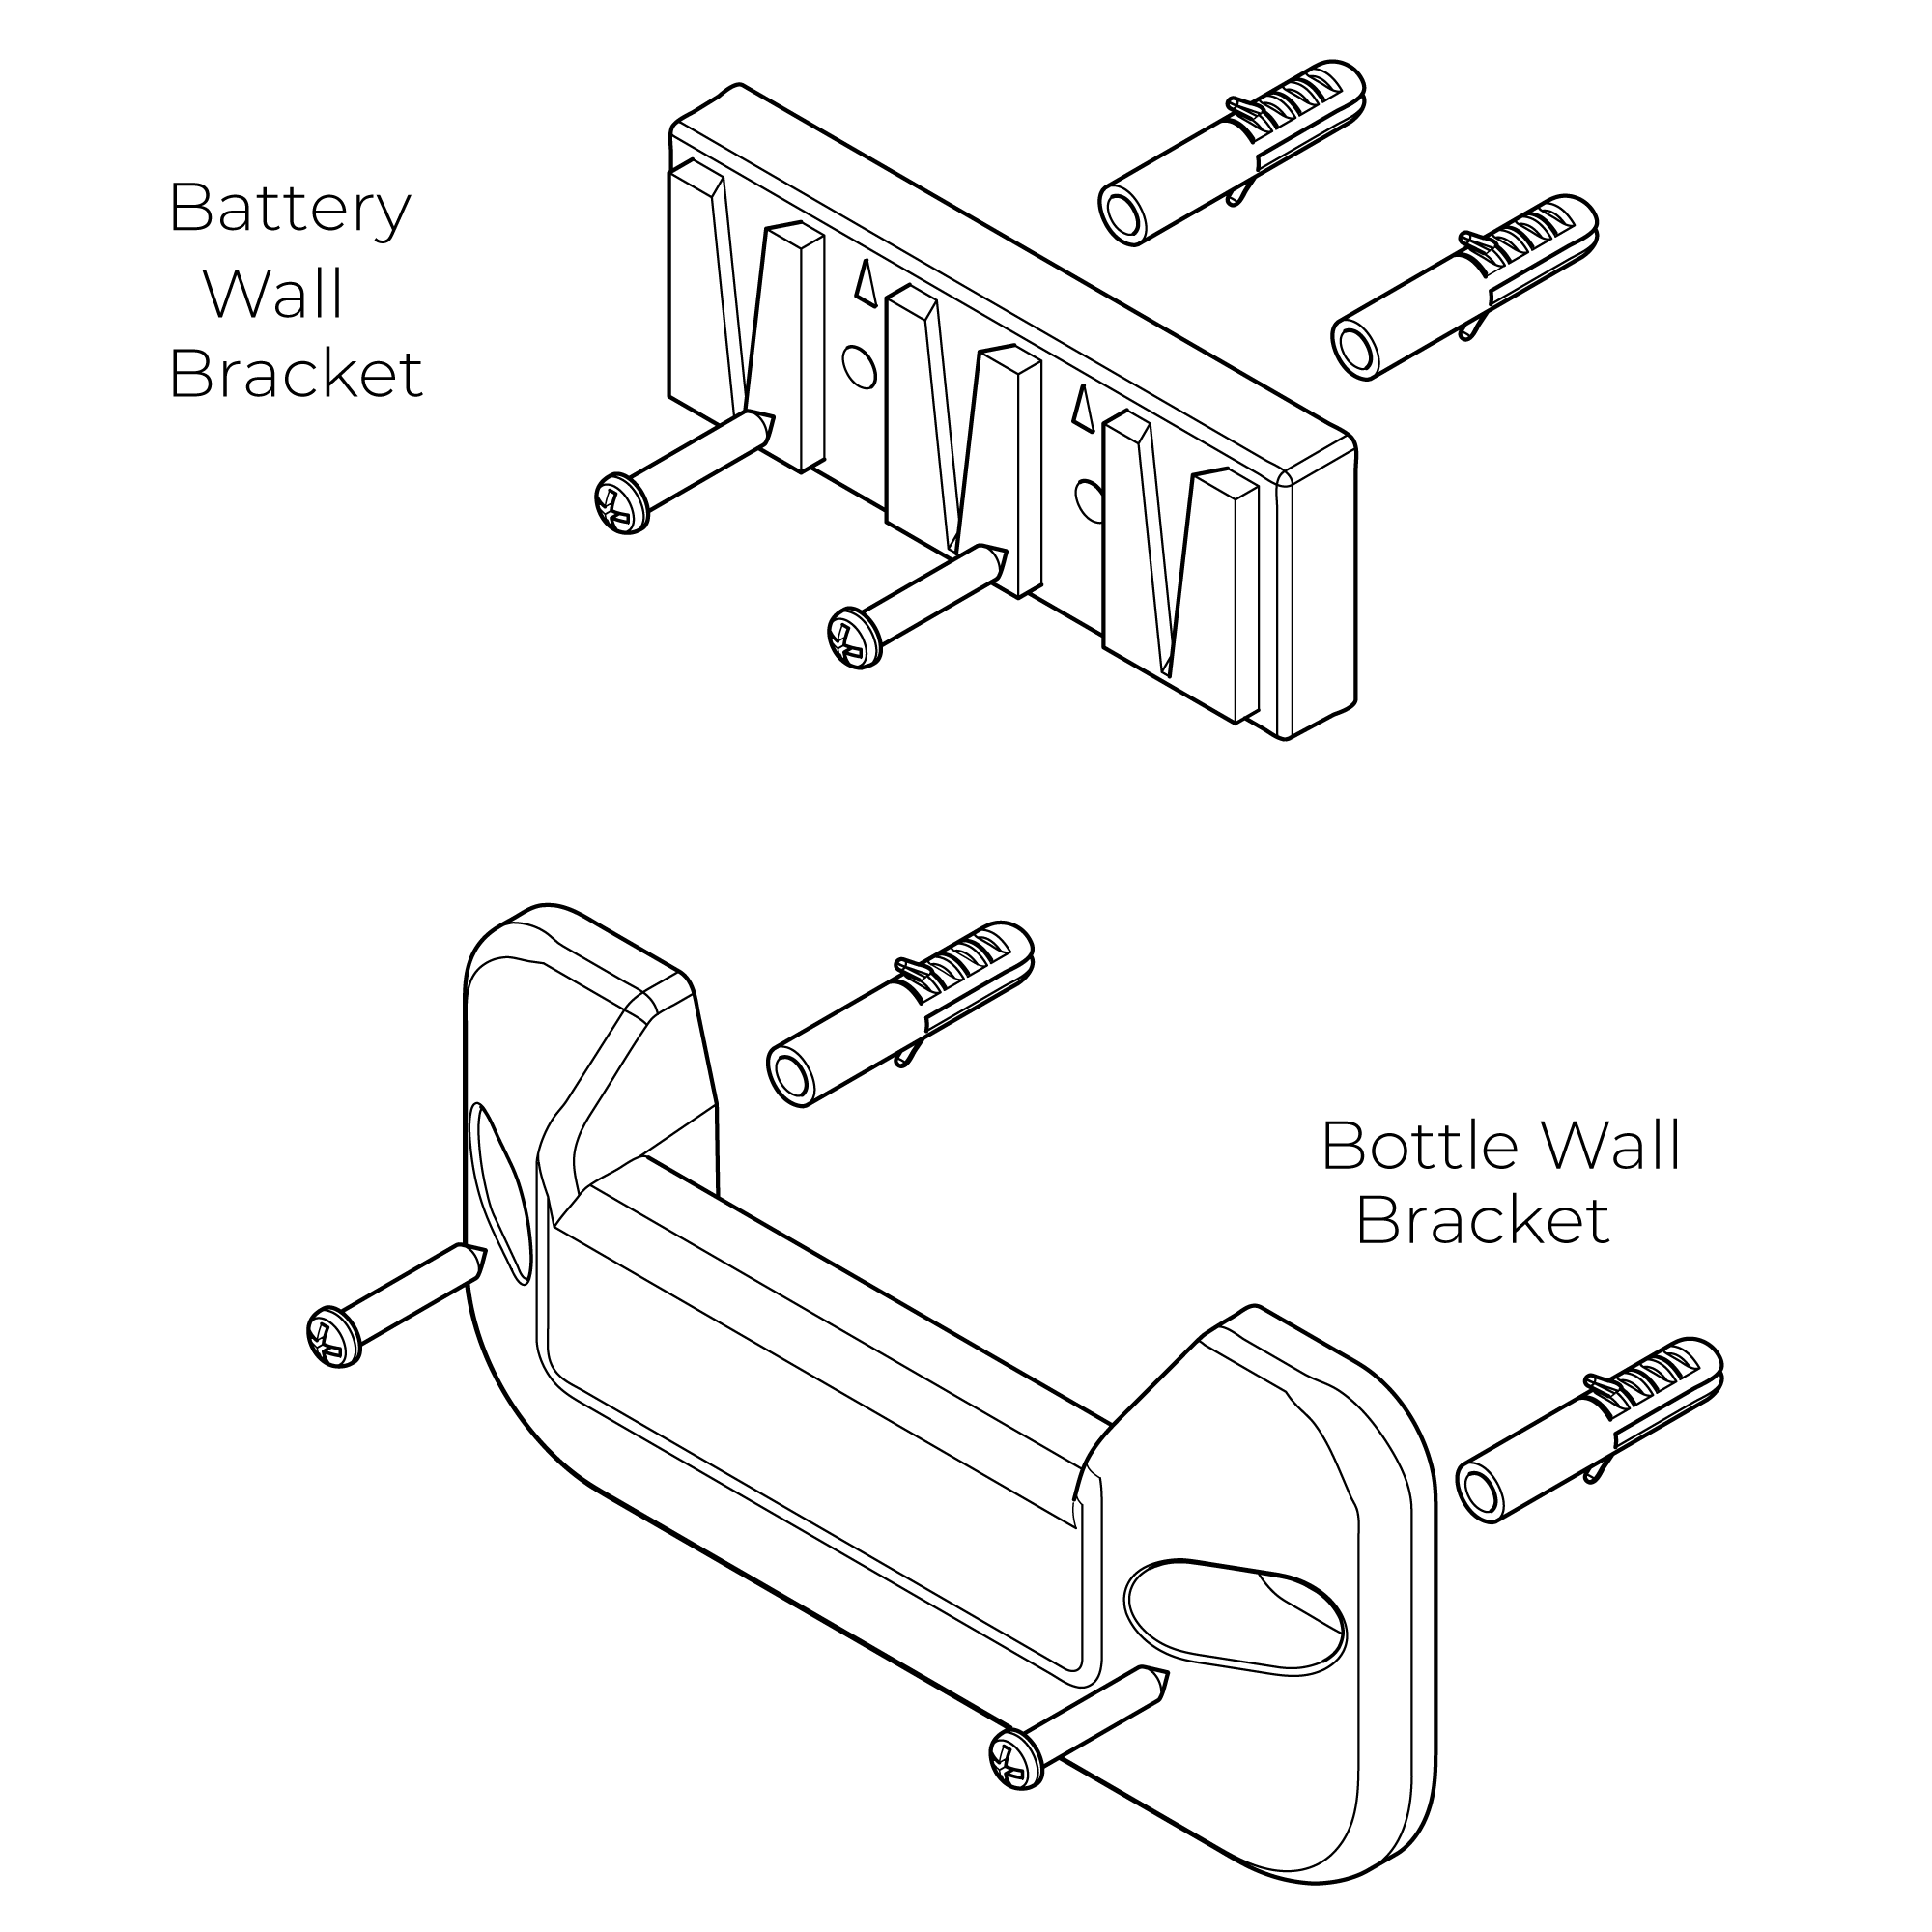
3. Fit Wall Brackets
Position the brackets onto the wall surface and mark the position of the fixing holes.
Remove the brackets and drill suitable holes for the wall plugs supplied.
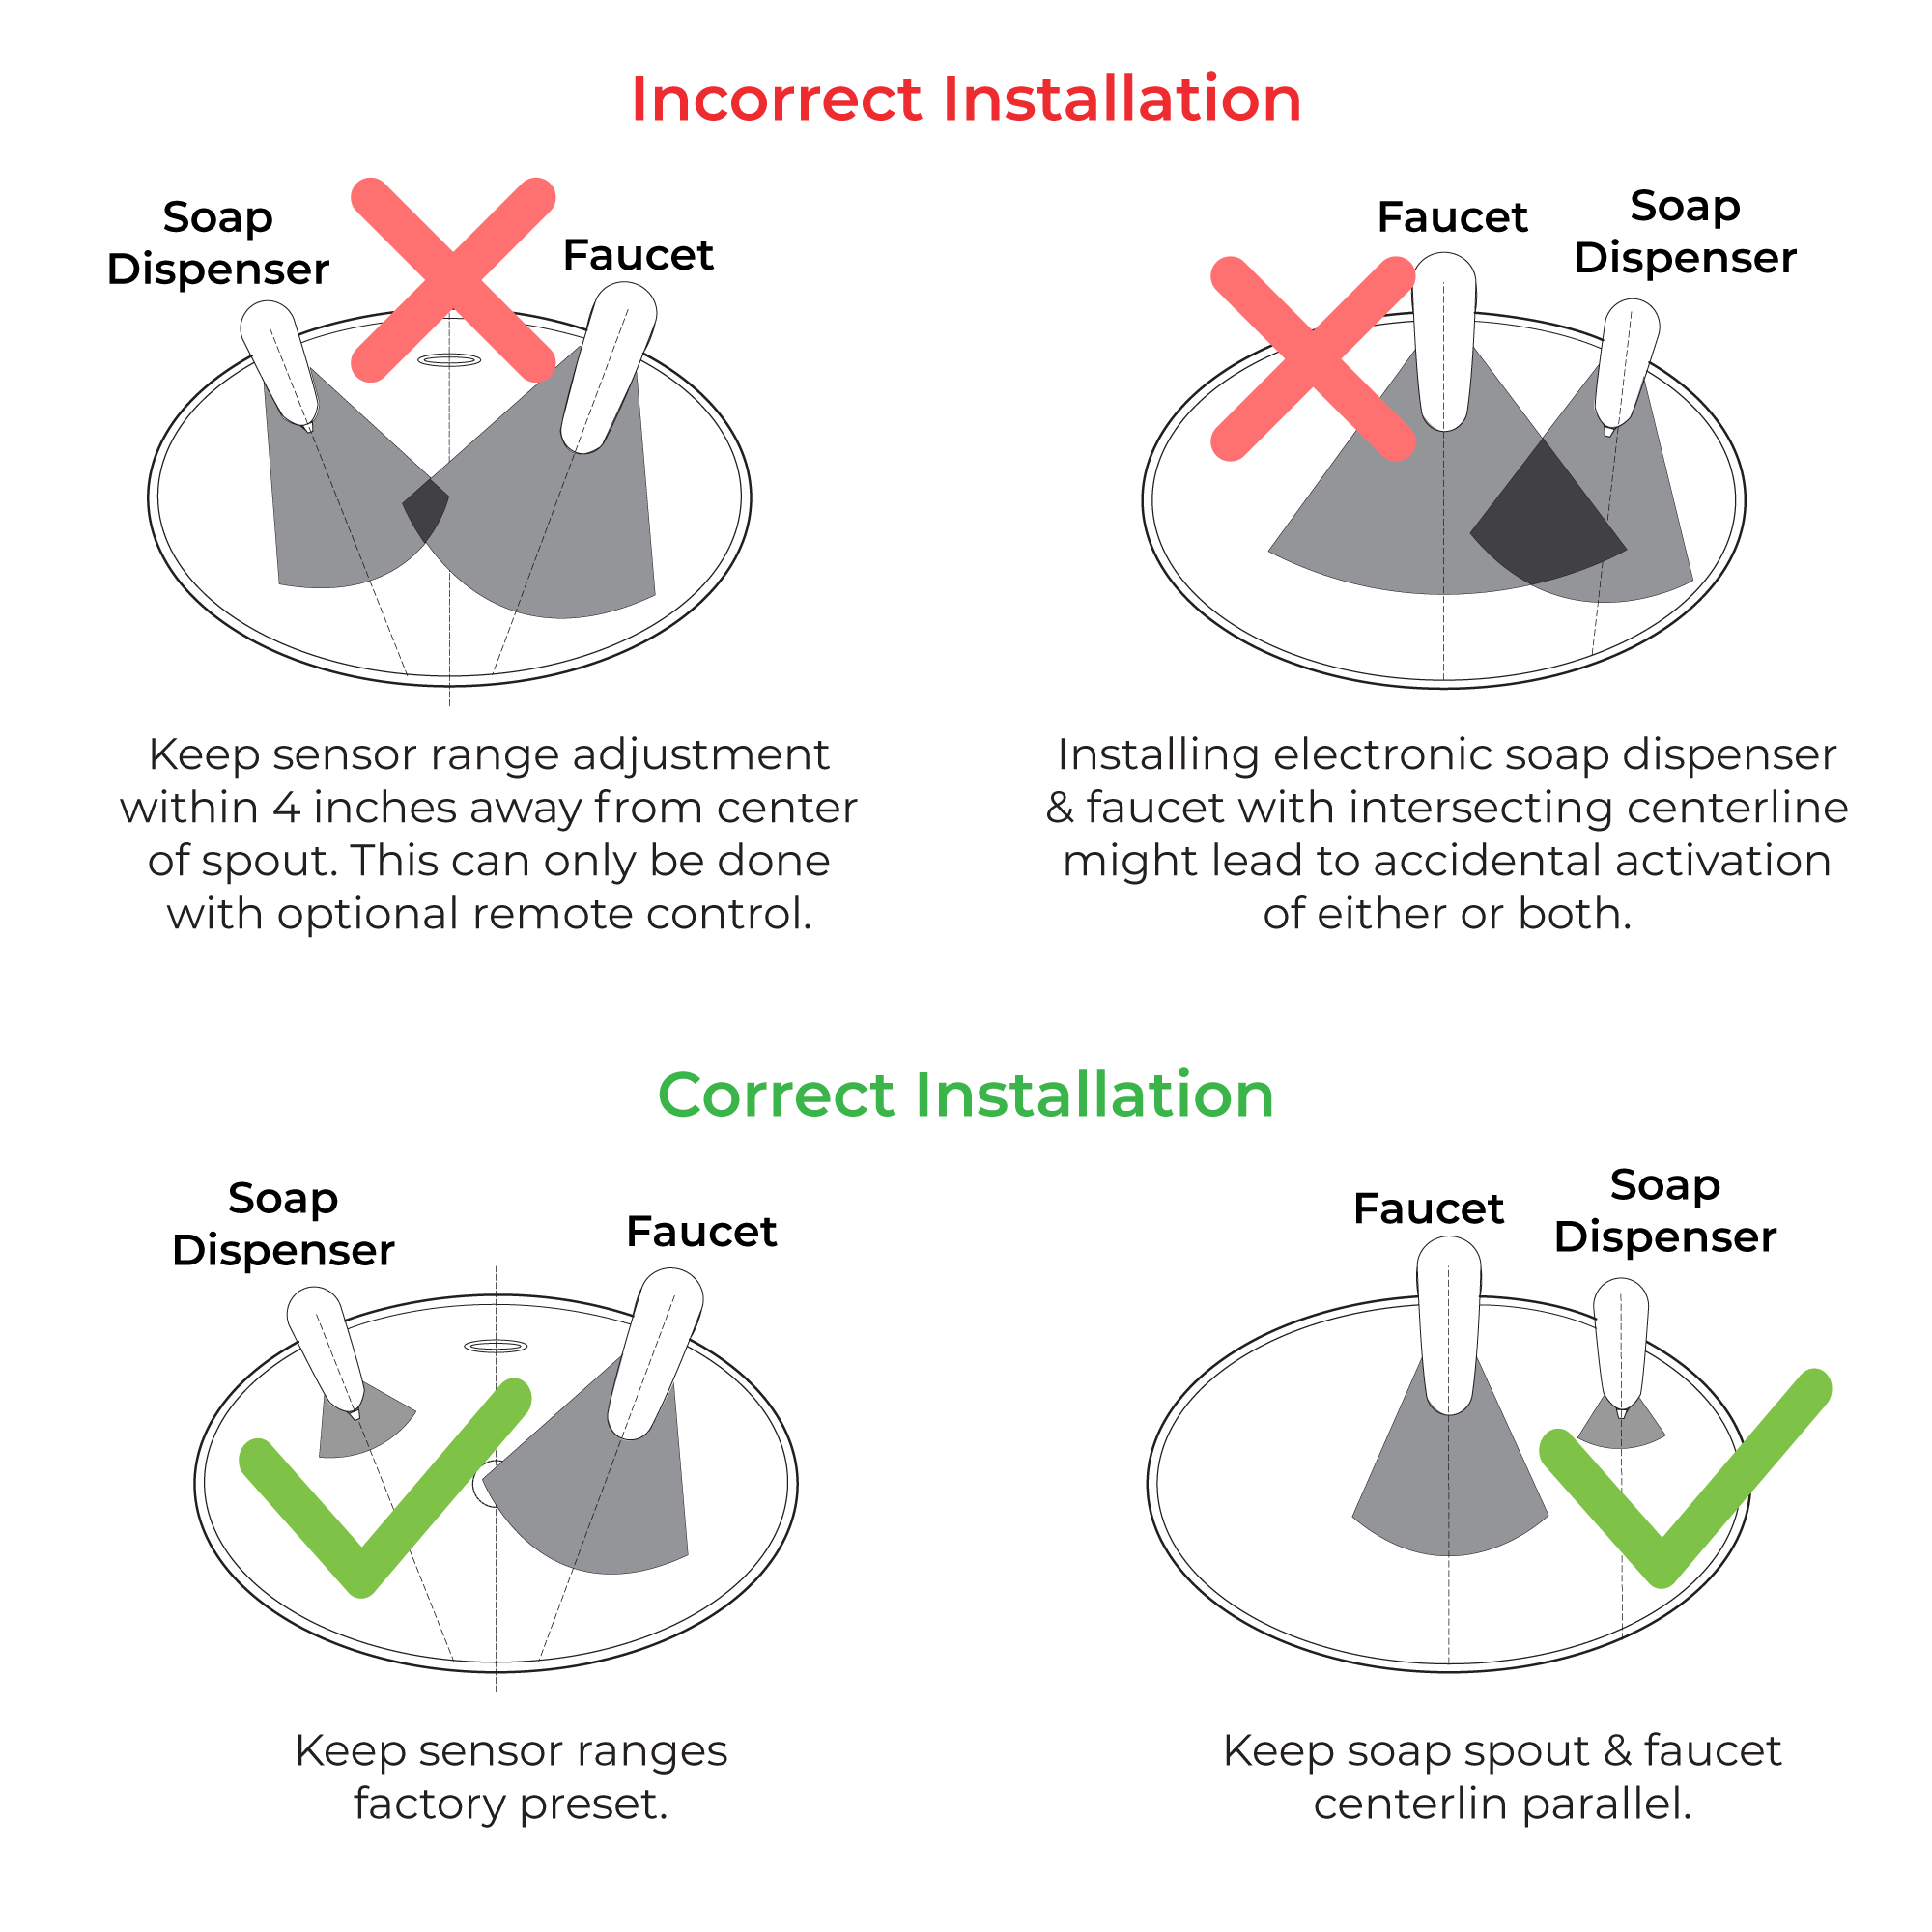
Before drilling into walls, check that there are no hidden electrical wires, cables or water supply pipes. This can be checked with the aid of an electrical detector:
If power tools are used do not forget to:
- Wear eye protection
- Unplug equipment after use
Fit the wall plugs and position the brackets into position and secure using the screws provided.
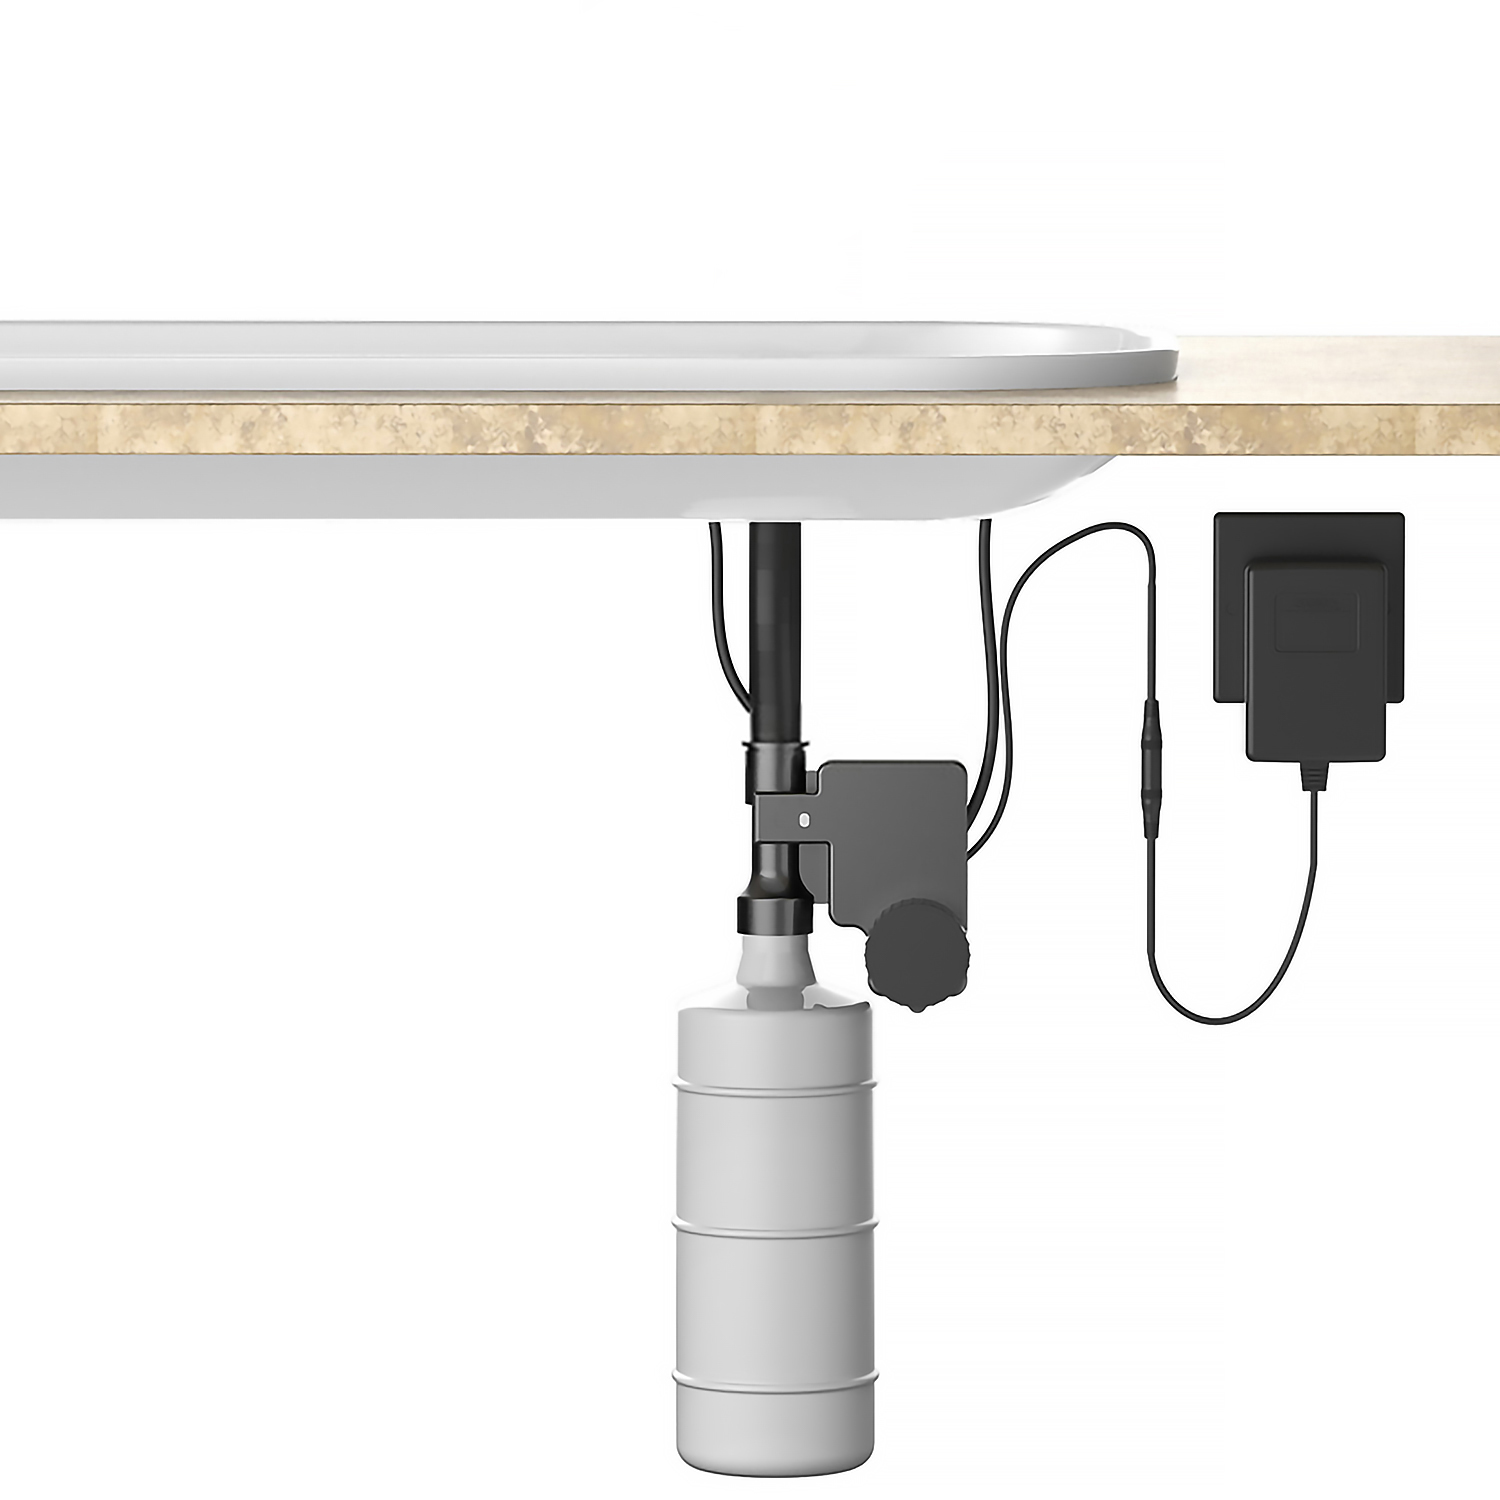
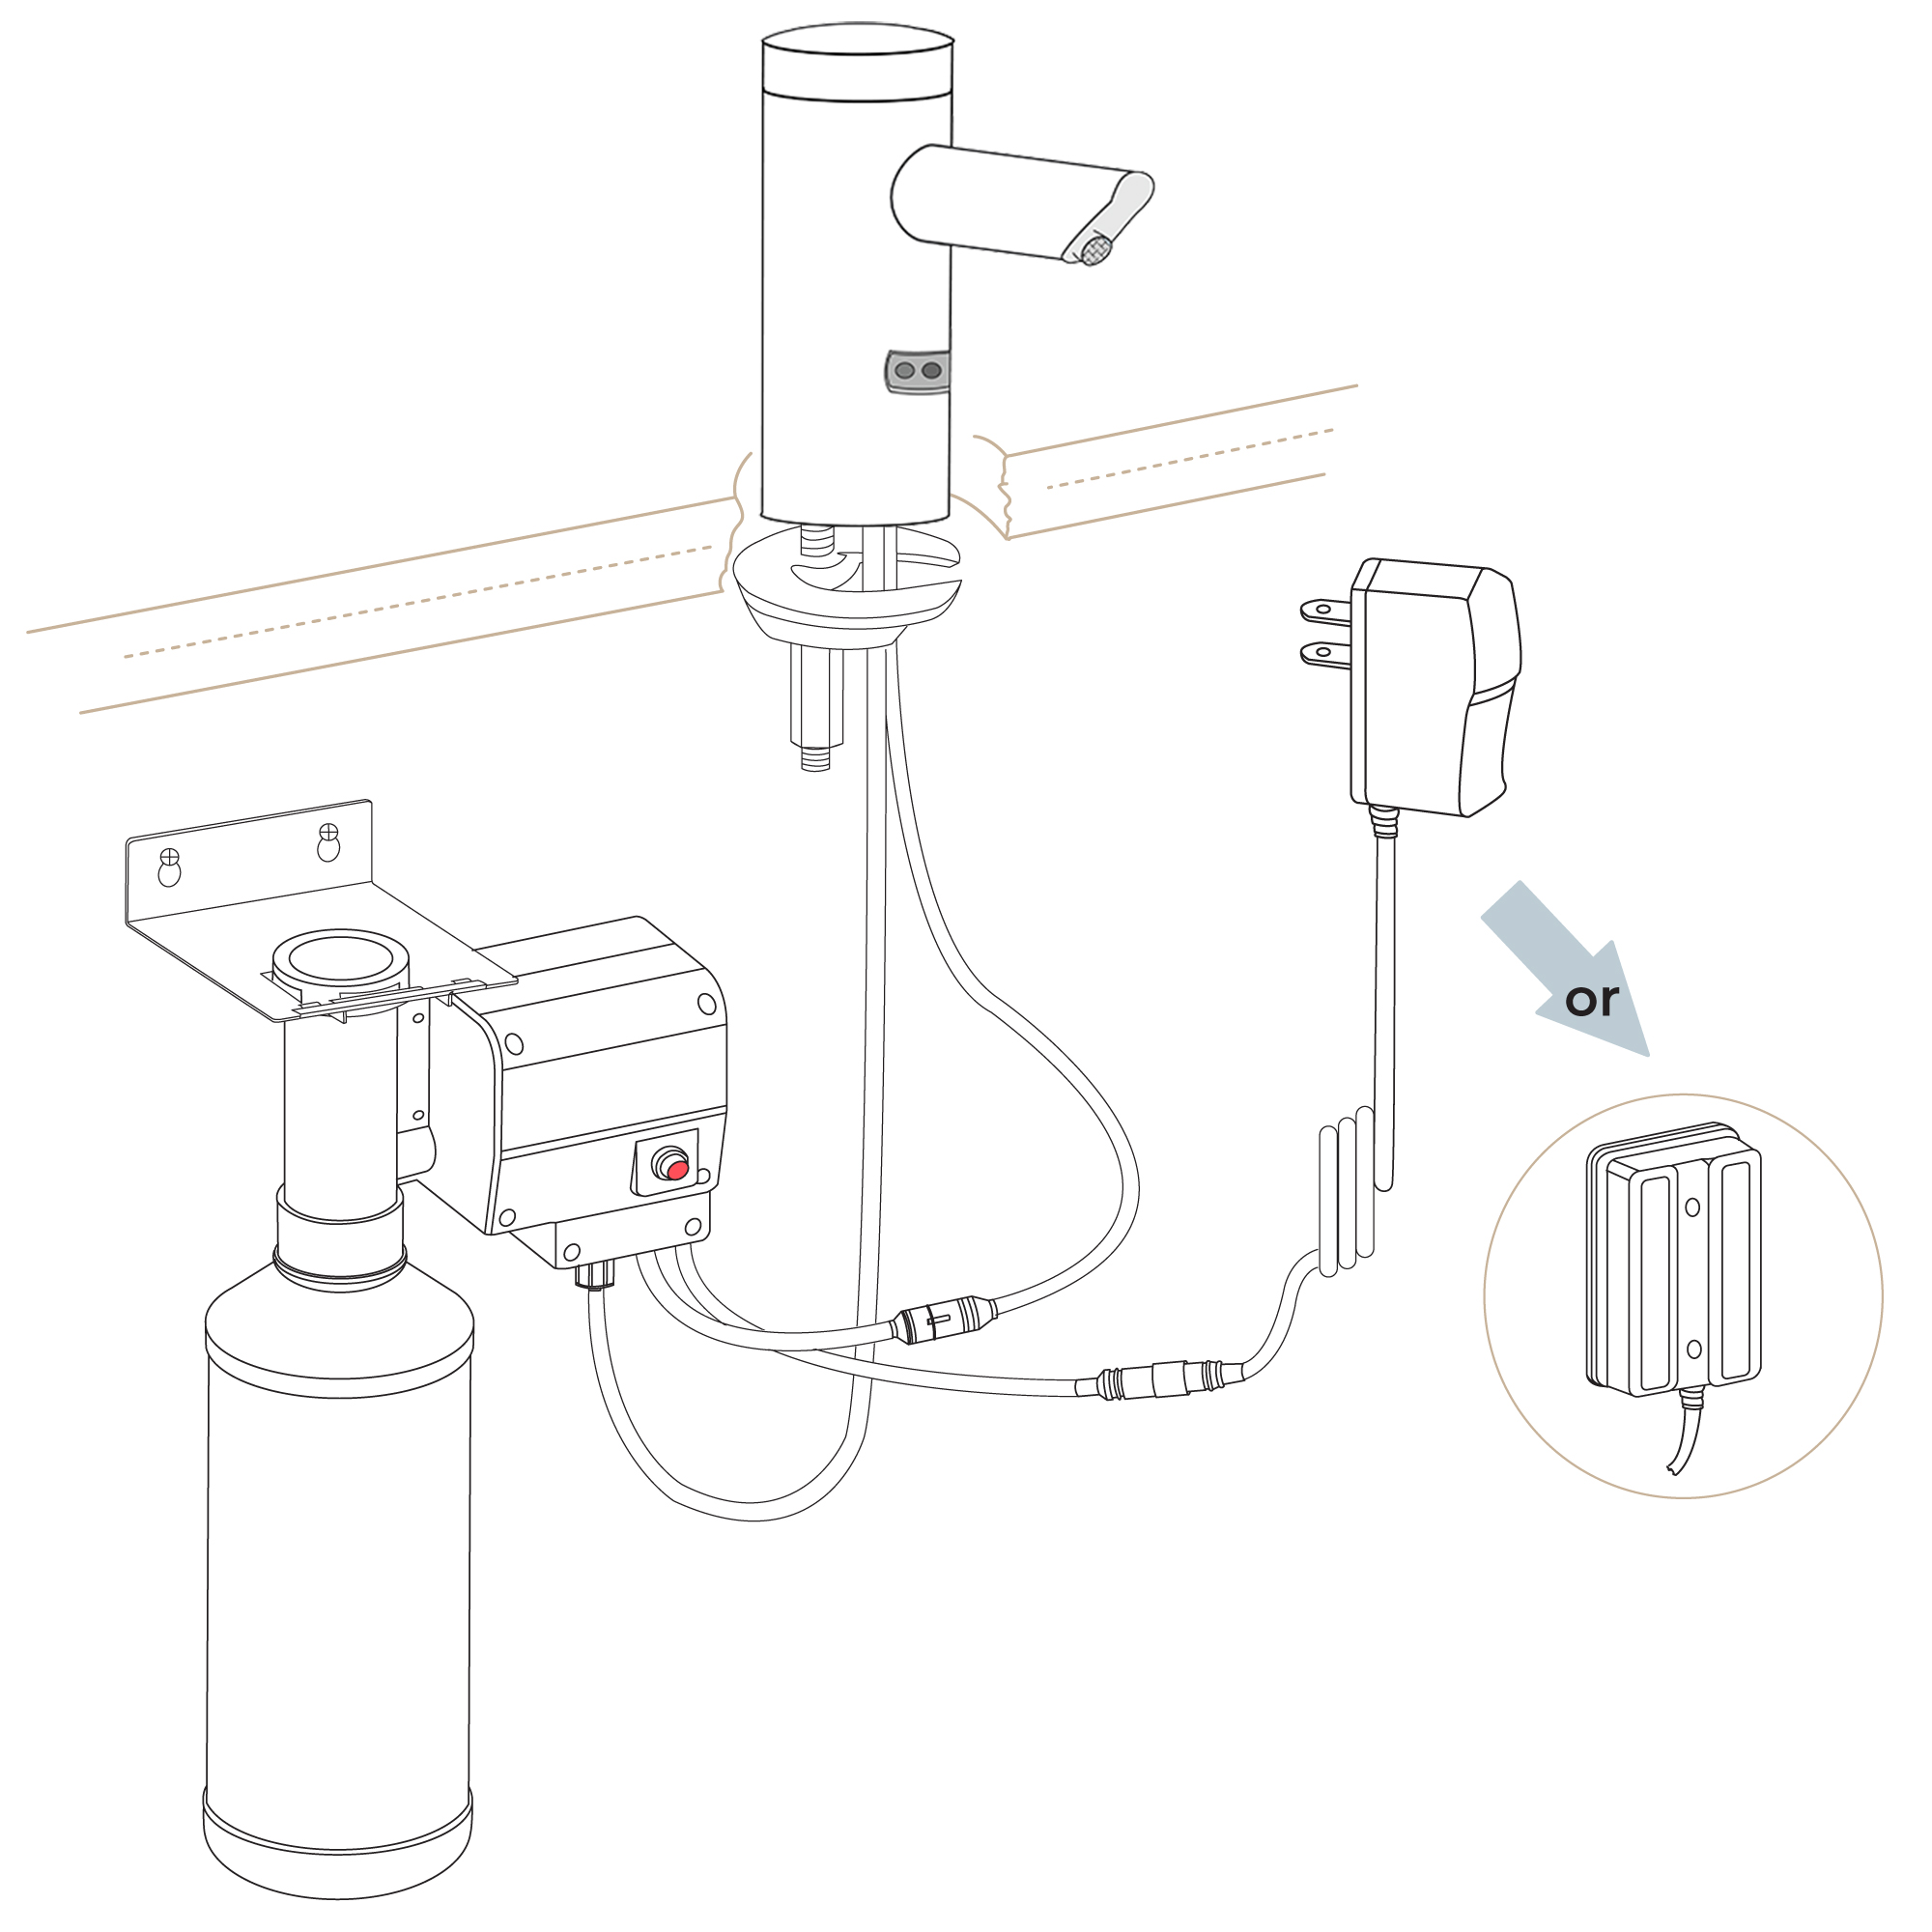
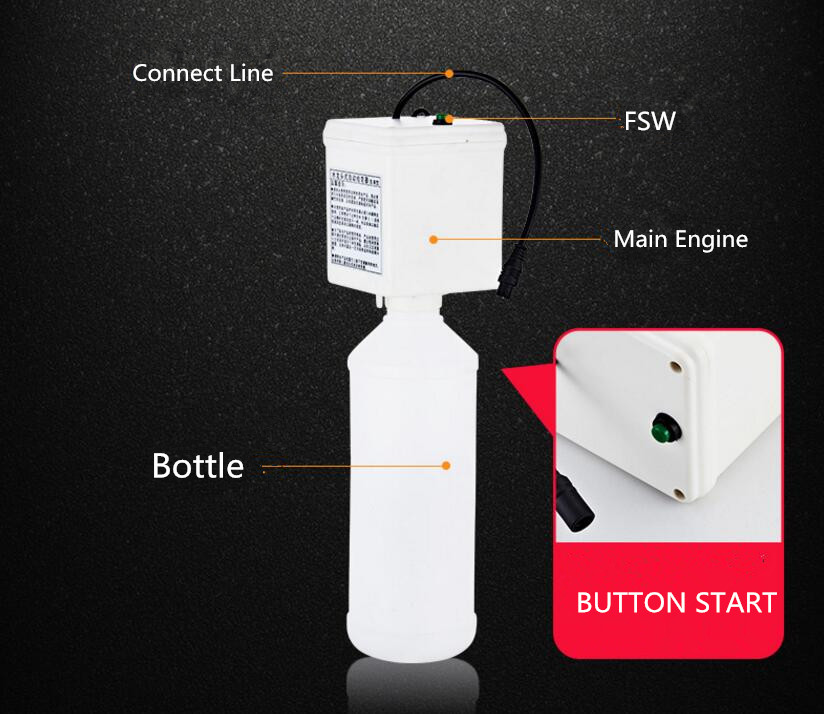
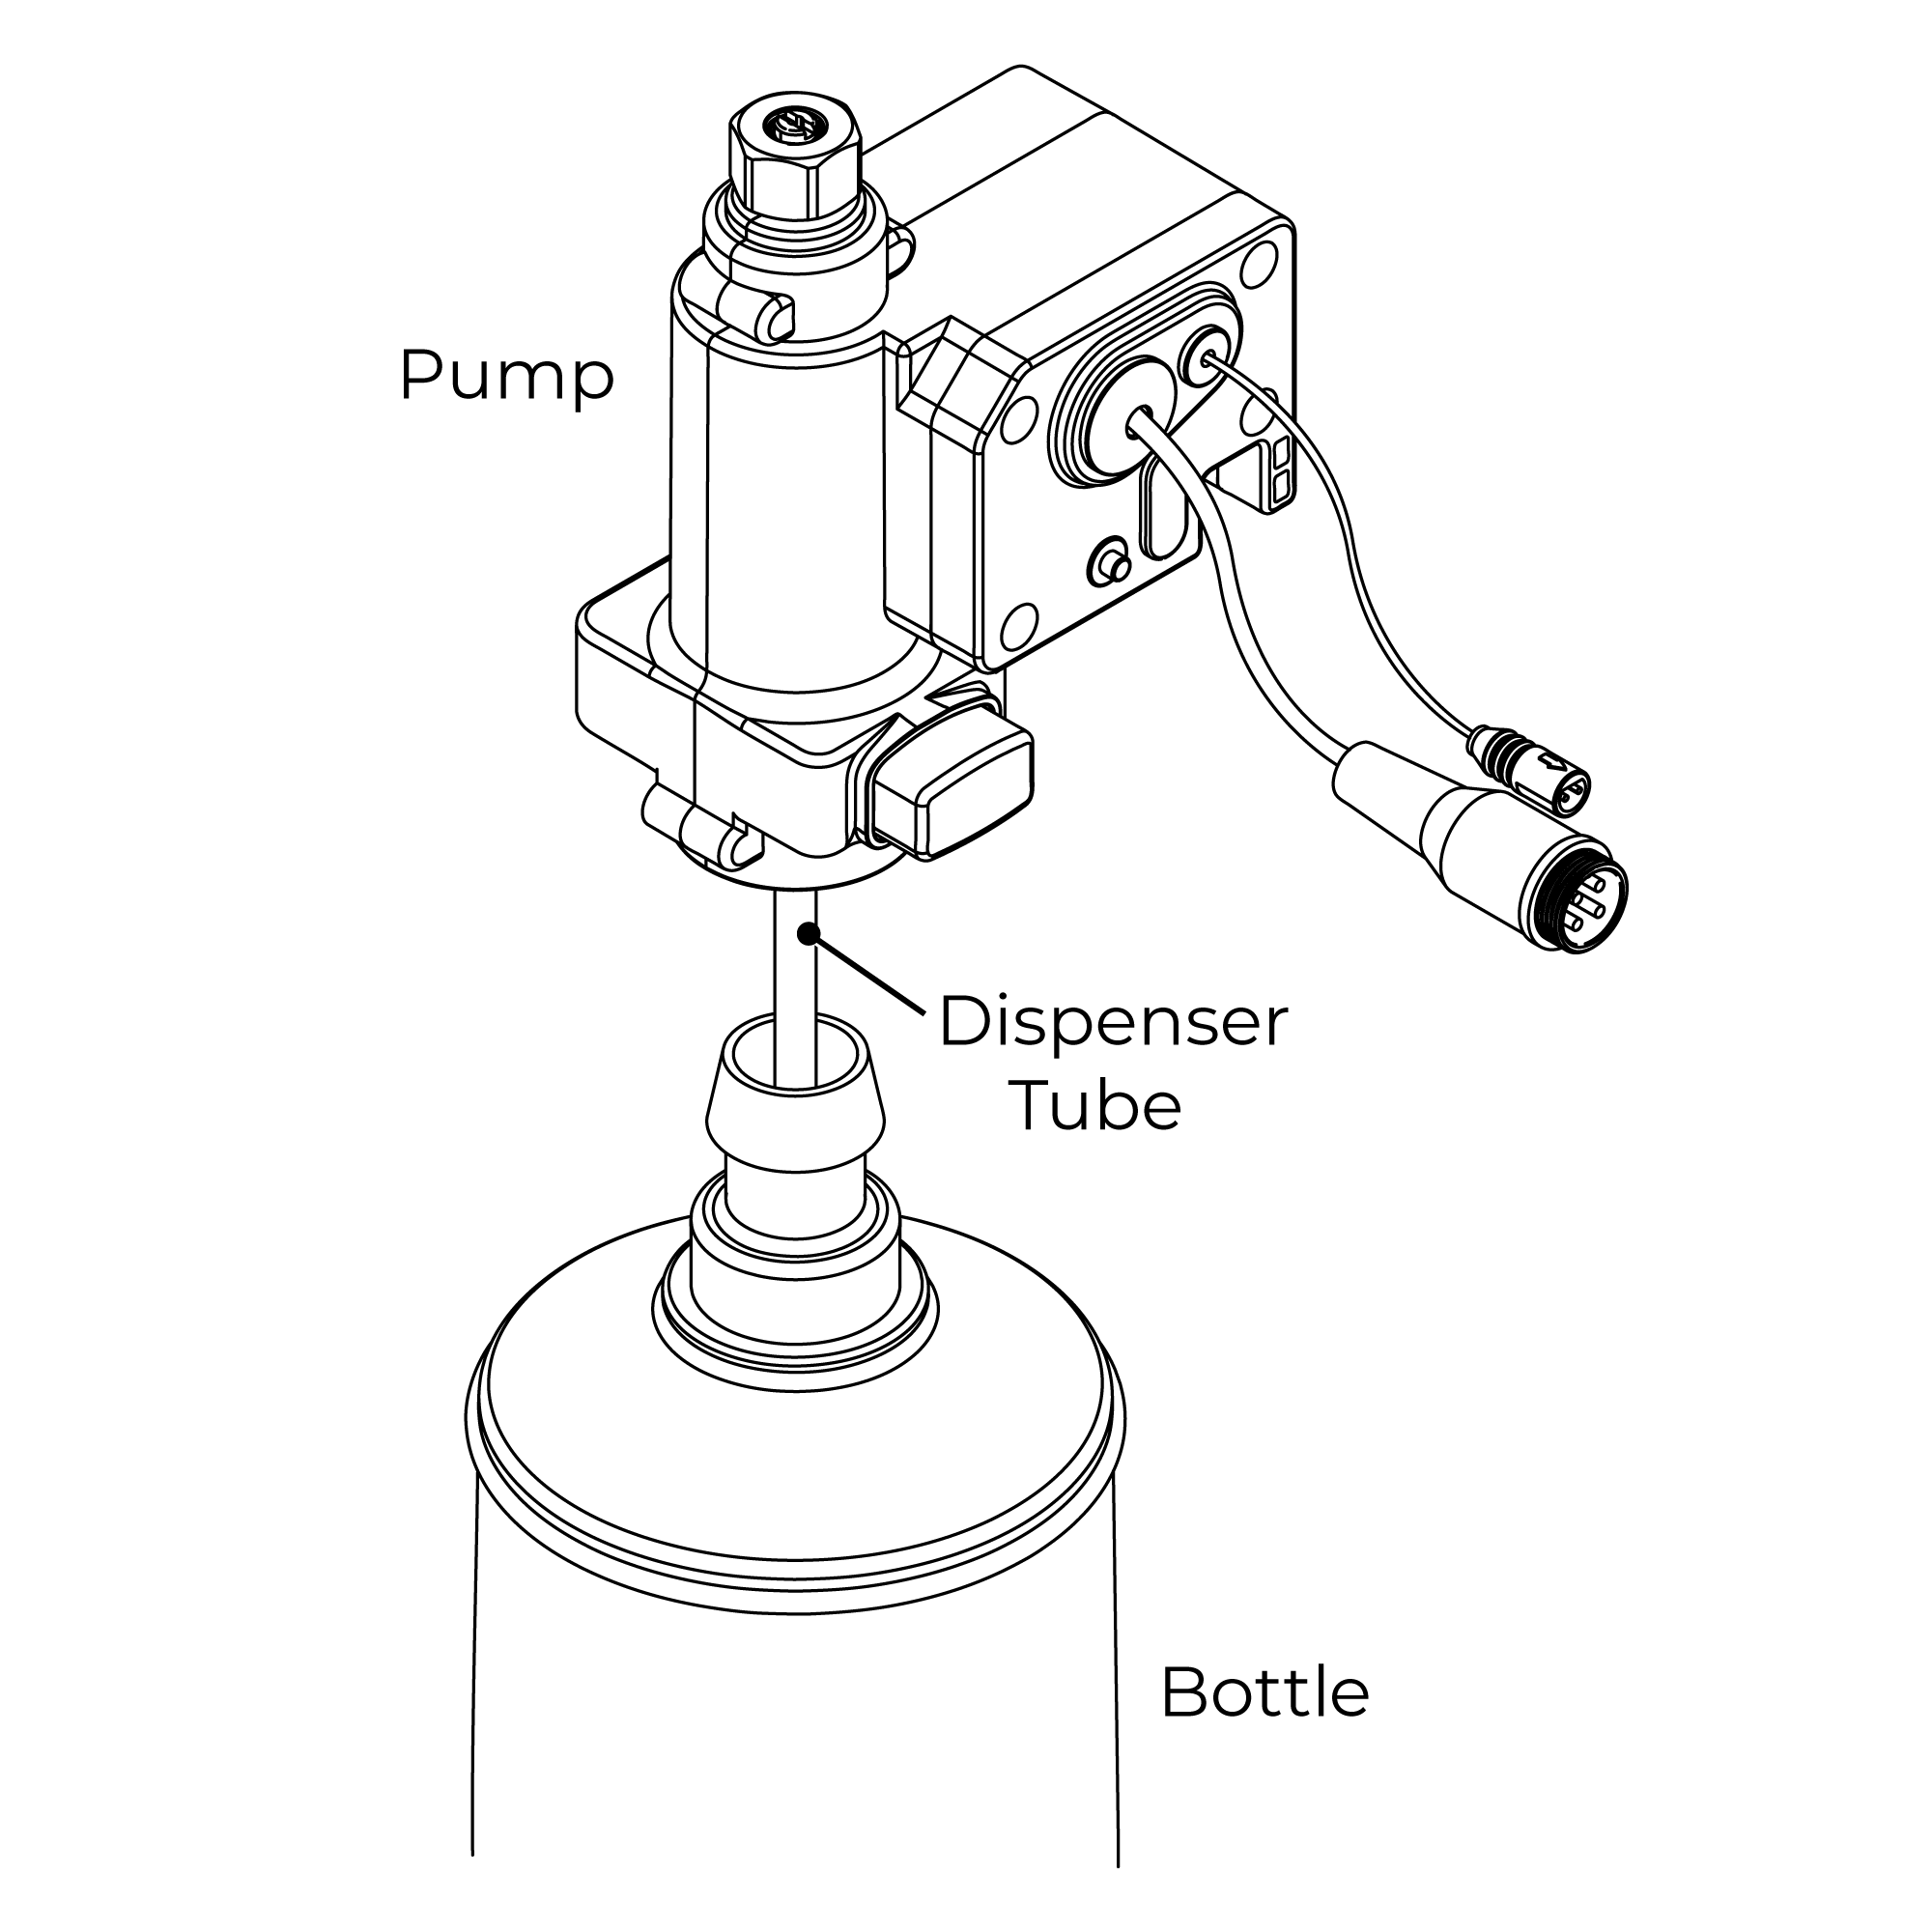
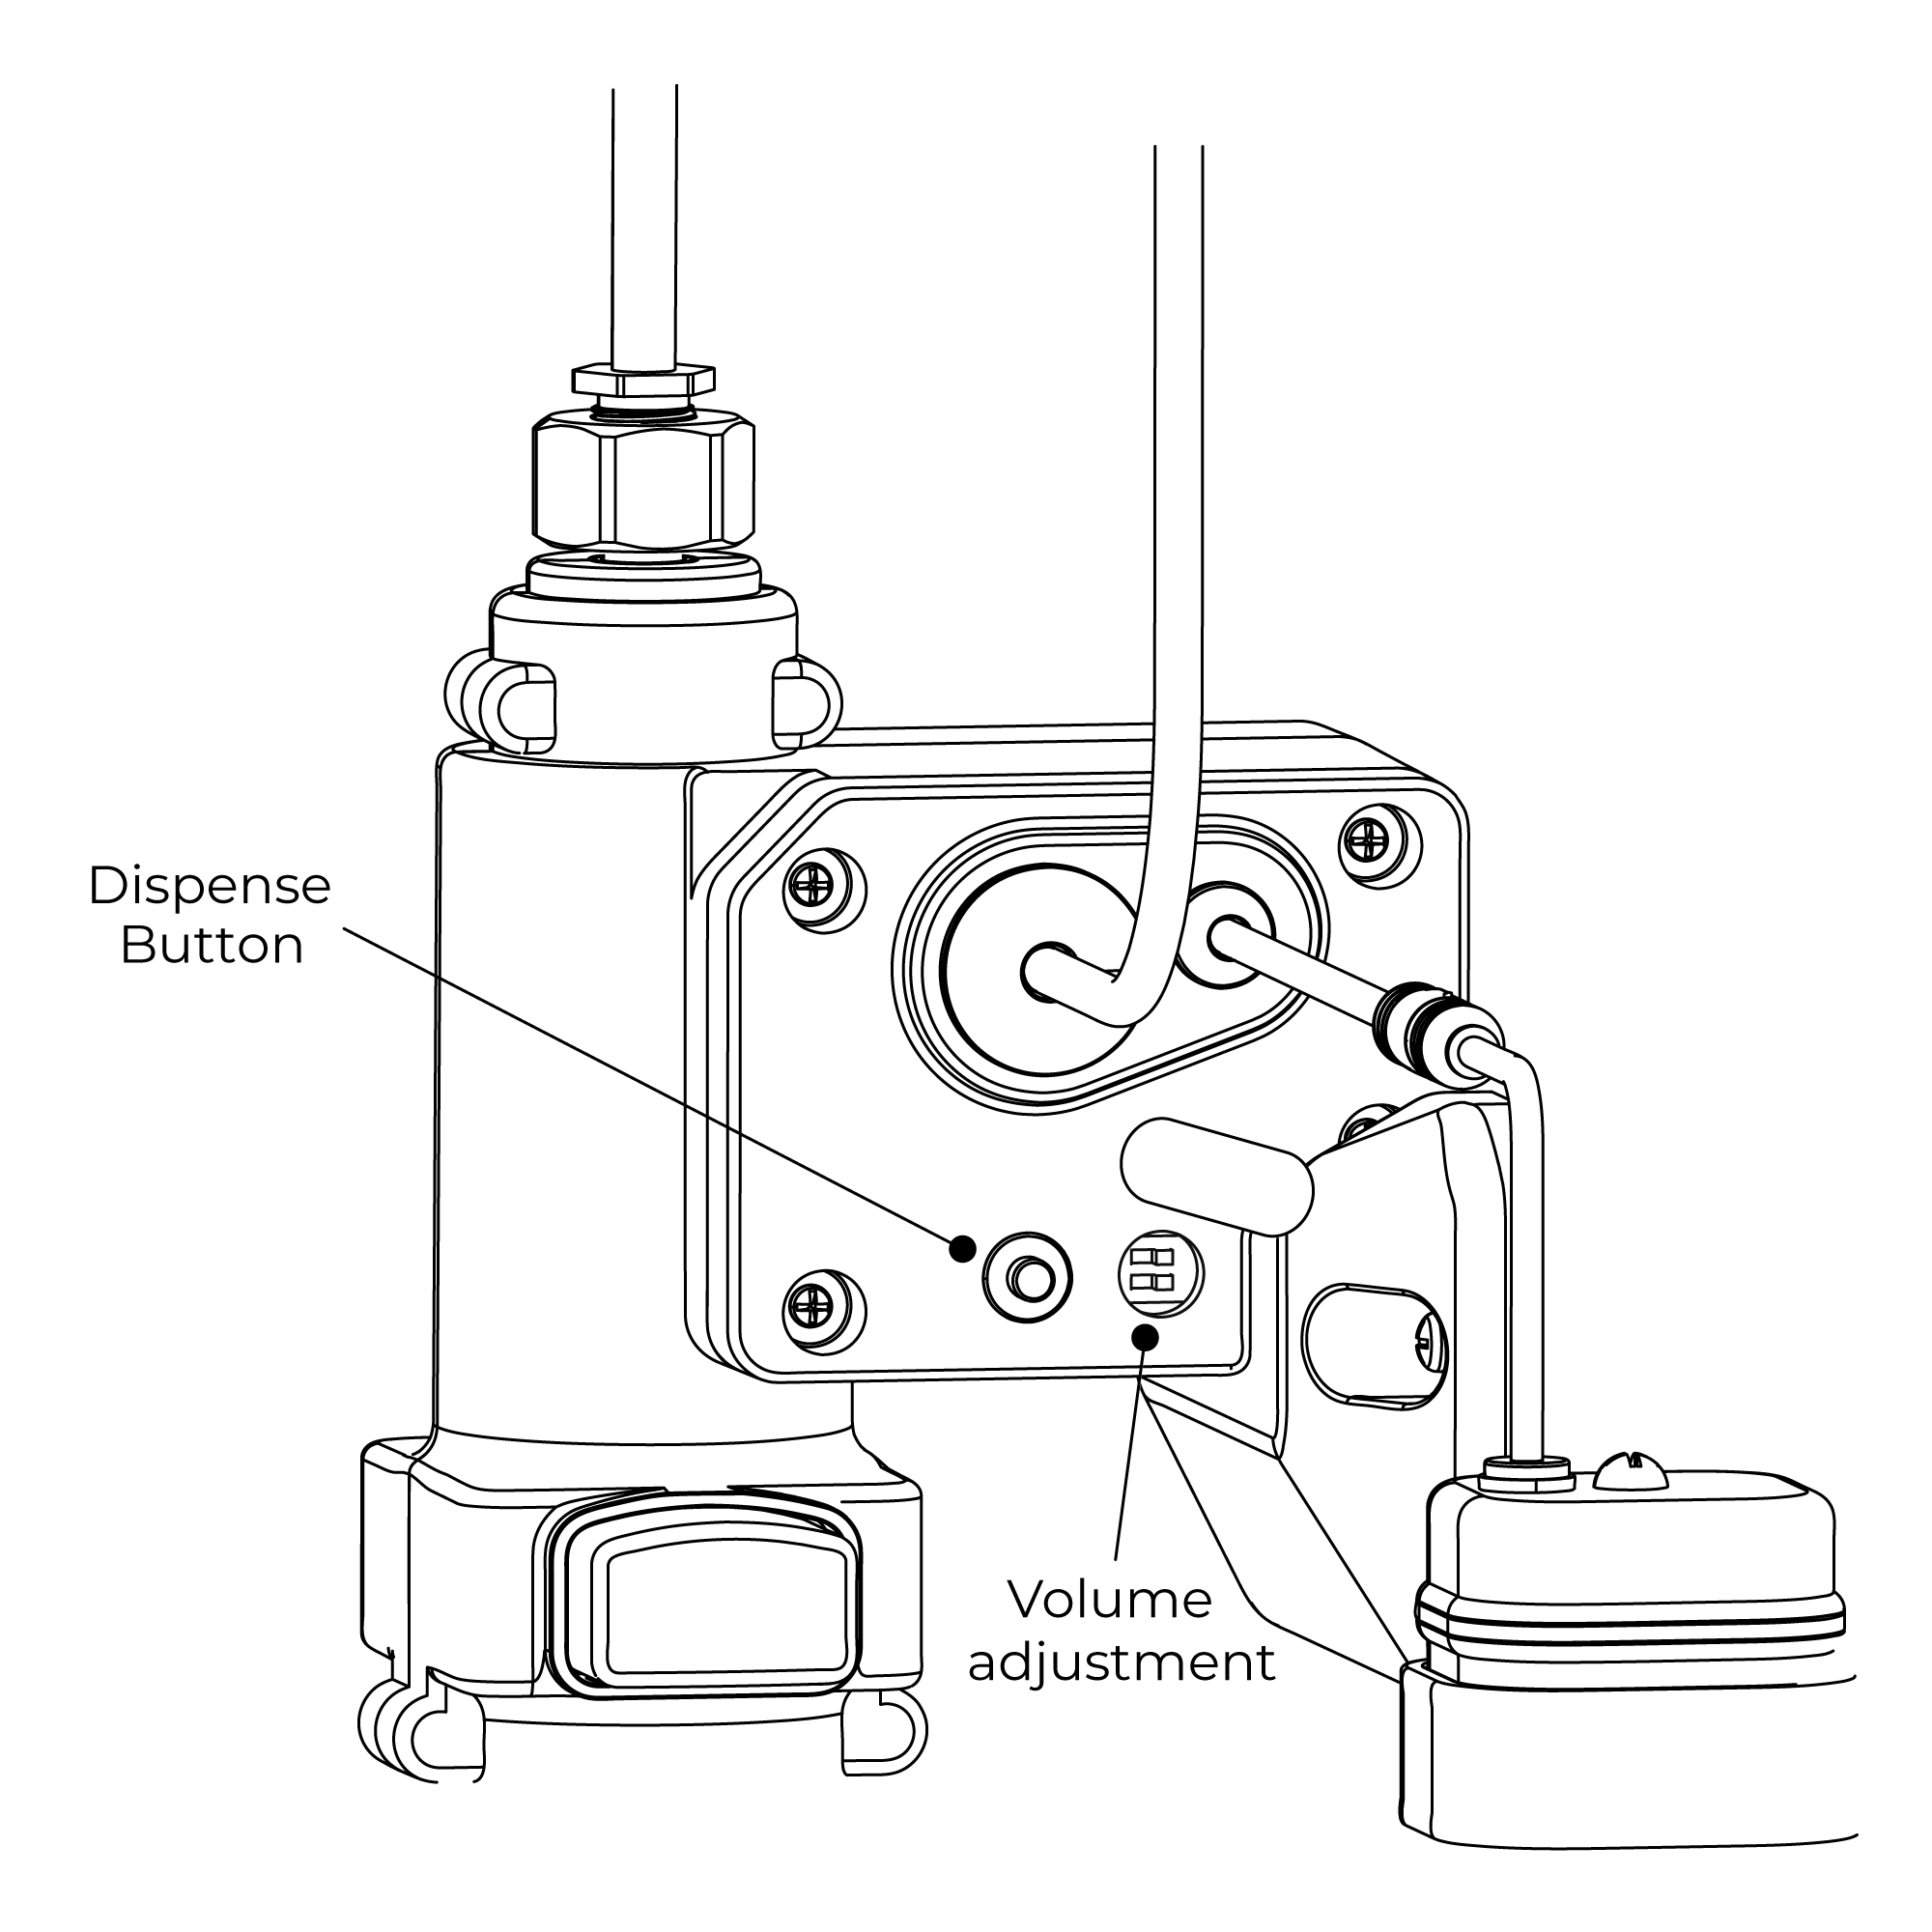
4. Attach Pump to Bottle
Ensure the dispenser tube is located inside the bottle and push the pump down firmly onto the bottle until a loud ‘click’ is heard.
To remove the pump from the bottle press the release button in on the side of the pump and pull the pump from the bottle.
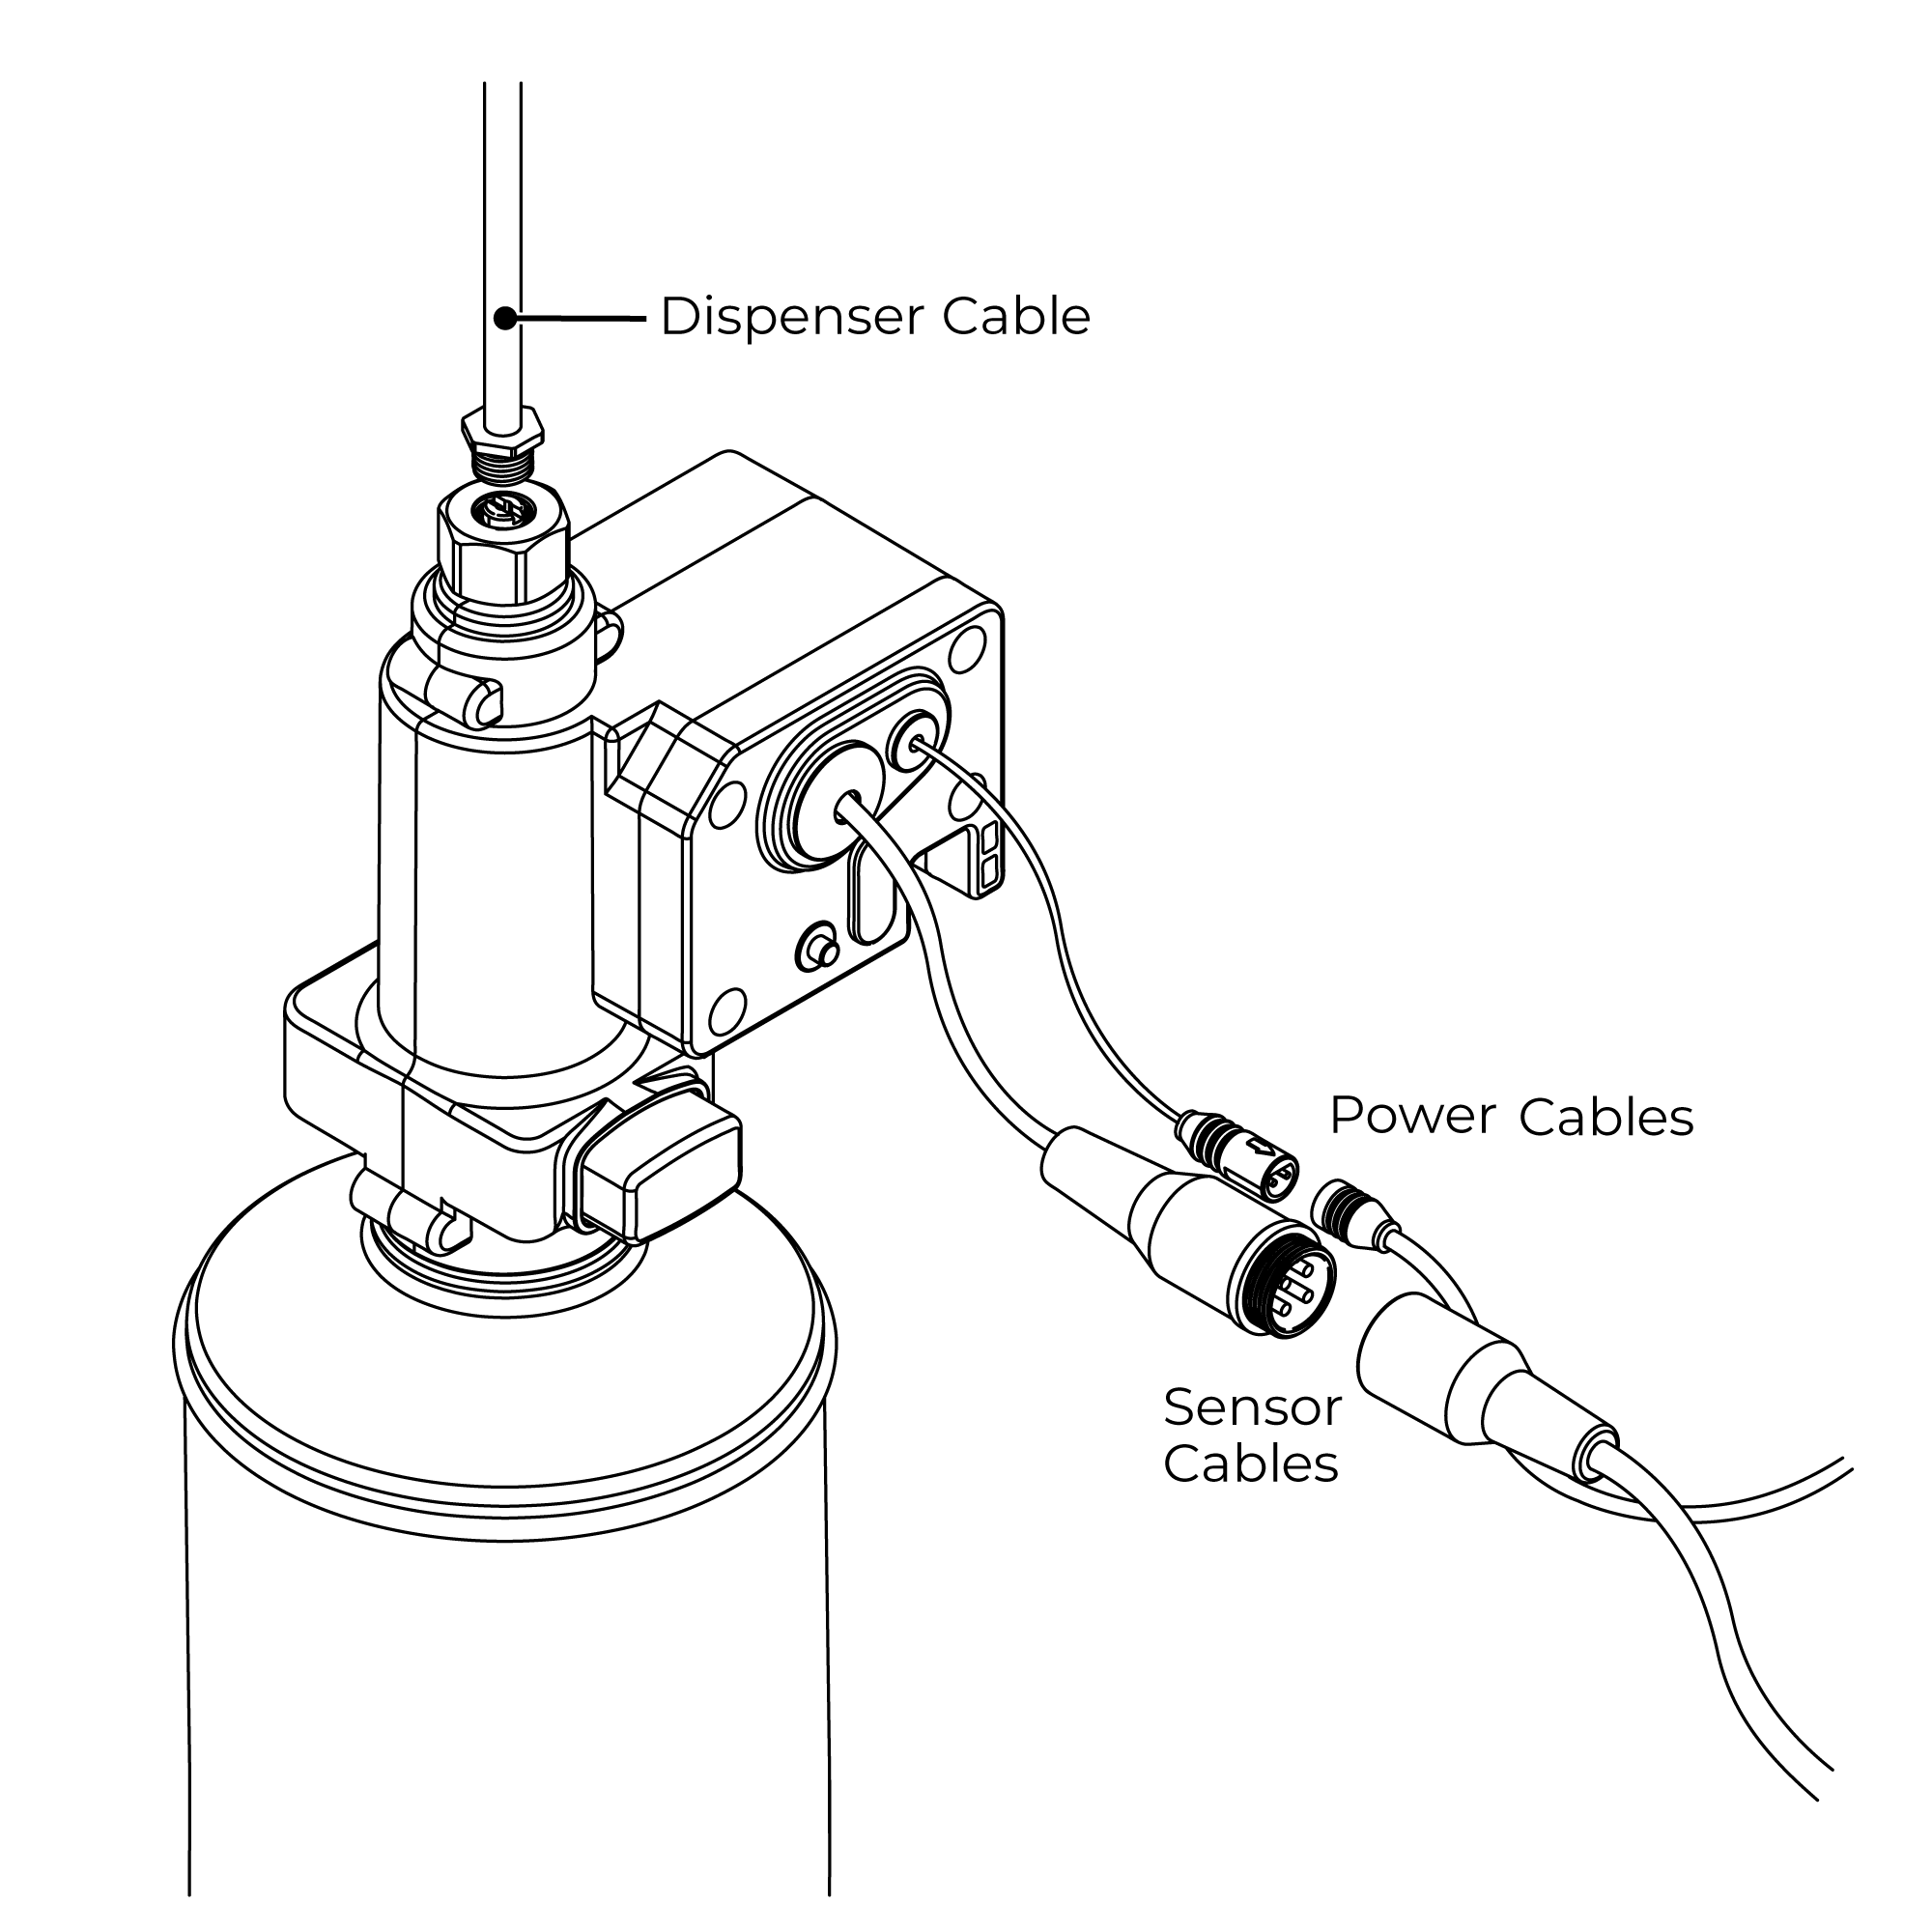
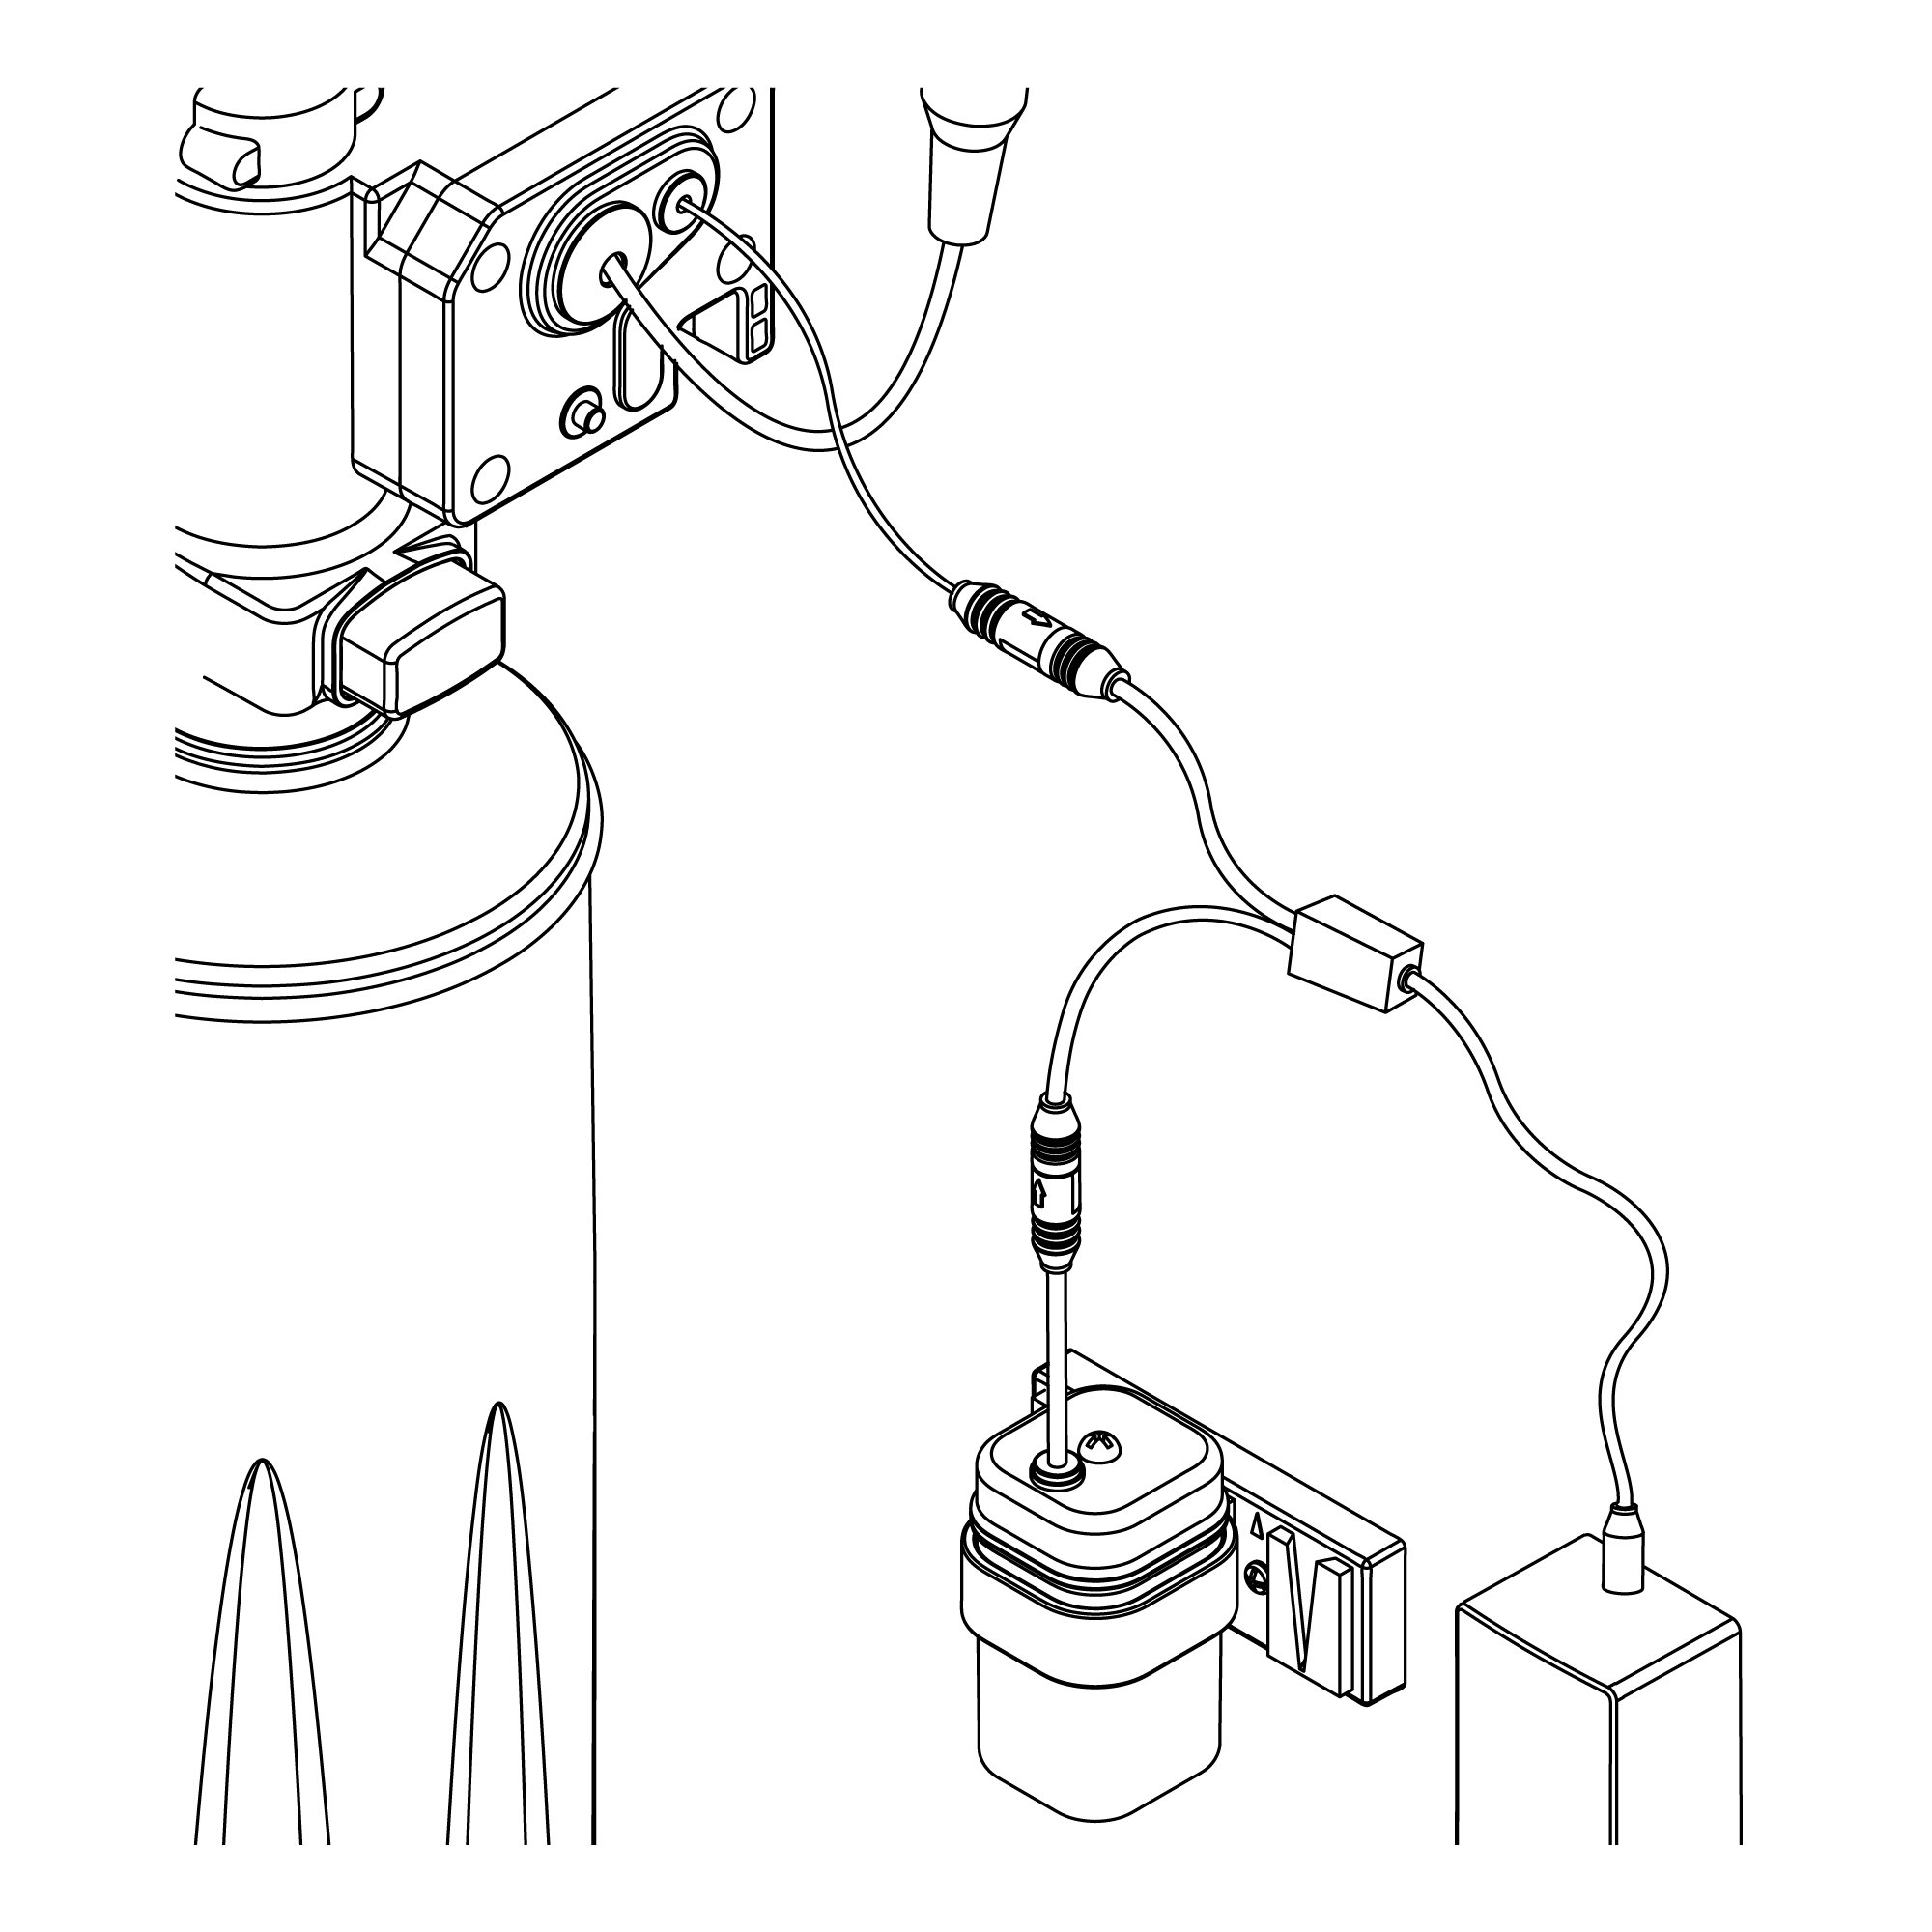
5. Connect Sensor Cable and Dispenser Cable
Connect the sensor cable from the spout to the sensor cable on the pump. Push the two connections together and tighten the connecting ring to ensure the two connections are locked together.
Connect the dispensing cable from the spout into the top connection on the pump.
Push the threaded connection of the dispensing cable into the connection on the pump and tighten the nut ensuring it is fully tightened.
A suitable spanner may be used to tighten the nut.
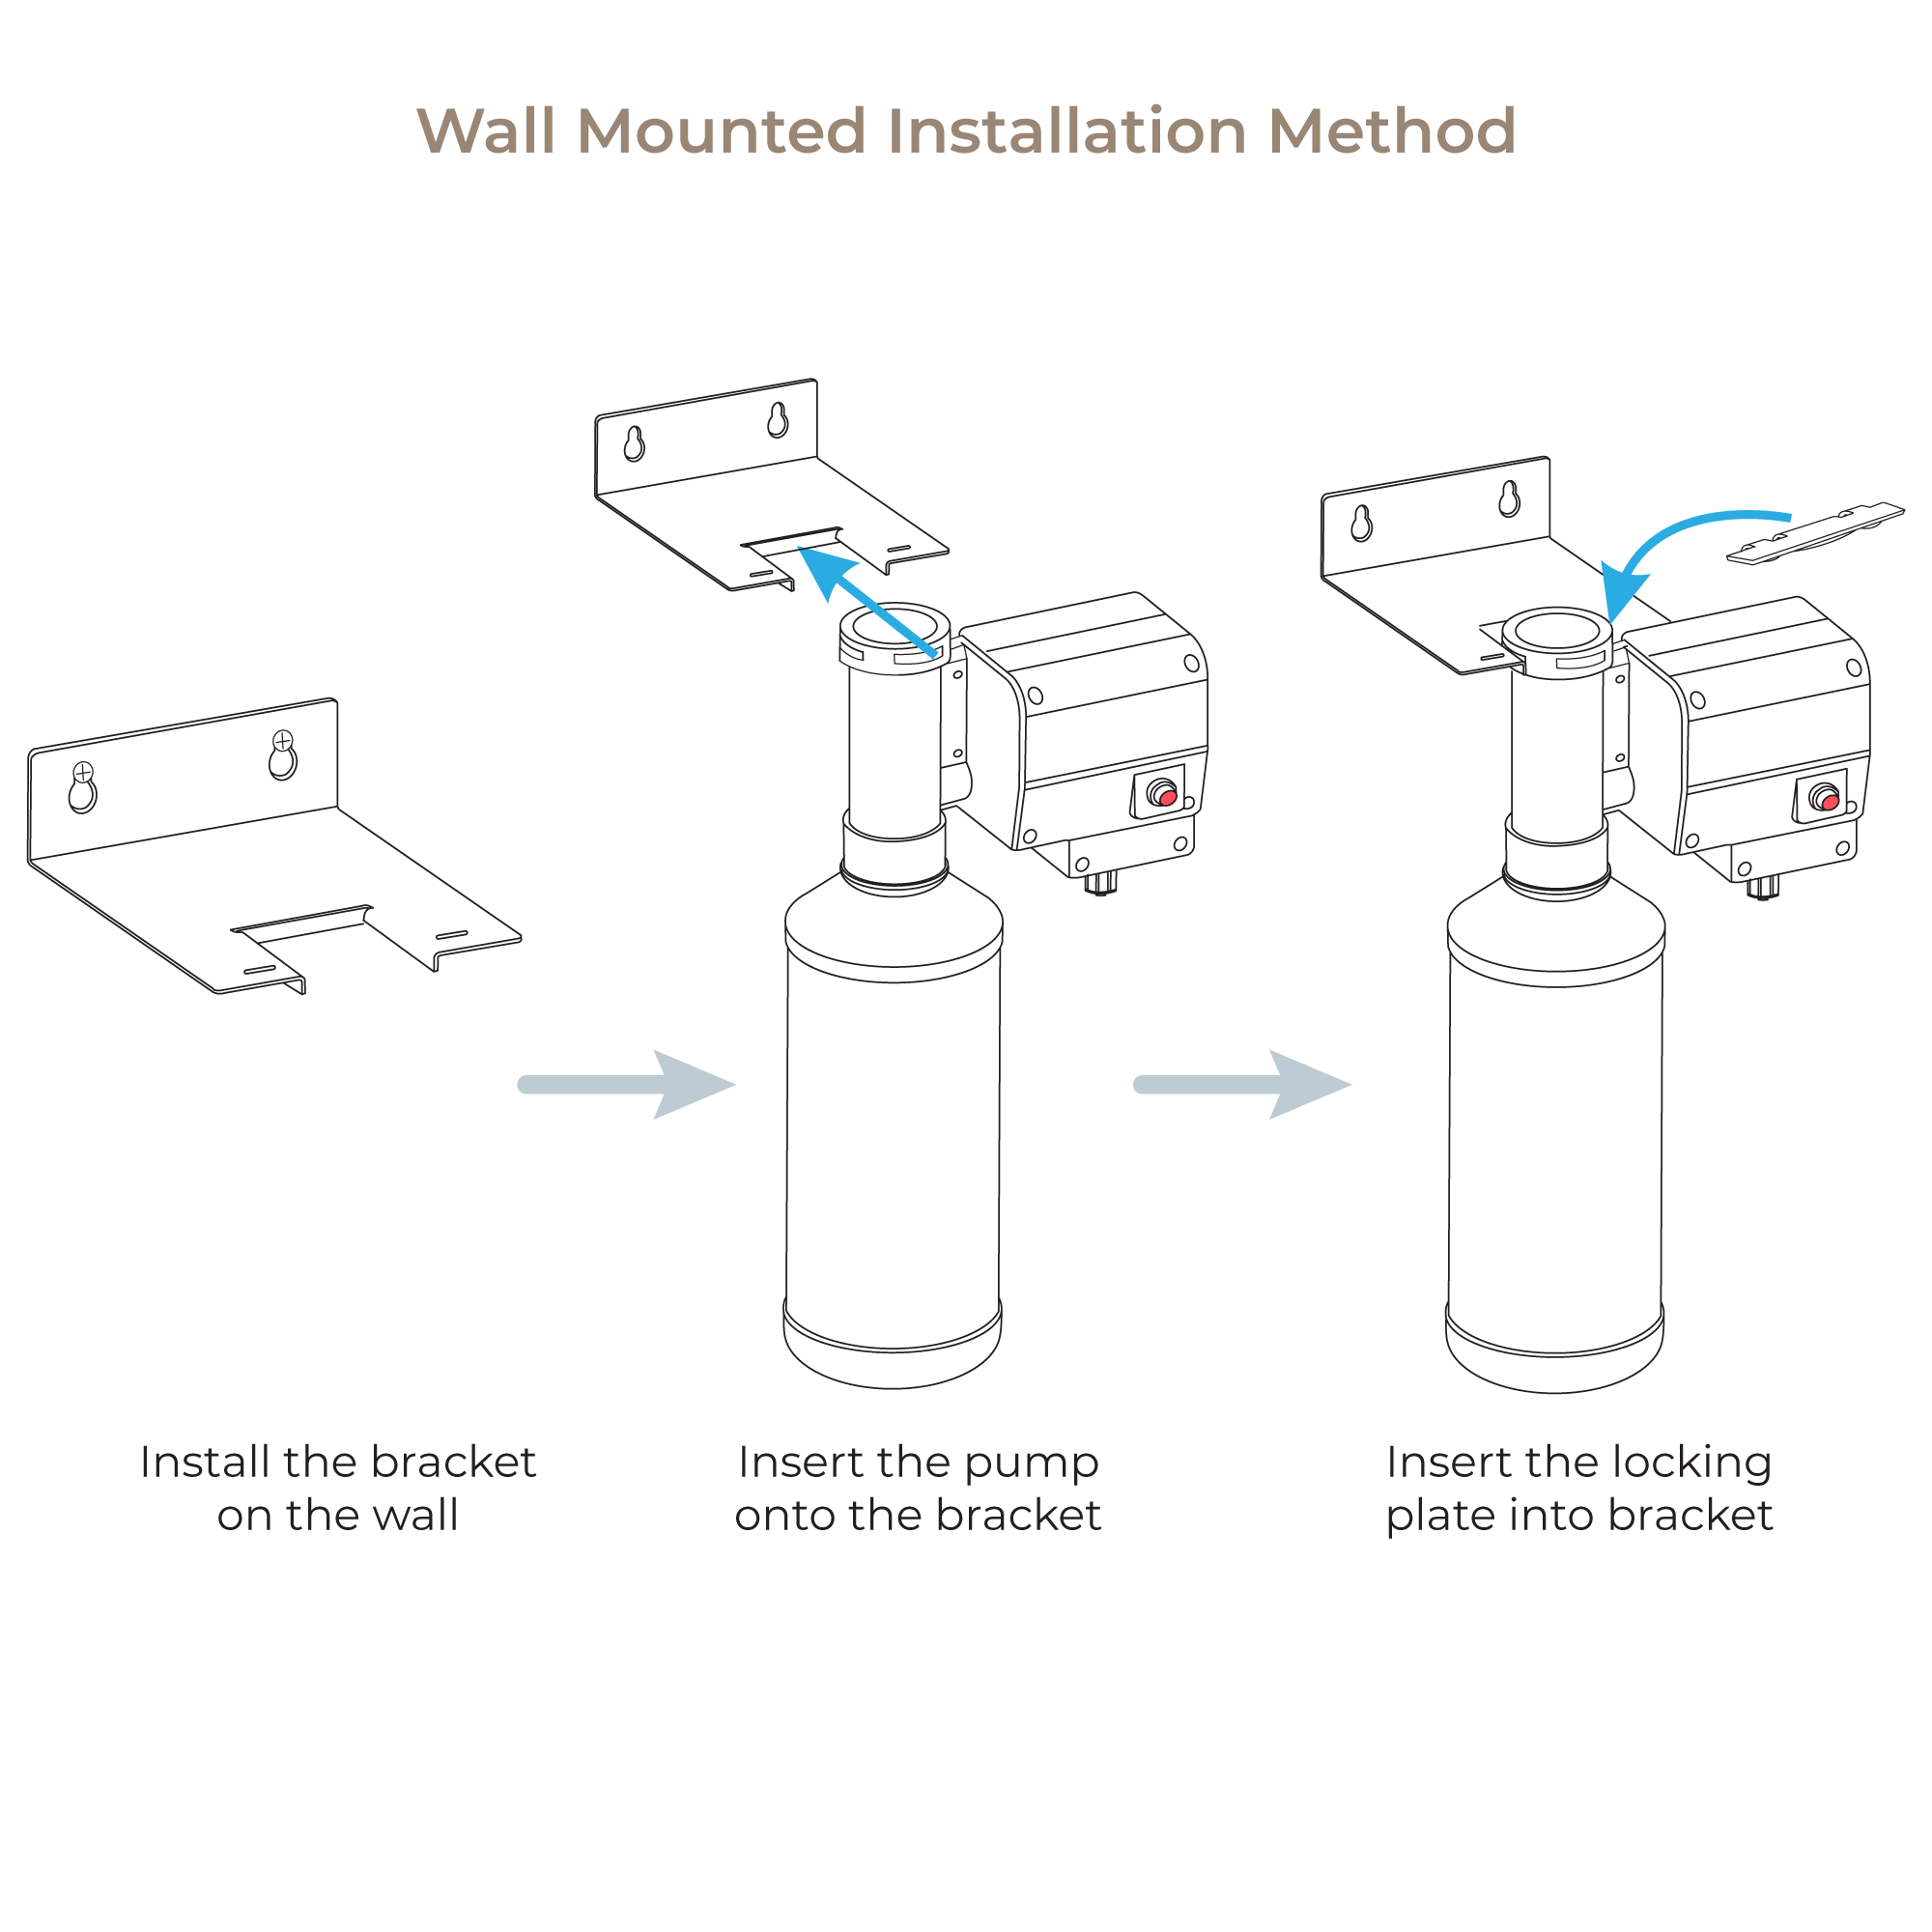
6. Place Pump into Bracket
The pump has a cut-out section which the wall bracket slots into.
7. Connect Power Supply Cable
Before starting any electrical work ensure the power supply is isolated.
Wire the electrical power cable into a switched fused spur off the ring main.
The blue wire should be wired to the neutral connection and the brown wire should be connected to the live connection.
Important: The power lead must be permanently connected to the fixed wiring of the mains supply using the factory supplied power cable.
Plug the power cable into the power cable on the pump.
8. Inserting Batteries
Remove the battery cover by loosening the screw in the top of the cover.
Insert 4 batteries into the battery box ensuring they are inserted the correct way.
Replace the battery box cover and tighten the screw. Insert the battery box into the holder.
Push the holder into the battery box wall bracket.
Commissioning
Commissioning Sequence
Before using the soap dispenser for the first time the following sequence must be carried out.
Fill the bottle full of soap.
Locate the dispense button on the side of the pump. Press and hold the button until soap is dispensed from the spout. This will ensure the dispenser tube and cable are full of soap.
Operation
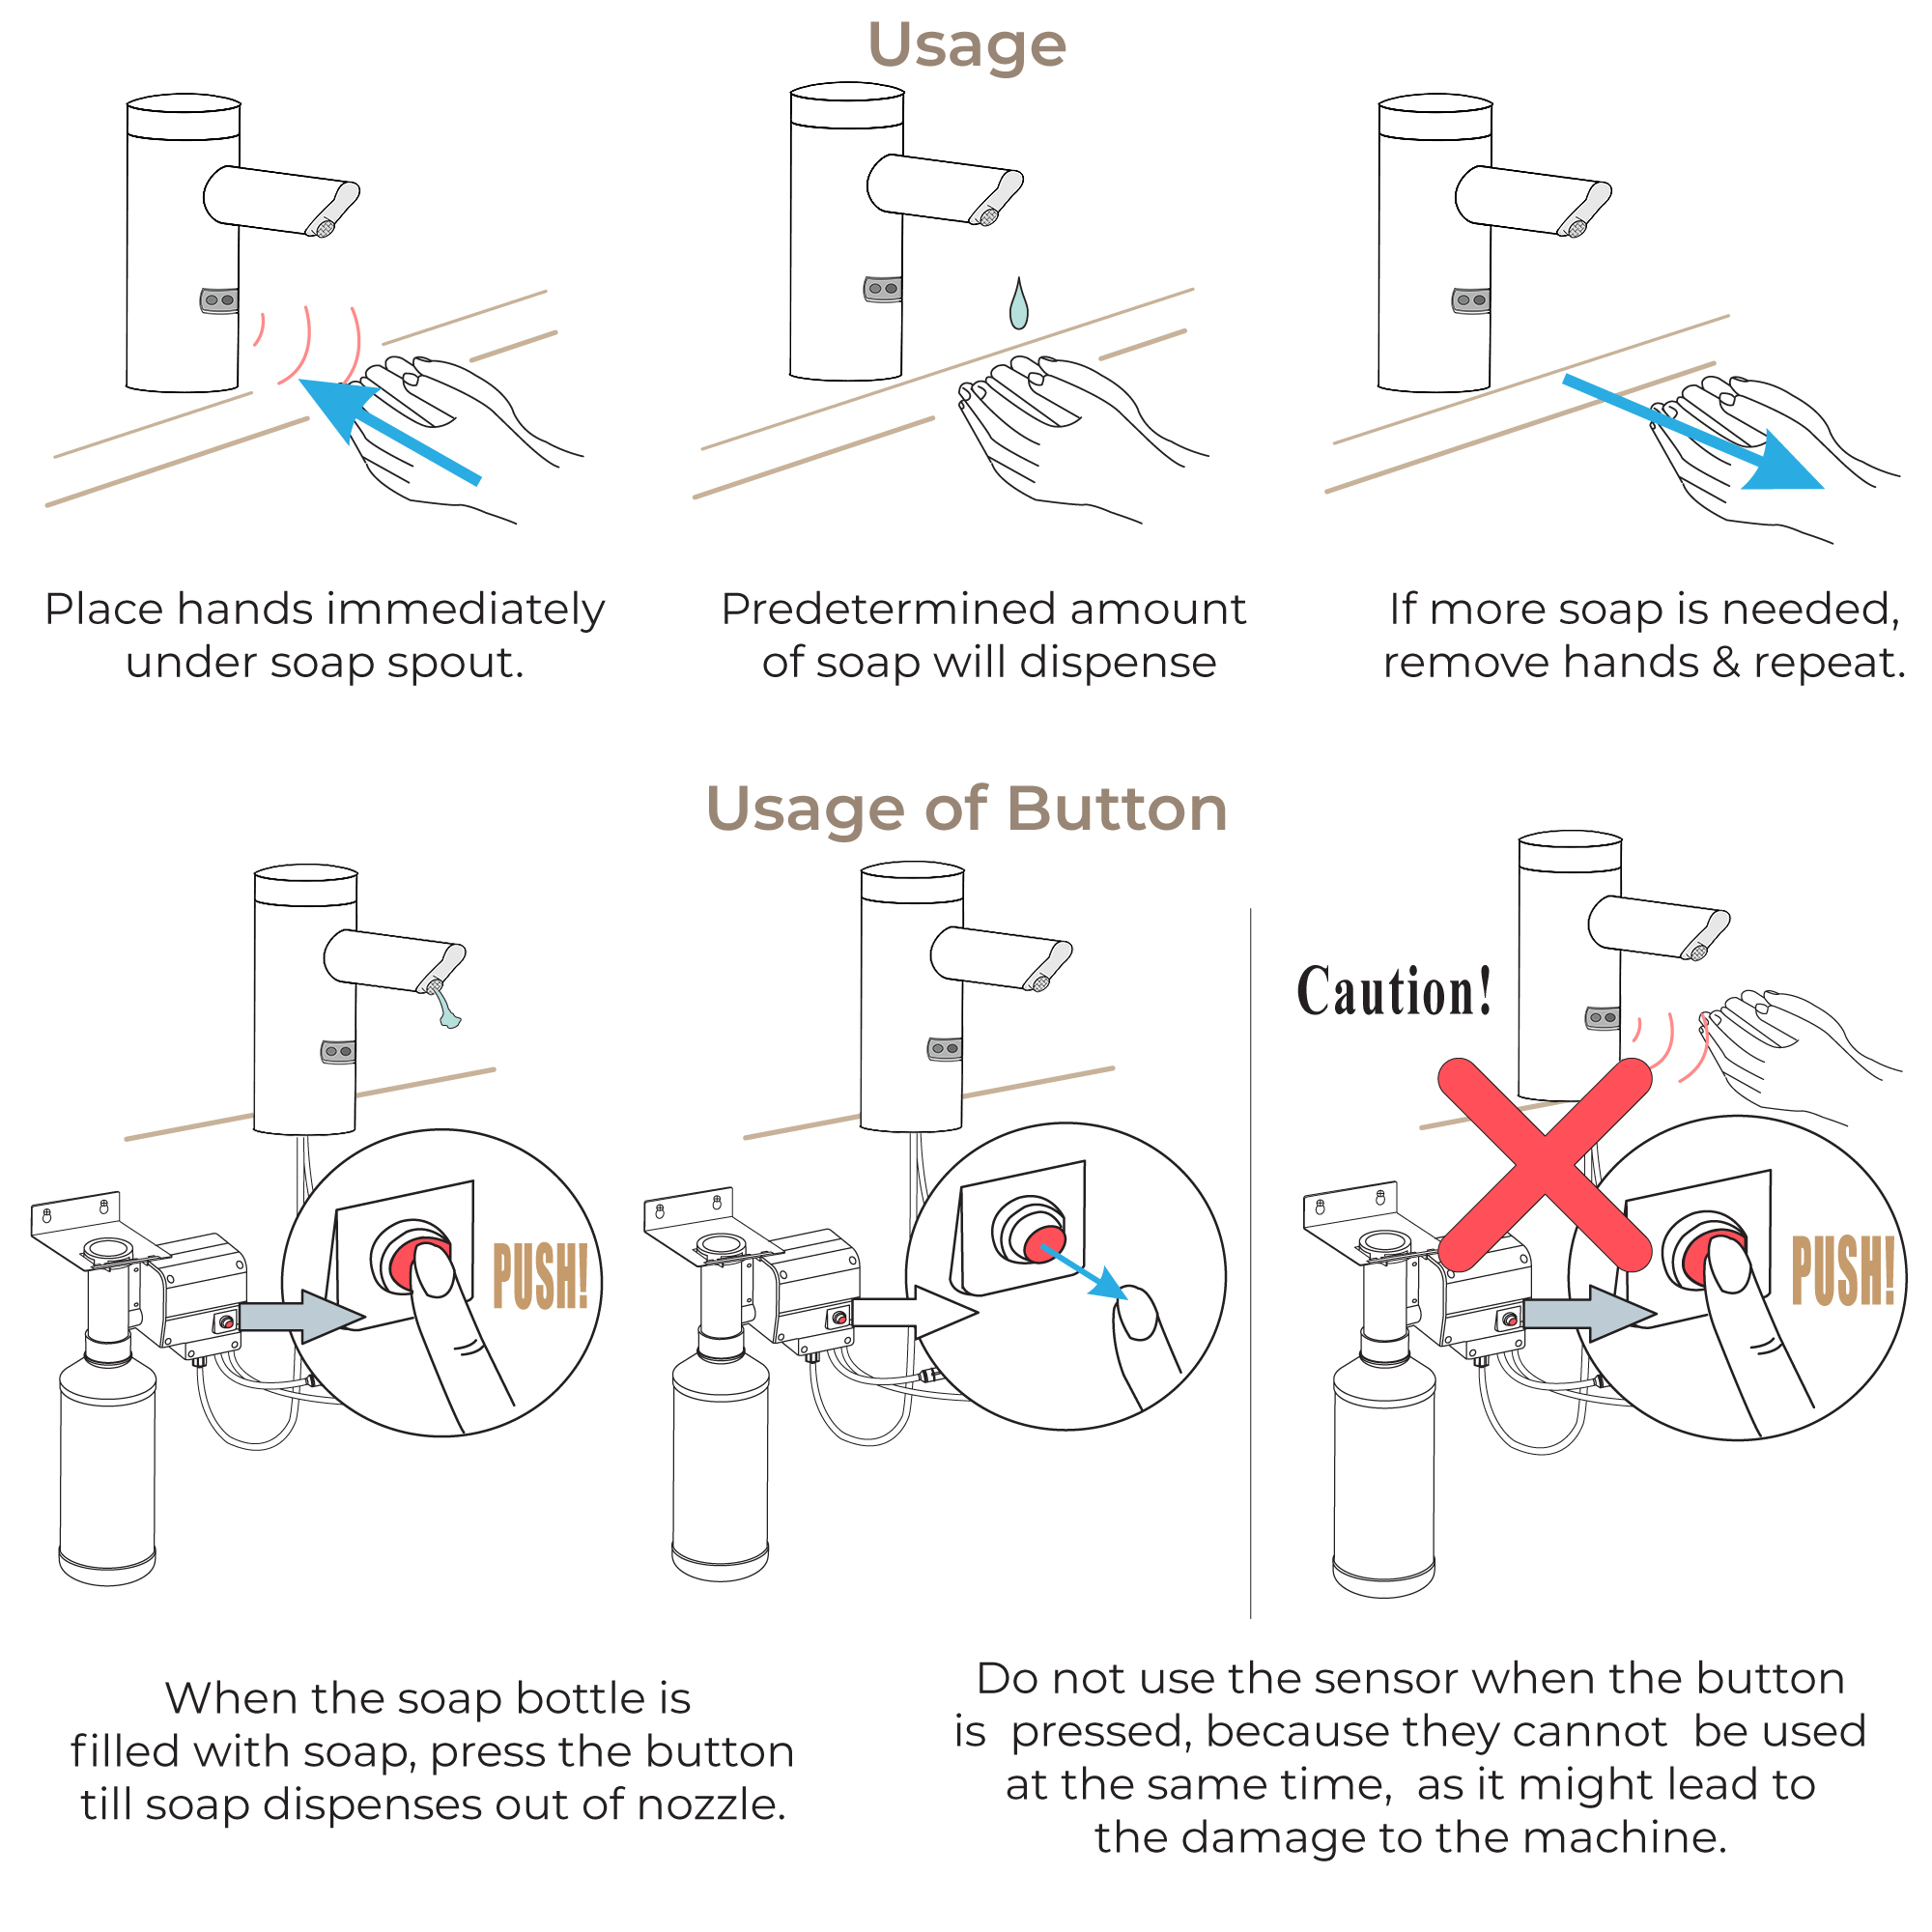
Using the Automatic Soap Dispenser
Place the hands under the spout within the sensing range.
Once the users' hands have been detected a small amount of soap will be dispensed from the spout into the users' hands.
|
|
|
|
|
|
Features:
Sensor Activated, Electronic, Brushed Nickel Die-Cast Body, Hand Washing Foam Soap Dispenser with the following features:
- Modular one-piece construction easily attaches to the deck surface
- All electronics in the spout are sealed
- Designed for drip-free foam dispensing operation
- Motor Assembly suspended under counter connected to soap dispenser spout
- Motor Assembly rotates 360 degrees for easy installation
- Battery life of 45,000 activations
- 1,500 dispenses per foam soap bottle
- Sensor range: nominal 5”
- 120V/15 Amp
CARE AND MAINTENANCE - General Instructions
1. Fill the soap bottle with soap for the first use.
2. Press and hold the button until soap is dispensed from the nozzle.
3. Place hand below the nozzle to dispense soap into the palm of hand.
CARE AND MAINTENANCE
If the soap dispenser fails to function correctly, firstly check all connections are tight and free from air leaks. If dispenser still fails to function, place manifold into a bottle of warm water. Pump the warm water through the dispenser to dislodge any dried soap residue and then refit manifold into soap bottle.
Water marks and soap residue on polished chrome surfaces are best cleaned using warm water and a mild detergent. Use a stainless steel cleaner for brushed stainless steel soap dispensers. Never use an abrasive cloth to remove stubborn stains. Dry with a soft clean cloth.
|
|
|
•
ALWAYS mount the soap tank feeding the dispenser/s BELOW the level of the dispensers
• NEVER mount the soap tank feeding the dispenser/s ABOVE the level of the dispensers
Also please note:
The soap type and brand used in these dispensers should not be altered throughout the life of the dispenser as mixing soaps can affect their chemical characteristics and cause them to become more aggressive. If another soap type or brand is needing to be used then the previous type must be thoroughly flushed through and cleaned from the soap dispensers and system prior to its use.
|
|
|
|
|
|
|
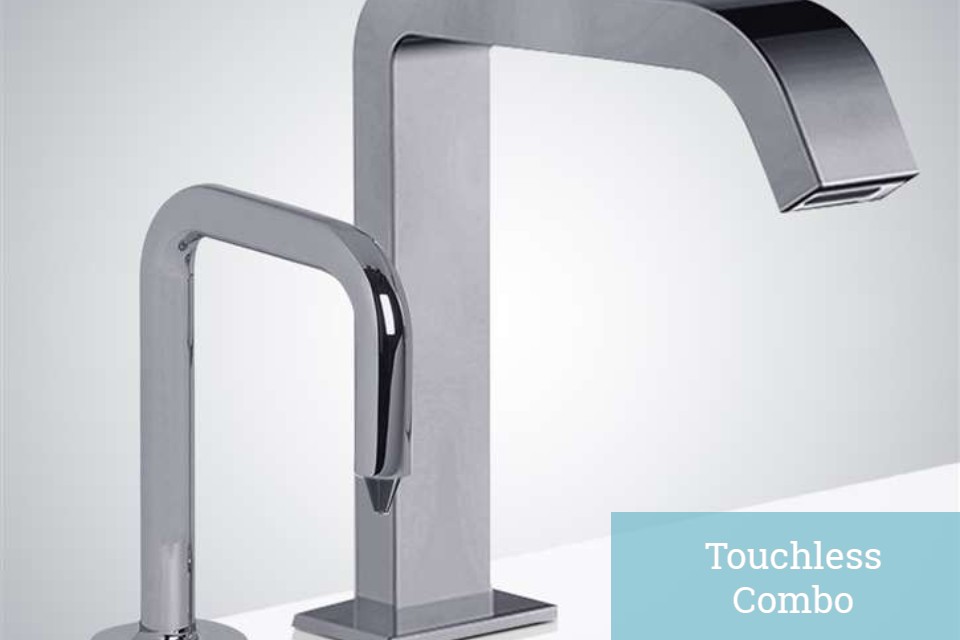
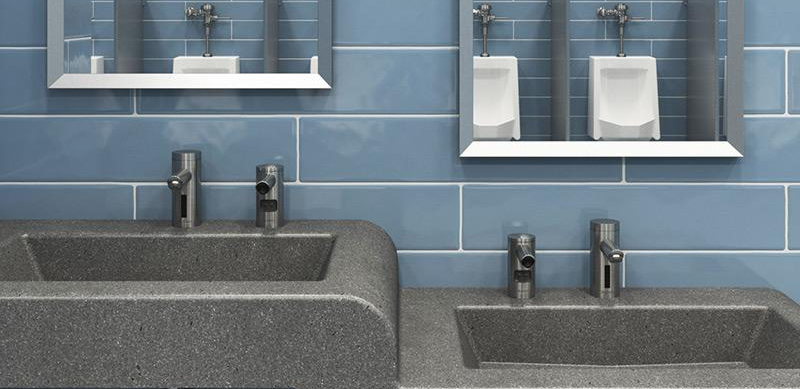
Fontana Brushed Nickel Dual Commercial Sensor Faucet & Automatic Soap Dispenser
This dual automatic sensor faucet and soap dispenser is an elegant fixture that will seamlessly fit in any contemporary restroom. This easy to use technology definitely makes your cleaning job easier. This cast brass electronic motion faucet is now available in dual function water and soap dispenser sensor faucet. This touchless motion sensor faucet reduces the transfer of germs by preventing cross-contamination and re-contamination of germs and bacteria by not touching the faucets or handles. Fits all standard US plumbing. Uses 4 AA Alkaline Batteries (purchase separately).Water Pressure: 0.5 - 7.0 KGS /cm, 10-125 psi. With its micro-computer controlling its action, the motion sensor faucet can self adjust its best detection zone as per the color and shape of the lavatory. Sensor faucet with built-in Infrared AI smart-chip no water dripping design 100% touch-free operation. Automatic deck mount brushed nickel finish is an eye-catching design which is both functional and nice to look at, the sensor faucet as well as soap dispenser has been developed with ease in mind. Fits all standard US plumbing. Ideal for commercial use applications in public restrooms, restaurants, office buildings, public facilities, hospitals.
Features:
|